family traditions.

Those of you who have been following my blog for a while know that my sister and niece moved here from New Jersey a couple of years ago.  Since they’ve been here we’ve started some new Christmas traditions.  Last year we drove around looking at Christmas lights on Christmas Eve, and I think we’ll do the same this year.

And last Saturday, for the third year in a row, I went to my sister’s house to help with her Christmas baking.  My sister definitely got all of the baking genes in our family, and basically there were none left over for me.  She loves to bake, and she makes a ton of cookies, quick breads and candy at Christmas.

Let’s face it, I really just go over on baking day to hang out, watch Christmas movies and eat cookies.  I do however have one official duty.  Ball rolling.  I wrote about discovering my mad skills at ball rolling the first year I helped Debbie with her baking.

Apparently no one really enjoys this part of the baking process.  My niece made up some lame excuse about being the godmother at a baby christening back in New Jersey just to get out of it.  So this year most of the ball rolling fell to me.

And although my sister cut down on the number of kinds of cookies she was making this year, apparently most of the cookies that require ball rolling remain on the list!  That includes Snicker Doodles, Almond Cookies, Ginger Cookies and Peanut Blossoms.

And this year a new task was added to my to-do list, Hershey Kiss unwrapping.

Yep, I can handle that one too, no problem.  Although now that I think about, maybe that is a bit of a demotion from ball rolling.

When I’m not rolling balls, or surfing Netflix in search of Christmas movies, I play around taking photos with some of my sister’s vintage cookie cutters (even though we really didn’t use these to make any actual cookies).

With all of this going on last weekend, I didn’t have much time to paint furniture or even finish the final post about my tour of Jodie’s house.  But I hope to be sharing that by Friday, and maybe this coming weekend I’ll find time to paint some real furniture.  I’m starting to suffer from withdrawal.

Oh, and one quick public service announcement.  If you’ve been thinking about painting your own gift boxes

Or maybe even just a decorative hat box or two …

the plain cardboard boxes are 50% off this week (thru Saturday, 12/16) at Hobby Lobby making it a great time to stock up.

IOD decor stamps.

If you’ve been following my blog over the past year, you’ve probably noticed that I have succumbed to an addiction.  Yes, it’s true.  I’m addicted to Iron Orchid Designs Decor Transfers.

I discovered them back in March when I saw one on a Facebook group I belong to, How to Paint Like a Pro.  I promptly ordered two of them online.  My first project with a Decor Transfer was the cupboard where I store my painting supplies (well, to be honest, just some of my supplies fit in this cupboard, there are two more cupboards full of supplies in other rooms of my house, who’s with me on that one?).

I love these Decor Transfers so much that I went on to do countless projects with them over the last 8 months (some of my faves can be found here, here, here and here).

So you can just about imagine my delight when I found out that Fusion and Iron Orchid Designs/Prima Marketing were teaming up.  Now Fusion retailers have the option of also stocking the IOD Decor Transfers.  And as an official Fusion Mineral Paint Blogger, I was offered the opportunity to receive some IOD products to try free of charge!

I believe I did a little happy dance when that message came across my computer.

But then I was stopped in my tracks by that word, ‘try’.  Hmmmm.  I have to admit, I felt like I would be a bit of a fraud if I sent back a big list of Decor Transfers that I wanted to ‘try’.  After all, technically I’d already tried almost all of them, many of them more than once!  And some of the ones that I hadn’t tried yet, I already had in my cupboard (yes, that same one shown above) waiting to be used on something.  I’ve had poor Mr. Q ordering IOD transfers for me via Amazon for months (he himself is an Amazon addict).

So it felt a bit greedy to ask for more!

But guess what?  Prima Marketing and IOD have some other cool products too, like their Decor Stamps.

These are stamps that are designed and sized appropriately for use on furniture or for other home decor applications, like walls for example.

So, ding, ding, ding, we have a winner!  I asked them to send me some of their Decor Stamps to try, as well as their 10″ x 12″ acrylic stamp block.

If you are not familiar with changes that have been made in rubber stamps over the past number of years, you may not be aware that many of them no longer come adhered to a wood block.  Now they make them out of a sticky rubber-like stuff that sticks well to a clear acrylic block, but also peels right back off again.  It’s so much easier to store lots of flat sheets of stamps and just one acrylic block (or several of differing sizes).

When my box arrived from Prima Marketing it was like Christmas came early for me.  I immediately opened it up and started fondling the supplies.  I decided to try a quick little project just to test them out.

I purchased this wooden sock stretcher at a garage sale last summer.

Back in the olden days when socks were made with wool, after you washed them you then put them on a sock stretcher while they dried.  That would ensure that the sock didn’t shrink up and no longer fit.  But when I see these old sock stretchers, I always immediately think ‘Christmas decoration’.

So I thought I would use the IOD stamps to give them a little more Christmas style.

I started by laying out my design right on the sock stretcher.

This way I could move the stamps around and make sure they fit where I wanted them.  These stamps are from the Alpha II set, by the way.

Once I had them where I wanted them, I simply placed my acrylic block (this is a block I already had, I didn’t need the big 10″ x 12″ IOD block for this small design) over them and pressed down to attach them to the block.

Next I lifted them off the sock stretcher and inked them up.

Although Prima Marketing/IOD does currently carry some inks, and they did send me a couple, they are not going to continue to carry ink in their line up.  So I went to my local Michaels and purchased some Ranger Archival Ink in a color called Watering Can.  You can use any kind of ink with the stamps, but be sure to choose one that is suitable for your project (especially if you are stamping fabric, which I hope to try soon).  In this case, I went with a permanent, waterproof ink.

You should absolutely test out your stamp on paper a couple of times before finally stamping your project.  That way you can get a feel for it, and work out any kinks.  You can see if you are getting enough ink on your stamp as well.  Always be sure to have your project on a hard, flat surface when stamping.  Of course, if you’re stamping furniture or walls, they will be their own hard, flat surface.

Finally, ink up your stamp again, place it where you want it and press down firmly.  I usually avoid rocking the stamp back and forth because that can blur your design.  Just press firmly straight down.

I added this sweet little crown to the top of my sock stretcher.

The crown is from the Grain Wreath set.  What I love about this is that the crown doesn’t look ‘new’ or recently added.  It looks like it could be an original detail.

Next I attached a pretty ribbon and hung my ‘sock’ up on the aforementioned cupboard.

This was a pretty simple, basic project using the stamps.  As you can imagine, the sky is the limit design-wise, but I wanted to start out with something easy to get my feet wet (or get my wool sock wet?).  I’ll be sharing a slightly more advanced stamping project soon.

But in the meantime, I’m almost entirely happy with my sock stretcher except for one thing.  I think she looks kind of lonely hanging there all by herself.  She needs a mate, don’t you agree?

I’ll definitely be keeping an eye out for more sock stretchers during next year’s garage sale season!

In the meantime, have any of you tried the IOD Decor Stamps?  If so, I’d love to hear about your project, so be sure to leave a comment.

jodie’s house, part 2.

Welcome back to part 2 of our tour of Jodie’s lovely home (if you missed part 1, you can see it here).  Today we’re going to take a look at the kitchen, the enclosed porch, the laundry room and the garage.  Yep, we’re even including the garage!

We’ll start in the kitchen where I’m pretty sure my sister got drool all over everything.

Especially the giant refrigerator.  My sister could easily fill that thing up, but I think my two bottles of wine, ketchup and other condiments would look pretty lonely in there.

I know my sister was also picturing just how many different kinds of Christmas cookies she could make if she had that huge island to spread out on!

As I mentioned in part one of our tour, all of the counter tops in Jodie’s home are made out of Granicrete, a concrete like product that can be colored to look like other stone materials.  Jodie chose a paler shade of brown for her island, but more of a dark granite color for the rest of her kitchen counters.

Just outside the window over Jodie’s kitchen sink, you can catch a glimpse of her enclosed porch.  Let’s head out there next.

Jodie and Doug did some really cool things out on the porch using salvaged materials.

The walls are a combination of old barn wood and sheets of galvanized metal.

The metal was salvaged from storage buildings on a friend’s property.

Isn’t the ceiling amazing?

Jodie has some great upcycled pieces out here on the porch as well, including the old military trunk turned coffee table.

I love what she has done with this old mailbox …

as well as the way she added a little pop of mid-century madness with this hanging light fixture.

Next let’s head back through the kitchen and into the hallway that leads to the laundry room.  Here’s another of Jodie’s window creations hanging on the wall.

I’ve got to keep that idea in mind the next time I see a pile of old windows for sale!

Also in the hallway is this giant ruler for keeping track of her kid’s growth.  Looks like they are both pretty tall, huh?

We’ve all seen this idea before, but I’ve never seen it done with the school pictures alongside.  Isn’t that clever?

And here is the laundry room.

I love this little arrangement that Jodie has on her counter top with the vintage iron in the old enamelware container.

 While I was admiring the arrangement, Jodie reminded me that I gave her the cross-stitched Noel towel.

I’d forgotten all about that!

This milk can arrangement in the window is also adorable.

That milk can has been in the family since Jodie was a kid.  Her grandparents owned a dairy farm just down the road and Jodie would use this milk can to get milk right out of the bulk tank.  I don’t believe that I’ve ever had fresh milk right off the farm, have you?

One of my favorite features in the laundry room is the old ladder hanging from the ceiling.  I’m a sucker for old ladders.  This particular ladder belonged to Jodie’s uncle and was much longer at first.  Doug cut it down to fit in this room, and you’ll see two more pieces of the ladder in other rooms before our tour of Jodie’s house is over.

Back out in the hallway we can take a look at Jodie’s gallery wall.

The use of horizontal stripes on the wall is perfect in this spot.

And what a great way to display many family photos all on one wall.

Before we finish part 2 of our tour, I just want to show you the garage.  Normally there isn’t much to see in the garage, but since Jodie took a couple days off work a few weeks back to paint her garage, I felt like I should be sure to include it.

Yep, that is the garage.  I think Jodie & Doug’s garage might be decorated better than some people’s living spaces.  Doug was working on building some sliding barn doors to close off one side of the garage while we were there that day.

Debbie might have drooled over the kitchen, but I drooled over the garage.  What I wouldn’t give to have a clean, bright, large work space complete with modern conveniences like plumbing.

Before we leave the garage I have to share this unique fishing rod holder that Doug made.

It’s made out of old clothes pins mounted on a board.  Isn’t that clever?

I hope you’re enjoying the tour of Jodie’s house.  I’m planning to share the final segment later this week, so be sure to stay tuned!

jodie’s house, part 1.

My co-worker Jodie and I have worked together at the day job for over 20 years now.  During that time Jodie has lived in a few different houses, but 3 years ago she and her husband Doug built their latest home out in Ellsworth, Wisconsin.  Jodie and Doug have two sons, the youngest is still at home but the oldest is off to college in Rochester, Minnesota.

While her home was under construction, my co-workers and I would hear frequent tales from Jodie about the process so I felt like I’d been there.  However, I’d never actually seen it in person until a month or so ago.  Mr. Q had a wedding to officiate in Ellsworth, so much to Jodie’s horror, I basically invited myself and my sister over to check it out so we could kill time while Mr. Q was doing the wedding.  I think Jodie was worried that I would notice every little detail that wasn’t perfect, but she couldn’t have been more wrong.  Both Debbie and I loved her house so much that I instantly asked Jodie if she would let me come back after her Christmas decorations were up to photograph it for a house tour here on the blog.  It has been a while since we’ve done a house tour and I’d been thinking about trying to find a willing victim for another one, so the timing was perfect.

And fortunately for us, Jodie agreed!

So last Saturday my assistant (a.k.a. my sister Debbie) and I drove out to Ellsworth again to get lots of pictures and more details about Jodie’s gorgeous home.

I have to admit, I was sort of hoping for a festive, snowy, winter day for our photo shoot, but instead it was bright, sunny and 45 degrees.  I shouldn’t complain, because a couple of days later not only did the snow show up, but so did the sub-zero wind chills.  I should have enjoyed that 45 degrees while it lasted!

But last weekend there was not a lick of snow in sight, yet Jodie’s house was still festive from the moment we walked up to the front door.

I ended up finding so many fab things to take photos of that I’m going to have to break this tour down into multiple parts.

  Today we are starting in the foyer.

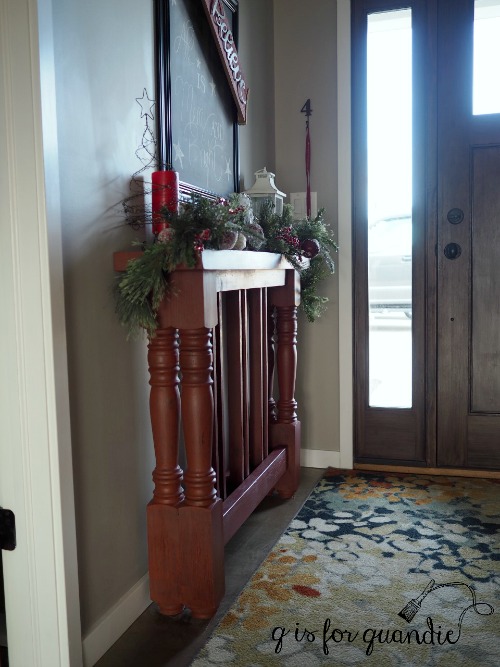
Jodie’s husband made the console table that is just inside the door.  Jodie had been looking for just the right thing for that spot and when she showed a picture of what she wanted to Doug, he said “well, I could just make one.”

So, Doug made the table and Jodie painted it with Folk Art Home Decor chalk paint in Tuscan Red, and then she added a wax top coat.

Jodie and Doug’s home office is just to the left when you come in the house.

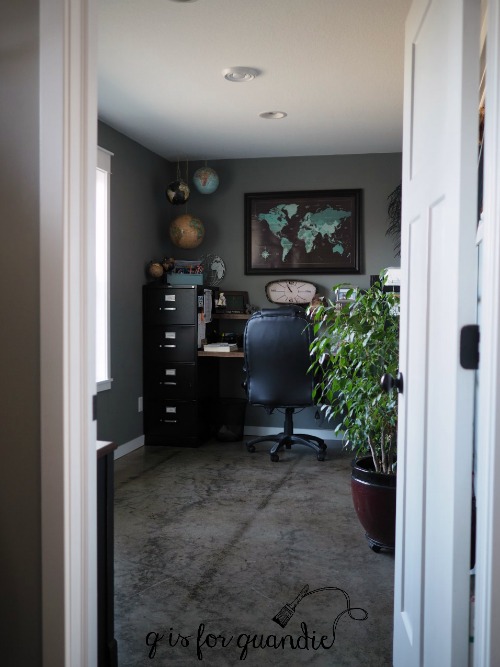
Are you wondering what’s on the floor?  At first glance it looks like an amazing old oriental rug with a very worn and muted pattern, but no.  The floors throughout the house are heated concrete!

The entire house is built on one level and is on a slab, so no basement.  The concrete has been stained with a concrete stain and then sealed.  The sealer has to be re-applied periodically.  The manufacturer recommends every year, but Jodie has only done it once in the three years they’ve been in the house.  She used a semi-gloss sealer, but says she would not do that again.  Scratches are just too obvious with the gloss finish (very similar to wood floors I’d say).  The next time she adds sealer she plans to use a matte finish.

One of my favorite things in the office are these globes that Jodie has hung from the ceiling.

I also love that she has an old family set of Encyclopedias on the window ledge.

These things might be totally defunct as far as researching your school paper goes, but they make awesome decor.

And hey, guess what’s over on the other side of the room?

Does anyone recognize it?  It’s the Old Pickup desk I painted back in July 2016.

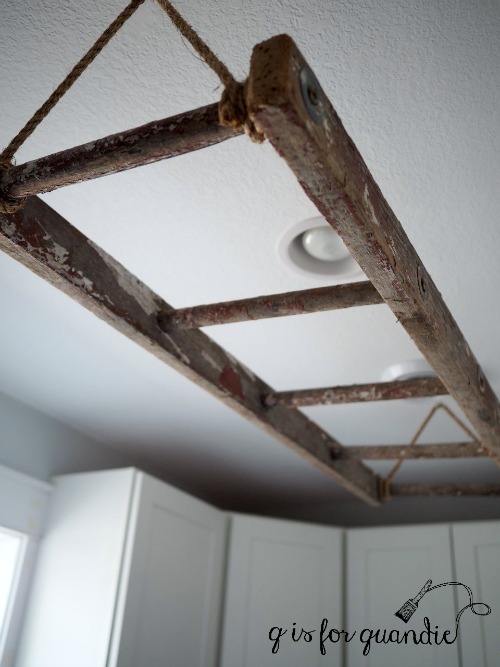
The ladder leaning against the wall might also look familiar.

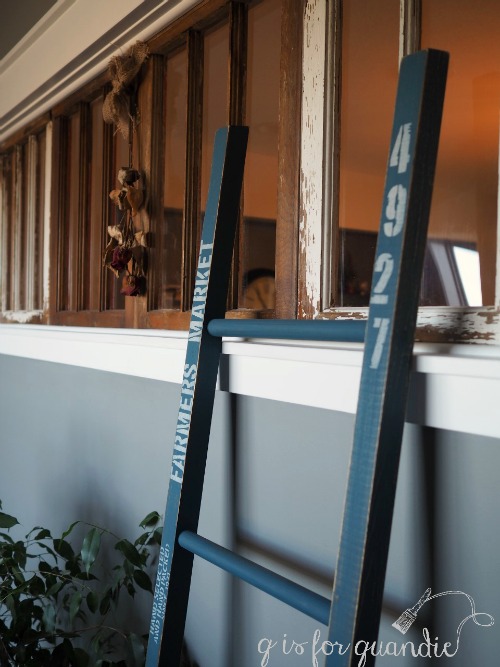
 Yep, Jodie has a few quandie originals lying around her house.

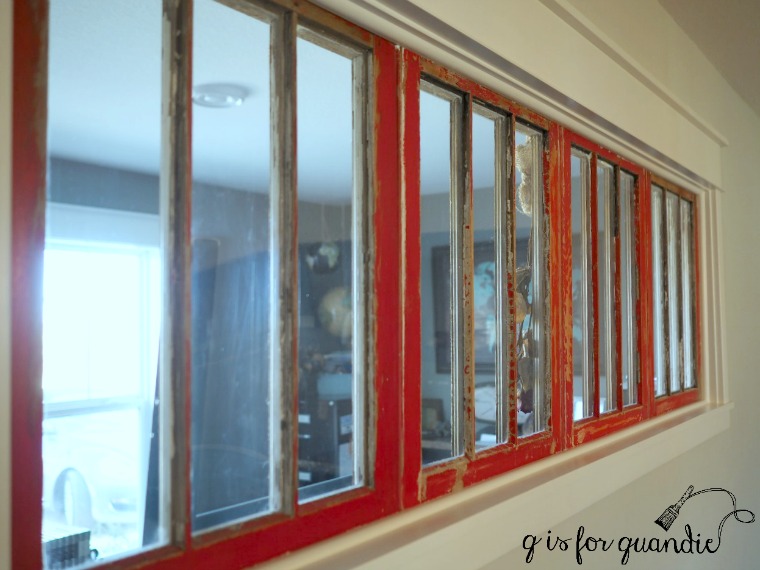
But the real pièce de résistance in this room, in my opinion, are those windows behind the ladder.  Jodie found them at a shop in Luck, WI called Junque in the Trunque.  She wanted to use them in the wall between the office and her dining room to allow more light to flow through.  So Doug framed them out.

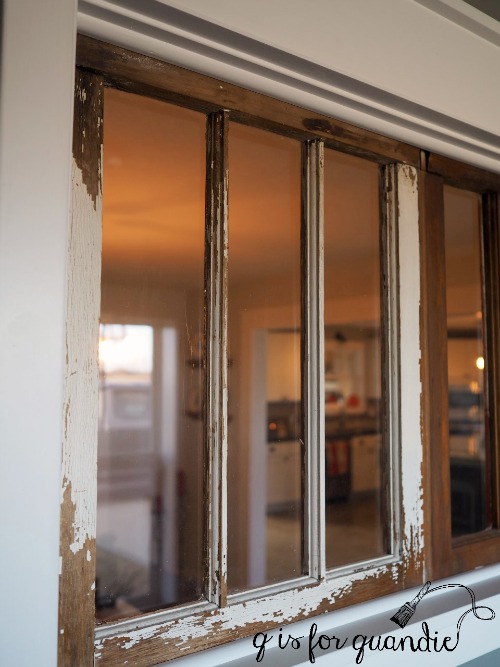
I love that she retained that chippy white paint, isn’t it amazing?

You’ll see the other side of these windows when we get to the dining room in just a minute.

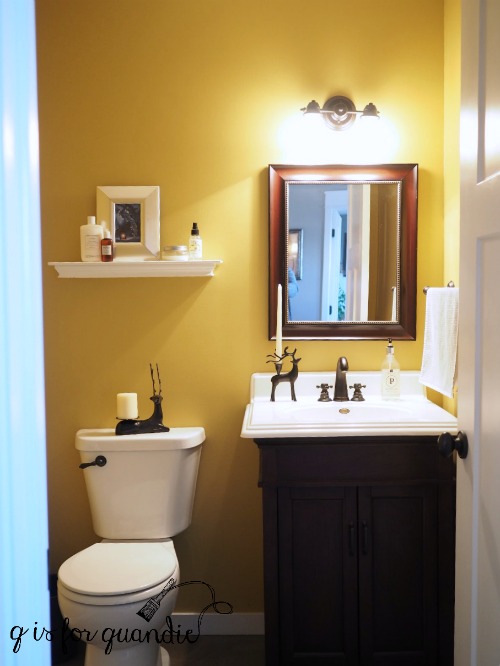
But first, let’s take a look at the small powder room that is also just off the foyer.

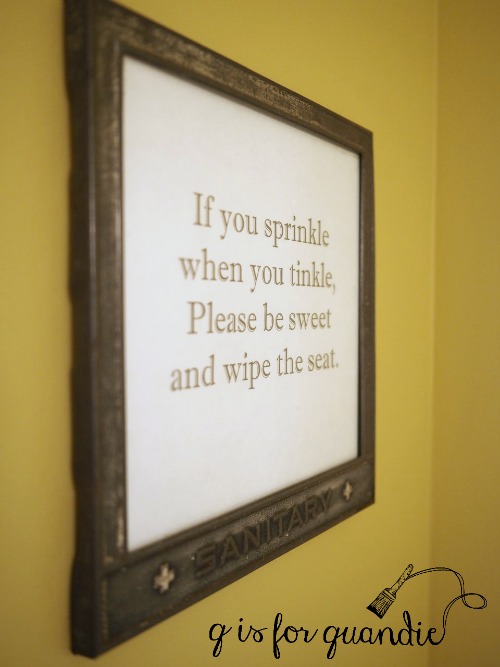
Hanging on the wall opposite of the toilet is this whimsical sign that Jodie made with a metal frame that she found at a junk shop.

I’m guessing that metal frame was once part of a first aid kit, but it is perfect for the powder room.  The message it contains is perfect for a house full of men too!

Before we leave the foyer, I also want to share this amazing ‘tree’ made out of barbed wire that hangs on the wall.  Jodie purchased the tree at a local occasional sale.  Then she cut the wording out of vinyl using her Cricut machine and added that to the wall.

I love the saying she chose, it works perfectly with the tree.

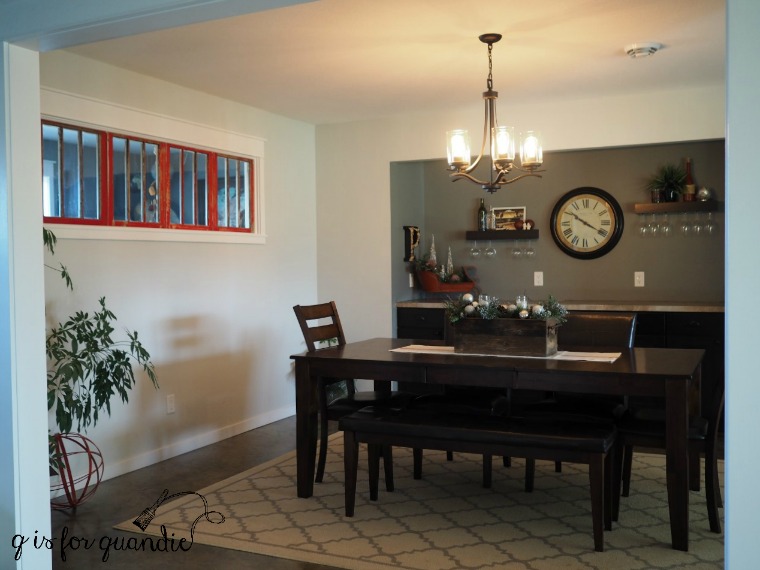
Just around the corner is the dining room.

And there is the other side of those fab chippy windows, only this side is red!

She has tons of storage in this giant built in cupboard along one wall.

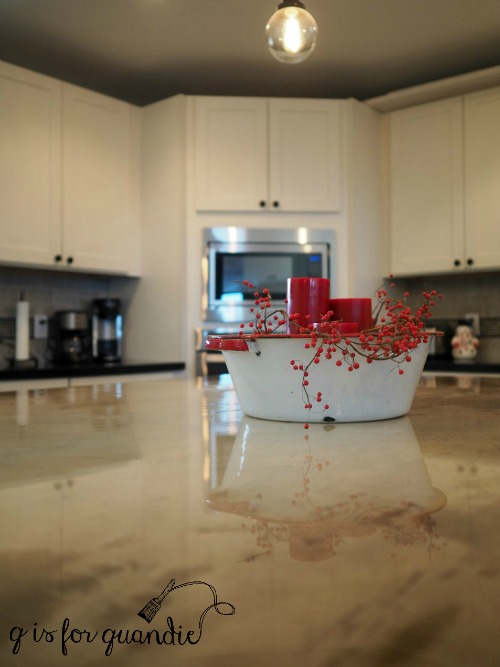
By the way, all of the counter-tops in Jodie’s home, including this one, are made out of Granicrete.  Granicrete is a modified concrete mix that can be colored to look like granite, marble or any other stone material.

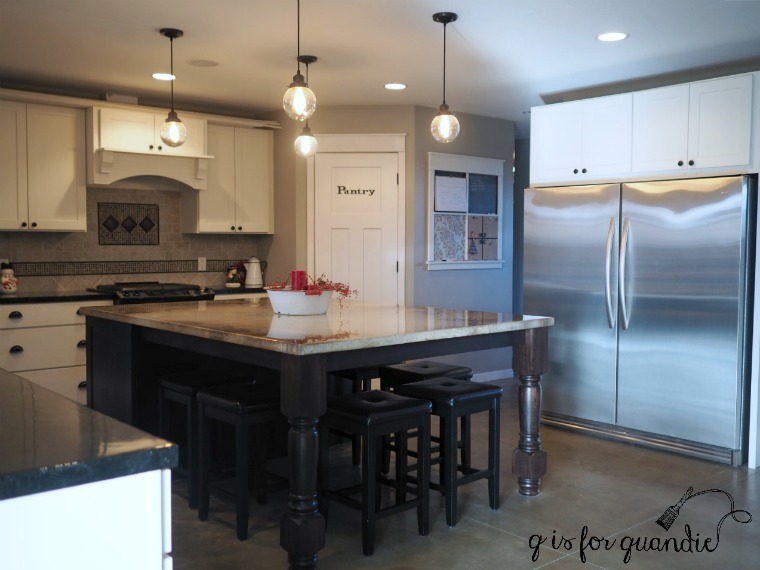
The dining room is open on two sides, one faces the kitchen which I’ll be sharing in a later post and the other faces the living room.

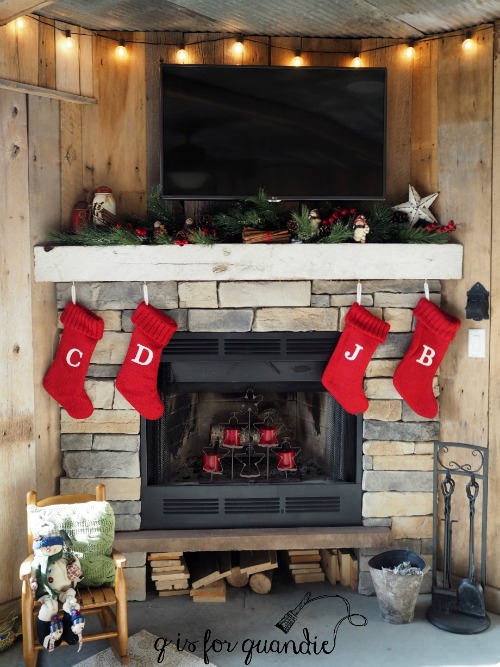
There are so many cool things to see in Jodie’s living room that I barely know where to start.  Let’s start with the window that is hanging on the wall next to the tree.

Jodie makes these window/signs out of salvaged windows.  When I come across suitable windows at garage sales, I try to snap them up for her because she is always working on another window for someone.  Now that my sister has seen this, she wants one next!  Jodie uses a combination of vinyl letters cut using her Cricut machine and hand painting to create her designs.

By the way, one glance at the Christmas tree reminds me that we are no longer in Minnesota!

Dang, those Peterson’s are a good looking bunch, aren’t they?

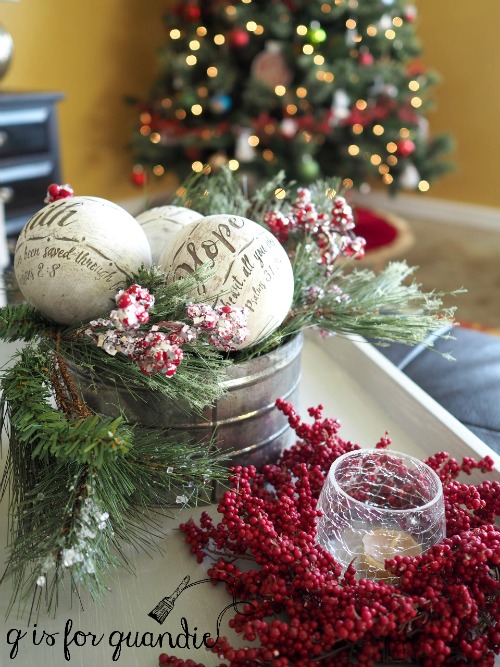
Jodie has lots of festive touches throughout her living room like this pretty snowflake pillow.

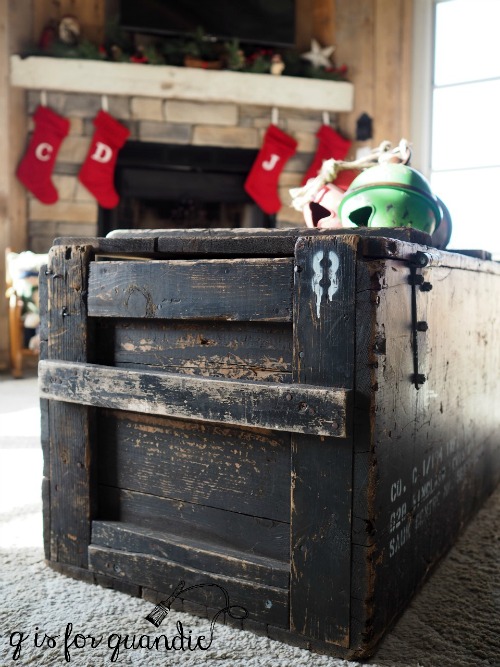
And this arrangement on the coffee table.

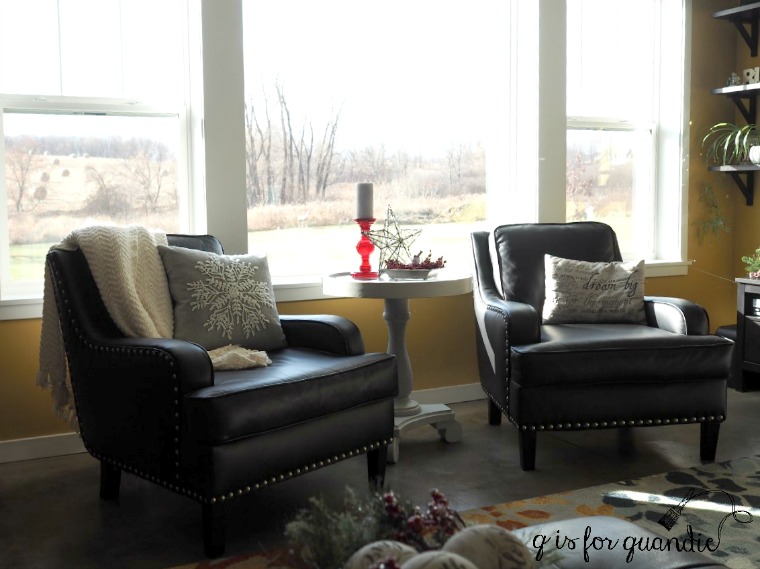
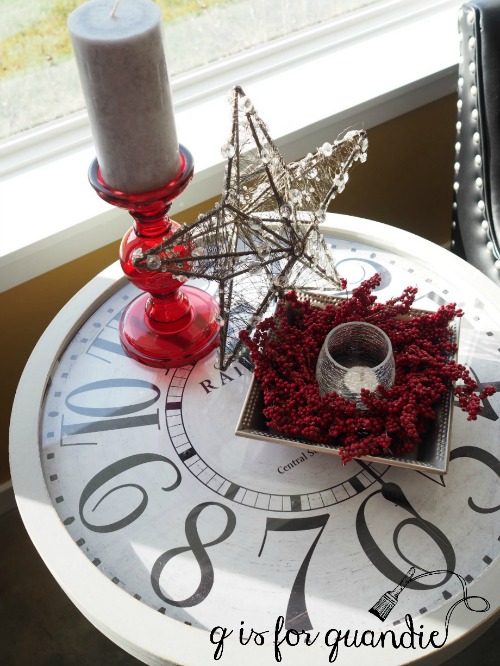
When Jodie was looking for the perfect table to place between the two chairs in front of her living room window, she couldn’t find exactly what she wanted.

So she made one!  She purchased a large round clock, and then Doug attached it to a table base to create the table she wanted.

The clock still works too!

In case you haven’t already figured it out, Jodie’s house is out in the country.  She and I are quite opposite in this regard.  She loves her country living and thinks it would be somewhat nerve wracking to live in the city (crime, neighbors looking in your windows), while I think living out in the country would be a bit unnerving (bears, bears looking in your windows!).

But, I can’t argue with the gorgeous views looking out from her windows.

Can you?

Be sure to check back next week for the rest of our tour!


another thrifty Thursday.

Many moons ago I took you all on a tour of my friend Meggan’s house.  I once said that I consider Meggan to be a master thrifter.  Now that I know her a bit better, I think it would be more accurate to say she has her doctorate in thrifting.  I’m not sure what her doctoral thesis was, possibly the guest post she wrote for us last year about packaging Christmas gifts in vintage suitcases.

I’m sure she could quite easily defend that thesis before a panel of thrifting experts!

Time flies, and we both have busy lives, but Meggan and I try to get together every now and then for a thrifty Thursday.  Meggan’s favorite thrift shop is just down the street from me, so she swings by to pick me up and we spend the evening thrifting.

Historically our thrifty Thursdays have always fallen on bitterly cold winter days.  As in below-zero sorts of days.  But we got lucky this time and last Thursday was a balmy 40+.

Not only did we get lucky with the weather, but we also got lucky with some great finds.

Ironically, I didn’t buy a single Christmas item.  Which isn’t to say they didn’t have plenty to choose from.  We did get a laugh or two out of making fun of some of the tackier items.  And I have to say, if you collect a Christmas village you should be heading to your local thrift store.  There were lots of village pieces including several pieces from the various Dept 56 villages.

I keep eyeing up those little houses because I absolutely loved the way Amy displayed some in her house last year on a pile of giant books.

Looking at that photo makes me think I should head back to the thrift store and buy Ebenezer Scrooge’s house after all!  Amy’s display proves that you don’t need an entire village, just a few choice pieces can create an adorable vignette.

Although I didn’t find any fabulous Christmas items to purchase, I did find a couple of vintage wooden advertising hangers.

It pays to dig through the rack of plastic and wooden hangers to look for a couple of gems like these.  I was pretty excited to score not just one, but two!  Looking at the one that says “U.S.A., Hawaii, Canada & …” makes me wonder if it pre-dates 1959 when Hawaii officially became our 50th state.  What do you think?

I also found a thrift store unicorn.

Usually the luggage aisle at the thrift store is pretty dismal, but every once in a while, in a cloud of magical pixie dust, I find a nice vintage suitcase.

Meggan talked me into this little rocking chair.

I was going to pass it by.  I’ve got a bit of a back log of chairs to paint, and chairs are not my favorite.  They are putzy to paint and they don’t sell for much.  But Meggan pointed out how adorable this one is, and suggested I paint it pink.  I’m not sure I’ll paint it pink, but it definitely will get a paint job of some kind!

Meggan also talked me into this plaid blanket.  She thought the colors were perfect for my guest bed.

And she was right, the combination of pink, coral and yellow is perfect on my Jenny Lind bed.

At just $3.49, why not?  I can use it for now until I find bedding I like better, and then I can just donate it back to the thrift store!

I purchased a few other odds and ends that didn’t make the cut for a ‘before’ photo, including the shelving board that I used to make the Christmas Tree sign for my sister.

It wasn’t until we were headed up to the checkout counter that I spotted the find of the day.

A pair of library chairs!

I’ve painted a few of these in the past.  I think my favorite was this one, painted in Fusion’s Brook.

Meggan says she can picture them painted black though.  How about you?  What color would you choose?


a two-faced suit case.

One of the things I started painted on the painting day that I shared a last week was a suitcase that I picked up at a garage sale last summer.

That’s it in the ‘before’ photo above.

I think it looks slightly more interesting in that photo that it really was.  It was just your basic hard sided Samsonite.  So I decided to paint it.

I started by painting the bottom portion with Fusion’s Coal Black.  Once that was dry, I taped off a line and painted the top portion in Fusion’s Casement, which is one of their brightest whites.

If this is starting to feel familiar to you, that’s probably because I’ve painted a few of these over the years.  You can see them here, here and here.  That last link is to a post from 2015 when I was going to have a suitcase painting class at my house.  That idea was a bust, by the way.  No one signed up, which was a bit of a bummer.

But anyway, after getting that far with the suitcase I was debating what stencil to use on it when the Christmas sign I painted for my sister caught my eye.

I realized it would fit perfectly on the suitcase.

How cute would that be set up beneath your Christmas tree?  Or sitting beside the door in your foyer to welcome your holiday guests?

But of course it occurs to me that no one wants a suitcase that they can only put out at Christmas.

So why not add a different stencil to the other side?

Once Christmas is over, you can just flip it around.

Now it’s a two-faced suitcase!

the art of the thank you.

This year my birthday fell on the Wednesday before Thanksgiving.  Taking the day off at my day job would have made for a very nice five day weekend.  It seems like a bit of a no-brainer, right?

But I didn’t do it.  Why?

Because my co-workers always make my birthday feel special.  This year they made Eggs Benedict for me, my favorite!

Not only that, but I got some awesome birthday presents from them.  Really, who doesn’t want to show up at work if there will be presents?

Since they went all out I wanted to do something special in return for the thank you notes, not just send store bought cards.  Now, before you start thinking that I am super clever and just came up with this idea out of the blue, I have to give credit to my friend Annie.  She did something similar for her wedding thank you notes many years ago.  Those thanks you’s were so fun and clever and the idea has always stuck with me, so I borrowed it for my birthday thank you’s this year.

Step no. 1:  take photos of the gifts.  Remember to leave some white space in your photo to have room for the wording.

Step no. 2:  add ‘thank you’ using Picmonkey or some other photo editing software.

Step no. 3:  print your photos on matte photo paper and cut them out.

It couldn’t be easier, and now you have customized thank you notes for your friends and family.

It really didn’t take very long, maybe a couple of hours from start to end.

Well, unless you count this next one because it did take me a little bit longer to drink that whole bottle of wine.

My co-workers tend to know me and my non-collections pretty well, I received not just one but two vintage cameras this year.

With Christmas coming up, maybe you’ll need to make some customized thank you notes of your own!

What do you think?

traditional red & green.

So far I’ve shared a pretty in pink Christmas including some pretty pink ice skates  and Christmas in black & white.

But maybe you are more of a traditionalist and you prefer the classic red & green!

I’m not much of a traditionalist myself, but I have a handful of red and green holiday decorations that I just can’t seem to part with.

Plus, I whipped up a couple of Christmas decorations in red and green to sell at Reclaiming Beautiful this year.

For starters, I found this oil can at a garage sale last summer and loved the patina of the red paint.

I washed it up with some Dawn dish-washing liquid (to cut the grease), I added a couple of Tim Holtz rub-ons, and then I clipped on a Dec 25 card.

It definitely makes for a unique Christmas decoration, despite its classic red color.

Next I purchased a green kid-size shovel from my friend Sue a few weeks ago.  She always has the best garage sale finds.  Unfortunately, I neglected to take a ‘before’ photo of it.  But I added a “Merry Christmas” in adhesive backed white vinyl that I cut on my Cricut machine.

I already had another similar shovel that I stenciled last year …

The shovels would be perfect hung on a door.

Last year I used the older one in the planter on my deck.

And finally, I painted this Christmas Tree sign for my sister using traditional red and green yesterday.

She stopped by to pick it up, and already has it hanging on the wall above her Christmas tree.

How about you?  Are you a traditionalist who loves red and green for Christmas?

P.S.  congrats to Melissa from New York who won my blogiversary giveaway!

another cutie patootie chair.

Every time I see little kid sized wooden chairs I snatch them right up.  They are so fun to paint, and they always turn out adorable.  You can see some of my previous chairs here and here.

So when I saw this pair at a garage sale in September, I bought them.

Then I tucked them away to become winter painting jobs.  I made a point of saving some of these smaller projects so I would have easy things to paint inside the house this year.

So last weekend when I had my sister and my friend Terri over to paint, I pulled out one of the chairs to paint myself.

I prepped the chair by washing it down with some TSP Substitute.  I was planning to paint it with milk paint and I would have been OK with some chipping, so I didn’t bother to do any other prep.  If you want to control the chipping, a good way to do that is to sand your piece well before painting, but I skipped that on this one.

Then I mixed up some Homestead House milk paint in Maritime Blue.  I used this color once before on a galvanized watering can and I knew it was a lovely shade of blue.

I painted two coats of paint on the chair.

Next I added a stencil to the seat using a warm white acrylic craft paint.  Once dry I sanded the chair fairly heavily to give it that well worn appearance since I didn’t get much in the way of chipping at all (despite my lack of sanding).

For a top coat over the milk paint I decided to pull out a jar of Fusion’s new wax.

The Fusion people sent me a few different jars of the wax to try out (including that jar of Rose Gold wax that is being included in my giveaway).  In addition to this clear Furniture Wax, I also have the black, the copper and the espresso.  I’m looking forward to trying each of them over the next several months and letting you know what I think.

But for today, I used the clear wax on this chair and I loved it.  It is very lightweight and spreads much more easily than other waxes.  I would compare it to the difference between spreading your toast with butter that has been sitting out on the kitchen counter versus butter that came out of the fridge.  Not only is it easier to spread, but you tend to use a lot less of it.

It also has only the most mild of scents, not a chemical smell but just a pleasant waxy odor.

Much like the Homestead House and Miss Mustard Seed waxes, this new Fusion wax is also environmentally friendly and doesn’t require the use of a hazmat suit while applying.

Today’s q-tip:  remember that you do not have to add wax (or any other top coat) over Fusion paint.  It is durable and washable without the extra step of a top coat.  However, some people like to add wax for aesthetic reasons.  For example, adding a dark wax to give a more aged appearance or to highlight details.  The new Fusion waxes will work beautifully over Fusion paint for that purpose.  They will also work over milk paint as a top coat to add some additional durability and protection.

I have to say that I haven’t been waxing as many pieces as I used to because of the labor involved in applying and then buffing the wax, but this wax was so easy to apply.  You’re definitely going to see some more waxed pieces from me now.

Be sure to check out Fusion’s website to read more about their new waxes!

By the way, while I was writing up this post I had to google ‘cutie patootie’ to see if that was really the correct spelling.  Here is the Urban Dictionary’s definition …

someone or something so cute that the word cute itself has to morph into something cuter, thus cutie patootie was born

LOL, so, I’m not sure if this chair is cute enough to really qualify as ‘cutie patootie’, what do you think?

a few of my favorites.

This year I decided to pare down my non-collection of vintage ornaments.  Or maybe I should say ‘refine’.  Yes, I like the sound of that better, I decided to refine my non-collection.

I pulled out all of my ornaments and went through them one by one.

I started with all of the solid colored balls.  I sorted them by color and I packaged all of them up to be sold at Reclaiming Beautiful.  Next I sorted through the rest of them and set aside any that I didn’t absolutely love, and those got sold as well.

Leaving me with just a few of my favorites (that is totally sarcastic, unless you consider about 150 or so ornaments to be ‘a few’, bwa, ha, ha).

One of the characteristics that pretty much guarantees a spot in my ‘favorites’ category is hand-painting of any kind.

I find the hand-painted ornaments just so darn charming even when it’s nothing more than a couple of swipes with a brush.

The ornaments also have to fit into my color scheme of pink, aqua, green or silver.

I don’t have a lot of green ornaments, and you’d think this would be a fairly common color, but for some reason it doesn’t seem to be.

But sometimes I deviate from my color palette if the ornament is pretty enough.  For example, just a handful of blue ornaments made the cut.

I also have a small contingent of gold ornaments.

I can’t really explain why these next two ornaments, with their oranges and yellows, made it through.  Except that I love those daisies, and the combination of orange, hot pink and red works for me too.  I think both of these have a 60’s vibe, don’t you?

This last ornament is one of my particular favorites with its hand-painted flowers.  I think they are supposed to be lily of the valley, or possibly white bleeding hearts.  What do you think?

If you are new to my blog and you haven’t already heard me say it, I find most of my vintage ornaments at garage sales and estate sales.  Oftentimes people are selling a bag full of ornaments and the vintage glass ornaments are mixed in with plastic, pipe cleaner, wood or other sorts of ornaments.

It’s less common to find ornaments as a set, or in their original box, but I do sometimes find boxes.

It’s even more rare to find boxes in really good condition like this one.

I almost never find a boxed set of ornaments intact like the one shown above.  I purchased all of those ornaments separately and then put them in a box that came with other mismatched ornaments.  Antique shops will almost always break up sets like these and sell them individually.  I think it’s easier to sell single ornaments for $3.95 each than it is to sell a box of a dozen for $48.

This year I put my silver tree full of vintage ornaments up in my Q Branch next to my giant English cupboard, just around the corner from my black and white decorations.

My pink painted gift boxes are perfect underneath it.

Speaking of which, don’t forget, tonight is the deadline for leaving a comment on my blogiversary post to be in the running to win the Seven Swans a Swimming box full of goodies.  If you haven’t left a comment yet, you still can up until midnight tonight (US Central time).

And gosh, I totally forgot to mention it in my original post, but Fusion also provided a jar of one of their new waxes to throw in with the giveaway.

This is their Rose Gold wax.  I haven’t tried this one yet, but I have tried the new Clear Wax and I loved it (I’ll be sharing more on that tomorrow).  If you win, I hope you’ll try out the Rose Gold wax and let us all know how you like it!