viv’s trippy blocks nightstand.

First up, congrats to Monica.  I drew her name at random to win my Dixie Shine giveaway from last Friday.  Now, on with today’s post …

As you guys know, I don’t typically do custom work.  I’ve learned over the years that I find it too stressful to try to meet someone else’s expectations about how something might (or might not) turn out.

I also don’t like working on something that isn’t really my style.  To explain what I mean by that, I always tell the story of a customer who once asked me to paint a dresser for her because she absolutely loved my work.  She wanted it to be exactly like other pieces I had painted.  Except purple.  And not distressed at all.  And with lots of flowers on it.

In other words, nothing like my normal stuff.

But every once in a while there is an exception to my ‘no custom work’ rule.  The furniture owner has to be willing to pretty much allow me to do my own thing without much input.

In this case, the furniture owner is my friend Viv.  Now that she and her husband’s four kids have all flown the nest, she’s turning what was formerly the boy’s room into a guest room.

She’s added a pair of queen size beds (it’s a large room!) with fabulous upholstered headboards, new linens and a new paint color on the wall.  She had asked me over to give her some ideas on what else she could do with the space, and when I saw the nightstand and bureau combo with their dated finish I immediately suggested she paint them.  Duh.  Obviously.

Well … OK, in the end, I offered to paint them for her, starting with the nightstand.

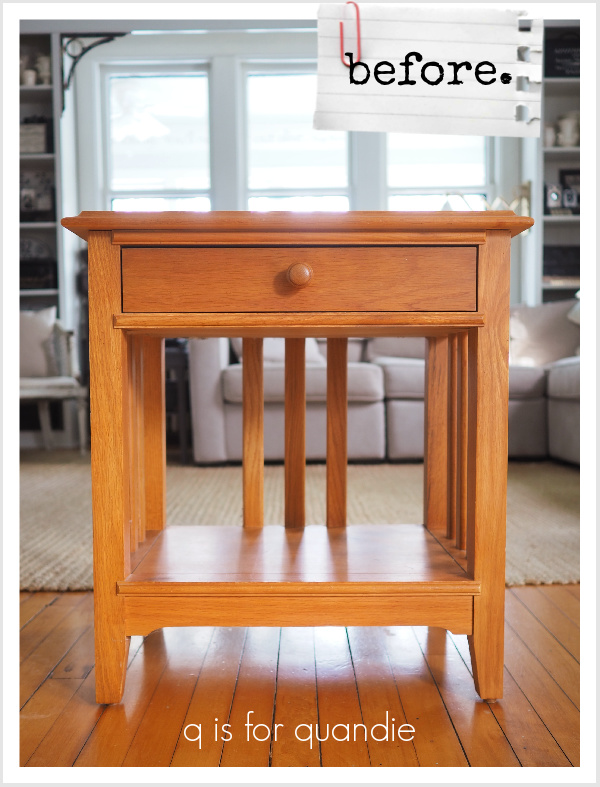
This piece of furniture was in really good condition.  Certainly better condition than 99% of the pieces I normally work on, and probably about 50 years newer.  The only problem was a few water rings on the top, and well … that orange-y sort of stain color (please just ignore how much that matches my floors, ugh!).

So aside from my usual prep process of scuff sanding and cleaning, I also opted to apply a base coat of Dixie Belle’s B.O.S.S. on the top before proceeding with the paint.

That brings me to today’s q tip:  when you have water rings or other damage that has compromised the existing finish, that change in texture may be hard to disguise with just a coat of regular paint.  You could end up seeing a ghost of those rings after your paint job.  To prevent that, create a uniform base by adding a coat of stain blocking primer, like the B.O.S.S., before painting.

That did the trick on this piece.

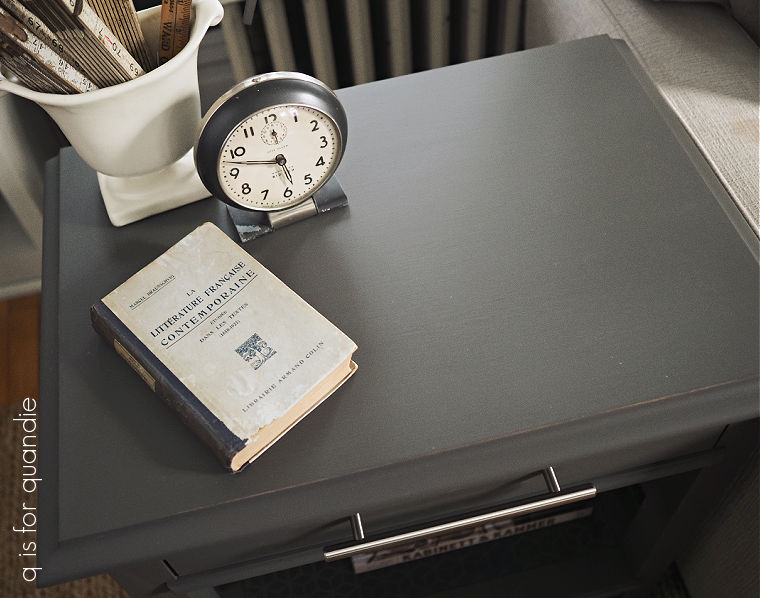
I painted Viv’s nightstand in two coats Dixie Belle’s Gravel Road.  Then I decided that the flat shelf at the bottom of the table needed a little something extra.  So I pulled out two stencils from Dixie Belle, Basket Weave and Trippy Blocks, and applied them to a tester board to figure out which one I wanted to use.

I used Dixie Belle’s Silk paint in Black Sands for the stenciling.  The color is a bit darker than the Gravel Road, and the sheen of the Silk paint is just a bit less matte than the chalk paint.  Whenever I mention the Black Sands color, I like to point out that it is not black.  It is a really dark grey, don’t be thrown off by that name.  I’d tried this technique once before (on this piece) using their Midnight Sky and Anchor (which is the black from the Silk line) and loved the subtle results.

I decided that Trippy Blocks would do the best job of modernizing the look of the nightstand, which was mainly what Viv wanted me to accomplish.

Once I had everything painted, I gave Viv the option of whether or not to distress the edges and in the end she decided against it.  So after a very light sanding with 220 grit on the flat surfaces, I sealed this piece with Dixie Belle’s Easy Peasy spray wax.

Next we decided to switch out the original wood knobs for something sleeker and more modern looking.  I had filled the center holes for the original knobs with some of Dixie Belle’s Mud before I painted, so we could do anything she wanted with the hardware.  Viv did a little shopping and came up with these drawer pulls from Menards.

They definitely go a long way towards making this piece look updated, don’t you think?

The pulls came in a wide range of sizes, so we were able to use one size on the nightstand, and two different sizes on the larger dresser (which you’ll see on Monday).

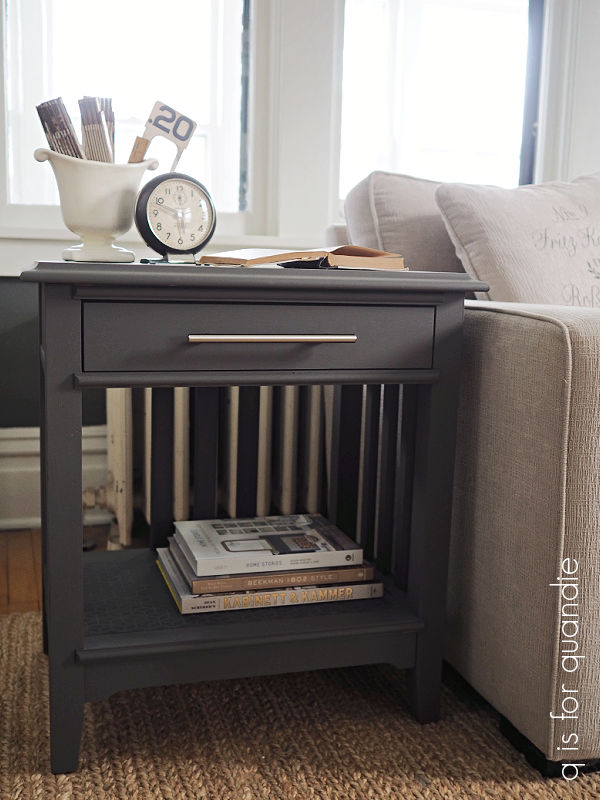
It’s always so satisfying to me to see the massive difference a little paint and a change of hardware can make to a piece of furniture.

I think we definitely met our goal of giving this nightstand an updated look.  What do you think?  Leave a comment and let me know!

home décor blindness.

Do you suffer from home décor blindness?

I definitely do.

What is it?  Well, that’s what I’m calling it when you’ve had your existing décor around long enough that you’ve grown blind to it.  You just don’t see it anymore.  It doesn’t necessarily have to be bad or outdated, it’s just that you’ve had it for a while and you no longer notice it.  That means it’s time to start changing things up a bit.

Such was the case with the mirror frame chalkboard that I had in my living room.

I painted this up back in October 2017, and eventually got around to adding a chalked design to it and hanging it over our sofa in March 2019.

But lately I’ve become rather blind to it.  I think it’s time for a new look on that wall, one that will incorporate that fabulous gold framed mirror I found at the Goodwill recently.

So I took the chalkboard down and decided to give it a refresh.

First I removed the chalkboard from the frame.  I gave the frame a good cleaning, followed by a fresh coat of clear wax.

Then I lightly sanded the chalkboard with some 220 grit sandpaper, cleaned off the resulting dust and re-painted it.  Last time I used Homestead House milk paint in Bayberry, which turned out to be the perfect chalkboard green.  But I decided to go back to a black chalkboard this time around, and thus I painted it with Dixie Belle’s Midnight Sky.

Today’s q tip;  both milk paint and chalk paint left bare (no top coat) make great chalkboards!

I gave it two coats of watered down Midnight Sky, and I sanded lightly in between coats.  I find that this is the best way to keep your chalkboard surface nice and smooth.  I also sanded lightly after the final coat was dry.

Then I waited a couple of hours to give the paint a little time to cure and harden up, then I seasoned the chalkboard by rubbing chalk all over it and then wiping it away.

Seasoning your chalkboard eliminates that ‘new’ look and makes your chalkboard look legit.  It also makes it easier to wipe away anything you later write on the board without leaving marks behind.  I can vouch for that because the final result that you’ll see in a minute is actually ‘take two’ (or would it actually be ‘take three’?) for this chalkboard.  The first time around I didn’t like the placement of my wording.  So I wiped it all off with a damp rag, re-seasoned the chalkboard and started over.

Now, I don’t know about you, but I really don’t like my own handwriting.  So I like to cheat a little when writing on a chalkboard.

In this case I pulled out my two newest flower market themed stencils from Wallcutz.  Then I used a chalk pencil to lightly outline my chosen wording onto the chalkboard.

Then I went back over those fine lines with a sharpened piece of regular chalk.

The cursive writing from their Fresh Flower Market stencil was perfect for my chalkboard …

as were the flower names …

The “BLOOMS, SEEDS, STEMS” writing at the bottom is from the Flower Market – Open ‘Til Dusk stencil.

And just like that, the chalkboard has a fresh new look for spring.

I’m still debating whether to put it somewhere else in our house, or to take it into the shop.  Or perhaps one of my locals wants to snatch it up (in which case, be sure to check out my ‘available for local sale‘ page for more details).

P.S. in case you are wondering, all of that white outside the window?  Yep, that’s still snow.  Those windows look out on Ken & Arlene’s north-ish facing front yard, and that’s one of the last areas to lose its snow cover in the spring.  Surely it will melt soon though, right?

Anyway, back to the chalkboard.

Even though I love how it turned out, I’m leaning towards selling it because that will force me to be on the hunt for some new things for our house that I’m not quite so blind to.

How about you?  Do you suffer from home décor blindness?  Leave a comment and let me know that I’m not alone.

the summer villa dresser.

When I saw I.O.D.’s spring release, I looked at the two new transfer offerings and thought ‘nope, not for me.’  I’m just not a fan of bugs, fish, mushrooms or monkeys.  I was so disappointed.

I was really hoping for new typography transfers that would work well on my toolbox makeovers.

Unfortunately, the designs that would have been perfect for toolboxes were offered as the Melange paint inlay rather than as a transfer.  I so very much would have preferred those designs as a transfer.  Why?  Because I do a lot of layering on those toolboxes, like you see on this one …

 I can’t think how you would layer the paint inlays in a similar fashion since you have to apply each one into a fresh coat of paint.  I know, I know, I could apply the first inlay into paint, and then layer another over it by applying it into a top clear coat on top of the first inlay, but doesn’t that sound putzy and time consuming?!  I also could apply a paint inlay as the bottom layer of a design and then layer a transfer over it, like I did on this tackle box where I layered wording from the Label Ephemera transfer over the Rose Chintz paint inlay.

But transfers are so much easier to layer!  If any of you know of a better method for layering paint inlays, please leave a comment and clue me in.

Anyway, initially I wasn’t going to purchase anything from the new release.

But then I saw the Summer Villa paint inlay.  And I had to have it.  I really tried to talk myself out of it.  After all, these dang paint inlays are rather pricey (it was $46) and I was fairly sure I’d only get one use out of this one.  As I mentioned last Friday, I’ve had mixed results with trying to use the inlays more than once.

  Still, I couldn’t resist, so I ordered it.

You know, sometimes you just have to splurge.  I have to admit, I spent more on a pedicure last week than on the paint inlay, and in the end I’d rather have the inlay (although my toes do look pretty good).

After ordering the paint inlay, I needed to find a piece of furniture to put it on.  I checked the measurements, and then started hunting on Facebook Marketplace and Craigslist.  I ended up finding this dresser on Craigslist.

It presented the perfect canvas for the Summer Villa paint inlay, the front of this dresser is just slightly smaller than the inlay.

This was an almost perfect Craigslist transaction too.  The seller responded to my inquiries right away, we set up a time for the pickup in the afternoon on the same day, and when we got to his house the dresser was at the curb and ready to be loaded.  Best of all, we didn’t have to navigate another icy Minneapolis alley.

I say ‘almost perfect’ because there was a bit of a bait and switch problem with the damaged legs.

Not only were the curved feet missing, but the curved bits further up the leg were also missing.  Somehow I wasn’t aware of that before I got there, and it seems like a detail I would have noticed.  In fact, I went back later and pulled up the photo from the ad …

As you can see, those curved bits further up the legs were still intact in that photo.

I did ask the seller if he had the pieces that fell off, and he did not.  But you know what?  I bought it anyway.  We were already there, the dresser was ready to go, and the price was right at just $40 (yes, the piece of furniture was less than the inlay … and the pedicure, come to think of it).  I was fairly confident that Ken and I could figure out a way to deal with those legs.

After I got the piece home, I had Ken come over for a consultation.  We ended up deciding to remove the curvy trim board from the bottom of the dresser and replace it with a straight board that was flush with the flat fronts of those legs.  That made it far less obvious that there was a curved bit missing.

Then, in an attempt to make those flat legs looks more intentional, I added some molded medallions.

I made these using I.O.D. paper clay and the Ancient Findings mold from re.design with prima.  I glued them in place with regular wood glue.

After doing some other small repairs like gluing veneer and such, I scuff sanded the piece with 220 grit paper and then cleaned it.  Next I began painting with a coat of Dixie Belle’s clear B.O.S.S.   This dresser absolutely had the look of a bleeder with that dark reddish stain.  Better safe than sorry.  As I was applying the B.O.S.S. to the sides of the dresser, I noticed that my brush was picking up some orange coloration (that happens sometimes with severe bleeders), so for a little extra insurance I gave those sides a 2nd coat of B.O.S.S.

I also then painted that fresh new board and those medallions with a coat of Dixie Belle’s Coffee Bean.  I did that so that there would be a uniformly dark undercoat.

After waiting 24 hours (if you read the fine print, the B.O.S.S. should be allowed to dry for 24 hours to reach full efficacy in blocking stains), the next step was adding two coats of Dixie Belle’s Sawmill Gravy.

I debated between Drop Cloth and Sawmill Gravy, but ultimately decided that the Sawmill, with its slightly gray undertone, would be perfect with the paint inlay’s shades of gray.

The paint went on quickly and beautifully over the B.O.S.S. and only took two coats for full coverage, which isn’t always the case when painting white over a very dark color.  That’s another benefit to using the B.O.S.S.

Now it was time for the inlay.  After trimming the edges off each carrier sheet, I laid out the full design on my baby grand piano (yet another great use for it!).  I then measured the width of the front of the dresser and cut down the sides of the inlay to fit (I took off about 1.5″ from each side).  I then held the inlay sheets up to my dresser to make sure that key areas such as the cow’s head and the people in the boat didn’t fall on a line between the drawers.  I then adjusted up or down accordingly before trimming about 6″ off the top and another 1″ off the bottom.  Fortunately there was a lot of sky at the top of this design, so it still looks OK with that much trimmed off.

This inlay comes on 8 separate sheets.  When applying a big overall design like this, whether it’s a paint inlay or a large transfer, I find it best to start at the middle and then work my way out to either side, and that’s what I did here.  Also, after applying the first row of sheets, I realized that it would be far easier if I trimmed my sheets down to the height of the drawer fronts and then did each drawer separately.  So I did that from there on out.

You can find full instructions on applying an I.O.D. paint inlay in this post.

After letting the applied paint inlay dry, and then removing the carrier sheets and letting the drawers dry thoroughly, I sealed the inlay with some RustOleum clear matte spray sealer.

Next up I sanded the edges of my piece to distress them, then gave everything a final topcoat with clear wax.  I also added just a bit of dark wax to the medallions to give them a little more depth.

Talk about getting a pedicure, don’t those legs and feet look so much better!

I freshened up the insides of the drawers by sanding them lightly, cleaning them well and then adding a coat of Dixie Belle’s Big Mama’s Butta in the Orange Grove scent.

I opted to replace the original wood knobs on this piece with some glass knobs from D. Lawless Hardware that I already had on hand.  I knew they would come in handy some day!

I felt like the glass knobs would be a bit more in keeping with the formality of the transfer design than a painted wooden knob, while also sort of disappearing into the background.

I really wish I had a dark grey wall to photograph this piece against, I think it would be stunning against a darker wall color.  I keep looking around my house trying to find a way to make that happen, but I have absolutely no spare wall space that I could paint dark gray for photo staging (maybe it’s time to reconsider that photo cottage?).

So we’ll just have to make do with photographing it on a white wall.

So, about the Summer Villa paint inlay, I feel like this is a ‘one and done’ sort of item (unlike the I.O.D. Label Ephemera transfer that I’ve purchased at least a dozen times!).  It is stunning, but it’s not terribly versatile.  Although it can be trimmed down a bit, you still need a fairly specifically sized piece to put it on.  You can’t really rearrange the design at all, although I suppose you could split it down the middle and use half on one piece and half on another (that could be pretty fab on a pair of nightstands, for example).

Still, I loved using the Summer Villa inlay to create this particular piece of furniture.  It turned out exactly how I pictured it.

Hopefully someone else out there will fall in love with it too, because this piece is for sale locally (see my ‘available for local sale‘ page for the details).

What do you think of this makeover?  Leave a comment and let me know.

Thank you to Dixie Belle Paint Co for providing the B.O.S.S., Big Mama’s Butta and the Sawmill Gravy paint used in this makeover.

can you really re-use an I.O.D. paint inlay?

Now that I’ve been playing around with the I.O.D. paint inlays a bit more, I thought I’d share some of the results I’ve gotten while attempting a 2nd use.

After all, I know that many of you have shied away from purchasing them because they are really rather pricey compared to both transfers and stencils, particularly if you only get one use of each.  So if you’re splurging on one thinking that you’ll definitely get two (or even three) uses out of it, I want to make sure that your expectations are realistic.

First up, if you plan to save a paint inlay for a 2nd use, you’ll want to remove the wet carrier sheet from your first project gently, taking care not to tear it.  Then lay it out flat somewhere to dry back out.  Once dry, return it to the original packaging with the protective tissues that came with the original packaging in between the sheets.

The used paint inlay will have picked up some of the paint that it was used over, as you can see on the two sheets on the right, below …

For reference, the above photo shows an unused sheet of Rose Chintz, one that was used over Kudzu (the green) and one that was used over Sea Glass on the far right.

Here are the results of that first experiment.

The book on the top is the first use of the inlay, and for comparison, the book on the bottom is the 2nd use of the inlay that was used over the Sea Glass.  These books were both painted in Drop Cloth before adding the inlay.

As you can see, the result after applying the used inlay is noticeably more faded, like well worn chintz fabric that has been washed over and over.  I actually rather liked that result on the book.  I did expect to see a little of the Sea Glass color transferring back off that sheet and onto the book, but it definitely wasn’t noticeable.  Also, I should note that the inlay was a bit more flimsy the 2nd time around and I wasn’t able to remove it from the surface without tearing it, thus making it unusable for a third go around.

Flashing forward a few months after the book experiment, I used the Gregory’s Catalogue paint inlay on this bench

and then later I re-used just a small section of it on this wood tote.

As you can see in the photos, the first use of the inlay produced a black image, while the 2nd use of the inlay is somewhat faded resulting in more of a grey image.

Also, as I mentioned in that post, once again I was unable to save the paint inlay when I removed it from the tote because it tore quite easily after a 2nd use and thus did not come off in one piece.

More recently, I decided to re-use some of the Rose Chintz over a darker color, Dixie Belle’s Kudzu.  This time I re-used the sheet that had been used over Kudzu once before.

Here are the results.

Again, I got a very faded 2nd use.  But since it’s over a dark color this time, the inlay is really rather hard to see.  This is probably not the look any of us are going for.  Therefore, I think it’s safe to say that you can’t count on re-using a paint inlay over a dark color.  You’ll want to stick to lighter colors for any repeat use.

The second problem I’ve run into when it comes to re-using an inlay is that I typically cut them up to fit the piece I’m using it on.

Now I’ve got an oddly shaped, used section of inlay.  I could only re-use this on something the same size or smaller, where I can trim it down again.  What I’m finding is that I have a pile of oddly shaped, used pieces of inlay that I may or may not be able to find a use for.

So that’s also something to keep in mind.

In the end, salvaging that watering can was easy enough.  I painted back over it with a fresh coat of Dixie Belle’s Kudzu and then applied a new section of the Rose Chintz inlay.

I have to admit, I think the Rose Chintz looks gorgeous over dark colors, including black.

I’m still willing to use it that way even if I have to use a brand new sheet each time.

To recap, you can’t always get a successful 2nd use out of a paint inlay, so keep that in mind when deciding whether or not to purchase one.  It may be a one time deal.  That being said, they really are fun to use once you get the hang of it (click here for my post with full step by step instructions on how to apply a paint inlay).

In fact, I’m just finishing up another piece with one of the newest I.O.D. paint inlays, so be sure to check back next week to see how it turned out.

In the meantime, have you tried re-using the paint inlays?  If so, leave a comment and let us know how that worked out for you.

stick with me.

You may remember that back in my library book review post, after seeing all of the gold leafing in Amy Howard’s book Rescue, Restore, Redecorate, I mentioned that there was a new product coming out from Dixie Belle that is similar to gold leafing.

Well, I went ahead and ordered some of the silver and some of the gold so that I could try this out.

To use this product you’ll need the Stick with Me Dixie Shine Glue, and one of the metallic foils that go with it.  Dixie Belle also recommends that you use their Finishing Pad to burnish the foil, but I simply used a microfiber cloth as I’ll explain in a minute.

I thought that those metal ceiling tin art pieces that I found while thrifting would make good guinea pigs for this process.

I had never used this product before, but I had a sneaking suspicion that I might need to have an undercoat color that I wouldn’t mind seeing through the gold here and there.

So my first step was to paint the ceiling tins in Dixie Belle’s Midnight Sky.  Then, I also painted over the stone tiles in the middle with their Drop Cloth.  I should note here that painting your surface first is not required, I did it for aesthetic reasons.

The following day I taped off the ceramic tile (center area), and then applied the Stick with Me glue to the metal ceiling tin (the black area) with a small brush.

I want to warn you guys that this stuff is super duper sticky.  And anything you get it on will also become super sticky.  For that reason I put some paper towels under my project so that I could just throw them away at the end.  I didn’t want this sticky stuff getting on the painting drop cloth that I use all the time.

Now you are supposed to wait about 15 minutes for the glue to dry and become transparent (naturally I jumped the gun a bit, but more on that in a minute).

Next up, cut strips of the foil to size and apply them to your surface shiny side up.

It’s OK if they overlap a bit.

Next you want to burnish (ie. rub with some pressure) the foil onto your surface.  As I mentioned earlier, Dixie Belle recommends using their Finishing Pad, but I simply used a microfiber cloth and that worked perfectly well too.  It does take a little bit of effort to make sure that you’ve rubbed firmly over the entire surface.  But once you think you’ve got it, you pull away the the backing paper and the gold foil is left behind.

Now, as I mentioned, I did not quite wait long enough on my first strip and as a result I didn’t get the greatest adherence.

I did better on the rest of the frame though.

It was easy enough to remedy that first side by applying more Stick with Me, giving it the full 15 minutes to set up and then applying more foil.

Also, as I suspected would be the case, I did not get 100% coverage over my very lumpy tin ceiling tile frame.  I was glad I had that black in the background.  That being said, you can also go back and press some of your remaining bits of gold foil into those spot to fill them in.

Also, as you can see, I got much better coverage on the smooth, straight areas.  Just something to keep in mind when using this product.

I have to say that the resulting  shiny gold was a bit bright for my taste.

You know I don’t like a lot of shine.  So I decided to experiment with ways to tone it down a tad.  I started by ‘glazing’ over it using DIY’s Dark & Decrepit.  I brushed it on, then wiped it back with a rag.  Once that dried, I also went over the frames with some dark wax.

That worked beautifully and gave me the more aged looking patina that I prefer.

I filled the center tiles using bits from a couple of different transfers.

The stuff in shades of grey is from Dixie Belle’s Vintage Post transfer, and the colored florals are from the I.O.D. Floral Anthology transfer.

These tiles look amazing against the dark grey walls in my living room in their new coats of gold.

The Dixie Shine is not quite the same as gold leaf.  The foil is not nearly as fragile as gold leafing and you don’t end up with flakes of gold everywhere after applying it.  The end result is quite shiny, but if (like me) you don’t like quite so much shine, you can easily remedy that with a dark glaze or wax.

I’m adding this post to my ‘how to‘ page, so you can easily find it there if you ever need to come back for a reminder on how to use Dixie Shine.

I’m also going to give one of you the chance to try the Dixie Shine.

I’ll be drawing one name at random to receive the Stick with Me glue, plus the gold and silver Dixie Shine foil.

The rules for today’s giveaway:  Simply leave a comment on this blog post (and please forgive me if I don’t respond to every one, but know that I read and appreciate all of them).

Your comment must be left on this blog post, not on Facebook or Instagram.  You are not required to follow my blog, or follow my Facebook or Instagram accounts, although it would be awesome if you did!

I will randomly draw the name of a winner for today’s prize from all of the comments left on this post by Sunday, March 26, 2023 at the stroke of midnight (U.S. Central time).

The fine print: no purchase necessary, you must be 18 years of age or older to win, void where prohibited by law, the number of eligible entries received determines the odds of winning, approximate retail value of prize is $55, if the prize is not claimed by Friday, March 31, 2023 another name will be drawn at random to win, blah, blah, blah.

Thank you to Dixie Belle Paint Co for providing their products that I’m giving away today.

the top heavy cupboard fix.

I promised I’d share what I ended up doing with that top heavy mini-cupboard.

If you’ll remember, I found it while thrifting a week or two ago.  I almost put it back on the shelf because I wasn’t sure it would be worth the effort to save it.  It had such a wonky, top heavy look.

In addition, what I didn’t show when I mentioned it last was that it was filled with gross contact paper.

I think yucky old drawer liner might be near the top of my list of things I really don’t like to deal with.  Right after smoky smells and mouse pee.  I mostly try to avoid old contact paper, but I completely draw the line at the other two!

Fortunately, the adhesive on the contact paper had really deteriorated, so it came off rather easily.

Next I had to deal with that top heavy look.

I asked you guys for suggestions, and several of you had some really good ones including just removing the door, or maybe moving the door to the bottom, or even flipping the cupboard upside down turning the top into the bottom and then cutting off the old legs and adding new ones.  I did pop it upside down to see how it would look and that might have been an option that worked well.

However, after consulting with my handyman Ken, we decided to remove the door and then cut back the top half of the cupboard so that it was stepped back rather than flush with the front.  If you look closely at the photo below, you can see where I marked the new measurement for Ken.

Ken simply used a jig saw to cut everything off beyond that 5″ mark.  Then he did his best to recreate the curved sides below the upper shelves.

I wanted to possibly re-use the door on the bottom section, but Ken felt it was too warped to use.  I suppose we could have added a new door, but in the end, I think it’s fine without a door.

After sanding and cleaning the piece, I painted the inner bits with Dixie Belle’s Kudzu, and the outer bits with their Drop Cloth.

I just love this combination of white and green, especially in springtime.  OK, well, spring is definitely not here yet, we still had some single digit temps last week while I was working on this one.  But surely it’s just around the corner, right?

Next I lined the shelves with that pretty gingham scrapbook paper you’ve been seeing me use a lot of recently.

Once again, I am totally kicking myself for putting the majority of my garden themed props out in the potting shed, including my green flower frogs.  There is still a 3′ bank of snow in front of the door.  So for now, I have to make do with my basic uncolored frogs.

Finally, I added a Classic Vintage Label transfer from re.design with prima to the ‘work surface’ before giving everything a coat of clear wax.  Well … not the paper of course, but all of the painted parts.  The paper, by the way, is not adhered.  It’s loose, so if someone wanted to switch it out for something else they could easily do so.

In addition to those frogs, I also staged this one up with the itsy bitsy dresser that I painted up a while back and few other bits and bobs.

Isn’t it sweet?

This little cupboard would be the perfect addition to a craft room, potting shed, desk top, etc, etc.

I think Ken and I did a good job of eliminating that wonky top-heavy look and giving this little cupboard a fresh new look with some paint, paper and a small transfer.  Ultimately, I’m glad I didn’t put this one back on the shelf at the thrift store.

What do you think?

The cupboard is for sale, so if you are local be sure to check out my ‘available for local sale‘ page for all of the details.

Thank you to Dixie Belle Paint Co for providing the paint used in this project.

open ’til dusk.

You may remember that I picked up this petite dresser while out thrifting a few weeks back.

It was a Goodwill find, and I mentioned that I don’t always like to buy furniture at the Goodwill because it’s usually in pretty rough shape.  And this piece was no exception.

The veneer was all chipped up around the edges of the drawers and the top of the dresser.  At some point, someone must have torn away the damaged bits and re-glued the veneer because despite the chips, what was left was held firmly in place.

There was also a hole in the bottom drawer, and there was a gap at the back of the top where there must have once been a mirror attached.

Finally, there was some pretty ugly wallpaper lining the drawers that had been seriously glued down.  Now this is the avocado green and harvest gold that I remember …

Pulling this stuff out was more trouble than I’d bargained for.  After pulling off the loose stuff, and scraping away at the rest, I still ended up with this …

What did they use to adhere this stuff, contact cement?

Finally I decided to just sand off what I could using my orbital sander.

And I still couldn’t get it all off.

So after Ken replaced the drawer bottom with the hole in it, I resorted to re-lining the drawers with some paper that I happened to have on hand with one main difference.  I did not glue mine down.  If some future owner wants to switch it out, it will be as easy as lifting it out of the drawer.

As for the outside of the dresser, I started with a good sanding and cleaning, then I painted it in two coats of Dixie Belle’s Midnight Sky.

Next I pulled out the Flower Market – Open Til Dusk stencil from Wallcutz.

If this looks familiar, it’s because it is the same general design as the Farmers Market stencil that I used last fall on this sign.

The stencil was a bit taller than the front of this dresser, so I decided to cut it down.  It would have been harder to get a nice, crisp result if I’d left the stencil whole.  So I trimmed off the top two lines of wording, and then applied the lower portion to my dresser front.

I first used Dixie Belle’s Putty to create a shadow for the word “FLOWER”.  Then, once that was dry, I moved the stencil up and to the right just a little bit and stenciled the little flourishes in Putty, and then the rest of the stencil in Dixie Belle’s Drop Cloth.

I used an artist’s brush to fill in the bridges on the lettering, and then added some dimension to the Putty colored flourishes with some dabs of Drop Cloth.

Finally, I decided to try adding the “Open Til Dusk” wording to the top of the dresser.

I placed it at the front because most people will put stuff on top of a dresser, so this way the wording will still show in front of any stuff.  After I got it on, I wasn’t entirely sure I liked it.  However, Mr. Q voted to keep it, so I went with it.

Let’s just talk for a minute about the bang for your buck with stencils.  I used the 18″ x 30″ version of the stencil on my dresser (this stencil comes in 8 different sizes ranging from 9″ x 15″ up to 21″ x 38″).  The size I used is priced at $25.95 (but FYI, there is a BOGO sale going on today at Wallcutz, so you could get two for the price of one, go check it out).  The beauty of stencils is that you can use them over and over and over.  You can mask off sections, and just use part of one.  For example, I could see using that “SEEDS – STEMS – BLOOMS” wording on something smaller.  You can re-arrange the layout by moving the stencil around.  And you can even cut a section off and use it separately like I did on this piece. And of course, you can use any color of paint you like with a stencil.  I especially like using them in white over black paint like I did on this piece.  If I just use this stencil 5 or 6 times, my cost per use is only going to be around $5.  That’s a total bargain in my book.  But in the end, even if I were to just use it once, it’s still cheaper than a transfer or a paint inlay.

As for the original wood knobs, I opted to just paint them in Midnight Sky and call it good.

They don’t completely disappear, especially the ones over the “F” and the “R”, but they mostly disappear.  I felt like trying to paint them to somehow match the stenciling would make them stand out even more.

By the way, remember those veneer chips I mentioned at the beginning of the post?  I could have taken the time to mitigate them by using some wood filler, but I didn’t bother.  I just painted right over them.  One’s eye is drawn to the stenciling and tends to completely ignore those flaws.

My handyman Ken helped with cutting down a board to fill in that gap at the back of the dresser where a mirror would have been.

It’s just a simple, plain board, but it finishes things off back there properly.

I went to Target and spent a bit of money on fresh flowers to stage this piece, but that’s OK because this post was sponsored by Wallcutz.  So I had a little bit of a budget for props.

The fresh flower display at my local Target was so adorable, with faux chalkboard signs showing the prices and that inspired me to do something similar with my staging.  Isn’t the color on those Gerbera Daisies gorgeous?

I mixed in a few of my faux flowers to fill out the scene.

At the beginning of this post I called this dresser ‘petite’.  That’s because it’s only about 27″ tall.  I think that makes it the perfect height to use as either a T.V. stand or as a nightstand alternative next to the bed.  It would also be the perfect size for a child’s room!

It was so much fun to give this little dresser a new life with some paint and a stencil!

What do you think of how it turned out?  Leave a comment and let me know.

This piece is for sale, so if you are local and have a spot for it, be sure to check out my ‘available for local sale‘ page for more details.

Thank you to Dixie Belle Paint Co for supplying the paint used in this project, and to Wallcutz for sponsoring this post and providing the stencil.


a march thrift haul.

Housekeeping item no. 1 – Congratulations to Marguerite.  I drew her name at random to win the Moody Blues giveaway.  Mr. Q sent it off in the post yesterday!

Housekeeping item no. 2 – Some nefarious person has created a fake profile on Instagram using my photo and the name ‘lindastrand1234’.  It is not me!  Do not be fooled.  Please note that my only profile on Instagram is qisforquandie!

OK, now on with today’s post!

I headed out for a bit more thrifting with my friend Sue last week.  Thrifting can really be hit or miss, and last week it was mostly a miss.

That’s about it for the smaller pieces.  Pretty blah, right?

I had to laugh at the reindeer candle holder.  He seems to be solid brass, but someone spray painted him brown.  Do you think they were trying to create a chocolate reindeer?  It really doesn’t seem to work in the same way as those chocolate bunnies.  Maybe because candlesticks made out of chocolate would probably be a bad idea.

I grabbed him because I thought it would be an interesting experiment to try and strip that spray paint back off.  And if that fails, I can always spray paint him gold.  Either way, I’ll hang onto him until the Christmas season.

Next up, these metal ceiling tile/ceramic tile thingies.

Again, I only grabbed these because I thought they might present the opportunity for a fun project.  I’m challenging myself to come up with a way to give these an updated look.  You’ll have to stay tuned for that one.

This next piece was a no-brainer for me.

I always grab these wooden totes when I see them.  They are so fun to makeover (take a look at a few I’ve done here, here and here).  This one will go into the stack of small projects for a snowy day (which we’ve had quite a few of lately).

Last up for the small items are these two galvanized pieces.

Let me ask you guys something here, do you think galvanized is on the way out?  Is it too closely associated with farmhouse style?

You may remember this galvanized tray that I thrifted quite some time ago …

I added that Vanilla Bean Farm wording to the front and took it to the shop, and there it sits.  Not selling.

So I was hesitant to pick up these two galvanized pieces, even more so because they were both priced rather high for what they are.  I literally will be lucky if I can make more than a dollar or two re-selling them.  But as seems to be the theme in this post, I thought they would both make fun projects.

I have been having a lot of luck lately selling pieces that have the I.O.D. Rose Chintz paint inlay on them, so I decided to go that route with the first galvanized tote.

I painted it in Dixie Belle’s The Gulf, and then blended in just a little bit of their Sea Glass in the center to add some depth.  Then I applied the paint inlay (my how-to post on this process can be found here).  Once dry, I sprayed it with a matte sealer to keep the inlay from smearing.  Then I sanded it very lightly and gave it a final coat of clear wax.

I painted directly over the galvanized metal without any sort of primer.  I find that chalk style paint does a very good job of sticking to galvanized metal like this as long as there isn’t a shiny topcoat on the metal.  I did wonder if the process of pulling off the paint inlay backing sheet would pull off any of the paint and there was just one small spot where that happened.

I’m OK with a little chipping, but if you’re not you may want to apply a coat of Dixie Belle’s Slick Stick before your first coat of paint over galvanized metal.

Next up is the galvanized container with the brass handles.  I actually picked this one up because I was looking for something to hold the amber bottles that I shared a little while back.

I was hoping they would all fit in this galvanized container, but it’s only big enough for three of them.  Nonetheless, I decided to do it up for that purpose.  I started by cleaning it, of course.  Then I painted the inside in Dixie Belle’s Anchor because it was a little stained and grungy looking.

Next I wanted to clean up those handles a bit.  I suppose I could have tried polishing them with some brass cleaner, but instead I decided to add some of Dixie Belle’s Gilding Wax in Bronze.

It was just enough to freshen them up a bit.

Next I added some sections of the gold Somewhere in France transfer from re.design with prima to the front …

and back …

The gold over the galvanized metal is pretty subtle, but I think it adds just a little something extra.

In addition to that meager pile of small items, I also picked up this kid sized cupboard.

I have to say, I put this in the cart and pushed it around a bit, then I almost took it back out of the cart because I just wasn’t sure I wanted to tackle it.  But it was only $6.99, so I figured if nothing else it would be yet another interesting experiment to see if I could improve upon it.  My biggest problem with it after the cherry red paint is that it looks so top heavy.  I’m really not at all sure how I’m going to solve that problem.  If anyone has any ideas, please share in the comments.

That brings me to my find of the day.

I dug that gold framed mirror out from behind a few other large mirrors.  I’d seen just the tip of it poking out.

Isn’t that lovely?  I think I’m probably going to hang onto this one.

What do you think?  Which item would have been your find of the day?  Leave a comment and let me know!

the biscuit box.

You might remember this simple wooden recipe box from one of my thrifting hauls in February.

There’s nothing particularly special about it.  I just really enjoy giving these small sorts of boxes a new look, so I tend to grab them when I see them (except apparently when I’m visiting my mom and don’t want to pack it in my suitcase, kind of regretting passing that one up now).

I gave it a light sanding with 220 grit, then I cleaned it and followed that up with two coats of Dixie Belle’s Sawmill Gravy.  Once the paint was dry, I sanded the edges to distress them a bit and then wiped away the dust.

Then came the fun part, pulling out all of my transfers and deciding what to use on this box.

Originally I was going to go with something more colorful, but I ended up picking out a subdued floral from I.O.D.’s Brocante transfer to begin with.

But before I applied that floral to the left side of the box, I filled in the other half of the front of the box with some wording from re.design with prima’s Paris Valley transfer and then layered the floral over it.

The Brocante floral went up and over to the top of the box.

Then I filled in the opposite corner with some of I.O.D.’s Floral Anthology transfer.

The transfers from the top and front of the box wrapped around to the sides a bit.

And I added a bit more to one of the sides using transfer scraps I had on hand.

Once again I didn’t bother to paint the interior this time around because it was in great condition.  I did line the box with some scrapbook paper though.

This size box is perfect for storing a pile of old black and white photos.

If you happen to have some that you need to protect from the elements a bit.

II think the box itself has that old sepia/black and white sort of look, with just a touch of hand-tinting on the top, don’t you?

By the way, here’s a follow up on the bleed-thru boxes that I shared back in early February.

The majority of you suggested that I go ahead and try to sell them ‘as is’, so I did.  I’m happy to report that they both sold.

I do want to be careful to note here that I wouldn’t recommend trying to sell furniture with bleed-thru though.  If you have stains or wood tannins bleeding through your paint on furniture, you should that Dixie Belle B.O.S.S. out and seal your piece and then paint it again.

Also, as I noted in that post, it was the final clear flat coat that drew those wood tannins through the paint.  So this time around I opted to topcoat the biscuit box with clear wax, although I don’t think this box would have been a bleeder anyway.  Still, better safe than sorry, right?

In the meantime, how do you like the biscuit box?  I plan to take this one into the shop, unless one of you locals wants to snatch it up first.  If so, be sure to check out my ‘available for local sale‘ page for more details.

Thank you to Dixie Belle Paint Co for supplying the paint used for this project.

the fresh flower market case.

Sometime last summer I came across this wooden case at a garage sale.

I have to admit, I walked away from it at first thinking it was too big and cumbersome, and it felt a bit too utilitarian for my tastes.  But then I realized that of course I could change that last part with some paint, and maybe a stencil or some transfers.  So I went back and grabbed it.

Here’s what the inside looked like initially.

The whole thing looks very much homemade.  I do wonder what it was made for, a ventriloquist’s dummy?  an accordion?  a secret stash of gold bouillon?  Hopefully it wasn’t anything creepy, like that time I accidentally bought an embalming table at an auction.  It’s made out of solid wood, so it is rather heavy for toting things around.  Any of you have any ideas about its original purpose?

After scuff sanding and cleaning the case inside and out, I painted the inside in Dixie Belle’s Collard Greens, and the outside in their Drop Cloth.  Next I added some sections from the I.O.D. Wall Flower transfer to the inside lid.

I think the florals in this transfer have that look of old 1940’s wallpaper.

I also added some pieces of the Wall Flower transfer to the front of the case, and then I pulled out a new stencil from Wallcutz called Fresh Flower Market.

I couldn’t quite fit the entire thing on my case, so I masked off those trim lines around the outside as well as the bottom line of wording using painters tape.  I then stenciled the word “MARKET” in Dixie Belle’s Collard Greens, and the rest of the wording in their Holy Guacamole.

I used a small artist’s brush to fill in the bridges on my stencil, and I think that really made the cursive font of ‘fresh flower’ work better.

For a final little touch, I added one of the bees from the I.O.D. Brocante transfer near the handle of the case.

You can’t have a flower market without bees, right?

With it’s fresh new interior, this wooden case could be used to store all kinds of things.  Maybe your spare linens, or your heavy winter sweaters?  Or even your ventriloquist’s dummy.

Or, you could just simply use it as décor.

It would be sweet just hanging out in your foyer, or on a protected porch.  It would also be perfect in your potting shed …

assuming you can get to it.

Earlier this year when I was planning for this project, I thought I’d be able to photograph the finished case out in the potting shed.  But then we got a lot of snow, and then we got a lot more snow, and then earlier this week we got another 7″ more.  I basically can’t get to the potting shed at this point.

Well … I could if I was willing to trudge through a couple feet of snow, and then shovel away the giant pile that fell off the roof and is now blocking the door.  But I’m not.

This was a bit of a tactical error on my part since most of my garden themed photo props are out there too.  I sure do hope spring is just around the corner.

In the meantime … an indoor photo shoot it is.

What do you think?  What would you use this case for?

The fresh flower market case is for sale, check out my ‘available for local sale‘ page for more details.

Thank you to Dixie Belle Paint Co for providing the paint, and to Wallcutz for providing the stencil used for this project and sponsoring this blog post.