
When I saw I.O.D.’s spring release, I looked at the two new transfer offerings and thought ‘nope, not for me.’ I’m just not a fan of bugs, fish, mushrooms or monkeys. I was so disappointed.
I was really hoping for new typography transfers that would work well on my toolbox makeovers.
Unfortunately, the designs that would have been perfect for toolboxes were offered as the Melange paint inlay rather than as a transfer. I so very much would have preferred those designs as a transfer. Why? Because I do a lot of layering on those toolboxes, like you see on this one …

I can’t think how you would layer the paint inlays in a similar fashion since you have to apply each one into a fresh coat of paint. I know, I know, I could apply the first inlay into paint, and then layer another over it by applying it into a top clear coat on top of the first inlay, but doesn’t that sound putzy and time consuming?! I also could apply a paint inlay as the bottom layer of a design and then layer a transfer over it, like I did on this tackle box where I layered wording from the Label Ephemera transfer over the Rose Chintz paint inlay.

But transfers are so much easier to layer! If any of you know of a better method for layering paint inlays, please leave a comment and clue me in.
Anyway, initially I wasn’t going to purchase anything from the new release.
But then I saw the Summer Villa paint inlay. And I had to have it. I really tried to talk myself out of it. After all, these dang paint inlays are rather pricey (it was $46) and I was fairly sure I’d only get one use out of this one. As I mentioned last Friday, I’ve had mixed results with trying to use the inlays more than once.
Still, I couldn’t resist, so I ordered it.
You know, sometimes you just have to splurge. I have to admit, I spent more on a pedicure last week than on the paint inlay, and in the end I’d rather have the inlay (although my toes do look pretty good).
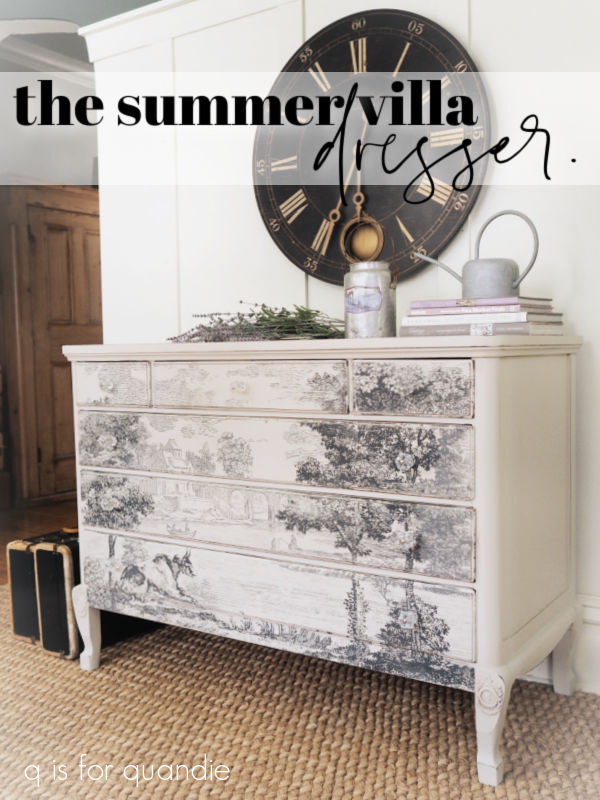
After ordering the paint inlay, I needed to find a piece of furniture to put it on. I checked the measurements, and then started hunting on Facebook Marketplace and Craigslist. I ended up finding this dresser on Craigslist.

It presented the perfect canvas for the Summer Villa paint inlay, the front of this dresser is just slightly smaller than the inlay.
This was an almost perfect Craigslist transaction too. The seller responded to my inquiries right away, we set up a time for the pickup in the afternoon on the same day, and when we got to his house the dresser was at the curb and ready to be loaded. Best of all, we didn’t have to navigate another icy Minneapolis alley.
I say ‘almost perfect’ because there was a bit of a bait and switch problem with the damaged legs.

Not only were the curved feet missing, but the curved bits further up the leg were also missing. Somehow I wasn’t aware of that before I got there, and it seems like a detail I would have noticed. In fact, I went back later and pulled up the photo from the ad …

As you can see, those curved bits further up the legs were still intact in that photo.
I did ask the seller if he had the pieces that fell off, and he did not. But you know what? I bought it anyway. We were already there, the dresser was ready to go, and the price was right at just $40 (yes, the piece of furniture was less than the inlay … and the pedicure, come to think of it). I was fairly confident that Ken and I could figure out a way to deal with those legs.
After I got the piece home, I had Ken come over for a consultation. We ended up deciding to remove the curvy trim board from the bottom of the dresser and replace it with a straight board that was flush with the flat fronts of those legs. That made it far less obvious that there was a curved bit missing.

Then, in an attempt to make those flat legs looks more intentional, I added some molded medallions.
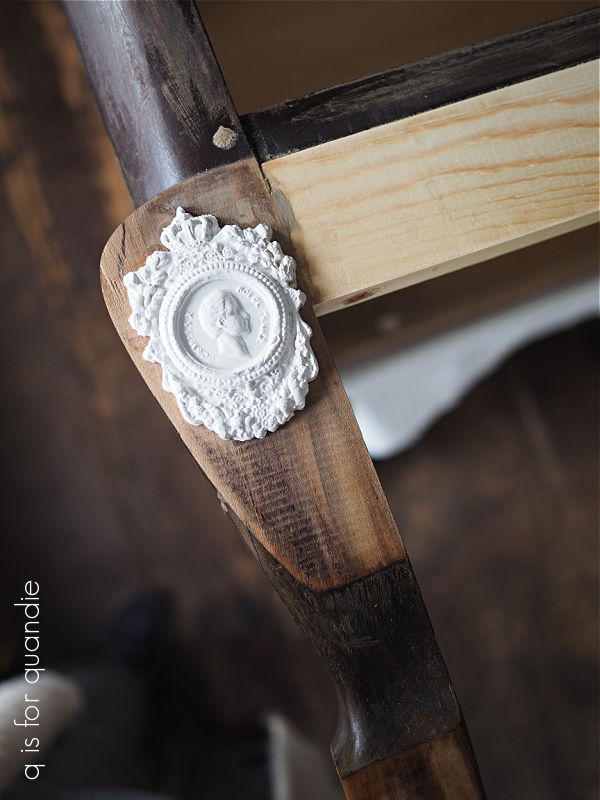
I made these using I.O.D. paper clay and the Ancient Findings mold from re.design with prima. I glued them in place with regular wood glue.
After doing some other small repairs like gluing veneer and such, I scuff sanded the piece with 220 grit paper and then cleaned it. Next I began painting with a coat of Dixie Belle’s clear B.O.S.S. This dresser absolutely had the look of a bleeder with that dark reddish stain. Better safe than sorry. As I was applying the B.O.S.S. to the sides of the dresser, I noticed that my brush was picking up some orange coloration (that happens sometimes with severe bleeders), so for a little extra insurance I gave those sides a 2nd coat of B.O.S.S.
I also then painted that fresh new board and those medallions with a coat of Dixie Belle’s Coffee Bean. I did that so that there would be a uniformly dark undercoat.
After waiting 24 hours (if you read the fine print, the B.O.S.S. should be allowed to dry for 24 hours to reach full efficacy in blocking stains), the next step was adding two coats of Dixie Belle’s Sawmill Gravy.

I debated between Drop Cloth and Sawmill Gravy, but ultimately decided that the Sawmill, with its slightly gray undertone, would be perfect with the paint inlay’s shades of gray.
The paint went on quickly and beautifully over the B.O.S.S. and only took two coats for full coverage, which isn’t always the case when painting white over a very dark color. That’s another benefit to using the B.O.S.S.
Now it was time for the inlay. After trimming the edges off each carrier sheet, I laid out the full design on my baby grand piano (yet another great use for it!). I then measured the width of the front of the dresser and cut down the sides of the inlay to fit (I took off about 1.5″ from each side). I then held the inlay sheets up to my dresser to make sure that key areas such as the cow’s head and the people in the boat didn’t fall on a line between the drawers. I then adjusted up or down accordingly before trimming about 6″ off the top and another 1″ off the bottom. Fortunately there was a lot of sky at the top of this design, so it still looks OK with that much trimmed off.

This inlay comes on 8 separate sheets. When applying a big overall design like this, whether it’s a paint inlay or a large transfer, I find it best to start at the middle and then work my way out to either side, and that’s what I did here. Also, after applying the first row of sheets, I realized that it would be far easier if I trimmed my sheets down to the height of the drawer fronts and then did each drawer separately. So I did that from there on out.

You can find full instructions on applying an I.O.D. paint inlay in this post.
After letting the applied paint inlay dry, and then removing the carrier sheets and letting the drawers dry thoroughly, I sealed the inlay with some RustOleum clear matte spray sealer.
Next up I sanded the edges of my piece to distress them, then gave everything a final topcoat with clear wax. I also added just a bit of dark wax to the medallions to give them a little more depth.

Talk about getting a pedicure, don’t those legs and feet look so much better!
I freshened up the insides of the drawers by sanding them lightly, cleaning them well and then adding a coat of Dixie Belle’s Big Mama’s Butta in the Orange Grove scent.

I opted to replace the original wood knobs on this piece with some glass knobs from D. Lawless Hardware that I already had on hand. I knew they would come in handy some day!

I felt like the glass knobs would be a bit more in keeping with the formality of the transfer design than a painted wooden knob, while also sort of disappearing into the background.
I really wish I had a dark grey wall to photograph this piece against, I think it would be stunning against a darker wall color. I keep looking around my house trying to find a way to make that happen, but I have absolutely no spare wall space that I could paint dark gray for photo staging (maybe it’s time to reconsider that photo cottage?).
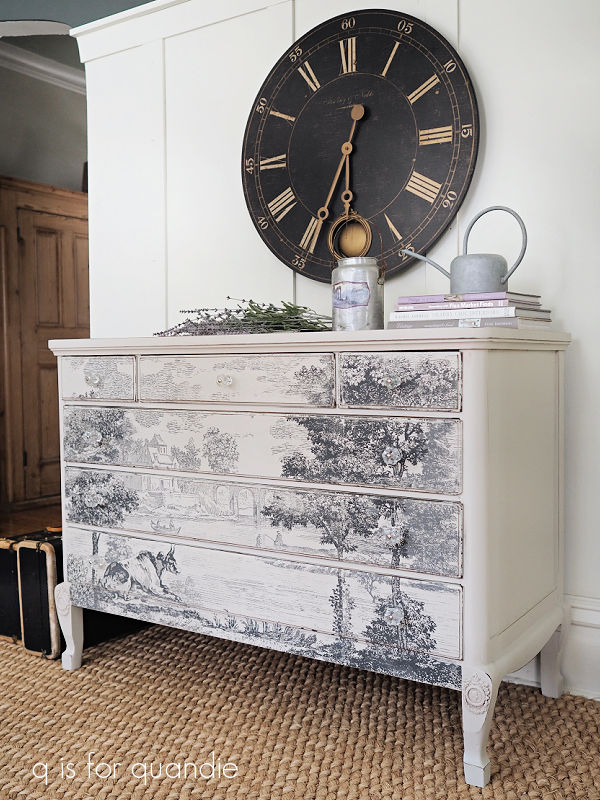
So we’ll just have to make do with photographing it on a white wall.
So, about the Summer Villa paint inlay, I feel like this is a ‘one and done’ sort of item (unlike the I.O.D. Label Ephemera transfer that I’ve purchased at least a dozen times!). It is stunning, but it’s not terribly versatile. Although it can be trimmed down a bit, you still need a fairly specifically sized piece to put it on. You can’t really rearrange the design at all, although I suppose you could split it down the middle and use half on one piece and half on another (that could be pretty fab on a pair of nightstands, for example).
Still, I loved using the Summer Villa inlay to create this particular piece of furniture. It turned out exactly how I pictured it.

Hopefully someone else out there will fall in love with it too, because this piece is for sale locally (see my ‘available for local sale‘ page for the details).
What do you think of this makeover? Leave a comment and let me know.
Thank you to Dixie Belle Paint Co for providing the B.O.S.S., Big Mama’s Butta and the Sawmill Gravy paint used in this makeover.

As always, an amazing transformation. Such a smart adjustment/fix and the finished piece is a beauty. I would add though a monkey on a tool box would imply that it held…….. MONKEY WRENCHES!!!
LikeLike
LOL, well, that’s a good point Neal. Although I have to say, I don’t think many of my toolboxes end up with monkey wrenches in them 😉
LikeLike
I absolutely LOVE this piece Linda! You continue to amaze me 😊
LikeLike
Thanks Monique! If I can’t sell it here first, it may end up in the shop one of these days 😉
LikeLike
Love the dresser. What is the location of the shop for some of your local sale pieces? Thanks. Rhonda Spence
LikeLike
It is Reclaiming Beautiful in Stillwater, MN. Here’s a link to their Facebook page with all of the details.
LikeLike
Wow, lots to unpack. No question that a project like this one, which started out with somewhat of a major issue, needed to be in the hands of an experienced craft master. Everything, from knowing how to prevent the bleed to positioning the inlay, depended on your skill and experience. Typically I don’t care for clear knobs but they were perfect for this piece. So all I can say is Well Done, it is just lovely.
LikeLike
Thank you so much Jan!
LikeLike
The dresser turned out beautiful! The transformation is stunning. I really like the look of the bottom of the dresser and the legs. I think that it looks better than the curved bottom. Well done 😊
LikeLike
That’s an awesome compliment, that my repair looks better than the original, thanks so much Monica.
LikeLike
This is perfect! I absolutely love it and am embarrassed to admit that I am an IOD stockist and have not even used this inlay yet. I would have preferred it as a transfer myself.
LikeLike
Well, it is pretty new … and you also really need to have the perfect piece to put it on. I just got lucky finding this dresser so quickly. All of that being said, I agree with you, I would have preferred both this one and the Melange as transfers!
LikeLike
WOW what a stunning transformation! Thanks as always for the inspiration.
LikeLike
You’re welcome Laura!
LikeLike
Wow! Fantastic make over! Always so interesting to read about your process.
LikeLike
Thanks Cheryl 🙂
LikeLike
Oh wow this is a stunner! Such a perfect piece for the inlay. It looks like a painting. Just the dark clock behind is enough to see how the contrast would be great against a dark background.
LikeLike
It really does look like it could have been hand-painted … by someone much more talented than me 😉
LikeLike
I think you made this piece look incredible. I agree with you about I.O.D.’s spring release. I’m not a fan of the transfers and was disappointed as well. And since I haven’t worked with inlays before, I didn’t want to pay the high price for something I’d only use once. But you nailed this! It looks amazing.
LikeLike
I hear you on that Michelle. If you do smaller projects, I think the Rose Chintz paint inlay can really be worth the investment since you’ll be able to use it on a lot of different smaller items. But for larger designs on furniture … well … I do think this one was worth the price for a one time special piece, but I highly doubt I’ll ever do another piece with this particular paint inlay.
LikeLike
Beautiful as always! I was wondering if you could maybe get a king size flat sheet in a dark gray color and fold it in half (to keep the light from filtering in) and tack it up on your wall where you do your photos? Would be fairly cheap and easy to put up/take down … if you look for clearances, etc, maybe at TJMaxx or even WalMart? Great job with the legs and medallion too – very ingenious…
LikeLike
To me, this is one of the prettiest pieces you have done. The black and white combo isn’t usually one I enthuse about but this is spectacular – I would use it in an entry/foyer.
Sheila
LikeLiked by 1 person
Thanks so much Sheila! I agree, this one would be perfect in a foyer 🙂
LikeLike
The dresser is beautiful.
LikeLike
Thanks so much!
LikeLike
Turned out fantastic! I thought I had patience, but I think you exceeded me on this one – beautiful!
LikeLike
Well, this one did take a bit of work, but it was worth it in the end 🙂
LikeLike
It turned out great. Love the scene.
LikeLike
Thank you!
LikeLike
This looks awesome! It was about the only new art from IOD that appealed to me, as well. It was a relief to hear someone else say that the new IOD release was disappointing 😟
The legs on this piece look fantastic 😊
elle
LikeLike
I was so hoping they’d come out with some sort of typography transfer that I would love, but no such luck. I’m sure there must be people out there who enjoy the bugs, fish, mushrooms and monkeys, but I’m just not one of them.
LikeLike
I really like the way this turned out! Beautiful!
LikeLike
Thanks so much Laura!
LikeLike
Hi
You got me at pedicure. The local beauty schools do them for a great price here and they do a nice job. If you have some near by, might be a way to save for those inlays 😉.
LikeLike
Great tip Mary, I’ll have to keep that in mind!
LikeLike
Another fabulously creative insightful piece!
LikeLike
Thanks Kim 🙂
LikeLike
Absolutely outstanding!
LikeLike
Thanks Valerie 🙂
LikeLike
Just perfect! I hope it sells quickly. I don’t know how you sell your creations. I would want to keep them all.
LikeLike
Well, we have a pretty small house, so it makes it impossible to keep it all 😉
LikeLike
Did it sell?
LikeLike
Yes, rather quickly too!
LikeLiked by 1 person
I’m not surprised. I love the piece and all the choices you made to give it a new life!
LikeLike
Thanks so much!
LikeLike