

You may remember that back in my library book review post, after seeing all of the gold leafing in Amy Howard’s book Rescue, Restore, Redecorate, I mentioned that there was a new product coming out from Dixie Belle that is similar to gold leafing.

Well, I went ahead and ordered some of the silver and some of the gold so that I could try this out.
To use this product you’ll need the Stick with Me Dixie Shine Glue, and one of the metallic foils that go with it. Dixie Belle also recommends that you use their Finishing Pad to burnish the foil, but I simply used a microfiber cloth as I’ll explain in a minute.
I thought that those metal ceiling tin art pieces that I found while thrifting would make good guinea pigs for this process.

I had never used this product before, but I had a sneaking suspicion that I might need to have an undercoat color that I wouldn’t mind seeing through the gold here and there.
So my first step was to paint the ceiling tins in Dixie Belle’s Midnight Sky. Then, I also painted over the stone tiles in the middle with their Drop Cloth. I should note here that painting your surface first is not required, I did it for aesthetic reasons.

The following day I taped off the ceramic tile (center area), and then applied the Stick with Me glue to the metal ceiling tin (the black area) with a small brush.

I want to warn you guys that this stuff is super duper sticky. And anything you get it on will also become super sticky. For that reason I put some paper towels under my project so that I could just throw them away at the end. I didn’t want this sticky stuff getting on the painting drop cloth that I use all the time.
Now you are supposed to wait about 15 minutes for the glue to dry and become transparent (naturally I jumped the gun a bit, but more on that in a minute).
Next up, cut strips of the foil to size and apply them to your surface shiny side up.

It’s OK if they overlap a bit.
Next you want to burnish (ie. rub with some pressure) the foil onto your surface. As I mentioned earlier, Dixie Belle recommends using their Finishing Pad, but I simply used a microfiber cloth and that worked perfectly well too. It does take a little bit of effort to make sure that you’ve rubbed firmly over the entire surface. But once you think you’ve got it, you pull away the the backing paper and the gold foil is left behind.
Now, as I mentioned, I did not quite wait long enough on my first strip and as a result I didn’t get the greatest adherence.

I did better on the rest of the frame though.
It was easy enough to remedy that first side by applying more Stick with Me, giving it the full 15 minutes to set up and then applying more foil.
Also, as I suspected would be the case, I did not get 100% coverage over my very lumpy tin ceiling tile frame. I was glad I had that black in the background. That being said, you can also go back and press some of your remaining bits of gold foil into those spot to fill them in.

Also, as you can see, I got much better coverage on the smooth, straight areas. Just something to keep in mind when using this product.
I have to say that the resulting shiny gold was a bit bright for my taste.

You know I don’t like a lot of shine. So I decided to experiment with ways to tone it down a tad. I started by ‘glazing’ over it using DIY’s Dark & Decrepit. I brushed it on, then wiped it back with a rag. Once that dried, I also went over the frames with some dark wax.

That worked beautifully and gave me the more aged looking patina that I prefer.
I filled the center tiles using bits from a couple of different transfers.

The stuff in shades of grey is from Dixie Belle’s Vintage Post transfer, and the colored florals are from the I.O.D. Floral Anthology transfer.
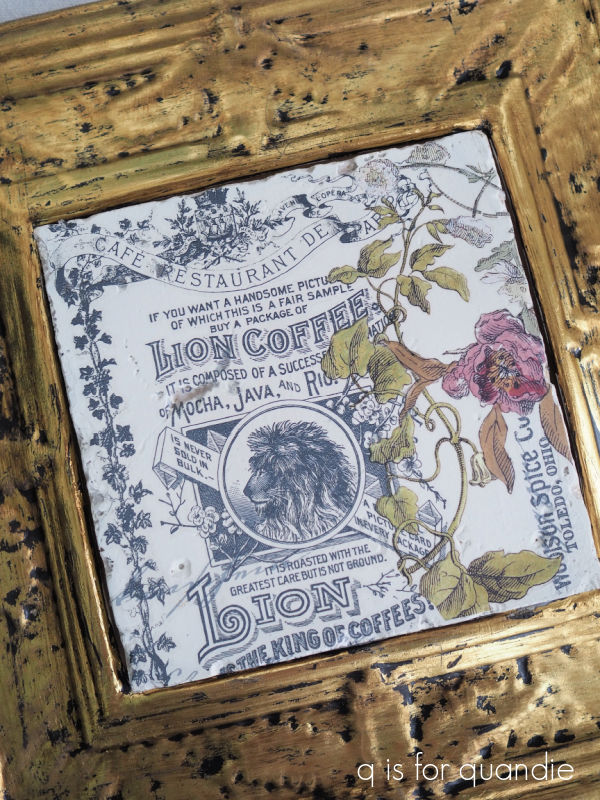
These tiles look amazing against the dark grey walls in my living room in their new coats of gold.

The Dixie Shine is not quite the same as gold leaf. The foil is not nearly as fragile as gold leafing and you don’t end up with flakes of gold everywhere after applying it. The end result is quite shiny, but if (like me) you don’t like quite so much shine, you can easily remedy that with a dark glaze or wax.
I’m adding this post to my ‘how to‘ page, so you can easily find it there if you ever need to come back for a reminder on how to use Dixie Shine.

I’m also going to give one of you the chance to try the Dixie Shine.

I’ll be drawing one name at random to receive the Stick with Me glue, plus the gold and silver Dixie Shine foil.
The rules for today’s giveaway: Simply leave a comment on this blog post (and please forgive me if I don’t respond to every one, but know that I read and appreciate all of them).
Your comment must be left on this blog post, not on Facebook or Instagram. You are not required to follow my blog, or follow my Facebook or Instagram accounts, although it would be awesome if you did!
I will randomly draw the name of a winner for today’s prize from all of the comments left on this post by Sunday, March 26, 2023 at the stroke of midnight (U.S. Central time).
The fine print: no purchase necessary, you must be 18 years of age or older to win, void where prohibited by law, the number of eligible entries received determines the odds of winning, approximate retail value of prize is $55, if the prize is not claimed by Friday, March 31, 2023 another name will be drawn at random to win, blah, blah, blah.
Thank you to Dixie Belle Paint Co for providing their products that I’m giving away today.

Very cool! Would love to give it a try. How do you think it could work on raised parts of furniture? Would it need to be sealed?
LikeLike
I think it would be perfect for highlighting the raised parts of furniture. I don’t believe it has to be sealed, however, I can’t speak to how well it would hold up on an area that gets handled frequently (like on knobs or drawer pulls). I may have to experiment with that a bit myself, and if so I’ll keep you posted.
LikeLike
I think that the frames turned out fabulous. I’m with you. I prefer the glazed and waxed one. I have used DIY Dark and Decrepit on other things. Thank you for your continued review of new products. 😊
LikeLike
You’re welcome Monica!
LikeLike
They look amazing, truly old. Thanks for sharing.
LikeLike
I love the look you created! I’m not much for the bright shiny gold look either, but your toned down method looks great. Thanks for sharing!
LikeLike
Thanks for experimenting for us. I’ve used traditional gold leaf and it’s so messy! Little bits of the foil flying all over the place. I’d love to try Dixie Belle’s new product.
LikeLike
Looks interesting – thanks for the chance to try a new product. PS working through the books I could get from the library review!
LikeLiked by 1 person
Linda, This is an interesting concept. I enjoyed your instruction blog about the application process. I agree, it sure was shiny!
LikeLike
Your instructions are very clear, I like when you include what didn’t work as well as what worked.
LikeLike
Ooo! That turned out nice. Would love to see a project done with the silver color!
LikeLike
It looks fantastic. I like your idea of using the wax. Might try it out on an old chandelier I have. Love your blog!!
LikeLike
These look awesome. Thanks for sharing your process.
LikeLike
I sure do appreciate you experimenting for us, live everything you do and look forward to your blog posts, thanks😊
LikeLike
Wow! Once you added the glaze and wax the gold was really pretty. But I really love how you layered your transfers!
LikeLike
I like a little bling every now and then.
LikeLike
So do you see yourself using this on things you keep? Just curious if it is something you like the look of or just an experiment. I like to rehab old gold broken, missing-parts plaster frames and think it might work well. I tone down the gold leaf/paint with oil paint mixed to match the rest of the frame. It’s usually a mix of green, brown and black to get it the same as the sooty areas. It was be interesting to try this and see how it works and looks over time
LikeLike
Lovely tutorial! I love learning about new products and techniques.
LikeLike
I like that Dixie Belle has come out with this new product. They continue to make their line new and exciting. Thank you for showing us how to use it properly. Personally, it’s not my favorite but there are definitely times when a piece is screaming for some shine!
LikeLike
These look lovely! I hear you on the ‘too shiny gold’ thing. I absolutely adore the dark wax. As always, you’ve outdone yourself ❤️
LikeLike
Very, very lovely!
LikeLike
That is an interesting process. I’m thinking about how I would use it? HUMMMM!
The frames look great!
Smiles, alice
LikeLike
Doing gold leaf on surfaces is so hard! Yours turned out really beautiful!
LikeLike
As you progressed through the process the voice in my head kept saying, TOO SHINY, TOO SHINY! But! Then you performed the shiny exorcism and I sighed in relief! Very cool against your dark walls!
Always something new with you, lady!! Thanks!!
LikeLike
Interesting product, thank you for sharing your process Linda!
LikeLike
I really like how these tiles came out. I’ve used gold leaf before so it would be interesting to see how this product compares. Love your blog!!!
LikeLike
Interesting! I too would tone it down and make it look more aged. I have not heard of Dark and Decrepit – will have to check that out!
LikeLike
One can never have too much gold ⚜️
LikeLike
Thank you for the detailed instructions; it’s so helpful to see a new product in use, a vicarious trying-out, so to speak. The combination of gold leaf, dark wax and transfers is stunning! I draw lots of inspiration from you.
LikeLike