oh deer.

Congrats to Laura Hopwood, the winner of the day no. 2 prize.  I’ll be drawing a name for the winner of the day no. 3 prize tomorrow (is this getting confusing for you guys too?  I’m doing my best to keep track of it all), if you haven’t commented on that post you have until midnight tonight!

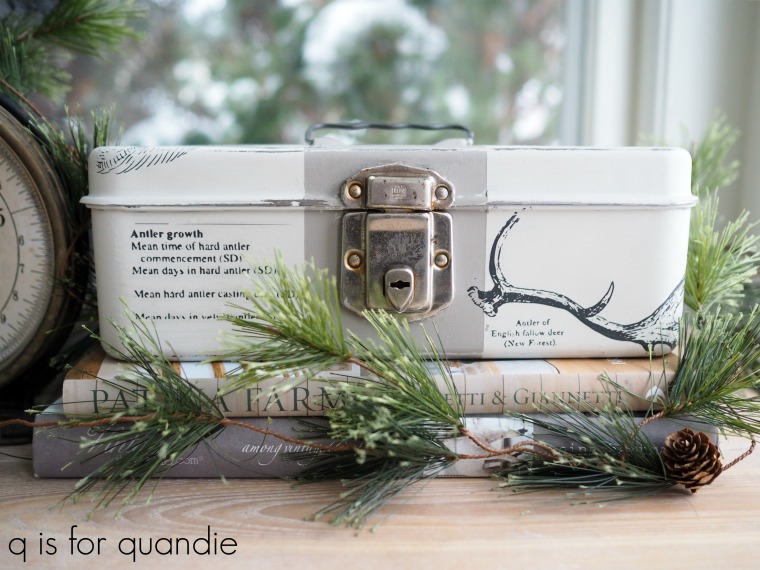
In the meantime, today is day 4 of my 12 days of giveaways, and I’m first sharing the transformation of this adorable (if I do say so myself) metal toolbox.

This toolbox started out looking like this …

My picker, Sue, found this for me.  She always grabs metal toolboxes when she sees them.  She knows I love to give these a new life with some paint.

To begin with I washed the toolbox using Dawn dish washing soap to cut any grease that might have been left behind by the former owner.  Next I added a coat of Miss Mustard Seed’s Tough Coat Sealer to prevent the rust from coming through my paint.

Today’s q tip:  Keep in mind that the Tough Coat Sealer does not block stain from bleeding thru (try the Dixie Belle BOSS for that), but I have found that it works well as a protective coat over rust.  It also works well as a top coat for a rusty piece when you want to retain the rusty look.

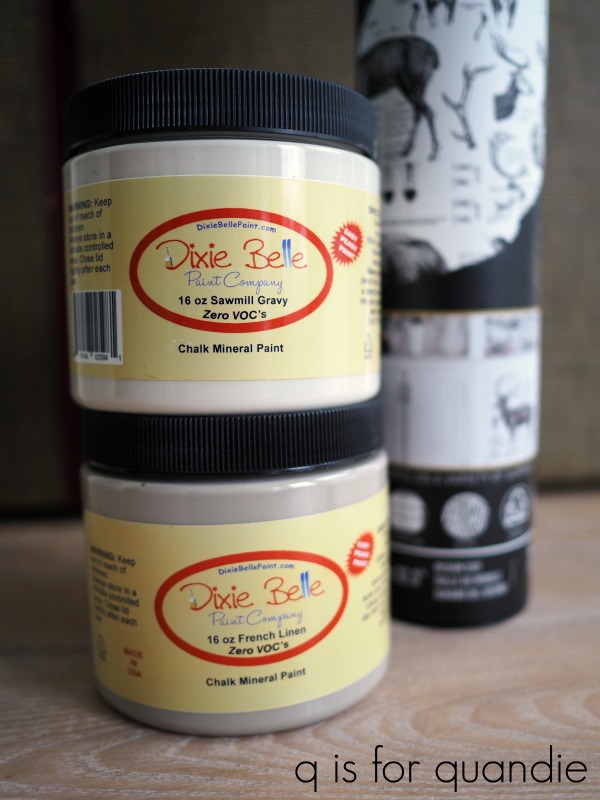
Next I pulled out a couple of new Dixie Belle paint colors, Sawmill Gravy and French Linen.  I can tell you now, both of these colors will be making their way onto my list of favorite neutrals.

I first painted the entire toolbox in two coats of the Sawmill Gravy.  Once dry, I taped off a wide stripe down the middle and painted it in the French Linen.  After that dried, I sanded the box lightly and then added a few sections from re.design with Prima’s Deer transfer.

I have to say, I totally underestimated the cuteness factor of this transfer!  When I first saw it I thought it was only going to be good for some sort of man-cave or hunting shack item.  But then I looked a little closer and realized it had a reindeer on it.

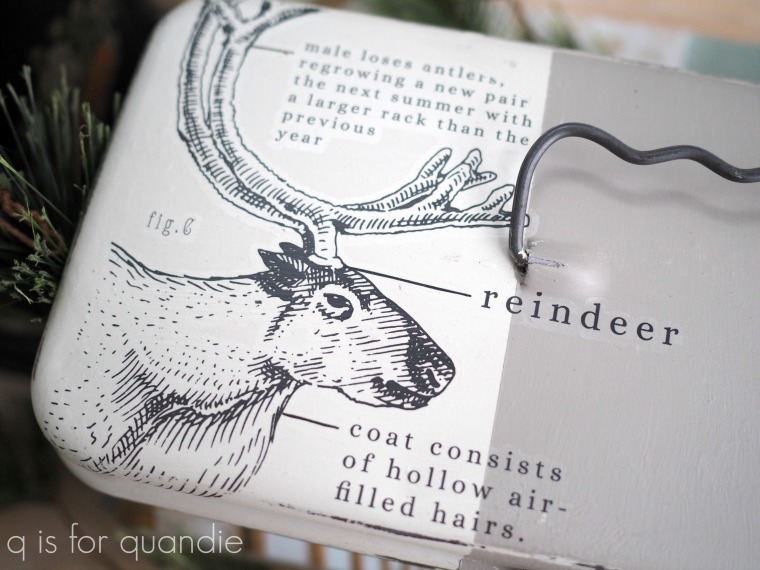
Seriously!  How cute is that?

If you have a few men in your life and you are looking for something that’s not feminine and flowery, be sure to check out the Deer transfer.  And if you really do need to dress something up for the hunting shack, this transfer would still be perfect for that too 😉

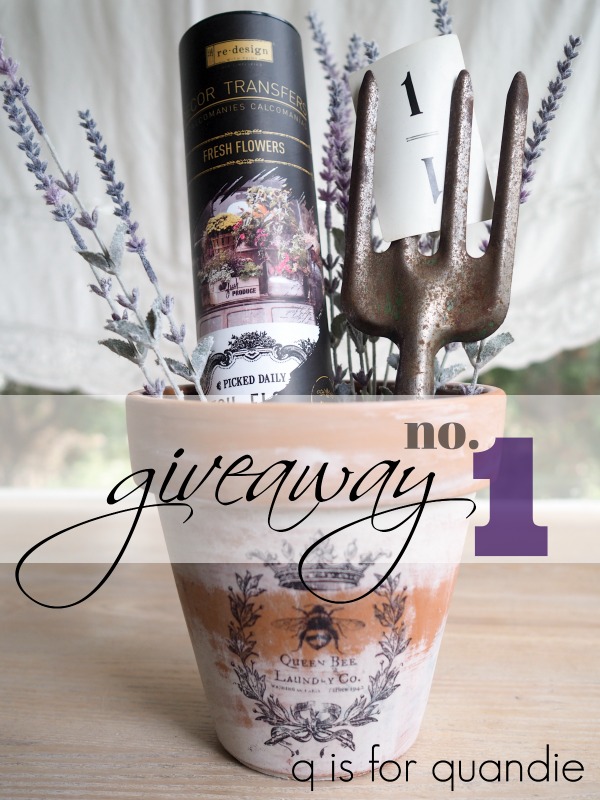
Now, for today’s giveaway.  I wish I had a spare Deer transfer, but unfortunately I don’t.  I do, however, have some Sawmill Gravy and French Linen to give away.  I also thought, why not give them away along with the toolbox itself?  They fit perfectly inside.

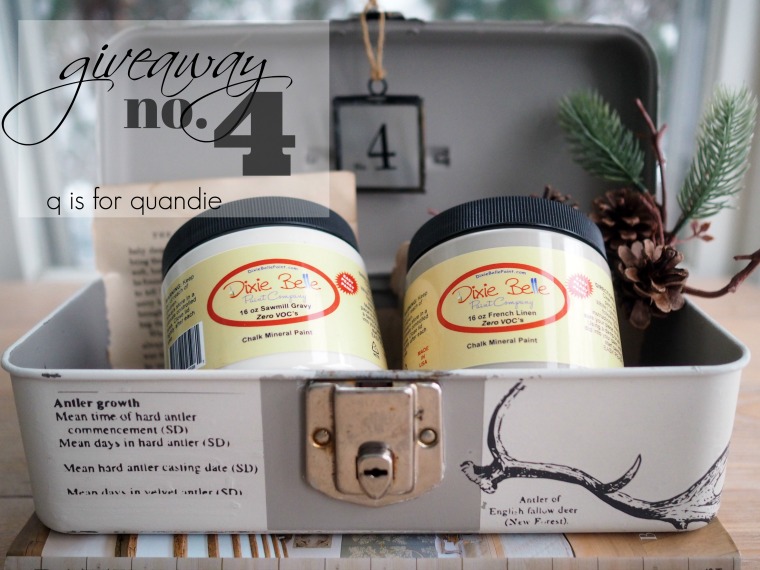
Thank you to Dixie Belle Paint Co for sponsoring this giveaway by providing the paint, and to Prima Marketing for providing the Deer transfer that I used on the tool box.

The rules:  to be eligible to win today’s prize leave a comment on this blog post.  If you can’t think of anything to say, just tell me what you would keep in this toolbox.  Your comment must be left on the blog, not on Facebook or Instagram.  You are not required to follow my blog, although it would be awesome if you did!

I will randomly draw the name of a winner for today’s prize from all of the comments left on this post by Friday, December 6, 2019 at the stroke of midnight (U.S. Central time).

The fine print: no purchase necessary, you must be 18 years of age or older to win, void where prohibited by law, the number of eligible entries received determines the odds of winning, approximate retail value of prize is $65, if the prize is not claimed by Sunday, December 8, another name will be drawn at random to win, blah, blah, blah.

Good luck!

me and Switzerland.

It’s day 3 of my 12 days of giveaways, and today I’m giving away a couple of my favorite shades of Dixie Belle Paint.  But first, congrats to Susan Williams who won the day 1 prize.  Last night at midnight was the cut off to be eligible for the day 2 prize so I haven’t drawn that name yet but I’ll get on it this morning.

I go through two Dixie Belle colors like there’s no tomorrow.  I have to say that, like Switzerland, I tend to stay neutral.  Partially because I find that neutral shades sell really well for me, but also simply because personally I currently prefer them in my own home too.

Drop Cloth is probably the color I use most often these days.

Drop Cloth is a warm, creamy white with a slightly greige undertone.  It’s not a yellow-ish cream, and it’s definitely not a bright white.

It’s my white of choice because I feel like you can bring this color into any room and it will play well with your other shades of white.  It won’t make any of them look dingy, although it may make some of your brighter whites look brighter.

My 2nd favorite neutral Dixie Belle color is Midnight Sky.  I originally favored their Caviar, and I do still love that color, but as I’ve been living with both of these shades of black I’ve realized that I prefer the Midnight Sky.  It’s just a hair lighter and leans more towards a deep, dark charcoal.

Because this color is slightly … well, for lack of a better description … less black than the Caviar I think it tends to be more forgiving when it comes to dust or smudges.

I used this color on my piano and quite honestly, I rarely dust.  So I need a dark color that is more forgiving 😉

The brush that I tend to reach for the most these days when using the Dixie Belle paint is their Flat Medium Synthetic brush.  It holds a nice amount of paint and I find that the shape of the handle makes it really comfortable to hold in my hand.  It’s also the perfect size to fit into even the smallest Dixie Belle paint jar without catching on the lip.  I know you aren’t supposed to paint straight out of the jar, but I do it all the time (maybe you guys should do as I say, not as I do on this one).  It may be my imagination, but somehow this brush also seems easier to clean that my Purdy brushes.  I have no idea why that would be, maybe the type of bristle?

Anyway, today’s giveaway is for all of you fellow neutral lovers out there.  It includes a 16 oz. jar of Drop Cloth, a 16 oz. jar of Midnight Sky and the Flat Medium Synthetic Brush.

Thank you to Dixie Belle Paint Co for sponsoring this giveaway by providing these products.

The rules:  to be eligible to win today’s prize leave a comment on this blog post.  If you can’t think of anything to say, just tell me whether you’re a fellow lover of neutrals or you prefer lots of color in your world.  Your comment must be left on the blog, not on Facebook or Instagram.  You are not required to follow my blog, although it would be awesome if you did!

I will randomly draw the name of a winner for today’s prize from all of the comments left on this post by Wednesday, December 4, 2019 at the stroke of midnight (U.S. Central time).

The fine print: no purchase necessary, you must be 18 years of age or older to win, void where prohibited by law, the number of eligible entries received determines the odds of winning, approximate retail value of prize is $65, if the prize is not claimed by Sunday, December 8, another name will be drawn at random to win, blah, blah, blah.

Good luck!

problem solvers.

Welcome back for day 2 of my 12 days of giveaways!

Today I want to talk about problem solvers.  When you’ve been refurbishing furniture as long as I have (25+ years), you know that running into problems is a given.  It’s rare to find a piece of furniture that just needs a coat of paint slapped on and it’s good to go.  More often, it has other problems that need to be solved first.

Luckily I have some help in that area in the form of my neighbor/handyman and number 1 problem solver, Ken.

Ken is a fixer.  He gets great satisfaction out of finding creative ways to fix things.  One of his favorite fix-it successes was the Humpty Dumpty dresser.  It was named that for obvious reasons.  All of the king’s horses and all of the king’s men may not have been able to put it together again, but Ken did.

After taking a fall off of the horses (the saw horse kind, not the kind the king’s men had), the Humpty Dumpty dresser looked like this …

But after a few days in Ken’s workshop, it looked like this …

To this day Ken still talks about how much he enjoyed rebuilding this dresser.  Sometimes I’m tempted to look for more pieces that are totally falling apart just to give Ken a puzzle to work on.

Unfortunately, I couldn’t think of a way to give away a ‘Ken’ today, but I can give away a couple of great products that help me deal with smaller problems.  The first problem being the dreaded bleed thru.

It’s always such a bummer when you realize your piece has stain that bleeds thru paint.  No matter how many coats of paint you put over this stain, the stain will just keep coming through.  But there’s a great fix for that though, Dixie Belle’s BOSS.  The drawers shown above are a great example.  They had some serious bleed thru issues as you can see on the top drawer, but the lower drawer shows how beautifully the BOSS worked to block the stain.

Another problem I run into fairly often is when a piece of furniture is missing just one drawer pull.  I always joke about this because if a piece is missing just one, it might as well be missing them all, right?

This washstand is a good example.  It was missing just one drawer pull, and I would have had a difficult time finding an exact match as a replacement.

So instead, I filled the holes for the original drawer pulls and added centered knobs to the drawers rather than pulls.

My favorite product for filling holes is Dixie Belle’s Mud, and I apply it using their little plastic spatula.

Today’s giveaway consists of these two problem solvers; Dixie Belle’s BOSS and Mud.

Plus a chip brush and the plastic spatula that works great with the Mud.

Thank you to Dixie Belle Paint Co for sponsoring this giveaway by providing these products.

The rules:  to be eligible to win today’s prize leave a comment on this blog post.  If you can’t think of anything to say, just tell me what problem you run into most often while DIY’ing.  Your comment must be left on the blog, not on Facebook or Instagram.  You are not required to follow my blog, although it would be awesome if you did!

I will randomly draw the name of a winner for today’s prize from all of the comments left on this post by Sunday, December 1, 2019 at the stroke of midnight (U.S. Central time).

The fine print: no purchase necessary, you must be 18 years of age or older to win, void where prohibited by law, the number of eligible entries received determines the odds of winning, approximate retail value of prize is $40, if the prize is not claimed by Tuesday, December 3, another name will be drawn at random to win, blah, blah, blah.

Good luck!

12 days of giveaways.

Here in the U.S. tomorrow is Thanksgiving.  If any of you have been following me since the beginning you may remember that I started my blog on Thanksgiving weekend 2013.  So yep, that makes this my six year blogiversary!  Well, technically speaking, it was yesterday.  But close enough.

Quite honestly, I never thought I’d make it past five years.

I also never thought I’d make it past 25 followers.

While I haven’t ‘gone viral’ and I don’t seem to have made it into the inner circle of ‘cool kids’ (just like in high school), today I’m feeling incredibly grateful for all of the amazing things this blog has brought my way.  But I’m especially thankful for all of you.  Without you, there would be no q is for quandie.  So thank you for following, commenting, sharing and otherwise supporting my blog.

Now it’s time to celebrate with 12 days of giveaways!

Starting today and running every Monday, Wednesday & Friday until December 23, I’m going to post a giveaway here on the blog.  That’s four weeks of giveaways!!  Woo hoo!

So let’s get this ball rolling, shall we?

I know it’s a little like picking my favorite child, and we aren’t supposed to do that, but I have to confess that Re.design with Prima Marketing is one of my favorite sponsors.  I feel incredibly honored to be included on their Design Team.

I get so excited when they have a new release and they send me a box of stuff.  The latest box even literally arrived on my birthday, what a treat!  And I can’t share any of it with you today.  The official reveal date of this latest release is December 16, so I have to sit here, all alone, drooling over these new designs until then.

In the meantime, today I’m giving away their Fresh Flowers transfer.  Last summer I used half of the transfer on this drop leaf table.

Here is the full design.

I’m still hanging on to that upper portion waiting for just the right project to come along.  But the lower portion was perfect for the table.

And of course, I am giving away the entire transfer (not just my unused portion, that would be tacky, right?)

Just to add a little something more to this giveaway, I’m also including the Queen Bee clay pot that I used for staging that piece.

I painted the pot using Miss Mustard Seed milk paint, and then used Fusion Transfer Gel to add the graphic (check out this post for all of the details).  Not all of my pots turned out that day, but this one is my favorite of the bunch.

Thank you to Re.design with Prima Marketing for sponsoring this giveaway by providing the transfer.

The rules:  to be eligible to win today’s prize leave a comment on this blog post.  If you can’t think of anything to say, just tell me what your favorite fresh flower is.  Your comment must be left on the blog, not on Facebook or Instagram.  You are not required to follow my blog, although it would be awesome if you did!

I will randomly draw the name of a winner for today’s prize from all of the comments left on this post by Friday, November 29, 2019 at the stroke of midnight (U.S. Central time).

The fine print: no purchase necessary, you must be 18 years of age or older to win, void where prohibited by law, the number of eligible entries received determines the odds of winning, approximate retail value of prize is $40, if the prize is not claimed by Sunday, December 1, another name will be drawn at random to win, blah, blah, blah.

Good luck!

full service is our rule.

A while back one of my fellow Reclaiming Beautiful vendors stopped by and she happened to admire the yardstick shelves that I have in my living room.

After she left I realized that it had been a while since Ken and I teamed up to make these shelves.  So I dug through my stash out in the carriage house and I found six random yardsticks (I tend to grab them when I see them at garage sales).

I thought both the red one and the one with the green writing would be perfect for Christmas.  But the other ones needed a little something more, they didn’t have any color or that aged patina that I love so much.

So I decided to fake it with a little stain.

I just used an old t-shirt to wipe on a little Early American stain, and voila!  Aged patina.

Next I sent the yardsticks over to Ken to be added to some old bead boards to make shelves.  I shared all of the details on constructing these back in this post …

So be sure to go back and check that out if you want to make some for yourself.

Once the shelves were made up, I was trying to decide what sorts of things could go on the red shelf to give it a holiday look.  Santa and some green bottle brush trees give it a traditional look.

Then I remembered the really cool clock that my sister purchased at last year’s Holly Jolly Market.  I decided that I could replicate it using my Cricut machine, some red vinyl and one of my own vintage alarm clocks.

I want to reiterate that this clever idea is not my own.  I wish I had gotten the name of the vendor that my sister purchased her clock from so that I could give them credit, but I neglected to do that.

But I love the Christmas clock paired with the red yardstick shelf.  What a unique, vintage look for Christmas decor right?

Since I had the Cricut out, I decided to make up a 2nd clock to bring to Reclaiming Beautiful.

If you’re not so into red for Christmas, the plain yardstick shelves can also be dressed up for the holidays.

This monochromatic look is a little more ‘me’.  I purchased these little houses at my local Bachman’s store a couple of years ago.  They look great paired up with some bleached bottle brush trees.  I was hoping to add another to my non-collection (because I swear I don’t collect anything) this year, but when my sister and I stopped in there on Saturday all we could find were much bigger, more elaborate (and more expensive) ones.  So I guess I’ll just stick with the three that I already have.

I love the clever little sayings on some of the yardsticks like the “Full Service is our Rule” above.  These must have been fun customer giveaways back in the day.  And now they make unique shelves for displaying your non-collections!

I’m planning to head in to Reclaiming Beautiful this week with the clock, the shelves and a few more Christmas goodies that I threw together yesterday (unless our weather decides not to cooperate).  If any of you locals want to do some shopping over Thanksgiving weekend, please note that they are closed on Thursday but will be open 10 a.m. to 5 p.m. on Friday & Saturday, and Sunday from 1 p.m. to 5 p.m.

old school sign making.

Remember the foot board that I purchased at the St. Anthony Park sales last summer?

There it is peeking out from behind the little cupboard.

The sellers said they were using the headboard that matched this piece, but they had no use for the foot board.  I think I paid around $5 for it.  I’m sure when they put it out they wondered if anyone in their right mind would purchase a lone foot board.

My initial plan was to either add a shelf (like I did here) or turn it into a chalkboard (like I did here).  But if you’ve read my blog for very long you are probably beginning to realize that I rarely stick with my initial plan.

Instead I decided to turn it into a Christmas themed sign, adding hooks across the bottom for hanging stockings.

I started by painting the foot board in Dixie Belle’s Drop Cloth.  Next I had to go back to my sign making roots.  I dug out my alphabet stencils to use as a guide, but rather than stenciling each letter I just traced them with pencil …

then went back and painted them in by hand.

I have been totally spoiled with the larger scale furniture transfers from Prima Marketing.  Those are so easy to apply and usually go on pretty quickly.  Hand painting letters is a bit trickier, and I’m never fully satisfied with my work.

But I reminded myself that a rustic, hand painted look was what I was going for so it didn’t have to be perfect.

Once I had the lettering painted I decided to fill in the rest of the space with some sections from the Christmas Farm stencil that I’ve been using on lots of projects this year (FYI – last I checked this stencil was on sale for $11 at Maison de Stencils).

I doctored it up a little this time using a “25” on the truck door rather than the wreath that comes on the stencil.  I also just flipped it over to have the truck facing the other way on one side of my sign.

I pick up old hooks whenever I see them at garage sales, so I dug into my stash and found 4 that were similar.  I painted them using Miss Mustard Seed’s milk paint in Boxwood that was leftover from the chair that I’m going to share in just a minute.

As you can see, they got pretty chippy.  But I’m a fan of chippy.  So I knocked off all of the loose paint and then sprayed them with a shellac type sealer so they wouldn’t be leaving chips of paint everywhere.

I didn’t actually have 4 matching Christmas stockings to hang from the hooks so I experimented with a pitcher and towel for some of my photos …

but then I decided to hang a kid-sized chair from two hooks to see how that would look.

Speaking of which, remember the trio of holiday chairs I shared two weeks ago?  Well, they sold like hotcakes at Reclaiming Beautiful so I found another set of 4 on Facebook Marketplace, picked them up last weekend, painted them, and brought them to the shop on Wednesday.

Three of them got painted in the Dixie Belle Drop Cloth with the Christmas Farm stencil, similar to this one …

I figured those weren’t worth sharing here on the blog since they are basically just a repeat of the ones I shared two weeks ago.

But I decided to try a different look with the 4th one.  I painted it in Miss Mustard Seed’s Boxwood milk paint.  I should back up a minute and mention that these chairs had already been painted multiple times when I got them (in the close up photo below you can see blue and white peeking out beneath the green).  I always do more prep work when painting over existing paint.  In this case I sanded them very thoroughly and then cleaned them with TSP substitute.  I also opted to use the bonding agent in my milk paint because it’s always dicey whether or not milk paint will stick to a previously painted surface.

Normally I wouldn’t choose milk paint for a previously painted piece, but I really wanted this particular shade of green so I went with it.

I painted the chair back using the Dixie Belle Drop Cloth and added a section of the Prima Marketing Gingham Red transfer over that.  Finally, I stenciled the seat using a warm white craft paint.

Adding the stencil totally made this one work.  I used Dixie Belle’s Big Mama’s Butta as a final finish over everything including the transfer.

My friend, and fellow Reclaiming Beautiful vendor, Lisa, gave me the pitcher.  She’d been planning to sell it, but it has a crack in it.  She thought it would work well for photo shoots though, and I have to agree.  It was perfect for this one.

The battery operated lights came from Target last year.  I’m not sure if they have them again this year.

I’m really enjoying working on these smaller holiday projects lately.  I’m not sure when I’ll get back to painting ‘real’ pieces of furniture, it may not be until after the new year.  It’s always good to take a little bit of a break before coming back with fresh ideas, right?

As always, thank you to Dixie Belle Paint Co and Redesign with Prima Marketing for supplying the products used in these projects.

what’s hiding in your attic?

Last weekend Mr. Q and I took part in our annual holiday tradition of getting the decorations out of the attic.

We can access our attic two ways.  There is a small door to it inside the guest room closet, plus the doors in the dining room (shown below) also open into the attic space (which is technically just above the kitchen and not the rest of the house).  I should mention that our attic is only about 4′ tall at most, so you can’t actually walk in there.

Mr. Q is always gracious enough to take the crappy part of the job, which is crawling in through the guest room closet and then lying on his stomach to hand things down to me through those doors shown above.

As a result, I never actually see what all is up there in the attic.  So this time I asked him to look around and see if there was stuff up there that we could discard.  Turns out we’ve been shoving things in there and forgetting about them for years.  I couldn’t believe all of the boxes and boxes of stuff that he was pulling out.  We’re still in the process of dealing with all of it.

Mr. Q even pulled out two boxes of old books that I had completely forgotten about.  They came from my parents when they moved out to Las Vegas.

Mr. Q claims that he has read every single one of them.  He went through them one by one and read them on his lunch hour back in the 90’s and it took him the entire decade.  But really Mr. Q?  Did you even read the Freud?

Anyway, I decided that I would try painting a few of these as holiday decorations and see whether or not they sell.  I’ve painted books a few times in the past and I’ve always loved them.   Here are some I did way back when I first started blogging …

I usually paint and then stencil mine, but I saw quite a few of them at the Holly Jolly Market that were painted and then stamped with words on the spines like “joy to the world” and such.

So I pulled out some Dixie Belle paint in Drop Cloth and painted a few.  But instead of stamping them with holiday words, I decided to try adding some Prima Marketing holiday transfers.

I first used the leftover bits from the Gingham Red transfer that I used on the kiddo sized chairs that I shared a couple of weeks ago just on the spine of one book.

This is a great way to use up some of those leftover scraps!

Then I pulled out the Christmas Greetings transfer and used sections of it on the other books.  I started out just using the smaller portions of the design that I thought would fit well on the book covers.

But then I realized that I could use the bigger sections and just wrap them around the spines, or cut them off at the edges.  Even though it feels a little wasteful to not use the entire image, I often prefer the look of a design that goes edge to edge like this.

Once I had all of my transfers applied, I sanded the books lightly to smooth out the finish and distress the edges.  Then I used Dixie Belle’s Big Mama’s Butta to add a light coating of wax for protection.

The final step was to put them in bundles and tie them with ribbon.

I’m betting that a few of you will totally relate, but do you have some crafting supplies that you never use because they are just too precious and you don’t want to ‘waste’ them?

That’s how I feel about this gorgeous vintage velvet ribbon.  I have to laugh because I only paid $2.50 for it at a garage sale, but still … I treat it like it’s gold or something.

I’ve had it for years but have only used the smallest bits of it.  And in the end, I didn’t actually use it on the books because I felt like it covered up too much of the transfer.  It sure looked pretty for these pictures though 😉

As always, thanks to Dixie Belle Paint Co and Prima Marketing for providing the products I used to restyle these books.

If you’re looking for Dixie Belle products you can find them here.

If you’re looking for Prima Marketing products you can find local retailers here, or online sources here.

And if you’re looking for my painted books you can find them at Reclaiming Beautiful in Stillwater, MN while they last.


instagram takeover.

Hey everybody!  For those of you who have Instagram accounts, I thought I’d give you a heads up.  I’m taking over the @redesignwithprima account today.

Each of us on their Design Team were given the opportunity to do a 24 hour takeover and today is my day!

I’ll be sharing some of my favorite projects using Prima Marketing products throughout the day, like this one …

And this one …

I had a hard time narrowing down which pieces I should share.  I figured nobody wanted me to be posting something every 30 minutes.

But they have so many gorgeous transfers, and I’ve done quite a few pieces with them over the past couple of years.

Plus, I’ll also be hosting an amazing giveaway of Prima products (you’ll have to go to Instagram to sign up to win).

Not only that, but many of the other Design Team members are also hosting giveaways on their takeover day.

So, if you haven’t yet drunk the kool-aid and joined Instagram, today might be a great day to do that.  And if you already have an Instagram account but you aren’t following @redesignwithprima (or, heaven forbid, me @qisforquandie) be sure to check them out.

painted hydrangeas.

This past Saturday morning my sister and I headed up to the Holly Jolly Market in Otsego, MN.  The market is held in a greenhouse so not only are there really fab vintage holiday goodies (and trust me, if you are local you shouldn’t be missing this one each year), but they also sell spruce tips and other evergreens at great prices.  I bought a dozen spruce tips for $21.99 plus a few random greens for $5.99 per bunch.

If you’ll remember back, last year I didn’t manage to get my front window box decorated for winter.  We were on our Adriatic cruise for two weeks in November and when we got back on the day after Thanksgiving the dirt was frozen rock hard so I just decided to skip it.

This year I was determined to get on it early, before the dirt was too frozen to work with.  I really thought November 9 would be early enough.  Nope.  The dirt was already partially frozen.  So I followed a tip one of my readers shared with me and I poured hot water on it to thaw it out a bit.  It worked like a charm and I was able to get those spruce tips sunk into the dirt.

While at the Holly Jolly Market I was admiring some deep red dried hydrangeas in one of the booths, so I asked the vendor how she managed to retain that rich color.  Her trick?  Spray paint.  As soon as she said it, I remembered that a couple of years ago one of my readers also recommended spray painting my dried hydrangeas.

Funny enough, in addition to red, the vendor also had some sprayed some with the Rust-Oleum color called Eden which just happens to be the same color I used on my Adirondack chairs, remember?

So when I got home from the market I dug into my spray paint stash and came up with a red, and the left over Eden from the chairs.

While we were at the market it was a beautiful, sunny morning and the temperature was above freezing.  The forecast wasn’t great though.  It was supposed to start raining by 3 pm, then turn over into a wintry mix.  The temps were predicted to start going down and keep going down with a high only in the teens Fahrenheit expected by Monday.

I knew I needed to get the window box done that afternoon or my dirt would be even more frozen.  By the time I got to the spray painting step it was drizzling and getting colder by the minute.  So if you’ve ever wondered if you can spray paint dried flowers that are wet with rain, in temps just above freezing … well, turns out you sure can.

In fact, it created a kind of cool effect, don’t you think?  Although I don’t suggest trying this on furniture 😉  I also don’t suggest doing this while wearing your favorite new parka, especially if you accidentally shake a wet and freshly painted blossom 😦

I’m quite sure that my neighbors thought I was nuts standing out in the rain cutting flowers off my hydrangea bush, holding them up and hitting them with the spray paint.

But it was definitely worth it in the end.  I got most of the spots off my parka, and the hydrangeas look fantastic.

Once I had the spruce tips, the hydrangeas and some twig lights in place, I added this giant jingle bell that my sister gave me a couple of years ago.

Things still looked a little bare, so I threw in three galvanized snowflakes that I’ve had for years.

They have battery operated lights in them and I always used to hang them on either the house or the carriage house, but honestly they always looked a little odd at night.  If all you can see are the lights, well … they just look like a random collection of oddly placed lights.

By the time I got to this point I was soaked through, starting to get cold, and it was starting to get dark so I called it quits for now.

I think I still need to add some twigs with red berries or something to add another layer of color up high.  I may have to take a walk in the woods and see what I can find for that.

But in the meantime, I’m feeling pretty good about filling up my giant front window box for less than $40.

How about you, are you rushing to get some outdoor decorating done before the temps plummet even further?  Or are you lucky enough to live in a warmer climate where you can decorate outdoors at your leisure?

sleds.

For the past couple of Christmas seasons I have found that painted sleds sell fairly well for me at Reclaiming Beautiful.

I started out with a pair of black and white sleds back in 2017.

I sold one and I kept the one shown above for myself.

Last year I did another pair of painted sleds, one in black again and one in more traditional Christmas colors.

and they both sold.

You’d think, knowing that I wanted to do some more this year, that I would have grabbed all the sleds I saw at garage sales this past summer.  But no.  I only bought one of them even though I saw quite a few.  I have a tendency to do stuff like that, because who is thinking ‘sleds’ in the middle of summer?

I was kicking myself over that recently, so I went to Craigslist to see if there was anyone selling them online.  Sure enough, there were quite a few.  But almost all of them were way above my price range.  Some ridiculously so, like this one listed at $225.

I’m sure that is a ‘highly collectible’ sled because of the rocket ship motif.  And I hope it goes without saying that I would never paint over that sled.

But even the more beat up and less unique versions were mostly listed in the $45 and up range.  However, I did come across someone selling three sleds for $15 each.  They were appropriately roughed up to justify painting them, and as an added bonus they weren’t very far away.  So I sent Mr. Q to pick them up, thus giving me four sleds to work on this year.

I set up a bit of a sled painting assembly line in my dining room in order to get all of the sleds done in one weekend.  I started with the black one.  I painted the wood parts of the sled using Dixie Belle’s Midnight Sky.  Then I stenciled it with a warm white craft paint.  Finally I added some of Dixie Belle’s Big Mama’s Butta.

I know black and white aren’t traditional Christmas colors, but I love the look.  Two years ago I wrote a whole blog post about Christmas in black and white.

Be sure to check it out if you like that look too.

The smaller black sled above is the one I kept two years ago, but this year I gave it a fresh coat of Big Mamas Butta and took it in to Reclaiming Beautiful to sell.  You’ll see why in a minute.

The other taller sled got the same paint job that I used last year.

That is Dixie Belle’s Drop Cloth on the sled, and red, green and black craft paint for the stencil.

I painted the handle and sides of the smallest sled using Dixie Belle’s Barn Red.  Well, wait, let me back up a minute.  I started out painting it with the same shade of red I used on the chairs I shared last Friday, Honky Tonk Red.  I painted the slats in Drop Cloth as a base for the Gingham Red transfer.

Once I had the transfer in place though, I felt like the Honky Tonk Red was just a bit too bright with the transfer so I pulled out the Barn Red and went over it with just one coat of that.

I really should have taken a picture of a chair and the sled side by side to show you the difference because I’m sure you’re thinking that this red looks the same.  But trust me, in person there is a difference.

This is the 2nd version of a red plaid that comes with the Prima Marketing re.design Gingham Red transfer set.  For this sled I only used one sheet of this plaid so I have another one left to use on something else.

When I got to the final sled from my Craigslist purchase I decided that the patina of the existing chippy red paint was too good to cover up with fresh paint.  I often work so hard to create this chippy look and here was a genuine version of it.

So for this one I simply sanded the surface lightly to remove any loose paint, added the stencil, and then gave it a wax job (again using the Dixie Belle Big Mamas Butta) to freshen it up and to protect it from the elements a bit.

As I was just finishing up my sleds, my sister stopped by for a visit.  I was telling her that I really loved how this last one turned out but I wasn’t sure I had a spot for it.  She suggested hanging it on the photo cottage door.

Sure enough, it looks freakin’ adorable there.  And once we get some snow on the ground and it starts looking more like a winter scene and less like a fall one, I think it will really look fab.  It has even motivated me to put some Christmas lights on the photo cottage this year.  I’ll be sure to share a photo of that if we get some measurable snow.

So the red one is staying with me, and that’s why I decided to sell the little black and white one.

And next year, remind me to grab those sleds when I see them at garage sales, OK?