the blue plate special.

A while back I shared a quick and easy craft project using unfinished wooden chargers (or plates) from Prima Marketing …

You can do so many different things with these plates and they are an easy, quick project to have fun with.

Here’s how the plates look when you buy them.

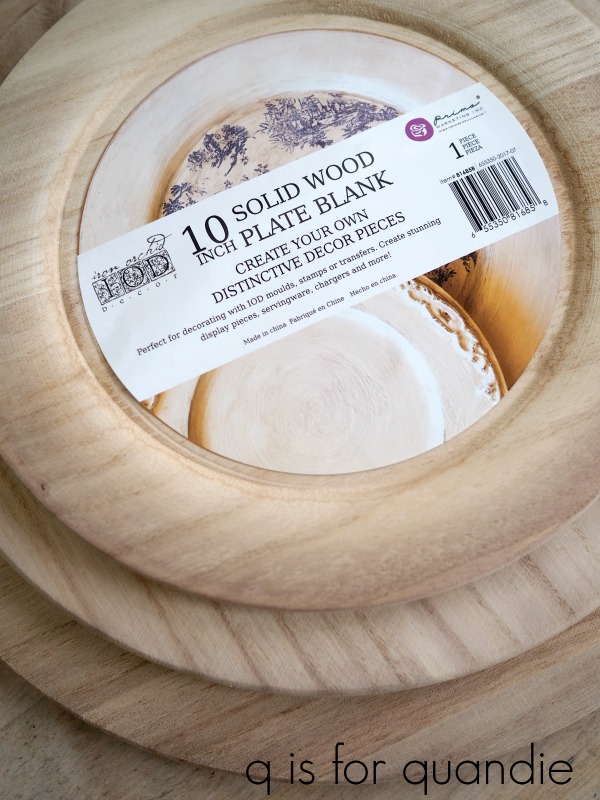
They come in three sizes, 10″, 12″ and 14″ and they are basically a blank canvas for getting creative.  Once finished you could use them as chargers, display them in a china cabinet or maybe just hang them on the wall.  They are light enough that you could easily do that with some 3M Command Strips.

Prima Marketing had sent me 3 of each size, so in addition to the ones I already shared, I’ve now finished up the rest of them.

First off, I made this coordinating set of three.

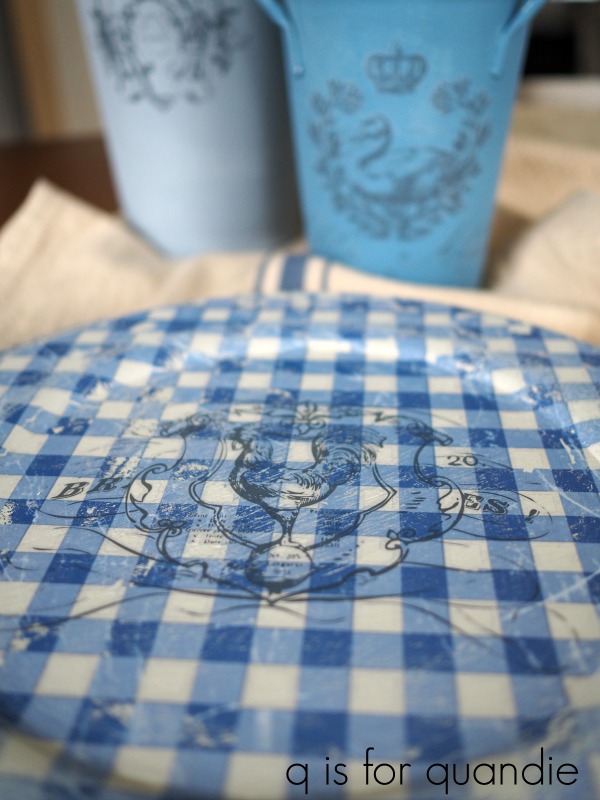
I painted them with Dixie Belle paint in Dropcloth.  Then I used 4 different Prima Marketing transfers.  French Ceramics (on the top plate shown above), French Ceramics II (on the bottom plate) and Floral Lover (the gingham on the middle plate, and why this is called Floral Lover is beyond me because the set consists of the gingham pattern and a striped pattern, no florals in sight).

To dress up the gingham plate a little bit more I also added one of Prima’s French Pots IV transfers over the gingham transfer.  Yes, you can layer transfers like this.  Just be sure that your first transfer is well adhered before adding the second one by lightly burnishing it with a clean, dry cloth.

After the transfers were in place I sanded lightly to distress them a bit and then sealed the plates with The Real Milk Paint Co’s Dead Flat Finishing Cream.  I think this set would be perfect to hang on the wall.

Next, I tried something just a tad different with a couple of the plates.  I turned them into cake plates by adding some wood pedestals that I picked up at my local craft store for about $6 each (or in my case, I took my sister with me and we each had a 40% off coupon, so they were $3.60 each).

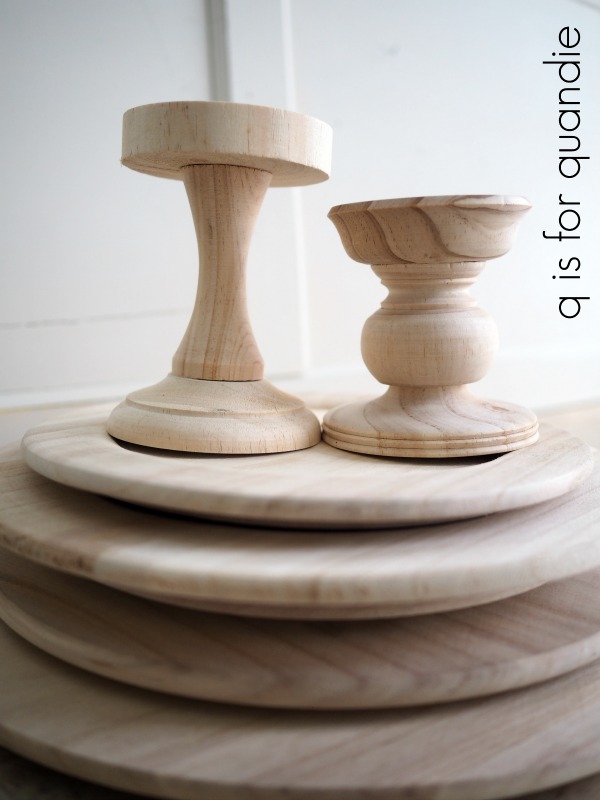
I used Elmer’s Wood Glue to attach the pedestals.  Once that was dry, I mixed up some Miss Mustard Seeds milk paint in Curio, which is a deep brown.  I don’t know that I would ever choose to paint something in this color and leave it that way, but Curio works great as a base color.  Especially over unfinished wood.  Unlike chalk paint or acrylic paint (Fusion or General Finishes), milk paint soaks into unfinished wood rather than sitting on the surface.  That makes it perfect to use as a stain too.

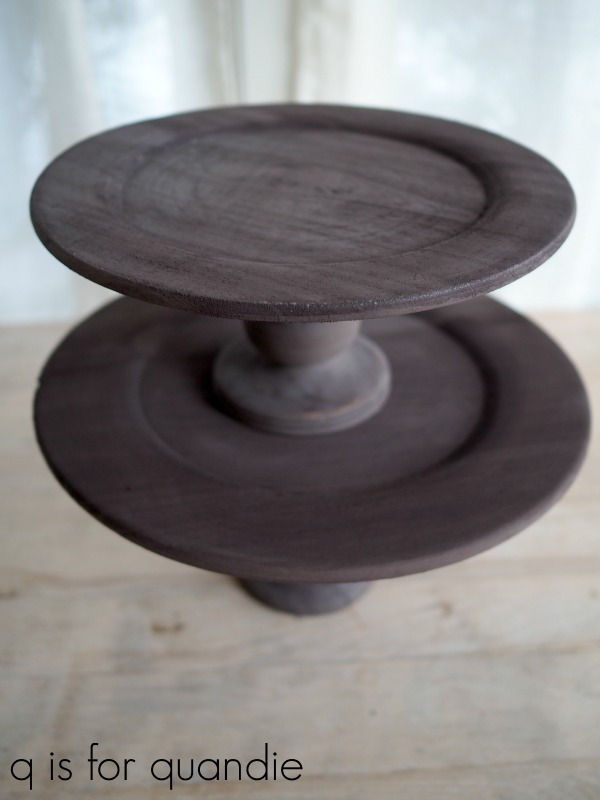
In my case, I just wanted a layer underneath my final color so that when I distressed these you wouldn’t see fresh new wood under the paint.

Once the Curio was dry, I sanded the plates lightly and then I added just a little beeswax to the edges to encourage my next coat of paint to distress just down to the darker layer.  Then I painted them with Miss Mustard Seeds milk paint in Linen, my favorite warm white shade.  It took several coats to get good coverage with the white over the dark brown.

In hindsight, I’m not sure it was worth taking all of this effort.  I didn’t get much chipping.  I did distress down to the Curio layer around the edges though, so maybe it added some depth.

After sanding the plates, I added the same two transfers that I used on my original pair of plates, Simplicity (which is the toile pattern) and Never Ending Story.  Once again I sealed them with The Real Milk Paint Co’s Dead Flat Finishing Cream.

But instead of stopping there I decided to have a little fun with a some new products that Prima Marketing sent my way, Modeling Material and a mold called Regal Findings.

I made a couple molds of the little bees (see them there in the middle row?) and added them to the bases of my cake stands.

I glued them on with wood glue before the molds had hardened which allowed me to form them to the curve of the base.  Once they hardened, I painted them with the Linen milk paint, allowed that to dry, topcoated it with the RMP Co’s Finishing Cream, allowed that to dry, then added a little Miss Mustard Seeds Antiquing wax to give them some definition.

I’m still practicing with the molds.  These tiny ones are a bit trickier than the larger designs.  Especially those fragile little bee legs.  As you can see, this bee lost a leg.

But after I get a little better at it, I plan to share a tutorial post on using the Modeling Material and the molds, so stay tuned for that.

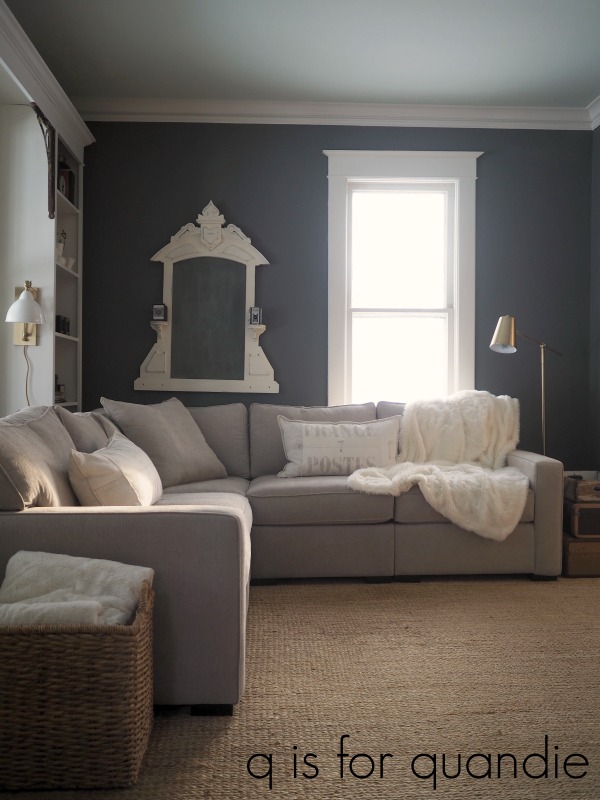
Meanwhile, although I’m not a baker and never have need for a cake stand, these also work well to provide varying layers of height to a display.

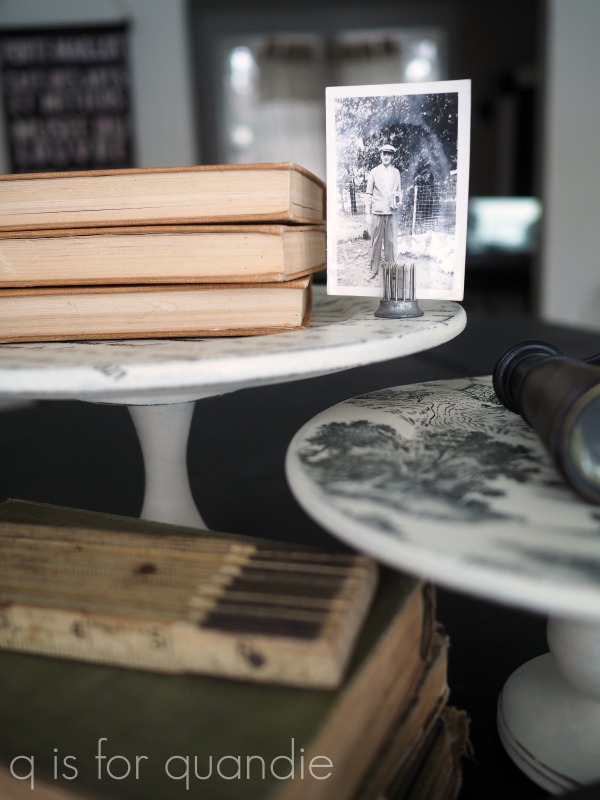
Funny side bar story, I never even knew these vintage opera glasses of mine say “PARIS” on them.

It wasn’t until I was editing the photos for this post that I noticed that!  Cool, huh?

Anyway, these were just a few ideas of the ways you can use the wooden plates. I’ve got one more set of them that I’ll be sharing later in the week so be sure to check back!

Special thanks to Prima Marketing, Miss Mustard Seeds Milk Paint, Dixie Belle Paint and The Real Milk Paint Co for providing products used on these projects.

a winter garden.

Like much of the northern part of the continent, here in the Twin Cities we got slammed with snow in the month of February.  In fact, we got a record breaking 39” of snow during the month.  It was the snowiest February on record, and the 4th snowiest month EVER (well, since they’ve been keeping track anyway).

The record for the snowiest month ever is still held by November 1991, the year of the Great Halloween blizzard.  We got 46.9” that month.  I clearly remember that blizzard (how about the rest of you locals?).  The snow started falling on October 31 and didn’t stop until November 3.  Nothing like having your carved pumpkins buried under more than 2’ of snow.

The snow didn’t end in February this year, we’ve now gotten another 10+” of snow so far in March including 6″ last weekend.  Spring just might be in sight though, we’ve had temps in the 40’s and lots of melting this week.

Most people I know like to take a tropical vacation to escape the winter weather if they can swing it.  But Mr. Q and I took our Adriatic cruise in November, which now feels like a very long time ago.  So I decided to treat myself to an indoor winter garden.  It helped that my local plant nursery, Gerten’s, had a house plant sale.  Buy one, get one half off.  It seemed like it was meant to be.

So the other day my sister, niece and I popped in to see what they had.

I was surprised to find that they had a whole bunch of blooming potted plants available.  I wasn’t expecting that.  I guess I never would have thought of a begonia as a ‘house plant’.  Technically speaking though, I guess pretty much anything that is alive and growing has to be a house plant this time of year.

They also had a huge selection of gorgeous cyclamens.

So I had to get two of them.  This smaller size was only $5.99.

Some of the plants will head to my office at the day job, but others will stay at the house.

I can brighten up both places!

Having all of these flowers made for a great opportunity to share the 3rd project I did using the Iron Orchid Designs Le Petite Rosier transfer.  I purchased two of the smaller sized versions of the transfer.  I used one on the tiny cupboard and then used the bottom section of that and of the 2nd one on my ceiling fan.

And now I’ve added the top portion of the 2nd one to an old watering can.

I gotta say, I pretty much love it.  I didn’t seal it with anything, so it wouldn’t hold up to outdoor display.  But that’s OK, I’ll keep it inside in my ‘winter garden’ for now.  If I decide to put it outside in the summer I’ll add a couple of coats sealer.

How about you?  Are you coping with a winter that seems to be dragging on and on?  Didn’t get the chance for a winter getaway?  Maybe you should consider a winter garden to tide you over until spring actually gets here.

P.S.  Remember my experiment with the lavender from last fall?

Well, in case you are wondering, no, those plants did not survive the entire winter.  I finally tossed them a couple of weeks ago.  I suspect that my window ledge was just too cold for them.  But they were pretty while they lasted, which was a lot longer than cut flowers.

time flies.

I can’t believe it was over two years ago that I shared this newel post …

It seriously boggles my mind to realize it wasn’t just a few months ago, but when I went in search of that original post about the post I found it in January 2017!

That’s not at all the point of today’s blog post, but I just had to say that out loud.  Time really does fly.

So, apparently I painted this post two years ago.  It ended up with a fabulously chippy patina.  I just had it leaning in the corner of a room as a sort of architectural salvage decor piece.  Sometimes it was in the piano room, and sometimes the living room.

While I was stenciling the piano last weekend I saw it and thought it could use a stencil or two as well.

I started with this ‘antiques’ stencil at the bottom.

Then I used the same stencil that I used on the little Mariner’s chair that I painted a couple of weeks ago to do two more sides of the base.

Finally, I added a portion of another stencil to the top.

I think the post has just a little more character now and it looks great just hanging out next to the cupboard that holds the ‘good junk’.

What do you think?

ebony and ivory.

I finally got around to painting my baby grand piano this past weekend and all I can say is, ‘what was I so worried about’?

Somehow I had built this up to be a HUGE project in my mind.  Obviously I should have known better.  I mean, come on, I’ve painted a few larger pieces of furniture in my day.  The Welsh cupboard in my dining room for example.

By comparison, the piano was so. easy.

As a reminder, here is how the piano looked originally.

Not super awful, but definitely not great.  And up close the finish on this thing was totally shot …

The arrows are pointing towards areas where the veneer has chipped away.

Before we move on, I have to explain something.  I don’t actually play the piano.  Well, I did take some lessons when I was a kid and I can now play ‘chopsticks’ fairly well.  But many years ago a former co-worker of mine was moving and needed to find a new home for her baby grand piano.  I had the brilliant idea that I would find the time to take lessons one day.  Ha.  Yeah, that never happened.

However, as it turns out, this is one incredibly handy piece of furniture.  It’s got a nice large work surface at exactly the right height for me while standing.  It’s perfect for folding laundry, wrapping presents, scrapbooking, painting small items and it also makes a great buffet/bar during parties.

I honestly can’t think of any other piece of furniture that I could put in this same spot that would be as functional for me while still looking appropriate in the room.  But it was starting to look a bit rough, so as part of my magic wand decorating plan, it was scheduled for a makeover.

I started by sanding it down which took about 10 minutes.  The finish was so dry on this thing that it didn’t take much work to rough it up.  I mostly wanted to make sure to sand down the paint drips that were on it because those can come back to haunt you if you just paint over them.  Next I vacuumed away the dust with my shop vac and then wiped it all down with a damp rag.

Next I pulled out some Dixie Belle paint in Midnight Sky.  You guys know how much I love their other black, Caviar, well this one is just a tad lighter.  That probably sounds odd to call a black color ‘lighter’, but it is just not quite as deep and rich as the Caviar.  It’s also a bit warmer with less of a blue undertone.

I watered down the paint just a tad.  I find that the Dixie Belle paint is pretty thick.  You can use it straight out of the jar if you want a more textured look, but if you want a smoother finish you can water it down which has the added benefit of making it go further.  I only used about 2/3 of the 16 oz jar to paint this piano.  That’s also partially because for the most part I got away with just one coat of paint.  There were only a couple of spots that needed a touch up with a second coat.

A couple of you suggested a strategy for moving forward on this project.  Start with painting the outside of the piano first, then tackle the inside bits at another time.  So I mostly did that, except that I opened the cover that goes over the keys and painted inside there.  I figure that’s the most likely spot to get opened up on occasion.

So I taped off the keys and painted that area.  I also took this opportunity to re-glue some of the ivories that had come unglued.

Just out of curiosity I did some google research on ivory piano keys.  Prior to 1930 almost all pianos had ivory keys, and mine are indeed ivory (check out this article to learn more about that).

Anyway, I used my E6000 glue to re-attach all of the loose ivories.  Then I added a stencil to the top of the piano.

I had so many ideas swirling around in my head about what to do with this piano.  I thought about painting it white and adding a transfer, but then it would compete with the Specimens Cupboard which is in the same room.

I also thought about wrapping some sort of stencil all the way around the sides of the piano.  But stenciling those curves would have been challenging, plus I felt like it wouldn’t be all that noticeable since you really can only see one side of the piano unless you happen to be squishing yourself between the piano and the wall or window.  So not a lot of bang for my buck.

Ultimately I tend to prefer a ‘less is more’ kind of style so I went with this simple ‘European grain sack’ stencil from Maison de Stencils.

Once the stencil paint was dry, I sanded the entire piece lightly with 220 grit paper to smooth out the paint.  I gave the edges a little extra pressure to add a distressed look.

After vacuuming away the dust, I then finished the piano with Fusion’s clear wax.  You might be wondering why I chose to wax such a large piece, and especially one that is probably going to see a lot of abuse.  There are definitely more durable top coats that I could have chosen.  But in my experience wax and/or hemp oil are the easiest finishes to ‘fix’ down the road.  If I get a ring from a sweaty glass, a scratch, or a drip of random paint here and there, all I have to do is sand it down lightly to smooth it out and then add a little wax to just that spot.  So in the long run I think I’ll be better off with wax.

One last thing, I had originally planned on keeping the chair I have ‘as is’.

I don’t want to go all ‘matchy-matchy’ with it and paint it black, but I’m not totally loving it with the piano.  I’ll probably keep an eye out for another option down the road.

By the way, I have to say I found it rather challenging to photograph a black piano in a room flooded with light reflecting off our latest snow fall.

Here’s the view out those windows.

Yep, lots of white to reflect the light.

OK, so if you are keeping track of the magic wand decorating project, here’s where I’m at …

    1.  repaint the insides of the bookshelves in the living room – check!
    2.  repaint the living room walls – check!
    3.  replace the living room furniture – check!
    4.  paint the baby grand piano – check!
    5.  replace the ceiling fan over the piano – check!
    6. repaint the piano room walls

That last item on the list, repaint the piano room walls is the last item on my original to-do list.  But I’m having so much success I’ve decided to go just a bit further with that last item plus add one more.  I’m adding ‘repaint the piano room built shelves beneath the windows’ because they really need it.  As for the walls, I have a plan and I have my handyman Ken’s commitment to help me with it, so you’ll just have to stay tuned to see what we do.

In the meantime, if you have been thinking about painting a piano or some other larger piece but haven’t had the nerve to make the leap, I say go for it!  It’s definitely not as hard as it looks.

the index card art project.

I am betting that many of you also follow Marian at Miss Mustard Seed.  If so, you may have seen her recent post about an index card art project that she is doing.

In her case she has 31 index cards and she’ll be painting one per day for the month of March.

As soon as I read her post the idea of changing it up and scrapbooking on the cards instead of painting on them popped into my head.  What a great way to do just a quick bit of scrapbooking every day, and in the end have a fun keepsake.

And I just happened to have a great set of vintage index cards in my stash.

Fun fact, these old cards were from Smead Manufacturing.  I’m sure many of you are familiar with Smead office supplies.  They began manufacturing in 1906 in St. Paul and then moved to Hastings, Minnesota in 1908.  It’s kind of interesting to read their history.  Funny to note that according to them, in 1906 only 2% of the population had telephones.  Can you imagine?

Anyway, back to my index cards.  I don’t quite have the complete alphabet, but oh well.  I also don’t have 31, but that’s OK, I’m getting a late start anyway.  Also, keep in mind that I have a day job so it may not be feasible for me to work on a card every single day, but I’m going to try and keep up.  I’ll also admit that I am working ahead on some days.  So far I’ve completed 8 cards.

The photos from our Adriatic cruise are the perfect subject matter for this project, so it made sense to start with ‘A’.

‘A’ is for Adriatic.  ‘A’ is also for Atlas.  The map I used on this card is from a very old Atlas, from back when Yugoslavia was still a country that included what are now Croatia and Montenegro.

The photo I used on this card is of the Saint Domnius cathedral in Split, Croatia.

I shared my ‘A’ card on Instagram last Sunday and have been sharing a card a day since.

I made two cards for the first port of call on our trip, Genoa.  I used a couple of my favorite October Afternoon papers on this first one.  The orange totally related to the color of the building in the photo, and the background color of their map paper matches my vintage index cards perfectly.

October Afternoon has always been my favorite brand of scrapbook supplies.  They were also a local company here in the Twin Cities, but I think they have gone out of business (does anyone know?).  They haven’t posted on their Facebook page since 2016, so I’m assuming they are defunct.  Luckily I stocked up at a couple of their warehouse sales and now have a lifetime supply of their stuff.  I love that all of their papers and ephemera can be mixed and matched and they always work well together.  My favorite product line was called Travel Girl; it couldn’t have been more perfect for me.

Initially this next photo of Genoa wouldn’t have made the cut for this project.  It really wasn’t my favorite shot from that port of call.  But then I tried printing it in black & white.  Suddenly I loved it.  It now has a gritty, mysterious look which is totally appropriate for Genoa.

Next up was Eze.  If you’ll remember, we visited Eze in the morning of the day we were docked in Monaco.

Hey, guess what?  I painted those cardboard letters with Fusion paint in Inglenook.  Not only is Fusion a great paint for furniture, it’s also perfect for crafting.  Once the paint was dry I stamped over it using a rubber stamp and some grey ink.

The card I made for Monaco has a simple message.

The “Cherish each Moment” is a rub-on applied to a French book page.  I purchased this particular set of rub-on’s at Hobby Lobby but I’m not sure if they still have them.

I used one of the ticket stubs from the Museo Archeologico for the Naples card.  I’m planning to include a few more tickets stubs and other small items on future cards too.

For the Herculaneum card I simply used a rubber stamp right on the index card and then added a couple of photos.  This one was super simple and quick, but sometimes simple and quick creates the best look.  It definitely allows the photos to be the stars of the show.

I loved the look of that stamp on the card so much that I used it again for this one.

But this time I left a bit more of it showing.  The black and white photo worked perfectly with the grey ink.  You can find a less cropped, color version of that photo in my post about our Godfather Tour in Sicily.

By the way, I’m fairly sure I purchased that rubber stamp at a garage sale for around a dollar.

Working on this project has reminded me how much I miss scrapbooking.  But I’m hoping that spending a spare hour here and there to throw together a couple of index cards is going to work well for me and I’ll be able to keep it up.  At least long enough to finish this project.

  Once I finish with this set of index cards, I may go back and insert a few more cards for each port of call on our trip.  We’ll see if I stick with that plan or not.  And naturally I will be on the lookout for a recipe box to revamp to hold the cards one they are completed.  Maybe something along the lines of this one that I made for my friend Terri …

I’ll be sure to share with you when the entire project is completed, but in the meantime if you want to follow along with each card as I complete it you’ll have to follow me on Instagram!  Or if you want to follow everyone who is creating art on index cards, be sure to check out #indexcardartproject.

Are any of you guys scrapbookers?  Or perhaps it would be more accurate to say ex-scrapbookers since I haven’t work on a scrapbook for at least two years.  Maybe you should look for some index cards and try this approach too!

la serenissima.

Today I’m sharing the final port of call on the Adriatic cruise that Mr. Q and I took last November, Venice.

Back in December I jumped ahead and shared part of our day in Venice, the tour of the velvet workshop, because it inspired my handmade Christmas wrapping paper.

But today I’ll share a few more photos from our visit to the Most Serene Republic of Venice, or La Serenissima.

I suspect that many people who visit Venice don’t find it serene at all.  Especially if they only go to St. Mark’s Square and the surrounding sights.  However, should you be lucky enough to sail into Venice on a cruise ship in the early hours of morning you might be able to capture the serenity.

This was the second time Mr. Q and I have arrived in Venice by cruise ship and it really is the most amazing thing.  You sail right down the Guidecca Canal passing beautiful Venetian buildings that look like they could sink below the waterline at any moment.

Back in 2017 Venice came up with a plan to divert large cruise ships from this route, but that won’t take effect until 2021.  I totally understand why they want to do this, while at the same time I consider myself really fortunate to have had this experience before it becomes obsolete.  So, FYI, if you’ve always wanted to do this you’d better book that cruise soon.

As I wrote in my earlier post, we hired a private guide in Venice.  Her name is Luisella Romeo and she was absolutely amazing.  So if you are booking that cruise soon, I’d recommend booking Luisella for a tour while you’re at it.

After spending time touring the velvet workshop, we headed across the Guidecca Canal by Vaporetto (water bus) to the Fortuny workshop with Luisella.  Once again she had arranged a totally private tour for just us.

Fortuny makes beautiful dyed fabrics.  However, they are extremely protective of their proprietary process.  So, unlike the Bevilaqua velvet workshop where we saw every step of the process, at Fortuny we only saw the showroom.

But that’s OK, it wasn’t really the fabric I was interested in, it was the garden that is tucked away behind the building.

I have to admit, November probably wasn’t the most impressive time to be visiting this garden.

Nonetheless, I totally enjoyed its serene, early winter beauty.

Even on this rainy day it was really lovely.

Unfortunately our time with Luisella was done after the Fortuny visit.  Had we realized how amazing she was going to be we definitely would have booked her for the entire day.  But we hadn’t, and she had another group scheduled for the afternoon.

So we parted ways, but not before she gave us some ideas of where to go next, drew the route on our map for us and made sure we knew which Vaporetto to get on and which stop to get off at.  She suggested we walk past the gondola workshop, or squero.  The Squero San Trovaso first opened in the 17th century.

You can’t actually tour the place, but it was still interesting to see it from across the canal and watch the craftsman at work.

Although Luisella had given us a couple of other suggestions for where to go from here, we ended up deciding to just wander around the quieter areas of Venice away from the rest of the tourists.

We knew we couldn’t get too lost, it is an island after all.

We just took our time and enjoyed the scenery.  Not everyone is enamored by the graceful decay of Venice, but I definitely think it’s beautiful.

Comically enough, we had just started to realize how hungry and tired we were when we looked up and realized we could see our ship from where we were.  It was easy enough to make our way back to the People Mover and then back to our ship.

I’ve really enjoyed sharing this trip with you guys.  I get to relive it myself while putting these Wednesday blog posts together.  I’m a little bummed to see it end (although I do have some semi-related posts coming up still).  I think Mr. Q and I are going to have to get busy planning our next trip so that I have more travel stories to share!

How about you, have you ever been to Venice?  And if so, were you able to find some serene spaces away from the tourist hordes?

a winter wonderland.

Good news!  The q is for quandie IT department (ie. Mr. Q) came through with flying colors.  When I got home from the day job on Friday he had a new computer all set up and ready to go for me.

I’m up and running with no need for a stiff drink.  I took a quick hour or two on Saturday morning to give all of my functions a test drive.  Since we basically woke up to a winter wonderland here in the Twin Cities with another 5″ or so of fresh snow, it was a great opportunity to take some photos and then run through my entire blogging process from start to finish (when it doesn’t involve actually painting a piece of furniture) to make sure everything was running smoothly.

As I said to Mr. Q , it was nice that it was only 4 degrees on Saturday morning because that meant the snow was really light and fluffy (which makes it easy to shovel).

And the sun just coming up lent the perfect light for taking a few photos.

Poor Cossetta, she is thigh-deep in snow these days.

I hope her feet aren’t too cold.

Looks like we won’t be grilling steaks any time soon.

I really wish I had a piece of furniture finished because it would be so fun to do an outside photo shoot in these conditions.

Remember this one?

Of course, that was a ‘before’ instead of an ‘after’.

But alas, my furniture painting has been on hold lately while I work on revamping my living room and piano room.  I’m itching to get something painted though, so I may take a break from the revamp and paint a dresser this coming weekend.  I still haven’t worked up the nerve to tackle my piano.

In the meantime, I’m just going to go get a fresh cup of coffee and enjoy this gorgeous snow.

Check back on Wednesday to hear about the final port of call on our Adriatic Cruise, Venice (ie. one of my favorite cities, but then I say that about most of the cities I’ve been to).

a french farmhouse fan.

Are you a fan of the french farmhouse look?  I know I am.  But today I’m talking about an entirely different kind of french farmhouse fan!  It’s a french farmhouse ceiling fan.

I know, I know.  Ceiling fans are no longer ‘in’.

If you are lucky enough to live in a house with central air conditioning, you really don’t have much need for a ceiling fan.  However, we live in a 1904 farmhouse with hot water heat.  In other words, we have radiators and we do not have duct work.  And we have a boiler rather than a furnace.  Putting in central a/c is a bit more complicated if you don’t have existing ducts to deliver the cool air throughout your house.

So, we don’t have central a/c and ceiling fans can make all the difference on hot summer days at our house.  Especially in the room that I call the piano room.  This room is right in the center of our lower level.  It’s also the room where we install a window a/c unit in the summer, so we need to move that cool air around and a ceiling fan is the best way to do it.

Our old ceiling fan still worked quite well, but it was dated.

I can’t really remember how long ago we put this particular one in here, but I suspect it was at least 15 years ago or more.  I thought it was fabulous at the time.  I thought my tomato red walls were pretty amazing too, but they didn’t last nearly as long as the fan.

Anyway, not only was the fan dated looking but those wicker fan blades were difficult to clean.

I began my search for a new fan online and found some gorgeous options that were priced in the $400 and up range, like this one …

But I didn’t want to spend that much.

When my sister and I were out shopping for furniture a couple of weekends ago, we stopped off at our local Menards store on the way home and I found this fan.

It was on sale for $149.99, so I nabbed it.

I liked the fact that the globes sort of look like canning jars giving it a bit of a farmhouse feel.

It wasn’t until we had the fixture installed and I was washing up the globes before putting them on that it occurred to me that it would be pretty easy to add a little more personality to them with some rub on transfers.  Plus, I just happened to have a couple of remnants from my IOD Le Petit Rosier transfer that would perfectly fit the three globes.

This was definitely a bit of an experiment.  I wasn’t sure if the transfers would look good on the glass.  So I started with just one.  I figured if I hated it, it would be easier to scrape a transfer off just one globe rather than three.

But I loved it.  Of course I did.

The transfers added just a little bit of extra personality to an ‘out of the box’ plain ceiling fan.

Now, I have no idea how well the transfers will hold up over time or whether or not the heat given off by the bulb will cause them to deteriorate in some way.  But worst case scenario we have to swap out the globes down the road.  That’s fairly easy and cheap.

I will also admit that this little detail isn’t earth shattering and I suspect a fair number of the people who visit our home won’t even notice it.

But I get a kick out of it every time I walk through the room.

And it was a super simple and inexpensive way to add a little french-ness to this farmhouse fan.

By the way, if you look really closely at that picture above you can see how high the snow bank is on the side of our driveway.  It’s almost all the way to the top of our privacy fence.  Can you see it (look just above the plants on the ledge)?  Ha!  This stuff is going to take forever to melt if it ever does warm up.

Anyway, if you’re keeping track, that’s the 4th item on my magic wand decorating list checked off.  I still have to paint that piano and the walls in this room.

I’m not gonna lie, I really keep procrastinating when it comes to painting the piano.  That’s going to be a big job, and will probably be last on the list.  But like the little engine that could, ‘I think I can, I think I can’.

In other news, eeeeekkkkkk!!  My computer died.  Since techie stuff like replacing a computer drives me to drink, I’m not sure how quickly we’ll get a new one up and running.  I’m sure I will be spending a good chunk of the weekend on that (the computer, not the drinking … well, maybe both).  So don’t panic if I don’t have a post on Monday.  Or Tuesday.  Or all of next week.  Hopefully I’ll be back up and running soon though.  Wish me luck!

ravenna.

Oh my gosh you guys, we are down to the 2nd to last port of call on our Adriatic cruise from last November.  Today we’re visiting Ravenna, Italy.

We woke to find a beautiful sunrise that we could admire from our balcony.

This is yet another place that I had never heard of before.  The main draw in Ravenna are the churches and their Byzantine mosaics, many of which are UNESCO World Heritage sites.

You can buy a combination ticket to visit the top 5 sites, and the route between them is easily covered on foot.

One thing to note if you ever end up in Ravenna via cruise ship, the port is quite far from the city center.  This was also a rare occasion where there were no taxis or other locals waiting just outside the gates at the port to take passengers on tours either.  There was absolutely nothing nearby.  Fortunately our ship offered a shuttle to town for $26 per person.

Once off the shuttle it was an easy walk to the ticket office to purchase the combo admission ticket.

Now, I have a bit of a confession to make.  Our visit to Ravenna was over 3 months ago and when I look at my photos and the map … well … I’m not sure which place is which and they all look rather similar.  So rather than give you any specific details on each place I’m just going to say that if you ever find yourself in Ravenna you should definitely visit all five of the top sites (and more if you have time, because there are more).

Some say the mosaics in Ravenna are the finest examples of Byzantine art outside of Istanbul, and they definitely were stunning.

The colors were so vibrant, and the magnitude of scale was incredible.

The level of detail is mind boggling.  Remember, these are made with tiny, little tiles.

There are also several painted ceilings.

And finally, when your neck has had enough of looking up at ceilings, you can head back outdoors and admire the architecture … but, oh wait, that mostly requires looking up too.

Well, not entirely.

You could just wander the cobblestone streets and admire the buildings too.

Or you can do a little shopping, there was plenty of it to be found.  In fact, this is the spot where we saw so many ‘Black Friday’ sale signs which totally took me by surprise (since Thanksgiving is not an Italian holiday).

I guess the moral to my story is that a visit to Ravenna may also require a visit to your masseuse to cure your stiff neck afterwards.  But it was well worth it.  Next week we’ll be visiting our last port of call, Venice.  Although I already shared our morning tour of the velvet workshop, I still have more to share from Venice.  So if you are enjoying these Wednesday travel posts, be sure to check back next week!

my new exercise room.

Did I mention that Mr. Q and I were adding an exercise room to our house?

Just kidding, because of course we aren’t.  Obviously if I really had that much extra square footage it would be devoted to a furniture painting studio not exercise.  But we had the living room mostly empty in anticipation of our furniture delivery on Saturday, all that remained was the TV.   Seeing so much space in the room, I said to Mr. Q ‘hey, this would make a perfect exercise room now!’  Plenty of room to stretch out while doing my favorite Leslie Sansone Burn to the Beat video.

One of the downsides of an older home, the rooms are all fairly small and there isn’t a lot of space to spread out.

Before we bring in the new sofa, I thought this would be a good opportunity to show you what we’re working with.  Our living room is about 11′ x 14′.  Those three windows above face north (and onto the front enclosed porch) and the single window faces east.  The west wall is mostly open to the front hall, and the south wall where I’m standing taking the photo is mostly open to the piano room.  The cable for the TV is in the southwest corner, so the TV is pretty much stuck there.  Not that I can think of a better location for it.

That pretty much leaves me with the space shown above for furniture placement.  During the first decade of living in this house I was determined to re-arrange our furniture on a regular basis (I just love the feeling you get from a freshly arranged room, don’t you?).  There are only two possibilities for a traditional sofa, in front of the radiator or in front of the single window.  As much as I wanted it to work, putting the sofa in front of the radiator just made the room feel long and narrow, like a bowling alley.  That left just the one spot that really worked for the sofa, on that wall to the right.  Adding a chair that faced the sofa meant that the chair had to be rotated for watching the TV.

Factoring all of that in, we decided it was time to consider a sectional.  It seemed like the most functional way to use our limited space and layout.

We can comfortably fit four people on this piece, and now that my sister and niece live in Minnesota we need to have seating for 4 much more often.  And when it’s just the two of us, we can both stretch out comfortably and watch TV.

This sectional came in umpteen bazillion different configurations.  In fact, I think “Popular Configurations:  217” means you can use the available pieces in 217 different ways.

We went with the smallest version, a right angle with a 87″ section on either side of a square corner.  We could have used a ‘wedge’ section to connect them but that added another 13″ in length to each side.  In other words, it would have left only about 2″ to spare on the east wall.  So, while it would have added a spot for a fifth person to sit, I think it would have overwhelmed our space.

For a visual, here is a picture of a configuration using the wedge in the store …

You can really see just how big that wedge is.  I have to admit, it was super comfy and I would have loved it for that reason.  But not only did I think it was too big this way, but I thought that wedge made it look kind of ’90’s sectional’ if you know what I mean.

Here is the store example with the square corner.

It felt a little more tailored looking to me, and it was still plenty roomy for two, and even four people.

We paid an extra $100 to get the white glove delivery service from Macy’s.  But then we got $100 off for opening a new Macy’s charge card (even though we already have one, which seems odd to me but my sister tells me that you can have up to three different Home Depot cards too, so go figure).  Anyway, that made the extra delivery charge a bit of a wash.

The white glove delivery was pretty much amazing.

These guys obviously knew what they were doing and were in and out of my house in less than 30 minutes.  And you should have seen them backing their giant truck down my narrow driveway with 3′ snowbanks on either side.  They took their shoes off, which I totally appreciated.  Then they unwrapped everything, set it all up and took the packaging away with them.  They even offered to wipe up the bit of wet floor by the door, but I sent them on their way.  I could handle that part myself!

For now we are going to try going without a coffee table or ottoman in front of the sectional.  I like how open it makes the room feel.  Plus, although I was joking about the exercise room, I really do exercise in this space so it will be nice to not have to move a piece of furniture every time I want to do that.

One side of the sectional has the entire shelf above the radiator behind it, and I stacked some vintage suitcases on the other end so we have somewhere to set drinks.

I also replaced two of the matching throw pillows that were included with my favorite Restoration Hardware pillows.

The sectional itself is very neutral and has very traditional lines.  I’m adding my own personality to the room with things like throw pillows, the items on the shelves and the stack of suitcases.  This way when I get tired of my Black Locust walls and want to lighten up or just completely change colors I can do that without having to change out the largest and most expensive item in the room.

 I also added a couple of new lamps from Target to the room.  We mounted this one to the bookcase and it will allow me to read while sitting in the corner of the sectional.

I’m a little on the fence about the other lamp.  It looks good, but it’s another lamp that just works for task lighting.  It doesn’t light up the room.  I’m probably going to swap it out for something else.

As a reminder, here was my ‘magic wand decorating‘ plan.

  1.  repaint the insides of the bookshelves in the living room
  2.  repaint the living room walls
  3.  replace the living room furniture
  4.  paint the baby grand piano
  5.  replace the ceiling fan over the piano
  6.  repaint the piano room walls

I’m officially halfway through!

I still have a little tweaking to do in this room.  I need to find something for the wall behind the TV, I will probably switch out that lamp, and I need to draw something on the chalkboard hanging over the sofa.  But for now we’re going to sit back on our new sectional, binge watch season 3 of The Tunnel, and enjoy the feeling of making progress on the list.