the autumn catalogue dresser.

I’ve mentioned before that I don’t normally do custom work.  Mainly because I find it too stressful.  I spend the entire time I’m working on a piece worried about whether or not it’s going to meet the customer’s specifications.  It’s just not as much fun for me.  I’d rather be free to make decisions on the fly as I run into problems, and then when the piece is finished try to find a buyer to match up with it.

However, earlier this year when I did the Blue Alligator dresser I had two people who really wanted it.

Since there was only one dresser, it went to the first person in line.  The second person in line, Debbie (not my sister, but another Debbie) mentioned that if I ever did another dresser with the same Iron Orchid Designs transfer she’d love to have it.

So, I did another one.

And as it turned out, Debbie didn’t like the color I chose.  Blue wouldn’t work in the room she wanted it for.

Ironically, I ended up again having two people who both wanted the blue one though, and once again it went to the first person in line.

So now I’ve done a third.  And although it wasn’t technically a custom job, I did paint it in a warm white, which is what Debbie wanted.

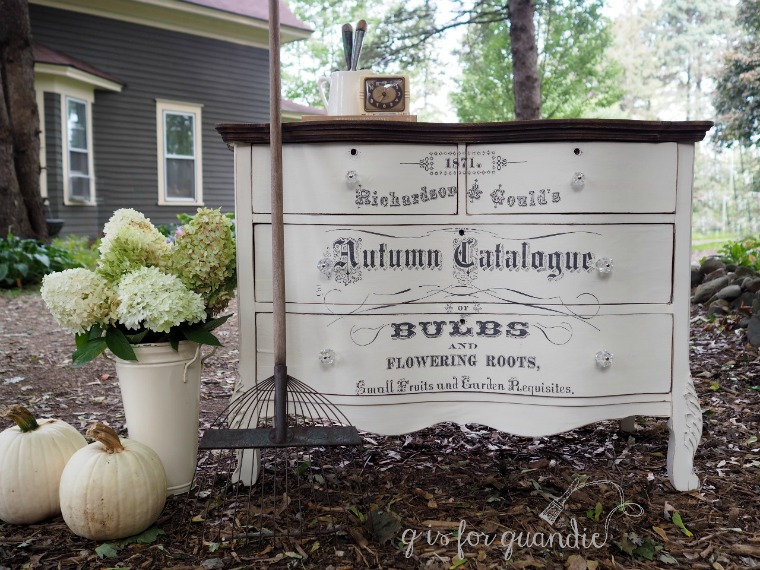
And this time I hit the nail on the head.  Debbie loves it.  And seriously, can you blame her?

But let’s start at the beginning, shall we?

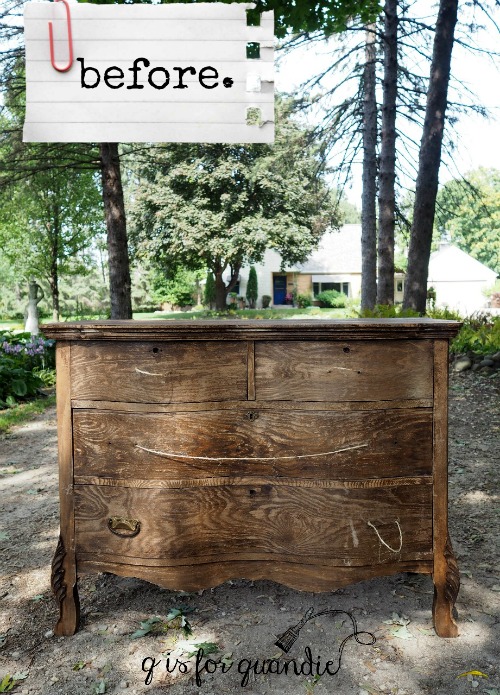
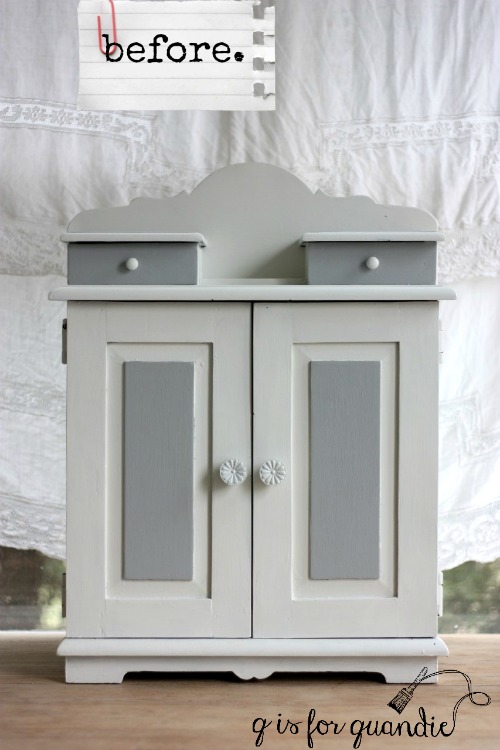
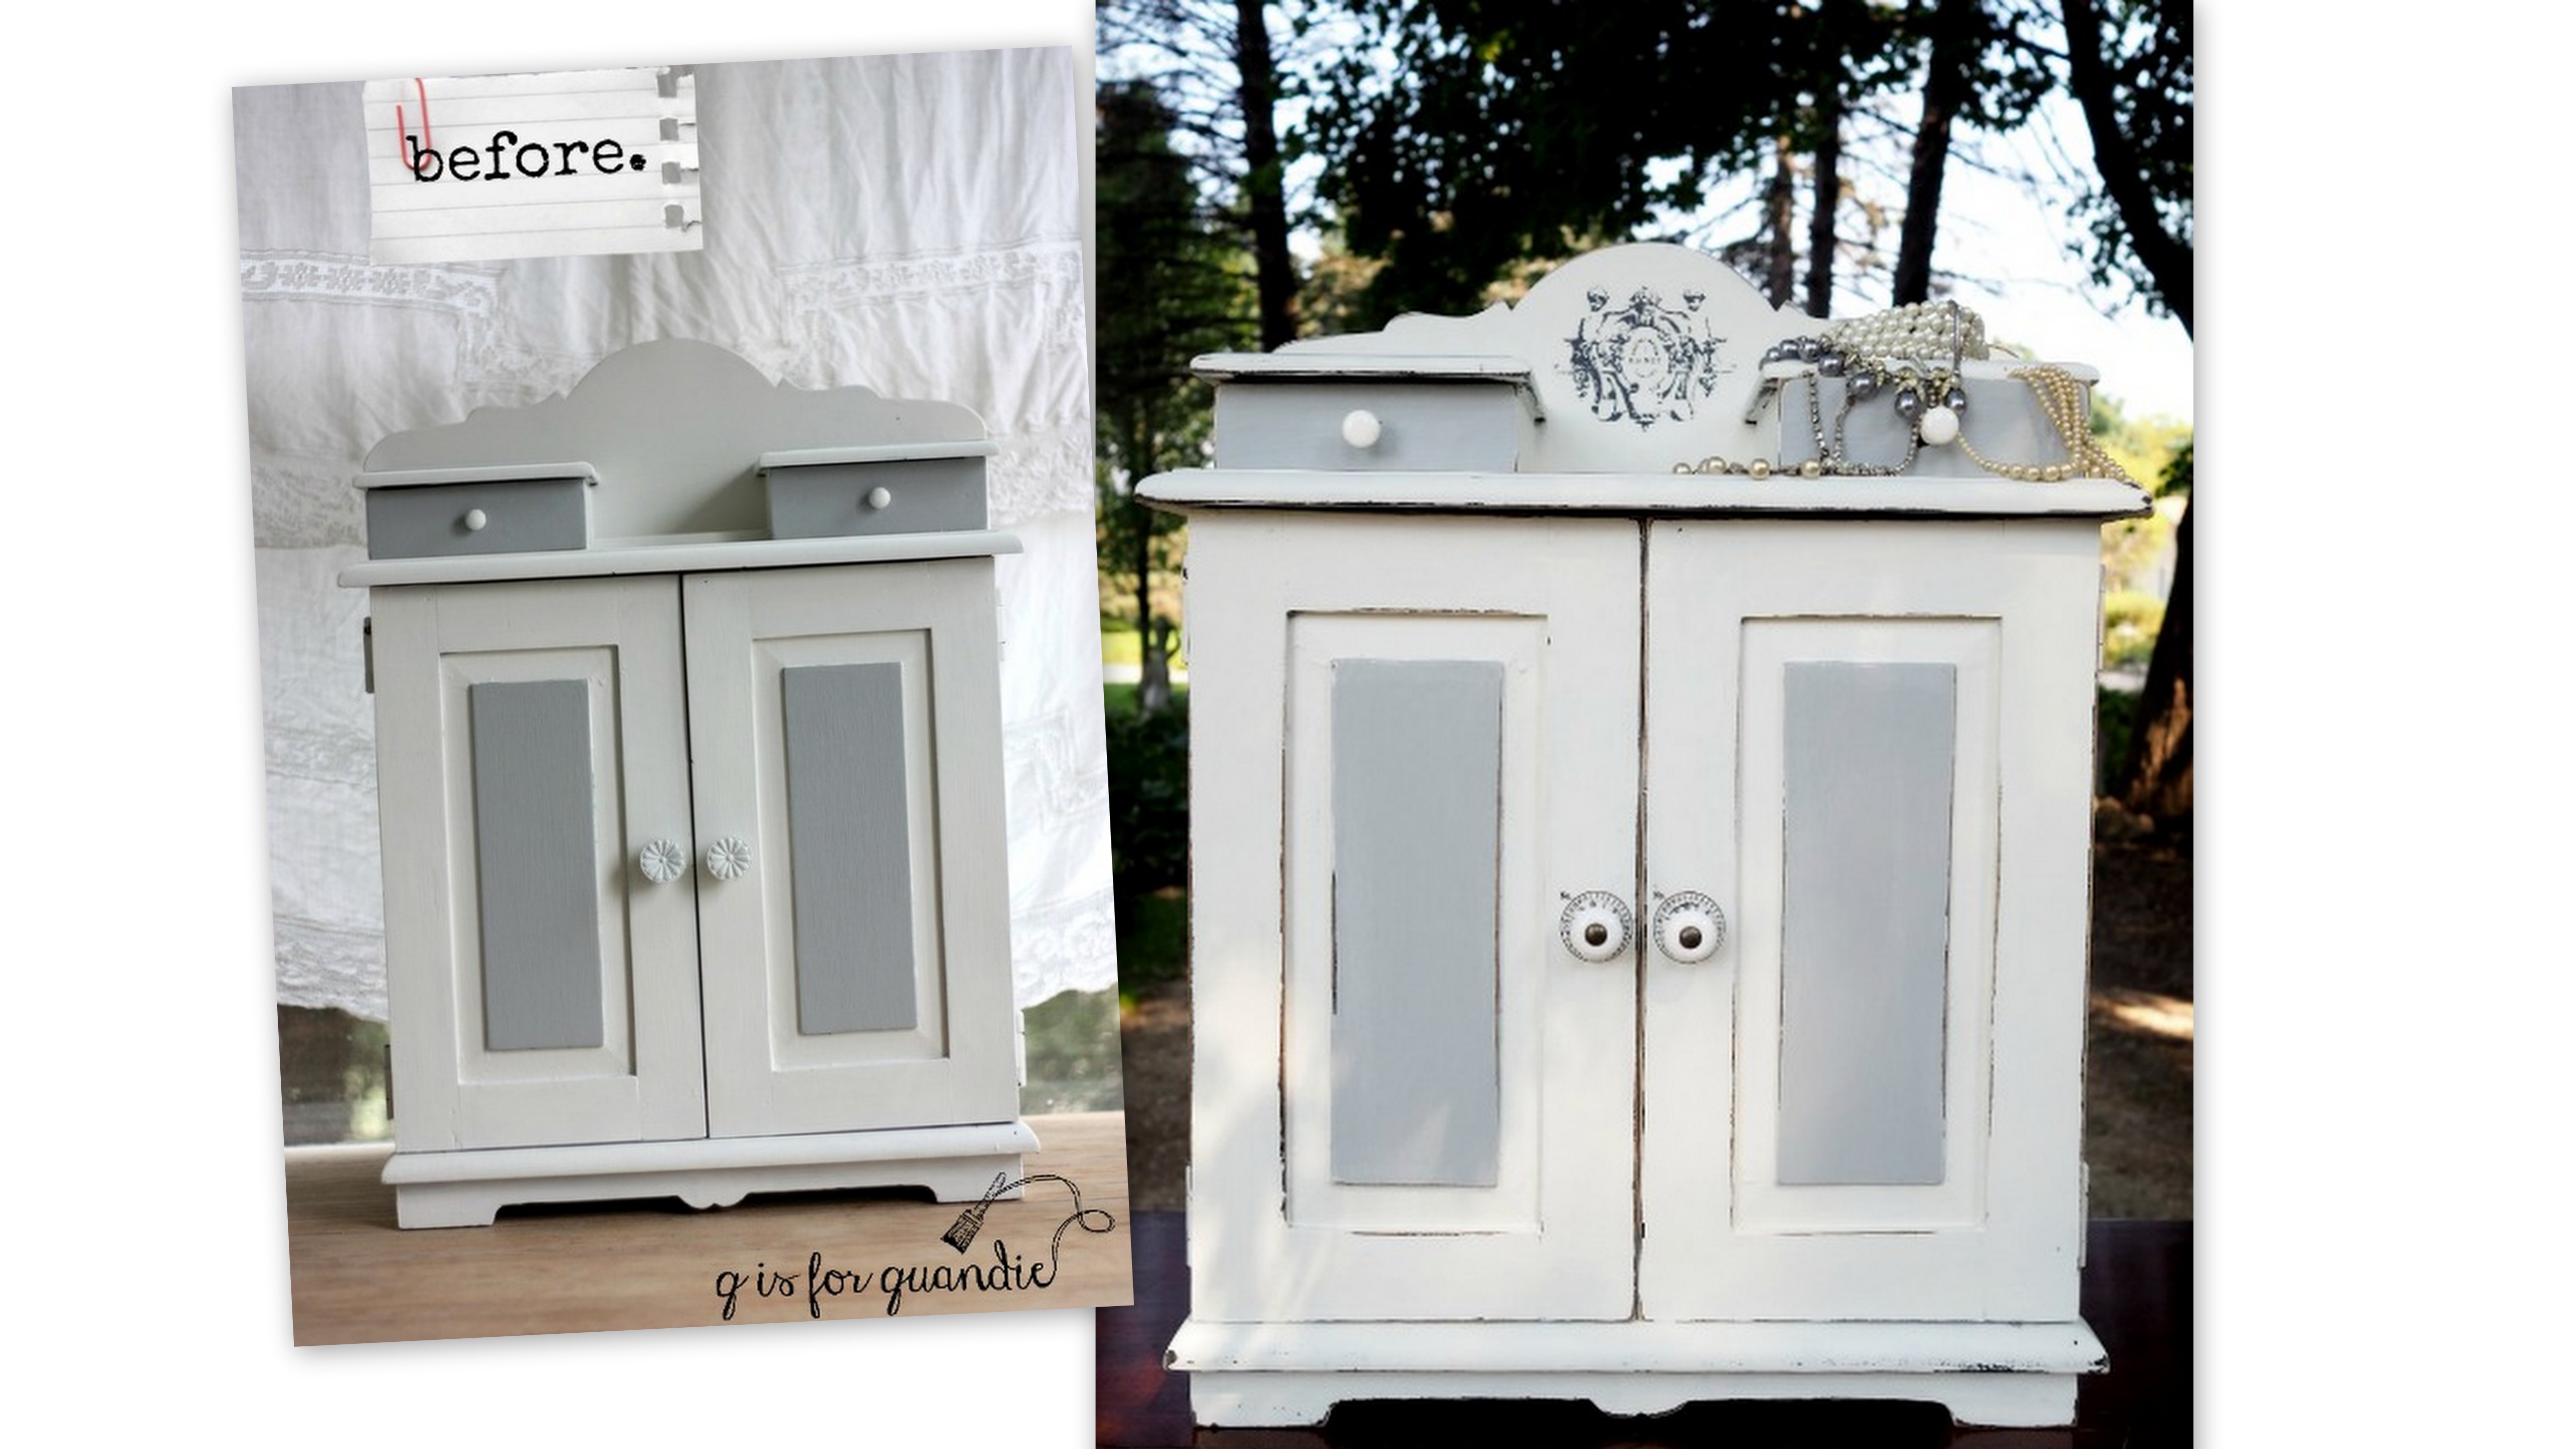
Oh boy.  I’m not going to sugar coat it, this one was in rough, rough shape when I got it.  That ‘before’ photo was taken after it came back from Ken’s workshop.  Ken took this one completely apart and put it back together again with fresh glue and wood reinforcements in every corner.  As you can see, it had only one sad little drawer pull.  Ken added the twine handles so that he could operate the drawers while he was working on them.

Not only was all the glue dried out, the finish was pretty dried out and beat up as well.

But I had a feeling there was some gorgeous wood underneath all of that abuse.

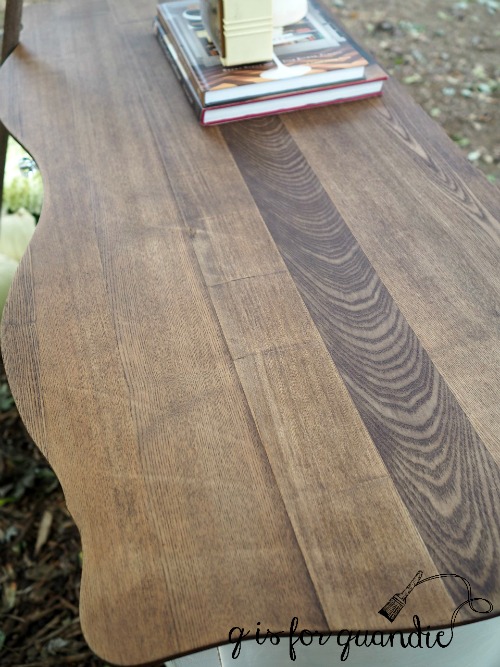
So after Ken performed his repair magic, I got out the stripper and started with the top.  I stripped any remaining finish off the top and sanded it down.  Then I waxed it with Miss Mustard Seed Antiquing Wax.  Yes, it’s just the wax over the bare wood.  Miss Mustard Seed has a great video tutorial on how to do this on YouTube, so if you’ve never seen it be sure to check it out.

Sure enough, it was the perfect way to go.  Just look how beautiful that wood is now!  I love these dresser tops that are made out of solid planks of wood rather than a sheet of veneer.

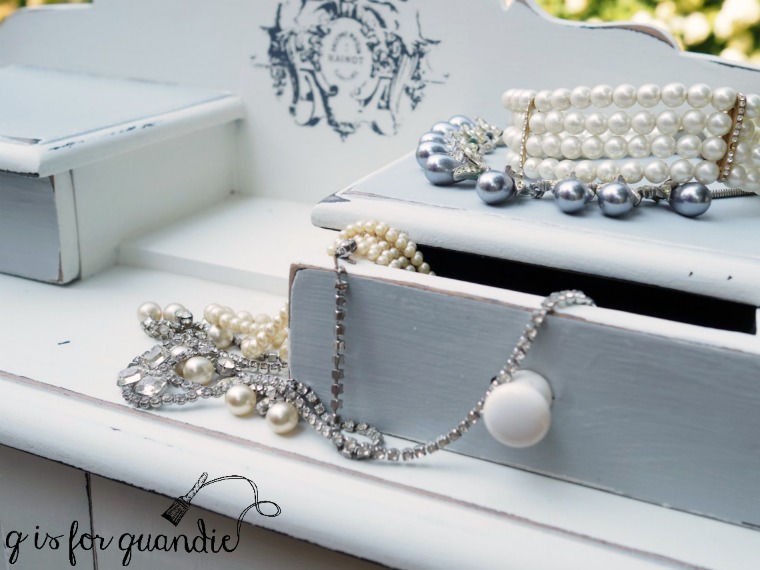
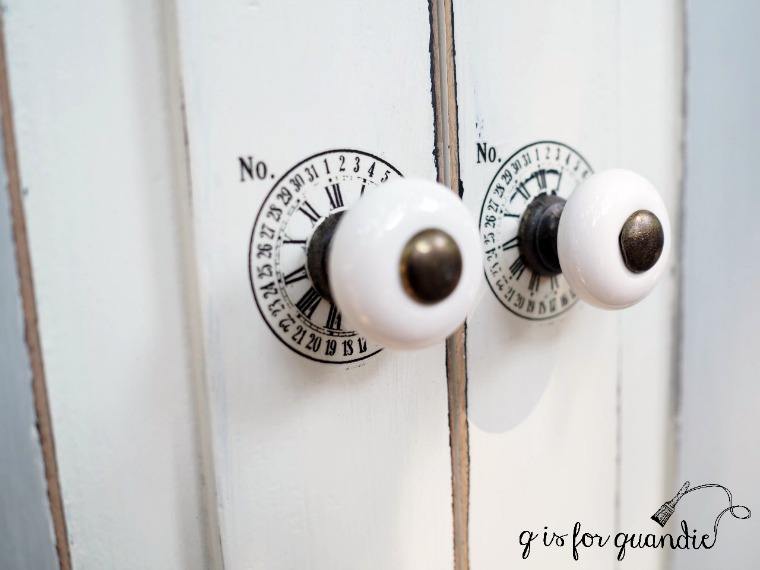
Meanwhile, I filled in the holes for the original drawer pulls on the drawers.  I knew I wanted to switch to glass knobs on this one (with just one hole each rather than the two required for a pull), so I filled the extra holes with Elmer’s ProBond wood filler and let that harden up while I was working on the top.

To prep the rest of the dresser I sanded it lightly by hand.  That finish was so dry that it basically just came off at the merest touch of the sandpaper.  I vacuumed up the dust, wiped the dresser down with a damp cloth and then painted the body and drawer fronts in Fusion’s Limestone.  It took three coats to properly cover that dark wood.

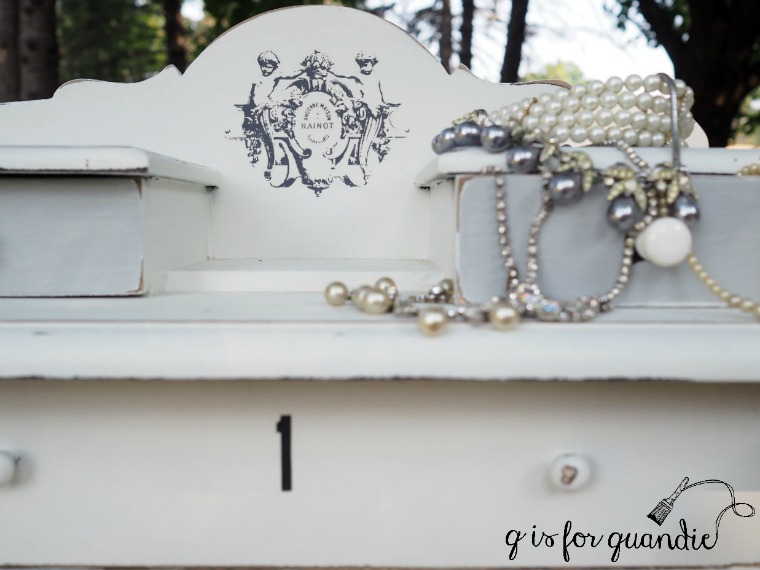
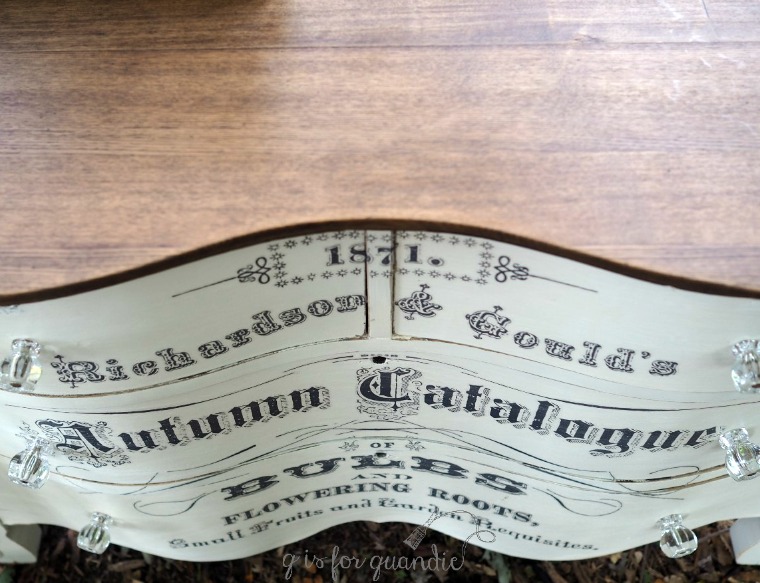
Once dry, I sanded the edges to distress and then applied the Iron Orchid Designs ‘Seeds’ transfer.  The transfer worked beautifully with the Fusion paint.

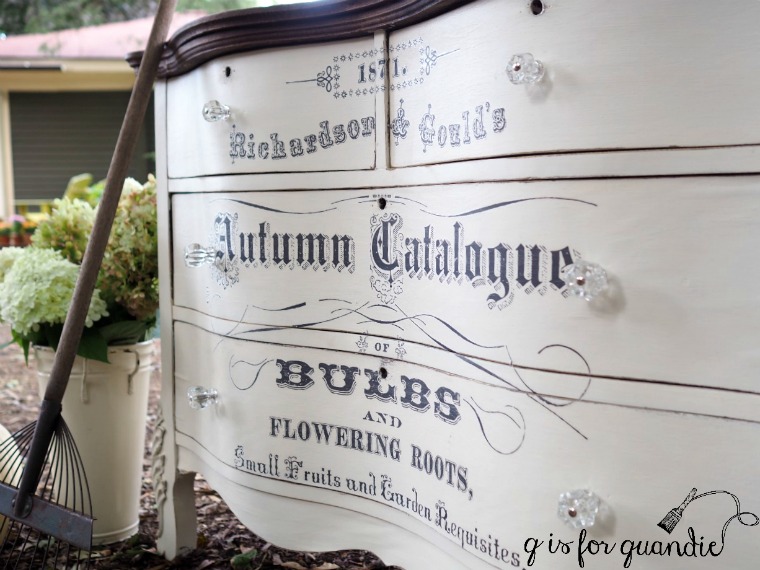
Q-tip:  the entire ‘Seeds’ transfer is almost 37″ long, this dresser is just under 33″ tall total, while the total space for the transfer is only about 23″ tall.  So I didn’t use the whole thing.  If you look back to the first two dressers, you’ll see that I did the same thing with each of them.  And in fact, I used different sections of the transfer on each one.  It’s quite easy to ‘cut and paste’ in this way with the IOD transfers.  And now I have a section of the transfer left over that will work beautifully on another piece.  It’s a great way to get two pieces out of one transfer.

Once the transfer was applied I went over it ever so lightly with 220 grit sandpaper.  That helps minimize the ‘halo’ that shows around each letter at certain angles of light.

Finally, I drilled new holes and added my clear glass knobs.

I’ve refinished a few serpentine dressers in my day (some of my faves are here, here and here), but this one is especially curvy.

Even the sides are curved.

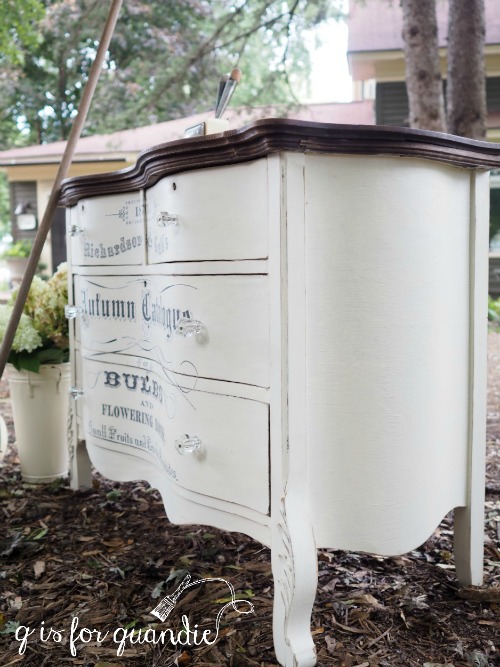
I think this dresser has been improved 100%, don’t you agree?

So tell me, which of the three versions is your favorite?

memory collectors.

Just before my occasional sale last year I had the idea to turn some vintage graters into photo holders.  I loved the way they turned out, so recently when I saw some graters at a garage sale I picked them up to make some more.

This time I decided to upgrade the idea a little with some more substantial clips.  I found these Tim Holtz Idea-ology clipboard clips at Hobby Lobby.

I pulled out the rest of the supplies I needed; some Little Billy Goat paint, Tim Holtz Idea-ology rub-ons, and some Homestead House Salad Bowl Finish (bees wax).

I started out with painting the clips.  Although they were OK as is, I wanted to ‘age’ them up with some paint.  I painted them with a couple of coats of paint, then sanded them to distress, added some rub-on designs and put a coat of Homestead House Salad Bowl Finish over it all.

I added various rub-ons to all of the graters themselves as well.

You know, at first I didn’t even realize that I’d used these Tim Holtz rub-ons in 3 out of 5 posts this week.  Sure enough, I used them on the yellow pots on Tuesday, the jewelry dresser yesterday, and now again today.  Obviously I love them.  I’ve always thought they would be so much fun to use on furniture if only they weren’t so very small.  I’m so glad that the ladies at Iron Orchid Designs started making their fabulous decor transfers in sizes suitable for furniture!

It wasn’t until I added the phrase ‘collector of memories’ to one of the clips that it hit me, that’s exactly what these are, memory collectors.

Although I have old photos clipped in place, you could also add some memorabilia like ticket stubs, old letters, greeting cards, old family recipe cards (that one is for you Meggan) … whatever.

This next one would be perfect for the family Christmas photo.

Since I’m not having an occasional sale at my house this year, I brought these in to Reclaiming Beautiful last night.  They are for sale at $12 each while they last!


storing the family jewels.

Way back last winter Mr. Q followed up on a Craigslist ad I sent him and he purchased this for me.

From the fuzzy pictures included with the Craigslist ad, I thought it was another old doll dresser.  When Mr. Q saw it in person he thought I would love it due to my love of tiny dressers, but he forgot to factor in that I am a bit of a tiny dresser snob.  You see, it’s not old.  Well, it’s probably slightly old … like 80’s old, but not the kind of old I like.  It’s also a bit bigger than I thought it would be.  I’m sure it was always intended to be a jewelry box.

So it sat.  First it sat in my Q Branch for a while, then it sat on my unused three season porch during the 4th season (winter), then it got moved out to my carriage house workshop where it sat all summer.

But I finally pulled it out and decided to give it a ‘quandie quickie Wednesday’ makeover.

First things first, I got out some sandpaper and gave the piece more of a distressed look.  That alone was a major improvement.  But then I swapped out the knobs on the front.  I just wasn’t loving either of the knob styles that the dresser came with.  The knobs on the tiny upper drawers were painted over metal and a bit too small, while the knobs on the lower drawers were plastic and just a bit too big.  So I replaced all of them with some white porcelain knobs that I had on hand.

I added some fun Tim Holtz rub-ons behind the lower knobs.

Next I added some more Tim Holtz rub-on numbers to the inside drawers.

But for me, the real pièce de résistance is the Iron Orchid Designs transfer I added to the top.

This is another of the designs that came with the “French Pots III’ set that I purchased for the cupboard in my bedroom.  Once again, even though these were meant for clay pots, this one worked beautifully for this jewelry box as well.

So, a few quick improvements added a lot to this piece, don’t you think?

This jewelry box found a new home with one of the Reclaiming Beautiful owners, Monique.  I hope she’s enjoying it!

goldilocks and the three yellows.

The other day I came across an ad on Craigslist for a vintage Jenny Lind style twin size headboard at a price that fit right into my current budget for the guest room, $40.  This one had all of the spindles in place, unlike the $5 garage sale one that I passed up a few weeks ago.

So, I sent an email to arrange to see it.  Every once in a while I find someone on Craigslist who would prefer to meet somewhere rather than have potential buyers come to their home.  This tends to be rare with furniture purchases.  After all, it can be rather inconvenient for the seller to load up some furniture to meet you somewhere else.  But I did once buy a nice cane backed chair out of someone’s trunk at a gas station.  The seller of this bed also wanted to meet somewhere and offered to let me name the place.  As it turned out, she was a young woman by herself so I commend her for being safe about it.

I asked her to swing by my office at the day job.  Since I work at City Hall, it’s pretty easy to find.  And I think she felt perfectly comfortable since the police department happens to be right there.  She showed up promptly at noon, I handed over the cash and transferred the headboard from her car to mine.  Easy peasy.

I’ve already shared the chippy cabinet painted in Homestead House’s Laurentien milk paint that’s in the room.  Yes, it’s the same name as the Fusion Laurentien I used inside my giant English cupboard and close to the same color.  Both of these paints are made by Homestead House, but one is milk paint and the other is acrylic paint.

I’ve also shared the pretty little chair that I painted in Miss Mustard Seed’s Apron Strings milk paint.  FYI, it’s also made by Homestead House.

Since the walls in this room are white, I felt like I could get as colorful as I wanted with the furnishings.  Plus, aside from the cupboard, everything in this room is an inexpensive garage sale find, so if I get tired of the colors I won’t feel bad at all about replacing a piece with something else.

So I decided to choose yet another cheery vintage-y color for the bed, one that would bring out another color in the quilt that I’ll be using.

I considered green, but ultimately I felt like yellow might just be perfect.  But what shade of yellow?

A while back the lovely people at Homestead House gifted me with some of their milk paint in several shades of yellow;  Buttermilk Cream (check out this dresser that I painted in the Buttermilk Cream), Ochre, and Garden Seed.  Since the Buttermilk Cream is the only one I’ve used before, I decided to mix up just a bit of each of the other colors and paint them on popsicle sticks to decide which one would be right for my bed.

That’s Ochre at the top, Buttermilk Cream in the middle and Garden Seed on the bottom.

Then, since I already had some paint mixed up, I decided to paint some clay pots too.  In case you haven’t already figured this out about me, I just love painting stuff.  If I have some paint sitting in front of me ready to go, I like to put it on something.

Then, since the pots were pretty plain I added some Tim Holtz rub-ons to them to dress them up a bit.

Nothing like getting a little distracted and losing sight of my original purpose.

But this little exercise did help me decide that Ochre (2) is the yellow I want for my guest room bed.  The Buttermilk Cream (1) is just a bit too pale.  Especially when compared to the other yellows.  It almost looks more like a creamy white in these photos.  But when it’s compared to white you can see that it is a very pale yellow.  The Garden Seed (3) , on the other hand, is just a bit too mustard-y.

That’s not to say that I didn’t love the Garden Seed, just not for my guest room bed.  And since I already had a brush wet, I decided to mix up some more and paint a sign.

I used the table leaf from a table Mr. Q and I picked up the other day and my Funky Junk Farmers’ Market stencil.  If you’re wondering how I gave it that two dimensional look, I first painted the stencil in a medium grey.  When that was dry, I re-positioned the stencil by just a hair and then painted it in white.  It’s a simple way to make your stenciled sign look just a tad more legit.

Well, so much for getting that bed painted last weekend.  But when I do get around to it, I’m definitely going to paint it in Ochre.


random garage sales.

Normally I stick with the big community wide garage sales on a Saturday.  It’s a great way to fit in 50 – 60 sales in just a few hours.  The reality of garage saling is that you’ll find great vintage stuff at about one out of 10 sales (I totally made up that stat, but you get my point, right?).

This past Saturday my sister and I had planned to go to the Cannon Falls community wide sales.  We were going to make a day of it and also visit the winery in town.  I was picturing a beautiful, crisp fall day when we made these plans.  In years past I’ve had to wear a jacket and a hat for the Cannon Falls sales because we usually get a cold snap right about now.  However, it was 92 and humid here on Saturday and I just didn’t have it in me to get up at 7 a.m. and drive the 40 minutes to Cannon Falls.

So instead my sister and I decided to hop in my convertible and drive into the city stopping at random sales along the way.  It was the perfect day to buzz around with the top down on the car.  My sister was in charge of sign spotting, although she still needs to work on those skills.  I definitely needed one of those bumper stickers that say “I brake for garage sales” because she never saw the signs until the last possible second.  We only got cursed at once, and that time we weren’t even stopping at a sale, I was turning off to let a very impatient driver get ahead of me.

My sister and I are really very compatible garage salers.  Neither of us wants to spend time looking at clothes or toys and other kid stuff, so we pass those sales right on by.  My sister is only looking for things to use in her own home whereas I am looking for cool vintage stuff to re-purpose and ultimately sell, so we tend to not pick the same stuff most of the time.  And my sister is a Disney fanatic.  So you can imagine the fun we had when one of the first sales we stopped at had tables full of Disney collectibles.

Debbie bought some pieces for herself, and I bought some pieces to wrap up for her for Christmas.  That sale had a nice selection of vintage stuff too, including quite a few vintage suitcases.  I just bought one, although in hindsight I don’t know why I didn’t buy more.  Garage sale regret strikes again.

Another sale we stopped at also had some great vintage pieces.  I grabbed the red oil can and talked my sister into the copper one.

She has always admired the oil cans I painted and turned into photo holders …

So now is her chance to make her own.  We later stopped off at Hobby Lobby for some of the little clips I used to hold the photos in place, plus a small jar of dark blue chalk paint for Debbie to use to paint hers.

When the garage sales started to dry up, and the day started to really heat up, we stopped off at a huge, very nicely air conditioned, thrift store.  Debbie has been looking for vintage plaid Faribo wool throws for her patio.

I just love that their tags say “purveyors of warmth and comfort since 1865”.  So far she has only found one genuine Faribo, and several no-name wool throws.  But the no-name versions will do until she has a Faribo for every chair.

I found a cute pair of bowls at the thrift store.

I’d been looking for some new dishes for my cat.  This is embarrassing to admit, but she has been eating out of the old dog dishes that we’ve had since we had a dog … um, like five years ago.  It’s about time I got her some pretty cat sized dishes!

Now Lucy can dine in style.

For me the find of the day was this old photo of a farmstead that someone enlarged and put on a canvas.

I don’t know what it is that I find so appealing about it, but I’m just drawn to it.

Check out the back …

It definitely has some age to it.

I wish I had realized how fragile the front was before I put it in the trunk of the car.  I ended up cracking the photo in several places and I’m very bummed about that.  But I still think it’s going to look awesome just as soon as I find the perfect spot for it in my home.

In general, the prices were lower at these random sales than they tend to be at neighborhood sales.  But we also came home with fewer items overall.  It’s a trade-off.  We had a fun time just driving around following the signs where they took us though.  We’d definitely do it again!

Oh, and I almost forgot, the winners of the hello fall banners were Barbara and Laura.  I know I have more than one Barbara and Laura among my readers, but I sent an email to the correct ones, so if you didn’t get an email, I’m sorry to say it’s not you.  Thanks so much to everyone who took the time to leave a comment last Friday though, and if you didn’t win one, I promise they are quite easy to make so just follow my directions from Friday and give it a go.

hello fall book page banner.

Fall officially arrives today, and I don’t know about you but I love this time of year.  As much as I enjoy summer, I don’t enjoy frizzy hair on humid days, the way my upper arms jiggle in sleeveless shirts or how the weeds take over my garden in what feels like a day!

Ironically it’s going to be 90 and humid today in the Twin Cities, so frizzy hair and jiggly arms it is for at least one more day.  But I’m looking forward to long sleeves, good hair days and not feeling guilty about reading a book on the sofa instead of weeding the garden.  Oh, and a trip to Disney World.  Yep, my sister, niece and I are going to Disney World for Halloween.  Mr. Q will stay home and man the fort.  I think he’d rather poke his eye out with a sharp stick than go to Disney World.  Anyway …

Last year I made some petite book page banners to say hello to fall for my occasional sale.

I thought they were pretty adorable.  At least a couple of other people must have thought so as well because the items I added them to sold really quickly.

So I made some more to sell at Reclaiming Beautiful this year, and while I was at it I thought I would do a tutorial for you guys.  Be sure to read all the way to the end of this post even if you don’t want to know how I made them because I’m giving a couple away.

step 1.  Print your message on vintage book paper.

I use pages from some old atlases for my banners.

The pages are a little bit bigger than 8” x 10”, so I trim them down to size.  Then I use the manual feed option on my printer and print directly onto the book page.  Click this link to open the word document that I used to make my banners:  hello fall

Q-tip:  you can play around with fonts and sizes as much as you want to, but be sure to leave enough spacing to cut your letters into flag shapes.  I recommend practicing on plain paper until you have the spacing just right so you don’t waste any of your book pages.

My doc will fit on an 8” x 10” page, and the end result will be 2” x 3” ‘flags’ for each letter.

step 2.  Cut out your flags.

For a uniform look to your banner, remember that you want your flags to all be the same size and you want the letter centered on each one.  I use my larger paper cutter at first to cut each strip of letters to 3″ tall ….

Then I switch over to my smaller Creative Memories paper cutter to cut them down into 2” wide pieces.

Finally I just free-hand the notch out of the bottom to give them a flag shape.

step 3.  Add string.

Use a hole punch to add holes to the top of each flag, string them on some pretty striped baker’s twine and you’re done!

Now all you have to do is find the perfect spot for your banner.  I have mine draped across an old window screen that is just hanging on the wall .

But it also looked great on my chalkboard door.

So many options.

And speaking of options, you have some options for getting your own ‘hello fall’ book page banner.

Option 1, make your own.

Option 2, if you’re local, go buy one of mine at Reclaiming Beautiful ($12 each, while supplies last).

Option 3, win one!  I have a couple of extras, so I’ll be drawing the names of two winners from comments left on this blog post by Saturday (September 23, 2017) at midnight (central time).  So leave a comment to be in the running to win, best of luck!

living with it.

Mr. Q and I invited my sister over for dinner one Friday evening a while back, but it was all part of a secret ruse to get some help moving my giant English cupboard into the house.

We followed the advice that Marilee gave me and removed the doors from the cabinet to both lighten it up and make it easier to grab onto (thanks so much for that piece of advice Marilee, it made this so much easier).  Of course we also took all of the shelves out.  Even so, this cupboard is still big, bulky and heavy.  We used some moving straps to lift it, Mr. Q on one end, my sister and me on the other.

It actually went more smoothly than any of us thought it would.  I gotta tell you, in person the size of this cupboard is pretty intimidating.

I’d asked all of you to give your opinion as to whether I should paint the cupboard, or leave it ‘as is’.  I totally expected the majority to say I should paint it.  After all, painting furniture is what I do and also I assume why most of you enjoy my blog.  In the end I only got two votes for painting it, one of them from my sister which really surprised me (after all, I’m pretty sure she reads this blog because she’s my very supportive sister, not because she loves painted furniture).  On the other hand, several of my fellow furniture painters voted for leaving it ‘as is’ which also really surprised me.  But the really unexpected result was how many of you suggested I consider adding a lime wax finish.  Eureka!  I hadn’t even considered that, and what a great idea.

But for the moment, the advice I decided to follow is to live with the cupboard for a while ‘as is’ and see how it feels.  At a minimum I wanted to at least bring it into the room to see how it looked in place.

So far, so good.  It fits perfectly into this space and I absolutely love it.  I still have the blue rooster cupboard directly across from it next to my desk.

I was worried the room was going to look a bit cupboard-heavy with two large cupboards, but I don’t think it does in person.

Of course, the inherent danger with this ‘live with it for a while’ plan is that I’ll grow complacent.  Now that the cupboard is in place, it will be a little bit more trouble to refinish it and I won’t be as motivated to get it done.  Will I end up just leaving it ‘as is’ because it’s the easiest option?  Or will it truly be because I love it ‘as is’?  We’ll just have to wait and see.

In the meantime, I’ve decided to fill ‘er up and see how well it functions for storing my many craft supplies.

Since I was transitioning from a dresser with drawers to a cupboard with shelves, I had to come up with containers for holding things.  In other words, I didn’t want to just pile my glue guns, craft paints, greeting cards and colored pencils in a jumble on the shelves.

Fortunately I already kept quite a few of my craft supplies in cool vintage tool boxes.

My glue guns and extra glue fit perfectly into the rusty aqua toolbox my co-worker Jodie gave me for my birthday last year (the same aqua toolbox that’s pictured in Vintage Holiday!).

And although they aren’t here yet, the green box and possibly one or two of the toolboxes I brought home from those lunchtime garage sales last week will probably make their way into this cupboard as well.

My unopened bags of milk paint can just line up on the shelves along with an ironstone pitcher full of wax brushes and some glass canisters full of knobs (I keep my opened bags of milk paint in an air tight rubbermaid bin to extend their shelf life, exposure to too much moisture can ruin the powder).

I’m still thinking about that lime wax that so many of you suggested, but for the moment I’m just happy to have this giant storage piece in my Q branch.  It holds so much stuff, and I know I’m going to get some great use out of it.


the farmers market ladder.

My niece Kris salvaged several of these ladders for me from a shop she worked in briefly.  They aren’t old, and they were never meant to actually function as ladders.  They were used for display only.

I decided to paint this one to give it a little more personality and since I seem to be on a green kick this week, I dug out one of my favorite shades of green milk paint, In A Pickle from Sweet Pickins.  It only took one coat of paint to cover the ladder.  Once dry, I added some farmers market stencils in an off-white craft paint.

Then I sanded to distress and added a top coat of Miss Mustard Seed hemp oil.  I brushed on the oil with a cheap chip brush and then wiped off the excess with an old black t-shirt (I didn’t want to leave any white fluff behind).

Hemp oil adds a bit more richness and depth to darker milk paint colors than wax does.  You can really see that with this shade of green.

But here’s a tip for you, although the hemp oil changes the color of the milk paint quite a bit, it does not change the color of the acrylic craft paint.  So keep that in mind when choosing your colors on a project like this.

By the way, how do you like the ‘q-tip’?  It was Mr. Q’s idea and I thought it was pretty clever.  From now on I’ll try to remember to give you a q-tip every now and then.

I added a basket to the ladder and put a potted lavender plant inside along with some vintage gardening tools.

Totally off-season for September I know.  I’m supposed to be sharing fall themed stuff now, right?

Well, one last hurrah for summer?  We’ve got two more official days of summer left, so I say let’s make the most of them.

I brought this ladder to Reclaiming Beautiful last week and it sold within days, so there must be some other green lover out there!

I still had one last ladder, so I painted it in Miss Mustard Seed’s Flow Blue and added the same farmers market stencils.  My sister was thinking she’d like to have this one for her house, but she really couldn’t come up with a spot for it, so I’ll most likely take it into Reclaiming Beautiful as well.

I think the ladders make great magazine racks, especially when one of the magazines displayed happens to be one that I am in!

Wait, what?!  Did you read that right?  Yep.  There is a story about my non-collection of vintage ornaments in the Fall 2017 issue of Vintage Holiday magazine!

Somehow we’ve gone straight from summer to winter today.

But seriously, my preview copy of the magazine just arrived yesterday and I couldn’t wait to share it with you guys.  I’m super excited and flattered to have my work in a real magazine.  The irony that it’s an article about my vintage ornament collection, despite the fact that I try so hard to deny being a collector of anything, is not lost on me.

The magazine is full of great vintage holiday decor, so be sure to watch for it on newsstands near you and pick up a copy.


vintage greens.

In addition to all of the fab stuff I found at the Lynnhurst sales on Saturday, I also found time to check out a few sales during my lunch hour last week.

I wasn’t specifically trying to find things that were green, but somehow I ended up with several items in that perfectly vintage shade of green.

First of all was this lovely little box.  I was drawn to the original painted finish.

This is the kind of chippy, distressed patina that I am trying to replicate every time I use milk paint.  I want to study the wear patterns on this box and make my next piece of furniture look just like this.  But really, although you can do amazing things with milk paint, it’s hard to beat the real deal.

I also love the fact that the box looks very homemade.  Even the handle looks like it was just cobbled together from some bent wire and bits of scrap sheet metal.

I’m not sure what I’m going to store in this box, but clearly it needs to be something special.  But for now it even looks fab with some green books.

This amazing little green birdhouse came from the same sale.

When I got it home I immediately replaced the scrapbook paper that was lining the bottom with some pages from an old German book that I purchased at Carver Junk Co.

It also has an amazing patina.  Wouldn’t it be adorable with a little plant inside?  Or filled with vintage books.

I also found a couple of old green toolboxes.

I actually came home with 4 old toolboxes, 3 of them from one sale.  The other two aren’t green though, so they didn’t make the cut for this blog post.  Although sometimes the original color and patina should be left alone, oftentimes I paint them like this …

You can see what I’ve done with other toolboxes in the past here, herehere and here.

I’m still working on finding the perfect spot in my house for a touch of green, but I’m determined to find it.

In the meantime, I’m just having fun playing around with my vintage greens.

lynnhurst 2017.

Fall garage sale season is in full swing.  My sister and I have plans to hit the neighborhood sales every Saturday for the rest of this month.  So far, we’ve been finding lots of great stuff.  This past Saturday we went to another Minneapolis neighborhood, Lynnhurst, for their neighborhood sales.

Once again, we filled up my sister’s SUV.  As it turns out, people in Lynnhurst price their stuff to sell!

My sister and I each had one specific item we were looking for.

Debbie wanted some pretty dishtowels to put in a bowl that was going back to her neighbor.  I don’t think I mentioned this here, but a week ago Debbie had a house warming party at her new place and a neighbor brought over a bowl of watermelon.  Debbie follows the rule that you never return a container empty, you put a thoughtful little ‘thank you’ gift inside.

Sure enough, she found a set of pretty blue and white dishtowels.

You might think it’s … well … icky to buy linens like these at a garage sale, but these have obviously not been used.  Often times people have been given stuff like this as a gift and it’s not the right color for them, or for whatever reason they just never used them.  So they sell them.

The one item on my list was a globe.  Not for me actually, but for my co-worker Jodie.  She mentioned that she was looking for a globe to turn into something.  I’m not entirely sure what, but she is very crafty.

Sure enough, we found a globe too.

Granted, it doesn’t always work out this way, but you’d be surprised how much luck we often have finding just what we need at garage sales!

I also came home with a glass canister and a bunch of old blocks.

As well as some more vintage graters to turn into photo holders.

I also found this adorable whisk broom with an embroidered cover.

Have you ever seen anything like this before?  I hadn’t.  I just couldn’t resist it.  I’m going to try soaking the cover in some OxyClean and see if I can clean it up a bit.

My sister added to her Disney ornament collection.  She likes that they are Disney, I like that they are vintage.

She also came home with a fab mid-century ice bucket.

I found a pretty little side table that I’ve already begun to make over, here is the before photo.

But the find of the day was definitely this oak washstand (or as some like to call them, commode).

The drawer pulls on this piece are gorgeous.  I think I would have purchased it for the hardware alone.  But it’s also quite lovely overall.  And look what I found when I opened the top drawer …

It looks hand drawn to me.  Only the top drawer has this liner.  I’m debating whether or not to leave it.  Unfortunately it has some water damage spots.

Do I rip it out?  Or do I leave it and let whomever buys it decide?

Also, I won’t be putting the mirror back on.  These pieces make perfect nightstands, but not with a mirror, because a mirror would be weird on a nightstand, right?  I know it seems like a bit of a shame, but they are both just far more versatile on their own.

The mirror and the harp that held it on the washstand are really pretty though, and in great condition ‘as is’.  I think they would look amazing hung on the wall over the sink in a bathroom.  Especially since it has that towel bar.

I added some hangers to it and hung it in my photo cottage just to give you an idea of what that would look like.  I wish I had a fabulous pedestal sink to use as a prop, but no such luck.  Instead, I’ll share this photo from pinterest to inspire you.  I love the look of the darker wood with the white ship lap behind it.

So if any of you locals happen to have the perfect spot for a mirror over your sink, be sure to check my ‘available for local sale’ page for details.

We didn’t come across the washstand until one of our last stops.  The SUV was fairly full at that point, but I was determined to fit it in.  So there we were once again, unloading the contents of our vehicle onto the curb and packing it all back in around the washstand.  Debbie’s girl scout camping trip packing skills come to our rescue yet again!

Currently I’ve got three furniture makeovers underway out in the carriage house.  Each one is taking much longer than I anticipated.  So let’s all keep our fingers crossed that I manage to get at least one of them finished this week to share with you, but in the meantime I think I still might be able to eke out another five post week.  Be sure to stay tuned!