talk about flexibility.

Remember the desk I painted last July?

I painted it in Dixie Belle’s Drop Cloth and added a couple of the smaller version of IOD’s Petit Rosier transfers.

I never intended for the piano stool to go with it, and in fact the piano stool that was pictured with it sold separately right away.

But the desk is still with me.  I have to admit, I’m a bit bummed out that this piece hasn’t sold yet.  I absolutely love it, but don’t have a spot for it.  Usually I will re-do a piece that doesn’t sell, but in this case I just can’t bring myself to do that.  I would hate to cover those transfers back up again.

In an effort to try and get this desk sold, I thought, “maybe it needs a chair … and possibly a mirror” (depending on if you want a desk or a makeup table).  So on my last trip to the thrift store I picked up this chair …

I had a few basic requirements for the chair.  It needed to be sturdy, a similar style to the desk, and easy to recover.  This one filled the bill perfectly.

I started with a good cleaning, and then applied a coat of Dixie Belle’s B.O.S.S. in clear.  This type of finish tends to bleed.  An ounce of prevention is worth a pound of cure, so I just went ahead and started with the B.O.S.S.

Next up I gave it two coats of Drop Cloth.  As per usual, the Drop Cloth went over the B.O.S.S. beautifully only requiring two coats for full coverage over that dark stain.  Once dry, I sanded lightly to distress and gave the chair a coat of clear wax.

For the seat, I pulled off the old grungy fabric and replaced it with some pretty black and white toile that I had on hand.  I wanted something that would work with the black and white on the desk.

Using toile always feels like a risk to me, but I know there are a couple of other toile lovers out there, right?

Next I pulled out a mirror that I had taken off a dresser (this one), and painted the frame in Drop Cloth.

I added a hanger to the back of the mirror so it can be hung on the wall.

Finally, I restaged photos of this piece as both a desk and a makeup table/vanity.  Talk about flexibility!

First up, the desk.

There is plenty of space on the top of this desk for a laptop, or really any sort of computer set up you have, leaving lots of room on either side for paperwork, books, a desk lamp and so on.

And you could hide a lot of office-y stuff in those 7 drawers!

One of the drawers has this funky glass piece that slides forward and back …

I’m completely baffled as to what the purpose of that piece is.  Do any of you have an idea?

If I add the mirror hanging over the desk, it magically becomes a vanity or makeup table.

Since the piece is black and white, it can be paired with any accent color, such as a pretty coral or pink.

So whether you are a neutral lover, or prefer a bit of color, this piece could be worked in to an existing décor.

Desk?  or Makeup Table?  Neutral color scheme, or dressed up with a pop of color?


Talk about flexibility, this one could go either way.

And it’s still for sale, and now includes the mirror and the chair.  If any of you locals need a desk … or a makeup table … be sure to check my ‘available for local sale‘ page for the details.

Thanks to Dixie Belle Paint Co for providing the B.O.S.S. and the Drop Cloth paint used on this project.

stillwater library book review.

After finding so many great decorating books at my mom’s local library, and after listening to advice from many of you, I decided to get a myself a new library card.  I’d had one about 25 years ago, and in fact there used to be a good-sized library just down the street from us.  We could walk there, and often did.  That was back in the day when there was no such thing as a Kindle.  But eventually that library closed, I started reading ebooks rather than paper books, and then things like pinterest and decorating blogs became a thing, and really, who needed a library card?

Now that I have a little more time on my hands, I’ve decided to check out the various libraries in my area and see what they have in stock for decorating books.  So a few weeks back Mr. Q and I popped into the Stillwater Library and got signed up with library cards, and I brought home this stack of books …

One big difference that I noted at the Stillwater Library v. my mom’s library in Henderson, Nevada is that my mom’s library had some newer books.  The publication dates on those books ranged from 2007 to 2021.  The most recent of the books I found here was 2013.

Full disclosure, I didn’t do any sort of deep dive into what books could potentially be available to me, I just went through those that were currently on the shelves.

So let’s start at the top of the stack with Cath Kidston’s in print (2005).  I grabbed this one because I’ve always enjoyed Cath Kidston’s style.  It’s very floral and colorful, and I love her use of vintage fabrics.

This particular book has lots of ideas for ways to those fabrics in your home.  If you enjoy sewing, this might be a great book for you to check out.

If you’ve followed me for long, you know that I don’t sew.  However, I do iron.

I thought this idea was positively brilliant.  I’d never really seen an ‘ironing table’ before.  I have a couple of fabulous old farmhouse type tables hanging about, I could easily make an ironing table.

I don’t have a fabulous laundry room to put it in though.  But I can sure see the appeal of ironing vintage linens on a big table like this rather than a narrow ironing board.

What do you think of that idea?  Would you use an ironing table?

The next book in the stack is another Country Living book, Decorating with White, and it’s the most recent of the books I checked out.

I mentioned last time that I tend to really like Country Living books and this one is no exception.  Although it was published in 2013, decorating with white seems to be fairly timeless.

Isn’t this pair of twin beds fabulous?

And apparently decorating with green is a classic also.  I was paging through the March 2022 issue of Country Living and came across a photo that was recycled from this book.

It was just a coincidence that I had just seen it in the book.  Talk about a timeless look.

By the way, although the book is called Decorating with White, there is a big chapter on pairing blue with white, and another section on using other colors as well.  Such as green.

This was the only one of the books that I checked out that I would consider buying just to go back and admire the photos now and then.

The next book I looked at was Salvage Style for the Garden by Marcianne Miller with Dana Irwin (2003).

I thought this one would really appeal to me since it combines two of my favorite things, gardens and upcycling.  It features various projects using reclaimed items.

I like the bench made out of a door and spindles, but not sure about the feasibility of finding 18 spindles at a reasonable cost.

I did get one takeaway idea from this book, and that is using andirons to support a flower box …

I just happen to have a spare pair of andirons lying around.  I picked them up at last year’s Trash to Treasure day.  See them there in the center front?

So now I’ve got some ideas swirling around in my head on how to use these in the garden this year.

Tattered Treasures by Lauren Powell (2001) definitely contains some vintage eye candy.

Even though it was the oldest book in the stack, it was filled with timeless classics like vintage cameras …

and crackled ironstone and pottery …

Most of the projects in this book felt a bit dated to me though, but what can you expect from a book that is 21 years old?

I definitely went through a china shard mosaic period myself.

Lars Bolander’s Scandinavian Design by Heather Smith MacIsaac was published in 2010.

This book is a bit different than the others since it isn’t focused on vintage items, but rather on Scandinavian design in general.  Painted furniture is very much a part of this style, and although I imagine it wasn’t originally distressed, much of it has worn over time.

I would say that my own style is strongly influenced by Scandinavian design.

I love the sparseness, and of course I also love the look of the painted pieces.

Although most of the colors used are pale, you’ll also see a lot of this blue.

After a trip to Norway in 2017, I was inspired by this color and painted a little stool in Miss Mustard Seed’s Flow Blue to try and recreate the look.

I ran out of time to really study this book because it was due back at the library, but I may check it out again sometime.

Last up is For the Love of Old by Mary Randolph Carter, published in 2006.

As I just mentioned above that I love the sparseness of Scandinavian style, if you’re familiar at all with Mary Randolph Carter’s style, you may already realize that I don’t love it.

Although I like some of the individual pieces she uses, like that shabby painted office chair, the clutter in most of her photos makes my eye twitch a little.

All I can think when looking at these rooms is how much dust there must be, and as someone who is allergic to dust I feel a sneeze coming on just looking at the photos.

So, her style is not for me.  But hey, variety is the spice of life.  Even though I may not like it, some of you may love it.

Which of these books would be your favorite?  Be sure to share your own opinions with a comment.

garden china.

Thanks so much for all of the fabulous comments on Friday’s post!  If you haven’t had a chance to check it out, I’m giving away some paint from Dixie Belle’s new Desert Collection.  You have until Friday, April 15 to leave a comment to be eligible to win.  So go back and do that if you haven’t already.

If you’ve followed me from years back, you’ve seen this before … so I apologize if this is a repeat for you.  But I like to make what I call ‘garden china’.

It’s a great way to use some of my stash of pretty dishes.  Especially the ones that are too crazed to be used as actual plates anymore.

Please note that it is not safe to eat off china that is crazed, ie. has tiny cracks all over the surface like the plate above.  Those cracks can harbor tiny unseen bacteria that no amount of cleaning can remove.  So, don’t ever use crazed china for food.

I simply add words that I cut out of adhesive vinyl on my Cricut to the pretty dishes and then use them in flower pots.

I’ve been known to do the same thing on other items too, like orphaned enamelware lids.

Or other enamelware pieces …

If you don’t happen to have a Cricut for cutting your own vinyl words, using the Classic Vintage Label transfers from re.design with prima work great for this too.

Back in the days of the occasional sale that my friend/picker Sue and I hosted, we had LOTS of pretty china.

We’re talking the hey day of shabby chic here.

I don’t have a stash quite as fabulous of that these days, but I did have a pile of floral china from garage sales last fall or recent thrifting.  So I pulled them all out and whipped up some garden china.

Most of them got Cricut words, but I did use a Classic Vintage Label on this pretty platter.

I’ve priced them ranging from $8 to $14, the $14 belonging to this fabulous ‘welcome’ platter.

That one would be perfect in a flower pot next to your front door.

I took these in to the shop last week, and I’m hoping to find some more pretty plates in the coming weeks to add to the basket.

One last note, if you’re wondering whether or not the vinyl words and/or transfers hold up outdoors, they absolutely do.  I have several plates that have been outside for several years and still look great.

In fact, my house number plate has been hanging outside all year round, including our frigid winters, for at least 7 years or more …

and it still looks just as good as the first day I hung it.  And yes, that is the same adhesive vinyl cut out on my Cricut machine.

Also, not to worry, if you ever want to remove the vinyl or a transfer you can scrape them off using a razor blade.  So, no china was harmed in the making of this blog post.

life is a journey.

I’ve got one last post today from my recent trip out west.  Be sure to read all the way to the end, because we’ve finally gotten to the giveaway!

When I was out at my mom’s place the first time this year, back in February, one of the things she wanted me to do was paint her front door.  Well, that is a project that is right up my alley!  And so much more fun than washing windows or doing her taxes, which are the typical sort of things she wants my help with.

So we popped out to her local Lowes to pick out paint for her door.  She wanted either a navy blue or a dark green.  We picked a lovely color from the sample chips and went up to the paint mixing counter to have it whipped up.  And you know what?  They couldn’t do it.  They did not have the appropriate dark base paint to mix up a dark color!  I have to admit, I was flabbergasted.  I mean, I’d been hearing that people were having some trouble getting paint these days but I guess I just didn’t expect Lowes to tell me that all they had available were pale shades.

Since I knew I was going back to visit again in a few weeks, I told my mom that I would bring some Dixie Belle paint with me for her door.  She ended up deciding that she wanted dark green rather than navy, so I chose Midnight Green from Dixie Belle’s new Desert Collection.  After all, a color from the Desert Collection seems appropriate for a door in the Mojave desert, right?

The beauty of the Silk All-in-One paint is that it has a built in primer and top coat.  So I only needed to pack the one 16 oz. jar in my suitcase.  I wrapped it in bubble wrap, and then enclosed it in a zip lock bag as an extra precaution.  I have to admit, I was a little nervous that the jar would explode in my suitcase and I’d be wearing paint splattered clothing for my entire visit (not as though wearing paint splattered clothing would be anything new).  But it survived the journey just fine.

To prep the door, I cleaned it with some spray cleaner that my mom had on hand and then I sanded it with a 180 grit sanding block that I did find at her Lowes.  Then I gave it two coats of Midnight Green.

Her door went from boring brown …

to a vibrant green.

One thing I hadn’t considered was how incredibly fast paint dries in a desert environment.  It was a gorgeous day, somewhere around 70 degrees, so not hot.  But the air out there is really dry.  I struggled to maintain a wet edge in order to avoid brush strokes on the large surface of a door.

But my mom loved how it turned out, so that’s the important thing, right?

Have you seen all of the colors in the Desert Collection?

There is the Midnight Green on the lower right.

I used the Mojave on the inside of a washstand I painted earlier this year.

I wasn’t sure what I thought of this color at first, but it really grew on me after using it on this piece.

It pairs beautifully with Dixie Belle’s Drop Cloth.

Since I happened to be out in the desert, I decided to see if I could find some of the paint colors from the Desert Collection at the Ethel M Botanical Cactus Garden.

Cactus was easy.

It’s a cactus garden after all.

I was really hoping that Prickly Pear would be easy too, but this vibrant pink is the color of the flower.  Apparently Prickly Pear cactus blooms in May through July, so there were no blooms to be found.

I think you can get a hint of Mojave in the spines on these cacti.

They don’t really have an oasis at the cactus garden, but I thought maybe Oak Creek from Sedona would count.  The color is certainly right.

I also found a bit of the Morning Sunrise color during one of our sunrise hikes in Sedona.

There are 5 more colors in the Desert Collection, but I’ve chosen these five to include in today’s giveaway!

But before we get to that, I had to share this funny coincidence.  When we popped inside the Ethel M Factory after checking out the cactus garden, there were signs announcing their revamped packaging that pays homage to the color palette of the Mojave Desert.

There is Fiery Sky, Midnight Green and Morning Sunrise.

And here is some Mojave.

And here is Umber.

OK, of course these colors are not based on the Dixie Belle colors, or exactly the same, but I just had to share the fact that two entirely different products (paint and chocolates) on two opposite sides of the country (Florida and Nevada) were thinking the same thing at the same time.

That brings me to my giveaway!

It will include five colors from the Desert Collection; Morning Sunrise, Cactus, Oasis, Mojave and Prickly Pear.  Plus some Prickly Pear taffy that I picked up in Sedona, as well as this bracelet, also from Sedona …

I purchased one of these bracelets for myself, and then thought it would be fun to include one in the giveaway as well.  Life is a journey, not a destination.  Although, as destinations go, Sedona was a pretty good one 😉

The rules:  Simply leave a comment on this blog post to be eligible to win.

Your comment must be left on this blog post, not on Facebook or Instagram.  You are not required to follow my blog, although it would be awesome if you did!

I will randomly draw the name of a winner for today’s prize from all of the comments left on this post by Friday, April 15, 2022 at the stroke of midnight (U.S. Central time).

The fine print: no purchase necessary, you must be 18 years of age or older to win, void where prohibited by law, the number of eligible entries received determines the odds of winning, approximate retail value of prize is $160, if the prize is not claimed by Friday, April 22, 2022 another name will be drawn at random to win, blah, blah, blah.

Thank you to Dixie Belle Paint Co for providing the paint I’m giving away today.

the back alley buy.

Mr. Q nearly bit the dust picking up today’s piece of furniture.  Well, OK, maybe that’s a slight exaggeration …

I found this piece on Facebook Marketplace and the seller was in south Minneapolis.  We were able to schedule a noon pickup, so at least we didn’t have to find her place in the dark.  But when we got there, the street in front of her house was closed because work was being done.  No worries, she directed us to the alley instead.

I know my local readers will understand what I’m talking about, but I’m not sure if ‘alleys’ are the same throughout the world.  So for those of you not familiar, what we call an alley here in Minnesota is a narrow street that runs behind the houses in older neighborhoods.  The garages are all in the back off the alley (and not attached to the house).

I get the original appeal.  All of the unsightly stuff like garages, cars, trash cans and so forth are all hidden out back.  They don’t put in alleys anymore though, at least not that I’m aware of.  These days people want their garages attached to the house, and alleys are just added extra square footage to maintain.

Normally I love a good alley (especially when it’s full of garage sales).  But in the winter, they can be treacherous.  They don’t get plowed out on a regular basis like they should, resulting in big ruts and ice build up.  Which was totally the case in this particular alley a few weeks ago when we picked this up.  Neither one of us was prepared for carrying a big piece of furniture over really uneven ice (we should have worn our Yaktrax).  I managed to save myself, but Mr. Q went down.  Luckily he just bruised his elbow a bit, it certainly could have been worse.

But we got it loaded and made it back home in one piece.  It was actually a fairly warm day, and by warm I mean it was around 30 degrees, so only just under the freezing mark.  I decided to take advantage of that and sand down the top of this piece before even bringing it inside.

Hey, when you don’t have a heated workshop, sometimes you have to improvise.  I prefer to keep as much dust outside as possible.

Next up I gave the piece a good cleaning, and it totally needed it.  It was fairly gross.  I emptied 4 buckets of dirty water cleaning this baby inside and out.

The finish on this piece was fairly alligatored.  Alligatoring or crazing are fine, irregular cracks in the finish usually caused by excessive heat or long exposure to sunlight.  Personally, I think an alligatored finish provides the perfect canvas for some milk paint (here’s one of my all time favorite alligatored pieces).  I had recently ordered some Fusion milk paint in Little Black Dress to give it a try, so I pulled it out for this dresser.

If you are unfamiliar with using milk paint, you can get the basics from my how-to post by clicking on the image below:

Aside from the cleaning, I did not do any other prep on the body of this piece.  I did not sand it at all.  I knew the alligatored finish was fairly dried out (usually that means milk paint won’t chip overly much), plus I was OK with some chipping.  I wanted a worn look to my final finish.

So, I mixed up my milk paint and painted the sides and drawer fronts in just one coat of Little Black Dress.

I often find that I can get away with just one coat of dark milk paint over a dark stain like the one on this dresser.  Especially if I’m going to be heavily distressing the piece anyway.

Once the paint was dry, I sanded over it with 220 grit sandpaper.  I vacuumed away the dust and then added a topcoat of Dixie Belle’s Big Mama’s Butta.

This stuff is so perfect over dark milk paint.  If hemp oil and wax had a baby, it would be this product.  I apply mine with a wax brush, but you can use a lint-free cloth as well.  I brush it on, wait a few minutes and then wipe off any excess with a cloth.  I also buff it up a bit after 24 hours or so.

One quick note, the Big Mama’s Butta comes unscented or in three scented versions; Orange Grove, Suzanne’s Garden and FlannelOrange Grove smells like that orange scented model glue from the 70’s, does anyone else remember that glue?  I loved the smell of that stuff, and I also really like the Orange Grove scented Butta.  Flannel smells like men’s cologne, and I probably should have chosen that scent for this masculine color.  But I went with Suzanne’s Garden on this one instead.  Mr. Q said it smelled like a funeral home in our house after I applied it.  It reminds me of the rose scented soap that my grandmother had in her bathroom.  Although the floral scent might be a bit overpowering at first, it does mellow out quite a bit after a day or two.  So if you love a floral scent, Suzanne’s Garden might be right up your alley.

There were a few stains on the top of the dresser that didn’t sand out, so I decided to go ahead and stain the top in Varathane’s Special Walnut.  This is your basic old-fashioned penetrating wood stain, not a gel stain.  So you have to be sure that all of your old finish is removed in order for it to go on evenly.  But if you have a good, clean, raw wood finish, penetrating wood stain is super easy to apply, just brush it on and wipe away any excess with a lint free cloth.  I wear gloves for this process to avoid staining my hands.  You can add additional coats to dark up the color, but I loved how this one looked after just one coat.

I let the stain dry for a day and then added several coats of Dixie Belle’s flat clear coat to protect the top.

One of the things that attracted me to this dresser was the hardware.  It’s really very pretty.  After cleaning the drawer pulls and keyhole escutcheons with some Dawn dish soap and hot water and letting them dry, I added just a little more shiny gold with re.design with prima’s Vintage Gold Metallique Wax.

Now, you have have noticed that I did not put the mirror back on this dresser.  And if you’ve followed me for long, you know that I rarely do.  I find that dressers tend to be more marketable without a mirror.  They certainly are more versatile that way, you can use them as a TV stand, in a foyer, in a dining room, etc. without them looking out of place.

Sometimes a mirror is attached in such a way that you can take it off and you’re good to go, the top is flush with the back and the mirror sits on top of the dresser top.  But other times the top of the dresser doesn’t go all the way back and butts up against the mirror instead, leaving a gap at the back that the mirror sits down into.  Like this …

It’s so much easier when you don’t have to deal with this, but that wasn’t the case this time.

Initially I thought it might be possible to use the mirror harp to fill in that space by cutting off the arms (I’d done something similar recently with this dresser).  So I sent it over to Ken’s workshop and he cut off the arms with a curve to match the style of the remaining piece.

Ken did a great job making it look intentional.  But once I had it painted and in place, I felt like it overpowered the rest of the dresser.

So we went back to the drawing board, or in this case, a simple 2.5″ board.

Ken helped me attach it with some dowel pins.

It’s just enough to fill in that gap, but not take away from the rest of the dresser.

I think most people would be placing items of some kind on the top of the dresser, thus hiding that back piece for the most part anyway.

What do you think?  Would you have gone with the tall, curvy back piece … or do you prefer the simpler look of the straight board?  I haven’t glued either one in place yet, so I could change my mind.  Feel free to weigh in with a comment.

Either way, this dresser is for sale, see my available for local sale page for more details!

practically famous.

My sister and I often drive out to Boulder City, Nevada while visiting my mom.  Mom lives in Henderson, Nevada.  If you aren’t familiar, Henderson is a huge suburb of Las Vegas that has grown tremendously over the last 30 years.  It’s southeast of Vegas, and if you’ve ever gone to Hoover Dam from Vegas you’ve gone right through Henderson.  All of that to say that it’s only about 20 minutes from my mom’s place to Boulder City, Lake Mead and the Hoover Dam.

Despite being so close, we’d never hiked on the Historic Railroad Hiking Trail in the Lake Mead National Recreation Area during our previous visits.  So this time around we thought we’d give it a go.

The parking area for the hiking trail is located just past the Lake Mead Visitor Center.  I took the photo above from the Visitor Center, and the parking area you see off in the distance on the right side of the photo is for the hiking trails.

The trail is an out and back trail (not a loop) and is around 7 miles round trip if you do the whole thing.  We only did the part of the trail that goes through all five tunnels, so about 5 miles total.

While the scenery on this hike wasn’t quite as spectacular as the scenery in Sedona, it was pretty interesting to go through the tunnels and to read some of the history of the area on the trailside signs.  This trail is built on the old Hoover Dam railroad bed that was constructed for the purpose of moving supplies and machinery by steam or gas locomotives to the dam construction site.

I was especially fascinated by the explanation of Ragtown, the area where workers from the dam and their families lived in wooden cabins, tents or even cardboard shacks during construction of the dam.  They had no running water and no electricity (in other words, no air conditioning and not even a fan).  With daytime high temps reaching close to 120 degrees, and not a lick of shade in sight, I can’t even imagine how miserable the conditions were.  And keep in mind, the dam wasn’t finished yet so the lake wasn’t there and you couldn’t just jump in to cool off.

Alongside the trail are sweeping views of Lake Mead.  Below is a view of the marina.

I’ve always thought it must be fabulous to have a boat on Lake Mead.  It’s so huge and there never seems to be a lot of boat traffic (ironically, I just watched Pam & Tommy on Hulu and discovered that their infamous sex tape was filmed on a boat on Lake Mead, so proof positive that you can find some fairly secluded spots I think).

We had a picnic lunch after our hike and then headed in to Boulder City.  I’ve written about Boulder City here on the blog before.  I think of it as the southwestern version of Stillwater, MN.  It’s a cute little historic town with restaurants and quite a few antique shops.  There’s also a section of town with the most adorable 1930’s bungalows.    I guess if you were higher up on the food chain of those who worked on the dam, you got to live in a pretty bungalow in town rather than in a cardboard shack in Ragtown.

I never manage to get any photos when passing by the historic neighborhood, but I grabbed one off the internet for you.

The next time I’m in Boulder City I really want to just walk through this neighborhood and take a few photos.

My sister and I did head into a few shops while we were in town including the Boulder City location of Bloom.

Full disclosure, I took that photo last year.  I neglected to get a storefront photo this time around.  I mentioned the location of Bloom that is in The District in Henderson the last time I visited my mom.  They are IOD retailers, so I always try to stop in to see what they have.  I purchased the Rose Chintz paint inlay there.  This time around I was hoping they had the brand new Cheers transfer, but they did not have it at either the Boulder City location or The District location.

However, I did manage to find several other things to buy this time …

I don’t know what possessed me with that giant rubber stamp.  I’m always drawn to the stamps, but to be honest I typically don’t like the way stamps look on anything other than paper.  But I’m going to do some experimenting with the IOD ink and see if I can do anything fun with this one.

We also stopped in to Goatfeathers Emporium in Boulder City where we found the usual suspects like jadeite …

and copper …

I had to snap a quick shot of this Pfaltzgraff Yorktowne stoneware and text it to my friend Sue.

I recently pointed out to her that pretty much every thrift store we’ve been in has at least one piece of this stuff if not more.  It’s kind of a joke between us now to find it and point it out each time.  Are any of you fans of this stoneware?  If so, you should be thrifting it and not buying it in an antique mall, FYI!

Before heading back to my mom’s house, we also stopped in at Bella Marketplace.  This place was definitely more my style than Goatfeathers was.

Just check out this adorable kid sized hutch …

The display of vintage linens on an old wooden ironing board was fun.

And you know I love old cupboard doors turned into signs or peg boards.

This shop also had a vendor selling re.design with prima transfers and DIY paint.  They didn’t have any of the newer prima transfers that I’ve had my eye on (such as the blue toile, or the London Love), but I did pick up some of DIY’s Liquid Patina in Dark & Decrepit.  I’ve wanted to try this product for a while now.  I’ll be sure to let you all know how I like it.

As I was studying all of the furniture painting supplies that were available I caught something out of the corner of my eye.

You know how it is when something is totally out of context and your brain takes a minute to register what you’re seeing?  Yeah, it was like that.

I thought, ‘hey, that looks just like my guest room bed’ …

It took me a second to realize … hey … wait a minute … that is my guest room bed!

How cool is that?  I’m practically famous!

That project goes back to when I was a content creator for re.design with prima, so it makes sense that one of their retailers would be using it for marketing.  It was really fun to see it being used in this way.  I don’t know whether or not the owner of this booth follows me here, but if you do, then thank you!  I enjoyed my visit to your shop.

I like to search for brick and mortar retailers of products I use when I travel, it’s a fun way to find shops that I think will appeal to my aesthetic.  And speaking of which, Mr. Q and I are going to Charleston in April!  I’ve done a little searching and see a couple of shops in Summerville that sell IOD or Dixie Belle products.  If any of you can recommend fun shops to visit, or other awesome things to do in Charleston, be sure to leave a comment and let me know.

And if you don’t have recommendations for Charleston, leave me a comment and let me know if you’ve ever been to Boulder City.  If you’re a regular visitor to Las Vegas, and have never made the trip out to Boulder City, I highly recommend it.  Assuming that, like me, you enjoy seeing some historic homes and visiting antique shops.

 I have one more blog post to share from my trip to Mom’s, and it’s going to include a fabulous desert themed giveaway, so be sure to check back for that later in the week!

swanky swigs.

I’m hearing more and more about things like pretty vintage china and glassware, pattern mixing, blue and white pottery, chinoiserie, and even chintz coming back into fashion.  Some are calling this resurgence ‘granny chic’, but I’m definitely not a fan of that name.  I prefer grandmillenial style … probably because it sounds more ‘grand’.  Whatever you call it, here is what Etsy trend expert Dayna Isom Johnson told TODAY Style, “Millennials are saying goodbye to minimalism and looking to express their personal style with unique, standout pieces, so it only makes sense that ‘granny chic’ accessories, which are filled with character and charm, are on the rise.”

Well, I for one am excited about this trend and ready to be ahead of the curve for once!  I am a huge fan of character and charm.  So I’m starting to dabble a bit with finding pretty dishes and/or glassware at the thrift store.  I merchandise them up a bit with my own unique packaging, and then send them to the shop to sell.  So when I saw this set of glasses at the thrift store, I snatched them up.

They looked vintage to me, however there weren’t any sort of markings on the bottoms so I wasn’t 100% sure of that.  But they certainly look like they would qualify as grand millennial style to me.  Once I got home I did a little google research and discovered that Kraft Foods began selling their cheese in these reusable glasses in the 1930’s calling them ‘swanky swigs’.  Well, dang, just the name alone makes them worth the purchase I think.  Who doesn’t want a swanky swig now and then?

I also grabbed this crate on the same thrifting trip for about $2.

It wasn’t until I was playing around at home that I realized the glasses fit perfectly in the crate.  So I gave the crate a quick paint job using Dixie Belle’s Silk paint in Endless Shore (one of these days I’m going to do another comparison post showing all of the shades of white in the Silk line, complete with another giveaway, so stay tuned for that).  I added a couple of simple transfers (from re.design with prima’s Everyday Farmhouse) to the sides of the crate, and voila!

A match made in thrift store heaven.  I figure with that transfer, this set could appeal to either lovers of farmhouse style or grand millennial, right?

Of course, it remains to be seen if it sells.  I’ll keep you posted.

On the same thrift trip I also purchased another pretty set of china.

I’m still working on packaging for this set, but I know I can come up with something.

Here are a few more of my recent thrift haul finds.

Apothecary bottles are always cool, right?  This one was plain when I found it at the thrift store.  I added one of the IOD Brocante transfers to it.  There are 4 slightly different versions of that transfer, I wish I had 3 more apothecary bottles to put them on.  But no, I just found the one.

I added a re.design with prima Classic Vintage Label transfer to the lid on this galvanized bucket.  I initially assumed this bucket was for kitchen scraps intended for the compost heap because it has a heavy plastic liner inside …

but then, why would it have a scoop?  Those don’t typically come with a scoop.  You could use this for potting soil, but it’s not terribly large.  How about using it for granular fertilizer in your potting shed.  That would work.

At a recent vendor meeting, the shop owners at Reclaiming Beautiful said they’d love to see vintage cookbooks and copper items.

I aim to please.

This french bottle drying rack was a fun find.

It’s not vintage, but it has a vintage feel don’t you think?

According to Eye For Design, “the purpose of the French bottle drying rack was to provide a place for French families to dry and store empty wine bottles before returning them to the vintner for refills.”  How fabulous is that?  I’ve seen anything from drinking glasses, coffee cups, clay pots, and spools of ribbon or thread as ideas for what to put on one of these.

Most of the things in the next photo came from my picker friend, Sue.

There was a little washboard, some old wooden clothespins, and a few pieces of ironstone inside that cardboard suitcase.  I found the bunny mold and the pretty floral platter while out thrifting.

I’d painted one of these cardboard suitcases before, so I thought I’d give this one the same treatment.

I painted it in Dixie Belle’s Midnight Sky and then added a stencil using their Drop Cloth paint.

That stencil is from Maison de Stencils, in case you are wondering.

Once all of the paint was dry, I sanded lightly with 220 grit sandpaper and then used Dixie Belle’s Big Mama’s Butta to seal it.

To jazz up the inside, I added some decoupage paper from re.design with prima called Cobalt Flourish.

I have to admit, it would be about 10 times more fabulous if I had lined the entire interior of the case rather than just the bottom, but that would have taken at least another package of the decoupage paper, and possibly two more.  At around $8 apiece, I just couldn’t justify adding that much expense to the suitcase makeover.

Some of these items already went to Reclaiming Beautiful, and some of them will go next week.  Which is your favorite?


rope dropping sedona.

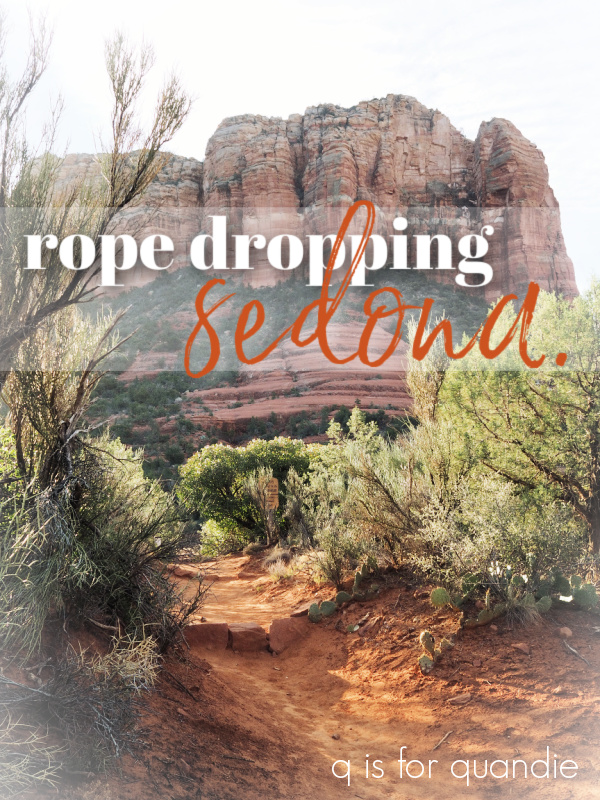
Those of you who visit Disney parks will know exactly what I mean when I say ‘rope dropping’, but for the uninitiated, rope dropping is when you get to a park before it opens to try and beat the crowds.  Back in the day they literally had a rope across the entrance that they dropped at opening time, hence the name.

My sister and I are expert rope droppers, we wouldn’t do Disney parks any other way.  They get so crazy crowded later at mid-day.  These days I find that the only enjoyable time to be in the parks is early morning, or late evening.

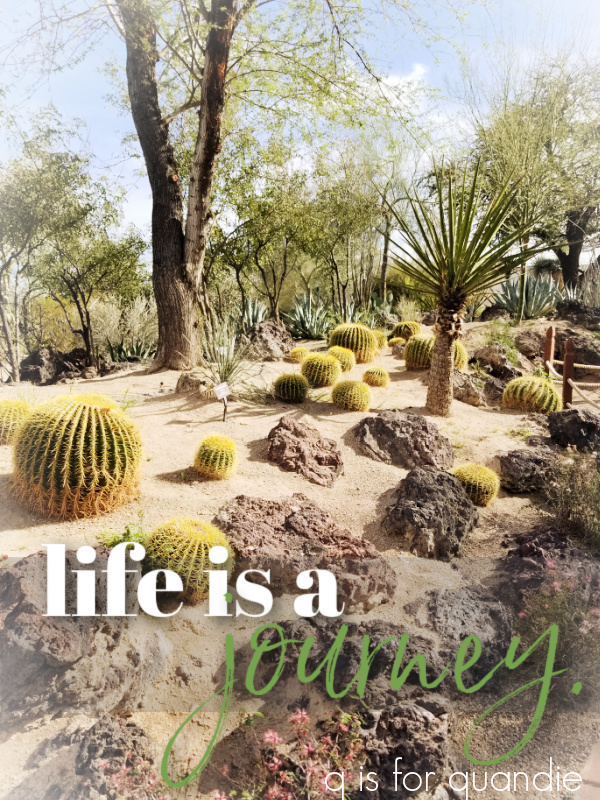
Well, as we discovered on our trip out there last week, Sedona, Arizona is a bit of the same.  Debbie and I put our expert rope dropping skills to work in Sedona!

But let me start at the beginning.  After flying out to our mom’s house, we got up early the next morning, packed up the car and headed for Arizona.  It takes just over 4 hours to drive from Henderson, Nevada to Sedona, Arizona.

We drove to Flagstaff, and then took 89A, a.k.a. the Oak Creek Canyon Scenic Drive, south from there into Sedona.  I took this photo from the Oak Creek Vista just so I could show you guys what that road looked like.

Uh, yeah, it was kind of scary.

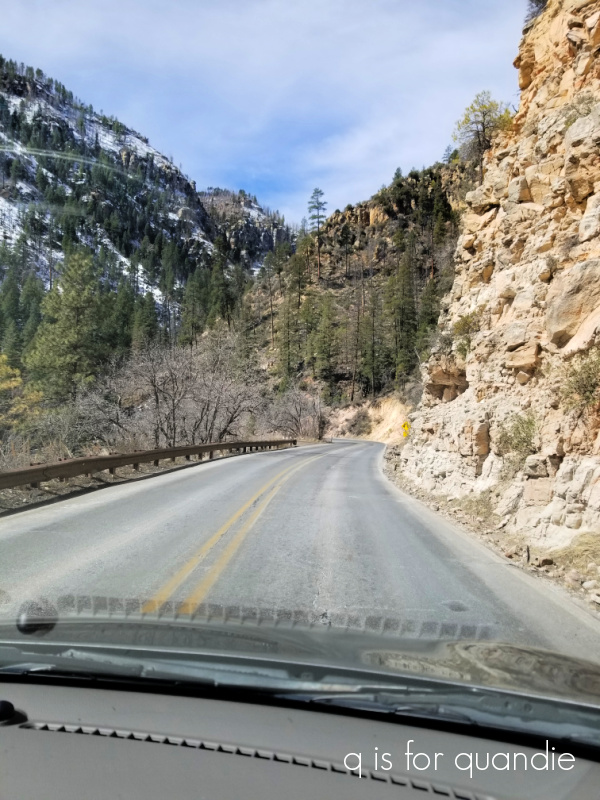
Rock wall on one side, massive drop off on the other.  My mom was cool as a cucumber in the back seat, but Debbie and I white knuckled it the whole way down.  The scenery was absolutely spectacular though.

If you head into Sedona from Phoenix or Tucson you won’t be coming this way, but it’s worth taking the drive up and back just for the scenery.  Just take 89A north out of Sedona.

Just to mess with our heads, we were traveling on the first day of daylight saving time.  Plus, Arizona is a different time zone than Nevada.  Plus, we had just flown in from Minnesota which is in even another time zone.  Plus, Arizona doesn’t do daylight saving time, but Nevada does.  Seriously, wrap your head around that.  We had a heck of a time figuring out what time we needed to leave my mom’s house in order to be in Sedona for a 2 p.m. tour we had scheduled.

But we managed it.

Prior to leaving home, we had read a travel tip that suggested taking a trolley tour when first arriving in town to get a good overview of the area and to decide what areas you want to go back to explore further.

So we had booked the Sedona Hi-Points Tour through Red Rock Magic Trolley.

I’m not going to lie, I was a little disappointed when I realized that our tour was in a van, not a cute little trolley.  Once again, I hadn’t read the fine print.  Only the shorter 55 minute tours took place in a trolley, our 2 hour tour was with a van.  But in the end, it was a fantastic tour.  In addition to the three of us, there was only one other couple in our group so it really felt like we had a private tour.  Our guide was super nice and very knowledgeable about Sedona.  We visited Bell Rock, The Chapel of the Holy Cross, and Airport Mesa.  Our guide explained the energy vortexes that Sedona is known for, and even did a little demonstration at the Airport Mesa, which is considered to be the most powerful vortex in Sedona.  I have to admit, I’m a bit of a skeptic about these things.  I didn’t get any sort of magical tingly feeling, but hey, maybe my chakras were a little cleaner after that.  Who knows?  My mom wasn’t up for much walking so she opted to stay in the van at Bell Rock and at the Chapel and our guide stayed with her and regaled her with stories of Sedona.  He was super nice to her and didn’t make her feel like she was an added burden at all.  It was handy having a driver to drop us off at both of these locations because they were very crowded and parking was a nightmare, so the tour was worth it just for that.

After our tour concluded, we settled in to our hotel.  We stayed at the Best Western Plus Arroyo Roble Hotel in the Uptown area.  The view from our patio was pretty spectacular.

Just behind the hotel you can walk down to Oak Creek, and my sister and I did that just before sunset on our first night.

It was so peaceful and picturesque.

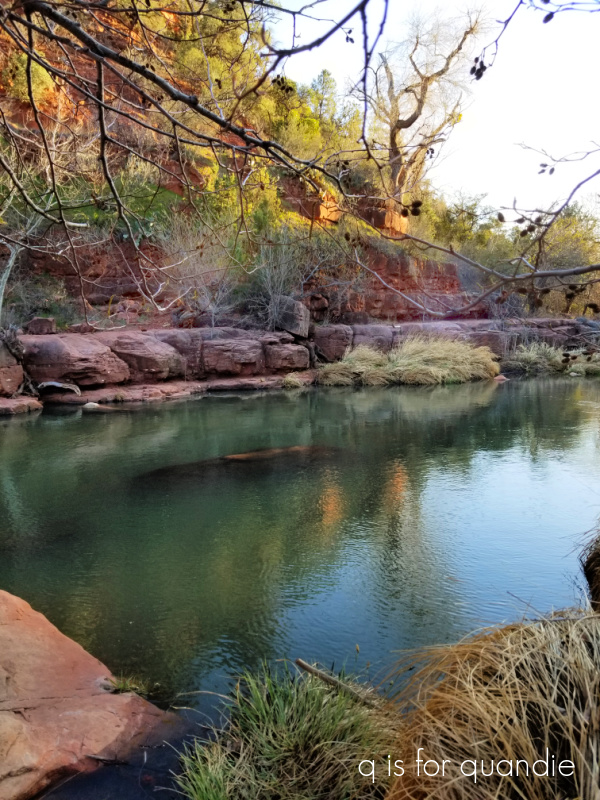
And having just flown in from Minnesota (where it was 7 degrees) the previous day, it just felt amazing to be outside in such beautiful surroundings.

The hotel also offered a fire pit.

Seriously, does that look like a fake backdrop or what?  Nope, that was our actual view.  Some other travelers at the hotel joined us out there after dark and it was fun chatting with them.

The pool area was lovely as well.

Although it was fairly cool while we were there, the pool was heated and people were using it in the afternoon.  We hadn’t brought swimsuits though, so we missed out on that.

I should mention that this hotel is right smack dab in the heart of the most touristy part of Sedona called Uptown.  I didn’t get any photos of that area, but it’s full of over-priced restaurants, cheap souvenir shops and LOTS of tourists.  It’s a strange juxtaposition to have all of that beautiful nature out the back, while being steps away from all of that intense action out front.  It was interesting to note that everything closed up fairly early though.  By 8 p.m. the area out front was practically deserted.

I have absolutely zero complaints about this hotel.  The customer service was fantastic.  In fact, on our last night there were weren’t able to get into the safe in our room and my sister had put the car keys in there while we went to dinner.  After the hotel staff couldn’t get it open either, they located someone at 9 pm to come and drill the safe open so that we wouldn’t have to give up our plan for a sunrise hike the next morning.  The included breakfast buffet was really nice too.

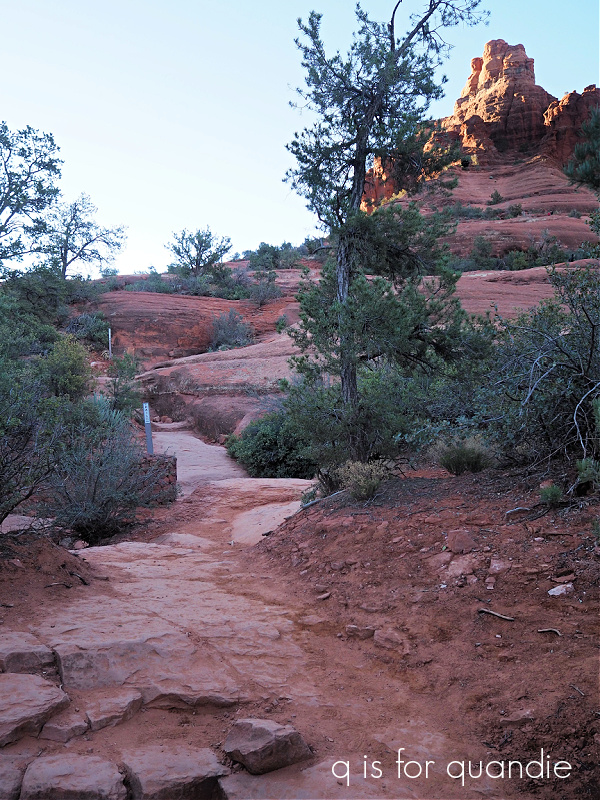
And speaking of breakfast, I think the best advice we got from our tour guide was to get up before dawn and do some of the popular hikes before breakfast to avoid the crowds.  In other words, we had to be at the trailhead at rope drop!

Now, I should preface this next bit by pointing out that my sister and I aren’t getting any younger.  She’s nursing a knee injury, and I have tendonitis issues in one of my heels.  Add on to that the fact that we are both afraid of heights.  So we planned on hiking the easier trails in Sedona, and not doing any climbing.  But for those of you in the same boat, these hikes are still well worth it for seeing some pretty spectacular views.

Our sunrise hike on the first morning was to Bell Rock and Courthouse Butte.

We started off down this trail headed towards Bell Rock just as the sun was coming up.

As you can see, the trail is pretty flat at first.  You can opt to climb Bell Rock, and there were plenty of people doing that, but I got sweaty palms just looking at other people standing at the edge up there.  So we chose to just walk around the perimeter, which still offered awesome scenery.

Just to be clear (for those who may also want to take this hike), the trail wasn’t flat sand the entire time.  There was some easy rock scrambling involved too.  But it was very doable.

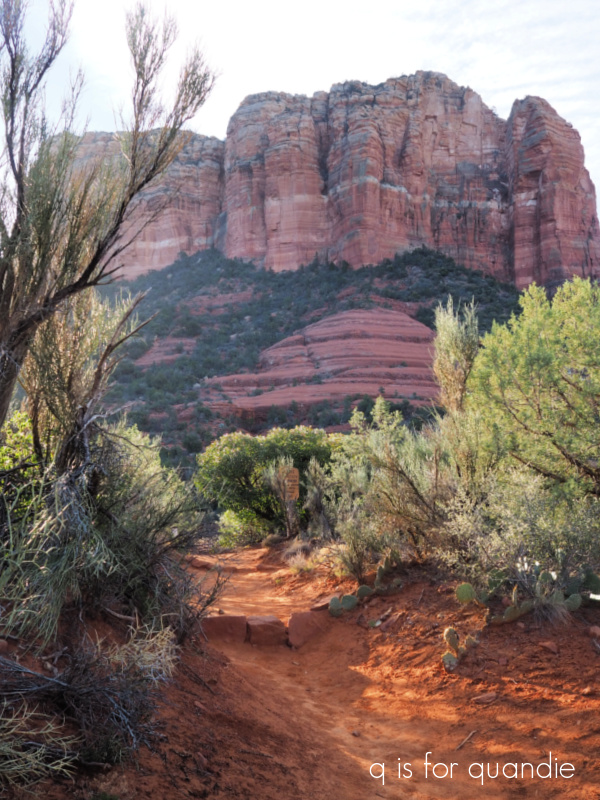
Next we headed off towards Courthouse Butte.

The butte is pretty darn impressive.

By the way, a butte is defined as an isolated hill with steep sides and a flat top (similar to but narrower than a mesa).

As impressive as that view is, if you turn around, the vista from here is even more spectacular.

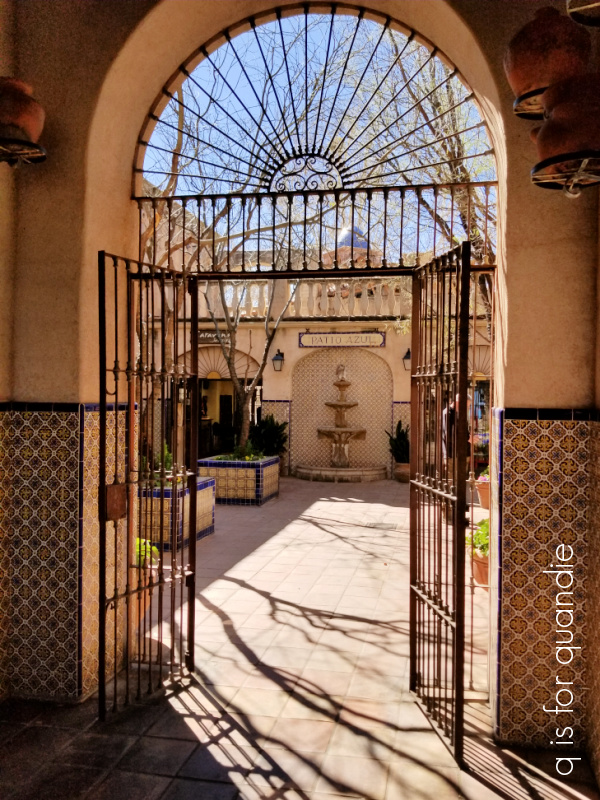
After hiking for a couple of hours, we headed back to our hotel for breakfast.  After breakfast we decided to check out a popular shopping area called Tlaquepaque.

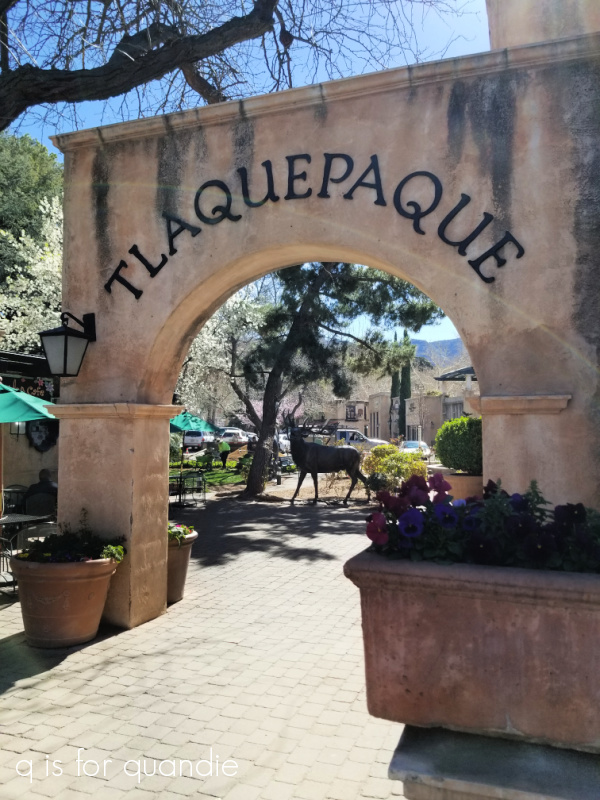
None of us are big shoppers, but the area was so pretty that we could have wandered around in there for quite some time just admiring it.

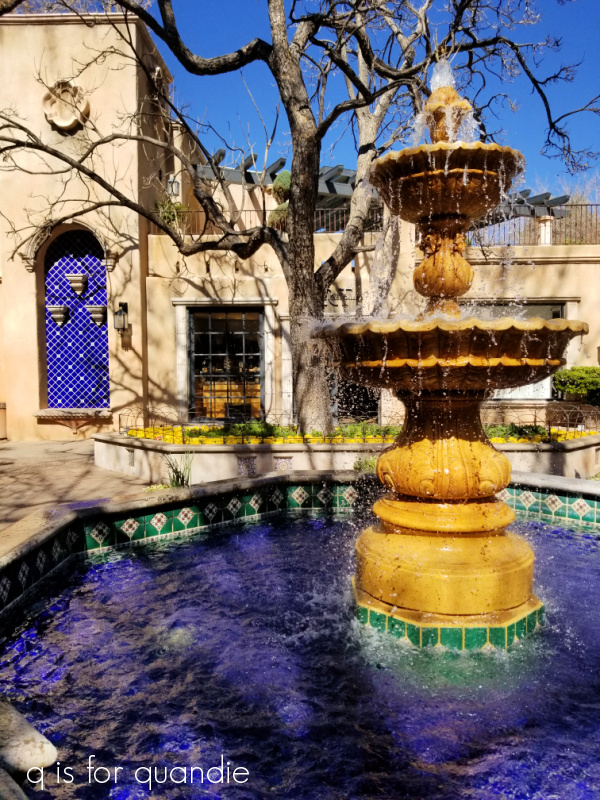
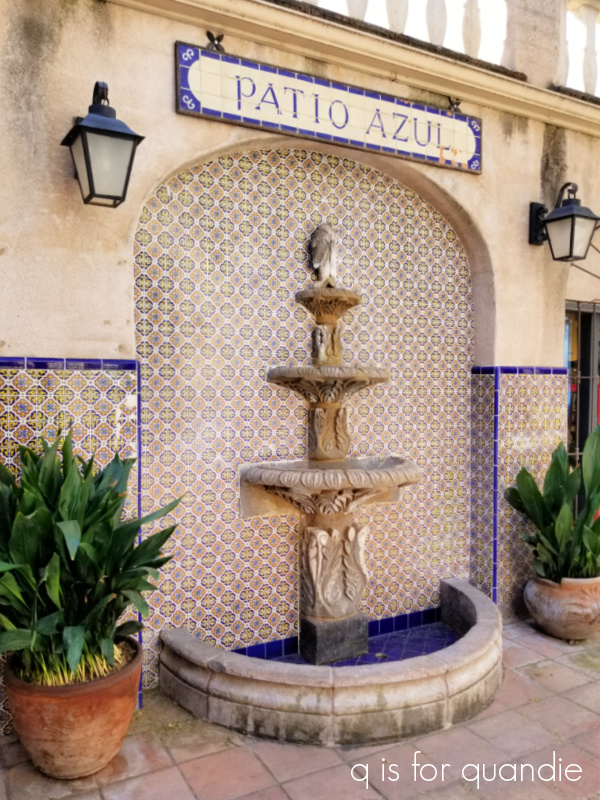
Tlaquepaque was designed in the 1970’s and the design was based on traditional Mexican villages.

There were pretty little plazas around every corner.

And the tilework was really gorgeous.

I really did feel as though I was in another part of the world entirely.  But then, this is completely different from anything you’d find in Minnesota!

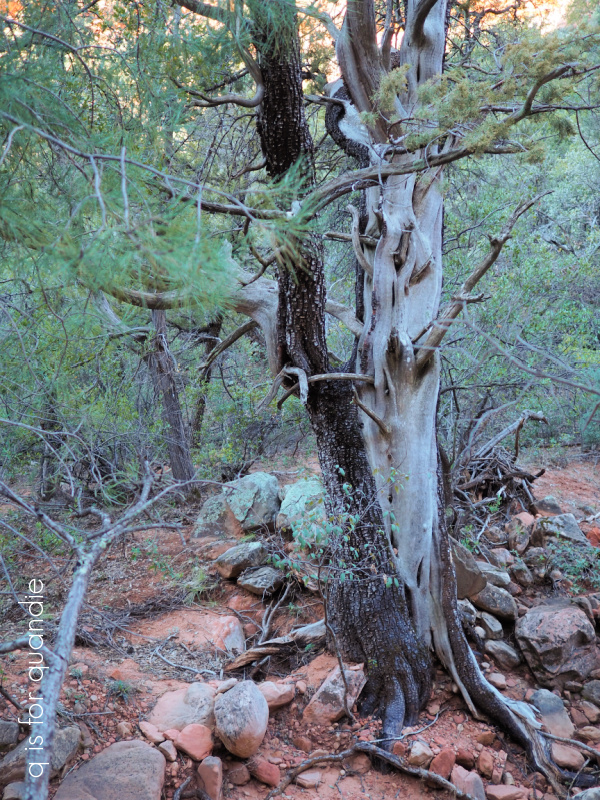
We did a shorter sunrise hike the next morning before heading back to mom’s house.

I have to say that the hike into Fay Canyon wasn’t quite as impressive as the previous day’s hike, but it was still rather magical.

As with the Bell Rock hike, there was only one other car in the parking lot when we arrived, but it was almost full when we left.  All the way back to the hotel we saw cars lining the roads at each trail head that weren’t there when we arrived at dawn.

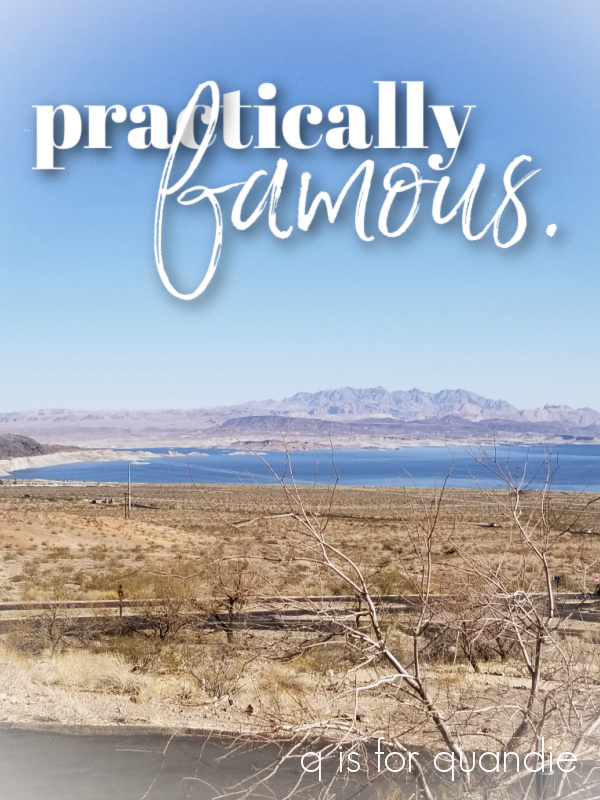
So my biggest q tip for you if you ever get to Sedona is to be sure and rope drop the hiking trails.  They are absolutely gorgeous in the morning light.  You won’t have them entirely to yourself, but there won’t be hoards of people on them yet.  And best of all, after all of that hiking you don’t feel one bit guilty about that extra sausage you’ll have with breakfast later!

Be sure to stay tuned because I’ll be sharing the rest of my trip out west next week and I’m planning a fabulous giveaway to go with it.  In the meantime, I have a dresser that I just finished up that I’ll be sharing on Friday.  See you then!


a cloche call.

I originally purchased this really cool clock at a garage sale over a decade ago.

It didn’t quite look like that when I bought it.  It had glass over the front, and of course it had hands and was a functioning clock.

I had it hanging in my living room.  But one dark, stormy night (OK, I don’t know that it was actually stormy) it fell off the wall startling both Mr. Q and me awake from a deep slumber.

I was bummed to find that the glass had broken and the metal clock hands were bent out of shape.  I’d still have been happy using the clock without the glass, but those hands never did work right again.  So I tucked it away out in the carriage house thinking that one day I would fix it.

Remember those library books I reviewed while visiting my mom in February?  Well, flea market chic had this photo in it …

It’s my clock!  And they called it a French Train Station clock, or some such equally fabulous name (sorry, I didn’t take specific note).  That sure made it seem like a more glamorous item.

Seeing it in the book inspired me to pull it back out of the carriage house once I’d returned home from my mom’s house last time.  I purchased one of those battery operated clock kits from my local hobby store and figured it would be super simple to just pop it in.  But the hands were too small, and too shiny, and just didn’t fit with the look of the clock.

I have to confess to you guys, I’m sure I could try and find a more suitable clock kit to repair it with.  And I could probably get the glass replaced fairly cheaply.  But I tend to get easily frustrated with these sorts of projects and just throw in the towel.  I had enjoyed the clock for a long time, I didn’t spend much on it in the first place, maybe it was time to just chuck it.

I had placed it on the table near the door to be carried out to the trash on my next trip outside.

But then my friend Patty stopped by.  She saw it there and mentioned how fabulous it was, and I told her my sad story and that I was at the point where I was going to just toss it.  And she said ‘why don’t you just use it like that, laying flat on a table as some sort of pedestal for something’.

Eureka!  What a brilliant idea!  Why didn’t I think of that?

And just a foot away on that same table was this …

the giant cloche that I purchased at one of my local garden centers just after Christmas.

I had it sitting on the wooden charger that I painted and added a clock transfer to, remember?

So I thought, hey, that cloche just might fit perfectly on top of the French clock.  So I whipped it off the charger and what do you know?  It did fit perfectly!

How cool is that?

I switched out the black books that I was using under the cloche for this warmer toned brown book.  I think it works better with the brown clock.

But otherwise, I kept the rest of the items that I used originally under the cloche.

To think that I nearly threw that clock in the trash, what a cloche call (pun compliments of Mr. Q)!

What do you think?  Pretty awesome, right?  Thank you Patti for giving me this fabulous idea!

wearin’ the green.

In honor of St. Patty’s Day, and since green is one of my favorite colors, I thought I’d share some of my favorite pieces painted in verdant shades while I’m off enjoying my visit with my mom.

I think my all time favorite shade of green is In a Pickle from Sweet Pickens milk paint.

I absolutely LOVE this color.  Isn’t it gorgeous on this washstand?  Pieces in this color never sell quickly for me, but every once in a while I paint another piece in it just because I love it so much.  I always eventually find someone who loves it as much as I do though.  I remember this particular washstand sold to an artist who wanted it for her studio.

I also used In a Pickle on this dresser.

This one crackled in the most perfect way.  And again, it took longer than usual to sell but I did eventually find a buyer.

I have one more favorite piece with this particular paint, this farmhouse table.

I really kind of wish I’d hung onto this piece now.  I’d love to be using it as my own desk.  It’s a bit larger than the one I have now, and I do need a little bit more space.  I’m keeping an eye out for another one like it.

My second favorite shade of green is Fusion’s Park Bench.

I’ve painted so many mid-mod pieces in this color.  Since I don’t want the chippy look of milk paint on the mid-mod’s, the Park Bench is the perfect choice for them.

Unlike with the In a Pickle, the pieces I’ve painted in Park Bench just fly out the door.

Especially the credenza’s.

Adding gold hardware to this color is always a hit.

My latest favorite green is Dixie Belle’s Kudzu.  It was gorgeous on the interior of this little cabinet.

It made a fabulous planter chair.

And it was perfect on this painted toolbox.

I also love it with the Rose Chintz paint inlay from IOD over it.

I still have a mostly full jar of this paint, I’m just waiting for the perfect piece of furniture to come along to put it on.

My mom’s town usually has a parade on St. Patrick’s Day so maybe my sister and I will check that out today.  I hope you’re doing something fun today to celebrate too.  I don’t have any Irish ancestry (that I know of), but I can get behind any holiday that celebrates the color green, how about you?