resistance is futile.

For a while now people have been telling me that I really need to get on Instagram.  I’ve resisted up until now for a couple of reasons.

First of all, it’s not like I have a bunch of spare time on my hands to learn a new medium.  I’m pretty busy with the day job, the gardening, the garage saling, the socializing (thanks again for that amazing pool day bff), the furniture painting and of course the blog writing.

Second of all, I needed to upgrade my phone first.  It’s embarrassing to admit, but I had an ancient windows phone that was not very compatible with Instagram or anything else for that matter.

OK, it wasn’t quite that bad, but close.

So not only did I have to learn how to use Instagram, but I also had to learn how to use a new phone.

And then there is the square photo format.  Not really a big deal, unless you are used to composing all of your shots for a rectangular format.  Suddenly you have to start thinking about how they will look as a square.  Lots of my photos are totally wrong for turning into a square.

But I bit the bullet last week and purchased a new phone.  Once I had the basics down, like being able to answer a call, I decided to download the Instagram app.  Just to explore what it was like.

I set up my account, qisforquandie, and then I followed some of my favorites; missmustardseed, vibekedesign, dreamywhiteslifestyle, savvycityfarmer, lizmariegalvan and frenchcountrycottage.

And you know what I discovered?  Turns out Instagram is like porn for blog readers.  Let’s face it, it’s all about looking at the pictures with very limited text.  It’s total eye candy.

And it all looks so pretty on my new phone, it was hard not be sucked in.

As they say, #resistanceisfutile, #youwillbeassimilated, #wearetheinstagram.

Any other trekkies out there?

Anyway, it’s official, I’m on Instagram.  No worries at this point, I have no plans to give up blogging.  If you still want some substance with your pretty pictures, you need more than Instagram.

But if you are already assimilated, I hope you’ll follow me on Instagram.  And if any of you have favorites that you follow, let me know.  I can always use a little more eye candy in my life.

refreshing chair no 6.

Several years ago … gosh, I’m not even sure how many … I went through a numbering phase.  I added numbers to everything and the stuff that got ‘numbered’ sold like hotcakes at my Carriage House occasional sales.

It must be the accountant in me, but I love things with numbers on them.  At the time it appeared that others did as well.

I painted a chair for myself back then and I gave it a no. 6.

Chair no. 6 was in my own kitchen for several years, but eventually I swapped it out for something else.  I recovered the seat and put it in my last occasional sale (fall of 2016), but no one bought it.  I guess the numbering phase is over.  So then it sat in my carriage house for almost two years, lost and forlorn.

I’ve been trying to go through everything that I have stored out there this summer and either revamp it to sell, donate it, or put it at the curb.

So I pulled it out and did a little re-gluing of the joints.  Then I sanded down the ‘6’, gave it a good cleaning and re-painted it with a fresh coat of creamy white using Fusion’s Limestone.

Then I pulled out the small version of Prima Marketing’s Seeds transfer.

I knew the entire thing wouldn’t fit, but it’s so easy to cut these up and just use parts of them.  I cut out a couple of sections of the transfer and played around with placement on the chair back.  Once I had them where I wanted them, I taped them in place.

Then I just used the applicator stick that comes with the transfer to rub it onto the chair.  It couldn’t have been easier and took all of about five minutes to do.

And thus chair no. 6 becomes a garden themed chair instead.

By the way, in case you were curious, I used a plain beige fabric that I painted with a grain sack stripe using black acrylic craft paint for the seat.

Then a couple of evenings ago I had some fun setting up a potting shed themed photo shoot with the chair.

First I pulled out a dresser that I just picked up last weekend.  One of my readers offered this dresser to me free of charge and you’ll read more about that next week.  But for today I thought it was the perfect stand in for a potting bench for some photos.

I love the crackle finish on those drawer fronts, but I don’t know that I’ll be able to save that.

But before I even get to that part, Ken is going to have to do a bit of work on this one so it may be a while before you see it again.

Anyway, I also grabbed some clay pots, a small hand held garden shovel, and yes I even yanked a geranium right out of one of my window boxes just for these photos.

It is possible that I have completely lost my mind.

But don’t worry.  No plants were harmed in the making of this blog post.  I simply tucked that geranium right back in place when I was done and gave it a good soaking.  It will be fine.

All of that, just to take a photo of a chair.

But it sure was fun.

This chair will likely make its way to Reclaiming Beautiful to be sold.  Unless of course one of you local readers wants to purchase it from me first.  Be sure to check my ‘available for local sale‘ page for more details.

fairy garden refresh.

‘Refresh’ seems to be the catch-phrase of the moment on social media.  We don’t redecorate, renovate, restore or remodel anymore, now we ‘refresh’.

Well, OK, I can get on board with that.  It seems like the refresh is a refreshing concept.   Less involved than completely renovating or restoring something.  Like sprucing up a room with a couple of new things, re-arranging the furniture or maybe adding fresh coat of paint.

A refresh sounds like something you should be able to accomplish in a day or less.

I decided this past weekend was the perfect time to refresh my fairy garden.

It had an evergreen tree in it that had completely outgrown the space.  The canopy of the tree had gotten larger than the container, which is an old cracked birdbath.

Plus it was getting overrun with miniature violets.

I don’t actually know where these violets came from.  I didn’t plant them.  They just started appearing one year in the cracks of my flagstone patio.  From there they migrated into the fairy garden.  They are perfect when they stay small, but they are greedy little monsters and once they start to takeover, they crowd out everything else.

I began by heading over to my local Bachman’s where I was hoping to find some miniature Cypress style trees.  They had some earlier in the season, but as luck would have it they were all gone.  They still had quite a few other options though, so I came home with Cole’s Prostrate Canadian Hemlock (what an awesome name) …

which I’m pretty sure is the same tree that I am taking out.  That one started out this small too.

And I also purchased this Berberis thunbergii ‘Concorde’

As you can see from the tags, both of these plants were a little pricey even for perennials.  I think they are getting away with charging top dollar because mini’s are so hot right now.

However, both of these plants will come back from year to year so let’s just call them an ‘investment’ shall we?

By the way, we take the birdbath top off its pedestal before the first hard freeze in the fall and bury it right up next to the house under piles of leaves to protect it for the winter.  That seems to do the trick for both the current tree and the mini hostas.  I just learned this past weekend that this process is called ‘heeling in’.

I also purchased this adorable Katydid’s Baby Tears to use as a mini ground cover.

This was much more affordable at $3.99, but it will only survive the rest of this season and can’t be over-wintered (well, technically it could if I dug it up and put it in a pot inside the house, but that’s not going to happen).

After pulling out all of my fairy garden decor, I also removed all of the existing plants.

Check out this hosta, you can easily see that it will divide out into multiple plants now that it’s out of the dirt.

I was able to get six plants out of it.

Once I had all of the plants out I added a little fresh dirt.  Now I have a blank canvas.

Finally I just started layering everything back in starting with the larger items and then filling in with the smaller ones.

Although you can buy faux mini flagstones, my flagstone path is made from layers that flaked off of my life size flagstones.

Gosh!  If only all gardening was this easy.  This wasn’t back-breaking at all.  If I didn’t like the arrangement of something I just pulled it out and moved it which took about two seconds.  If you have back issues that keep you from gardening, then a fairy garden is perfect for you!

Even the ‘big, heavy statue’ is easy to move around.

If you don’t happen to have a cracked birdbath on hand you could use an old wagon or any sort of galvanized container.  I even saw one done in an old Weber grill once.

I had to wait until dusk to be able to see the string of fairy lights that I added.  You can’t have a fairy garden without some fairy lights, right?

I found the lights in the dollar section at Target a couple of months ago.  They aren’t intended for outdoor use and probably won’t hold up forever, but for a couple of bucks I don’t mind.  I’ve had them out since May and so far they are doing fine.  I have had to change the batteries once already, mainly because I just leave the lights on 24/7.

I finished up by giving my refreshed fairy garden a good soaking from the hose, and now I can just sit back and wait for it to fill in a little … but not too much.

think pink.

I brought this Thomasville dresser home a couple of months ago.

This is how the drawers were arranged for the seller’s Craigslist ad photo, so I left them like this for my ‘before’ photo too.  I wonder, did they not realize they were in the wrong spots?  Or did they just think the dresser was supposed to look like this?  Or did they just not care?

Either way, this dresser was an amazing deal.  Probably for two reasons; because it’s laminate and because one drawer pull is missing.  I’m bummed about that missing pull because those original pulls were perfectly themed for the faux bamboo style of this piece.

This piece is made entirely out of laminate fiberboard rather than real wood.  Let’s talk veneer v. laminate for a minute.  I think these terms sometimes throw people off.  What is the difference?

Technically the term veneer refers to a thin layer of hardwood that is bonded, or glued with adhesive, to a cheaper sub-surface that is hidden below.  I sometimes call it ‘wood veneer’ to make it clear that it is still a wood surface, just not solid wood.  When working with a wood veneer you can finish it in much the same way as solid wood.  You can strip an existing finish from it and then wax, stain, oil, paint, etc.  The main thing to keep in mind is that the veneer is very thin so you need to be careful when sanding it so that you don’t sand right through it.

Laminate on the other hand is a man-made plastic product.  It can be manufactured to sort of look like wood or marble or granite, but it also can be just a solid color (like on this piece) … really, I think the sky is the limit with the look of laminate.

But laminate cannot be treated just like wood.  It is a slick, impervious surface that can’t be stained or waxed and gives paint absolutely nothing to hang on to.  However, that doesn’t mean that you can’t paint it.  With the proper prep and primer you are able to paint laminate and once the paint has cured (usually about 30 days) it will be just as durable as other painted surfaces.

You may remember that I tested out Dixie Belle’s Slick Stick on a laminate tabletop recently.  It worked really well, so I knew that I would have success using it on this piece too.

Once again I followed the directions carefully.  I started by cleaning my piece thoroughly using TSP Substitute.  Next I used a damp brush to apply one thin coat of Slick Stick and allowed that to dry for 3 hours.  Then I added a second coat of Slick Stick and left it to dry overnight.

I want to also remind you that the Slick Stick dries white.  I didn’t distress this piece, so the white worked fine for me.

As soon as I saw this dresser I knew I wanted to paint it in a vibrant color.  I had recently seen something painted in Dixie Belle’s gorgeous color called Peony.  So I reached out to them and asked if they’d like to sponsor this project.

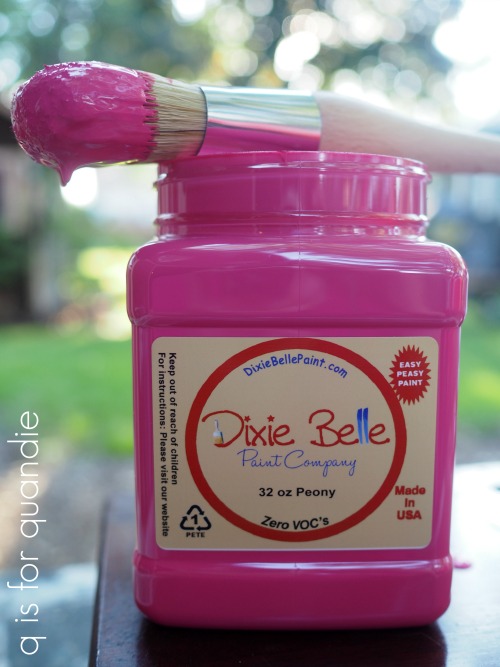
They jumped on board and provided me with all of the products I needed for this piece including the paint, the Slick Stick and the Clear Coat.  Although they provided this stuff for free, all opinions are my own.

I went way outside my comfort zone with this color choice and I got quite the reaction from pretty much everyone who saw me working on this piece including Ken, nnK, Mr. Q and my sister.  I think they were all wondering if I’d lost my mind.

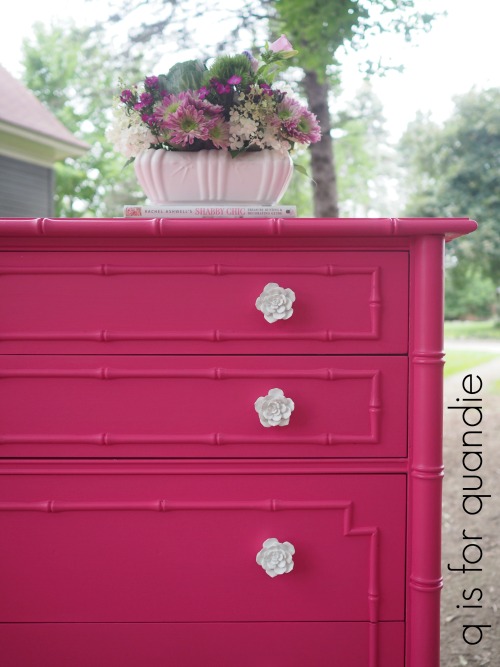
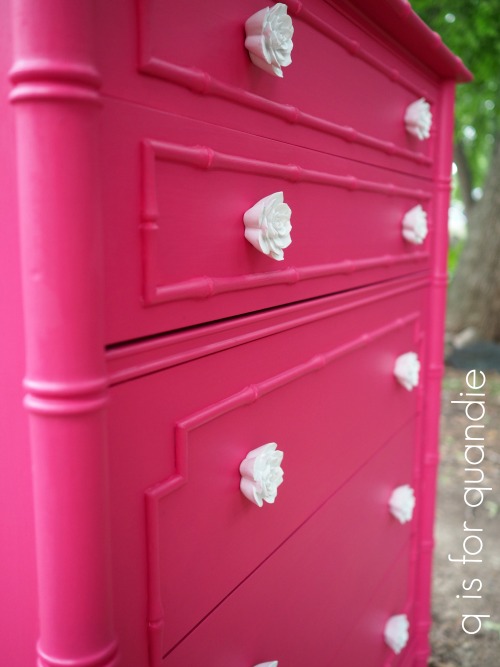
But I went for it with three coats of the Peony.  I used the Dixie Belle recommended technique of dipping my paint brush in a cup of water every 2nd or 3rd time before I dipped it in the paint.  This basically waters the paint down allowing it to go on more smoothly.  If you leave the paint thick you will see more texture, ie. brush strokes.  However, to get good coverage with the bright pink over the white Slick Stick I needed three thinned coats of paint.

Once the final coat of paint dried I added a coat of Dixie Belle’s Clear Coat in the satin finish.  I wanted just a hint of shine rather than a flat finish.

I have to admit, there is more than one reason why I generally prefer working with a flat finish.  The first reason is that I love the look, of course.  But the second reason is that a shinier finish highlights any flaws there may be in the paint job.  Working on this piece reminded me that I am good at flaws and it’s probably best if I stick to a flat finish in the future.

Part of the reason for my delay in working on this piece was that missing drawer pull.  I so very badly wanted to find an exact replacement.  That hardware would have looked amazing with some gold wax on it.  I searched for weeks.  I tried Etsy, any number of hardware suppliers, and some Facebook hardware exchange groups, all to no avail.  I found a few similar vintage pulls, but none that were an exact match.  I even would have purchased three that matched each other and replaced all three if I could have found them, but no luck on that either.

So I finally gave up on that idea and purchased these white rose knobs from Hobby Lobby.  Wait … are they roses or are they cabbages?  I’m really not sure.  No, they’re roses, right?

Anyway, I’d gone crazy wild with the color after all, so why not go a little over the top with the knobs too?  I filled the holes left by the original drawer pulls using Dixie Belle’s Mud in brown and then drilled new holes so that the knobs lined up all the way down.

In the end, I think the new knobs give it a slightly more updated look, although I still would have loved to have that original hardware!

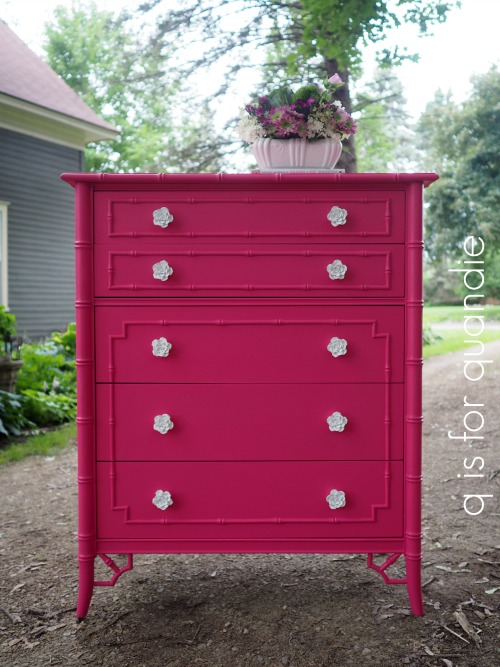
I staged this piece very simply with just a couple of books and a pretty floral arrangement.

Let’s face it, nothing was going to be able to compete with that amazing color!

So, there you have it.  A gorgeously bright pink bamboo dresser.

What do you think?  Have I lost my mind going with this vibrant color?  Or do you think someone out there is going to love it?  Ken predicts that it will take no longer than two weeks to sell.  I hope he’s right.

I’m going to hang onto it for the full curing time before I list it for sale though, just to be on the safe side.  However, if you are local and interested in knowing when it’s ready to go be sure to let me know in a comment or via email (qisforquandie@gmail.com).

my picker’s finds.

It’s official, I have a picker!  What’s a picker, you ask?

Here’s the official definition.

pick·er ˈpikər/ noun

a person or machine that gathers or collects something. “a tomato picker”

a person who plays a plucked instrument, especially a guitar, banjo, or mandolin.

“banjo pickers”

My picker doesn’t play the banjo or pick tomatoes (although she does pick strawberries every year), but when she sees something at a garage sale that she thinks I might like she buys it for me.  My picker is my friend Sue, who is also my partner for the Carriage House sales (which are currently on an indefinite hiatus) and also a co-worker at my day job, and also a neighbor, but most importantly she is my garage sale mentor.  If it weren’t for Sue, I probably never would have even tried garage saling.  She taught me the ins and outs of finding the good stuff over 20 years ago.  I shared a tour of Sue’s beautiful home and garden back in the early days of my blog (you can see that here and here).  I’ve been wanting to update that house tour this summer but haven’t found time yet.

But today I’m sharing a couple of fun pieces that she picked for me lately.

The first is this cute little stool.

OK, well maybe not so cute in its ‘before’ state.  But it’s very sturdy and I like the little slot that can be used as a handle to carry it around.  This would make a great gardening stool.

I started by sanding it down, especially trying to remove all of those paint drips.  If you don’t get all of those off of there, they will come back to haunt you when you later sand to distress your paint job as you may notice in my ‘after’ photos below.

Next I mixed up the same custom color of milk paint that I used on the bookcase I shared on Monday.  Mostly Homestead House’s Craftsman with a little of Homestead House’s Loyalist mixed in.

After two coats of paint, I sanded it well to distress, then wiped the dust off and added my favorite Prima Marketing transfer.  This is the small version of the Seeds transfer.

For you hosta lovers out there, that one on the upper left is called Lakeside Dragonfly.  It’s perfect for the front of the garden because it doesn’t get huge.

 By the way, I had to cut the transfer in half to space it around the handle opening and I didn’t use the entire thing.  I’m sure I’ll find somewhere to use the rest of the transfer.

After the transfer was applied, I lightly sanded over the whole top again and then added a top coat of the Real Milk Paint Co’s Dead Flat Finishing Cream.

I really do love using this finish over milk paint.  It’s so easy to apply and it provides a little more protection than wax or hemp oil.  It has a thick gel-like consistency, so you don’t have to worry about drips.  It will also provide plenty of protection for the transfer.

Sue also found a simple wooden tote (or toolbox if you prefer) for me.  I neglected to get a ‘before’ photo of it though.  Drat.  But it was made out of fresh, new wood and had never been painted.

So I added a couple of coats of different colored paints to give it a little fake history.  First a coat of Fusion’s Laurentien, then a coat of Miss Mustard Seed’s French Enamel, and finally a coat of Homestead House milk paint in Raw Silk.

I sanded the edges to distress down to some of those other layers of color.

Initially I was going to stencil this tote, but the stencil I had in mind didn’t fit so I used a remnant of another one of my Prima Marketing transfers instead, this time the large Seeds transfer.  I’d already used the rest of this transfer on a dresser.

That’s one of the things I love about these Prima Marketing transfers, you can cut them up and create several masterpieces with just one of them.

I originally filled the tote with books for the photos, but then I thought ‘what the heck, it’s summer, let’s fill it with greenery instead.’

Plus, I used a portion of the transfer on both sides of the tote so I wanted to show the other side anyway.

By the way, that gorgeous purple flower is a purple astilbe.  It just started blooming last week.

Since both sides of this tote have a design, one could easily use it in the center of the dining room table.

In case you are wondering what in the world I do with all of this smaller stuff after I transform it, the answer is that I take it to Reclaiming Beautiful (a shop in nearby Stillwater) to sell on consignment.

The stool is already sold, but this week I’ll be bringing in the tote along with a few other fun things I’ve finished up lately.

Some stenciled buckets …

The blue bucket is painted with Miss Mustard Seed milk paint in French Enamel.  As I’ve mentioned before, milk paint works beautifully over dull galvanized metal (it may chip more if the metal has a shiny coating over it).

A vibrant aqua toy truck …

Yes, I painted it this color.  It had also been painted by the previous owner, so I wasn’t defacing a collectible toy or anything.  This is Cece Caldwell chalk paint in Santa Fe Turquoise.  Just for fun I also added a small rub-on transfer to the hood too.

My sister picked up that truck for me at a garage sale one of her neighbor’s was having, so technically I guess I have two pickers!

I also have another painted wood tote (this one I found at a garage sale myself).  It’s also painted in Miss Mustard Seed’s French Enamel and then stenciled with a warm white acrylic craft paint.

So if you’re local, be sure to swing by Reclaiming Beautiful this weekend to see what other fab items they have in stock (open Thursday – Sunday only).

an alligator-ed bookcase.

This past weekend I finished up the remaining piece from the trio of large pieces that I purchased at the Linden Hills garage sales back in May.

You’ve seen the dresser …

And the white bookcase …

Now for the bookcase with the glass door.

Much like the white bookcase, this piece was also once a built-in.  However with this piece someone had already done some work to allow it to be a stand-alone piece of furniture.  There had already been a finished side added to the side that was once up against a wall.

If you look at the top of the bookcase in the ‘before’ shot, you can see that at one time there also must have been some trim around the top that had been removed.

As luck would have it, I happened to have a spare length of old trim in the rafters of the carriage house that was plenty long enough to add some trim back to the top of the bookcase.

My handyman Ken made quick work of cutting the trim to fit and attaching it.

From there I simply sanded lightly, cleaned the piece with TSP Substitute and then I painted the outside with Sweet Pickins In a Pickle.

Except … wait a minute … hold the phone … did you notice the piece doesn’t look green at all in that photo of the trim?  Well, as it turned out I didn’t like the green on the bookcase.  I can’t really explain why, it just wasn’t working for me.

So I whipped up a custom mix of Homestead House milk paint instead.

This is about a 1/2 cup of Craftsman, which is a pale minty gray-green, with about 2 tablespoons of Loyalist, a medium blue, added.

This subdued blue-green-grey color seemed much better suited for this bookcase.  I added two coats of this color over the In a Pickle.  Once dry I sanded the piece and added a very light coat of Miss Mustard Seed’s clear furniture wax for protection.

I was initially planning to paint the inside as well, but ultimately I decided I wanted to leave it the dark wood instead.

Something like ironstone or milk glass will really pop against the dark wood.

I swapped out the original knob, which was rather boring, for this white enamel knob.

I’ve had that single knob in my stash of hardware for so many years that I can’t remember where I purchased it.  Possibly Anthropologie, but I’m not positive.

As you can see in those close up shots, the finish on this piece was very alligator-ed.  It had to have been stored somewhere hot (like an attic) for some length of time.  I love the textured look I get using milk paint over a damaged finish like this.  I didn’t get any chipping with my milk paint, but sanding over that bumpy finish created an aged look that I love.

Looking at these photos has made me realize that if I’m going to keep attempting to take furniture photos inside my photo cottage (like these), I really need to put a fresh coat of paint on the floor and walls.  It has not held up well at all.  It looked so fresh and clean when I initially painted it …

I guess four years of walking on it with dirty shoes, dragging furniture across it, and having it semi-open to the Minnesota weather has taken its toll.

I’ll just add that project to my to-do list … you know, the one that is longer than my arm.

But in the meantime, be sure to let me know what you think of my alligator’ed bookcase!

This piece is available for sale locally, so be sure to check out the details if interested.

in memoriam.

It has been a sad week for our family.  Mr. Q’s sister Christina passed away unexpectedly on July 5.  She was only 48 years old and in addition to siblings, her father, cousins, aunts, uncles and so many friends, she also left behind three children.

I really hesitated sharing this news here on q is for quandie because I would rather keep things happy and light.  I don’t want to bring people down.  But normally I would have a post to share with you guys today, and this week I don’t.

Instead of painting furniture, or photographing a rusty pedestal makeover, we spent the last couple of days in the small town of Mountain Lake in the southern part of Minnesota for a visitation and funeral.

I considered just not posting at all today, but instead I decided to share one of my most recent happy memories of Chris.

Last September Chris was in Texas for a business trip and she made the time to visit Magnolia Market.  She was a big Fixer Upper fan.  She rented a car and drove to Waco by herself because she just had to visit, and hopefully catch a glimpse of Chip & Joanna.  She posted a live video on Facebook showing that she was the first person there that morning.  The sun was just barely up.  She was so excited and you can hear the joy in her voice at just simply being there and taking it all in.  She took all of us watching on a tour of the place and laughed about the fact that she was there so early and apparently no one else was!

I remember sitting here at my computer watching her live video with my morning coffee and just being happy that Chris was so obviously enjoying herself immensely!

Although Chris and I weren’t terribly close, we shared that love of vintage farmhouse style.  She was always so supportive of my blog and that meant a lot to me.  Unfortunately I have to admit that I never told her that.  Somehow I always thought that there would be time down the road to bring it up and now it’s too late to let her know how much I appreciated her.

So do me a favor today.  Instead of leaving a comment here, tell someone in your life how much you appreciate them.  You never know when that opportunity will be gone for good.

a rusty garden pedestal.

Way, way back about two years ago I picked up this garden pedestal at the White Bear Lake Trash to Treasure Day.  You can click that link to read more about Trash to Treasure Day, but suffice to say, stuff is free at the curb.

After I brought it home I shoved it somewhere in the carriage house and there it sat for two years.

I looked at it a couple of times and thought ‘hmmmm, what should I do with that thing?’  But I never followed through.

That is until it occurred to me a few weeks ago that this piece was the perfect candidate for some Dixie Belle Patina Paint.

Last winter Dixie Belle sent me some of these products free of charge to give them a try.

I used the Prime Start, the Iron paint and the Green spray on a metal lamp to see how well the products worked.  To read those full instructions, check out this how-to post:

This time I decided to go with a slightly bigger project and turn this pedestal into a rusty masterpiece for the garden.

First I started with a little prep.  The paint was starting to peel off of the pedestal and under the paint is just a plaster of paris sort of material.  As I started to sand away the chippy spots of paint I realized that most of it was going to have to come off.

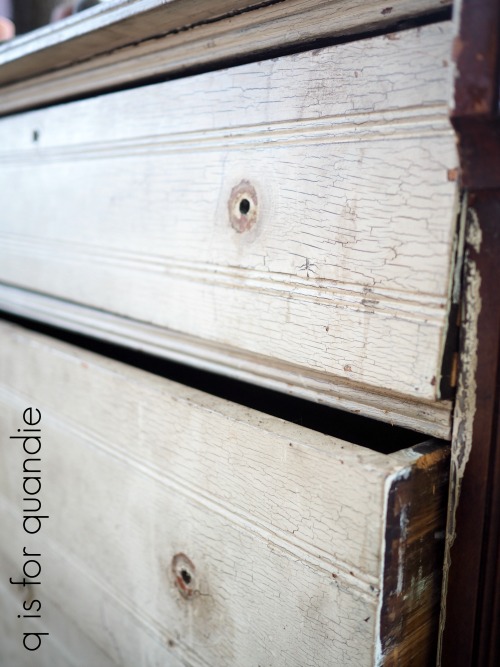
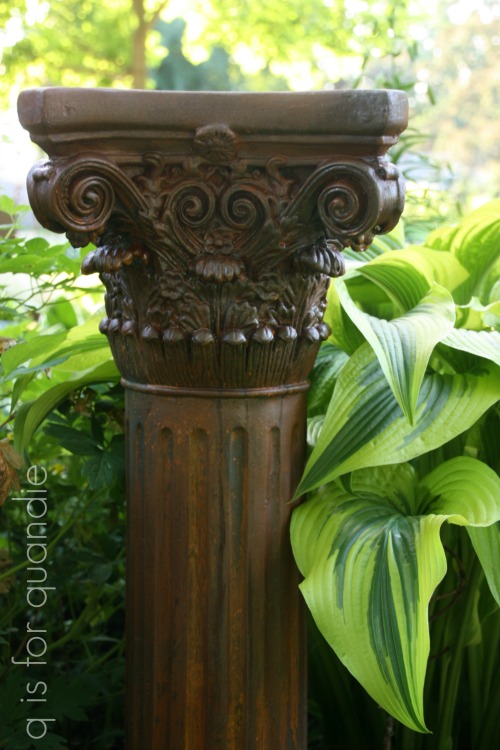
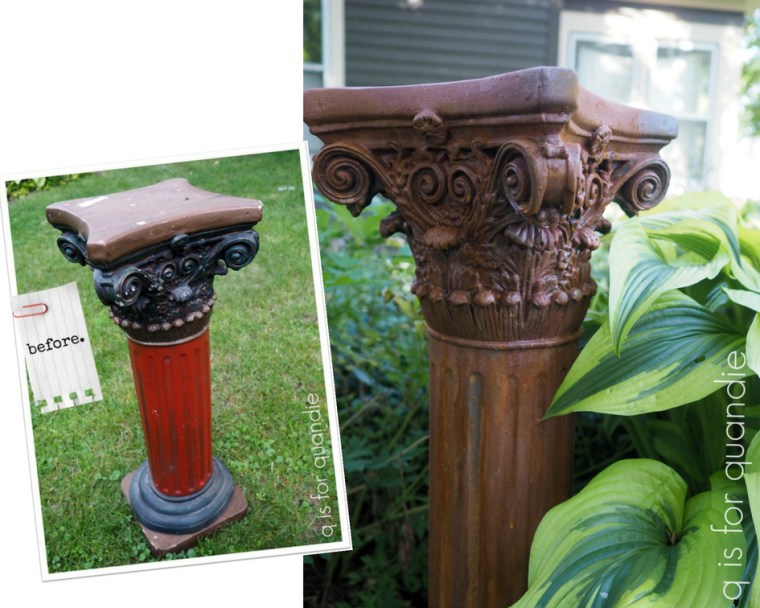
So I got out my razor blade and started scraping off the paint.  I didn’t completely remove all of it, but I did take it all off the top and the bottom portion of the pedestal where most of the peeling was occurring.

Here’s an important q-tip to keep in mind when it comes to working with pieces that are already painted.  Your paint job is only going to adhere as well as the paint underneath it.  So it doesn’t matter how durable your paint is, it’s only going to adhere to that original layer of paint.  And if that paint is peeling off, well, you get the picture, right?  Honestly, that’s probably the number one reason why I normally avoid pieces that have already been painted.  Because you just can’t be sure what you are working with, and I hate stripping paint.

But remember, this pedestal was free at the curb so I figured I could put a little extra work into it and if it’s a massive failure, well, no worries.  It was free.

After removing all of the peeling paint, I painted the entire piece with a coat of Dixie Belle’s Caviar.  If this piece was metal I would have used the Prime Start instead of the regular paint.  In this case my piece is plaster, so I could just use any Dixie Belle paint as a primer.

Once that I was dry I painted on a coat of the Iron paint.  I ended up having to let that dry overnight because it was quite humid outside and this piece has a lot of nooks and crannies that took a while to dry.

The next day I added a second coat of the Iron paint and while that was still wet, I sprayed it with the Green Patina Spray.

Then I just sat back and waited for the magic to happen.

The next day I put my reading glasses on and after taking a closer look I realized that I missed a few spots with the paint entirely, and a few spots weren’t as ‘rusty’ as I wanted them to be.  So I simply dabbed on some more of the Dixie Belle Iron paint and then sprayed those spots with the Green Patina Spray again.  That worked like a charm.

If you’re wondering whether or not this piece will hold up outside in the garden, I have to admit so am I.  I have a plaster Buddha out there and he’s deteriorating quite a bit after several years of year-round outdoor living.

Hmmmm … maybe I should rusty him up too?  But my point is that items made out of clay or plaster that is faux painted to look like concrete don’t last forever outside.  So I suspect this pillar won’t either.

However,  I have been surprised to find that after being in the garden for several weeks and being rained on a few times, if anything, so far the pedestal has developed an even more fabulously rusty patina.

Even the top which has had standing water on it (we’ve had quite a bit of rain) continues to look amazing.

But let’s call this an experiment, shall we?  I’ll keep the pedestal in my garden all summer and then share a review of how well it held up in the fall before I put it away for winter.

So far though, this is a massive improvement over the ‘before’ version wouldn’t you say?

an Italian table.

Earlier this summer I picked up a simple pedestal style table at a garage sale.

I have to admit up front that I made a couple of poor buying decisions this summer at garage sales and there is an underlying theme to them.  I purchased things that had other things piled on top of them so that I couldn’t really see what I was getting.  One table I purchased has a huge burn mark on the top that I didn’t notice until I went to load it in the car.  And this table has a Formica (laminate) top.  That fact completely escaped my attention until I got it home.

Today’s q tip:  Do as I say, not as I do, and thoroughly inspect a piece of furniture before you agree to purchase it!

But look back at that ‘before’ picture, see how shiny that top is?  Yep, it’s Formica instead of wood.  I should have noticed that.

The problem with Formica is that paint doesn’t always like to stick to it.

But then I realized that this table provided me with the perfect opportunity to try a product that Dixie Belle sent to me recently, Slick Stick.

I plan to use this product on a dresser that is entirely laminate, but before I get to that I thought it might be a good idea to test it out on a smaller scale first.  Here is how the Dixie Belle website describes it:  Slick Stick is a water-base primer specifically made to bond to most any “tough to paint” surfaces. With Dixie Belle’s Slick Stick, surfaces like PVC, glass, Formica, metal, and more, are easily painted and stay painted.

It has some very specific instructions that I followed to the letter.  I started by cleaning my piece thoroughly using TSP Substitute.  Next I used a damp brush to apply one thin coat of Slick Stick and then I allowed that to dry for 3 hours.  Then I added a second coat of Slick Stick and left it to dry overnight.

I used the Slick Stick on the laminate top only, not on the wood pedestal.

The next step was to paint the piece using two coats Dixie Belle’s Gravel Road.

I want to point out here that the Slick Stick does dry white.  If you are a distress-er (and I definitely am), you will see that white when you sand the edges of your piece to distress it.

That is definitely something to keep in mind when choosing to use this product.

After I had the table painted I let it sit for a week or two.  Not for any real reason, just because it was really just rather blah.  While the paint job had definitely given it some more appeal, it needed something more but I wasn’t sure what.

Then while I was stenciling the back of the bookcase that I shared on Friday I decided to use the same Prima Marketing re.design stencil on the top of this table.

I used the same small foam roller and the same Dixie Belle paint in Driftwood to apply the stencil over the entire tabletop.

I think it’s interesting to note that when used over the darker grey of Gravel Road the Driftwood looks really light, while over the white of Fluff it looks really dark.

But I promise you, it doesn’t look it, but the stencil was painted with the exact same color on both of these pieces!

Once the paint was dry I sanded over the entire thing to give it a more faded appearance.

And that was enough to give this table plenty of personality!

It’s now a great little table for a reading nook or perhaps at bedside.

As I was taking the photos for this post, one of the books happened to flop open to this page.

That brought a smile to my face as an unexpected reminder of the trip Mr. Q and I are taking to Italy later this fall.

In fact, it made me realize that this table has a bit of an Italian flair, maybe Italian renaissance with that damask pattern?

OK, that might be a tiny bit of a stretch, but I’m going with it.

a no-longer-built-in bookcase.

Remember the pile of furniture that I purchased at the Linden Hills neighborhood garage sale?

Well, today’s post is about that white bookcase in the back behind the other pieces.  As it turns out, I neglected to get a good ‘before’ photo of just the bookcase.  Argh.

My handyman/neighbor Ken would be so disappointed if he knew that I didn’t have a good ‘before’ photo of this one (he never reads my blog because he is 80 years old and he doesn’t even know what a blog is, so let’s not tell him about this, OK?).  He made some clever changes to it and I know he was proud of his work.  Although I can try to describe what he did, as they say, a picture is worth a thousand words.

Well, I’ll try and do my best.

The thing about this bookcase is that it was formerly a built-in.  One side of it wasn’t finished on the outside because it had been up against a wall and tied in to the baseboard trim along the wall.  The other side was trimmed out top and bottom.  And of course the side that was trimmed out is the side you can’t see in that photo because it’s behind the cabinet with the glass door.  Dang.

Suffice to say that Ken removed some trim, cut down some trim, added an outside to the one side, and basically gave the entire piece a more symmetrical look.  He did a brilliant job.

While he was doing all of that, I removed the back so that I could stencil it.

I’d recently received some beautiful stencils from Prima Marketing’s new re.design line including one called Imperial Damask.  This is a large stencil at 22″ x 28″.

I knew it would be perfect for adding something special to this bookcase.

If you’re ever thinking about stenciling (or wallpapering) the inside back of a bookcase, it is much, much easier if you can remove the back to work on it.  In this case the back was held on with a bunch of nails and it came off rather easily.

So I started by sanding it down and adding a coat of Dixie Belle’s Fluff, which is a lovely shade of white and almost perfectly matched the existing paint job (which badly needed to be refreshed).

Before I started stenciling, I needed to pick the right color for the stencil.  I narrowed it down to three Dixie Belle colors; Sand Bar, Savannah Mist and Driftwood.  I painted a scrap of wood in the Fluff and then pulled out a small stencil I happened to have that is very similar to the Imperial Damask, just on a much smaller scale.  I stenciled a section with each of the three colors (please excuse the sloppy stenciling, this was only a color test).

Once I saw all three, it was easy for me to pick the Driftwood (far right).

Next I used a small inexpensive foam roller to apply the paint using the Prima Marketing stencil.

I just poured a little of the paint onto a paper plate and then rolled the foam roller in it.  I didn’t water the paint down at all.  The original thickness of the Dixie Belle paint makes it perfect for stenciling.  Much like when stenciling with a brush, you want to use a somewhat dry roller to avoid a messy result.  Runny paint is not your friend when stenciling.

I wanted the design to be centered once the back was back in place, so I measured and placed the center of the stencil at the top center of the back and then worked out and down from there waiting for the paint to dry each time before re-positioning the stencil.

Today’s q tip:  always start in the center and work your way out when using an all-over stencil like this one.  Otherwise your end result may look very unbalanced.

Before putting the back of the bookcase back on, I gave it a coat of Dixie Belle’s Flat Clear Coat.

Next I sanded and added a fresh coat of Dixie Belle’s Fluff to the rest of the piece, followed by the Flat Clear Coat.  I added a second coat of Clear Coat on the shelves because they will likely take more of a beating than the rest of the piece.

Once everything was dry, Ken helped me put the back piece back on.  While we were working I was telling him that I really couldn’t have done this piece without his help, while he was claiming that he really couldn’t have made it pretty enough to sell without me.  We concluded that we are a great team.  He makes ’em functional, and I make ’em pretty.

And this one sure is pretty!

The stenciled back adds so much life to this bookcase!

What do you think?

The bookcase is for sale locally.  If interested, be sure to check out my ‘available for local sale‘ page.