an adorable desk.

Happy 4th of July to all of my readers in the U.S. and happy Wednesday to the rest of you 😉

I thought it would be fun to go a little patriotic with the color scheme today in honor of the holiday.

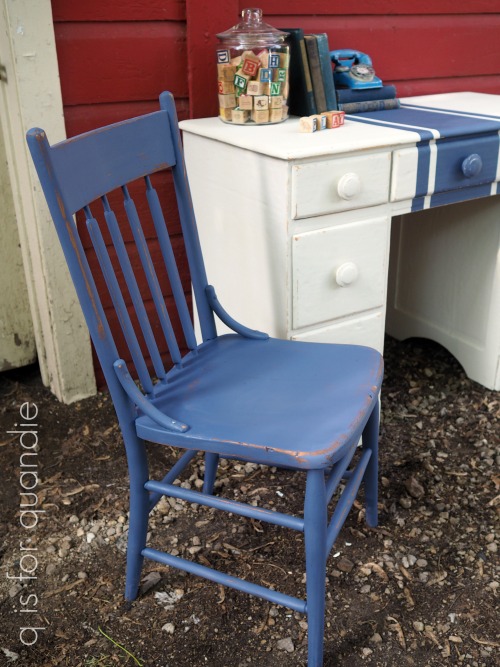
Remember the desk I purchased at the Kenny/Armitage sales?

We came across it at the end of our shopping that day and I have to say, my sister is always game to try and fit stuff into her SUV.  So what if it’s mostly full already?  She will help me pull everything back out and re-arrange until the amazingly-bargain-priced desk fits.  Even in the rain.  That quality alone makes her the ideal garage saling companion.

Anyway, I mainly fell in love with the knobs on this desk.  Aren’t they adorable?  They give an otherwise fairly plain piece a lot more personality.  I’m so glad they were all there and I could keep them on the desk.

It needed a bit of repair, and at some point someone stripped some existing paint off of it and they didn’t do a very good job.  But it was nothing that a little glue and some new paint couldn’t solve.

After some gluing and clamping (handled by my handyman/neighbor Ken), I sanded lightly and then cleaned the entire piece with TSP Substitute.

Next I added two coats of Dixie Belle paint in Drop Cloth.  I left that overnight to be sure it was good and dry before I taped off some grain sack style stripes and painted them in Dixie Belle’s Yankee Blue (note:  all Dixie Belle products used on this desk were provided to me free of charge from Dixie Belle, but all opinions are my own).

I sanded to distress and then finished with Dixie Belle’s Easy Peasy spray on wax.

I gotta say, I love that stuff.  It’s SO much easier than traditional waxing.  Just spray it on, lightly spread it with a cloth, then just let it dry and you’re done.  I will admit that it is not the cheapest topcoat option available though.  It costs $19.95 for 8 oz.  The same amount of Clear Coat is $12.95, and you can get a 10 oz. can of traditional wax for $18.95.  But sometimes it’s worth the splurge to go with the easiest option.

I did two coats of the spray wax on the desk top for added protection.

When I brought this desk home the drawers were all fully lined with some rather old and grungy contact paper.  I pulled all of that out only to find even older and more grungy drawer bottoms.  It’s always a gamble what you might find under drawer liners.  Most of the time I find pristine drawers that were always protected.  But sometimes I find yucky ones that were covered up instead.

So I cleaned them all with Krud Kutter, then painted them with the Yankee Blue.

That ended up working out great on all of the drawers except the middle one.

The middle drawer had a large black ink stain that bled through the paint.  So I pulled out the Dixie Belle BOSS (blocks odors, stains, stops bleed thru).

I followed what I thought were all of the instructions.  I painted one coat just over the stain (no need to coat the entire drawer bottom), let it dry, then painted a 2nd coat and let it dry.  Once the second coat was dry, I painted over it again with the Yankee Blue.  But once again, the ink bled through the paint.  Egads.

So as my dad used to tell me, when all else fails read the instructions.  It says right on the jar that if two coats doesn’t work then a longer drying time of the BOSS is needed.  So I put two more coats just over the stained spot and then let it dry overnight.

That did the trick.  The next day I added a coat of the Yankee Blue over the BOSS and voila, no bleed thru stain!

After I finished the desk I realized that it really needed a matching chair.  I just happened to have a spare chair out in the carriage house.  It also needed some gluing, but once it was shored up I simply painted it with just one coat of the Yankee Blue, sanded to distress and finished with the spray wax.

I especially love that Dixie Belle spray wax for chairs, it’s so much easier to apply than other waxes!

By the way, the back of the desk is painted as well as the front.  Whenever a desk has a ‘finished’ looking back I always paint it too just in case the future owner wants to float the desk in the middle of the room with the back facing out.

Since it’s the 4th of July, I couldn’t help but stage this piece up against the carriage house under my flag holder.  I purchased that flag holder years ago at an antique shop in New Jersey.  At the time my sister was still living there and I was visiting her over the 4th.  This style flag holder was everywhere out there and I’d never seen one before.  Just in general I would have to say that people in New Jersey do far more decorating for the 4th of July than people in Minnesota, does anyone disagree?

Anyway, I was determined to find one and bring it home with me.  I have since seen them for sale here too though.

Well, I’m off to enjoy the holiday with Mr. Q, my sister and my niece.

If any of you locals are in need of an adorable desk, be sure to check my ‘available for local sale‘ page for more details!

the farmer’s market island.

Late last winter I shared the story of the three pieces of furniture that I purchased from one of my readers, Mary.  I finished the first two pieces earlier this year but the third piece was hanging out in my carriage house waiting for some more significant repairs.

Specifically, one of the legs had broken off the dresser and a big chunk of it was missing.  I thought I had taken a great photo of the dresser in its initial ‘before’ state, but I can’t seem to find it anywhere.  Drat!

I did manage to get a photo of the repaired leg before I painted it though.

I have to tell you guys, when I first asked my handyman/neighbor Ken to take a look at this leg he gave me one of those looks.  You know the one, the look that says you’ve got to be kidding me.  But I had total faith that he could fix it and make it look like it was never even broken.

And I was right.  Basically Ken cut away the broken portion of the leg.  The he cut down and carved a new section of wood to match the shape of the original leg and glued it in place.  The man is basically a miracle worker.

Next I realized that a piece from the side of one of the lower drawers was cracked and had broken off.  We could have tried gluing that back together, but I don’t think it would have held up very well.  So I came up with plan B, remove the lower two drawers and add a shelf to the bottom instead.  Then the future owner could use baskets on that shelf instead of having drawers.

This involved another consultation with Ken, and a bit more work on his part, and here’s what I ended up with.

Ken removed the framework that was between the two bottom drawers, and he added a sturdier bottom ‘shelf’ made from the old bead boards from a ceiling that nnK tore out of her breezeway.  Try to imagine that there are two smaller drawers still in place at the top because those are going back in.

The next task was to strip the top using Citristrip.  That was easy enough.

Once I got that far, I was a little stumped about what color to paint the piece.  It had to be something that would work with the wood top and wood bottom shelf because I was leaving both of those unpainted.  I also wanted to use a contrasting color inside the bottom section.  I debated using green, or maybe aqua, or even just white.  But none of those choices felt right.

That’s when I decided to just go with what has become my favorite black, Dixie Belle’s Caviar.

And to brighten up the inside of the lower section, I painted it in Fusion’s Plaster.  I also painted the insides of the upper two drawers in the same color.

Then, while I had the Plaster out, I went ahead and used it to stencil ‘Farmers Market’ across the top two drawers.

It really wasn’t until this moment that I decided this piece would make an amazing kitchen island.  But for that it needed to have some sturdier updated casters so that it could be moved around in a kitchen.  The dresser had come with old wooden casters, but a couple of them no longer had the wooden wheel, just the metal framing for the caster.

So I removed all of them, but was unfortunately left with holes that were larger than the size of the new casters that I purchased at my local DIY store.

Once again, I called on Ken for assistance.  He filled the old holes using a dowel stick and lots of glue.  Once the dowel stick was in place, he cut it off even with the bottom of each leg.

Once the glue was dry, he drilled new holes of the correct size for the new casters.

Next I realized that I also needed to paint the back of the dresser if it was going to be used as an island floating in the middle of someone’s kitchen.  So I gave that a couple of coats of Dixie Belle’s Caviar too.

Finally I used Dixie Belle’s Easy Peasy spray on wax as a top coat over the paint.  I used Miss Mustard Seed hemp oil to freshen up the bead board lower shelf.  And I used Miss Mustard Seed Antiquing Wax on the dresser top.

You might now be rolling your eyes and asking yourself ‘why oh why does she use so many products?  couldn’t she have gotten by with just one?’  And the answer is yes, I could have.  I could have used the Antiquing wax for the entire piece.  It would have worked beautifully over the black paint, and it also would have freshened up the bead board nicely.  However, it would have required more elbow grease for both of those than the products I did use and I’m a fan of saving myself extra labor whenever possible.  So, three different topcoats it was.

So after many starts and stops and decisions along the way, the Farmers Market Island is finished!

And I absolutely love it!

My sister loved it too and is inspired to create a similar piece for her own kitchen.  I’ll be sure to share her project when she gets going on it.

In the meantime, if you are local and need a Farmers Market island be sure to check out my ‘available for local sale‘ page for more details!

P.S.  Be sure to let me know what you think of the results on this one Mary!


a quick Sunday post.

Hello everyone!  I hope you’re enjoying a lovely Sunday where you are.  Unfortunately it’s raining here in Minnesota, but I’m hoping it will clear up later because we’re headed out to a wienie roast for Mr. Q’s mom’s birthday.

You may remember that Mr. Q’s mom and step-dad’s workshop burned down back in February.  Well, I’m happy to report that they were able to replace it with a new pole barn.  It’s not going to have the same charm as the original workshop, but it will be just as functional if not more so.

Naomi and Tom are the type of people who always see the glass as half full, so they have pointed out that the new building is all on one floor which will make more sense for them as they get older.  The stairs in the old workshop were fairly steep and Naomi was already finding them challenging.

The new pole barn is nearing completion, so I’m looking forward to checking it out later today.

I’d like to take this opportunity to again thank all of you who helped support them during that difficult time with either a financial donation or just your thoughts and prayers.  It meant a lot to them, and they were able to use the money to replace some of Tom’s tools.  Although insurance did provide enough money to put up the pole barn, it will never pay to replace all of the tools that Tom lost.  So thank you for that!

In other news, I have drawn the names of all of the winners of the Prima Marketing transfers from my posts last week.  They are Cherie, Debbie, Jacqueline, Jill, Toia, Laura and Carolyn.  I’ve sent an email to each of the winners and all but one have gotten back to me.  So if you didn’t get an email, I’m sorry to say that you did not win.

Thank you so much for all of your comments on those posts!  I’m sorry I wasn’t able to respond personally to each one (and I also wish each one of you could have been a winner), but I did read and enjoy every single comment.  I also took the time to check out some of the blogs that you guys recommended on Friday.  There were a few that I already follow, and there were a few that were new to me and I’m looking forward to giving them a closer look.

A couple of people mentioned in comments that they didn’t receive an email notifying them of last Friday’s blog post until after the midnight deadline for the drawing.  That can be the result of the settings that they chose when they signed up to follow my blog via email.  If you are following via email you can choose to be notified about new posts immediately, daily or weekly.  If you want to change those settings you can do so by clicking on the word ‘manage’ in parentheses over on the right under ‘you are following this blog’. Next look for my blog listed under ‘followed sites’ and click on ‘settings’. You should be able to change that setting there.

Just for fun I thought I’d share where the garden beds from last Monday’s post ended up.  Susan, the buyer, was kind enough to share a photo of them in their new home with us!

I love that the room has a garden theme with the watering can and pots up on that shelf!

One last thing before I leave you today.  I don’t know if all of you know that I also produce a blog for Reclaiming Beautiful, the shop where I sell on consignment.

I usually only post once a month there, but during the month of June I posted every week to share a gorgeous wedding venue called Redeemed Farm.

This place was simply stunning.

If you haven’t seen those posts and you have some time on your hands you should head over to the Reclaiming Beautiful blog and check it out!

In the meantime, enjoy your Sunday.  I’ll be back tomorrow with another furniture makeover!