the chair with a heart.

Last week was a rough one for me.  I won’t go into the details, but I was camped out on the sofa for nearly 5 days.  I had time to watch the entire Outlander series from the beginning through the current episode, and that is no small feat.  Luckily I had finished today’s project prior to getting ill so I had something to share with you guys today.  I’m still working on regaining my strength though, so I can’t promise I’ll be back to my regular posting schedule just yet but I’m sure you guys will cut me some slack.

I picked up this chair at a garage sale last summer … well, really last spring, as evidenced by the tulips blooming in the background of my ‘before’ photo.

It was in decent shape, just terribly outdated.  I apologize to grandmothers everywhere, but there isn’t much of a market for these needlepoint seats anymore.  But this chair had some lovely lines to it, and a rather unique look to the back, so I snatched it up.

I knew I could give it an entirely new look with some chippy milk paint.

Now I have a small confession to make.  I actually painted this chair last summer.  And then somehow it got shoved to the back of the workshop and I forgot about it, so I’m a little spotty on the details regarding exactly which products I used.

I know I painted it with a layer of blue paint first but I can’t remember for sure which blue, I think it was Miss Mustard Seed’s French Enamel.  Then I added Miss Mustard Seed’s Ironstone over that.  You can just see the blue peeking through in a few spots where I’ve distressed the carving at the top of the chair.

And as you can see, I got some great chipping!

I pulled this chair out of the workshop at least a month ago or so thinking that all it needed to finish it up was some new fabric for the seat.  My vision for this piece was to use a fabulous vintage European grain sack for that.  But I didn’t actually have one.  I shopped around a bit for one, but those things are not cheap.

Finally I realized I was being foolish.  I know how to create something nearly as fabulous at a fraction of the price.  Duh!

Just stencil some drop cloth material and ta da!

The stencil is from Maison de Stencils.  If you are looking for European grain sack style stencils, they have a fantastic selection.

And just like that, the chair was finished.

I don’t know what took me so long to finish it off!

the aviary chair.

For quite some time now I’ve been wanting to try the newest Miss Mustard Seed’s Milk Paint color, Aviary.

Let’s see.  I think this color came out about a year or so ago, right?  Hmmmm.  Why am I always so hopelessly behind the times?  Well, better late than never I hope.

One of my strategies when working with a new paint color is to paint a practice board first so that I can get a feel for how the color looks with different top coats before moving on to a large piece of furniture.  But this time I decided it would be more fun to paint a little schoolhouse chair to test out this color.

As you can see, the finish on this chair was in pretty rough shape.  Parts of the finish were so dried out that I really didn’t think I would get any resistance at all (and thus no chipping).  I wanted to end up with a chippy, beat up, authentically old looking finish, so I didn’t do much prep work to the chair at all.  OK, let’s be honest, I did absolutely zero prep.  I may have wiped away a cob-web or two, but that was it.

Sometimes that can backfire on you, and had this been a larger piece of furniture it would have been a mistake.  But for this little chair, it was a calculated risk.  It’s a small piece, so it would be easy enough to fix if the paint didn’t adhere at all.  Sure enough,  I ended up getting quite a bit more chipping than I expected on the legs of the chair, but very little chipping on the seat.  So I simply sanded down the super chippy legs and painted them again.  Problem solved.  The sanding helped the next layer of paint stick.

Today’s q tip:  If you’re comfortable with taking a chance and rolling the dice, you can skip the prep on your project like I did.  But if you’d prefer to exercise a little more control over the amount of chipping you get with milk paint then do proper prep first.  Sand your piece lightly all over and clean well with TSP Substitute (or similar).  For more tips on painting with milk paint, check out my milk paint basics post.

The coverage with Aviary was really good.  Two coats of paint was plenty.

Once my paint was dry I sanded heavily for two reasons; first, I wanted to be sure I removed any chipping paint (more on that in a minute) and second, I wanted a very distressed look for this vintage chair.  I still had some chipping, but it was just the right amount this time.

Once sanded, I vacuumed the chair with my shop vac.  Then I used a clean, dry, nubby cloth to wipe the chair vigorously.  I wanted to be sure that I had all of the chipped paint and dust off before applying a transfer to the seat and back of the chair.

This project was a great way to use up the leftover pieces of the Prima Marketing French Ceramics transfers that I used on a dresser that I painted last year.

When using a transfer over chippy milk paint I have found two options that work well.  Sand the chippy paint really thoroughly and be sure to remove all chips and dust first; or seal the milk paint with Miss Mustard Seed’s Tough Coat Sealer (or another water based sealer) before applying the transfer.  If you don’t do either of these things, you may find that the transfer backing paper removes your chipping paint rather than releasing the transfer onto your piece.

Also, do not try to apply a transfer over freshly applied wax.  It will become a sticky, gooey mess as the friction from rubbing on the transfer will heat up the wax and it all just goes downhill from there.  Been there, done that.  Remember transfer first, wax second.  However, you can apply a transfer to a waxed surface that has cured for 30 days or more.

Once I had my transfer in place, I sanded over it with 220 grit sandpaper.  I wanted a distressed look, so I wanted the transfer to look worn away in spots too.

Next I wiped the chair down with a clean cloth again and then applied Miss Mustard Seed’s Furniture Wax in the special edition lavender scent.

I applied it using a new wax brush that my friend Terri gave me for my birthday.  It came in a kit with three brushes, some brush soap and a few other little things like a pair of plastic gloves and one of those sanding blocks.

I haven’t tried the brush soap yet, but it smells divine.  I’d be tempted to use it as a regular hand soap it smells so good.  I think that smaller non-tapered brush might work well for stenciling.  And the pointy brush just came in handy for getting at a hard to reach spot on the bench I shared last Friday.

I used the largest brush at the bottom for waxing this chair though and to be honest I think the bristles are just a bit too long and too soft for really effective waxing.  I prefer my waxing brushes to be a little bit more stiff.  It was hard to work the wax into the surface with this brush.  It might be better suited to painting rather than waxing (and fyi, it is meant for either painting or waxing).

I haven’t had the milk paint out in a while, and now I’m reminded of why I love it so much.  It really does provide the most authentically aged looking chippy finish.

And isn’t the Aviary a lovely shade of grey-blue?  I’ll be keeping an eye out for the perfect dresser to put this color on next!

Thank you to Miss Mustard Seed’s Milk Paint for providing the paint and wax, and to Prima Marketing for providing the transfer for this project.

If you’re wondering where to purchase the Prima Marketing re.design French Ceramics transfer, check out their ‘where to buy’ page.

If you’re wondering where to buy Miss Mustard Seed’s product, here is where you can ‘buy online.’

And finally, if you happen to be local (Twin Cities, MN) and in need of an adorable little chair, check out my ‘available for local sale’ page to see if this one is still available.

dreaming of spring.

OK, I know I’m jumping the gun a bit with the garden theme of this piece.

I just couldn’t help myself though.  I’m already dreaming of spring, how about you?

I wasn’t especially looking for another bed frame to turn into a bench, but I came across this bed while garage saling on my lunch break last fall.  Luckily I was with my co-worker Jodie and she was driving a pick up truck so we were able to load it up.

There were no side rails included, so that made this one a great candidate for a bench.  If I’d wanted to sell it as a bed I would have had to replace the side rails.

In addition to adding a seat and the lower front trim piece to the bench, this time my handyman Ken also had to insert boards into some gaps in the headboard and foot board in order to make this piece work.

This is the third bench that Ken has made out of an old bed frame (here is the first and the second if you want to see them).

Once the bench was constructed, I painted the old wood with two coats of Fusion’s Bedford, while the new wood on the seat only required one coat.  Bedford is a medium warm grey.

I let the paint dry overnight, and then I added Prima Marketing’s Seeds transfer.

I didn’t quite use all of the transfer, although I did put some of it on the lower section of the bench too.

I also sanded the edges of the piece to distress the paint job.  With Fusion paint I recommend doing this within a few days of painting the piece.  Fusion is more difficult to distress once the paint has cured.

Although Fusion paint does not require a top coat for durability, the bare wood that I exposed by sanding could use a little protection.  So I added just a little bit of Miss Mustard Seed’s furniture wax to a cloth and wiped it over all of the distressed areas of the bench.  I didn’t add a lot of wax, just a bit.

I did the same over the transfer, just rubbed it lightly with a waxy cloth to give it a little extra protection.

I couldn’t resist staging the bench with plants and gardening supplies.  Sure, it’s January and everything outside my window is frozen solid.  But inside I can pretend it’s practically spring!

If you’re wondering where to purchase the Prima Marketing Seeds transfer, check out their ‘where to buy’ page.

If you’re wondering where to buy the Fusion paint in Bedford, check out their ‘where to buy’ page.

And finally, if you happen to be local (Twin Cities, MN) and in need of a fabulous bench, check out my ‘available for local sale’ page to see if this one is still available.

herculaneum.

In the year 79 A.D. Mount Vesuvius erupted.  At the time it had been dormant for 800 years, so I imagine that the residents of the nearby towns had no idea what was happening or how to react.  Following the eruption, the town of Herculaneum was buried under 50 – 60 feet of ash.

You can see Vesuvius in the background of that photo, the mountain that has blown its top.  You can also see that Herculaneum sits about 60′ below the ground level of the current town around it.

While our ship was docked in Naples last November, we toured Herculaneum.  We were happy to be out enjoying the sunshine for this tour!  Plus, there is just something amazing about walking around a town that was last populated almost 2,000 years ago.

Did you know that fast food is not a modern invention?  Herculaneum’s residents could visit the thermopolium to purchase ready made hot food and beverages served from counters.

Public baths were also very popular at the time.  Few people could afford a private bath in their home.  The public baths were open to everyone regardless of class and the one in Herculaneum had separate areas for men and women.

In last week’s post I mentioned that most of the mosaics, furnishings and other artwork from both Herculaneum and Pompeii have been moved to the archaeological museum in Naples, however some mosaics are still intact like the Neptune floor in the public bath.

And the amazing mosaics surrounding the garden court of the House of the Neptune.

Many structures were also decorated with beautiful frescoes.

Sadly, many of the residents of Herculaneum fled to some underground boat sheds to shelter from the eruption.  They thought they would be safe in these cave-like structures.

But nothing could have protected them from the surges of extreme heat from the volcano.

These skeletons weren’t excavated until 1982.  Prior to their discovery it was thought that the people of Herculaneum had managed to escape.

It’s sad that the people living around Mount Vesuvius met with such a terrible fate, but at the same time it created such a unique opportunity to study what life was like 2,000 years ago and it was fascinating to tour Herculaneum.  If you ever are in Naples, Italy I highly recommend taking the time to see it!

that’s a wrap.

Happy New Year!

Where in the world did 2018 go?  It just flew by for me.  Overall it was an awesome year, except this last part got a little rocky.  I had some dental work done just a couple of weeks before Christmas and it was a rough recovery.  My body just doesn’t adjust well to having foreign objects installed (it was a crown, in case you are wondering what in the world I’m talking about).  I’m only just starting to feel more like myself again.  Have any of you had this experience with a crown?

It required four trips to the dentist, and I do not enjoy the dentist (even though my dentist and her assistant worked really hard to make me comfortable).  Honestly, the whole thing just threw me for a loop.  Mr. Q was concerned because I completely abandoned my paint brush during this time frame.  I find it difficult to be creative when I’m not feeling well, how about you?

Next time remind me not to schedule this sort of thing just before the holidays!

I’m starting to feel much better now though and I’m putting the whole experience behind me, along with the rest of 2018.  But before we move on, let’s take a look back at some of the projects that I shared with you here on the blog this past year.

Photo collages wrapping up your work for the year are all the rage on Instagram these days, so I thought it would be fun to create one myself for this blog post.  But as I started looking back through my 2018 posts I realized that I needed more than just one.  How about more like seven?

Starting with some of the pieces I did with Prima Marketing transfers …

In fact, I had so much fun using transfers during 2018 that I have to share a second collage of transfer projects.

I was going to do a collage with just pieces painted with Dixie Belle paint, but I soon realized I could do an entire collage of just those painted in Dixie Belle’s Caviar

This deep, rich black has turned out to be one of my favorite colors to work with.

Next, here are many of the mid-century modern pieces I painted last year.  It’s obvious that Fusion’s Park Bench (green) was my go-to paint for the mid-mods in 2018.

Those are four different dressers painted green, not just different shots of the same piece.  I also did a few dark grey pieces usually using Fusion’s Ash, but the one on the lower right is Dixie Belle’s Gravel Road.  Fusion’s English Rose is the perfect Millennial Pink for this style of furniture too.

And then there are the milk paint pieces from 2018 …

Hmmm, it would seem that I have a definite preference for using milk paint in shades of blue.

Next up are some of my favorite smaller projects that I did in 2018 …

Smaller projects like these are one of my favorite ways to try out new techniques or new paint colors.

And let’s not forget my favorite garage sale finds of 2018.

Is anyone else starting to experience garage sale withdrawal?  Spring is just around the corner, right?

Well, that’s a wrap on 2018.  If you’re looking for more details on any of the pieces of furniture featured in the photos above just visit my ‘fab furniture‘ page where you can see ‘before’ & ‘after’ photos with links to blog posts with all of the details.

I hope to have many more inspiring projects to share with you in 2019, and perhaps I’ll experiment with a couple of new products here and there too.  Be sure to stay tuned!

toolboxes playing dress up.

Recently Prima Marketing sent me a few of their newest transfer designs.  To be honest, it might have been the best thing I received for Christmas this year!

They’ve got a couple of new kinds of transfers; foil transfers and adhesive transfers which are used with metallic foils.  I’ll be experimenting with both of those styles down the road, but for today I’m sharing some of their newest transfer collections.

I’m calling them ‘collections’ because these sets aren’t meant to be used as one large design on a single piece, but instead they have a bunch of smaller designs on each sheet that are meant to be cut up and used separately.  This makes them perfect for smaller projects, like dressing up some old toolboxes.

I’m guessing that I’m not the only one here who likes a rusty old toolbox.  Sometimes I re-paint old toolboxes, but when they are already a fab color I like to leave their original rusty patina alone.

But adding a little something extra is good too.

I started with this collection of transfers called Overflowing Love.

This one comes with two sheets of transfers, the one shown above which has several different designs and is meant to be cut apart and used individually (on the right below) and a second sheet with a full design meant to be kept together (on the left below).

It’s like getting two for one!

I added a couple of the big roses to the top and side of my turquoise toolbox.

They were super easy to apply.  I made sure the toolboxes were clean and dry first, and then I just rubbed them on.

Next I pulled out the Everyday Farmhouse collection.  This one comes with three sheets inside, all with various wording or numbers.

This is perfect for giving something a less flowery, more farmhouse-y rustic look.

You could literally do dozens of small projects with just this one set of transfers.

Finally, for a definitively industrial look, I pulled out the Industrial Mechanics transfer.

This set comes with three sheets that could be joined up together to create one large design.  Or you could use just part of it like I’ve done on this last metal case.

It has a chalkboard-ish sort of look to it, don’t you think?  This transfer would be perfect on a desk.

I use these toolboxes to store my craft supplies.

They work great for holding my hot glue gun or other crafting tools too.

Got any ideas for things you could use these new transfers on?  If so, please share in a comment.

If you’re wondering where to purchase the Prima Marketing transfers check out their ‘where to buy’ page.

people of mature age and respected morals.

The third port of call on our recent Adriatic cruise was Naples, Italy.  This was also the third time I’ve been to Naples.  The first time I went to Pompeii with my mom and sister, the second time I went to Capri with Mr. Q and my bff, so this time we decided to visit Herculaneum.

But our tour of Herculaneum was in the afternoon, so that left us the morning to do something else in Naples.

I don’t think I’ve mentioned it here yet, but we were lucky enough to have the ship’s port lecturer at our dinner table on this cruise.

Let me elaborate for those of you who may not be familiar with cruising.  When you book a cruise these days you can usually decide between anytime dining or a set dining time of either the ‘early’ or ‘late’ seating.  If you choose a set dining time, you can also choose to be at your own table for two (or however many are in your party) or you can roll the dice and choose to be seated with strangers.  When Mr. Q and I travel alone we prefer late dining and as large a table as we can get.  Mr. Q is a social butterfly/extrovert and the more, the merrier in his opinion.  And the ‘late seating’ always gives me time for a nap before dinner 😉

I’m always a tad nervous about the possibility of ending up with unpleasant dinner companions, but so far we’ve always been lucky.

Once again, we were quite fortunate this time.  We were at a table for 8 with three other couples.  The first couple was from Canada and were retired from the travel business.  The second couple was from Connecticut currently, however they had immigrated to the U.S. from Moldova (a former Soviet republic) back in the 90’s.  I have to say, Nathan and Svetlana were the nicest people.  We had to work hard to understand them through their still rather thick accents, but it was worth it.  Mr. Q was in heaven because he loves Russian literature and Nathan was clearly a fan as well.  The third couple, Ken and Leslie, were from England.  We were well into our second dinner together before Ken fessed up that he was the cruise’s port lecturer.

How convenient to have the ship’s expert on our ports of call right there at our dinner table every night!

It certainly came in handy for Naples.  When we asked Ken (not to be confused with my neighbor/handyman Ken) what we should do with our morning in Naples he recommended visiting the Museo Archeologico Nazionale di Napoli.

He explained that all of the really good stuff from both Pompeii and Herculaneum is at the museum.  Most of the items that you see at the sites themselves are reproductions.  Naturally the originals have been sent to the museum to be protected.

Plus the museum is within walking distance from the ship, or just a short and inexpensive taxi ride away therefore it would be easy to visit in the morning before our tour.

So after breakfast that morning Mr. Q and I headed out on foot to the museum.  It was a bit longer of a walk than we anticipated, but maybe that’s because we had to stop and have coffee at a small sidewalk cafe along the way.  Italian coffee is the best!

I was highly amused by this poster plastered on the wall along our route.

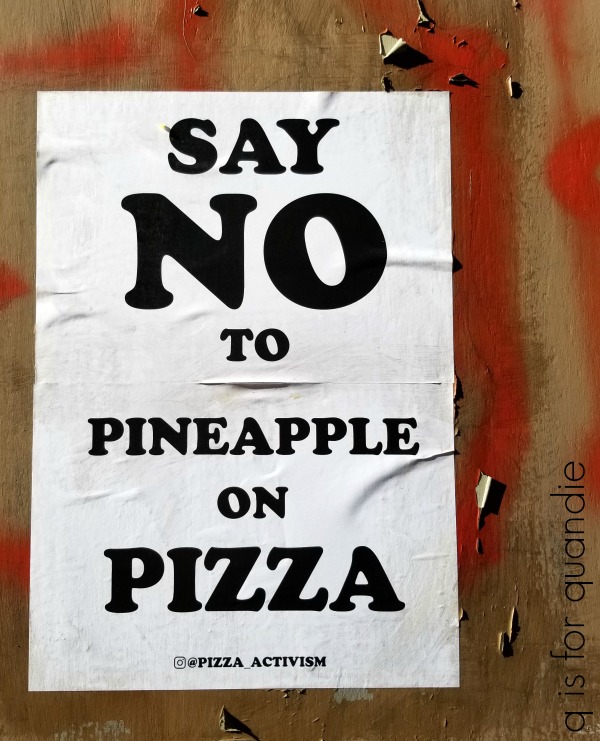
I would never have admitted it out loud on the streets of Naples, but pizza with pineapple on it is pretty much the only pizza that I like.  Shhhhh, don’t tell the Italians!

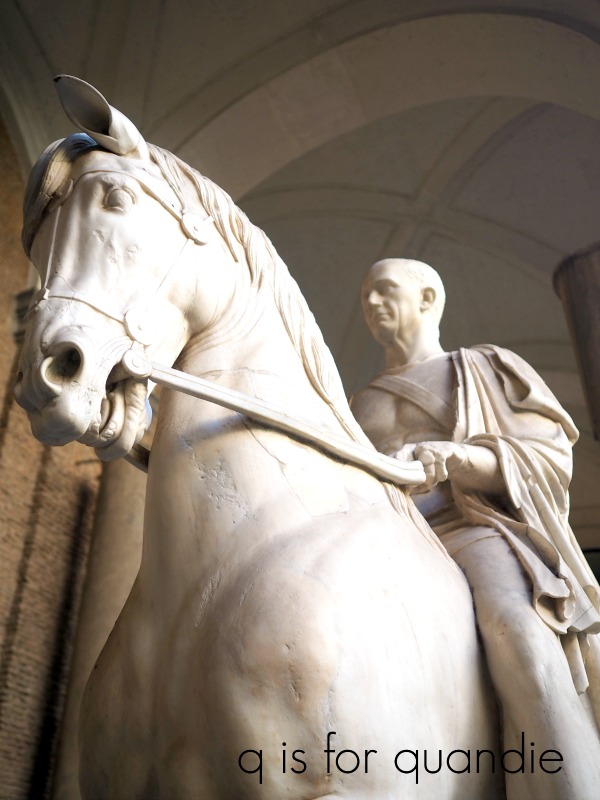
We were greeted just inside the door of the museum by a young man offering a personal one hour guided tour in English, but it was €60 which seemed a little pricey.  In hindsight, we probably should have at least rented the audio guides which were only €5 each, but at the time we didn’t think we needed them. We hadn’t realized that many of the printed explanations in the museum would be written in Italian only.  Luckily some of the more major exhibits were also explained in English, but I’m sure we would have gotten much more out of our visit with the audio guides.

Also just inside was this model.

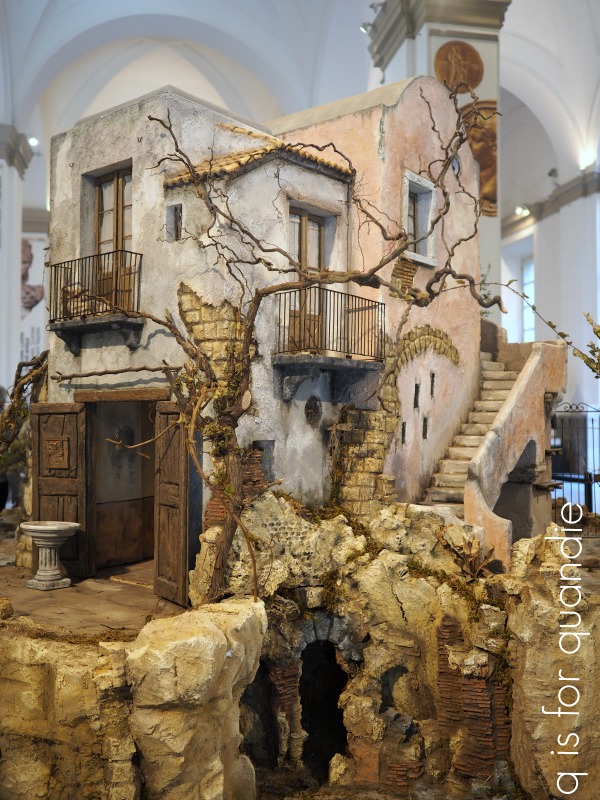
It was roped off and surrounded by people working on it though.  I wish I knew more about what is was, but I haven’t been able to find any info on it at all.

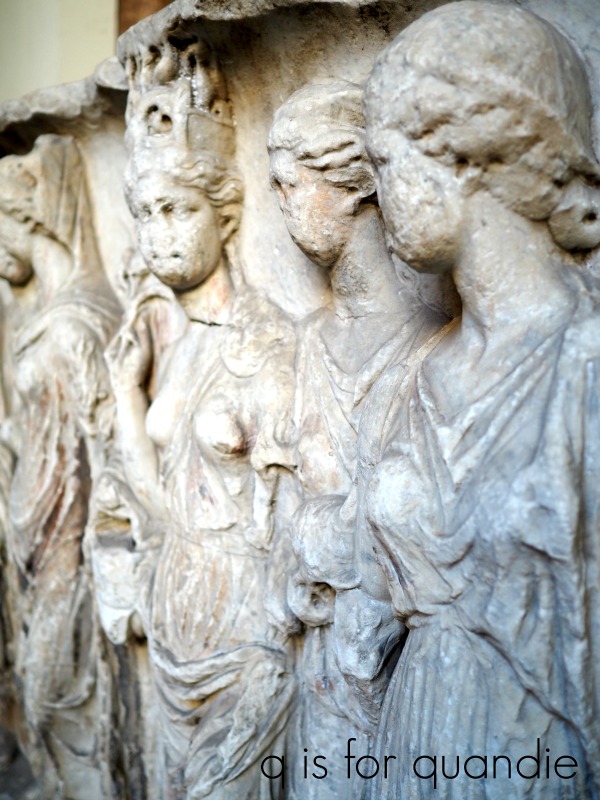
Of all the pieces in the museum, I was the most impressed by the mosaics.

It’s really hard to appreciate these in photos.  The one above is only about 2.5′ tall or so, it’s not an entire wall sized mosaic as it may seem in the photo.  So look again at how incredibly tiny those pieces are that make up the mosaic, and the detailed shading in the design giving it a three dimensional look.  Here’s another …

I can’t even imagine the patience it would require to place all of those tiny little pieces!

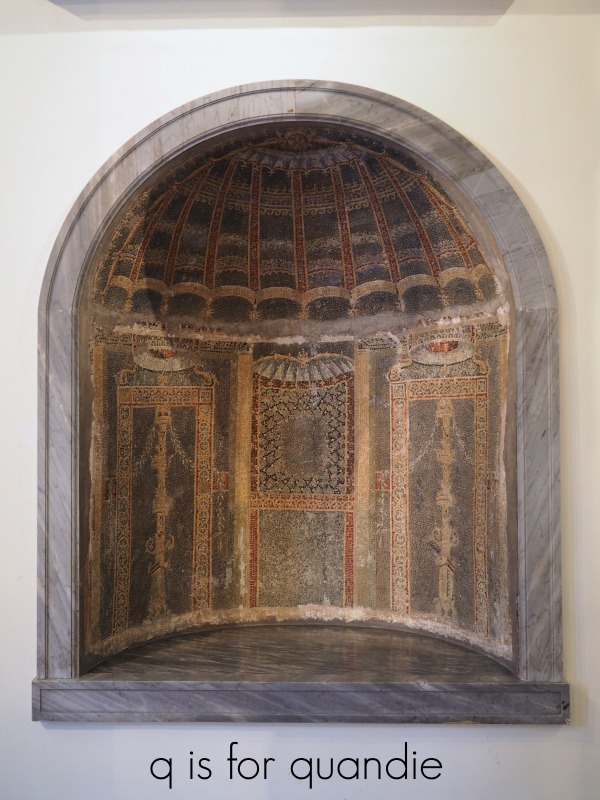
These little niches likely held small statues, but perhaps they were the inspiration for the telephone niches of the 1950’s!  Who else remember those?

They didn’t just have small mosaics in the museum, they had huge mosaics too.

This is the Alexander Mosaic.  It was a floor in the House of the Faun at Pompeii and it dates to around 120 B.C.

 We also stumbled across a section of the museum called the secret cabinet.  Port Lecturer Ken had warned us about this area … or did he simply tell us that we should be sure to see it?  I’m not sure which now.  Believe it or not, until the 1960’s the items on display here were ‘only accessible to “people of mature age and respected morals”, which in practice meant only educated men’ (Wikipedia).  I’m sure that Mr. Q and I are of a mature enough age, but not so sure about those respected morals.

Anyway, they let us in.  In fact I was even able to take photos at will.  I debated sharing a photo or two here, but I don’t want to end up on some sort of restricted internet list or anything.  I also don’t want to offend the sensibilities of any of my readers.  But if interested, be sure to check out the Wikipedia entry here to read more about the sorts of items that were found throughout Herculaneum and Pompeii.

We ran out of time to see anything more at the museum after that, so we grabbed a cab out front and headed back to the port for a quick lunch before heading out to Herculaneum.  I’ll be sharing that next Wednesday, so if you’re enjoying these travel posts be sure to check back then!

wishing you a very merry.

As I’ve mentioned before, I use an online random number generator to choose the winners for my giveaways.  There is just no way that I could simply ‘pick’ a winner based on merit, or how much I liked that person’s comment.  If I did that, I’d have to choose every one of you and I just don’t have enough prizes for that!

Imagine my surprise when the number generated this time was number 1!  I guess it does pay to be first in line sometimes 😉

So congrats to Stephanie, and a huge thank you to everyone who left a comment on the four giveaway posts for my blogiversary.  You all said so many kind things.  At one point I told Mr. Q that maybe I should have said something like “you’re not required to say something flattering to win”.  I felt a bit like I was fishing for compliments, when in reality I just wanted to thank all of you for your continued support of my blog.  I couldn’t do it without you!

For those of you who celebrate Christmas, I hope you have a very merry holiday with friends and family.

Don’t forget to leave some cookies out for Santa!

And for those of you who don’t, I hope you at least get to enjoy a couple of days off work to rest and relax.

I’ll be back on Wednesday with the next port of call from our Adriatic cruise, Naples.  I’ve also got some fun quick projects to share with your on Friday.  See you then!

keeping it simple.

While I was gone on my cruise last month I received a text from one of my favorite customers.  Nikkii has purchased a gazillion pieces of furniture from me, I do believe I have lost count of just how many.  Last summer she purchased the gorgeous bed I painted in Dixie Belle’s Caviar.

She got in touch because she was looking for a dresser to pair up with the bed.  She wanted something that would hold a decent amount of stuff.

Mr. Q and I happened to have just returned to the ship after our Street Food Tour in Genoa when she texted, but I promised to get back to her when our trip was over because I had a couple of dressers that I thought might work for her.

She ended up going with this one.

Initially you might be thinking that the simple, clean lines of this chest on chest dresser don’t relate to the more ornate style of the bed at all.  However, I knew that painting it the same color would go a long way towards making them work together.

I prepped the dresser using my regular m.o.; removed the hardware, sanded lightly, vacuumed inside and out, cleaned with Krud Kutter Kitchen Degreaser, and rinsed with a damp cloth.  Then I added two coats of Dixie Belle’s Caviar.

Once that was dry I added my Blanchisserie de Francaise stencil using Ceramcoat craft paint in a color called Deep Taupe.  The curvy lines of the stencil will also help this piece relate to the curvier lines of the bed.

Readers frequently ask where I got this stencil, but unfortunately the Etsy vendor I purchased it from is no longer in business so I can’t provide a source for it.

After adding the stencil it was simply a matter of sanding lightly again using 220 grit paper, vacuuming again and then waxing the piece using Dixie Belle’s Best Dang Wax in Black.

Gosh, I’d forgotten what a workout it is to wax a large piece of furniture.  And this one is large at 53.5″ tall.  I never feel guilty about skipping the gym when I’m spending time waxing a piece of furniture.

And it sure did feel good to be painting again.  I’d definitely missed it!

I retained the original drawer pulls on this piece.  I initially debated swapping them out, but they had two screws each which would have meant filling holes and re-centering new holes for knobs.

When I think about it, this dresser makeover really was an exercise in keeping in simple.

First of all, that original red stain would have definitely bled through a lighter color of paint.  Sure, I could have used a stain blocking primer like Dixie Belle’s BOSS and that would have solved that problem.  That would have been an extra expense, and an extra step or possibly two (if it had required two coats).  Just painting it black was much simpler.

Second, keeping the original hardware meant I didn’t have to fill those extra holes.  Plus there would have been the added expense of buying 10 knobs.

Some days it feels like the competition out there on social media is so fierce, and everyone is trying to out-do each other with the most elaborate makeover possible.  Sometimes it’s good to remind myself that keeping it simple is OK too.

You can really change the look of a piece of furniture with just some paint, don’t you agree?


eze in the off-season.

I veered off track a bit with my Wednesday travel post last week and skipped ahead to the end of our Adriatic cruise, but now I’m back on track and today I’m sharing what we did during the first half of the day while our ship was docked in Monaco.

We took a ship sponsored shore excursion to Eze, France.

Eze is a small medieval hilltop village just across the border from Monaco.  It probably took us less than 30 minutes to get there, so it’s not far.  I’m not really sure of the exact timing because our very charming tour guide kept us entertained the entire way sharing interesting tidbits about both Monaco and Eze.

Once again I’m wishing I had a drone so that I could show you the amazing location of this pretty little village using my own photo.  Coincidentally, I was just reading the December 2018 issue of Martha Stewart magazine and guess what?  Martha has a drone.  She uses it to take photos of the sweeping vistas of her own property.  I don’t really think I need one for that, but it sure would be fun to have one for travel.  In the article she claims that drones are ‘more accessible and affordable’ these days.

Regardless, I doubt I’ll get a drone anytime soon.  Plus, I suspect Martha’s definition of ‘affordable’ is slightly different than mine.

In the meantime I’ll borrow this next photo from the web just so you get a feel for the location of Eze, which is perched at the top of a hill overlooking the sea.  You can see the church in about the center of the photo, and above it just a little to the right at the very top is the exotic garden.

Eze has been on my bucket list since the last time we went to Monaco, which was about 10 years ago.  That time we didn’t make it to Eze and I really regretted it.  So when I realized this cruise made a stop in Monaco I knew I had to get there this time.

The only downside to Eze is that it tends to be terribly touristy.  I always say that the reason why places become touristy is because they have something fantastic to offer.  People start talking about the place because it’s uniquely charming, or interesting, or historically significant and then word gets out and everyone wants to go there.  Suddenly the place is overrun with tourists.

But here’s the trick to visiting really touristy places, go in the off-season.  These captivating little alleyways can be thronged with people in the summer, but they were practically empty while we were there.

We stopped for a cup of coffee at this lovely cafe and were literally the only people in the place.

Granted, probably at least half of the shops were closed.  But that doesn’t matter one bit to me, I’m not a shopper when I travel.  I’d much rather spend my time running around taking photos rather than shopping.

While in Eze, we toured the Église Notre-Dame-de-l’Assomption d’Èze.

This church was built between 1764 and 1778 on the ruins of an original 12th century church.

I thought the interior had a very French look with all of the gold, pale blue and crystal chandeliers.

Our guide pointed out the permanent arm holding a crucifix coming out from the pulpit.  Do you see it there in the photo above?  I’m not sure I would necessarily have noticed it otherwise.  She said that the priest’s arm got too tired holding up that heavy crucifix so he had a permanent one installed.  I’m not sure if that’s the true story behind it or not, but it was entertaining.

Le jardin exotique d’Eze is located up at the very top of the hill above the rooftops of the village.

  The first time we were in Monaco and visited the Jardin Exotique de Monaco, I was surprised to find that it was mainly a garden of succulents.  That time I was expecting something entirely different, a typical french garden like the one in Giverny that was featured in so many Monet paintings.  But this time I knew what to expect.

I have to admit cacti and other succulents are not my favorites.  I much prefer a lush cottage garden.  But the views from le jardin exotique d’Eze were spectacular.

I don’t think I would have enjoyed Eze nearly as much if we had visited during the summer, but seeing it in November was fantastic.

Not only were there fewer tourists, but the fall colors were beautiful too.

So I say if you ever have the chance to visit Eze in the off-season, and you enjoy charming little medieval French villages, definitely go for it!