my vintage ornament non-collection.

Those of you who have followed me for any length of time know that I am in total denial about being a collector of any kind.  I guess I really don’t think of myself as one of those people who collect items because they are valuable.  Or rare.  I hope to never be one of those people who has spent tons of money on some sort of collection believing that the items will appreciate in value, and then when I die my heirs can’t even give it away.

But obviously I do have collections, I just prefer to call them non-collections in order to maintain my delusion that I am not a collector.

I really have just one absolute requirement for the items I collect, they have to be something that brings me joy (I followed that rule long before Marie Kondo came along).  And I guess there are a handful of additional rules that I generally follow as well:

Rule #2 – the items must be fairly cheap.  I think I’ve pretty much established that I’m a frugal person.  I’m never going to spend a bunch of money on something just because it’s considered ‘collectible’.

My non-collection of vintage Christmas ornaments totally meets this rule since I typically find my ornaments at garage or estate sales.  If I’m lucky enough to find them there, they are usually less than $1 each.  These baggies of ornaments for $10 each were probably the most I’ve ever paid for ornaments at a garage sale.

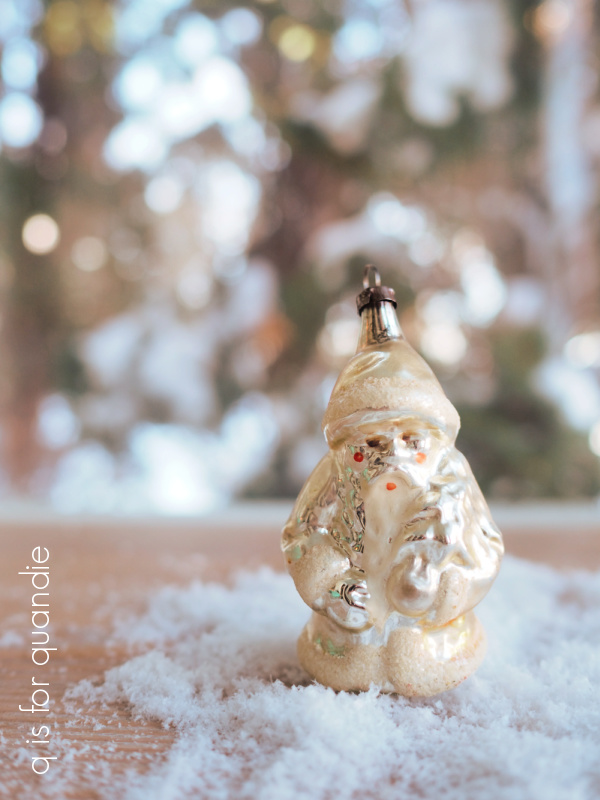
On occasion I have also been known to splurge on ornaments at antique shops, but in this case ‘splurging’ still means paying less than $10 each for really special ones, like this Santa ornament …

Quite a few of my favorite ornaments came from a shop that was in No. St. Paul called La’ Garage.  I’m sure some of my local readers remember that place.  The best way to describe it would be as an estate sale in a storefront.  The proprietors bought out estates to stock their shop.  They had amazing vintage ornaments each year at Christmas and I always stopped by at least once each season and purchased some.

They also sometimes sold the old boxes separately and I snatched those up whenever I saw them.

They really came in handy when I sold off a bunch of my ornaments a few years ago.

Sadly, La’ Garage closed up shop back in July 2020, and I still miss them.

Rule #3 – the items collected must be something that I display or use, not something to tuck away in a cupboard somewhere.

I pretty much broke that rule last year because I didn’t put up my tree.  Let’s face it, Christmas 2020 was a weird one.  Covid was putting the kibosh on most of the usual socializing, and I just wasn’t in the mood to put up a tree.  Plus the day job was really overwhelming me, and I didn’t have the energy left over to decorate much last year.

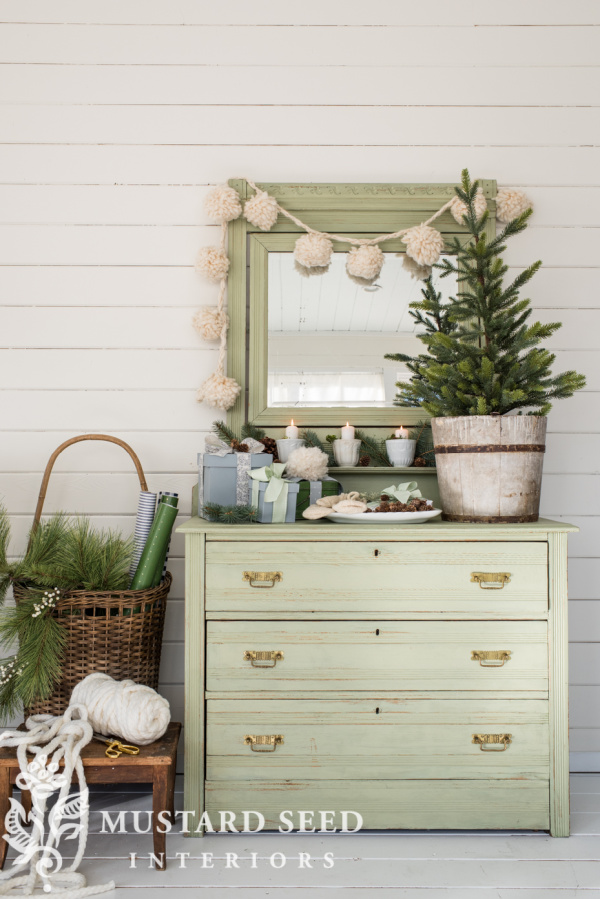
But this year I’ve pulled out my tall, skinny, silver tree once again and filled it up with my vintage ornaments.

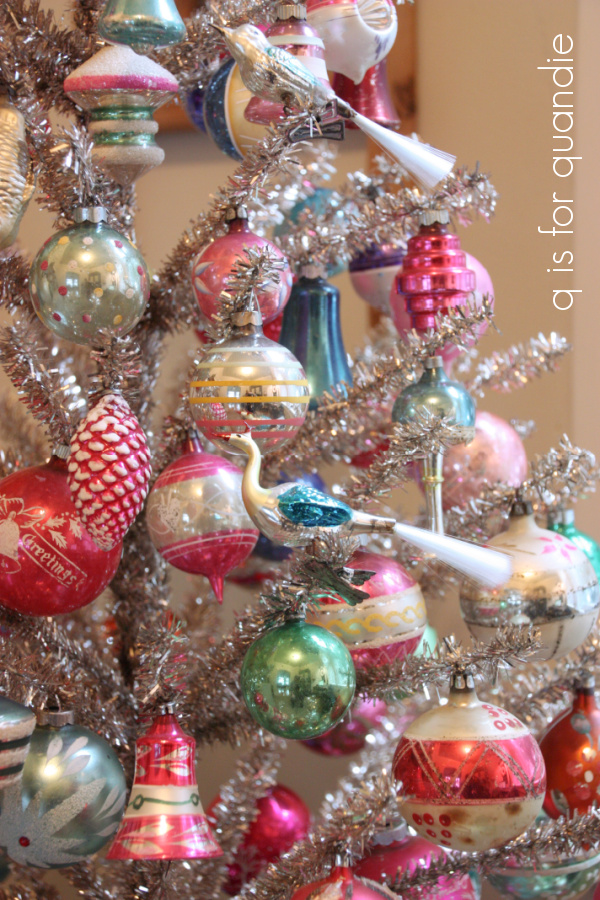
I love unwrapping each one from its tissue paper and admiring how pretty it is as I add it to the tree.

Rule #4 – I mainly collect vintage items.  They just appeal to me more than reproductions, or new items.

With the ornaments, I especially love the old hand-painted ones.  They are always unique.  Doesn’t the one above have a 70’s vibe with those daisies?  I think that particular ornament artist was ahead of her time.

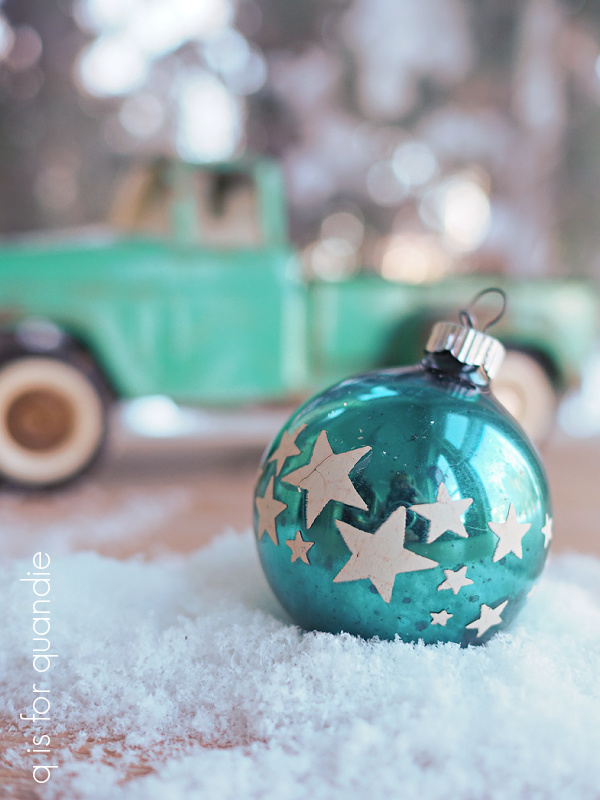
I’m really drawn to the unique color combination on this next one with its blue and green …

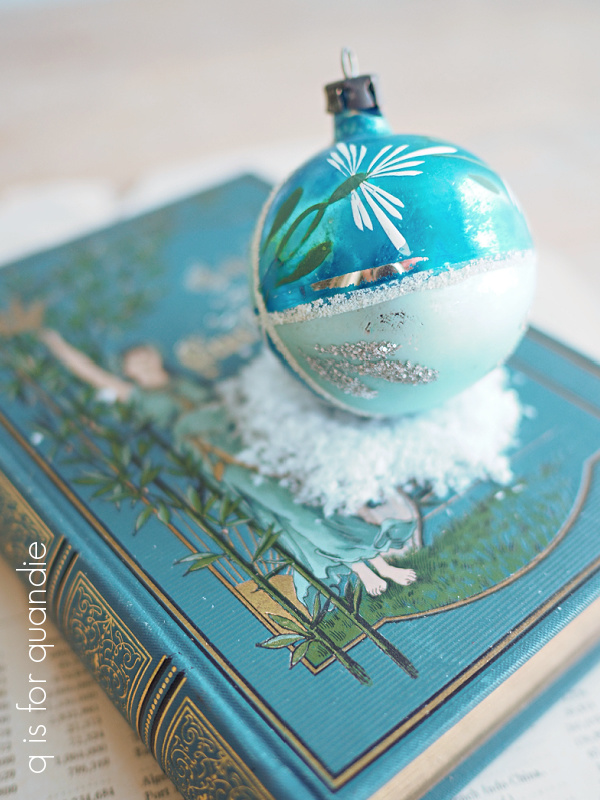
It just happens to perfectly match the gorgeous colors on that vintage book that my friend Sue gave me for my birthday.

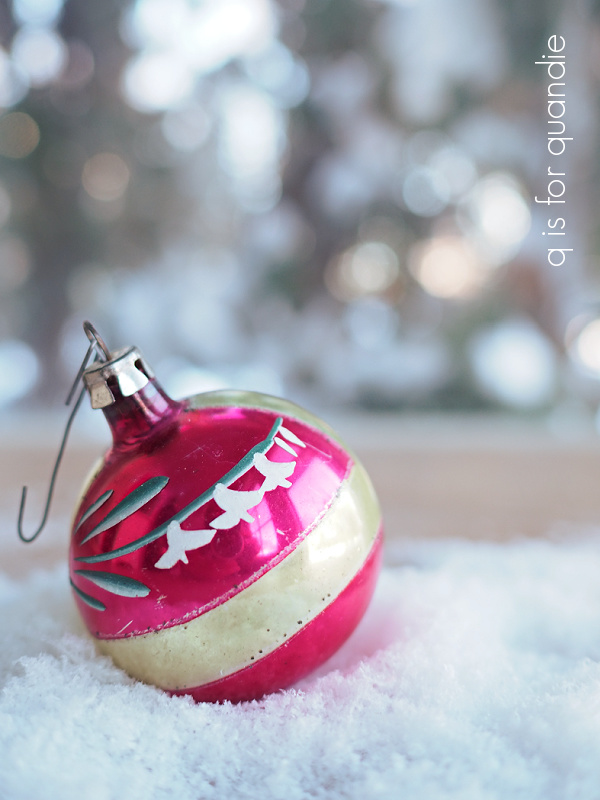
I’m not precisely sure what the flowers on this next one are supposed to be, but to me they look like Lily of the Valley.  Certainly not a flower you typically think of at Christmas time, but how pretty are they on this bulb?

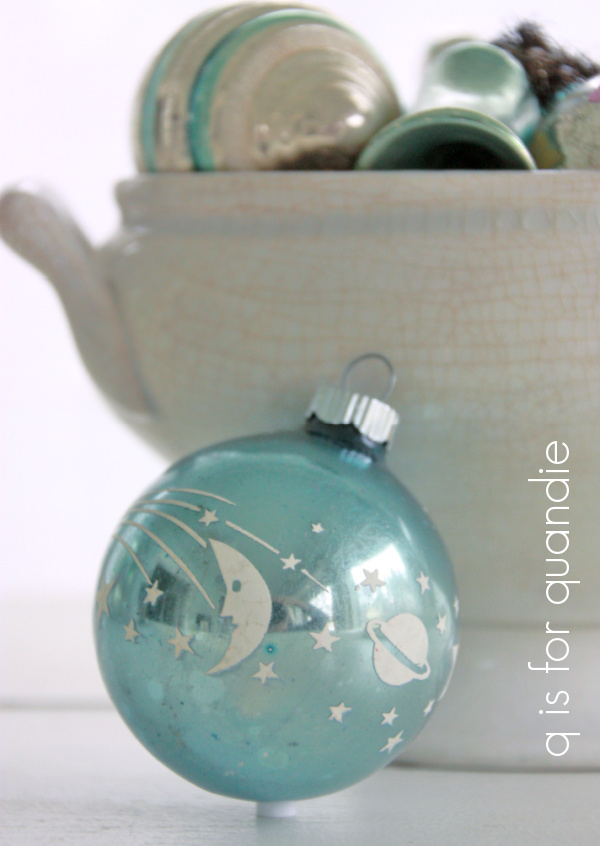
I also enjoy the more geometric patterns.

Don’t they have a sort of mid-century atomic vibe?

I’ve read that there was a trend towards space age themed ornaments in the 50’s and 60’s as Americans were caught up in the space race.  I’m still bummed about the really cool planet ornament I once had that I broke back in 2015 …

I used it in a furniture photo shoot and it rolled off the dresser and shattered into a million pieces (which tends to happen when these fragile ornaments hit the floor).  What was I thinking being so cavalier with that ornament?

So far the closest replacement I’ve found for it is this one …

And let’s face it, it’s nowhere near as cool.

So I’m still on the lookout for a replacement planet ornament.  Maybe one day I’ll find another.

Rule #5 – I’m also not one who believes my collections have to get bigger and bigger and bigger.  Over time, as I find fabulous pieces to add to my non-collections, I tend to start narrowing my scope in some way.  As I mentioned above, I sold off quite a bit of my non-collection of ornaments a few years back.

For example, if I had six of the same design, I sold five of them and just kept one.

And I also sold some that weren’t in my preferred color scheme of pink and aqua.

Those gold ones were so pretty boxed up with old book pages to cushion them.

What is it about these vintage ornaments that I find so appealing?  Maybe it’s that my grandparents likely used ornaments similar to these on their Christmas tree and subconsciously I am trying to recreate my childhood love of Christmas.  Or maybe I’m just drawn to shiny, pretty things.  Who knows?

But how about you?  Do you have any Christmas related non-collections?  Do you follow a similar set of ‘rules’ for collecting, or do you just go for broke?  Leave me a comment and let me know.

I have a special treat planned for next week.  I’m super excited to be sharing a tour of my friend Amy’s house, which is looking amazingly festive.

Her holiday decorations make me drool, and I bet you guys will love them too!  So be sure to stay tuned!

the garden Christmas tree.

Do any of you remember the free Balsam Hill Christmas tree that I found back in the spring?

The photo above shows my haul from the White Bear Lake Trash to Treasure Day, where residents leave items at the curb for anyone to take.  The tree is in two boxes at the back.

At the time, I knew enough to know that the Balsam Hill brand is generally good quality, and I googled this particular style and found that it was their most popular seller.

And it was free.  So I grabbed it.

It’s a pre-lit tree, and I had a sneaking suspicion that the lights wouldn’t be working properly.  Why else would someone be getting rid of an expensive faux tree?  So I can’t say that I was surprised when I got it all set up and plugged in and only about 1/3 of the lights worked (although I was maybe just a tiny bit disappointed).  None the less, I still thought I’d use it in my living room until I dragged it in there and realized that it was really too big for my space.  I’ve mentioned a few times here that our house is not large.  It’s a 1904 farmhouse, and back in 1904 they didn’t see the need for huge rooms.

At that point I debated just boxing the tree back up and putting it at the curb with a ‘free’ sign on it, but then decided why not use it outside?  I’ve done this before and really enjoyed having a Christmas tree in the garden.  So I lugged it out to the garden and Mr. Q helped me weight it down with some sandbags (crucial for an outside faux tree, to avoid having it blown over in a storm).

I knew that trying to remove the non-functioning lights would be a frustrating, time consuming exercise, so I opted to just add new lights on top of the old.  Then I set about decorating the tree with garden items that I already had on hand, including most of my watering can non-collection.

I didn’t attached the cans with anything, I just basically tucked them in between branches.

And by the way, I should throw in here that one of them has an IOD transfer, and one of them has a re.design with prima transfer, and both brands of transfer have held up perfectly on these watering cans that I leave outside year round.

Most of the decorations, including the big galvanized snow flakes, are just tucked in.

I harvested dried flower heads from the garden and tucked those in here and there too.

Along with some birch logs, vintage garden tools, and even some clay pots.

I topped the tree with a rusty crown that usually lives in the garden.

I really wasn’t sure how this haphazard approach to decorating the tree was going to hold up outside, but we had a fairly blustery storm a few days later and nothing fell down, or fell off.

So I think it’s good to go.

I do like the spot I put it in, it’s outside my kitchen window and it’s fun to see it out there, especially at night when it’s lit up.

All of the preceding pictures were taken before our big snowfall last Friday.  Now the tree looks more like this …

Still pretty, but a lot of the smaller details have been lost under the snow.  It does make me realize what a good choice those bigger items such as the watering cans and the big galvanized snowflakes were for outside though.

But I’ve been thinking that maybe next year I’ll put the tree in the photo cottage.  If I left the top half of the door open, you could see the tree inside there all lit up.  Hmmmm.  Well, I have another year to think about that idea.

In the meantime, I’ll enjoy the tree where it is.

Do you put any Christmas trees up outside?  Or decorate ones that are already there?

and just like that.

There’s nothing like a good snow day to fill you with holiday spirit.  Last week I mentioned that we could use a little more snow for good outdoor holiday photos, and just like that, we got a perfectly picturesque snowfall last Friday afternoon and evening.

Some parts of the Twin Cities got up to 21″, but we probably got somewhere closer to 8 or 9″ here at our house.  Just the right amount to be festive, but not totally overwhelming.

And I’m sure some of you are tired of hearing about it, but boy, how fabulous to be retired and not have to commute in a snow storm!

Mr. Q and I stayed home and watched it come down.  He made his famous secret family recipe brownies, while I watched And Just Like That.  Any other Sex and the City fans out there?  I was a huge fan of that show.  I knew that they were coming out with a reboot, but I wasn’t quite clued in to the fact that I could watch it on HBO Max, which we just happened to add to our channel line up when Dune came out.  So, I’m a little behind (what’s new there?) and two episodes are out already.  Spoiler alert!  Don’t read the rest of this paragraph if you haven’t seen the show yet!  But wth?  I wasn’t expecting them to kill off Big in episode one.  Then again, it makes sense.  What would be the ongoing story line in ‘happily ever after’?  I love the fact that the characters are all around my age, and their lives have changed accordingly.  I can totally relate to Carrie trying to stay relevant with Instagram and podcasts.

But I digress.

I got up early on Saturday morning as the sun was just coming up so that I could get some photos before shoveling out.

On the one hand, the snow is gorgeous.  On the other hand, it covered up a lot of my outdoor decorations!

Hmmmm.  You can’t even see the arrangement of greens in my various containers.

But not to worry, that snow will melt later in the week and my greenery will be revealed once again, including my garden Christmas tree (I’ll share the details on that soon).

Since I knew the snow was coming, I took some time on Friday morning to finish up my front window box.

Well, more accurately, to almost finish it up.  You see those stars?  One of my readers (thanks again Connie!) sent me three of them.  I only had enough lights on hand for two of them on Friday though.  I’d like to get the third one in there too, hopefully I’ll get to that this week.

In the meantime, I’m just going to enjoy this snowy wonderland for a bit.

There’s nothing like that first good snowfall of the year.  I absolutely love it.  How about you?  Are you a fan, or are you in the ‘snow is a four letter word’ camp?

remember that bed?

Remember that bed that didn’t sell?

I ended up repurposing the headboard into a Farmers Market sign

I was hanging onto the foot board for a similar purpose.  To make it into a sign.  Only this time one with a holiday theme.

And here it is.

I scuff sanded the foot board and gave it two coats of Dixie Belle’s Drop Cloth.  Then I added the stencil using their Honky Tonk Red, Evergreen and Midnight Sky.

I’d ordered the stencil from Wallcutz in just the right size for the foot board (sorry, can’t remember exactly which size it is, but the point is that you can order in a variety of sizes specifically to fit your item).

I love the way the curve of “Rudolph and Co” mirrors the curve at the top of the foot board.

And the classic red and green color scheme works beautifully on my red carriage house.

I debated adding a row of hooks in that bottom section, which would have made it the perfect spot to hang Christmas stockings, but I knew I’d be using this outside so I left them off.  And speaking of using it outside, I just used clear wax as my top coat.  I’ve done that on quite a few things that I use outside and I never seem to have much of an issue with it not adding enough protection.  Especially for seasonal items like this one.  It will be hung up for about two months each year, and the rest of the year will be stored inside the carriage house.

For those of you who may be newer-ish to my blog, this is my carriage house, a.k.a. the ‘garage’ a.k.a. ‘the barn’ a.k.a. my ‘workshop’ (in summer).  Technically it is a carriage house as evidenced by the doors which slide open to the side, rather than a barn.

Although our house was originally part of a dairy farm, the carriage house would have been used to store carriages and was never used to house animals like a barn would have been.

There is a 2nd floor that we use for storage.  In the summer it’s mostly empty, but in the winter we keep all of our patio furniture up there, plus a good bit of nnK’s garden furniture and pool parts.  I have thought about how fantastic it would be if I could use that space as a workshop, but carrying furniture up and down the steep staircase all the time wouldn’t be terribly practical.  And putting in an elevator wouldn’t really be practical either 😉  Also, heating it in the winter would not be cheap.  And I’m nothing if not cheap.

That’s an old photo, by the way.  We did get a little snow this week, but not quite that much, although more is coming this afternoon.  Maybe I’ll get a good opportunity to update that photo later today!

So, how do like my re-purposing of the foot board?

Although I’m starting to wind down on creating Christmas décor pieces to sell for this year, I’ll be keeping an eye out next year for more unique pieces that I can use this stencil on.

Next week I’ll share the rest of my outdoor Christmas décor, so be sure to stay tuned!

been there, done that.

I know, I know.  These craft paper scroll signs have been around for years.  As tends to be the norm for me, I’m the last one to catch on to a new (and by now, old) trend.

I really debated even sharing this project, fearing that you guys will all be thinking ‘been there, done that’.

But I’ve always wanted to try my hand at making one of these, and I never found the time when I was a 9 to 5’er.  Now that I am retired, I’m going to have time to get to more of these little side projects.

Not only that, but for me this project was completely free, only requiring supplies that I already had on hand.  Now that I’m on a fixed income, I’ll need to be watching my budget more closely.  Ha … who am I kidding?  I’ve always been a penny pincher, nothing has changed there.

First up, I gathered my supplies.  I always have a giant roll of brown craft paper on hand.  In addition, I pulled out my Dixie Belle paint in Caviar, my re.design with prima 1.5″ wax brush (which works great for stenciling larger designs), some stencils and some string (oh, and not pictured, some paper toweling and some Frog tape).

I rolled out a section of the kraft paper and weighted down the ends with heavy items that were close at hand to keep it from rolling back up as I worked.  Then I used yellow Frog tape to secure my stencil (I ended up going with my North Pole Trading Co stencil from Wallcutz).  I left about a foot of paper at the top and bottom to roll up later, and then cut this piece from the roll.

The yellow Frog tape is the one for delicate surfaces and I really recommend it for this project in particular because it won’t leave a mark on your craft paper when you pull it up.

Libby left me a comment last week suggesting I write a post about my stenciling technique, and I plan to do a more detailed one later, but for now, here is one of my most important q tips … always use a dry brush for stenciling.

What does that mean?  Well, basically you load your brush with paint and then dab most of it off onto a paper towel before using it.  It feels rather wasteful, but it’s the best way to get a clean result.

Another of my stenciling recommendations is to use a thicker paint.  In this case, I am at the very bottom of this particular jar of Caviar.  I’ve gunked up the threads on the jar so badly with dried on paint that the lid no longer seals tightly.  As a result, the paint has really thickened up, making it perfect for stenciling!

Patience is also key while stenciling.  If you aren’t getting immediate coverage with your dry brush, that’s OK.  Wait for the first coat to dry and then go back over it with a 2nd coat.  Just make sure your stencil hasn’t shifted in the meantime.

Once the paint was dry, I used my Carpenter Square to make a pencil line where I wanted to trim down the width of my craft paper.

After trimming off the excess on the side, I simply rolled the top and bottom and secured the rolls using paper clips.

Then I threaded my string through the top roll, tied it in a bow, and hung my scroll on the wall.

Ultimately I felt like it needed just a little something more, so I added a garland of faux greenery to the top to dress it up.

This project couldn’t have been more simple, or more cheap.

Have you ever tried making a craft paper scroll?  Am I hopelessly behind the times with this project?  Been there, done that?  Leave me a comment and let me know.

a handful of stragglers.

First up, congrats to Jeanne Raway!  I drew her name to win my blogiversary giveaway.

Now, on with today’s post.

Way back before I went to Disney World in early November, I brought a load of Christmas items in to the shop where I sell on consignment, Reclaiming Beautiful.  At the time, I definitely thought I’d be painting up many more things and bringing them in.  And then life intervened and I spent a bunch of time and energy on arranging to retire from the day job.  And somehow I just haven’t quite managed to make it back down there again.  Now I feel like the Christmas decorating season is winding down and I may have missed the boat on that.  Do most people buy decorations well before the holiday so that they can enjoy them for a while?  Or is that just me?

Either way, I have a handful of stragglers that haven’t made it into the shop, and I thought I’d share them here today and see if any locals what to snatch them up (must be able to pick them up at my house in Oakdale, MN).

First up is one more stenciled sled.

It looks pretty cute on my deck …

but I have another very similar sled that I’ve kept for myself for this spot.  So this one is up for grabs.  It is 46″ tall by 22″ wide.  It’s for sale at $50.

Next up is this bucket (tree not included).

The bucket itself isn’t especially Christmas themed, but it’s the perfect container for a small tree.  And as a bonus, you can use the bucket year round for other things.

The bucket is $40.

And I have a 2nd bucket …

The buckets work well with a Christmas floral arrangement too.

This one is also available for $40.

I completely missed bringing this pair of ice skates into the shop this year.

I actually created these last year, but they didn’t sell.  So I put them away, and then forgot all about taking them back in to the shop again.

They would be fabulous filled with greens and hung on the door instead of a more traditional swag.

The skates are $28 (greens not included).

Last up is one more cupboard door sign.

It would be perfect for holding a couple of Christmas stockings.  Or maybe hang some mittens from those knobs.

It is 25″ wide x 10.5″ tall and is available for $28.

If any of you locals are interested in these items, be sure to shoot me an email at qisforquandie@gmail.com.

milk and cookies.

Unfortunately, I neglected to get a ‘before’ picture of the pair of kid sized chairs that my picker, Sue, found for me last summer and I’m sharing here today.  Gosh, I’ve really been bad about that lately, especially with these Christmas items.

Anyway, I don’t have a ‘before’, but here is the after.

These chairs were a little bit smaller than the kid sized chairs I’ve painted in the past …

So the Christmas Farm stencil wasn’t going to fit on their seats.

I measured the seats of the chairs and determined that the 9″ x 9″ version of the Milk and Cookies stencil from Wallcutz would fit perfectly though.  So I ordered it a while back and had it ready and waiting.

I painted the chairs in Dixie Belle’s Drop Cloth first.  Then I decided it would be fun to do one of the chairs in traditional red and green, and the other in a more neutral palette so that you all could see a comparison.

To give the design a little more depth, I added a shadow to the ‘milk & cookies’ wording on the neutral version using Dixie Belle’s Coffee Bean.

To accomplish that, I simply stenciled just that portion first in the Coffee Bean.  Then I moved the stencil just a hair up and over and stenciled the entire design in Dixie Belle’s Putty.

So cute!  And perfect for those who aren’t necessarily fans of the traditional Christmas colors.

For the red and green version, I decided not to add a shadow.

I wasn’t sure what color I could use that would look good, so I went without.

Still super cute I think.

They are the perfect size to tuck under the Christmas tree, and a great spot to leave out the milk and cookies for Santa!

I took these chairs into the shop back before I went to Disney World (gosh, that seems like forever ago now!), so I’m fairly sure they are no longer available.  But which one would you choose?  Traditional red and green, or the more neutral option?  Leave me a comment and let me know!

once in a blue moon.

If I do say so myself, I think I’m pretty good at letting go of the things that I create.  Many of you often leave comments saying that you wouldn’t have been able to part with this or that, and I know what you mean.  But for the most part, I am happy to sell my items on for someone else to enjoy.

But every once in a blue moon I finish something and realize that I don’t want to part with it.  Such is the case with today’s project.

I purchased an old wooden grain shovel (or at least that’s what I was told it is) at a barn sale last summer.  I paid a little more for it than I usually would spend on such items, mainly because it had the perfect surface for a stencil.  I was immediately able to picture it dressed up for the holidays!

Unfortunately, once again I neglected to get a ‘before’ photo … I’m going to work on being better about that.  If I had one, I’d insert it here 😉

I had purposely purchased the Rudolph & Co stencil (from Wallcutz) in a size that would fit on the toy truck that I shared last week …

and coincidentally, it also just happened to be the perfect size to fit on this shovel.

As you can see, once again I went with my black and white color scheme.  I painted the background in Dixie Belle’s Midnight Sky, and then stenciled using their Drop Cloth.

Next up I used clear wax on the entire thing, which freshened up the remaining unfinished wood without taking away from its vintage patina.

I hung it on the wall next to the cupboard in my piano room.  It works perfectly with the rest of the black and white Christmas décor that I use in that room.

Is it weird that I use a perpetual calendar as Christmas décor?

I know that a lot of people would be tempted to dress up the handle of the shovel with some greens and maybe some ribbon, but I like the simplicity of it without that.

Maybe I’ll grow tired of the grain shovel, and next year I’ll sell it on.  But for now I think I’m going to hang onto it.

How about you, do you have a hard time letting go of things?  Or are you more like me, keeping only the really special ones, and letting the rest go to be enjoyed by someone else?

birthday treats.

Believe it or not, one of the things I’m going to miss most about the day job is celebrating my birthday there.  That might sound a bit odd, I know a lot of people prefer to take their birthday off work.  But my co-workers have always been so generous about bringing in birthday treats, or planning a special lunch.

I’ll never forget my 40th birthday when my co-workers arranged to have me pulled over on the road just outside City Hall where I was presented with a ‘ticket’ for going 40 birthdays over the limit.

Gosh I have some fond memories of those days, it was always so fun to be at work on my birthday (right up until this year when it was just awkward since I’d given my notice by then and management wasn’t speaking to me.)

Another of my favorite things about celebrating my birthday at work was getting some fabulous gifts from my co-workers, especially the one from my co-worker/picker Sue.  She always finds the coolest vintage things.  But really it’s her presentation that is so special.

Remember last year?

This year was no exception.  She presented me with an old galvanized bucket full of a few of my favorites things like some ironstone platters, and some old books.

Aren’t the colors on these books fabulous?

She also included a salt cellar this year.

I’ve always wanted one of these.  Somehow it makes one feel so much more chef-like to grab a pinch of salt from a salt cellar instead of using a shaker, or even just the container the salt came in from the store.

Anyone who knows me at all, knows that I’m about as far from chef-like as one can get.  But still, I love the idea of a salt cellar.

Of course, that plain wooden lid was crying out for some quandification.  So I sanded it down a bit, and then painted it in my favorite off white, Dixie Belle’s Drop Cloth.  I sanded the paint to distress the edges and added a Classic Vintage Label transfer from re.design with prima.

Easy peasy.

I filled it up with the salt that Sue also gave me, and voila!

I’m practically a real chef!

OK, really, not even close.  But it looks great on my kitchen counter.  And I’m going to feel like a real chef every time I need to salt my scrambled eggs.

time flies when you’re having fun.

When it rains, it pours.  There seems to be a lot going on in my world these days.  This week I’ll have celebrated my birthday, Thanksgiving, my niece’s birthday, and next Tuesday I’ll be celebrating my retirement!

And with all of that celebrating going on, I almost completely forgot about my blogiversary!

Wowza, can you believe that 8 years ago today I posted my first blog post?  Time really flies when you’re having fun.

Over the years, I’ve gone from this header …

to this header …

to this one …

And then last February I gave myself a fresh, neutral look with this header …

In 8 years, I’ve written 1,271 blog posts.  My posts have been viewed 875,743 times.  And you guys have left 31,782 comments!  Thank you for that!

My furniture painting style has certainly evolved over the years too.  My color choices have definitely changed.  Early on I used a lot more color overall, especially that pale aqua/sea glass sort of color.

And who remembers all the pieces I did with vintage wallpaper?

That was a fun phase.

Lately I’m doing a lot more neutral pieces.

I’m not entirely sure if that’s because neutral is more marketable, or just because my own preference is leaning more towards the neutral.

Maybe it’s a little bit of both.

Up until the last couple of years I shared far more vintage garage sale/thrift store find makeovers.

They are still one of my favorite things to post about.

But COVID did a number on garage saling, with barely any sales in 2020 and things just starting to come back in 2021.  Hopefully going forward I’ll have a lot more vintage find makeovers to share, especially now that I’ll be able to garage sale on weekdays!

For that matter, COVID messed with my travel posts as well.

I’m happy to report that after meeting with our financial planner, it appears that we’ll still be able to afford to travel in retirement.  I’ll admit that I was willing to give it up if that meant I could leave the day job, but thankfully we won’t have to.  So hopefully I’ll have more travel posts to share in the future too.

I’ve shared a few home tour posts over the years, including Nancy’s house

And Amy’s house at Christmas …

I really need to get back to doing more of those.  After all, Amy has since moved and has another fabulous home that I’d love to share (hint, hint Amy)!

I’ve done quite a few room makeover posts from my own house over the years as well.

Since beginning the blog I have made over the living room, the piano room, the dining room, the pantry, the principle bedroom, the guest bedroom and the q branch (ie. the study where I write this blog).

Now that retirement is going to free up a bunch of my time, I hope to tackle a few more redecorating projects going forward too.

And let’s not forget the garden tour posts!

Sue’s peaceful garden is one of my favorites.

And Jackie’s scented garden is amazing as well.

And of course I like to share my own garden on occasion too.

I think that being retired from the day job is going to result in a renewed enthusiasm for blogging, and I’m really looking forward to it!

So I want to express a huge THANK YOU to all of you who have supported my blog over the past 8 years whether it was with a purchase of one of my pieces, becoming a follower, leaving a comment, or simply just clicking on a post and reading it.  I appreciate every single one of you!

It wouldn’t be a blogiversary without a giveaway, would it?  Since this one sort of snuck up on me, I didn’t have a lot of time to compile a super fabulous giveaway.  But recently someone commented on how they scrutinize the books I use to stage some of my furniture photos looking for clues on what decorating books I like.  She also suggested I write a blog post about my favorites, and I still might get around to that.  But in the meantime, I thought it would be fun to give away a couple of fabulous decorating books by two of my favorite bloggers.

First up is Liz Marie Galvan’s new book, Cozy White Cottage Seasons.

Who doesn’t need 100 ways to be cozy all year long?  And has anyone else noticed that even her dog matches her preferred color scheme of whites and pale wood tones?

I’m also including Marian Parson’s (a.k.a. Miss Mustard Seed) new book, Feels Like Home …

which is filled with the beautiful photos that we have come to expect from Marian.

I have to be honest though, I still miss the old days when she painted furniture on the regular.  I don’t think we’ll ever see that from her again though, more’s the pity because her painted furniture pieces were to die for.

Her work, especially her photo staging, has totally influenced my own style.

And her new book is fabulous and definitely worth a read.

I’m also going to throw in this gorgeous Staalmeester brush, just in case the winner wants to do a little painting.

The rules:  Simply leave a comment on this blog post to be eligible to win.

Your comment must be left on this blog post, not on Facebook or Instagram.  You are not required to follow my blog, although it would be awesome if you did!

I will randomly draw the name of a winner for today’s prize from all of the comments left on this post by Tuesday, November 30, 2021 at the stroke of midnight (U.S. Central time).

The fine print: no purchase necessary, you must be 18 years of age or older to win, void where prohibited by law, the number of eligible entries received determines the odds of winning, approximate retail value of prize is $60, if the prize is not claimed by Friday, December 3, 2021 another name will be drawn at random to win, blah, blah, blah.

Thanks to Mr. Q for ordering the books for today’s giveaway from amazon.com 😉  Good luck!