painting 101.

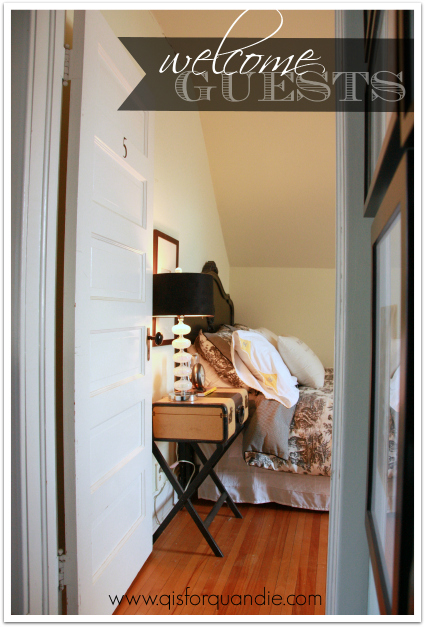
I held my second pop up painting class last weekend, and it was a blast!  I had 4 students, and they all brought some really cool pieces of their own to work on.

painting 101

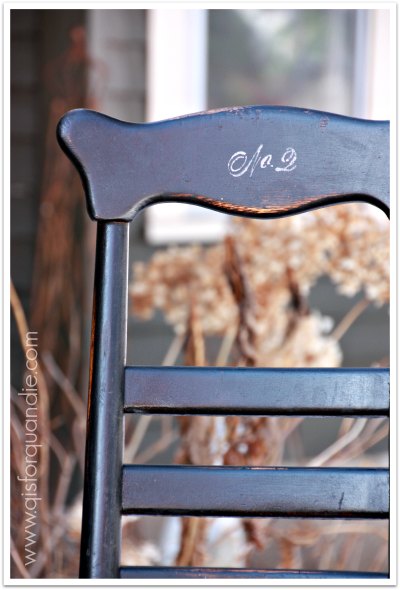
Patty brought a sweet little black chair.  She wanted to keep it black, but someone had stuck a bunch of masking tape all over the seat.  She removed that with some Goof Off, and then went over the whole chair with some MMS milk paint in Typewriter.  Then she added some stencils, distressed and waxed with the Cece Caldwell Aging Cream.

Here she is sanding away.

Patty sanding

And here is the finished product.

pattys chair

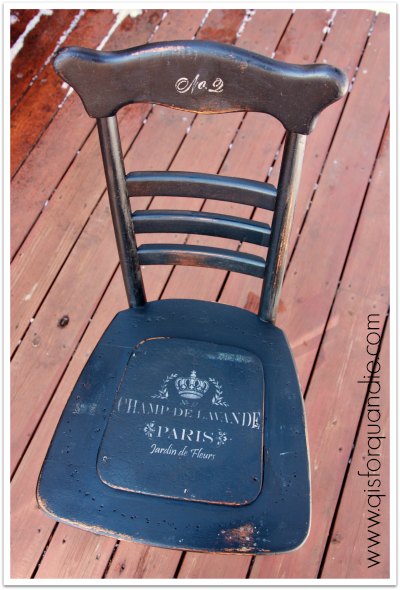
She’s going to use this chair in her bathroom, so she added a little tongue in cheek stencil to the back rest.

pattys chair detail

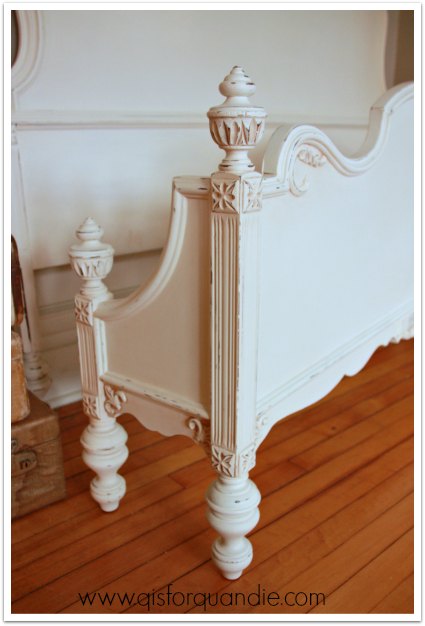
Ruth brought a cute little bench to paint.

class bench

She was the most experienced of my students, so she was comfortable with mixing up her own custom minty green milk paint using a combination of the MMS Eulalie’s Sky and Luckett’s Green.  Then she added a stenciled grain sack stripe to the top, and a no. 1 to the little shelf below.  She finished her piece with the MMS white wax.  She had always wanted to try the white wax, so this was a good opportunity for her to try it without having to purchase a whole can of it.
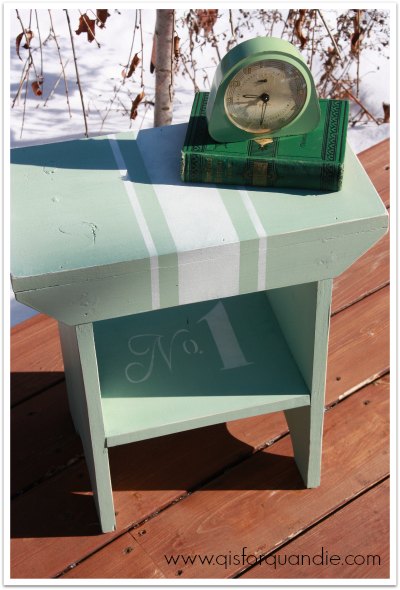
painted bench

Isn’t it sweet?

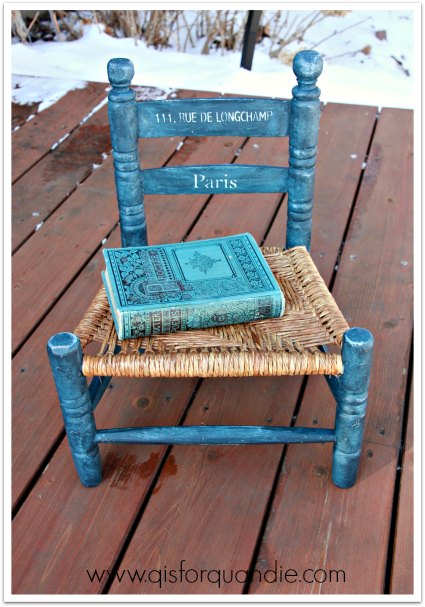
Jenny brought a little Mexican chair with a rush seat to paint.  She said she’s had it since she was a young girl, but the original yellow and red paint job just wasn’t cutting it for her.  Since she didn’t want to see any sign of that original color, she painted a base coat of Annie Sloan chalk paint in Louis Blue on her chair first.

jennys chair before

Then she added a coat of MMS milk paint in Artissimo.  When it came time to distress her piece, I showed her the technique of using a wet paper towel to very gently distress just down to the chalk paint layer.  This worked beautifully for her.

Jenny with her chair

Jennys chair close up

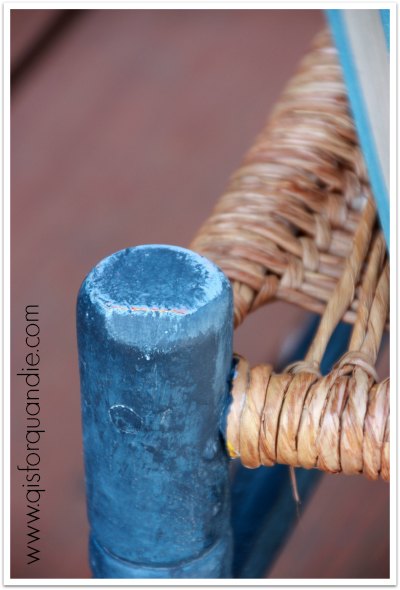
She opted to not paint the seat, but instead just refreshed it with some MMS hemp oil, which I think was a great choice for this little chair.

jennys chair after

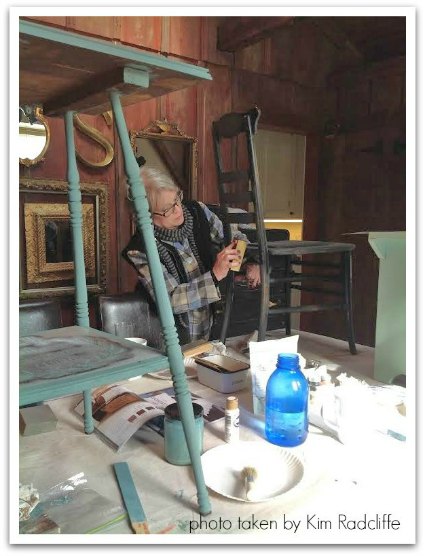
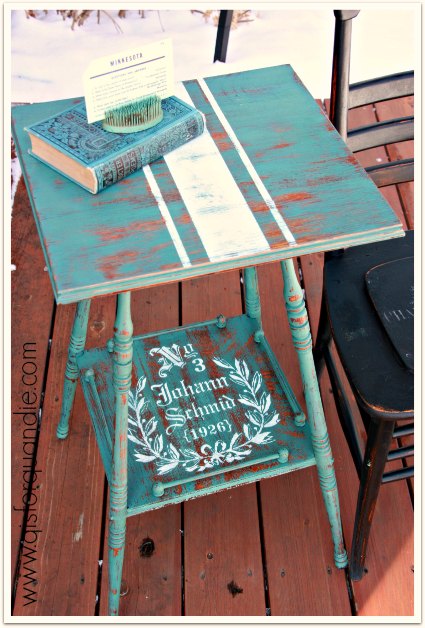
Finally we have Kim’s fabulous table.  First I have to tell you that she brought 3 potential pieces along with her because she just couldn’t decide which one to paint.  So we all weighed in.  I wish I had taken pics of all three of her pieces to share, but I didn’t think of it.  Drat.  The first was a little wooden child sized chair that belonged to her grandfather.  I think we were all in agreement that she shouldn’t paint it.  Now you all know me, I will paint most anything.  But this chair had the most beautiful patina and was absolutely lovely as is.  Her next option was an old short step ladder.  Had she just brought that, it would have been a great piece to work on, and I know she would have enjoyed transforming it.  But she also brought a fab small antique side table.  It had been poorly refinished at some point in its life with a not so great shade of stain.  We all agreed that this should be her piece for the class.

She wanted to really go for it, so she chose one of my favorite colors for her table, the MMS Kitchen Scale.

Here is the table before a top coat has been applied.  You can also see the first coat of the Louis Blue on Jenny’s chair in the background.

Kim's table

You can see how much the top coat changes the look of the color in this next picture.

class table closeup

She added more distressing to her piece than the others, and I love the results.

class table

So four great painted pieces went home with four great students!  Plus I think everyone learned a lot about many of the numerous products that are available out there.  And we all had a great time.

Kim sent the nicest email afterwards saying:

“Thank you so much for opening your home, sharing your expertise with us, and allowing us to make a colossal mess in your dining room on Saturday.  My daughter and I are now eagerly planning our first projects.  Since Saturday I have realized the true value of attending a workshop, at least for me: I had to learn a new skill AND complete a project within set time constraints. Left to my own devices, that little table would have taken me three days to complete as I would have dithered over every step, overthinking, rereading directions and trying to anticipate the outcome before acting.  The truth for me is that the most pleasing artistic results seem to come from spontaneity, NOT overthinking.”

And she is so right!

I’m planning to offer a painted suitcase class next.  I’ll be posting more on that next week, so stay tuned!

welcome guests.

I’m so excited because my sister is coming for a visit!  She arrives on Thursday night, and on Friday morning we head up north for a scrapbook weekend.  On Sunday my niece joins us and then they are both here for all of the following week.  They are going to be doing a little job hunting in hopes of being able to move to Minnesota next summer.  My fingers are crossed!

guest room title

Meanwhile, since I had to get the guest room cleaned up anyway, I decided it was a good time to share it with you.

First, a bit of a disclaimer.  This room is near the top of the list for a makeover.  Even though I have painted this room no less than four times, I’ve never been happy with the results.  Currently the walls are a pale green, but they have to go.  This room is the most likely candidate for next winter’s makeover (every winter I try to fully makeover a room in my house, this year it was the Q branch).  I have some ideas in my head for a french nordic look and am keeping my eyes peeled for the perfect bed.

However, for now, I’ll share the room as is.

Let’s start with the bed.

guest room bed

This is one of my first furniture paint jobs!  When Mr. Q and I were first married, we got a few pieces of furniture from Mr. Q’s great uncle and this bed was one of them. The bed was painted white when I got it, but I had grandiose plans of stripping it and re-staining it.  This was 25 years ago.  Painted furniture was not in vogue at that time.  I sent it off to a furniture stripper who ‘dipped’ the furniture.  Honestly, the exact details of how that was done are a little fuzzy now.  But, once the bed was stripped, it turned out that this piece of furniture was always intended to be painted, not stained.  How did we know that?  Because the ‘carved’ wreath and details at the top of the headboard are not wood.  They are a plaster of sorts that is glued in place.  In addition, the bed (and its matching dresser) is made with several different types of wood.  The woods didn’t have to match, because they were going to be painted.  Who knew?  So after all of that stripping, I just turned around and re-painted the bed white.  It stayed white for many years, but eventually I painted it black.  There is a gorgeous curved foot board that goes with the bed, but I’m not currently using it.  I will likely touch this bed up with chalk paint, reunite the headboard and foot board and sell it once I find a replacement.

Have I mentioned before that I kind of have a thing for vintage linens?  I just love the weight of the linens that were used ‘back in the day.’  Plus the hand stitched details that went into them are just precious.

guest room vintage pillowcase

I loved the little touches of black on these.  Aren’t they fantastic?

I put together the suitcase nightstand quite a few years ago as well.

guest room nightstand

I have a pair, you’ll see the second one in a minute.  I’m not sure if I was ahead of my time or what, but neither of these tables sold at my Carriage House sale when I first did them.  So I kept them.  They have been in my living room, and now they are in my guest room.

I like to encourage my guests to relax with this chair.

guest room chair

And it seems to be a running theme in my house, but this is also a piece that went in the Carriage House sale first, and when it didn’t sell, I kept it.

guest room chair and table

I’m keeping one big thing from you in this post.  Just to the right beyond the frame of this photo is my dollhouse.  Once of these days I will share it with you.  You’ll just have to stay tuned.

guest room clock

But meanwhile, I hope my guests feel welcome!  I’m sure we are going to have a great visit.


family and friends gather here.

I purchased a fantastic french stencil a while back, and quite honestly I wasn’t paying any attention at all to what it said (not to mention that I don’t actually read  or speak any french).  I bought the stencil strictly for its looks.  Later I realized that it says “family and friends gather here”, which made me laugh since I was considering using it on a bedroom dresser.  Hmmm.  Probably not quite the right sentiment for the bedroom.

However, when it came time to paint this tiger oak buffet, I knew I needed to use this stencil!  Because family and friends do indeed tend to gather in the dining room.

Prescott buffet before

Originally I had planned to paint this buffet with Miss Mustard Seed’s Kitchen Scale, like my own oak buffet (see it up there in my blog header).  But I decided I wanted a more subtle color to work with this stencil.  I would have loved to use one of Miss Mustard’s new European colors like Mora or Schloss, but I haven’t managed to get my hands on anything except the Layla’s Mint so far. So instead I mixed my own pale grey using approximately 1/3 c of Trophy and 2/3 c Ironstone.

tiger oak buffet painted in milk paint

I decided that rather than attempt to patch all of the chipped up veneer, I would just work with it and give the piece a very distressed, aged look.  After painting the first coat of my custom grey color, I found that there were also some stains on the top that were bleeding through the paint.

bleed thru stain

This gave me a great opportunity to try out Miss Mustard’s new product, the Tough Coat Sealer.  I simply brushed the sealer on over the spots that were bleeding through the paint.  I did not coat the entire top of the piece.  Once it was dry, I painted another coat of paint over the whole top.  There was definitely a great improvement, but I think a second coat of sealer would have eliminated the bleed through entirely.

bleed thru after

But since I’m going for a rustic look, I decided to go with it at this point.  Or more accurately, I was running out of my custom color and didn’t have enough left to seal again, and the repaint the entire top, so I let it go.  Note to self:  next time try two coats of sealer before painting again.

After the second coat of paint on the entire piece, I added my stencils using Martha Stewart craft paint in Lake Fog.  I want to take a minute here to explain to you how I use just pieces of a stencil rather than the entire thing.  Here is my ‘family and friends’ stencil.

family and friends stencil 2
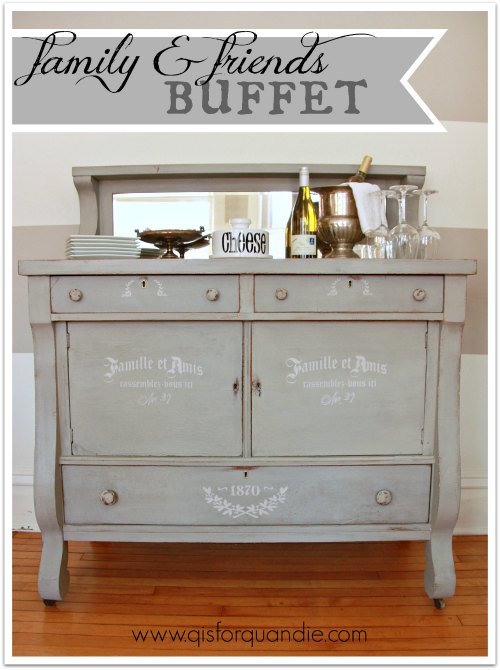
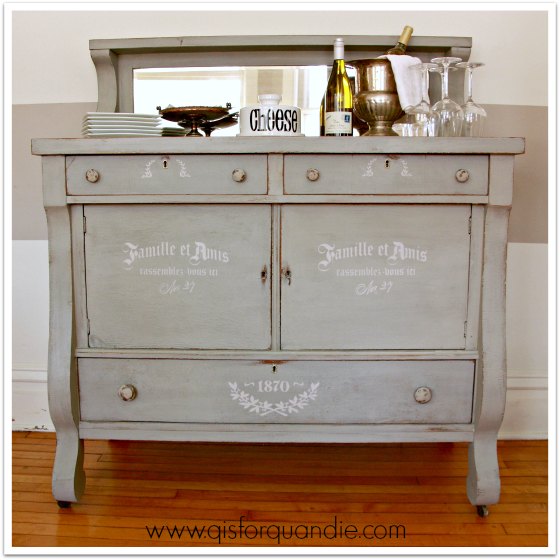
As you can see, I used just part of it on the doors of my buffet and then I used just the lower portion of the stencil on my lower drawer.

stenciled buffet

The sweet little leafy bits that are around the locks on the upper drawers came from a different stencil, this one.

champdelavande_lg

f and f keyhole stencil

It’s super simple to just mask off the portions of a stencil that you want to use with painters tape.  I do it all the time and it gives me a lot of new looks out of the same old stencil.  Since these stencils tend to be a bit pricey, it’s nice to be able to use them in different ways like this (and as a reminder to Patty, I get most of my stencils from Maison de Stencils).

To help support my distressed look for this buffet, I sanded with extra vigor around areas that would normally have some wear on an old piece such as around the key holes and on the knobs themselves.

faux wear

Then I waxed the entire piece with Cece Caldwell’s clear wax.

The insides of the drawers on this piece were in rather pathetic condition as well.  Normally I don’t line my drawers, unless they are in this kind of condition and there is no better option than to just cover them up.  Luckily I had some lovely vintage wallpaper on hand that worked perfectly with the grey.

f and f wallpaper lining

I’ve staged this piece for a wine and cheese party.

f and f wine and cheese

Wouldn’t it be fun the next time you have family and friends over to be able to serve them from this fab piece?!

oak buffet painted in custom mix of MMS milk paint

This buffet still needs some help from my handyman Ken.  The mirrored back piece needs to be re-attached because it’s just not secure with its original screws.  I’m sure he will be able to shore it right up though.

family and friends buffet

a pair of chairs.

The other day I saw an ad on craigslist for this pair of chairs (this is the seller’s picture that was with the ad).

chairs

Here is how my thought process went.  “Hey, those could be kind of fabulous!  Then again, maybe they are permanently ugly.  I know paint can do wonders, but is the shape all wrong?  And what are those weird pointy things sticking out of the back?  Will they come off?  And what is under those cushions?  Even though the upholstery is white, it still manages to be all wrong with that 80’s texture and sheen.  What will it take to re-fab these?  Should I?  or shouldn’t I?”

Then I did some research on pinterest and the closest I came to a similar chair that looked good was this chair from The Cross Decor & Design (although it appears to no longer be available).

wing back cane chair

And it’s not painted.  Mine will be painted.  But it still gave me a hint of what these chairs could look like.

After exchanging a couple of texts with the seller and finding out that yes, those back cushions are removable and there is cane beneath them, I decided to take a chance on these chairs.  Mr. Q and I drove out to pick them up on a frigid evening.  Upon seeing the chairs in person, I was still not sure about them.  They weren’t as nice as the cane back chair I painted last year that now resides in the Q Branch, but I had to remind myself that I wasn’t sure about that chair at first either.  The price was right, and I was there already, so I handed over the cash and threw them in the truck.

Here is my ‘before’ picture of one chair.

chair before

From the angle of my shot you can see that it has some pretty cabriole legs in front, and some nice curves on the arm supports that weren’t as apparent in the craigslist photo.  That back cushion is still just freaking me out though!  Not to mention the weird pointy details, which as it turns out are made of metal.

chair metal acorn
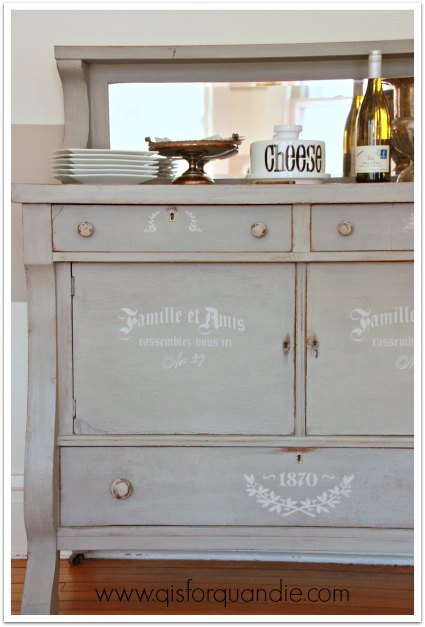
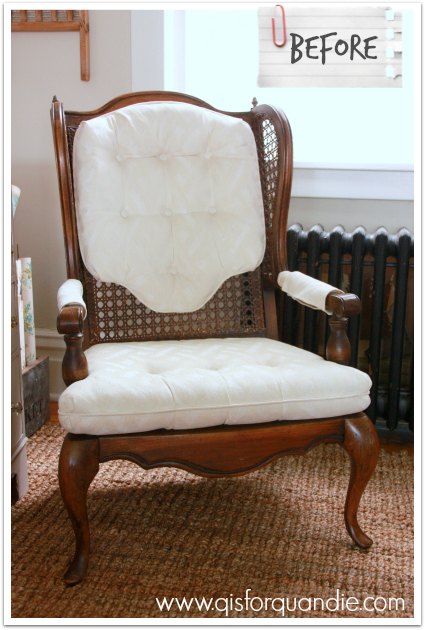
Those are definitely coming off!

Then there are the tacky arm sleeves that are velcroed in place.

chair arm covers

Gotta go!

Here is the chair with those items removed.

chair better already
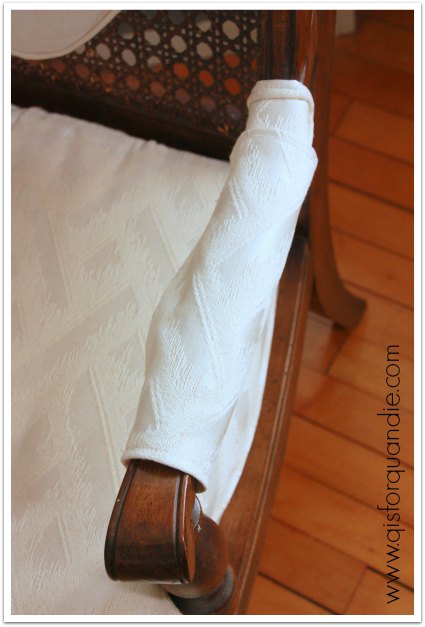
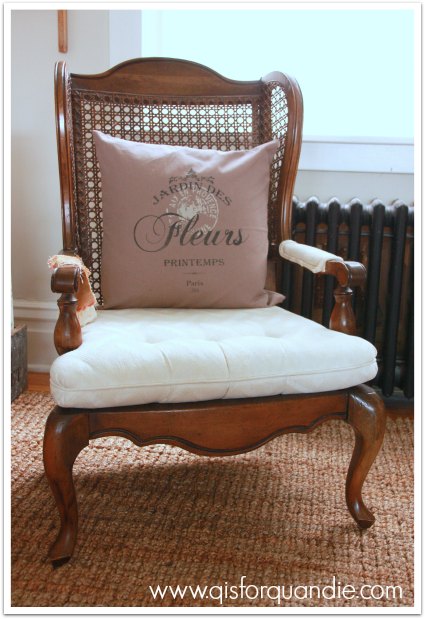
Ahhhhh, getting better already.  I also found upholstered arms under those funky sleeves, and started ripping one off.  There are about a million staples holding it in place though, so that little process is going to take some patience.

I threw one of my H & M pillows on the chair just to get a feel for how it would look without back cushions.

chair with pillow

Not bad, right?  Some paint and some new fabric on the seat cushions are going to do wonders for these chairs.

By the way, after I showed these chairs to Meggan, she sent me this.

fixer upper chairs

Turns out that Joanna Gaines used them in the a recent episode of Fixer Upper, the Tire Swing House.  I hadn’t even noticed!  Well, if cane wing back chairs are good enough for Joanna, they are good enough for me!

Now I just have to decide, should I go for chippy with Miss Mustard Seed milk paint, or solid with chalk paint?

vintage goodness.

Way back on my birthday last November, my friend Terri gave me a galvanized cake stand that she purchased from Decor Steals.  She knew it was so ‘me’, and that I love pretty much all things galvanized.  Yet, still, it sat around for all of this time because I was struggling with how to use it.  Obviously, I’m not going to be using it for cakes.  I’m one of those people who has to dust my stove, remember?

I finally decided that I would use it as a centerpiece on my dining room table.

vintage goodness

And I pulled out some of my vintage pieces in my favorite shade of aqua to put on top of it, the flour sifter that I picked up recently while thrifting and a little clock that I purchased at Oronoco Gold Rush.

clock and sifter

I also added my favorite aqua clock and some aqua flower frogs, along with another of my ’22’ tickets.

clock and ticket

I love how it looks on my table.  I may change out the cyclamen plant with something in bloom, but for now I like the patterns on the leaves.

I like changing up little things like this in my house.  It gives me an opportunity to see things with a fresh eye, and it doesn’t cost anything.  You should give it a try.  Move some of your things around and display them in a different room, or in a different way, just for fun!

sail the seven seas.

Remember the lovely tall dresser I picked up a while back and took its photo in the snow?

riverside dresser before

I pulled it out of storage for its makeover last weekend.  The shape of this dresser says ‘gentlemen’s chest’ to me.  Usually the taller dresser in a set was meant for the gent (sorry, couldn’t resist that bad rhyme).  I could easily have gone more feminine on this piece though, with those pretty curvy legs at the bottom.  But I was feeling the masculinity of this piece and went with MMS milk paint in Artissimo, which is a rich navy blue (finished with Cece Caldwell’s clear wax, which has rapidly become my favorite wax to work with).  I stripped the top and then just waxed it with the Cece Caldwell’s dark wax.

Dresser painted in MMS Artissimo milk paint

After adding a vintage suitcase and my dad’s old Tarzan books, I was getting the feeling that this dresser had a sense of adventure.

seven seas leg and suitcase

artissimo staging

Then I added some old sheet music inside the upper drawer.

seven seas sheetmusic

And now this dresser is ready to sail the seven seas!

artissimo dresser side view

How about you, are you ready for some adventure?

Linking up with:

Embracing Change

lock in your love.

Have you heard of love locks?  According to wikipedia the idea of love locks goes back 100 years, but they started appearing in Europe in the early 2000’s.  What am I talking about?  For those of you who don’t know, it’s simply the idea of affixing a padlock to a bridge or a gate as a way to symbolize your love.

I saw my first love locks back when Mr. Q and I were in the Cinque Terre in Italy in 2008.

cinque terre love lock

We walked along the Via dell’Amore and wondered why all the padlocks?  Someone explained them to us, and we were so bummed that we hadn’t know about it in advance and didn’t have a padlock with us.

We vowed to pay attention the next time we traveled, and sure enough, when we went to Prague in 2011 we brought a lock.  And we researched in advance so that we could find the right spot.

love locks Prague

It was a charming little bridge that was kind of hidden away in the Mala Strana, but not far from the main areas.  We attached our own padlock and figured our love was now unassailable.

love lock Prague 2

Comically though, we missed the part where you are supposed to lock it, and then throw the key over the side.  Key?  Wait, what?  We brought a combination lock!  Ha!  Oh well, close enough, right?

Unfortunately, it seems that what started out as a sweet and romantic custom, has now become a menace.  Love locks are popping up all over the place.  According to BBC News, they are creating havoc.  Adding so much weight to often historical bridges that their structures are compromised.  Some just think they are an eyesore.

love locks Prague

Personally, I think graffiti can be an art form.

marry a clown

But, I get it.  Not everyone loves it.  And the number of locks really adds up over time.  It costs money to remove the locks when there gets to be too many.  It’s not like coins in a fountain, where at least the value of the coins offset the cost of cleaning them out of the fountain.

Now that I have done the research, Mr. Q and I won’t plan to lock up our love again.  There were a couple of locations on our last trip where we could have done so, in Elisabeth Square in Budapest, or on the pedestrian bridge across the Danube in Regensburg, but we neglected to bring a lock with us this time.  At first I felt bad about that, but now I wonder if maybe it was a good thing.  We don’t want to contribute to the destruction of historic bridges.  We’ll just have to rely on our combination padlock in Prague and hope that it continues to do the job.

I hope you have your love all locked up this Valentine’s Day too!

fixer upper.

Are any of you watching Fixer Upper on HGTV?  I had 4 different friends tell me that I just had to see this show.  If 4 people who know me well think this show is right up my alley, it must be!  Luckily, I found Season 1 in its entirety on Comcast on Demand.  So last weekend I had a Fixer Upper marathon.  My friend Meggan suggested a drinking game to go along with the show.  Every time Chip says “bucks” you have to take a drink.  Had I been playing the game, I would have been sloshed after just one episode!  And I watched about 10 of them.  Once you start listening for “bucks”, it’s hard to watch the show without giggling every time he says it.  Go ahead, just try it!

Aside from that, I have to say that I love Joanna Gaines’ style.

Fixer Upper - Tire Swing House
Fixer Upper – Tire Swing House
Chip and Joanna Gaines' farmhouse
Chip and Joanna Gaines’ farmhouse

 Check out more pictures of the Magnolia farmhouse here.  If you aren’t watching the show, you should be!  And go ahead and add Meggan’s drinking game and let me know how that works out for you!

But meanwhile, I have a little fixer upper of my own to share with you today.  I purchased this industrial stool from my friend Sue at my own Carriage House sale.  No one else bought it (which is just plain crazy, it was $12), so I did!

mint stool before

Some people might have just left this stool as is.  But since I pretty much paint anything that isn’t nailed down (and even a lot of stuff that is), I decided to give it a little makeover.

I painted the entire stool with some custom mixed milk paint, the same paint I used on the Wintergreen dresser.  So, now it looks like this.

mint stool after

It has a metal base and a wooden seat.  From everything official that you read about milk paint, you wouldn’t think it would stick to metal without using the bonding agent.  However, I have found that isn’t always the case.  I’ve painted a couple of other metal pieces and not used bonding agent, so I decided to give it a try on this one too.  Worst case scenario, my paint would all flake off and I’d start over.  Instead I got some very nice chipping, but not too much chipping.  Here is a close up of the metal legs so you can see the end result.

mint stool close up

In addition, the mixed milk paint I used was close to 4 weeks old.  Mixed milk paint isn’t supposed to last more than 5 to 7 days.  I’ll admit, it was a little stronger smelling than usual.  But other than that, I didn’t see any problem with using it.  Once I gave it a good stir, it wasn’t lumpy at all.  It had thickened up a little, but that worked in my favor on this piece.

mint stool top

I’m not advocating painting with milk paint that is past it’s due date, or counting on it sticking to metal.  However, sometimes breaking the rules works out just fine.

mint stool staging

the paris bed.

The client who purchased the gorgeous dresser that I painted in Duck Egg blue recently, also purchased the matching bed.  She’s not putting them in the same room though.  The dresser was for her own bedroom, and the bed is intended for her daughter’s bedroom and she wanted it painted white.  I am still a big fan of white painted furniture, although I don’t do as much of it as I used to.  I knew this bed would be gorgeous no matter what color it was painted though.

Bed painted white.

Am I right?

But let’s go back to the beginning of the story.  This bed had some damage on the footboard, which you can see here.

paris bed damage

I sent it home with Ken for repairs.  He chiseled the break so that it was even, and then glued in a piece of wood to patch it.  Here is how it looked with the patch in place.

paris bed repair collage

If you haven’t heard me say it before, I’ll say again, I am very lucky to have Ken for a neighbor.  He can do these sort of repairs in no time, and he does a beautiful job of it.

Here it is painted.  You can hardly even tell that there was a problem.

paris bed repair painted

This foot board was really the piece that sold me on this entire bedroom set.  I have seen many beds with a foot board that curves around the bed, but I had never seen one that had side pieces quite like this.

paris foot board corner

Aren’t they just gorgeous?  The headboard on this bed is lovely too.

paris bed headboard detail

But the foot board is like a work of art.

paris foot board closeup

I staged the bed with a stack of vintage suitcases, and you’ll recognize my faux french hat box from Monday’s post.

paris bed with suitcases

My client told me that her daughter loves everything french, so I couldn’t help adding a little surprise to the bed.

paris foot board full

Do you see it?  There at the bottom?  A little Paris stencil that fit perfectly on that raised section of trim.

paris bed stencil close up

I think it added the perfect finishing touch to this lovely bed.

White bed with Paris stencil

paris bed before and after

Linking up with:

French Country Cottage

pop up painting class.

I’m hosting another BYOP (bring your own piece) pop up painting class!

class title

Here are the details:

When:  Saturday, February 21 at 10 a.m. (class will last approx. 4 hours, but may go longer if we are waiting for pieces to dry)

Where:  Casa Q (that’s my house, which is in Oakdale near the intersection of hway 36 and 120)

What:  The goal of this class is to send you home with a fully finished painted piece (that you brought with you) of some kind.  Your piece needs to be small enough to fit on top of a table.  For example, a stool, a small chair, a mirror frame, a small side table, a plant stand, a magazine rack, a doll sized dresser, a metal tool box, a vintage suitcase …

painting class collage 1

painting class collage 2

you get the idea.

You will learn about both milk paint and chalk paint, plus the many different top coats that are available for them.  You’ll learn which pieces do well with milk paint, and which ones are better off with chalk paint. as well as how those products with react with different pre-existing finishes.  If someone wants to stencil her piece, I have a multitude of stencils available for your use.

Included:  all supplies necessary to finish your piece, snacks and beverages.

Cost:  $95 per person

I only have room for a maximum of 4 students, and I need a minimum of 3 to hold the class.

If you are interested, please send me an email at oakdalecarriagehouse@gmail.com to hold your spot!

Update:  I have 3 signed up, only one spot remains!  Let me know if you want it.