welcome guests.

I’m so excited because my sister is coming for a visit!  She arrives on Thursday night, and on Friday morning we head up north for a scrapbook weekend.  On Sunday my niece joins us and then they are both here for all of the following week.  They are going to be doing a little job hunting in hopes of being able to move to Minnesota next summer.  My fingers are crossed!

guest room title

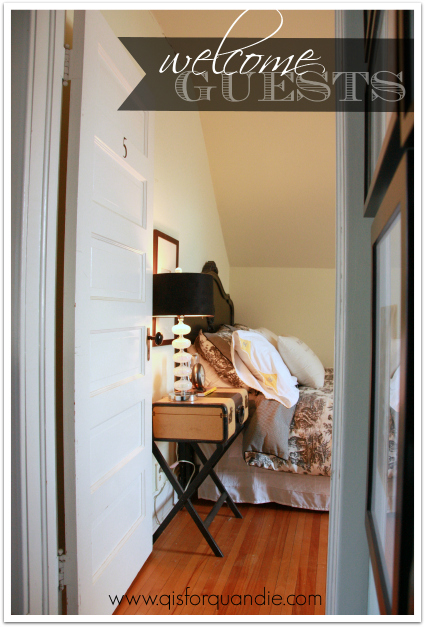
Meanwhile, since I had to get the guest room cleaned up anyway, I decided it was a good time to share it with you.

First, a bit of a disclaimer.  This room is near the top of the list for a makeover.  Even though I have painted this room no less than four times, I’ve never been happy with the results.  Currently the walls are a pale green, but they have to go.  This room is the most likely candidate for next winter’s makeover (every winter I try to fully makeover a room in my house, this year it was the Q branch).  I have some ideas in my head for a french nordic look and am keeping my eyes peeled for the perfect bed.

However, for now, I’ll share the room as is.

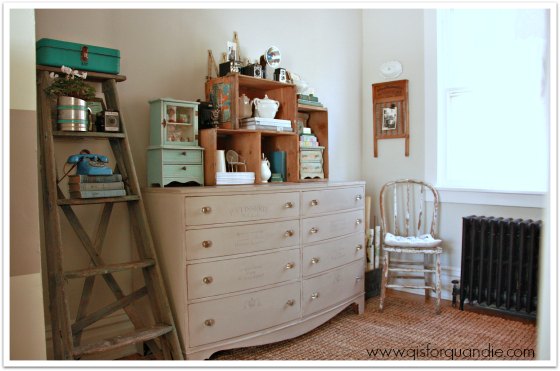
Let’s start with the bed.

guest room bed

This is one of my first furniture paint jobs!  When Mr. Q and I were first married, we got a few pieces of furniture from Mr. Q’s great uncle and this bed was one of them. The bed was painted white when I got it, but I had grandiose plans of stripping it and re-staining it.  This was 25 years ago.  Painted furniture was not in vogue at that time.  I sent it off to a furniture stripper who ‘dipped’ the furniture.  Honestly, the exact details of how that was done are a little fuzzy now.  But, once the bed was stripped, it turned out that this piece of furniture was always intended to be painted, not stained.  How did we know that?  Because the ‘carved’ wreath and details at the top of the headboard are not wood.  They are a plaster of sorts that is glued in place.  In addition, the bed (and its matching dresser) is made with several different types of wood.  The woods didn’t have to match, because they were going to be painted.  Who knew?  So after all of that stripping, I just turned around and re-painted the bed white.  It stayed white for many years, but eventually I painted it black.  There is a gorgeous curved foot board that goes with the bed, but I’m not currently using it.  I will likely touch this bed up with chalk paint, reunite the headboard and foot board and sell it once I find a replacement.

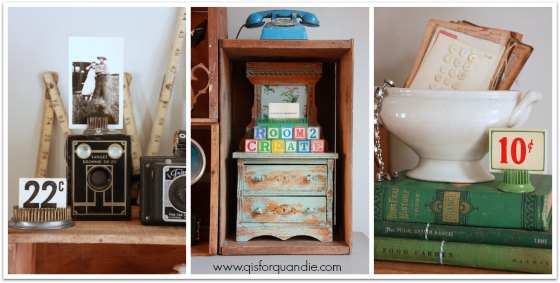
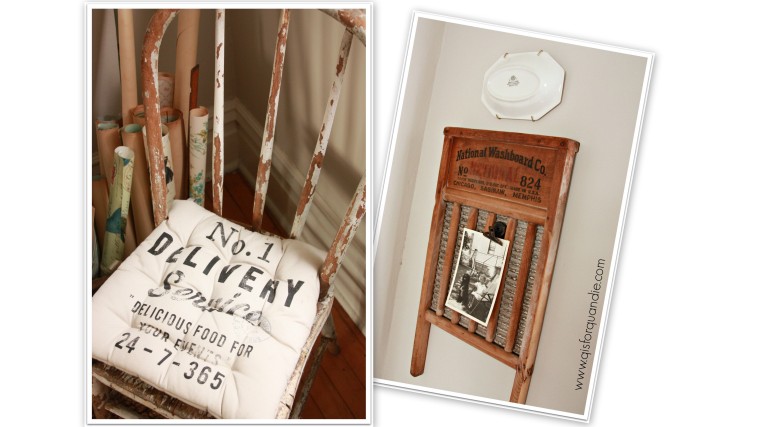
Have I mentioned before that I kind of have a thing for vintage linens?  I just love the weight of the linens that were used ‘back in the day.’  Plus the hand stitched details that went into them are just precious.

guest room vintage pillowcase

I loved the little touches of black on these.  Aren’t they fantastic?

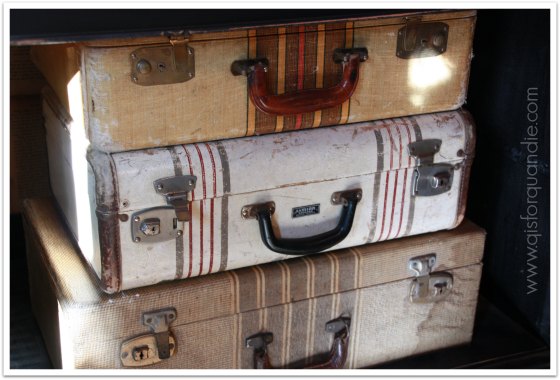
I put together the suitcase nightstand quite a few years ago as well.

guest room nightstand

I have a pair, you’ll see the second one in a minute.  I’m not sure if I was ahead of my time or what, but neither of these tables sold at my Carriage House sale when I first did them.  So I kept them.  They have been in my living room, and now they are in my guest room.

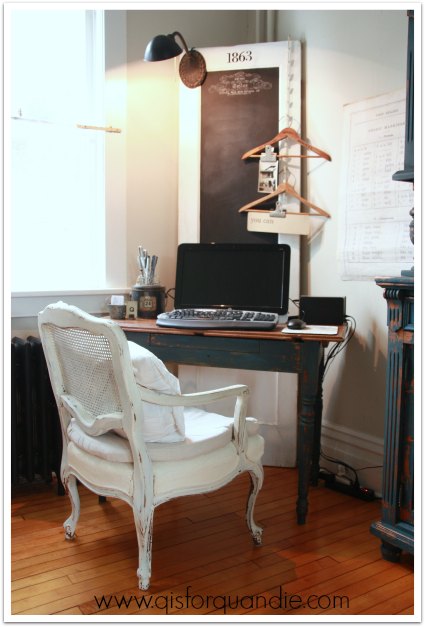
I like to encourage my guests to relax with this chair.

guest room chair

And it seems to be a running theme in my house, but this is also a piece that went in the Carriage House sale first, and when it didn’t sell, I kept it.

guest room chair and table

I’m keeping one big thing from you in this post.  Just to the right beyond the frame of this photo is my dollhouse.  Once of these days I will share it with you.  You’ll just have to stay tuned.

guest room clock

But meanwhile, I hope my guests feel welcome!  I’m sure we are going to have a great visit.


the q branch.

At first I thought Mr. Q’s idea of calling my former craft room ‘the Q branch’ was kind of dorky.  But the thing is, I am a huge Bond fan (which he knew).  I don’t have a favorite Bond, I love them all equally.  Well … maybe I’m a tiny bit partial to Daniel Craig.  I mean, who isn’t?

Bond

Oops.  Got distracted there for a moment.

Anyway, what really sold me in the end was the fact that I found a fabulous logo for it!

qbranch

Well, maybe if I could edit out the guns … those aren’t really appropriate.  Could I somehow change them into paint brushes?  I’ll have to work on that.  But really, the motto?  Always have an escape plan?  It couldn’t be more perfect.

But meanwhile, I bet you all want to see a final post with everything pulled together in the Q branch!  And I bet you also wouldn’t mind knowing how much I spent on the total room makeover would you?  Well, read on, all is about to be revealed.

First of all, with nnK’s help, I repainted the walls and ceiling in the room using paint that I already had.  The wall color is a mixture of the two colors I used for my living room stripes, and the ceiling paint is the same blue I used in my living room also.  I had quite a bit of paint left over from those earlier projects, so I didn’t have to buy any paint for this makeover.  The cost for paint, $0.

study paint job

Next (after giving the floor a really good cleaning), I brought in the chippy farmhouse cupboard.  I paid $195 for it on craigslist.  I paid $4 for the rooster feed sack.  The drawer pulls were some that I already had on hand.  I used about a cup of milk paint, plus quite a lot of antiquing wax, so let’s call that about $20.  All in all, I spent about $219 on the farmhouse cupboard.  However, I’ll be selling my previous cupboard and am hoping to get $225 for it, a net gain of $6.

rooster cupboard

The desk is a table that I paid $20 for at a garage sale last summer.  The french cane back chair came from craigslist last winter, and I paid $25 for it.  The door behind the desk is one that I painted a couple of years back.  I hauled it out of a dumpster, $0.  So, I spent about $45 for the new desk, but I have already sold my old desk on craigslist for $225.  So, a net gain of $180.  So far, I seem to be making money on this makeover!

study desk w french chair

Naturally I brought Lula back into the room, but she resides in the opposite corner from where she used to be.  I shared her story with you a while back, in which I mentioned that she was cobbled together from a Styrofoam manikin that was free.  Behind her I hung an old rusty child sized folding chair that I turned into a chalkboard.  My friend Michelle gave me this chair to see if it could be saved.  It’s another item that was for sale at my last sale, but had no takers.  The cost for these, $0.

Lula at q branch

On the opposite wall, I kept the dresser that was here before, but gave it a new paint job.  I used about $10 worth of paint, and I gave this piece all new knobs from Hobby Lobby.  I purchased them at 50% off (never, never, never pay full price for these at Hobby Lobby, they go on sale all the time), still the knobs set me back $40 because I needed 16 of them! The cost here, $50.

q branch dresser wall

I already had all of the wooden crates.  I grab them whenever I see them at garage sales and usually use them to display items at my Carriage House sale.  I’m going to have to find some more before my sale next June!  I had fun filling them up with some of my favorite vintage things.

q dresser collage

The ladder is one that I hauled in from the Carriage House.  I’m not even sure where this ladder came from, it might be one that came with the place.  We found a few old wooden ladders stashed in the rafters out there.  I added my newly painted tackle box, a cyclamen potted in an old flour sifter, a vintage camera, some old books and a toy phone.  I have an idea for a future project involving this ladder, but for now I kind of like it as is.

q branch ladder

Over on the other side of the dresser is the chippy chair that didn’t make the cut for a desk chair.  I added a seat cushion from H & M Home.  Above the chair I hung an old washboard to use as a magnetic board and added an old photo of my mom when she was little.

q branch collage

The second most expensive piece in the room was the rug.  It was $180 from Overstock.com.  Initially I wasn’t going to splurge on it, but I felt like the room needed a rug to really look pulled together.  Even Mr. Q agrees that the rug did a lot to make the room seem more cozy.

q branch carpet

I kept my existing window treatment, which is nothing more than a vintage embroidered cutwork tablecloth hung over the window (although it is hard to see in this photo), along with my ‘inspire’ banner.

As you are about to leave the Q branch, you’ll notice that I hung some of my ironstone plates over the arched entryway.  This was my friend Meggan’s idea.  I had mentioned to her that I really wanted to keep these in the room, but wasn’t sure where to put them.  She came up with the idea of hanging them over the arch, and don’t they look fab?  Clever idea Meggan!  Thanks!

q plates 2

So, if you are keeping track, once I sell the black cupboard I should be out only about $50 for this entire room makeover.  Not bad, right?

On another note, I’ve had a couple of people mention that it’s hard to get a feel for the layout of my rooms.  So I took a couple of photos to help put the location of this room into perspective for you.

q branch location 1

It is just through an opening off the piano room.  See where the Kitchen Scale buffet normally resides?  When I do photo furniture shoots in winter, I move that buffet to the other side of that arched opening and use that space for staging furniture.  It works fairly well because I have the buffet on those felt slider thingies, so it’s easy to just push it over, and then push it back when I am done.

Here is another angle into the Q branch.

q branch location 2
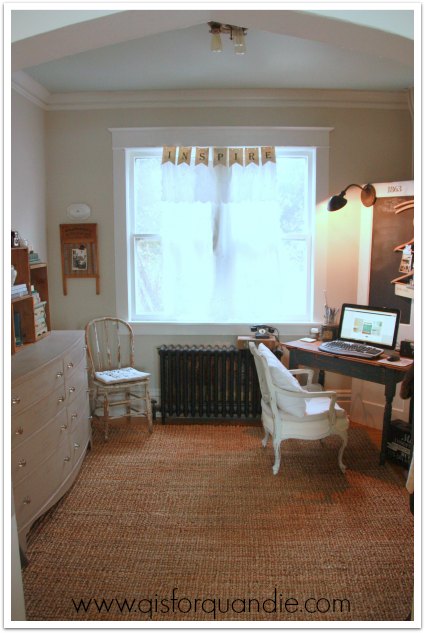
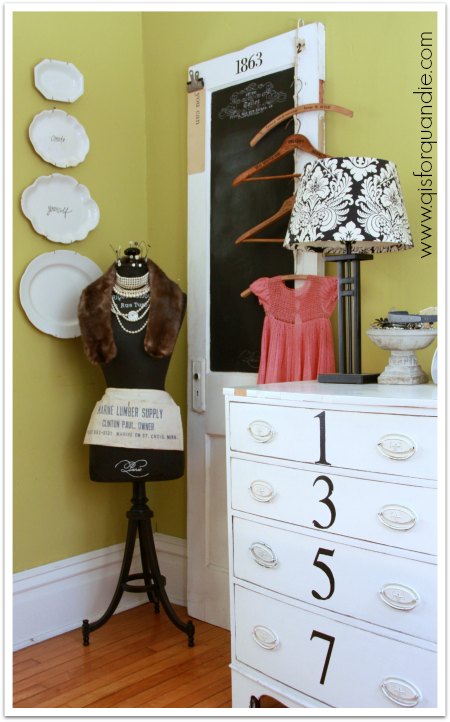
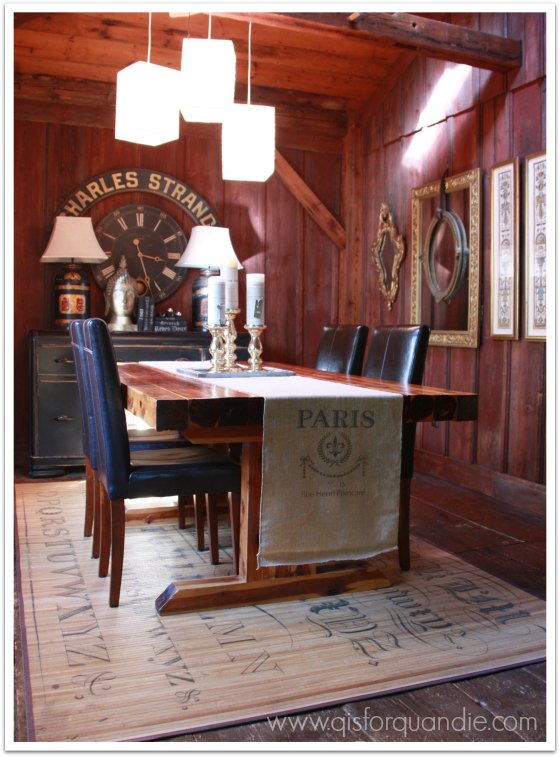
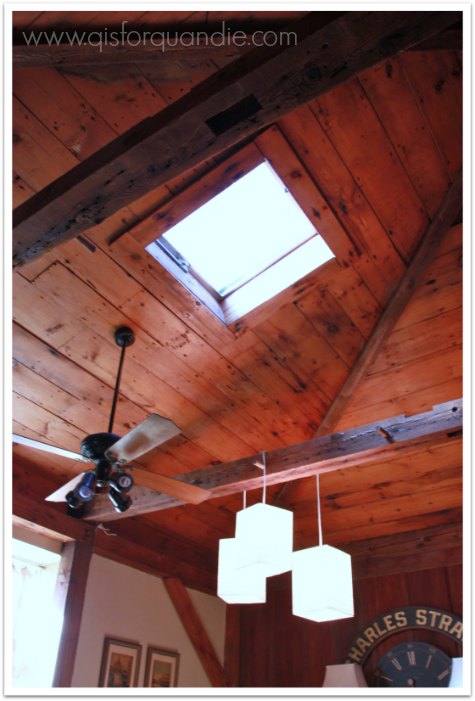
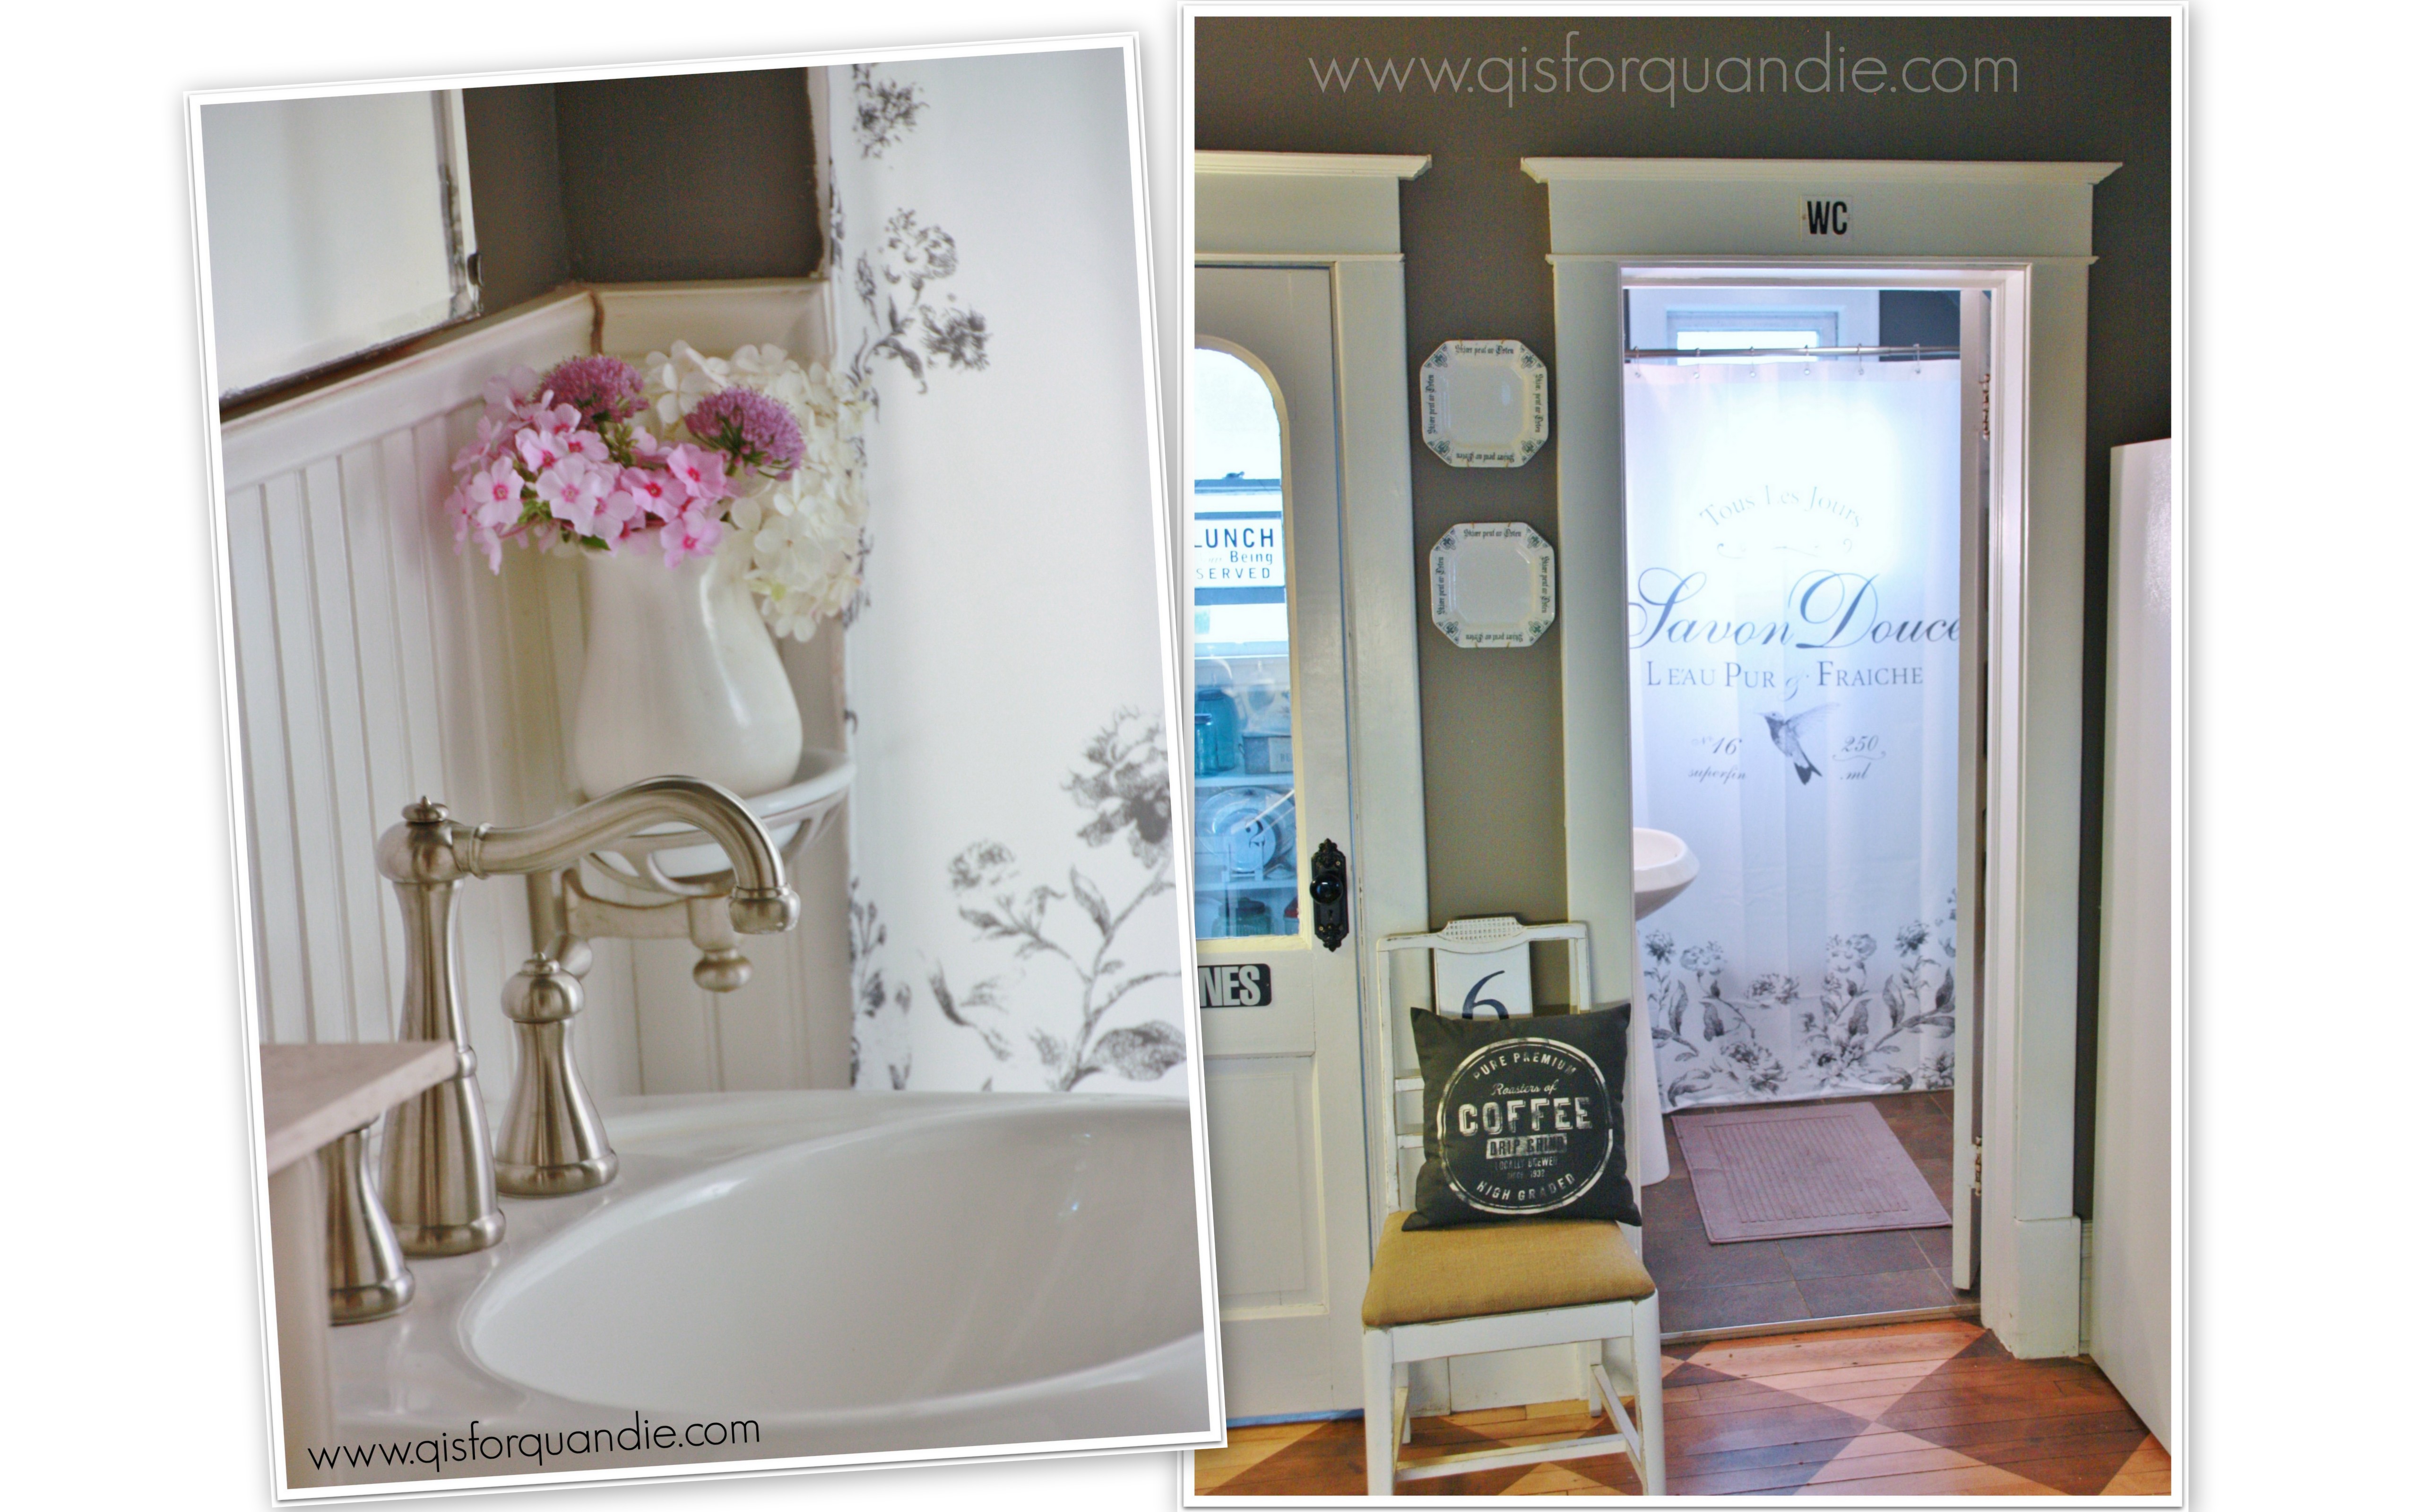
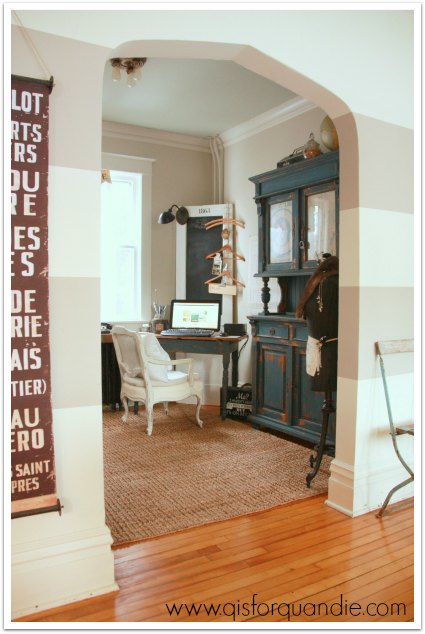
These photos explain why I felt a need to make this room prettier.  It really is on display to anyone coming into our home.  It also really needed to flow color-wise, which it does much better now.  Hopefully now that I have spruced the room up a bit, and helped make it more functional, I’ll be able to keep it tidy.  I’m really happy with the results of my makeover.  I spend a lot of time in the Q branch writing up blog posts and editing photos, so it will be nice to have a lovely room for it!

Linked up with:

Elizabeth & Co

french farmhouse dresser.

Remember how my dresser in the ‘room formerly known as my craft room’ looked before?  If not, here is a reminder.

studio south wall

It was looking a little worse for the wear.  You can see that some of the veneer was breaking off the top edge above the drawers.  And I never liked those drawer pulls.  Plus, it didn’t really fit with my vintage farmhouse theme for the room makeover, so I gave it a little spruce up.

First I took all of those pulls off, which had two screws each, and filled one of the holes.  You all have seen tutorials on how to do that a million times, right?  If you’ve never tried it, don’t be intimidated.  It is really easy to pull off.  You just need some patience to fill them with wood filler, let them dry (there will be shrinkage no matter what the manufacturer says), fill again, let dry (sometimes I even need a 3rd pass with the filler, but not always), then sand.  Easy, peasy, but putzy.

Next I also sanded the numbers off.  I didn’t want to see the outline of them through my new paint.  The rest of the dresser got a light sanding too.  Then I painted with Cece Caldwell’s Young Kansas Wheat.  A few years ago, if you had told me I was going to paint anything in a warm, greyish beige color I would have told you that you were crazy.  But, I didn’t want this piece to be the showstopper in this room.  I wanted it to blend a bit, especially since it is so big.  This color works very well for that.  After all, when one of the other pieces in the room is a saturated blue cupboard with a rooster feed sack, well, that makes enough of a statement for one room.

Are you wondering why I didn’t use milk paint on this piece?  Especially since I wanted a rustic, farmhouse look?  It was mainly because of the existing white latex paint.  I didn’t want to see an undercoat of white through any chipping.  For some reason, I just have a thing about white undercoats.  They remind me too much of primer maybe.

Dresser painted in Young Kansas Wheat

Let’s chat about the stencils for a moment.  I used sections of two different stencils to add something to each drawer.  I wanted it to be subtle, but maybe not quite this subtle.  When I painted the stencil before waxing the piece, there was much more contrast between the dresser color and the acrylic stencil paint.  When I added the wax, the Young Kansas Wheat chalkpaint got darker, the acrylic stencil paint did not.

dresser stencil closeup

The top drawer has been waxed, the lower two are not waxed.  See the difference?  At first I was disappointed, but I’ve gotten over it now and I like the subtlety of the stencil.

The knobs that I added are from Hobby Lobby.  They are brand new, but look old and grungy.

It’s probably a stretch to take a piece like this with very traditional lines and try to turn it into something ‘vintage farmhouse’, but I think the color, the distressing, and the new hardware help.  The stencil just adds that little bit of french-ness that I love.  So maybe this dresser isn’t exactly what you picture when I say “french farmhouse”, but it’s working for me.

dresser stencils

I’ve added some rustic wooden crates to the top of the dresser for more height, and more display space for some of my favorite collectibles.  My vintage cameras, my mini furniture and some of my ironstone pieces are right at home here now.

dresser full

Eventually I would like to replace this piece with something a little more ‘me’, but for now I need the storage and this piece will serve that purpose until I find the perfect thing.

I was waiting for one last piece, a rug I ordered from Overstock.com, to complete my room makeover.  It arrived last weekend, so if you have been following along, stay tuned later in the week when I’ll be posting a final reveal of the whole room.

chippy farmhouse desk.

I mentioned in my previous post that I’m going to start calling the room I’m currently revamping ‘the study.’  But really, that name isn’t quite right either.  Let’s face it, I don’t do any studying in here.  As part of making over the room, I gave some serious thought to what I need the room for and how it should function.  In the end, there are two main purposes for this room;  I write my blog (and do other computer stuff), and I store my creative supplies here.  What shall I call it?  Got any ideas for me?

After giving some serious thought to functionality, I realized that the desk had to go.  Here it is, in case you don’t remember it.

studio desk

It is beautiful, but see that base?  That was annoying.  My legs are far too long for this desk.  It would be perfect for a shorter person who likes to raise their feet a little under their desk, but I am 5’10”.  My feet always had to be tucked under my chair.  Plus, this desk (technically, it’s a library table) was just large enough that I tended to pile crap on it.  Empty surface area = piles of stuff to look through later.

And let’s just mention the chair for a moment.  Those wheels were leaving big black marks on the floor.  I was able to get them up with a magic eraser, but still.  Not good for the floor.  Although it was quite comfy.

But all of that brings me to my new desk!

study desk w french chair

A bit smaller for sure, but enough space for exactly what I need, a perch for my computer.  It’s now tucked in the corner which makes the room seem ten times larger.  I angled it to avoid the look of furniture just lined up along the walls.  Once Mr. Q and I put the angled desk in place, I realized that the space behind it was perfect for my chalkboard door.  See those pipes running up the wall behind the door?  Those are radiator pipes going up to the 2nd floor.  Because of those, nothing could really be tucked right in to this corner of the room.  And I now have a fab little vintage suitcase hiding all of those electrical cords, but I forgot to put it in place before this photo.  Dang.  In an older house, lack of electrical outlets can be a big challenge.  This room has two, neither of which are in a good spot for the desk.

So let’s talk about the ‘desk’ itself.  Do you recognize it?  It’s the Boxwood farmhouse table!

boxwood as desk

I tried selling it at my last Carriage House sale, and there were no takers.  Clearly it was meant to stay.  As much as I loved the green, it just wasn’t working in this room.  So, I really quickly slapped on a coat of MMS Flow Blue followed by a coat of MMS Artissimo.  We’re seriously talking ‘slapped on’ here folks.  The lighting was dim, I didn’t try to get 100% coverage.  I wanted the look of a piece that has been painted multiple times.  And here is what I got.

desk collage

Love it!  Perfect chipping with layers of color.  Just what I wanted.

As for the chair, I have to laugh, I started out with this chippy farmhouse chair (oh, and there is the little suitcase in this shot).

desk with chippy chair

That chair lasted all of about five seconds.  I don’t know what part of my brain thought that I could actually sit and write blog posts in that chair.  It looked cool, but was definitely not going to be functional.  Thank goodness I still had my french cane back chair out in the photo cottage!  It’s perfect for the new desk.

desk with chair

It is super comfy (I’m sitting in it now as I’m writing this).

There is just enough room on the desk for my computer, a couple of external hard drives (note to self, come up with way to disguise these!), some pens, a little container of business cards and a little ‘Q’.

desk top

I’ve used some vintage hangers and metal clips to add a little ‘pin board’ of sorts to my chalkboard door.

message board

So now you’ve seen both the farmhouse cupboard and my farmhouse desk.  Are you sensing a theme?  Stay tuned next week when I reveal what I did with the dresser on the other side of the room, plus a final room reveal (if one final piece arrives in time!).

a chippy farmhouse cupboard.

In typical fashion, my decision to get rid of the chartreuse walls in my craft room snowballed into a more comprehensive room make over.  My original thought was to just repaint the room, maybe repaint some of the existing furniture and restyle the room a bit.  But as I thought about it, I realized that painting over the black on my existing cupboard wouldn’t give me the result that I wanted.  I decided that if I could find a new-to-me cupboard at a reasonable price, I could buy it and then sell the black one on craigslist … hopefully with a net outlay around $0.

And within days I found this guy.

studio hutch before

A clean canvas for whatever color I wanted.

But boy oh boy, did I go round and round about what color I wanted!

First, I was convinced that I had to paint it in my signature aqua.  Love that color!  And I pinned this example for inspiration.

aqua cupboard

Yes, it would have been gorgeous in this color.  I seriously considered it.

Then, I had a moment where I thought ‘white!’  Back to basics.  Keep the entire room bright and filled with light.  I even found a cupboard on pinterest that is very similar in style and painted white.

white cupboardAlso very nice.  But as much as I admire this all white decor, it just isn’t me.

I like color.  And I wanted this cupboard to be the focal point in my study (that’s what I’m going to call it now since I rarely actually do any crafts in here).  So I decided to go with a rich shade of blue.  Miss Mustard Seed painted her jelly cabinet in exactly the color I was looking for, so I decided to just copy her technique.

jelly cupboard

She started with a layer of Artissimo, so I did too.

studio cabinet sneak peek
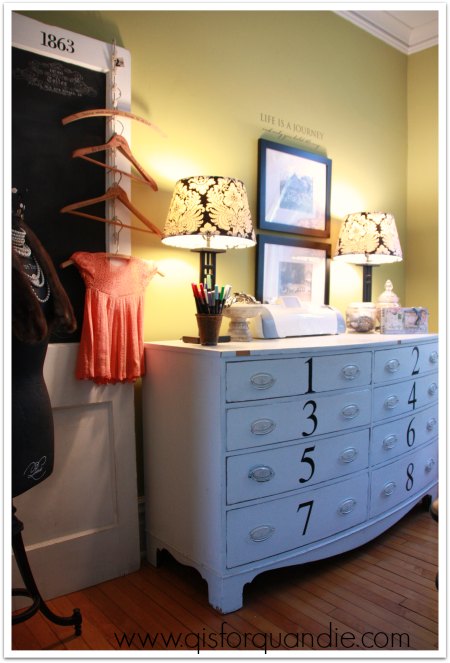
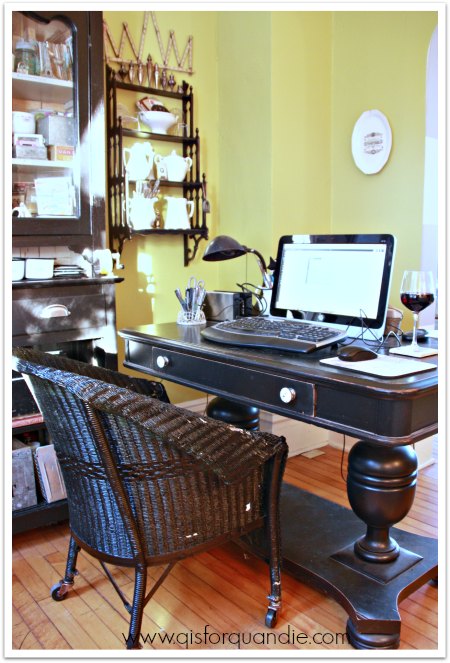
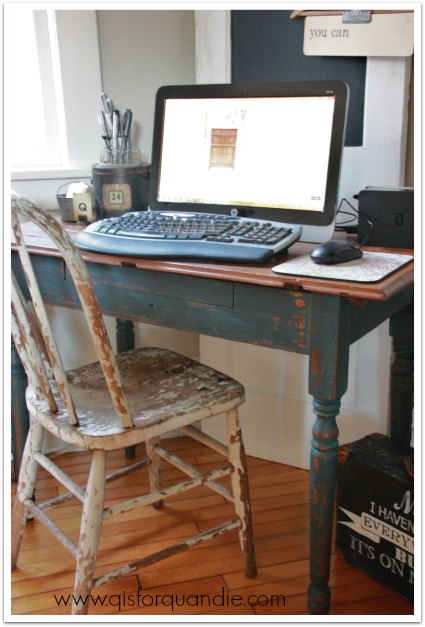
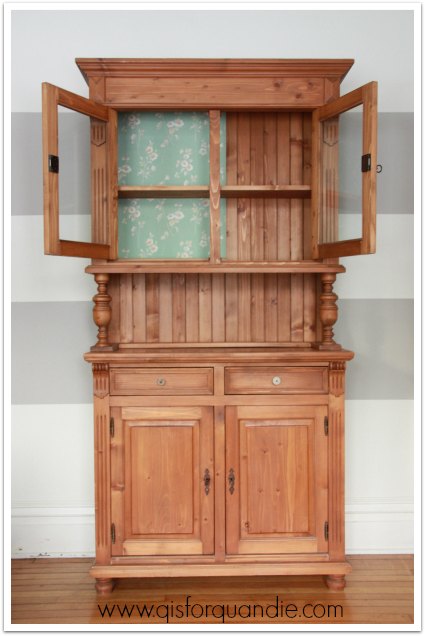
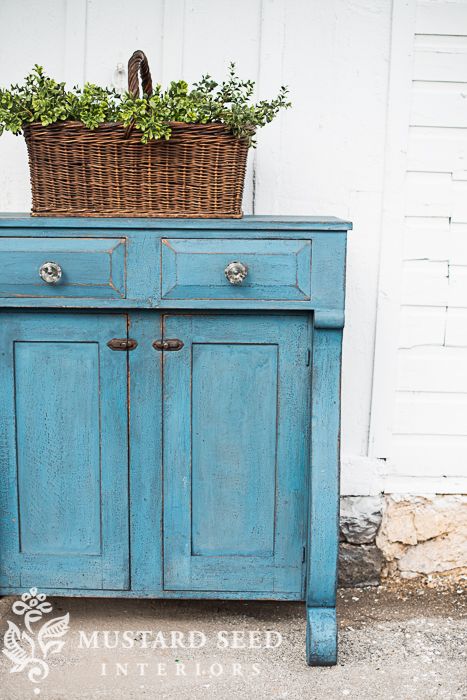
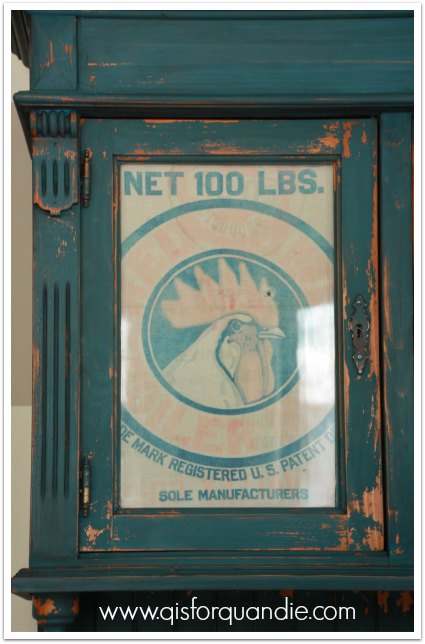
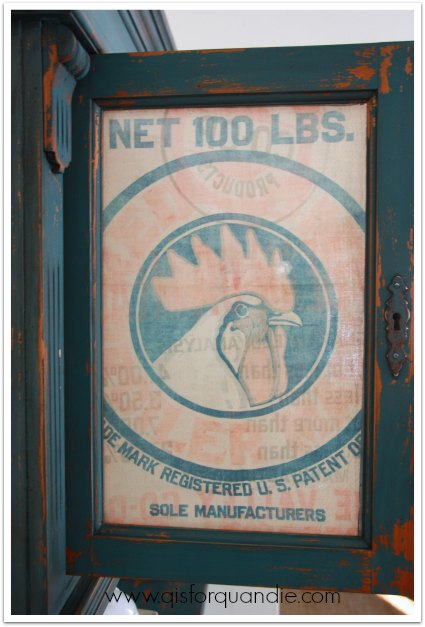
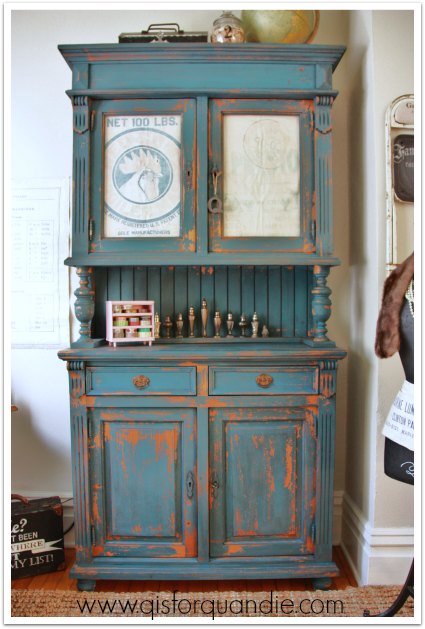
I really wasn’t sure about this pine finish that I was painting over.  I suspected it might chip like the dickens.  But the first coat of Artissimo really didn’t chip at all.  Hmmm.  OK.  I wanted a little chipping, so I was a little disappointed not to get any.  I waited a full day and then moved on to add a coat of Flow Blue on top of the Artissimo.  And then guess what?  It started chipping.  And then it chipped A LOT.  I freaked out.  Some cuss words may have been uttered.  This is the point in many projects where I decide to sleep on it.  Maybe even wait a couple of days before making any decisions.  But I really thought I was going to be sanding it down and starting over with chalk paint.  Not the end of the world, but I’m not a fan of starting over.

Then, on day 4, I came home and took another look at the cabinet.  I pondering the extreme chipping and I realized that it was starting to grow on me.  Maybe I could just go with it, maybe play it up a little.  And thus, the chippy farm cabinet was born.

cupboard rooster

I love it!  Every time I walk in to the room, I smile a little inside because this cupboard makes me happy.  I think it’s the rooster.  Whatever it is, this is the response I want to get from my decor.  So if it’s not everyone’s cup of tea, that is OK, because it is definitely mine.  And since I’m keeping this one, I’m the only one who has to like it.  Well, it’s a bonus if Mr. Q likes it too, and he does.

chippy farmhouse cabinet

A couple of things about the color.  First of all, my color doesn’t really look much like Miss Mustard Seed’s jelly cupboard.  I think I followed her exactly, a coat of Artissimo, followed by a coat of Flow Blue, and then finished with her antiquing wax.  Why so different looking?  Maybe because my piece started out a different color?   Maybe because the lighting is different in my photos?  In addition, in person the cupboard doesn’t seem to have such a color variation between the top and bottom.  I’m not sure if that is another trick of the lighting, or if it’s just something that isn’t so noticeable in person.

I added some vintage drawer pulls to this piece from my stash.  I wanted it to feel ‘old’, and these helped with that quite a bit.

you can

What really pulled it all together for me on this cupboard was the rooster feed sack.  That was just a little bit of fate at work.  I knew I wanted to put something behind the glass because I want to be able to shut the doors and not see all of my stuff (unlike the old cupboard).  I figured I would do a stenciled piece of linen or something, but as I dug through my fabric I came across this feed sack.  The coloring couldn’t have been more perfect.  And that rooster is just plain handsome, isn’t he?

rooster feed sack

I staged the cupboard with some ironstone and some blue canning jars just for these pictures.

farmhouse cupboard

Once I have it in place in the study, I’ll show you how it will look in ‘real life’.

chippy farmhouse cabinet 2

But in the meantime, what do you say?  Chippy farmhouse?  A ‘do’ or a ‘don’t’?

a room of one’s own.

There is this odd little room on my main floor that is just off the piano room.  It’s not large at about 10′ by 10′, and it is accessed through an wide arched opening, thus has no door and is open to the rest of the main floor.  I don’t know what this room was intended for, but for us it has had a number of different identities.  I set it up as a dining room for a while, but we never actually ate in there, so that didn’t really work.  For a long time it was simply a room where I displayed my doll house (one of these days, I’ll have to share that with you).  But that seemed like an awful waste of space.  We considered using it as a small TV room, but that never happened, although I still think it would be perfect for that.  So, a while back I decided to turn it into my studio/crafting space.  A room of my own.

Part of the reason I’m sharing the room with you now is because I want you to see it before I change it up.  I’ve grown tired of the chartreuse walls, and the black and white accents.  I’m still formulating my plan, but I’m hoping that if I say it out loud to all of you, I will actually follow through.

But for now, here is the room as is.

This dresser is fantastic because it holds a LOT of supplies.  I’ve thought about replacing it, but I would have to find something that holds just as much stuff.  The numbered drawers have been very convenient.  I can always tell Mr. Q that the paper cutter is in drawer no. 2, or the glue is in drawer no. 5.  But I am ready to move on to another look.  I’m thinking about just repainting this piece and keeping it, but that remains to be seen.  The lamps must go.

studio south wall

The chalkboard door and my manikin, Lula, will stay.

studio corner

My desk was a craigslist find.  I painted it black before I discovered chalk paint or milk paint, so it is just latex.  I love it, and it is a good size for the room, so I wouldn’t mind keeping it, but it needs a new look.  When sitting at my desk, I like facing out towards the rest of the house, so I like that this style desk can be floated in the room.  The chair is quite beat up, and not the most comfortable thing in the world.  I have an old wooden desk chair that I might paint as a replacement.

studio desk

As you can see, I am prepared for blog post writing with my glass of wine at the ready.  And here is the window that is behind me …

studio window

I made the “Inspire” banner with old pages from an atlas.

studio banner

The window is also covered simply with a vintage cut work tablecloth that is gathered in the center with my Q typewriter key bracelet.

studio window covering

I do have a few Q’s scattered around the place.

studio q

studio q ironstone

I have an old grocery counter paper dispenser that I keep filled with ribbons.  I have an idea for a different use for this though, but I’m going to keep that under wraps for now (ha, pardon the pun!).

studio ribbon dispenser

My pin board holds pictures and other random bits that I want to hang on to.  That is me in the fur hat I bought in Helsinki a few years back.  I should get that hat out, we are expecting wind chills of 35 to 40 below zero this morning.  Brrrr.  Perfect weather for starting an indoor winter project though!

studio pin board

Well, that is my studio … for now.  I think it could be so much better, and without spending very much money.  It will take a bit of paint and a bunch of time and energy, but I hope I can pull it together before spring gets here.  If you have a minute, please provide me with some motivational comments to get me going on this, OK?  Go ahead and tell me the chartreuse walls are all wrong, not me, and they need to go!  Admit that you wonder how I can even stand to live with this room.  It’s OK, I can take it.

on display.

I have been promising myself that I would get around to cleaning out my studio since early fall.  Basically it has been a disaster since last summer, but I was too busy getting ready for my October sale to deal with it.  I told myself that as soon as the sale was over, I would get around to it.  Then, I told myself as soon as I got back from my trip, I would take care of it. Then it was ‘as soon as the holidays are over, I’ll get to it.’  You see, I have a bit of a problem.  I don’t put my stuff away after I use it.

hutch with crafting supplies

Yep, true story.  It generally looks about this bad, and then every few weeks I clean it up.  Except this time it had been months and I just hadn’t found the time.

Finally last weekend, I had a full day to devote to it.  Eureka!

So with the Harry Potter marathon playing in the background, I took the time to really sort through all of my supplies.  I tried to be brutal and get rid of excess stuff (which I’m sending home with my friend Sue for her sister).  And everything that remained was organized so that I could see what I have at a glance.  I need to keep everything visible, otherwise I forget that I own it and thus never use it.  Do you have that problem too?

Since everything is on display, I like to use vintage containers to store my supplies in an attractive way.

All of my washi tapes are kept in my vintage pink toy dresser.

Washi tape stored in vintage pink toy dresser.

I use pretty vintage china for some things, like this butcher’s string.

Butchers string in vintage floral bowl.

I took the time to wind all of my vintage ribbons around some old index cards, sorted by color of course.

vintage green ribbon

Vintage enamel refrigerator boxes work great for containing stuff, while keeping it visible.

Tags in vintage enamel boxes

I labeled these using rub-on letters and they have held up quite well.  I’ve probably been using them for at least 5 years or more.

I like to use old muffin tins for sorting the small stuff, like metal clips, buttons, bingo chits and clock faces.

Vintage muffin tin

And voila, my supplies are organized and all is right with the world.

hutch after

Now I have room to create.

room 2 create

If you are wondering about my chartreuse walls … well, I am sick of them too.  I have been planning to repaint this room for a while.  I’ve also been meaning to show you the entire room.  So, just as soon as I get a sunny afternoon, I plan to get some ‘before’ shots of my studio to share with you.  Then, I plan to revamp it a bit.  Stay tuned.

dining room.

I’m very interested to hear what you think of my dining room.  I think you might be a bit surprised by it.  It definitely has a different look than the rest of my house.  You might want to grab a cup of coffee and sit back for this one, I feel like there is a lot of explaining to do in this room.

dining room with barn wood walls

The room that I use as a dining room was added on to the back of my house by the previous owners, probably sometime in the 70’s I think.  They used wood from an old barn that was being torn down for the floors, walls and ceiling.  Yep, that’s a lotta wood.  The walls retain their original barn red finish.  Trust me when I say, I have considered painting them white many times.  Thing is, I could never go back.  The original barn red would be gone forever.  And that makes me hesitate.  Would you do it?

dining room ceiling

This room was intended to be a family room, and we did use it that way for many years.  However, being poorly insulated, it is the coldest room in our house in winter, and the hottest in summer. It just isn’t a room I could get comfy in and watch some TV.  So when I hauled home a baby grand piano for the formal dining room area next to my living room, this room became the dining room.

You can see that I practice what I preach furniture-wise because my waterfall buffet was salvaged by nnK (that’s new neighbor Karen).  She was visiting her parents in Wisconsin and saw it abandoned on the roadside and dragged it home for me.  It is a literal ‘trash to treasure’ story.

waterfall buffet painted black

I painted this black long before I discovered milk paint or chalk paint.  It was missing one drawer in the middle, so I just removed the 2nd middle drawer and added a stack of fab vintage suitcases instead.

vintage suitcases

Are you wondering about the Chinese tea tin lamps?  I purchased them at an auction many years ago.  I’ve actually been working towards toning down the Asian feel to this room, but I can’t seem to part with the lamps.

dining lamp

The “Charles Strand” sign hanging over the clock is the original sign for the general store in Marine, MN when my husband’s great-grandfather owned it in the early 1900’s.  Here is an awesome picture of the store from back then.

strand store

Teddy Bear hunting?  Don’t you love it?

I have some of my painted books next to my giant buddha head,  which was a garage sale find.

painted and stenciled books

I’ve tried to bring more light into the room with a wall full of gold framed mirrors.

dining mirror wall

The door that we use to get in and out of the house is in this room, in the corner opposite the one seen in the very first picture.  Next to the door is my owl dresser, so named because the drawer pulls have the most amazing owl faces on them.

Dresser with owl pulls

I purchased this dresser on craigslist last year.  You can read about the method I used to paint it here.  I didn’t plan to keep the mirror frame because the mirror was long gone, but ultimately I decided it really added a ton of personality and presence to the piece so I asked Ken to cut a piece of hardiboard to fit and I painted it with chalkboard paint.  I suppose I could have replaced the mirror, but I like this better.  I used one of my stencils and a chalk pencil to add the wording.  The bottom two drawers are full of shoes (yeah, I have a problem) and the top two drawers store scarves, hats and gloves.  The little hankie drawers at the top have keys and sunglasses.  In other words, this dresser is really super functional for this spot.

The table in this room, by the way, was made by none other than Mr. Q.  Many years ago a co-worker offered him a bunch of cedar 4×4’s, so he used them to make the table.

dining room table

I made the burlap runner using  a plain runner from Michaels, which I then stenciled.

As for the rug … well, I’m sure most of you have seen this rug before.  I purchased mine from Decor Steals when it was the steal of the day.  My friend Terri spotted it first, and she ordered one too.  It was hard to pass up, and it works perfectly in this room.

Well, there you have it.  My dining room.  Probably not what you expected from me.  I should point out that it is Mr. Q’s favorite room in the house (and he loves the rug), so for now, it stays as is.  It is not even close to the top of the ‘rooms to re-do’ list.

breakfast on the deck.

When my sis arrived, we were having an awful spell of disgustingly humid weather.  I don’t know about the rest of you, but humidity does my house no favors and it is my least favorite weather condition.  I do not have central air (radiators, not ducts).  I do have a couple of window units, but only use them when the situation is really dire.  In this case, it was very humid but not especially hot, so I left them off.  As a result, my house was sticky, smelly, damp, ugh!

So I was delighted to wake up on Monday to fresh breezes and a distinct drop in humidity levels.  Plus as an added bonus, the sun was shining.  So I thought it would be lovely to have a leisurely breakfast on the deck.

berries

I may have mentioned before, I am the type of cook that has to dust her stove.  In other words, I don’t really cook.  But I can cut up some berries, brew up some coffee and toast some english muffins.  Well, actually, my sister did that part (she got the cooking genes in our family).

muffinsI may not cook, but I can set a pretty table.

pretty table

A mix of vintage and new.  The monogrammed glasses came from Goodwill.  How could I pass them up?  The cafe au lait bowls were ordered online for what I confess was some exorbitant sum.  The numbered plates are from Target.  The pitcher and ironstone bowl for the berries were both garage sale finds.

breakfast on the deck

This is how I roll.  Spend pennies on most stuff, but occasionally splurge on something special.

no 3Can you see my fabulous napkins?  Those are from Jeanne d’Arc Living, and I bought them online (you can order some for yourself here).  I only break them out for special people.

monogram spoon

 My deck happens to be a particularly lovely spot for breakfast right now because my Limelight hydrangeas are in full bloom.

seatingThe Key Lime hydrangeas next to the photo cottage are looking pretty good as well.

hydrangeas

This, in a nutshell, is why I love hydrangeas.  They are covered in blooms, with absolutely no effort made on my part at all.  The flowers last forever, and when dry I will add them to my window boxes where they will look good all winter as well.

 You may have noticed my deck chair pillows.  I have to tell you, I made a mistake when ordering them from Restoration Hardware.  I got them on clearance, and I thought I checked the size, but when they came, they were far too wide for my chairs.  So, my friend Sue chopped off a bit from each end (thanks goodness for friends who can sew).

deck cushions

I was worried it would look ridiculous, but I think it works.  If I hadn’t told you, would you have thought they were meant to be this way?

breakfast on deck1

My sister and I lingered over breakfast for quite a while.  Partly because it was just so darn idyllic on the deck.

carriage house

And partly because we were pouring over these.

budapest guide booksYep,  we are planning a trip!  And it’s going to be an exciting one.  Pretty soon I will have some more awesome travel photos to add to my gallery wall, and I am so excited!  I’ll share more on that soon.  But meanwhile, we set place no. 4 for you, want to join us?

no 4

the world’s smallest bathroom.

It is possible that I have the world’s smallest bathroom.  I haven’t checked with the people at Guinness, but I wouldn’t be surprised.  This is the price I pay for living in a charming 1904 farmhouse.  They weren’t real big on bathrooms back then I guess.

Actually, I have always suspected that the plumbing in my house was added after the original part of the house was built.  For this reason, not only is my bathroom amazingly tiny, but it’s also right off the kitchen.  Ewwww, right?  It’s also the only bathroom we have, and it’s a long way to go in the middle of the night.

2014 summer blog16

Obviously we did not buy our house for the bathroom.  But we’ve tried to make the best of it.  Over the years we have changed things up.  I made choices along the way that I would not make again.  For instance, I wish I had gone with a vintage looking floor, instead I went with large tiles that were popular at the time but not really in keeping with the era of my house.  However, we also added heat under the tiles and that was an awesome decision.  In Minnesota, a heated bathroom floor is a very good thing.

Another good choice I made was to keep the original etched medicine cabinet in place.

bathroom mirror 1

 My tub is situated in an arched nook that has a window in it.  Originally there was no shower in our house, but we added one shortly after moving in.  Showering with a window is a challenge.  We have a privacy film on the window, then some white curtains, then a clear shower curtain over that.  I hope my neighbors can’t see us in the shower, I’m pretty sure they don’t want to.  I’m not going to show you what is behind the curtain, it’s not exactly picturesque.  Re-doing the tile and plumbing in the shower is at the top of my wish list.  The shower curtain by the way is H & M.

bathroom arch 1

The last time I made over the bathroom I chose this dark wall color for the walls and ceiling.  I still like it, but I think I’d prefer a little bit lighter grey.  I’ve debated just repainting quick, it wouldn’t take more than an afternoon to do, but I haven’t taken the time yet.  The bathroom gets a lot of light from the window, so the dark color works for now.

There is a tiny linen closet tucked in beside the tub.  It is quite deep and we fit a lot of supplies inside.  It also has a handy laundry shoot at the bottom.

2014 summer blog15

None of the light fixtures that were in place in our bathroom were original to the house.  They were all kind of awful.  I replaced the wall sconces with reproduction lights from Rejuvenation.  I was somewhat limited because these lights are not hardwired to a wall switch.  The fixture must incorporate its own on/off switch, and these did.  And in fact, when we moved in, there was no wall switch in the bathroom at all.  The ceiling fixture was operated by a pull chain.  We added a wall switch for that when we remodeled the kitchen.  The ceiling fixture is from Schoolhouse Electric.

2014 summer blog21

 Having a tiny bathroom forces you to be creative.  I have a tiny little shelf on top of the radiator that is next to the sink.  The lidded metal box contains all of my makeup, and the metal boxes hanging on the wall hold my makeup brushes and q-tips.  My super magnification mirror (essential for makeup application at my age) is a wall mounted model to save space on the counter.  His and hers towels hang on the back of the door.

bathroom towels 1

 You may recognize my trash can that gets tucked next to the pedestal sink.  My towel/magazine rack is a rusty old crib rail turned on its side.

2014 summer blog14

You can see more of it in this next picture, along with my favorite thing in the bathroom which is my giant photo of a Parisian street scene from the 50’s (or maybe 60’s?).

bathroom artwork

Mr. Q says he always feels like he is peeing in Paris.  Is that TMI for a blog post?

Somehow our bathroom doesn’t feel quite so small when there is a view of Paris to admire!