tgif.

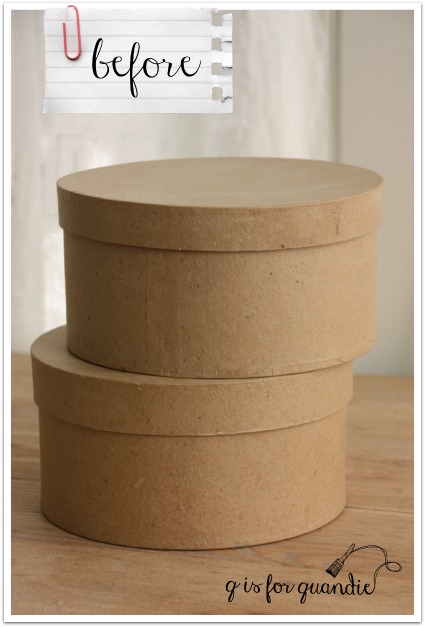
So, here it is Friday and I got nothin’ to blog about.  Yikes!  Usually I am overflowing with stuff to post about.  But somehow, despite the fact that I had a four day weekend last weekend, I haven’t managed to actually complete a project (aside from my squarely modern chair) and get pictures of it in time for today’s post.  I didn’t want to leave you all hanging on a Friday though, so I thought I’d share some pictures of the hatbox kits that are all ready to be popped in the mail for the two lucky winners, Wendy & Lori.

hatbox kit

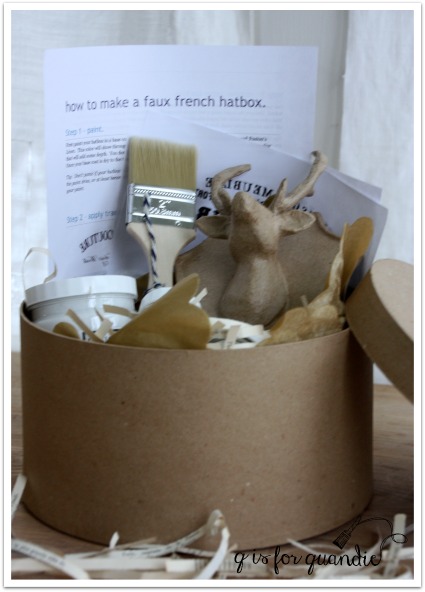
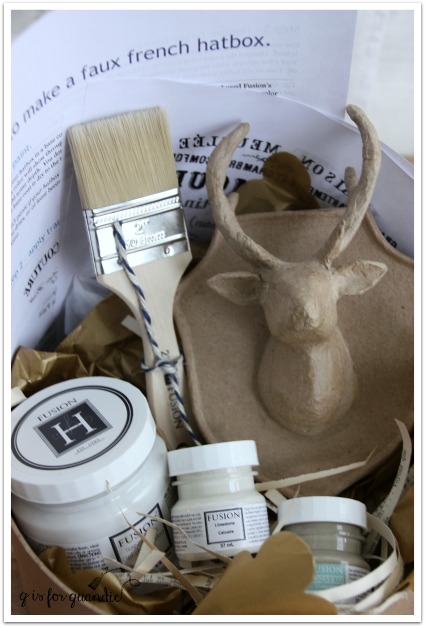
They will each get a hatbox, instructions for how to dress it up and a selection of reverse images to transfer.

hatbox instructions

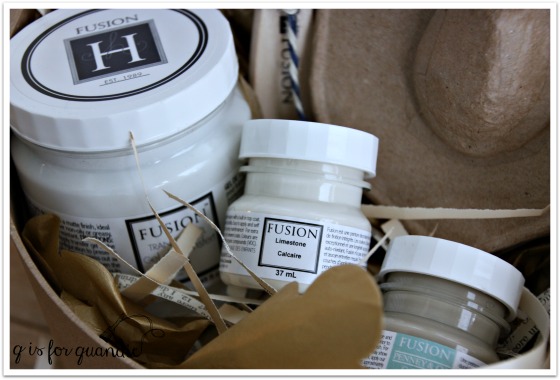
They’ll get the two colors of Fusion paint, plus a jar of Fusion’s Transfer Gel …

hatbox paint

While I was picking up the hatboxes at Hobby Lobby I came across these funky mounted deer heads and I couldn’t resist them.  So I threw one in each kit.

hatbox kit

Wendy and Lori can paint them however they like.

By the way, if you are considering making a hatbox of your own, they are on sale through tomorrow at Hobby Lobby for 50% off.  It’s a great time to stock up!  If you would like a copy of my instructions, leave me a comment and I will email them to you.

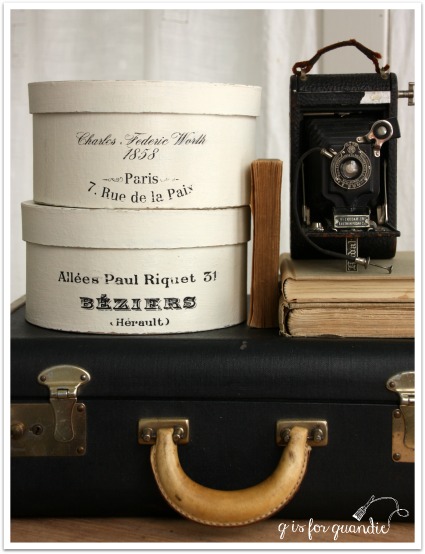
Since hatboxes were on sale, I bought a few extra myself and tried a couple of different looks.

hatbox options

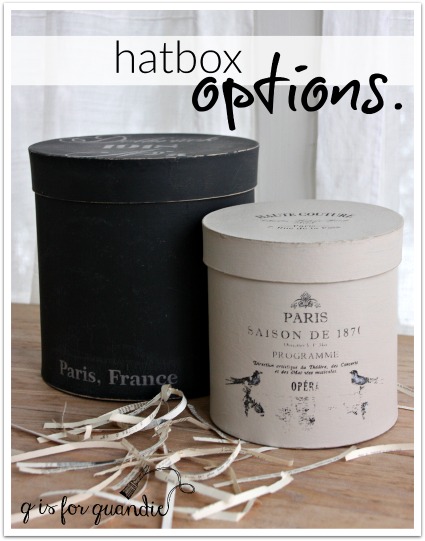
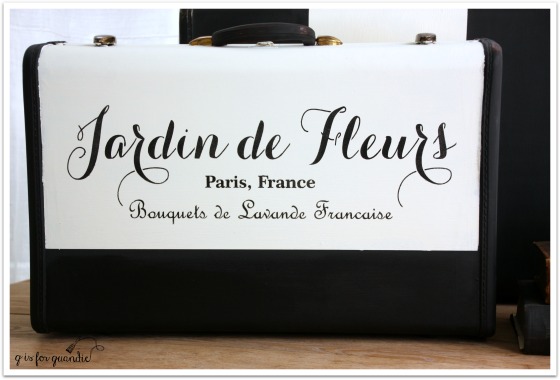
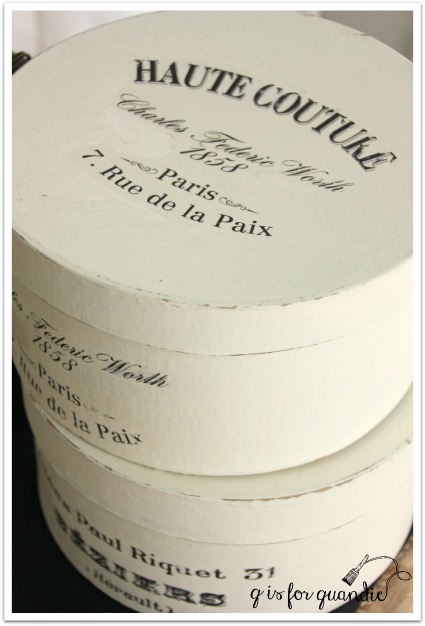
I had seen a black hatbox on pinterest that I really liked, so I painted one in black chalkboard paint.  I added the wording using stencils.  I’m not sure whether or not the transfer method would work on black.  Maybe if you printed something in a pale grey ink?  I may have to experiment with that a little.

hatbox options 2

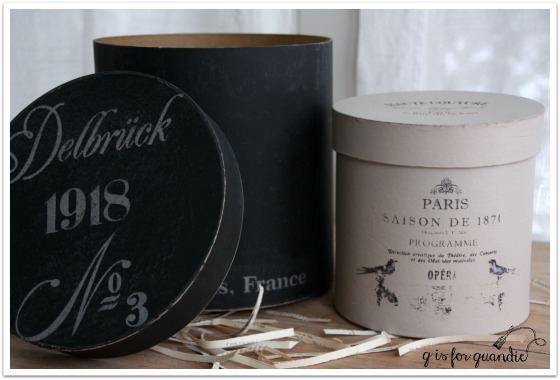
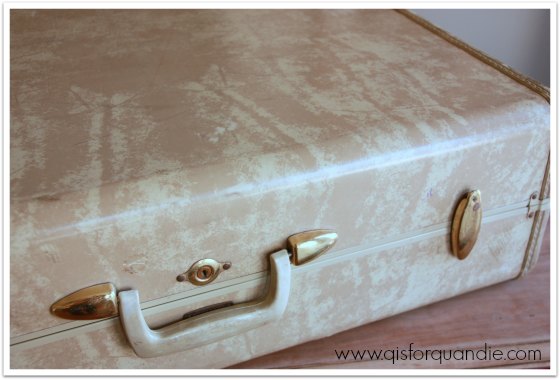
If you look closely at the smaller hatbox (which is painted in Fusion’s Cathedral Taupe by the way) you can see that my transfer didn’t work so well towards the bottom.  That was my fault, I scrubbed a little too hard while removing the paper and ended up removing ink as well.  This can happen, especially with a more detailed/delicate graphic, so use caution if you are trying this yourself.  Personally I like a distressed look, so I’m OK with it.

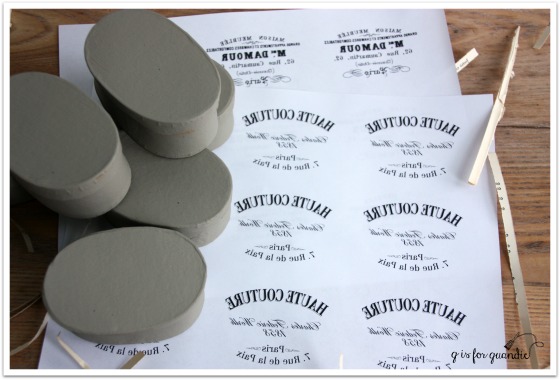
While I had my paint out, I painted up a bunch of tiny boxes for my upcoming party.  I’ll go ahead and finish these through letting the transfers dry and then my guests can practice removing the paper.

hatbox samples

I’ve got a lot on my plate this weekend including a trip to the Minnesota History Center with my sister and niece to see their Suburbia exhibit.

surburbia

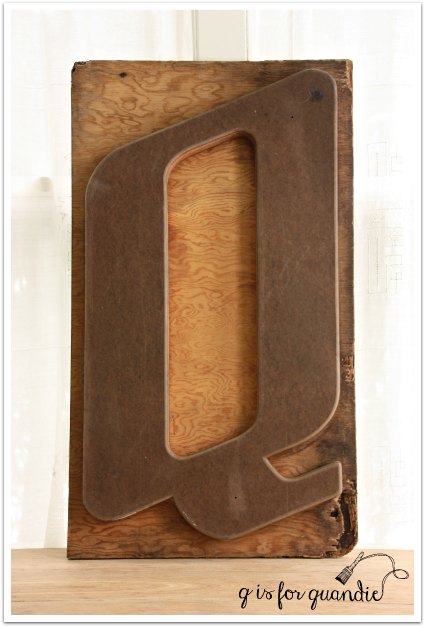
We’ll also be celebrating Mr. Q’s birthday!

So I’m just warning you, I may not have anything worthwhile to post next week either.  But stay tuned, I have a couple of great pieces of furniture coming up soon!

fab finds on craigslist.

Before I get on with today’s post, I want to congratulate Wendy and Lori, the winners of the hatbox kits.  I have sent them both emails and will be sending out their hatbox kits later this week.

fab finds on craigslist

Now, let’s talk craigslist.  Usually I am just looking for furniture on craigslist, but lately there have been slim ‘pickins.  The pieces that I like are priced too high, and the pieces at decent prices are just not worthy of a makeover.  So in a moment of desperation last week I decided to troll the ‘antiques’ section.  I usually avoid that category because I find that most people who have ‘antiques’ want big bucks for them.

I was just quickly scrolling through the ads when a photo of this caught my eye.

ironstone soap dish

It’s a little ironstone covered soap dish.  I have been looking for one of these for more than a year now!  I’ve wanted one to store my Miss Mustard Seed brush soap next to my kitchen sink.  You know you clean a lot of paintbrushes when you need to keep your brush soap this handy.  And when I say “looking for”, what I really mean is that I keep an eye out for them when I happen to be in an antique store or vintage shop, and I would snatch it up if I happened to see it at a garage sale (obviously this hasn’t happened).  It also means that I’ve looked at them on Etsy, where they tend to be priced around $50 plus shipping.  In other words, way out of my price range.

This one was $12.  I should point out that it does not have the strainer inside for keeping the soap dry, which can bump up the price.  I saw a really lovely one with a strainer on Etsy for $68.  Yikes!

So clearly I was super excited when I saw it and immediately made arrangements to pick it up.  The seller was located in the Bryn Mawr neighborhood of Minneapolis, one of my favorite garage sale neighborhoods.  For even more fun, he said he had a few other pieces for sale as well.

Mr. Q and I drove out last Friday evening and when all was said and done, I came home with all of this (plus one more item I’m saving for last).

ironstone

The most expensive piece was the little covered casserole in the back at $36.  But isn’t it sweet?

ironstone casserole

I couldn’t resist it.  It has such beautiful details on the handles and the shape is unique.  Speaking of beautiful details …

transferware tea pot top

This brown transferware teapot was a super bargain at a mere $5.  But, there was a reason for that, it has a large crack in it.

brown transferware tea pot

This poor teapot will never hold water again.  There is a trick to using pieces like this as vases though, just put a smaller watertight container inside.  It’s also suitable for display of course.  And I just happened to already have the matching creamer …

brown transferware set

The gentleman who was selling these was very knowledgeable about antique china.  He said that he acquired his first ironstone platter when he was 5 years old!  He had some really lovely antiques in his home as well.  I was seriously coveting some beautiful small oil paintings that he had on the walls, and Mr. Q really enjoyed seeing an amazing antique clock that had all wooden parts except for one brass gear.

As we were getting ready to leave, he showed us a couple of other transferware pieces that he had in his dining room.  While standing there, a piece that he had in his china cabinet totally caught my eye.  Those of you who know me by now won’t be at all surprised when you see what is was!

mini soup tureen

A teeny tiny soup tureen.  Complete with a teeny tiny ladle.  Good grief, that thing was calling my name.  So based on my ‘it never hurts to ask’ philosophy I asked if he would consider selling it.  Sure enough, he was game!

And it looks right at home on one of my tiny dressers, don’t you think?  The thing is only about 4″ tall.

mini tureen on dresser

So, all in all I ended up with some pretty fab finds from that craigslist ad.  How about you?  What’s the most fab thing you’ve ever purchased on craigslist?

when inspiration strikes.

Sometimes I find inspiration in the most unexpected places.  This time it struck while watching a movie.  Cuba starring Sean Connery came out in 1979, but it’s set in the late 50’s.

cuba

There is a scene in the movie where one of the characters fills a suitcase with money in anticipation of fleeing the country after the fall of the Batista regime.  Ding, ding, ding!  Fabulous black and white vintage suitcase!  My eye went straight for it.

I just love the graphic punch of black and white, as evidenced by my front porch floor.

summer porch

Or this mid-mod bureau that I painted last summer …

black and white title

Seeing that black and white suitcase in the movie reminded me that I’ve had a couple of hard sided vintage suitcases lying around for a while.  One of them is Uncle Leon’s suitcase that I picked up at the Nokomis neighborhood garage sales last summer.

suitcase collage

The other is a thrift store find.

unicorn

There are a lot of vintage suitcases that I wouldn’t dream of painting, but I’m not a big fan of these marble-ish finishes.

So I pulled out some chalk paint in black (Cece Caldwell’s Beckley Coal) and white (Annie Sloan’s Old White), some frog tape and some stencils and got to work.

inspiration title

I have no idea what the material is that this particular style of suitcase is made out of (do any of you know?), they certainly aren’t leather or cardboard.  I’m fairly sure the edges are some sort of rubber or plastic maybe.  Despite not knowing what this material is, I still follow my usual m.o. for painting them.  I sand them down a bit to rough up the surface so paint will adhere better, then I wipe them down with TSP substitute to remove surface grime and oils.  I have painted this type of suitcase with milk paint and with Fusion paint, both of which worked great.  This time I used chalk paint.  If you’re going to use tape to make a clean line (like I did on these) I would say stick with either Fusion or chalk paint.  The milk paint is going to be a bit too thin for a crisp line, and your tape is going to pull paint off.  I used the yellow frog tape for these (the one meant for delicate surfaces).  I removed it carefully shortly after painting the second coat of paint and I had no problems with paint lifting off.

The first case I worked on most closely resembles the suitcase in the movie (it was black with a wide white stripe down the middle).  I painted this one black first, then measured off my white stripe, taped it off and painted three coats of white.

1918 stencil

I added a subtle extra detail with some stencils.

suitcase rue henri

I changed up the stencil on the reverse side of the suitcase.

paris stencil close up

I used the wet paper towel method of distressing on the edges, handles and hardware.  Have you tried that with chalk paint?  Rather then using sandpaper and getting a rough effect on those rubber/plastic/whatever they are edges, I used a damp paper towel and just rubbed paint off.  It worked great on these!suitcase with Paris

The fact that you can wipe the paint right off with a damp paper towel suggests that you really do need a top coat over the chalk paint.  I used clear wax on these, and I have to admit it got a little tricky.  The wax picks up some of the paint, so I had to be very careful not to get black paint onto my white areas.  I used separate rags for waxing the black and white areas.

Just to be clear, I never intend for these suitcase to be functional as suitcases.  They are really just for decor purposes only.  Despite a wax top coat, if you tried to send one of these through the baggage system at your local airport it would come out much worse for the wear. They will get dinged up.

The second case got a little different black and white treatment, and I used my new Jardin de Fleurs stencil on it (by the way, are you keeping track?  This is the 3rd use of the stencil so far).

jardin de fleurs suitcase

I really can’t decide which suitcase I like best, can you?

suitcase tops

I love that Jardin de Fleurs stencil, but I also think the striped suitcase looks more authentically vintage.

They kind of make a great pair.  Don’t they?

suitcase pair

These guys need to find a new home, so if you are local (sorry, no shipping available) and interested in purchasing them just leave a comment and I’ll get back to you with the details.

an invitation.

Who would like to make their own faux french hatboxes?

repeats 2

A couple of my friends have mentioned that they’d be interested.  So I’ve decided to host a hatbox painting party!

class title

And since I have three extra spots at the table, I thought I’d open the invitation up to my local readers.

Here’s how it will work.  I will provide everything except the hatbox, including paint, transfer gel, transfer images (unless you want to bring your own, remember it must be a mirror image), snacks and lots of laughs.

You just need to bring a hatbox (or two if you like).

repeats before

You can find these at Hobby Lobby, Michaels and JoAnn Etc. in various shapes and sizes.

The party will be held at my house on Saturday, February 27 at 2 pm.

This is a party, not a paid-for class.  There is no charge.

Why?  Since the Fusion people have incredibly generous with some transfer gel and paint samples, I am paying it forward.

transfer gel

Even though I’m not calling it a ‘class’, you will learn how to layer paint colors and how to use the transfer gel.  Keep in mind that the gel takes 6 – 12 hours to set, so you won’t be going home with a fully completed project.  You’ll finish your hatbox up to applying the transfer.  I’ll have some samples ready that are already set so that we can get some hands on experience removing the paper after your transfer has set.  So you’ll get a feel for the process, but you’ll have to remove the paper on your own hatbox at home the next day.

I wish I had room for more people, but sadly I don’t.  So if there are more than 3 people who want to join, I will have to draw names.

Finally, since I don’t want those of you who aren’t local to feel left out, I’m also going to draw names and give away two ‘faux hatbox kits’.  The kits will include the hatbox, as well as transfer graphics and enough paint and transfer gel samples (compliments of Fusion) to finish your hatbox.

And before I let you go, I just wanted to give you all a heads up on Fusion’s custom color contest!

custom color contest

Fusion is having a contest, where you, yes YOU, can combine existing Fusion paint colors to create your own custom color. To enter, simply head over to their Facebook page and comment there with a picture of your custom color on a piece of furniture, its name and recipe.

They will choose 8 favorites entered in the months of February and March and then the fans will vote on the final 8 colors to ultimately decide on the winning color recipe! The winner will receive a custom Fusion giftpack valued at $350.  Nice!  So get creative and have fun inventing your own color.

And for those attending the hatbox party, rather than watch paint dry on our hatboxes, we can play around with my Fusion paint and make up some fun colors of our own in between steps on our hatboxes.

So, who wants to make a hatbox while simultaneously inventing a new paint color?

Here’s what I need you to do; leave me a comment.  If you want your name in the running for the party, make sure to mention that you are available to attend (I am located in a suburb of St. Paul, MN in case you didn’t already know that).  If you can’t attend the party, just any old comment will do.  The winners of the hatbox kits will be chosen at random from all comments excluding those selected to actually attend the party.  Please have your comments in by Sunday, February 14 at midnight to be eligible for the drawings.  Best of luck to you!

repeats 1

the winter carnival.

winter carnival

Each year St. Paul hosts a winter carnival.  I’m pretty sure it was started just to prove that Minnesotans are tough and that we laugh in the face of winter.  The carnival has been taking place since 1886 and is the oldest winter festival in the United States.

Back in the early days they built amazing ice palaces as part of the festivities such as this one from 1888.

1888 ice palace

Even as late as 1941 the palaces were pretty extravagant.

1941 ice palace

Unfortunately they no longer make anything like this.  The last time we had a decently sized ice palace was 2004.

2004 ice palace

It was large, but certainly not as elaborate as some of those earlier models (I’m betting that there are more safety regulations these days!).  Mr. Q and I did go see it that year along with about a bazillion other people.

This year since my sister and my niece are new to Minnesota they decided it would be fun to visit the winter carnival.  So last Saturday we headed into St. Paul to check it out.

To be honest, this year’s ‘mini ice palace’ was looking pretty sad by the time we saw it.  I didn’t even take any photos it was so pathetic.  I did get a couple of photos of some ice sculptures though.

ice sculpture 1

ice sculpture 2

ice sculpture 3

As a special bonus, we got to see a marriage proposal taking place in front of one of the ice sculptures.  It was pretty sweet.

There is a fake legend that goes along with the winter carnival (you can read the full story here).  The legend says that on the last day of the festivities Vulcanus Rex and his Krewe storm the ice palace and force King Boreas to give up his icy hold over his winter capital.  Thus there is a Vulcan Victory Torchlight Parade on the final day.

torchlight parade

Back in the day the Vulcan Krewe would kiss the girls along the parade route leaving smears of black grease paint on their face, but that custom has been toned down.  These days they just use a grease paint crayon to leave their mark.  I warned my niece Kris that pretty girls were obvious targets!

kris at winter carnival

Hail the Vulc!

By the way, are you wondering what appropriate attire is for a winter carnival?

me and deb at winter carnival

Down parkas of course!

Here’s hoping the Vulc’s have done their job properly and booted King Boreas off his throne!  I am ready for a little less winter, how about you?

think spring.

I’m probably jumping the gun a little thinking about spring, but last weekend it was sunny and close to 40 here in the Twin Cities.  Sunlight was streaming in through my windows.

roses in blue jar

After our previous stint of sub-zero temps, that felt positively balmy.  Snow was melting, birds were singing and it just smelled like spring outside.   The days are starting to get longer already, I’m no longer coming home from work in the dark.  But then yesterday we got a big pile of snow dumped on us.  I think it was Mother Nature’s way of reminding me that it really is only early February after all.  Drat.

Nonetheless, I am ‘thinking spring!’ and in anticipation of gardening season I ordered a new stencil for myself via Etsy.  I took it for a test run on this vintage picnic basket that I found at the thrift store.

stenciled picnic basket

And I love it!  I hope to use it on many more things.

While I was feeling floral, I also picked up some more pretty floral plates to add words to, as well as a Le Jardin themed table runner, both also from the thrift shop.

thrift store finds 2

I also ordered some more vintage floral wallpaper from Hannah’s Treasures via Etsy.

vintage wallpaper

This is in anticipation of an upcoming project that I have in mind using this …

coming soon

Ta da!  I am so excited!  I’ve been sent some samples of the new Rachel Ashwell Shabby Chic paint line to try out!

But before I can get to that project, I have to finish up the desk that I’m currently working on.

desk before

And speaking of desks, my February post at Reclaiming Beautiful is up and running today and is all about desks.  Head on over and check it out!

desks

the gleason board.

Melanie from Lost and Found Decor (the blogger who spearheaded Monday’s Fusion giveaway) recently wrote about her trip to the auction house.  Reading it reminded me of one of my favorite auction stories, so I decided I should share it with you guys!

There is an auction house just a few blocks down the street from me.  They hold an auction nearly every Monday evening.  The owner/auctioneer is quite funny and entertaining.  In a way, attending the auction is similar to live theatre.  It’s definitely worth the trip just to enjoy the show.

Quite a number of years ago I got the auction bug.  I bought a few really cool things that I still have, like the full length mirror in my bedroom that is framed in copper salvaged from the roof of a historic building in Philly (or at least that is what the sticker on the back claims).  Here it is leaning on the wall next to my armoire.

mb armoire

And hey, sidebar note, I have an exciting project coming up involving this armoire … so check back for that in the coming weeks.

The lamps made out of antique Chinese tea tins that used to be in my dining room were also from the auction house …

waterfall buffet painted black

In the end though, I realized that auctions were a bad idea for me.  The problem was that my right arm would just fly up on its own accord every time I saw something that I liked.  In the excitement of the moment, my brain didn’t have time to compute the full price with fees and taxes added in.  This particular auction house adds a 15% commission plus 7.125% sales tax to every item.  For example, a dresser that you bid $75 on suddenly costs you something closer to $92.

But the real problem for me ended up being items sold in ‘lots’.  It always seemed like the items I wanted were being sold as part of a ‘lot’ and the other items in the lot were crappy stuff that I didn’t really want.  And to further complicate matters, at that time when you bid on a lot you were bidding per item.  So, if your lot contained 3 items and you bid $25, you were going to pay $25 per item, or $75.  And then you still had to add in that pesky commission plus sales tax.  Yikes!  That’s a lot of math to do in your head in a split second!  In the excitement of the moment your brain is thinking “$25!  What a bargain!” And what it really should be thinking is “$25 times 3 equals $75, plus commission and taxes is $92.  Yikes!”

Such was the case with a vintage birdcage that I really wanted one night.  It was being sold in a lot with two other items.  One was a small rocking chair with a cane seat and the other was listed as an antique folding table.  I didn’t want either of those things, but I figured I could unload them at my own occasional sale and just keep the birdcage.  I can’t remember now what I ended up paying for the lot, but I’m fairly sure it was more than I should have paid for just the cage.  I loaded up my items and brought them home.  I then decided to put the table up and see how it looked.  I first noticed that the legs were a little short.  The table was only about 2’ tall or so.  And weirdly enough, one side sort of tilted up.  It also had a label that said “Gleason Board”.

I immediately got a bad, bad vibe from the thing.  But I’ll admit I was thinking ‘doctor’s office’ at the time, not ‘funeral home’.

I put it in my front hall closet and put it out of mind for the moment.

A few months later I went to the Oronoco Gold Rush (an annual antiques flea market here in Minnesota).  As I was wandering around, what did I happen upon?  A very similar table.  I still remember thinking “Oh look!  One of those tables.  Let’s see how much they are charging for it.”  I walked over and took a look at the tag, which prominently said “antique embalming table”!

mortuary_Gleason_1886_table_overview

Quelle horreur!

I dropped the tag with a gasp and jumped back.  Dear lord!  I had an antique embalming table in my front hall closet!  I don’t think I even noticed the price because I was so horrified.

Later that night as I slept in my bed I had a terrible dream.  I dreamt that the spirits of every person ever embalmed on that table were now inhabiting my front hall closet.  I opened the closet door and there they all were.  I woke with a start and reached over and shook Mr. Q awake as well.  I told him the table needed to be removed from the closet a.s.a.p.  I didn’t care what he did with it, it just had to go.  And by a.s.a.p. I meant ‘right now in the middle of the night’, not just sometime soon.

He ended up putting the table in the trunk of his car.  I think his intent was to get rid of it somewhere eventually, but instead it stayed in the trunk of his car for quite some time.  And as a matter of fact, it was still there when we traded the vehicle in on a new one!  Yep.  We left it in there.  Somewhere out there, someone bought a used car that came complete with an antique embalming table!

Accidentally buying an embalming table sort of ruined auctions for me.  I haven’t gone back since then.  I think I’ll leave auctions to the people who can control the are holding their paddle, do math really fast in their heads, and recognize creepy antiques when they see them!

a Fusion Studio Metallics giveaway.

Recently one of my favorite bloggers, Melanie from Lost and Found Decor, decided to put together a blog hop.  She asked me to join in along with three other fab bloggers, Homeroad, Bliss Ranch and Finding Silver Pennies.

metallics collage

Our focus is the Mathew Mead Studio Metallics paint from Fusion.  As you may remember, a while back Fusion sent me some free samples of this paint.  So far I have painted a pale gold chair and added some brushed steel to the back of a mid-century bookcase.  I’ll admit that when I agreed to try the metallic paint I really wasn’t sure what I would do with it, or if I would really even like it.  Since then I have become a serious fan of the stuff.  Along with the Pale Gold and the Brushed Steel, Fusion also sent me some Copper.  So I pulled that out for this project.

copper 1

Back just before Christmas my sister and I had popped into one of our local thrift shops where we picked up some wooden divided bowls.  I had seen similar wooden serving dishes painted in a metallic gold, so I thought it would be a fun project to try with one of the Fusion metallics.

wood trays before

I’m afraid I have a confession to make at this point.  I went ahead and painted them without my sister.  When Melanie sent out the post asking if anyone wanted to join her in this blog hop, I knew this would be just the right project, so I got painting pronto without waiting for Debbie.  Sorry sis!

I started by sanding the bowls slightly and then wiping them down with TSP substitute.  I then painted them entirely with three coats of Fusion’s Picket Fence, which is a nice, bright, crisp white.

copper step 1

This is one of those projects that doesn’t take a lot of effort to do, but there is a lot of waiting between steps.  You know, paint the top, wait for it to dry, paint the bottom, wait for it to dry … repeat twice.

Next, tape off a section of the bowls to paint in the copper.

copper step 2

I absolutely love this copper color.  Isn’t it gorgeous?

copper paint

I used two coats of the copper paint.  I wanted a very solid coverage.

Once the copper was dry, I taped off at another angle to add the next color.  But before I started I used a little sandpaper on the seam between the copper and the white that I was painting over.  If I hadn’t done this, there would have been a visible ridge under the final color.

copper sanded

I wiped the dust away and then added a couple of coats of my favorite Fusion paint color, Laurentien.

copper step 3

As you can see, I don’t do a very good job of keeping the mouths of my paint jars clean.  Bad, bad, painter!  I often have to ask Mr. Q to help me get these open again.  It also works to run them under hot water for a minute.  But I always ultimately get them open.

Laurentien

After all of these small steps, in the end I have these lovely painted bowls perfect for holding jewelry.

copper with jewelry

Including my Mantraband bracelets.

copper with bracelets

You’ve probably noticed that I seem to have plenty of jewelry in my favorite color of aqua as well!

copper bowl aqua earrings

So there you have it, a simple way to update some divided wooden bowls.

copper bowl necklace

So snag some at your local thrift shop and get painting!

copper with jewelry 2

To help you out with that, Fusion is sponsoring an amazing giveaway for us today.

giveaway

The giveaway includes the following:

2 MM Studio Metallics (winner chooses color)
2 Pints Fusion Paint (winner chooses color)
1 small Fusion Brush
1 Fusion Brush Soap
1 Fusion Antique Glaze
Nice, right?
There are numerous ways to get your name in the hat via Rafflecopter to win!  There is the same Rafflecopter on all five posts, so you only have to enter on one of the blogs to qualify.  Click the following link to enter …

a Rafflecopter giveaway

Please take a moment to visit each of the other blogs participating to see their Studio Metallic projects:

Bliss Ranch

Finding Silver Pennies

Homeroad

Lost & Found Decor


a fun new venture.

As some of you know, last summer I started selling some of my furniture pieces at a shop in Stillwater, MN called Reclaiming Beautiful.  It’s a shop that focuses almost exclusively on refurbished vintage furniture, so pretty much a perfect fit for my pieces.

Recently the owners of the shop came to me with a proposition.  They asked if I would be willing to spruce up their blog and write the occasional post for them in exchange for a reduction in their commission rate.

title photo

It took me about two seconds to think about it and then say YES!

I really enjoy blogging.  I love taking the photos, editing the photos, writing the text, coming up with the ideas.  And I especially love connecting with the people who leave comments.  I’m not as big a fan of the technical aspects of blogging, but my WordPress skills have come a long way since I originally started my own blog and fortunately the Reclaiming Beautiful blog is also on WordPress.  That couldn’t have worked out better.

Since writing blog posts doesn’t feel at all like work to me, I was happy to take this on.

First I spent a little time giving their blog a fresh new look.  I added their logo in the header, changed the ‘theme’ that they were using to one with bigger photos, updated some info, and added a link to their Facebook page.

Today is the official unveiling of the new look along with my first post for them.

I hope you’ll take a minute to pop over and take a look (click here).

Let me know what you think!  And consider becoming a follower.  You definitely won’t see me posting as often there as I do here on q is for quandie, so it might be convenient to get an email every time I do.

the q.

Imagine my delight on Christmas Eve when I found this under the tree!

q before

Well, it wasn’t quite ‘under’ the tree because it’s a little too big for that.  This guy is a bit over 3′ tall.  And seriously heavy.

My sister got it for me.  She saw it way back in August at the Grand Opening for Eye Candy ReFind, and she decided it would be the perfect Christmas gift for me.  How fab is that?  I’m so touched that she remembered it and went back for it later.

Of course, it needed a little ‘quandification’.

First of all, as I mentioned it was really, really heavy.  And the Q was mounted on some pretty unattractive plywood.  It was a no-brainer to start with removing that backing.  I thought this would be easy.  Ha, silly me!  It’s never easy, is it?  There were about a dozen screws holding the Q to the plywood and every single one of them was rusted tight.  After attempting to loosen them up myself and failing miserably, it was time to call in the professional, my handy neighbor Ken.

He started by attempting to drill out the screws from the back.  No dice, the drill wouldn’t stay on the screw.  Next he decided to just drill the plywood all the way around each screw.  Once he’d done that, we were able to pull the Q away from the plywood and then go back with a vice grips and remove all the screws.

Q removing screws

Once I had the Q free from its backing I painted it with a base coat of Miss Mustard Seed’s Flow Blue.

q in blue

I suspected I wouldn’t get much chipping.  I’m not really sure what kind of material the Q is made out of, but it’s not real wood.  It seems sort of like layers of hardi-backer board glued together.  Whatever it is, I had a feeling it would absorb the paint, and it did.

Once the Flow Blue was dry, I rubbed hemp oil into it wherever I wanted to get chipping after applying the final color which is MMS Linen.  I painted three coats of Linen, and then since I wanted lots and lots of chipping I got out my trusty blow dryer.  I have found that adding heat usually results in more chippyness.  Here is how that starts to look as you’re blow drying.

q chipping

Once I lightly sanded, vacuumed off the chips and then added wax, the finish looked like this.

q chipping 2

q after painting

Initially I was going to stop here.  But the more I looked at my Q, the more I realized it needed just a tiny touch of something more.  Like maybe some stencils.

q stencil 1

After I added a couple of stencils, I hung it in its new home in the Q Branch.

q

And I just love it!

After hanging it, I realized there were a couple of other small details that I needed to finish up in the Q Branch.  I’ve got those all pulled together and later this week I’ll share an update on those.  Check back on Wednesday as well for a fun announcement.