my obsession with tiny furniture.

tiny furniture obsesssion

My obsession with tiny furniture continues!

Who remembers this little number that I picked up at a garage sale in early summer?

tiny cupboard before

It had an authentically aged original paint job, but I just couldn’t handle the red.  So I painted over the red with some Annie Sloan Duck Egg.  Then, the fresh coat of Duck Egg made the original cream exterior look seriously dingy and yellowed.  So I went over that with some Miss Mustard Seed milk paint in Linen.

tiny cupboard

I fully expected a bunch of chipping since I was painting over paint, but I didn’t get a single chip.  When I say that whether or not milk paint will chip can be unpredictable, I mean it.

Once it was painted, I also added a tiny little ’37’ rub-on to the top.

room to create

I know it can be hard to judge scale in these photos, but this little cupboard is just 18″ tall.  It’s the perfect size for placing on a dresser or table top and filling it up with some of your crafting supplies.

tiny cupboard and crafting supplies

It’s kinda adorable, right?

I was contemplating keeping it and letting it join its brethren in the Q Branch (my study).

mini collage

But I really don’t think I need another tiny piece of furniture!

So it will probably end up at my sale in October.  I think.  Maybe.  Yes. Probably.

oopsy daisy.

Although technically my furniture moratorium continues to be in place, I still bring in the occasional piece(s).  Especially when it’s an amazing bargain that is far too good to pass up.  So recently when I saw an ad on craigslist for a tall dresser that was exactly my style and about half the price I usually pay, I had to send Mr. Q for it.

Yep, I had to.

tall oak before

But this post isn’t about that dresser, it’s about the second dresser that the seller had.  When Mr. Q got there the seller asked if we’d be interested in another piece she had for sale.  He texted me a photo, and I said “sure, why not?”  And thus, he came home with two pieces.

oak pair before

This low dresser was missing it’s hardware entirely.  I suspect the seller removed it at some point thinking she was going to refinish it, and then over time the hardware was misplaced.  It was priced accordingly though, so no complaints on that score.  I planned to just replace it.

Have I ever mentioned that my best ideas usually come to me in the shower?  Maybe because that’s the time when I’m really not concentrating on anything else.  My mind wanders while I’m shampooing.  So I was in the shower thinking about this cute little low dresser and I thought vintage wallpaper!  I haven’t done a wallpapered piece in a while, and looking back I’ve done quite a few of them over the years (here, here, here, here, here and here).

I happened to have a really pretty yard of wallpaper with daisies on hand (I usually order my vintage wallpaper by the yard via Etsy).  But before we get to the wallpaper, I first painted the shell of the dresser in Fusion’s Limestone.  I love the warmth of this white.  I sometimes forget how ridiculously easy it is to use Fusion paint.  I sanded the piece ever so quickly, wiped it down with TSP substitute and slapped on two coats of paint.  Then I distressed the edges a bit with fine sandpaper.  Done.

The wallpapering was a different story.  This was one of the more fragile pieces of wallpaper I’ve worked with.  I ripped it more than once.  Basically though, I measured a section of wallpaper to fit down the left half of both drawers, then a second piece to fit down the right half of both drawers.  I mixed up some wallpaper paste (I use the Zinsser Sure Grip powder so I can mix up just the small amount that I need) and smoothed it onto the back of each piece then gently folded them over to ‘book’ the paper.  I then drew a pencil line down the center of each drawer.  I lined up the wallpaper with the center line and worked my way out.  I kept the patterns lined up so that when the drawers are in place the pattern runs from one to the next, if that makes sense.

wallpaper 2

I made two mistakes with the wallpaper.  The first mistake was rubbing too hard while attempting to remove excess paste from the front with a damp rag.  Some of these vintage papers are not colorfast, and this is one of them.  I could see that I was starting to take the color off the paper.  Ooopsy daisy.

wallpaper close up 2

The second mistake was not allowing enough overlap in the middle of the drawers to cut off the edge of the paper.  The design did not go all the way to the edge on this paper.  There is about ¼” that was meant to be trimmed off.  Dang, oopsy daisy again!

I really felt like this piece needed to be up on casters.  It’s a low piece anyway, so the casters are like adding heels to just give it a little bit of a boost.  But boy, those things fought me every inch of the way.  The dresser obviously originally had casters.  Three out of the four original metal sockets were still in place and extremely rusted.  Although I had 4 vintage casters on hand, only one of them fit in the original sockets.  That meant I had to get those old rusted sockets out.  It took a bunch of elbow grease and there might have been a fair amount of cursing taking place, but I finally got them out and was able to fit the vintage casters with sockets in the existing holes.  Phew!

For such a simple piece, this one really gave me a run for my money.

I think this low dresser would be perfect for a TV stand.  It would place the TV at the perfect height for viewing.  Alternatively, it is also low enough to sit at the foot of a bed with some quilts stacked on top.

I’m still using the beautiful hand stitched baby dresses that I purchased from my friend Sue about two years ago for the occasional furniture photo shoot.

baby dress

They are so lovely, but both Sue and I often ask ourselves what one would do with these other than hang them in a nursery?  Any ideas?

I always enjoy getting a glimpse of pieces inside the photo cottage after they are done.  They never stay in there for long though!

wallpaper in photo cottage


a color blocked bed.

Bigger is better?

Before we get into today’s post, did you notice I made some tweaks to the blog?  Wordpress announced a new and improved version of my blog ‘theme’ way back in January, but I never took the time to look at it until now.  With this new theme, my page is wider, my photos can be larger, my fonts are larger … everything is just BIGGER!  I think that’s a good thing, but what do you think?  Feel free to leave a comment with your opinion.

I’m still exploring some other possibilities with this new theme, so don’t be surprised if you see a few more changes here over the coming weeks.

On with today’s post!

I’m a fan of color blocking, how about you?

I like it in clothes, and I also like it in decor.  In fashion, color blocking is described as pairing blocks of different colors together.  It usually refers to pairing bright colors, so maybe I should call this ‘toned down color blocking’ because rather than using bright colors I used the muted tones of Fusion’s Algonquin and Limestone on this bed frame.

color blocked bed 1

This bed came to me as part of a set.  I split it up since I’m not much of a fan of ‘suites’ of furniture.  The dresser and vanity have already been painted and all that was left was this bed.  It was in great shape and has the side rails and the slats meant for holding the box spring and mattress, but it wasn’t particularly pretty or interesting.  It was just rather dull.

So I decided to give it a slightly more modern vibe with some toned down color blocking.

First I painted the entire bed in Algonquin, which is a lovely sort of greige color.  The I simply measured and taped off a wide stripe down the center of the headboard and foot board and painted that in the Limestone.

color blocked bed

I distressed the edges a little with sandpaper.

bed close up

Both my sister and my neighbor, nnK, asked me if I was going to put a stencil on the headboard, but I thought that would be too much.  I like that this bed has a subtle sense of style.  It could be dressed up or down with different bedding.

color blocked bed 5

It is for sale.  It is a full/double size bed, so a great candidate for a kids room or a guest room.  Unfortunately vintage beds in anything larger than a full are pretty much unheard of since queen and king sized beds weren’t really around until the 50’s and 60’s.

color blocked bed 3

By the way, have I mentioned that my Limelight hydrangea is absolutely GIGANTIC this year?  Bigger may not be better in this case.  I plan to prune it down a bit this winter to keep it in check!

cheater, cheater, pumpkin eater.

When I was a kid my mom sewed most of my clothes and she whipped up some really cute things.  I can remember going through a pinafore stage in grade school.  I loved those pinafores and my mom made several for me.  They had made a come-back in the 60’s people, so don’t judge.  My mom also made matching halter-tops for me and my bff.  My bff’s mom made some for us too.  We loved matching!

My mom tried to turn me into a seamstress.  When I was in my early 20’s and broke, she helped me sew some wool suits for my office wardrobe.  I still get a little itchy remembering those wool pieces that weren’t lined.  I probably should have tried some less ambitious projects because in the end I just got frustrated with how much work was involved and the ‘sewing thing’ just didn’t take.

Although I have absolutely no interest in sewing clothing, every once in a while I do wish I had the sewing skills and equipment necessary for upholstery work or even just for sewing simple pillow covers or curtains.  Obviously I don’t wish it badly enough to do something about it though.

Instead, I find ways to cheat!

I suspect that the cane chair that I brought home from a garage sale a few weeks ago originally had a loose cushion for the bottom.

cane back chair

It would be preferable to replace it with another cushion because that would give it a softer, more comfortable seat with some give.  But since I can’t sew, I decided to add an upholstered seat similar to those on your typical dining room chair.  I started by having Ken cut a base out of plywood.  He cut a cardboard template to get the size and shape right, and then just used that to cut the plywood.  Then I added a bunch of layers of thick batting and covered it with a feed sack that I picked up at a garage sale (out of the free pile, believe it or not!).  I stapled the feed sack on and voila.

chair seat 3

It’s perhaps not the perfect solution, but it works for me.  I only spent about $6 for this chair.  The chair frame was $3 at a garage sale, the grain sack was $0, the plywood seat base was a little less than $3, the batting and the paint were items I had on hand but of course they would add to the cost if you had to buy those supplies.

chair half

By the way, I painted the rest of the chair using Miss Mustard Seed milk paint in Linen.

chair angle

I got a little chipping, but I’m hoping that over time the chair will wear and get even chippier.

cheater chair

What do you think of my cheater chair?  Not bad for $6, right?

the dresser that refused to be staged.

andrea's dresser title

Normally I don’t do custom work, but if you’ve read my blog for long then you know that I like to break my own rules all the time.  And I’ve broken this one a few times.

A very nice woman named Andrea purchased the spoon carved dresser from me a while back.

Remember that one?

spoon carved title

It was so pretty.  And when Andrea bought it she asked me if I would be willing to paint another one to match.  Ironically, if you read back to the post about that first one I mentioned that I’d custom mixed the color because I ran out of MMS Marzipan and I had to stretch my paint out by adding some other whites.  So I explained to Andrea that I didn’t think I could match the color exactly, and that I don’t often do custom work.  But … all of that being said, I do love painting these spoon carved pieces and I was willing to give it a shot if she was OK with not getting an exact match.

So Andrea kept her eye out for another spoon carved dresser that she liked and when she found one she sent it over to be painted.  Here is how it turned out.

andrea's dresser 1

Although I used what I thought was close to the same mix of Marzipan, Linen and Ironstone, the color on this one is a bit lighter than the other.  Andrea had mentioned that if I couldn’t get the color quite the same, she’d prefer I went lighter rather than darker.

Andrea's dresser side view

I used the same straight up Ironstone to highlight the spoon carving.  It doesn’t stand out quite as much on this piece, I think partially because there isn’t quite as much contrast between the colors but also because the spoon carving details are smaller on this one.

andrea's dresser corner

I really struggled with staging this dresser for photos.  I didn’t necessarily want to cover up the spoon carving that is at the middle back, but I tried putting various objects on the hankie drawers and leaving the middle empty and that just always looked odd.  I tried using a really pretty transferware pitcher and some vintage books.  Nope.  I tried adding a suitcase into the mix.  Nope.  I tried using several ironstone casseroles.  Still, no dice.

So finally I just filled my large ironstone bowl with a floral arrangement and called it good.

floral arrangement

I just used flowers that were available in my yard; some Vanilla Strawberry hydrangea (they are just barely starting to show a hint of pink), some hosta flower stalks, some sedum flower clusters that haven’t opened yet and a sprig or two of variegated ivy.

Andrea picked up her dresser earlier this week and she loved how it turned out.  Phew!  I’m always a little bit relieved when custom jobs go well.

the pirate desk.

Ahoy matey’s, today I have a pirate desk to share with you.

pirate desk before

You are probably wondering what makes it a pirate desk, right?  Well, it had a peg leg when I bought it.  You can’t see it in the ‘before’ photo unfortunately, so you’ll just have to trust me on this one.  See those curvy feet (well, as much as isn’t covered by grass)?  Well, the back right one was missing and the previous owner of the desk just nailed on a chunk of 2 x 4 instead.  That explains why the price on this desk was ridiculously low.  Well, that and the numerous spots where veneer was chipping off, and maybe all of the dings too and that one mismatched drawer pull.  Yep, this baby had a few flaws.

But it was especially unfortunate about the foot because otherwise the back of this desk is finished, meaning it could be floated in a room with the back facing out.  But certainly not with a 2 x 4 foot.

So after I brought this one home I called Ken to come over for consultation (which involves him going out his back door and crossing over though my backyard to my workshop).  He looked seriously skeptical as I stood there saying I was quite confident that he could come up with a fix.  Ken may not have faith in his abilities, but I do!

I told him it didn’t have to be perfect, it just had to blend a little bit.  He hemmed and he hawed, and then he studied the other feet, and then he went home and thought about it for a while.  Then when I came home from work a few days later he had done this.

peg leg repair

Ken, being a bit of a perfectionist, was not entirely happy with it but I thought it was amazing!  I knew once I got it painted you wouldn’t even notice that it was different from the other feet.  It certainly beats a 2 x 4!

I decided to go with Little Billy Goat’s Prizewinner on this desk.  I really love this blue!

pirate desk close up

To deepen the blue a bit, I used Little Billy Goat’s new black wax as a finish.  I had only used the black wax on top of black before, so I wasn’t sure how it would work over a color, but it worked perfectly over the Prizewinner.

Did you notice in the ‘before’ photo that there was one mismatched drawer pull on the lower left hand drawer?  I find it odd that the previous owner chose to put the mismatch on that drawer rather than the upper middle.  Duh.  That fix is a no brainer.  I was able to use all of the original pulls on the side drawers and I just added a coordinating knob from my stash to the middle drawer.

pirate desk hardware

I also added a little Paris, France stencil just to give the desk a little extra personality.

Remember I posted a week or two ago about finding some chairs to use with desks?  Then my sister-in-law brought over this chair.

harp back chair

Seemed like kismet, so I painted it up to match the desk and I added a pretty faux grain sack seat.

pirate desk with chair

But guess what?  It doesn’t quite fit under the desk.  Argh.  However, not all desk chairs have to be tucked in, right?  For example, my own desk chair does not fit under my desk because it has arms.

chair seat

By the way, in case you’re wondering how that replacement foot ended up blending in once painted, check it out.

pirate desk back

Be honest, if I hadn’t told you about it would you have even noticed?  Can you even tell which one it is?

I did go ahead and paint the back because with Ken’s faux foot, I think this desk would be perfectly fine facing out.  This way whomever purchases the desk will have options.

I actually did two different photo shoots.  I started out in the photo cottage, but I wasn’t super happy with any of those photos.

pirate desk

So then I pulled it out into the driveway where I staged it simply with a cream colored vintage typewriter and some Reader’s Digest books.

desk

I picked up the books at a garage sale because the colors were so pretty.  I knew they would come in handy for furniture photos.

books

I almost forgot.  I have one more thing to take care of before this desk is available.  I need to line that middle drawer.  I have to admit though, I’m a little drawn to the graffiti art that I’ll be covering up.

desk drawer

How about you?


all out girly.

I was planning to wait until tomorrow to post this one, but an expected turn of events has my mom coming to town, and then she, my sister, and I will hop in the car and drive to South Dakota for the weekend.  I’ve been told I have to show up at my sister’s place at 5 a.m. tomorrow morning.  Gack!  We’ll be on the road for about 4 hours and quite honestly to a city girl like me it feels like we are out in the middle of nowhere on that drive.  Farm fields as far as the eye can see.  Spotty cell service at best.  So I decided to share this one today instead!

This sweet little vanity was part of a bedroom set that I picked up a while back.

pink vanity before

I thought it had some great potential, but it badly needed an update.

Since a dressing table is definitely a feminine piece of furniture, I decided to go all out girly on this one and paint it pink.  So I pulled out Fusion’s Little Piggy.  In case you are keeping track, so far I have painted a small chair, a dresser and now this vanity and bench all from the one 16.9 oz jar of paint and I still have a little bit left.

pink vanity angle

The Little Piggy is a classy pink, not an obnoxious bubble gum pink.  I popped out some details by highlighting them with Fusion’s Limestone.  I also added a stencil to the front in Limestone as well.  This was the first time I stenciled using Fusion paint and it worked out quite well.  I just made sure that my stencil brush was ‘dry’ by blotting it on a paper towel after dipping it in the paint.

bench

I swapped out the knobs that came with the vanity because they were just sort of blah.  These cream colored knobs from Hobby Lobby work much better with my color scheme.

pink vanity close up

I recovered the bench in some fabric from a beautiful bark cloth curtain panel that I purchased at a garage sale earlier this summer.

pink vanity and bench

I dug out one of my hatboxes for staging …

hat box

Wouldn’t this piece be perfect in a young girl’s room?  Or maybe an older girl’s room too!

pink vanity

If you have the perfect spot for this sweet vanity, be sure to check out my ‘available for local sale’ tab to find out if it’s still available.

Due to my unexpected weekend in South Dakota, I’m not at all sure if I’ll find stuff to post about next week but hopefully I can come up with something.  I hope you’ll stay tuned!

the owl pull dresser.

Do any of you remember the black Eastlake dresser that was in the spot where I now have the Belgian bench?

Dresser with owl pulls

I call it the owl pull dresser because of these fantastic drawer pulls.

owl pull

I painted it many moons ago, before I had a blog.  I wrote a blog post about it back in December 2013 where I shared the unconventional method I used to achieve this finish.  It was one of those situations where a mistake ended up paying off.

Basically after deciding to paint the dresser black, I got out the black spray paint.  In my original blog post I mentioned ‘satin’ spray paint, but thinking back I’m pretty sure it was flat black spray primer.  I spray painted the whole thing and then let it dry for about 30 minutes.  My original plan was to spray prime it black, then paint it with black latex.  However, once it was dry to the touch, I realized that I’d gotten really good coverage with the spray and maybe I could skip a step and not bother with ‘real paint’.  I thought I could wax it to add a bit of sheen to the flat primer and then call it good.

Not a bad plan, or so I thought.

Back in those days I was using Johnson’s paste wax.  Here is how Johnson’s describes their product: “Cleans and polishes floors and furniture, restoring, revitalizing and leaving a shine.”  Specifically take note of the word “cleans”.  The Johnson’s paste wax contains deodorized naptha which is a solvent, otherwise known as white mineral spirits.  I’m no chemist, and I could be totally wrong, but I think that might be the cause of what happened next.

As I started to work the paste wax over the painted surface, the primer started to soften up and combine with the wax.  I was basically wiping it right off with my cloth.  Yikes!

But wait a minute … hey … it looked kind of cool.

owl pull closeup

So I kept going.  I just worked the wax enough to remove some paint until I had a look that I liked.  Then I stopped.  This was a very messy process.  I went through a few rags that had to be tossed and my hands were totally blackened by the end (I know, I should have worn gloves!)  I then left the dresser alone for several hours before going back and buffing with a clean, dry cloth.

Here we are three (or maybe it’s four) years later and it still looks great.  I don’t know if I could recreate this finish in the same way twice though!

owl pull dresser

Did I mention that the mirror glass was missing when I purchased this dresser?  My original plan was to just remove the mirror frame and call it good.  But it is such an amazing frame, right?  It adds a lot of presence to the piece.  So I turned it into a chalkboard instead.

owl pull chalkboard

To stage it up for some fresh photos, I added a huge ironstone bowl (thanks again for that Skip) and my grandmother’s 1909 class photo.

class photo

My grandma, Carrie Moe, is the 2nd from the left in the front row (dark dress).  Sadly there are a couple of scratch marks over her face, and yes, they look intentional.  I don’t know if she scratched over her own face or if one of her siblings did it to annoy her (that sort of behavior might run in the family).  A few of the children are holding Norwegian flags.  My grandma was born in South Dakota but I’m guessing that the area where her family farmed mainly consisted of Norwegian immigrants.  You know, I’ve always assumed this was a class photo but now that I look more closely there are an awful lot of men in the photo (and no women).  That can’t be right.  I wonder what the group really represents.  Do any of you have any ideas?

At this point you might be wondering why I’m blogging about the owl pull dresser again today.  Well, it needs to find a new home now that it has been replaced by the bench.

bench long shot

So just in case any of my local readers needs a gorgeous black dresser, I thought I’d post it here.

For us this dresser was the perfect piece for next to our back door.  I kept hats, scarves and gloves in the upper drawers, and shoes in the lower drawers.  The hankie drawers were perfect for sunglasses and car keys.  It would also be awesome in a dining room filled with table linens and the good china.  It would also be fun to use as a coffee station don’t you think? You could easily put your Keurig between the hankie drawers, there is space to run the electrical cord through under the chalkboard.  Fill the hankie drawers with your K cups.  Perfect!  Of course, one could just use it in a bedroom too.

If interested, please be sure to check the ‘available for local sale’ tab for current information.

the bed bench from belgium.

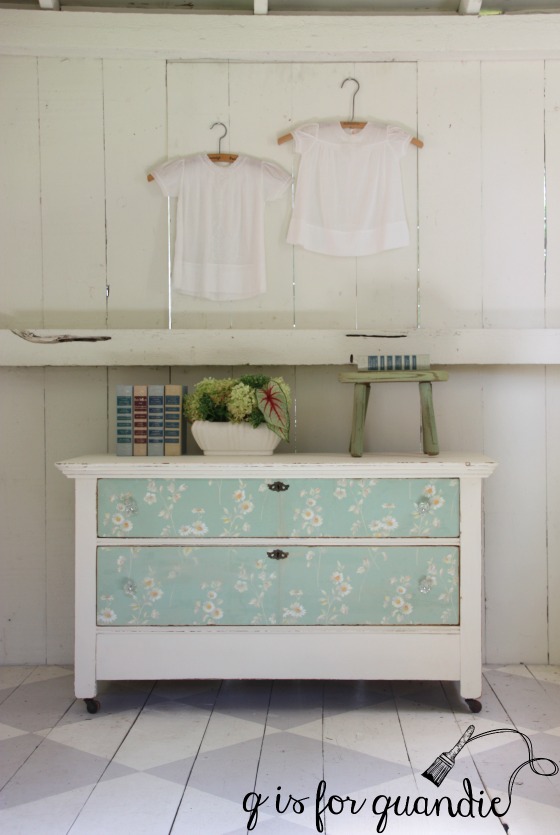
Do you remember the bench that I picked up at a garage sale last May?  Also scouted by my friend Meggan, I might add.

find of the day 2

The sellers said that it was made out of a bed that their parents brought over from Belgium.  Although it was gorgeous ‘as is’, the finish on the bench seat was ruined.  It looked as though someone kept house plants on it, lots of water damage.  I could have opted to strip and re-stain that bench seat, and I might have gone that route if I wasn’t going to keep it.  But I did some measuring and I discovered that it would fit perfectly into the spot just inside my back door.  Which is exactly where we need something to sit on when putting on our shoes.  As much as I love the warm look of a beautiful wood piece in a room with white walls and ceilings, my room has red barn wood walls, dark wood floors and a wood plank ceiling.  That’s a lotta wood, none of which I plan to paint anytime soon.  This bench would be kind of lost among all of that wood.  Also, you might remember that I am on a mission to lighten up that room with white furniture.

So, I decided to paint it.

belgian bench angle

I held my breath the entire time just hoping that I would be doing it justice.

I used my own mix of Miss Mustard Seed whites to create Farmhouse White.  I found the recipe on The Ironstone Nest blog.  It’s equal parts Ironstone, Linen and Grain Sack.  It would have made more sense to just buy Farmhouse White, but I had plenty of the other three colors in my paint stash already so why spend more money?

The only thing I did to prep my piece was to go over it with a damp cloth and some TSP substitute.  I didn’t sand it at all.  I wanted plenty of chippy-ness.  I was willing to take the chance that all of the paint would just chip off, in which case I would have had to start over.  But I also didn’t want to totally eliminate any possibility of chipping altogether, which sometimes happens when I pre-sand.

I also painted a small test patch on the back of the bench before I started.  I wasn’t sure whether or not I would get bleed-thru on this piece and I wanted to know that before I was committed to the white paint.  But it was fine.  I started painting at the top, but when I got down to the bench seat, guess what?  Yep, it was a bleeder after all, but just the seat.  I’m assuming the seat was added when the bed was made into a bench and therefore it had a different finish than the rest of the piece.

After just a couple of swipes of Farmhouse White on the seat, it was obvious that I needed to do something about the bleed-thru.  Out came my secret weapon, Shabby Chic Clear Primer.

clear primer

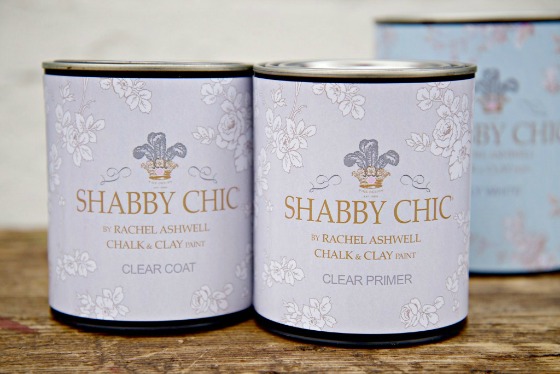
I gave the seat just one coat of the Clear Primer.  Once dry, I painted over it with my homemade Farmhouse White and no bleed-thru.  Problem solved.  However, take note that the seat did not chip like the rest of the piece.  The Clear Primer will give the paint a great surface to stick to, thus eliminating chipping.

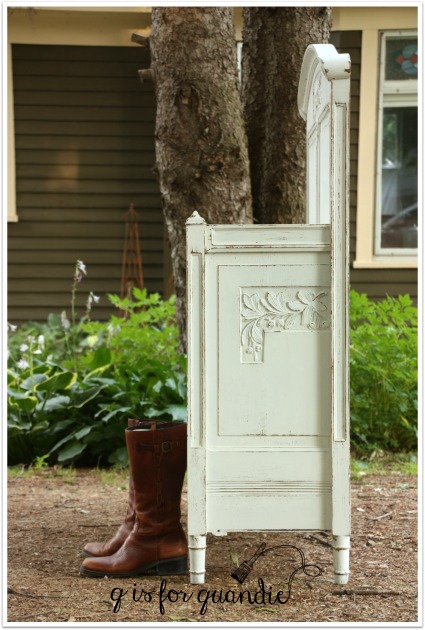
I ended up doing three coats of Farmhouse White on the bench to get good coverage.  I did two coats one day, then came back the next day and added the 3rd.  Normally when you’re going to get chipping on a piece you’ll see the paint lifting before you get to coat number 2 or 3.  With this piece I only saw two little spots of lifting paint.  I was a little bummed at that point, thinking I wasn’t going to get the chippy-ness I wanted.

bench pillow

It wasn’t until I started sanding that this chippy-ness in all of its glory showed up.

bench detail

The sides of this bench have some lovely details, don’t you think?

bench side view

I am so happy with how my bench turned out!

belgian bench title
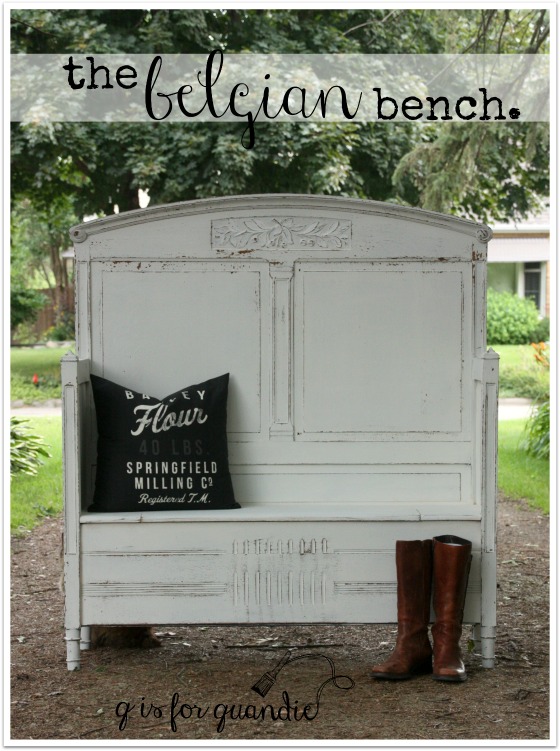
Can you see my little photo bomber in the picture above?  Behind the left side of the bench?

That’s Lucy, my cat.  She absolutely insisted on being included in these photos.

Lucy

I would call her away between shots, and then she would just meander right back over there.

Anyway, this fab bench has found a new home in my dining room.

bench long shot

I think it works beautifully mixed in with all of that dark wood.

bench in room

You may remember that I started a dining room makeover last summer.  Here we are a year later and I still haven’t finished it!  Somehow my own projects always come last.  Here’s what I’ve done so far.

Replaced my black waterfall buffet with a Welsh cupboard full of ironstone …

hutch after 2

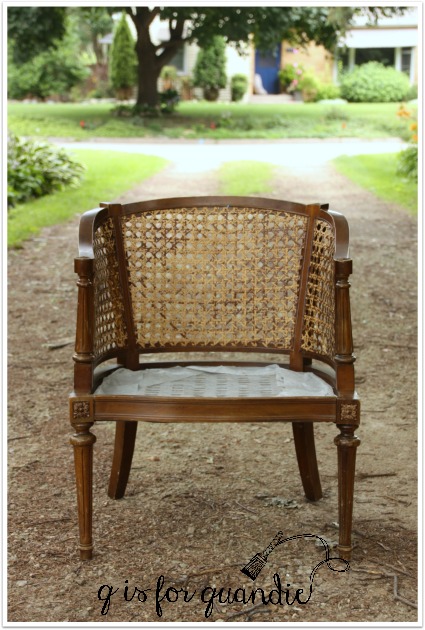
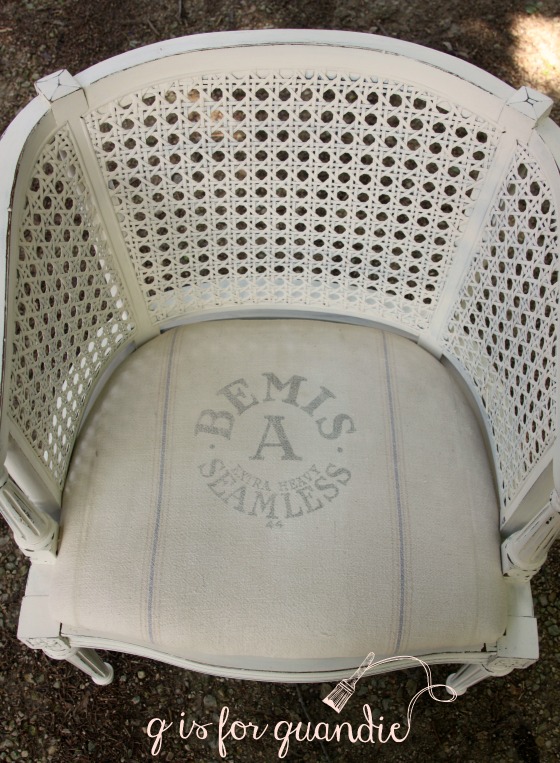
Replaced brown leather Parson’s chairs with painted cane back chairs with feed sack seats …

chair seats

Painted the cedar dining table that Mr. Q made …

dining-table-after

Swapped out some IKEA hanging lights for this …

dining light closeup

And now I have the bench.

Still on the to-do list, strip wallpaper (there is wallpaper behind that bench), replace the window (we’ve theoretically got that in the works) and come up with something fabulous for the giant blank wall.  Hopefully I’ll get the rest of it done before another year comes and goes.  I know I’m not the only one who takes this long with a makeover project though, right?  And I have to say, I think the bench was worth the wait.

a thrift store desk.

My friend Meggan is a master thrifter.  I’m not sure what qualifications are required for that title, but whatever they are, she has ’em.  A while back she texted me from the thrift shop with a heads up on a sweet desk.  It had been marked down and she could tell it had potential.  Luckily Mr. Q was available that day, so I sent him right over to nab it.

old pickup before

Its biggest problem was that it was GRUNGY!  Someone had treated this poor thing like crap.  It was also missing a couple of handles as you can see.  That’s OK, I didn’t love them anyway.  But otherwise it was structurally sound and the drawers open and close as smooth as silk.

Oddly enough, each drawer had 3 holes for hardware …

old pickup 3 holes

… which leads me to believe that the original hardware had been swapped out at some point anyway.

I started by stripping the top of the desk and while that was percolating, I filled two holes on each drawer just leaving the center hole.  To accomplish that I always put a piece of painters tape over the back of the hole so that I don’t loose any filler out the back, then I fill with wood filler.  In this case I used Elmer’s Wood Filler in Mahogany.  I let the first load of fill dry, then went back and topped off each hole.  Once dry again, I sanded to make it smooth.

Remember last Friday when I mentioned that my sister said she preferred stained and poly’ed over rustic and waxed?  Well, she was looking at the Dragonfly dresser and this desk side by side when she said that.

old pickup top

You can’t blame her for preferring this look, it is gorgeous.  This is Dark Walnut gel stain topped with a matte finish wipe on poly.

I seem to paint a lot of desks black.  I’m not sure why that is except that they always turn out so fantastic.  There is just something about pairing black paint with a wood top on a desk that appeals to me.  This time I used Little Billy Goat’s Old Pickup (which is the name of their black).  Here’s a funny side story.  Whenever I try a new brand and/or color of paint, I always go to pinterest first to see if I can find any finished pieces in that brand and color.  So I entered “Little Billy Goat Old Pickup” into the search field on pinterest, and here is what I got.

little billy goat

Bwa ha ha, kinda literal, huh?

What I did not get was any sort of photo of furniture painted in this paint.  I want to change that, so could y’all please pin some of these next few photos for me?

Desk painted in Little Billy Goat's Old Pickup

I want to mention that this is just one coat of paint.  I’ve talked before about how the Little Billy Goat paint goes on thick if you don’t water it down a little.  Sometimes it works great to just leave it thick and get away with one coat.

desk painted in Little Billy Goat's Old Pickup

Next thing I want to mention is that this paint distresses extremely easily.  I just use fine sandpaper for my distressing, but you can also use a damp paper towel which will take the paint right off.  Keeping that in mind, you definitely have to top coat this paint with either wax or a sealer of some kind.

This time around I used a new black wax that Little Billy Goat will be adding to their product line up soon.  I don’t have all of the details about this product yet, so I was just kind of winging it.  I applied lightly with a rag, waited a couple of minutes and then buffed with a clean old sock.  It went on quite easily.  I felt like it didn’t require nearly as much elbow grease as some of the other waxes on the market.

old pickup

  The black wax sort of reminded me of shoe polish in appearance.

black wax

I will warn you though, it does have that chemical-ish smell that I’m not too fond of.  This is one that I would reserve for use in my outdoor workshop, or a well ventilated room.

That being said, I loved the results of the black wax over the black paint.  It gave me a deep, rich black color.

old pickup corner

The level of sheen is contingent upon how much you want to buff it.  I’d say I stopped at a mid-point.  If I had kept buffing I could have gone shinier, but for me this sheen is perfect.  I will definitely continue using this black wax on my future black pieces.

There was no getting out of lining the drawers on this one.  As I mentioned earlier, the previous owner had not taken good care of it.  Which was too bad because some of the drawers were in good shape and the wood bottoms were lovely, but others were a mess.  So I lined all of them.

old pickup lined drawer

old pickup lined drawers

When it came time to put some knobs back on, I checked my stash and I had 4 of these Hobby Lobby knobs that were a perfect fit.

old pickup knobs

Luckily I was able to find 4 more at my local store since I needed 8 of them.

I’m beginning to realize that I should be picking up single chairs when I see them at garage sales so that I have some to pair up with desks.  I don’t have a chair to go with this desk. I used my super chippy farmhouse chair for staging some of the photos, but it’s not quite the right partner for the desk.

old pickup desk 2

Note to self:  buy chairs!

Note to you:  buy desk (that’s not very subliminal is it?)!