all’s well that ends well.

I’m getting a rather late start for this year’s garage sale season.  I usually kick it off the first weekend in May with the Bryn Mawr neighborhood’s Festival of Garage Sales in Minneapolis.  But I wasn’t even thinking about garage sales when my sister and I booked our trip to Disney World, so I missed out on that.

But this past Saturday my sister and I managed to get out to the Linden Hills neighborhood for their sales.  It was a beautiful day, if a bit chilly at first.

I didn’t come home with much though.  Certainly not compared to previous years (2022, 2018, 2015).  Still, I thought I’d share what I found with you guys.

My first buy of the day was a pair of owl bookends.

I’m not sure what material they are made out of, but they are very heavy (as bookends tend to be).

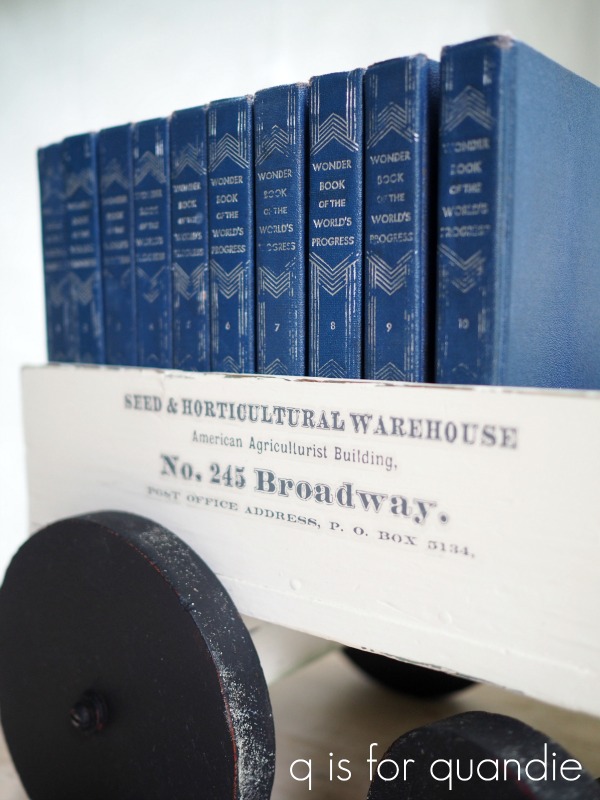
The old books were a good find, and I especially liked the crown on the spine of the one shown above.

I also picked up this little wooden shelf thingie.  I think this one will be fun to reimagine somehow.  You’ll have to wait to see what I can come up with for it.

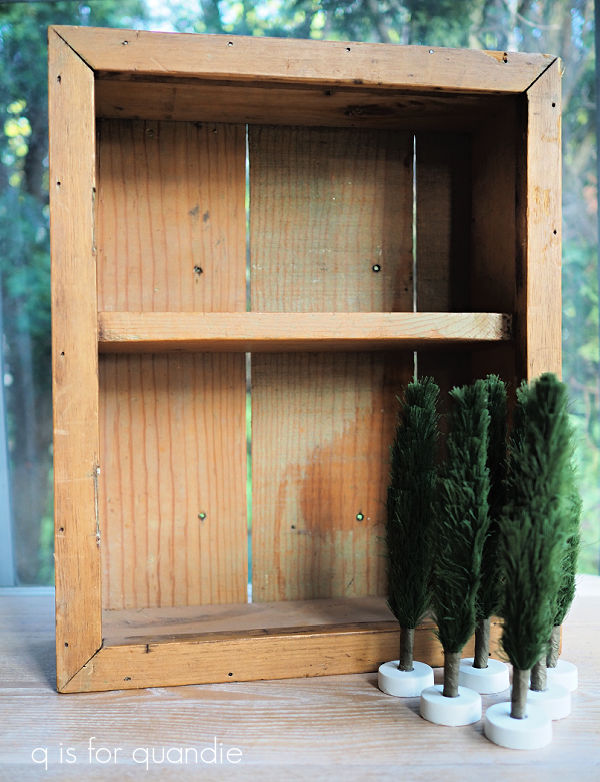
As for those little trees in front, those are the same little Christmas trees that I purchased last year at the same woman’s garage sale (she has a giant box of them).  Once you fluff out the limbs they look like this …

I purchased some last year and put them in vintage flour sifters as holiday décor.  So I grabbed a few more to hang onto until next Christmas.

For some reason I couldn’t resist this vintage lampshade.

Isn’t it fun?  Here’s the other side …

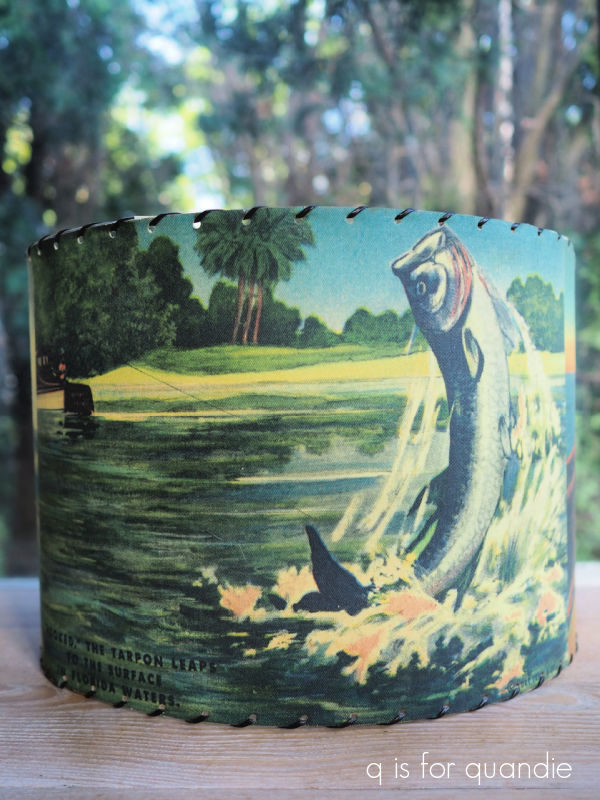
I think it would be perfect for someone’s lake cabin.  I just need to find the right lamp to put it on.

I purchased this small chippy step ladder from a gal who said she bought it at a boutique for ‘lots more’ than she was charging for it because it has such a great patina.

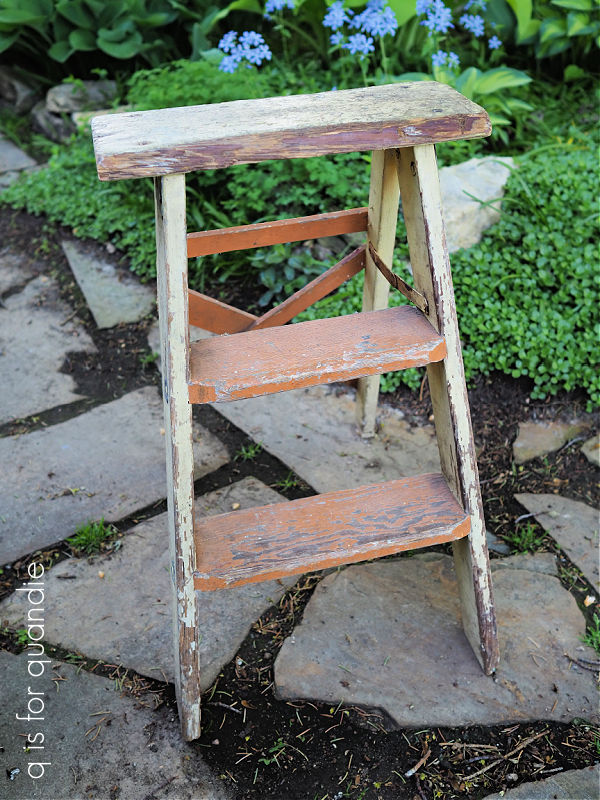
I don’t disagree.  It does have a great patina, but not such a great color scheme.  I’m just not a fan of the orange and pale yellow combo.  I’m planning to give it a new look, while also retaining some of that patina.  Wish me luck on that one.

I did find a few other small things, including some items that I’m gifting to others so I don’t want to spoil the surprise by sharing them here.  But overall, as you can see, I didn’t find much.  In fact, I decided that the find of the day status goes to this …

Homemade macarons!  I love macarons, and these were delicious.

The trend towards neighborhood garage sales only providing an online (and unprintable) map using Google My Maps isn’t working very well for me.  Sure, I can bring it up on my phone, and even get directions to a particular sale from wherever I am.  But a phone is just to darn small to see the entire map, and you can’t put a big ‘X’ through the sales you’ve already been to on your phone.  We end up going in circles, and ending up back at sales we’ve already been too, and eventually having no idea which areas we’ve seen and which we haven’t.  Especially when there are 70+ sales taking place.

So after a fairly frustrating couple of hours trying to make our way around, and not finding much, we called it quits early.  We then went to lunch, followed by a visit to a thrift store where I found some ironstone.

So, all’s well that ends well, right?

Now I’m off to clean out my workshop, pressure wash and seal our deck, and maybe even start painting some things.  But how about you?  Did you find anything amazing at garage sales this past week?  Would the macarons have been your find of the day?  Leave a comment and let me know.

what’s blooming this week?

Good morning from my zone 4b garden!

It feels like we’ve gotten a bit of a late start this year, but then again, I’m pretty sure I say that every year.

As you can see above, most of the hostas are starting to fill in, although there are still a few that are only pointy shoots just coming out of the ground …

While I wait for all of the foliage to fill in, I’m enjoying lots of early spring flowers.

The tulips were still looking great earlier in the week, but they’ve pretty much gone over by now.  I’ll be cutting off the flower stalks this week, but leaving the leaves to store up energy for next year.

I planted Darwin Hybrid Pink Impression tulips, and I specifically chose a Darwin Hybrid because they are more likely to naturalize, ie. they will bloom again next year and even potentially multiply.  Overall though, daffodils, scilla, crocus and muscari are better at naturalizing than tulips.  So we’ll take a wait and see approach with that one.

Speaking of muscari, I added some this year.  Here they are with some lovely Maidenhair Ferns (one of my favorites, I love how delicate they look) behind them, and the pop of a small lime green hosta in front (I wish I knew the name of that one, but I’m not sure which one it is).

Normally I would plant the muscari as a bulb in the fall, but I found these for sale in pots and decided to see if planting them now would work.  The employee at the nursery where I purchased them said it would, but I’m not sure she knew her stuff.  I do hope they come back next year though, because they are lovely in that spot.

It’s interesting to see how much of a difference in bloom times there can be even in a garden as small as mine.  The daffodils that I planted on the east side of the house in a very sunny spot that is rather protected from wind started blooming two weeks ago, while the very same variety planted in a spot with less sun only just opened this week.

This fabulous rich, wine colored dwarf iris is blooming this week too.

It’s hard to tell from that photo, but these are only about 8″ tall.  I love them for that reason, the other bearded iris in my garden often require staking.

Someone gave these to me, so once again I don’t know what variety they are, but they certainly look like ‘African wine‘.

Another favorite of mine that is blooming right now is the Brunnera.  I have some Jack Frost which has the silver veining on the leaves, but I also have some that have solid green leaves.  The thing is, I’m pretty sure I planted all Jack Frost but some have reverted back to solid green.  Do any of you have any experience with that?

Either way, I just love the delicate froth of pale blue flowers that shoot up this time of year.

Speaking of blue flowers, my wild blue phlox is also blooming now.

I purchased this plant at a garage sale, and I didn’t know what it was.  But I posted about it here last year and one of you identified it for me.

It will eventually be overtaken by those hostas, but for now it looks rather sweet.

Now, I know I’ve called a number of the plants in my post today a favorite, and everything can’t be a favorite, but I do love the lilacs too.

They have just come into full bloom, and I think our cool weather this week is making them last (it was 44° when I woke up yesterday).  Even the flowers I cut and put in that watering can have stayed fresh looking for days (and usually I have trouble with preventing lilacs from wilting in a vase).

If you’ve followed me for long, you know that I have struggled for years to create a lilac hedge along our back property line.  In fact, earlier this week I dug out two more spindly, pathetic looking plants and replaced them with new ones.

However, the center of the ‘hedge’ has gotten to at least 8′ tall and is covered in flowers.

Now, if only either end would catch up.  I suspect it will be several years yet before these lilacs provide proper privacy, but I’m feeling optimistic.

That’s about it right now for blooms.  But before I go I thought I’d share my fern glade.

I’m fairly sure these are Ostrich ferns.  I planted them at least 25 years ago or more.  At the time that patch was under pine trees and it was only good for growing weeds.  The pines are all gone now, but the area is still in full shade from nearby trees.  It’s also a low spot in our garden, so it gets very wet in spring.  In other words, perfect for ferns.  These will take over and become almost impossible to eradicate though, so keep that in mind if you decide to plant some.

They are  are presided over by St. Francis.

It’s always amazing how fast these ferns shoot up out of the ground.  They look just gorgeous this time of year.  I wish they would last through to the first freeze, but they usually start dying back to the ground in late August, especially if we have a dry summer, and then start to look quite awful.  Also, in recent years, they’ve been plagued by the Japanese beetles too.  According to the internet, Japanese beetles aren’t attracted to ferns.  But they sure do like mine.

So tell me, what’s blooming in your garden this week?  Are your plants way ahead of mine?  Leave a comment and let me know.


is English green a thing?

I watch a lot of British television.  Mostly garden shows, detective shows like Vera or Father Brown, and the occasional Graham Norton.

One thing that always seems to catch my eye are brick or stone cottages with a vibrant green trim.  I searched high and low online for a photo of the shade of green I picture in my head, but couldn’t find the exact color.  I have this photo that I took at The Beamish back in 2017.

That green isn’t quite as vibrant as others I’ve seen, this next one might be a bit closer.

Hopefully you get the idea.

Last summer I decided to change up my front door color to what I think of as that English Green.  I ended up choosing a color from Behr called Mown Grass.

Then earlier this week I pulled that color back out and painted the obelisk trellis that my handyman Ken made.

You may remember that earlier this spring.  I painted up a Flower Market sign to hang on my back deck.

Well, OK, it was supposed to be spring, but we had that freak snow storm on April 1.

I used a Dixie Belle color called Kudzu on that sign, and I really love it.  At the time I was only thinking about what color would work well on the dark olive green-ish color of our siding.

I never even thought about the pair of Adirondack chairs that would sit in front of it.

It wasn’t until we pulled them out of winter storage this spring that I realized their existing yellow-green color was all wrong with the Kudzu.

I did love that color on the chairs.  It’s Rust-Oleum spray paint in a color called Eden.  It worked beautifully with all of the lime green foliage in my gardens.  But it definitely didn’t work with the sign.

But that’s OK because the chairs needed a paint touch up anyway.  So after giving them a good cleaning with some TSP substitute, I went ahead and painted them with the Mown Grass too.

It’s the perfect garden green.

And this color works much better with my Flower Market sign.

Try to ignore the fact that there is a hole in our deck under the chair on the left.  We’re working on getting that repaired.  It’s on the list with all of the other spring projects.  But I can check off ‘paint the Adirondack chairs’ and that feels good.

How do you like the new color?  And have you ever noticed that shade of English green?  Leave a comment and let me know!

a little bit rusty.

Between my most recent trip to my mom’s and then to Florida, I feel like my painting skills have gotten a bit rusty.  Since coming back I’ve been so busy in the garden that I haven’t even picked up a paint brush … well, except to paint the obelisk trellis in my garden.

But more on that later in the week.

In the meantime, speaking of rusty, I did pull out the Dixie Belle patina paint before my trips to turn some small garden statues into rust.

As you probably know, I just love this stuff.  The Iron paint combined with the green spray creates a perfectly authentic looking rust.

Here’s where my two pieces started out.

The pretty girl on the left is from the thrift store, and St. Francis came from my friend Sue.

Both are made from some sort of plastic or other man-made material, and have faux finishes.

After cleaning them up, I gave them a base coat of spray red primer from Rust-Oleum.  Dixie Belle does make a primer to be used with the patina paint called Prime Start, and they recommend you use that on metal pieces to prevent the patina paint created rust from becoming actual rust.  But I prefer to use a spray primer on pieces like these that have lots of nooks and crannies simply because it is easier.  In addition, neither of these are metal, so technically they don’t require the Prime Start.  However, both of them have a surface that may not hold onto paint well.  So rather than attempting to scuff sand, I just spray primed them.

For the full instructions on using the patina paints, check out my how-to post here.

I painted both pieces with the Iron paint, followed by the green spray.  After a day or two, they still weren’t looking as rusty as I wanted so I sprayed them with water.  That’s not an official technique for using this product, but I have noticed on my outdoor garden pieces that more rust comes out after they get rained on.  Sure enough it did the trick.

Here is how St. Francis turned out …

And here is how the peasant girl turned out …

I’m always rather particular about faces when it comes to statues like these.  Some of the cheaper versions have some fairly awful faces.

But her face is quite sweet I think.

At this point you may be wondering how this rusty patina holds up outside, and if it continues to develop more rust over time.

I’ll start by first noting that the durability of any paint treatment really depends upon what you are painting over, and in addition whether or not you applied it correctly.

But here are some examples of my rusty pieces that have been outside for a while.

I painted both of those last summer, and they both sat outside all winter.

Sometimes, in fact, even literally buried in snow.

They get some pine sap drips on them from the tree overhead, but otherwise they look really good.  I didn’t blog about the bench specifically, but I did share the two matching chairs and small table with all of the details here.

But how about items that have been outside for more than one year?

You may remember that I rusted up a pair of planters back in the summer of 2019.

These are made out of that molded plastic composite stuff, I don’t know exactly what that material is made out of.  But they are lightweight, not iron, not metal, not concrete, but some kind of man-made material.

These have been outside since they were painted, including winters.

So they are going on four years and are holding up fairly well, except for the very bottom where they often sit in snow.

When I purchased these pots, they were dark brown.  So actually, it’s the original paint that has failed down to the white material underneath it here, not the patina paint.  I plan to touch these up with some more patina paint, and that will be quite easy to do.

Also, you may notice that the pot looks a bit rustier now than it did when I first finished it (first photo with purple flowers).  So yes, these items will get rustier over time when outside in the elements.

I think my advice would be to take these items in for winter (if you live in a climate like mine in Minnesota) if you want them to last for many years.  However, if you only paid $30 for the pair at a garage sale, and you don’t mind having to touch up the patina paint down the road here and there, I say enjoy them outside in the winter!

Tell me what you think of my garden statues, was the rust an improvement?  Leave a comment and let me know.

the festival topiaries.

As promised, today’s ‘Sunday mornings in the garden’ post is brought to you from Disney World’s Epcot.

Normally when my sister and I go to Disney, we like to go in the fall.  The weather is perfect in late October to early November, and the crowds aren’t super awful then either. But this year we decided to go for my sister’s birthday, which happened to be during Epcot’s Flower and Garden Festival.

The mouseforless.com says that “more than 500,000 plants, trees, and shrubs are planted for the festival; 250,000 of those are annual blossoms installed for the festival.”

In other words, it’s a massive amount of plants and tons of color.

I really thought I’d be able to share all of my photos in one blog post, but as I’m working on it I realize that it’s far too much for just one so I’m going to break it down into a couple of different posts.

There are around 25 themed gardens featured for the festival ranging from the Bouquet Garden in the France pavilion to the Shishi-odoshi Garden in the Japan pavilion (and I’ll share more on those in my next post).  There are also a butterfly house, food booths featuring plant based and/or themed food and drink, and a Garden Rocks concert series.  We saw Kool & the Gang and that was super fun.

In addition, there are over 100 topiaries.

But they aren’t what I think of as legit topiaries.  When I say ‘legit topiary’ I am thinking of living shrubs that have been strategically pruned to form a shape.  In my mind, these are the kinds of topiary that Disney was originally known for having in their parks, like these examples in front of It’s a Small World in Disneyland.

Large shrub topiaries can take up to 10 years to create though, so I can understand that they aren’t very practical if you need over one hundred of them.

They had a Topiary Heritage Garden in the United Kingdom Pavilion where they had placards explaining the different types of topiary being used in Epcot, with examples of each.

Standard Form topiary are created by training a woody plant to a long, single stem topped with a round head of foliage.  I think the double globes of foliage below also count as standards, but don’t quote me on that.

The spirals fall into the category of Free Form topiary.

They did have an example of a shrub topiary in the Topiary Heritage Garden, but there were a couple of gardeners trimming it up while we were there so I didn’t snap a photo of it.

Almost all of the topiary at the Food & Garden Festival are what is called Sphagnum Topiary though.  They are created using heavy steel frames that are then fitted with sphagnum moss and fast growing vining plants.  They also will use dried plant material to create details like faces or clothing items.

For example, I’m betting that Miss Piggy’s lavender gloves and shoes, as well as her face, legs and arms are made out of dried plant material.

I’m sorry, I just can’t help but feel like that’s cheating.  How much of these are even real growing plants?

However, although these topiaries feel rather ‘fake’ to me, they are pretty cute.

And this is Disney after all, their goal is to create magical illusions, right?

And I do rather love the ‘fluffy’ ears on Lady …

But tell me, what do you think?  Are you a fan of the sphagnum moss topiaries, or do you find them a little too ‘fake’ looking?  Leave a comment and let me know.

chairs, tulips and daffodils.

Phew!  My trip to Disney World really took it out of me.  My sister and I were there for 8 days, and we walked more than 20,000 steps almost every day.  It was really fun, but also really exhausting.  I’m still recovering.

I made a bit of a tactical error in that I didn’t have a completed project lined up to blog about upon my return.  So I’ve spent the last few days wondering just how in the heck I was going to come up with something, and where I was going to find the energy to quickly get it done.

Then I remembered this pair of little wooden chairs that I’ve been meaning to sell.

My friend/picker, Sue, found these for me back in the fall of 2018.  I’ve had them hanging on the wall in our bedroom since then.  But I’m ready for a change so I thought I’d move them on.

I was initially thinking about painting them in chippy milk paint, but the wood had a rather nice patina.  So rather than paint them, I decided to simply add some Classic Vintage Labels transfers to the backs.

I gave both of them a garden theme.

They are a bit wobbly, so I wouldn’t necessarily want a small child to sit in them.  But they’d be perfect for holding a potted plant, like this little pot of muscari.

I staged them out in the garden, mainly because I wanted to show off my daffodils.

And my tulips.

But that being said, these little chairs wouldn’t hold up for more than one or two seasons if you left them outside unprotected.

They would be awesome on a protected porch though, or maybe in a sun room.  Or really anywhere inside.

In that last photo, you may have noticed that my scilla (all of that stuff that looks like grass in the garden behind the chairs) are pretty much done blooming.  They have been followed up by the daffodils and tulips.  I planted a few new ones last year (for more details on that, go back to this post), so I thought I’d share how they did and exactly what they are in case any of you want to get some this year.

This first daffodil is Narcissus Double Delnashaugh.  It’s a late blooming double, and the white and apricot flowers are fairly long lasting.

If you’re not a fan of the typical yellow of most daffodils, this is a great alternative.

I also planted Narcissus Double Cheerfulness.

The flowers on this one are about half the size of the first one and not nearly as showy, but they really are rather sweet I think.

I managed to save a couple of patches of tulips from the deer by surrounding them with chicken wire.

If you use the green chicken wire, it’s not nearly as noticeable when it’s in place as the silver stuff so it’s not a horrible eye sore.

Also, I just loosely circled each patch and that seems to do the trick even though a deer could easily pop his head over it to eat the tulips.  My neighbor nnK gave me that tip.

I’ve been removing the chicken wire during the day so I can enjoy the tulips without it though.

These are Darwin Hybrid Pink Impression tulips.  And just to put quantity in perspective for you, I planted 100 of them and that gave me a patch this size …

I purchased these tulips, and both of the daffodil varieties from Longfield Gardens.  I also purchased three different varieties of allium from them last year, so I’ll keep you posted when those start blooming.

In addition, I planted some cheap tulip bulbs from my local Menards, but those were the ones that the deer got to before I could cover them.  So they look like this …

So it’s pretty much impossible for me to compare the quality of the cheap tulips with the more expensive tulips from Longfield.

But back to those chairs, what do you think?

Do you like them this way, or would you have painted them?  Leave a comment and let me know.

my all-time favorite.

 For today’s ‘re-run’ I decided to share all many of the pieces I’ve done using one of my all-time favorite transfers called Seeds.

I’ve never actually added up how many times I used this transfer, I’ll try to do that with this post, but I’m not sure I’ll find all of them.

Unfortunately, this design is now retired and after a quick search online I was unable to find it for sale anywhere.  If any of you are retailers and have these available, be sure to leave a comment below with your details so people could buy them (or so I could buy them).

This transfer came in two different sizes and two colors, black or white.  And I’ve used them all, so let’s take a look shall we?

My first ever use of this transfer on a piece of furniture was the Blue Alligator dresser.

I had custom mixed the milk paint color for that piece using three different colors and two different brands of milk paint.  It’s equal parts Homestead House Loyalist, Homestead House Upper Canada Green and Miss Mustard Seed Kitchen Scale.

I loved the resulting color, and I named it Blue Alligator.

This was early days for furniture transfers (although smaller rub on transfers have been around for decades) and since then they have cleaned up the look of that hazy halo that a lot of people complained about.

But it never bothered me.  I was so thrilled to find a product for adding detailed typography to furniture that wasn’t incredibly painstaking and time consuming (hand-painting).

That was back in April 2017, and I used the smaller version of the transfer on a metal stool that month as well.

Or a portion of it anyway.

I used the upper half of that smaller transfer on a little wooden stool a couple of months later.

The next larger piece that I used the Seeds transfer on was this dresser in July 2017.

 I mixed up a custom milk paint color for this one too, mainly to use up a few partial packets of paint I had on hand.  I started by mixing equal parts Miss Mustard Seed’s Eulalie’s Sky and Shutter Gray.  The resulting color was just a bit too blue for me, so I then added another equal part MMS Grain Sack to both lighten it up and add a little more grey.  I loved the subtle pale blue gray color that I ended up with.

In autumn of 2017 I added the Seeds transfer to yet another dresser, this time over Fusion’s Limestone.

In January 2018 I used the smaller version of the transfer again, this time on a washstand that was painted in Miss Mustard Seed’s Linen milk paint.

I advise using caution when applying a transfer over chippy paint as the transfer can pull off the paint, rather than adhering to your piece.  You may want to add a clear coat over your milk paint first, then add the transfer to avoid that problem.

The next piece that received a Seeds transfer was this linen press dresser painted in Dixie Belle’s Drop Cloth.

That piece was a bit of work since I initially painted it in milk paint that then proceeded to almost completely chip off.  I had to sand it down and start over with Dixie Belle chalk style paint.  But in the end it was awesome.

Next up came the garden beds.

It’s not often that I find a matching pair of twin beds, so I was thrilled to find this duo at a garage sale.

I added the smaller version of the transfer to the back of this chair in July 2018 …

and also to this little wooden stool in the same month.

While I was at it, I also used some remnants from a large Seeds transfer on this wooden tote.

Let’s see, are you keeping track?  What am I up to?  An even dozen pieces so far.  Let’s keep going.

I used another small sized transfer on a mirror frame that I turned into a chalkboard in September 2018.

and also on this washstand in October of that year.

That one is also painted in Dixie Belle’s Drop Cloth.

I also had some fun using pieces of the smaller version of the transfer on this pull toy.

I still can’t believe I paid less than $1 for that horse and cart at a garage sale.

I also applied bits of the smaller one to this vintage refrigerator box.

The following January I used the larger version again, this time on one of the bed benches that my handyman Ken created from an old headboard/foot board combo.

That bench is painted in Fusion’s Bedford.

In summer of that year I used the smaller versions on yet another washstand that was painted in Drop Cloth.

I also used the smaller version on the back of a wooden folding chair in July 2020.

It wasn’t until January 2021 that I used the larger version on a big piece of furniture again.  I think that’s because I was hoarding my last couple of these transfers knowing that I’d eventually not be able to find more.

That armoire was perfect for it though.

It remains one of my all-time favorite pieces.

I used another of my carefully guarded stash of Seeds transfers on this dry sink last summer.

Wasn’t it just perfect for that piece?

As I mentioned in the blog post about that one, I don’t necessarily recommend hoarding a stash of transfers like I have done.  They do tend to dry out a little over time, and then they become harder to apply.  Not impossible necessarily, but certainly more difficult.

But when they keep retiring your favorites, there doesn’t seem to be any other option.

Sadly, that dry sink received the last of my large sized Seeds transfers.  However, I did have a few scraps that were left over from pieces where the entire transfer didn’t fit.  I used one of them on the wooden box I painted for my potting shed last fall.

Then one of my lovely readers was kind enough to send me one of the smaller ones, and it made its way onto this little cupboard.

In the end I had one small white Seeds transfer left.  But to be honest, I never liked the white version.  The first time I used it was on a wooden box that I painted up as a gift for my sister in April 2018.

Yep, not spectacular.

I wouldn’t have purchased a second one, but when I ordered a black one from a retailer online she sent me a white one instead.  When I contacted her about the mix up, she admitted that she didn’t actually have a black one, so ultimately I just kept it.

I finally used part of it last fall on this toolbox.

It worked out well on that piece, I think because it was just a small dose.

I also tried to use the remainder of that one on this case …

I applied it over the I.O.D. Rose Chintz paint inlay, and that was a bit of a fail.  I ended up sanding that down and painting over it.

Although I did keep the little “New York” bit on the side.

OK, so I think I counted 26 pieces with some portion of the Seeds transfer on them.  Yep, I’d say this one was definitely a favorite of mine.

How about you?  Did you use the Seeds transfer on anything?  Or do you have another favorite that you used over and over?  Leave a comment and let me know.

this furniture is permanized.

I thought I would try something a little different while off on vacation this week, re-runs!

Hey, it works on T.V., so I thought maybe it could work here.

I’ve picked out a couple of different furniture makeovers from the past to share with you guys this week.  I tried to go a ways back so it wouldn’t feel too repetitive for those of you who follow me on a regular basis.

I refurbished these mid-mod pieces back in 2018.  Wow, can you believe that was five years ago now?  Time flies, doesn’t it?

Here is how they looked when I brought them home …

I purchased these two along with a 3rd matching dresser that I painted up separately, and forgot to get a ‘before’ photo of.

I thought it was funny that the manufacturer said these pieces were ‘permanized’.

I once again tried googling “Kroehler permanized furniture” to see if I could find any info on it, but that mostly took me to my own blog post about these two pieces.  So I still have no idea exactly what that means.

After scuff sanding and cleaning, I painted this pair in Fusion’s Ash.

This dark gray works beautifully with the mid-mod style.  I don’t typically use Fusion anymore, these days I would swap that out for Dixie Belle’s Gravel Road.  That’s simply because I find that a chalk style paint is more error proof than an acrylic paint.  It adheres to a dicey surface better, it distresses more easily, and if you water it down a tad you don’t have to worry about brush strokes.  On the other hand, chalk paint does require a separate top coat while the acrylic paints do not.  It’s a trade off.

I painted the inside of the bookcase portion of the headboard in Fusion’s Mustard.

I love that pop of mustard yellow next to the gray, and it’s so easy to find bedding to coordinate with that combo.

In addition to the paint, I also refreshed the hardware using some of Prima Marketing’s art alchemy Metallique wax in Bronze Age.

The bronze was gorgeous next to the dark gray.

Although I painted these two pieces to match, if I remember correctly they didn’t sell together.  I believe the dresser sold right away and it took a while to sell that headboard.

As for the 3rd piece from this set, I went in a different direction with that one.  I painted it in Fusion’s Park Bench.

I definitely went through a phase where I painted at least half a dozen mid-mod pieces in this gorgeous green.  They all sold super fast too, so it was definitely popular.

I lined the drawers on this one with some paper I’d found that was perfect to pair with the Park Bench.

 I wanted to retain the original light gold on the drawer pulls for this piece, so I just washed those with soapy water and put them back on.  But the little round knobs were a much darker brass color than the pulls.  To get a better match, I again used the Metallique wax, but this time in a color called White Gold.

This trio was not actually the first time I followed this formula.  The previous February I’d painted another pair of mid-mod pieces in the same colors.

When I went back and read the original blog post, I was reminded that this pair had sat on Craigslist unsold for weeks before I purchased them and they were very reasonably priced.  Five years ago you could still get mid-mod pieces like this pretty easily.  I feel like that no longer seems to be the case, do you find that as well?

This time the tall dresser was painted in Dixie Belle’s Gravel Road.

And the credenza style dresser was painted in Park Bench.

You can check out all of the details on those makeovers here and here.

So tell me, which color appeals to you the most, the dark gray (whether it’s Fusion’s Ash or Dixie Belle’s Gravel Road) or that fabulous Park Bench green?  And what do you think of the mid-mod style, do you think it will continue to be popular for another five years or even longer?

Leave a comment and let me know.

the first flowers.

Before I headed off to visit my mom a couple of weeks ago, I mentioned that I hoped my scilla wouldn’t bloom while I was gone.

I needn’t have worried, because it held out and I enjoyed it for the full week and half between that trip and leaving for Florida yesterday.

These are always the first flowers of the season in my garden.  Scilla siberica, or squill, is a bulb that blooms in late winter to early spring.  In my zone 4b garden they usually bloom anywhere from the middle to the end of April and I’m always so excited to see them after a long, cold winter.

I have two colors of scilla in my garden, white and blue.  The white ones were already in the garden when we purchased our house 30 years ago.

As you can see, up close they have a little bit of a blue streak to them.  From a distance they mainly look white though.

I prefer the blue ones, so I planted some of those myself a few years back.

They are such a gorgeous, vibrant shade of blue.

Scilla is perfect for naturalizing, ie. it will spread over time filling in the space where it’s planted.

  Some consider it to be invasive, so keep that in mind.  If you decide to plant it, be sure to put it somewhere that you won’t mind having lots of it.

Over time, mine has crept out into the lawn in some spots.

It also pops up randomly, rather far away from where it was originally planted.  I’m not at all sure how it does that.

The brilliant thing about scilla is that after it blooms it dies completely back to the ground.  In the garden, it starts dying back as the perennials around it start to fill in, so it’s perfect.  And in the lawn, by the end of May you won’t even know it was there.

Another huge plus to scilla is that it’s deer and squirrel resistant.

Speaking of which, I have decided to give up on tulips.  You’ll remember that I planted a bunch of new ones last fall, and here’s what I found out in the garden the other morning.

Not only have the deer munched them right down to the ground, they’ve literally pulled two of the bulbs right out of the dirt.  Argh!

I know I could do things to thwart the deer, like spray smelly deer repellant on the garden after every rain or enclose the tulips in chicken wire, but neither of those solutions are appealing to me.  I’d just as soon forgo the tulips and plant other bulbs that the deer won’t eat, like daffodils, alliums or more scilla.

How about you?  Do you have scilla in your garden?  Or are you able to grow tulips without deer eating them all for breakfast?  Leave a comment and let me know.


goodbye snow, hello flowers.

You may remember this tote from a recent thrift store haul.

I always feel a little bit bad about painting over someone else’s hand-painted item, but that snow covered pine cone branch had to go.

As I was working on this post last Saturday morning, it was lightly snowing off and on outside, so I thought maybe if I symbolically removed those snowy pine cones it would also bring about a change in our weather.  Wishful thinking?

Either way, I’m about done with snow both on the ground outside, and on this tote.

I sanded the hand-painted bits down so that they wouldn’t show through my new paint job, then I painted the outside of the tote in Dixie Belle’s Drop Cloth and the interior in their Holy Guacamole.

I love pairing this avocado green with the Floral Anthology transfer from I.O.D. that has a similar shades of green in it.

That’s the backside of the tote, which I left word free.

For the front, I added some wording from the I.O.D. Label Ephemera transfer.

I wrapped the florals around both sides as well.

Now the tote is pretty from all four sides.

Speaking of being done with snow, I’m heading off to Florida with my sister on Saturday.  We’re spending another week at our favorite Disney resort, Port Orleans – French Quarter.  This time we’ll be at Epcot for the Flower & Garden Festival, so I’m betting I’ll have a Sunday morning garden post for you when I return.

But in the meantime, due to my back to back trips, I’m a little short on projects to share here.  However, I do have a couple of flashback posts scheduled for next week to keep you entertained while I’m gone so I hope you enjoy them!