vanilla mint vanity.

Remember the gorgeous set of furniture I picked up last year?  The dresser and bed were intended for a custom client who had been looking for just the right pieces for a while.

2014 early summer blog

The pieces came as part of a set that also included a vanity and the seller didn’t want to break them up so I purchased all three.  The vanity has been waiting patiently out in the carriage house for a makeover ever since and I finally got to it last weekend.

Here is the winter-y ‘before’.

vanity before

The vanity was in worse shape than the other two pieces.  If you look closely, you can see that the lowest round part of the leg on the far right of the photo was broken off.  There were actually 4 of these round sections broken off of the various feet.  Ken helped me glue them back on.  In addition, the veneer inside the knee hole was badly damaged on one side.  The drawer fronts also had quite a bit of veneer damage.  In other words, this piece was an excellent candidate for a paint job.

I took my inspiration for the color scheme from this beautiful nightstand that was painted by Dana at circadee.

circadee nightstand

Isn’t it gorgeous?  It’s painted in MMS milk paint in two of the new European colors, Layla’s Mint and Marzipan.  Fortunately, I had just stocked up on those two colors up at the Round Barn.

Here is my finished result.

vanity title

My Layla’s Mint looks a little more green than the inspiration piece, but I still love how it turned out.  I highlighted the details on the piece in Marzipan, which is sort of an almond color.

vanity mirror closeup

I got a lot of great chipping too.

vanity close up

MMS Layla's Mint and Marzipan

The hardware that came with this piece is lovely.  I debated adding some rub n’ buff in gold like Dana did on her nightstand, but in the end I just cleaned mine up and waxed them with the MMS furniture wax.  I took a side by side pic so you could see the difference a little clear wax makes.

vanity hardware

I always love keeping original hardware whenever possible.  It just works so much better than the new stuff.  Let me take a moment to tell you about escutcheon pins.  Are you familiar?  They are the little bitty nails that hold a drawer pull like this one in place and keep it from spinning around.  You can see the little hole for the escutcheon pin on this one at that little point just below that center detail.  See it?  Often times these pins are missing on old furniture.  You can then usually see damage around the drawer pull made by the pull spinning around.  You can see that on this dresser I brought home last winter.

riverside dresser before

See those circle shaped groves around the hardware?  People will try to tighten the screw to keep the pull from spinning, but really you need to just replace the pin.

But, back to our vanity.

Vanity painted in MMS Layla's Mint and Marzipan

I love the shape of the mirror on this one.  Very unique and lovely.

Vanity mirror

Wouldn’t this piece be absolutely lovely in your dressing room?  Not lucky enough to have a dressing room?  Then perhaps in your guest room, or maybe your daughter’s room?  This one is for sale.  Ooops, sorry  you missed it, this one is sold.

I’ll leave you with one last ‘before and after’.

2014 early summer blog1

pencil it in.

First, a big thanks to all who left a comment yesterday.  I wasn’t able to respond to everyone, but I’ve read all the comments and everyone’s name will go in the hat to potentially win the big Fusion grand prize!

Mr. Q delivered the herb toolbox to his mom yesterday and she was thrilled with it!  It even brought a tear to her eye, so sweet!  They met up at the senior facility where his grandparents live.  Yes, you read that right, both of my m-i-l’s parents are still with us at the age of 98 (they are the same age).  Apparently there were quite a few ladies there admiring the toolbox!

Next, I want to take just a moment to plug my Carriage House sale.  OMG – it is only one month away!  I admit, I feel a little panicky when I put that in writing!  The Carriage House itself is currently full of unpainted pieces of furniture.  I have stuff scattered everywhere!  I haven’t even begun to clear things out in anticipation of setting up for the sale.

carriage house dress form

But, the show will go on!  Luckily I have my sister here now to help me!

This is just a quick post to remind all of you locals to pencil it in on your calendars.

Where:  The Carriage House (stay tuned as the sale date gets closer for more details)

When:  Thursday, June 11 from 5 pm to 7 pm and Friday, June 12 from 9 am to 2 pm

a portable herb garden and a Fusion giveaway.

Happy Monday!  I hope you have your coffee in hand, this is going to be a long one!  So kick back and enjoy.

fbh portable herb garden

You all know that the people from Fusion offered me some free paint a while back to try out.  They also invited me to join their blogger group.  I am beyond flattered to be included in this group of really talented and creative people.  Today I’m participating in a blog hop with the rest of the group, and as a bonus for you, there is a giveaway component!  So, first I’ll share my Fusion project, but stay tuned at the end for all of the details on the giveaway and links to visit the other bloggers who are participating with Fusion projects of their own today.

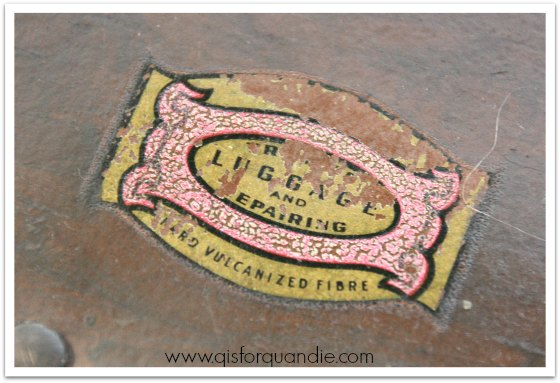
At the same garage sale where I found my hard vulcanized fibre case, I also picked up a rusty old Craftsman tool box.

fbh before

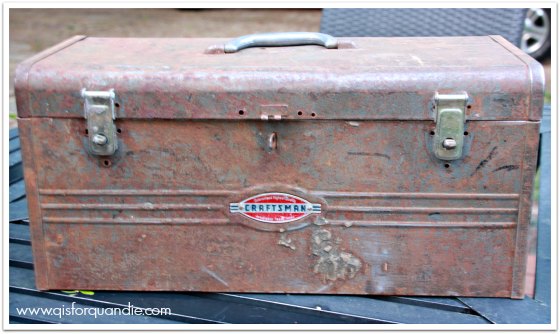
Personally, I’m not opposed to rust.  I would have considered leaving this guy all rusty except for two things.  First, it’s going to be a gift for my mother-in-law, and I don’t think she has the same appreciation for rust that I do.  Second, someone wrote the price on top with a Sharpie at the garage sale.

fbh price

Yep, it was $2.

This is a good sized toolbox, and I decided it would make a fabulous portable herb garden for my m-i-l for mother’s day.

To prep the toolbox for paint, I sanded it quite a bit.  I wanted to remove a fair amount of the rust because I didn’t want a lot of it to bleed through the paint.  I’m sure that a proper paint job would involve somehow removing the rust entirely with some nasty chemicals or something, but that’s not the way I roll.  I just sanded until it felt pretty smooth, and then I wiped it down with a damp rag.  I taped off the handle, the latches and the Craftsman logo.  Then I added two coats of Fusion’s Laurentien.  Since you could still see the “$2” through the paint at that point, I added another two coats just over that writing, blending at the edges.  That did the trick.  I distressed the toolbox thoroughly.  Even though I didn’t leave it rusty, I still wanted it to look old.

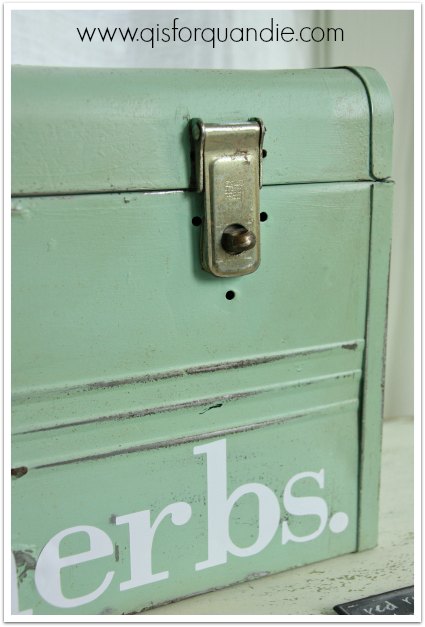
Next I dug out my trusty Cricut machine and some white vinyl and added a title to my toolbox.

fbh herbs

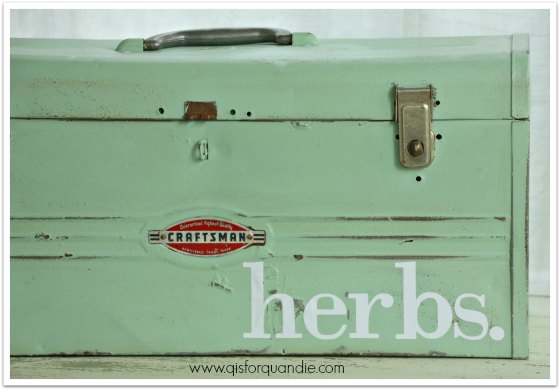
A couple of years ago I used my Cricut and some vinyl to add my house numbers to my mailbox and they have held up beautifully outside in the elements.  So I’m hoping that this ‘herbs.’ holds up as well.  If not, it’s not the end of the world, the letters can just be peeled off again.

fbh closeup 2

With Fusion paint, you do not need a top coat, even if your piece will be going outside.  However, if you distress it down to bare wood or metal, like I have here, you should add some protection with wax or a top coat of some kind though.  In addition, you can add wax to help you achieve a more aged look, and that is what I decided to do with my toolbox.  I added a coat of Fusion’s beeswax first, and then strategically added some Cece Caldwell aging cream (a dark wax) to add a little more dimension.  Having that base coat of beeswax helps the dark wax be a little more ‘workable’.  You can blend it and move it around a little.

Never let it be said that I do things in the proper order.  I know it drives my handyman Ken a little nuts when I paint something, and then say “now, could you just fix this little piece?”.  He would prefer to do repairs before I paint, although I keep telling him that it’s OK if he dings up the paint, I want it to look distressed!  Anyway, I next flipped the box over and used my very manly large drill bit to make drainage holes in the bottom.

fbh holes

Plants do not do well without drainage.  Ooops, you can also see that I only painted the bottom with one coat.  Shhhh.  Don’t tell, no one will ever know.

As I mentioned this is a fairly good sized toolbox, and it’s already kind of heavy on its own.  For that reason, I didn’t want to fill it up entirely with dirt, so I used a little trick.  I filled the bottom with some empty cans and plastic bottles to take up some space.  This is a great trick to use if you have a large planter.

fbh filler

Once it gets filled in with dirt, no one ever knows!

fbh dirt scoop

One the dirt was in, the next step was to fill this baby up with herbs.  I found a great selection at my local Bachman’s.  I just love the Minnesota shaped tags on these.

fbh herb tag

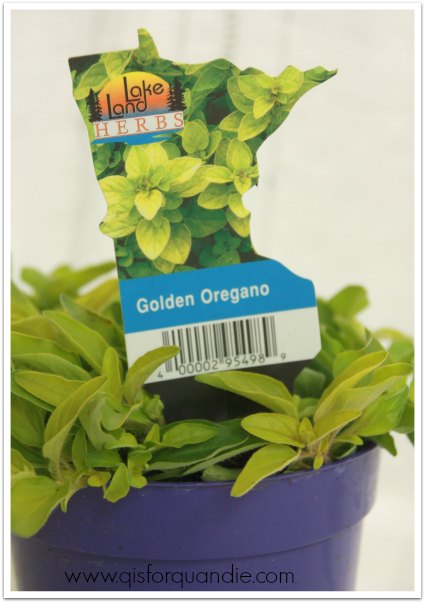
I ended up with the golden oregano, chives, thyme, rosemary, tri-color sage and a purple basil.  My m-i-l loves to cook with fresh herbs, so I know she’ll get use out of all of these.

I planted them and then labeled them all with the same chalkboard picks I used for my administrative professional’s day flowers.

fbh closeup2

I tucked some vintage plates in the dirt too, just to add some interest until the plants fill in.

fbh plates

I know my m-i-l will love this little herb garden.  She often uses fresh herbs in her cooking and in salads.  If the plants fill in and get too crowded, she can always move some of them into her garden.

OK, now for the fun stuff.  You guys are eligible for some free stuff from Fusion now too!

fusion giveaway

There are two ways to enter!
1. Visit Fusion Mineral Paint here, and then leave me a comment telling me which one of their products you want to try the most and you’re in!
2. For a 2nd entry, follow Fusion Mineral Paint on Instagram here, and then comment again with your Instagram name letting me know that you have done so (or just leave the comment if you already follow Fusion on Instagram).
I will be randomly drawing a name from all of the comments I receive and that name will be provided to Fusion for a chance to win the grand prize.  Fusion will determine the final winner.  Each of the participating bloggers will be providing a name as well.  I’ll be keeping my fingers crossed that my winner will be the ultimate winner!
Visit-more-Fusion-Mineral-Paint-Projects.11-PM
Hint, hint:  You can also enter the contest at each of these other blogs giving you a whole bunch of chances to win!
This giveaway is good worldwide. You must be over the age of 18 to win. Void where prohibited. Winner will be deemed by random draw. Winner must enter with valid email and reply within 3 days of winning email sent to you. This giveaway ends Monday, May 18th, at midnight EST. Winner will be announced in this blog post by May 20th.
If you don’t want to wait to win and just want to get started on your own Fusion project today, the closest place to buy Fusion for my local readers is Farmhouse Inspired in Hudson.  Jody at Farmhouse has offered a discount of 10% on Fusion paint for my followers!  So, stop in and mention q is for quandie to get the discount!  Thanks Jody!
The rest of you can find your nearest Fusion retailer here.
Best of luck to you!  I hope you win!
5/19/15 update:  I used a random number generator to pick Miranda V. to submit to the final drawing for the Fusion prize.  I’ll be keeping my fingers crossed that she wins!
Final update!  The winner is Lucy Auburn, whose name was actually drawn by two of the bloggers participating.  Congrats Lucy!

french enamel dresser.

This dresser was another craigslist find spotted by nnK.  I really didn’t need to add to my stash of furniture to paint, but the look of this one really appealed to me.

blue sea before

Unfortunately, I once again forgot to get a ‘before’ picture of my own, so I am borrowing the picture the seller used in his craigslist ad (I hope he doesn’t mind).  This one wasn’t in terribly bad shape except for those drips of stain under the key holes.

I knew I wanted to strip the top, and I also wanted to keep the original drawer pulls.  That meant I needed to find a color that would work well with the wood tone, and with the brass pulls.  I also definitely wanted to go with milk paint on this one, it was calling out for a chippy finish to play up its age.  I also thought two layers of color would add to the whole effect.  So I dug out my stash of MMS milk paint to see what I had.

I started with a base coat of Shutter Gray.  If you’ve never used this color, I think its name can be a bit misleading.  If you are expecting a grey (especially after seeing the little color dot on the package), you might be surprised how blue it is.  I sanded the entire dresser by hand before I started painting (I also stripped the top first, always do this first, it’s a drippy process).  The finish was very dry, and since I wanted to get some chipping I didn’t do too much sanding.  I wiped the dresser down and then painted on a coat of the Shutter Gray.  Then I went and started some laundry.  When I came back to the dresser, I knew right away I was in trouble.  There was A LOT of chipping.  I went over it lightly with sanding block to knock off the loose paint, and this is what I ended up with.

blue sea chipping

Kind of a cool look, but not what I wanted.  Don’t panic if this happens to you, this can be easy to fix.  I just sanded it down much more thoroughly and added another coat of the Shutter Gray.  The second coat had much less chipping.  Here is how the same side of the dresser looks in the end after a 3rd coat of paint using my final color, French Enamel.

blue side

I did not use the bonding agent.  Just the extra sanding I did helped the paint adhere better.  I prefer doing this to using the bonding agent because you still get some chipping, just not an excessive amount.

Once the second coat of my base color, Shutter Gray, was dry, I used canning wax on the edges and around the key holes.  The idea was to get a resist there with my next color so the Shutter Gray would show through.  I followed up with just one coat of French Enamel.  The results were a little more subtle than I was hoping for.  Next time I’ll know to be more generous with the wax, or perhaps I’ll try Vaseline.

blue close up

I’d never used French Enamel before, although I’ve had this bag in my stash for ages.  Up until now I’d always passed it over in favor of some other color.  That was a mistake.  Now that I’ve actually used it, I know what I have been missing.  It’s gorgeous, a much more saturated blue than I was expecting.  I have to say, I had a really hard time capturing the true color in my photos.  I tried three different times of day to get the lighting just right.  I even tried setting a custom white balance on my camera, but I still got a million different variations of the color in my photos.  I really think this is a color that you just have to try for yourself and see in person.

french enamel dresser 2

I’m glad I kept the original hardware.  It has some great patina.

blue hardware

I staged it with flowers that were white and chartreuse.  Yes, those roses really are a pale green rather than white

blue staging

french enamel dresser 3

Does anyone need a vintage farmhouse dresser?  This one is for sale for $225.  Ooops, sorry you missed it, this one is sold.

the folding furniture with the permanent look.

A week or two ago one of my neighboring towns, White Bear Lake, hosted a Trash to Treasure Saturday.  They encouraged home owners to put anything they wanted to give away at the curb with a ‘free’ sign on it.  Then people were invited to drive around and load it up!

Well, you didn’t have to ask me and my friend Sue twice!  We were on it.  And we brought home a nice little haul of free stuff.

the freebies

This is what I got; two faux bamboo folding chairs with cane back seats, a gutted sewing machine table, a gutted radio cabinet with no legs, a tacky metal french flower bucket and a pair of vintage yellow Samsonites.  Total cash outlay = $0.

I’ve already given makeovers to the chairs.  But first, here is where we picked them up.

yellow chairs

Not terribly promising from a distance.  We almost drove right on by.  But the chairs caught my eye.  I grabbed two of them and was leaving the other two.  One was totally trashed and the other had some damage to the cane.  In the end Sue grabbed that one though, planning to do something about the cane.  I think it goes without saying that we passed on the old TV, plastic high chair and bad patio cushion.

Once I got the chairs home, the biggest task was removing the seriously tacky yellow vinyl from the seats.

yellow chair before

I’ve never seen so many staples!  I still have the blister I got pulling all of those out.  Next came a paint job.  I’ll admit I began with a brush and some Fusion paint, but in the end I threw in the towel and brought out the spray paint.  It was just too putzy to paint all of those spindles with a brush.

As for the seats, I cut some drop cloth fabric to fit and then painted on a faux grain sack stripe.

chair seat

This was made much easier by my newest find, super skinny tape!  I’d been looking for such a thing for a while and I finally found it at Menards (a local DIY store).

skinny tape

It’s made by Painter’s Mate and is .23″ wide.  Perfect for a faux grain sack stripe!

Aren’t these chairs a great combo of faux bamboo and cane?

chair back

And yes, you read that right earlier, these are folding chairs.  Stakmore, “the folding furniture with the permanent look.”

stakmore

folding chairs

I think they turned out smashing.  You could use them at a small dining table for two, at a desk, or even just keep them on hand as extra seating at parties.

chairs

They really aren’t trashy anymore!

I am selling these for $30 each if anyone is interested.

thrifty lunch.

I spent my lunch hour checking out the local thrift shops again a while back,  and I hit the vintage camera jackpot.

thrift store cameras

Crazy, right?  I found four of them!  Which is funny, because I just said that I needed some more to fill in my black cabinet on the porch.

front porch hutch display

I knew that if I kept my eyes peeled I would find some!  I didn’t expect it to be this quickly, or to find 4 at once.

thrift store camera 1

I tucked all of them into my cabinet.

thrift store camera cabinet

I just need a few more to fill in.

thrift store camera 2

And in addition to the cameras, I also picked up this awesome pair of vintage glasses.

thrift store glasses

I’ve often thought it would be fun to have some vintage eyeglasses for staging furniture photos.  Especially desks or nightstands.  So I splurged and purchased these for $10.

I just love a thrifty lunch, don’t you?

bryn mawr, 2015.

Every spring I really look forward to the neighborhood garage sale season.  It kicks off with Bryn Mawr, one of my favorite neighborhoods in Minneapolis.  This last Saturday dawned bright and sunny.  It was gorgeous, which sounds like a good thing.  But what that actually meant was that Bryn Mawr was mobbed.  Everyone was out enjoying the fab weather.

I was out there with them and I brought home some goodies.

bryn mawr

The best find of the day was the aqua phone.  Isn’t it awesome?  And it cost me a quarter!

aqua phone

I loved the patina on this copper planter.

planter

I’ve decided to add some more vintage books to my photo prop stash and I found some great ones in my colors.

bryn mawr books

Are you sensing a theme here?  I had more than one person comment on how pretty the colors were in my cart.

I’m not sure what I’m going to do with these folding chairs, but they fit in with my color story.

bryn mawr chairs

I may try to recover the seats with some pretty vintage fabric.

I also found a couple of awesome metal boxes.  The red one is perfect as is.

toolbox collage

And its rusty companion has already gotten a paint job using Fusion’s Laurentien.

aqua toolbox

I didn’t get photos of all of my buys.  I also brought home a gorgeous sisal rug in perfect condition for $20, and a really cool wrought iron window box.  The home owner who sold it to me said she pulled it off her 1940’s bungalow when they replaced the siding and decided not to put it back up.

So now I’ve gotten my feet wet and I’m sure the spring garage sale season is only going to get better from here!

going green.

I mentioned that I bought a little matching table at the same estate sale as the Lily Pond dresser.  I’m not a fan of using ‘matching’ furniture pieces, so often when I buy pieces that came from a ‘set’, I split them up.

green before

I’m still going green, but this time with Miss Mustard Seed instead of Fusion.

green books

There are lots of shades of green out there.  Avocado, mint, grass, pea, pear, forest, moss, the lily pond I used on the dresser …

I have to say, some times with the MMS milk paint greens, I feel like there are a lot of shades in the same bag of paint!  One of the quirks of milk paint is that you can never be entirely sure precisely what shade you will get.  You really need to be OK with that if you’re going to use it.  I knew that going in when I decided to paint my little estate sale table in Boxwood.

I’ve used Boxwood before, and loved it.  But this time it just wasn’t working for me.

boxwood

Now don’t get me wrong, I don’t think it’s bad.  It’s just not quite what I was going for.  I got some great chipping, which I loved, but the color just felt a little flat to me.  A little too 80’s country maybe?  Maybe the problem was the orange finish showing through the chips.  I don’t know, but something about it wasn’t speaking my language.

So I came home from work one night and decided to add a layer of Luckett’s green over the Boxwood.

green chippy 2

Ahhhh, so much better.  I love the little peeks of Boxwood showing through.

green chippy close up

I tucked some toile scrapbook paper inside the drawer.

green drawer interior

Is it possible to not love this color? or the chippyness of milk paint?

green table in Lucketts

Or maybe it’s just simply the layering of colors that appeals to me so much.

chippy green table

It works great next to a chippy chair.  Wouldn’t this be a great combo in your potting shed?  Or maybe on a covered porch?

And on a more personal note, today is my sister’s birthday.  Happy Birthday Deb!

Debbie

Are you digging that mid-century bookcase?  Debbie was this size when mid-century was just called ‘new’.

Last night my mom flew from Las Vegas to New Jersey to help her celebrate, and then to keep her company on the drive to Minnesota.  They will be hitting the road bright and early tomorrow morning, and my sister will be an official Minnesotan by Sunday!  Woo hoo!  How lucky am I?

hard vulcanized fibre.

One of the handy things about having a day job office that is located in a mostly residential area is that I can pop into garage sales on my lunch hour (one of the not so handy things is a limited choice for lunches).  I stopped at one the other day and didn’t find much, except I did get this interesting case.

brown case before

I was at a loss as to what it was for, and what it was made out of.  It didn’t quite feel like metal, but it definitely wasn’t leather.  I had a sort of cardboard-ish vibe, but felt much stronger.

Despite not knowing what it was made out of, I decided to paint it.  I wasn’t digging the brown.  And even though I wasn’t sure how it would work out, I went ahead and got out the milk paint.  Guess what?  It stuck just fine.  Two coats of MMS milk paint in Typewriter, a finish coat of hemp oil and a stencil left me with this.

black case

The case came with a really cool key that still works.

key

It wasn’t until I was editing the photos that I took for this post that I realized the label on the top said it all.

black case label

Hard vulcanized fibre.  Ever heard of it?  Here is what wikipedia has to say about it.

Vulcanized fibre is a laminated plastic composed of only cellulose. The material is a tough, resilient, hornlike material that is lighter than aluminum, tougher than leather, and stiffer than most thermoplastics.

So there you go!  If you were wondering whether or not milk paint would stick to hard vulcanized fibre, well, wonder no more!  It does.

black case after

big blue.

As part of my ongoing attempt to clear out a back log of furniture in my carriage house, last weekend I painted this guy.

big blue title

I don’t even have a ‘before’ shot of this one, I was so anxious to just get it done.  I sent Mr. Q out to pick it up last fall.  From the picture on craigslist, I thought it had more of a mid-century vibe.  I was going to paint the body white, and then do an ombre effect on the drawers.  However, when I saw it in person it wasn’t at all what I expected.  It is big, and sort of ‘heavy’ looking.

Honestly, I was so uninspired by this piece in person that I was just going to turn around and re-post it on craigslist as is.  However, the finish was in such bad shape I simply couldn’t do it.  I decided it would be better to just give it a quick chalk paint makeover with some Annie Sloan in Aubusson.  I then realized that I needed to go with a wood top to balance out all of that blue, so I stripped the top.  Unfortunately, that only made it more obvious that someone had used the top of the dresser as an ashtray.  Jeesh.  Have you ever seen that?  Burns about the length of half a cigarette all the way around the perimeter of the top.  Clearly someone had rested their lit cigarettes on the edge of the dresser and left them to burn there.  Why do people treat furniture with such disrespect?

I tried bleaching the burn spots, then sanding them down, then bleaching again, then sanding again.  They lightened up a little, but were still pretty apparent.  So in the end I decided to try and cover them with General Finishes Java gel stain.  I think it did a decent job of covering the marks.

big blue top

If you look closely you can see that the Java gel went on darker in the areas around the edges where I sanded heavily.  But this is such a great improvement over how it looked before that I am happy to call it good.

big blue closeup

By the way, in case you are wondering, I topped the Aubusson with some of my custom mixed dark wax.  I’ve mentioned this before, but for those of you who missed that, I mix 1 part dark brown Briwax with 4 to 5 parts cheap Johnson’s Paste Wax to create my own dark wax.  The Briwax on its own is very dark, but mixed with the Johnson’s it is just the right color.  I would never use it indoors, because it’s quite smelly.  It’s also probably bad for the environment and one’s health.  But when it’s nice enough to work outside, I sometimes pull it out because I really like the end result I get with it, and let’s face it, it’s cheap.  I bought the Briwax for $1 at a garage sale, and the Johnsons is about $6 per can.

I’ll be the first to admit that this piece isn’t my usual style, but I like to think that I saved this dresser from an uncertain future.

big blue angle

And now it is done, and hopefully will go to a good home and I can move on to some of the pieces I have waiting that are more ‘me’.

I was continuing my British theme from last week’s Union Jack desk while staging the photos of this dresser.  I used some London map paper on the wall and my Perfect English Farmhouse book.

big blue staging

And on the other side, look kids, Big Ben!

big ben

So, do any of you need a big blue dresser?  Ooops, sorry you missed it, this one is sold.