You might think that you’re about to read a blog post about some fun and creative project. But no, I’m actually going to tell you about my window repair which wasn’t much fun but we did have to get a little creative in the end.
Remember way back to the summer of 2015 when I told you that I was making over my dining room? Yeah, it’s still not quite done. It’s almost done, but not quite. One of the big hold ups was the windows.
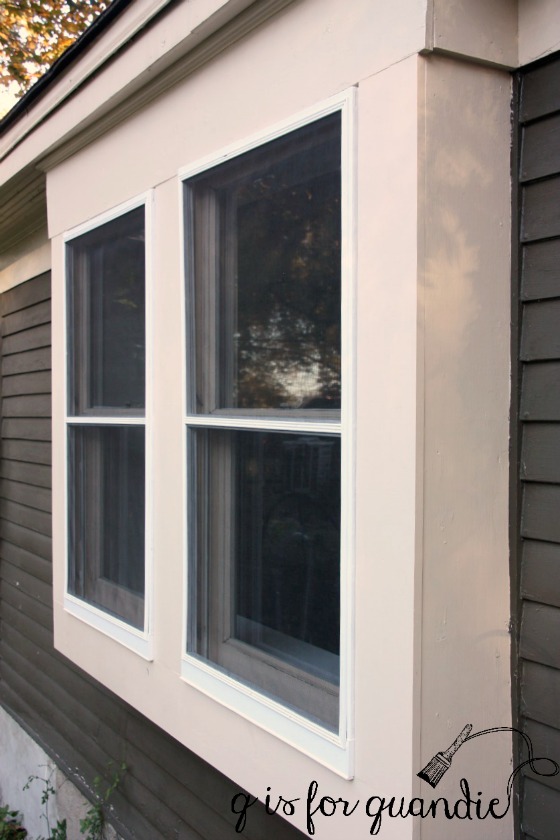
As a reminder here is how they looked before …

They don’t look so bad in this photo, but if you look closer you can see that trim needs new paint and the window on the right doesn’t have a screen.
I’ve mentioned before that my dining room was an addition built by the previous owner of my home. The windows are a bit wonky. They are sort of just cobbled into place and aren’t centered between the two 6″ x 6″ posts that are on either side. Over time the storm/screen combos and the outside trim boards had started to rot. Then this spring a bird decided that pecking away at those soft spots was a super fun hobby. He pecked huge holes in a couple of the trim boards (sorry, I didn’t get a photo of that). In addition that right side storm/screen had completely fallen apart. At that point we knew we had to stop procrastinating and deal with the problem. Plus re-doing these windows entirely, centering them and maybe even eliminating that big trim piece down the center would be a nice improvement so why not just get ‘er done.
In early summer we ‘hired’ (it was just a verbal agreement) a handyman who’d done some work for us before to replace the windows. He had a busy summer though and thus forgot all about our small window job. About mid-August I started to panic when I realized he wasn’t going to get to us and we needed another solution. So we called Renewal by Andersen.
Now before I go further, full disclosure, Mr. Q worked for Andersen Corp. for almost 30 years. We have been fully brainwashed to believe they are the best windows on the planet. They also aren’t cheap. We expected that. However, when the quote to replace two windows came in at over $6,400 dollars I believe I snorted coffee out through my nose.
Let’s see … new windows or a trip to Belgium next year? Which is it going to be? That’s a no-brainer, right?
We could have kept shopping around for a cheaper solution, but any way you cut it, replacing custom sized windows and re-building the cobbled together framing was not going to be cheap.
If you’ve read my blog for very long, I’m wondering if you can already guess who came to our rescue. Ken! Of course! With his Ken-do attitude.
Since the windows themselves were still fully functional, it was really just the trim and screens that needed work. Ken got busy and re-built screens to fit our windows. He used parts of the existing screen framing and added new pieces where necessary. Then he replaced the rotted exterior trim with new boards and I painted them to match the existing trim.
Of course, the repairs that Ken did aren’t going to improve our r-value like new Andersen windows would have (although he did add some new insulation to the surrounding framing). But I did the math, I estimated that it would have taken well over 30 years to save enough money on our heating bill to pay for those $6,400 windows!
In the Q household a trip to Belgium trumps high quality windows every time and unfortunately we can’t afford both. When Mr. Q and I are sitting in the old folks home reflecting back on our life are we going to regret not spending money on quality windows? Or are we going to remember how much we enjoyed that trip?
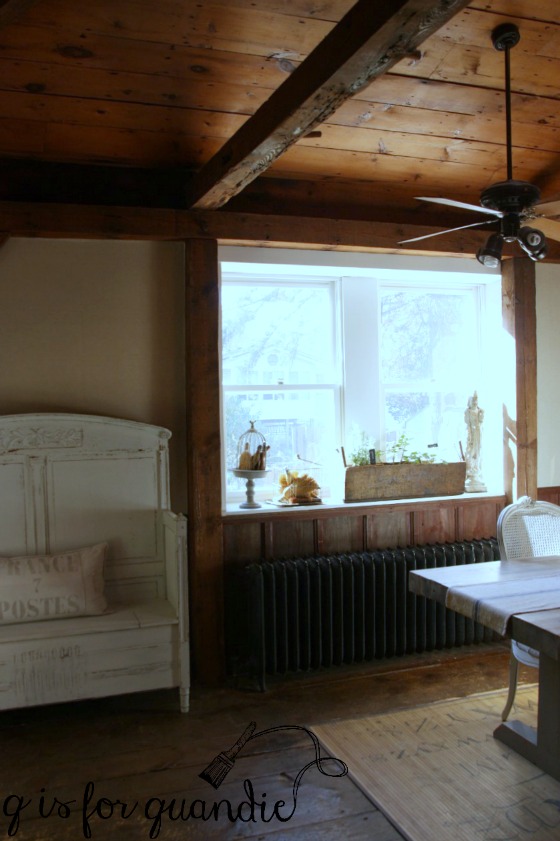
Once the repair work was done, I could focus on the last step, paint. If you check back to that ‘before’ photo above, the inside trim was painted in a gold-ish color. As part of my campaign to make my dining room seem lighter, I repainted the trim white.

And by the way, I used one of Fusion’s new colors called Raw Silk (the same color I used on the pumpkin I posted on Monday). This is the first time I’ve used Fusion paint on trim work. It occurred to me that it was the perfect product for the job. Once cured it should be waterproof.
You see, I’m planning a little winter window garden for this spot so ‘waterproof’ would be a good thing. I found this amazing giant wood tool box at a sale this summer.

I stenciled it with a french garden stencil and I’ve added some re-potted white geraniums and some lavender plants that I want to over-winter.

Whether or not these plants will do well over the winter is yet to be seen, but I figured it was worth a shot. This window faces south and gets great light.
Although I put everything in the window for my photos, I then took it all back out again. I want to give the Fusion paint that chance to cure before adding heavy items. I’ll put everything back in a couple of weeks. But just to give you an idea of how it will look …
What’s left in the dining room? Stripping wallpaper on either side of the window (yep, that’s wallpaper on those walls), painting those white, and then coming up with something amazing for the opposite wall. I’m still working on that plan. It may take another year, we’ll see.
But in the meantime, which would you pick? Fancy new windows or a trip to Belgium? Who’s with me on that one?