my travel gallery.

Everybody loves a good gallery wall, right?

I like the mixed media type walls, with items other than just framed stuff.  Like a giant letter or maybe some ceramic antlers.  But for my own gallery walls I just went with my own travel photos and a related wall quote.

travel gallery quote

My upstairs hallway was the perfect location, but it is fairly narrow so I couldn’t add anything that would stick out too far.  Encountering ceramic antlers in the middle of the night could be quite dangerous in this spot.

travel gallery

The door on the right leads to Mr. Q’s study, the door on the left is the master bedroom … and behind door no. 5?  The guest room.  Why is the door numbered?  I numbered all of my doors on a whim one time.  The upstairs doors still have their numbers.  And can I just take a moment to say, I love my doors.  Super heavy, original six panel doors.  Over time I have switched out most of the knobs to black or white vintage enamel.

Anyway, when I decided to do this, I began by stockpiling black frames at garage sales.  They are easy to find, and usually pretty cheap.  I still have more black frames on hand and hope to get more pictures soon to add to my gallery.  You could also find basic black frames at Goodwill on the cheap.

travel gallery doors wallI suppose I could have done something fancy, like lay all of the frames out on newspaper first and arrange and re-arrange until I was happy with the layout and then use the newspaper to line up the nail holes on the wall.  But no, that would be way too much work for me.  Instead I just started in the center and worked my way out.  Not perfect, but I’m happy with the outcome.

All of the pics were taken by your’s truly.  I love, love, love travel photography.  Did I mention, I love it?  Thank goodness Mr. Q is up for wandering around a foreign city without a goal in mind other than finding fab things to photograph.  As long as we occasionally stop for coffee, he is game.  Mr. Q and I put a lot of miles on our feet when we travel and we know from experience that getting lost is the best way to see a new city.

2014 summer blog12

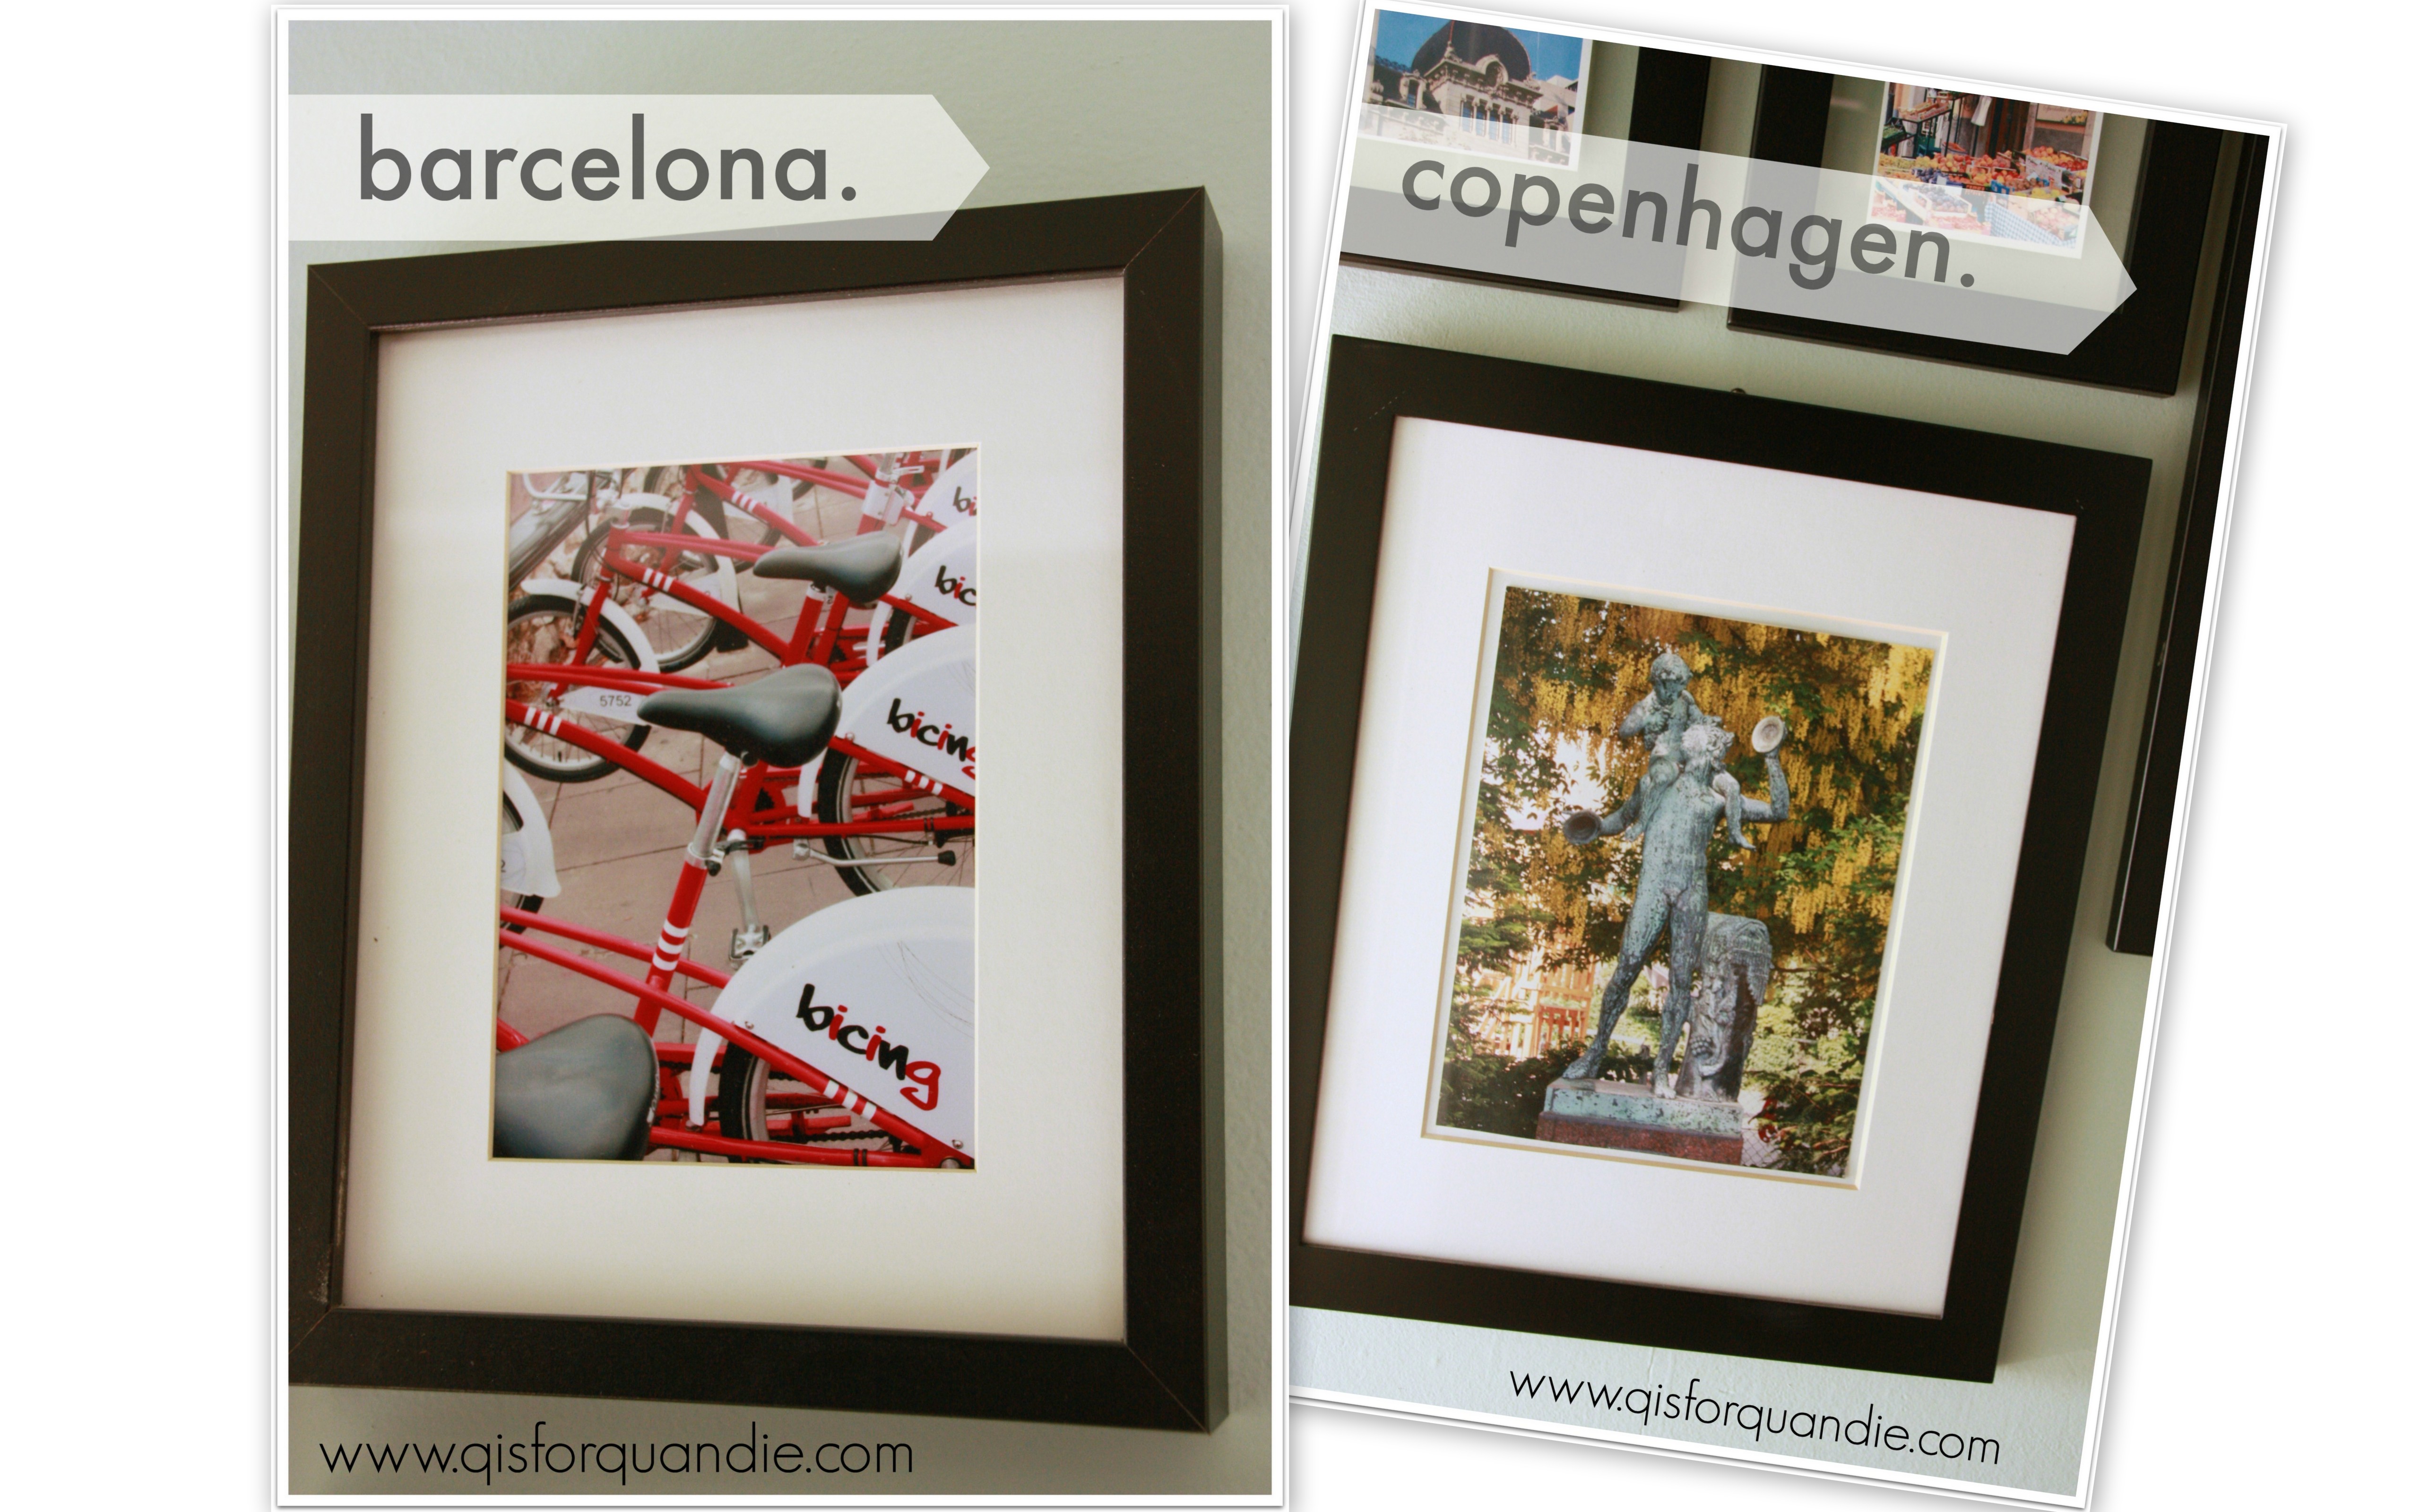
 Both Barcelona and Copenhagen are fantastic cities to get lost in.  We were in Copenhagen in springtime and these fabulous trees with hanging yellow blossoms were everywhere.  I don’t know what they are, but they were amazing and they looked gorgeous behind this verdigrised statue.

travel gallery doors
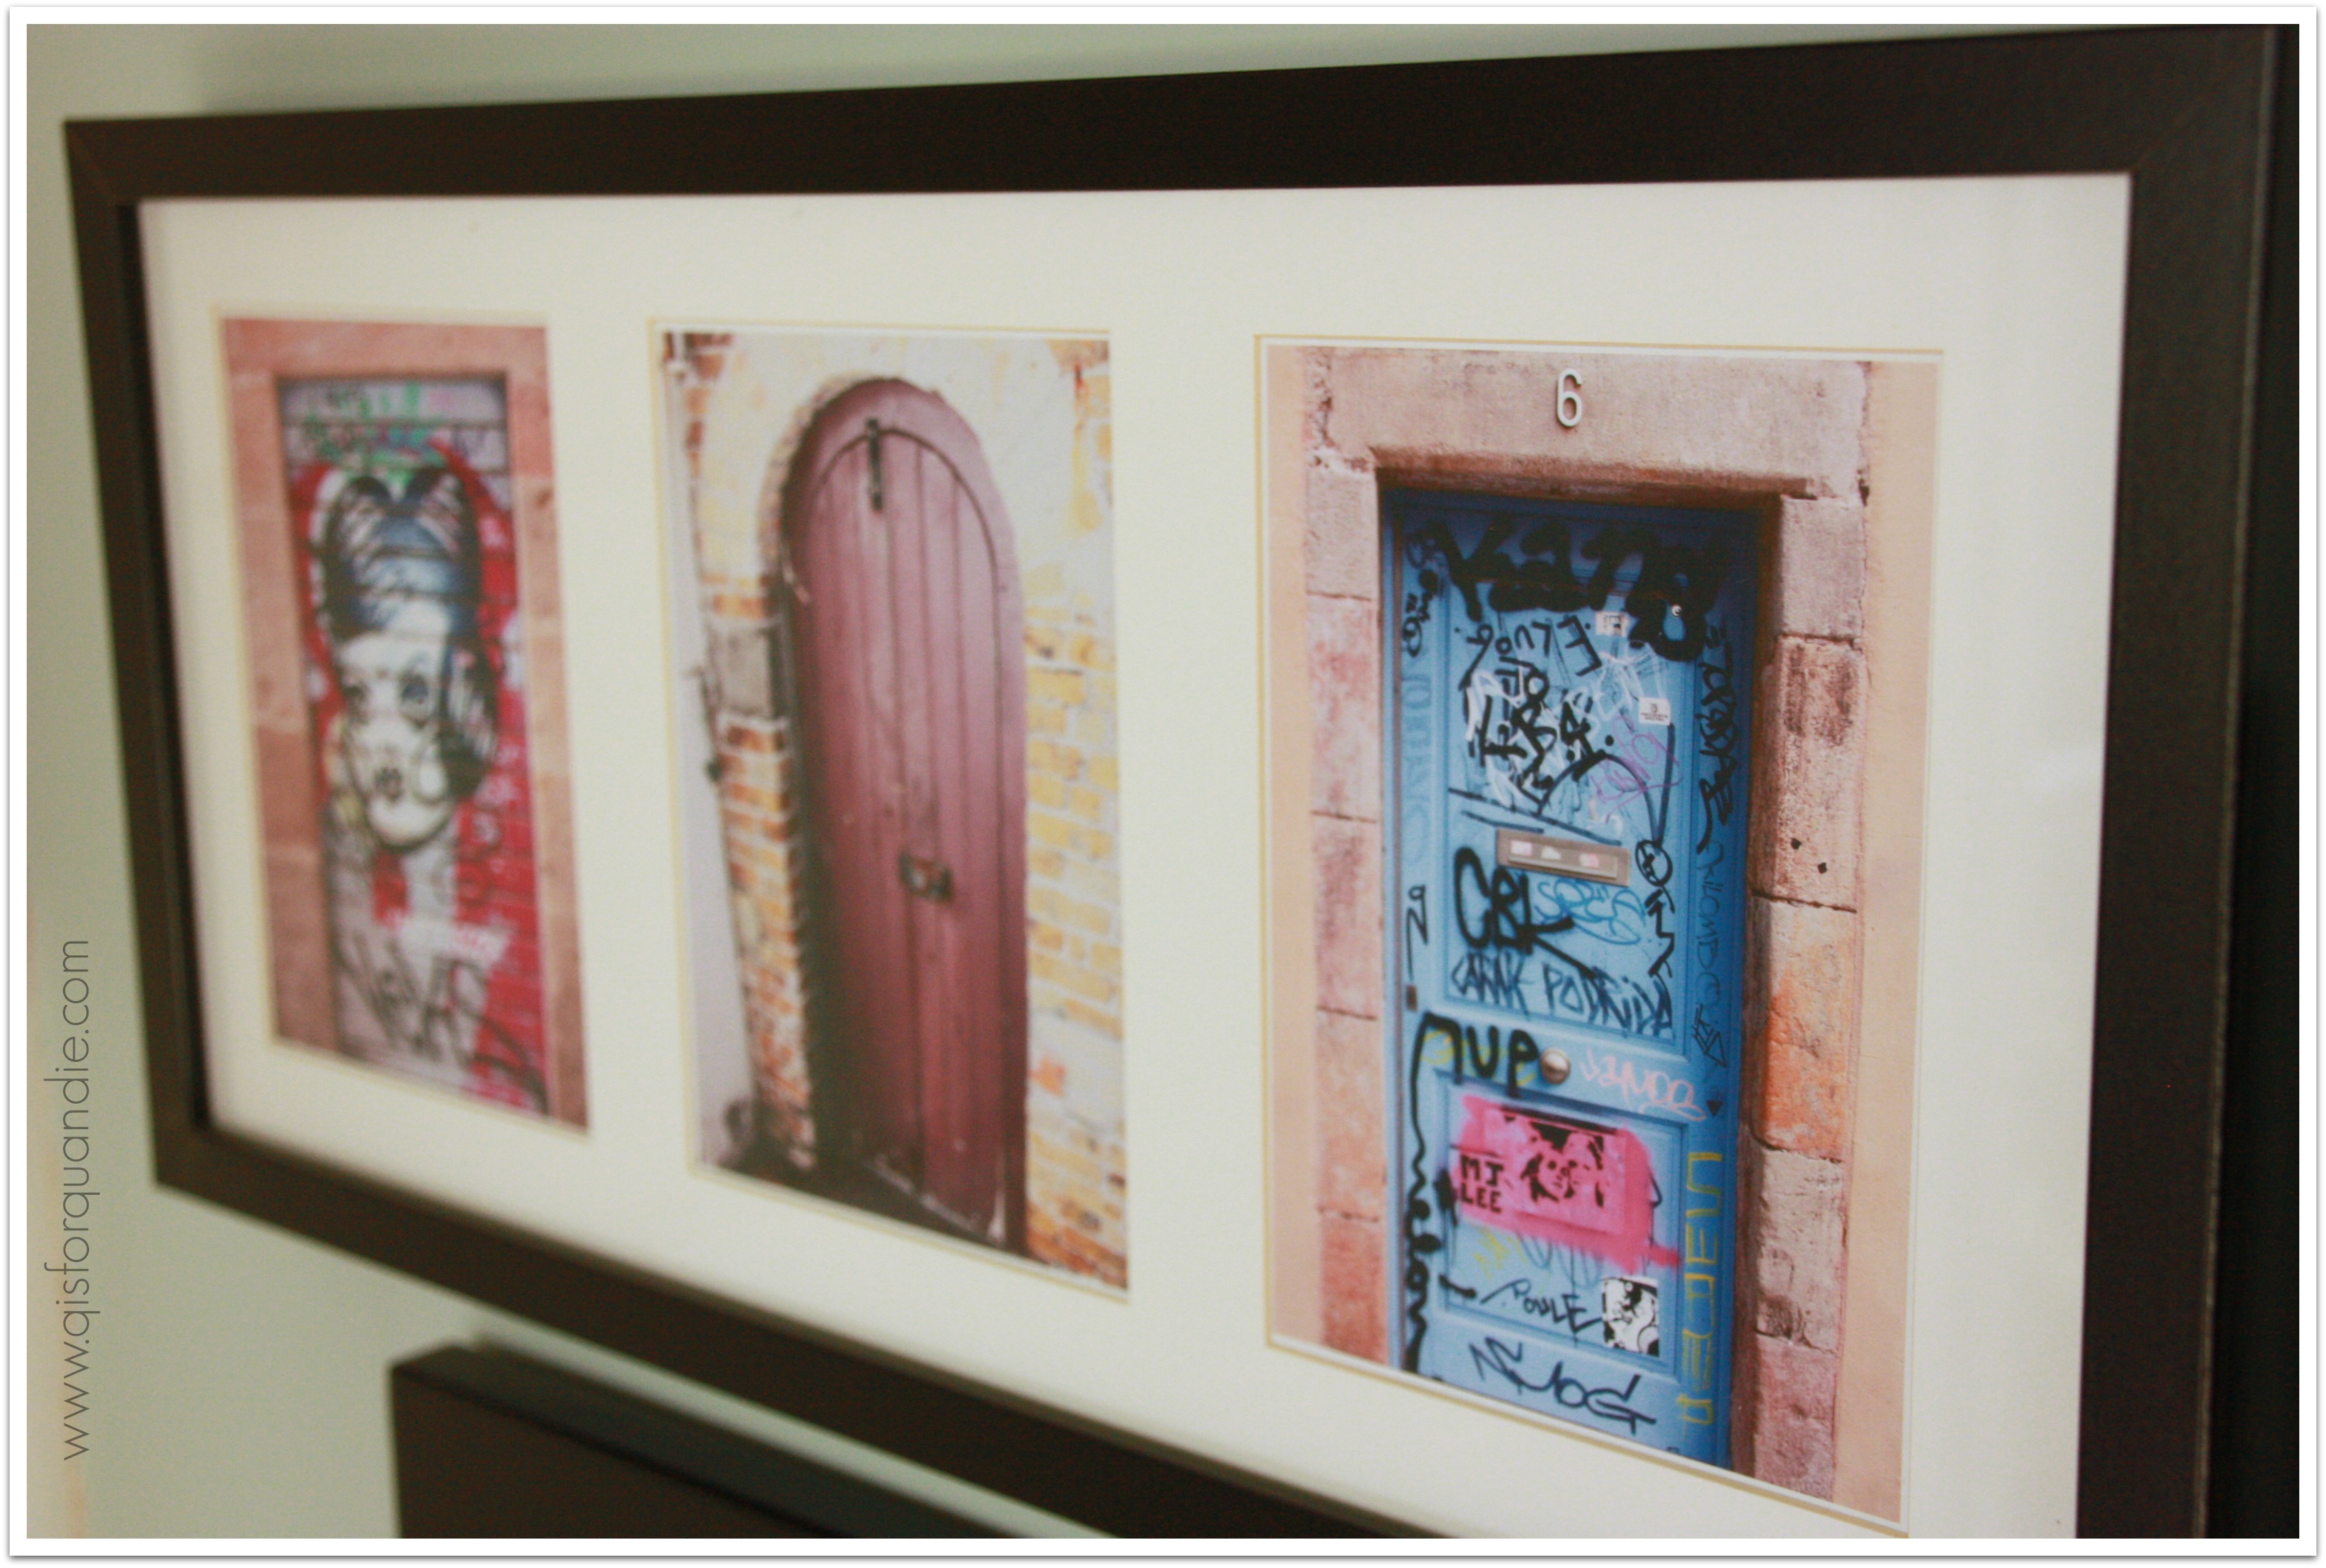
These doors were all in Barcelona.  I love graffiti, it has such a raw, urban feel to it.  And I also love taking photos of doors, so these doors were perfect for me.

2014 summer blog13

Tangier has some great doors too, and it also had this fantastic motor scooter/cart.  We hired a private guide in Tangier, because the Medina in Tangier is probably one place you really don’t want to get lost.

We went to a wedding in this church in Puerto Vallarta.  One of Mr. Q’s co-workers was from there and he invited us down for his wedding.  The church was fantastic and filled with history and the reception was a blast.  It was held in a big park, but there were tables with linens and candles right out in the open and it was a gorgeous night in February.  Each table had several bottles of tequila and bowls of limes and we were serenaded by a mariachi band.  As you can imagine, much fun was had by all!

travel gallery wall

The red mailbox with the “GR” on the front is in Gibralter, and the fruit stand is in the Cinque Terre.  The photo with the canal in it at the upper left was taken in Prague.

Although I didn’t keep track of how much this gallery wall cost, I am sure I never paid more than a dollar or two for each frame.  I printed the photos myself, so yes the paper and ink cost me something.  But overall, this was a pretty budget friendly way to make a big impact as long as you don’t factor in the actual cost of the travel!

As you can see, I have filled the walls nearly right down to the baseboard.  I think this helps up the fabulousity factor.

travel gallery window

If you are a budding photographer, I recommend you do your own gallery wall.  Take some great shots, print them out and fill up a wall in your house!

the master bedroom.

I’ve held off on showing pics of my master bedroom on q is for quandie simply because when I look at it, I see all of the things I want to change.  You see, the last time I updated the room I had some cockamamie idea that mixing vintage and space age would be a sophisticated juxtaposition of old and new.  Maybe it would have, if I had done it well … but instead I just put in some stainless steel modern fixtures.  I liked it for a while, but it grew old quickly.  I’ve removed a lot of the modern, but I still need to make some more changes.

But recently I decided, what the heck, I’ll share it anyway.  A lot of the changes I want to make are probably a ways down on the priority list.  It could be awhile.  So, I’ll show it to you as is.

mb east wall

Technically, the Q casa is a story and a half.  For those of you not up on house lingo, this means my upstairs is not a full story and all of the rooms have these quaint slanted ceilings.  I feel like this picture makes them look really low, but they aren’t.  Mr. Q and I are both tall, and we don’t hit our heads while getting into bed or anything like that.

I would love to do something with this wall behind the bed to make it more of a feature wall.  Perhaps add an all over stencil, a fabulous wallpaper, or even a wood plank wall.  Of all of these options, a stencil would be easiest and cheapest, a wood plank wall would be most fabulous, but least likely to ever get done.   And seeing as my bff spent many hours helping me strip not one, not two, but 3 layers of old wallpaper from this room, she might want to cause me bodily harm if I decide to wallpaper again!

I’d also like to paint the sleigh bed.  I know it would be gorgeous painted, but I just haven’t gotten around to it.  Before I paint the bed though, I’d rather paint the armoire, and add a stencil to the door.

mb armoire

One of our big splurges back when we were relatively new homeowners was the ‘bedroom set’.  Back in the day, you got a set of all matching furniture.  Those of you who have read my blog for a while know how I feel about this now!  Matching is bad!  Mixing is good!

I ditched the matching nightstands that came with this set, and replaced them with vintage pieces that are both painted a pale grey, but otherwise are quite different in style.  ‘His’ is a Swedish spoon carved commode that belonged to my grandparents, ‘hers’ is a curvy legged table.

mb nightstand collage

I’ve always thought I should paint the wood parts of the lamps white.  Another small project that I never quite get to.

Meanwhile, I love my bedding, which came from H & M Home.  I was so happy when we were finally able to get their home products in the U.S.

mb bedding

This turquoise bench lives at the foot of the bed.  I painted it several years ago.  It’s quite handy for piling up clothes that I don’t feel like putting away.

mb bench

I could use an area rug on the floor to add a little more coziness to the room.  We’ve had several different versions of rugs in this room off and on.  It’s actually a very large room, so it’s not cheap to get a rug that fills it up properly, and that’s just not at the top of the priority list right now.

Oddly enough, the master bedroom is the room in my house that gets the absolute best light.  It faces northwest, but with 3 big windows there is always plenty of light in here.  Probably slightly wasted on a bedroom of all rooms.

mb windows

See that door back in the corner?  Yep, that’s my closet.  And it is small.  Want to live in a 100+ year old house?  Then be prepared to get creative when it comes to such things.  I only keep my current season’s clothes in there, and only my clothes.  Mr. Q gets a closet in another bedroom (which he uses as a study), and I get the guest room closet for my off season clothes.

I’m not entirely happy with my current ‘artwork’ in the bedroom either.  Basically I have taken the maps from the back of a vintage dictionary and framed them in basic white IKEA frames.

mb walls

I would love to change these out for something with more presence.  These are OK, but not fabulous.

Next to the armoire is my jewelry station.

mb jewelry station collage

I used to keep all of my jewelry (and let’s face it, I love costume jewelry) in one of those standing jewelry boxes.  The problem was, I couldn’t see it at a glance and many days I just didn’t even take the time to wear it.  So I came up with this plan to keep my jewelry in plain view and right next to the door.  As I leave my bedroom in the morning, I am visibly reminded to grab some jewelry!

The earrings are on an old window screen, the bracelets and rings are in two old metal drawers that are attached to the wall, and the necklaces are held by old wooden spindles that are screwed into the wall.

mb final

Sadly, it seems that master bedrooms are sometimes that last room that gets much sprucing up because the public at large rarely sees it.  One of these days I will give it the attention it deserves … then again, I might rather spend the money on a trip to a tropical island in winter …

photo cottage final reveal.

I can’t tell you how happy I am with my decision to turn my summer house into a photo studio, now aptly named the ‘photo cottage’ (thanks Darrielle!).

I am having a great time staging my furniture makeovers in the cottage and getting great pics.  I have found that I have to time it properly.  Morning light is much better than evening light because it’s not reflecting off of my red carriage house.  Bright sunshine is best, but I can fake it a little if there are clouds.  My next goal is to research my artificial lighting options so my timing can be more flexible.  Since I have a day job masquerading as an accountant, morning photo shoots might be few and far between.

I thought I would pull the makeover all together into one final post for you.  First, a quick ‘before’ collage of the summer house.

summer house collageIt was charming and lovely, but sadly underutilized.  So let’s head on in and check out the new look!

The door handle on the cottage is an old hand held garden tool that Ken affixed to the door.  To the side of the door is my planter and watering can on a pulley.  Those poor begonias look pretty sad.  I never have luck with them!  I usually don’t buy them, but these were just such a gorgeous deep pink.

photo cottage exterior collage

photo cottage exterior

The bricks that make up the stoop are from an old brick patio that used to be in front of my deck.  We pulled them up a while back to make the patio larger and we replaced them with flagstone.  I saved the brick and have been using it to edge my gardens and I also used it here.  Honestly, the bricks are just stacked in place.  No mortar or anything.  They have held up quite well though.

After painting the inside walls and floor white, adding a grey diamond pattern to the floor, and having Ken build a faux wall insert for the back window, I now have the perfect canvas for furniture photo shoots.

wall

And on the other side of the room, I have a cozy seating area in case I ever do want to just relax out there and read a book (ha, as if I really ever do that!).  Plus, I finally came up with the perfect spot for the Paris sign that I purchased from Curious Sofa.

photo cottage chair

You may recognize the chair.  It was a makeover from last winter.  I brought it to Junk Bonanza, but there were no takers.  I also had it out for my Carriage House Sale, but again, no go.  Sometimes things are just meant to be mine!  This chair is quite comfy too, especially with the added pillow which is covered in one of my favorite vintage monogrammed pillow cases.

photo studio pillow close up

I used the space above the window to display some of my chippy green garden tools.

photo cottage slate and tools

And across from the chair is the cupboard for storing my photo props.

photo cottage cabinet

For a little better perspective, here is a shot of that entire side of the cottage.

photo cottage north wall

It’s not a large space at all, but it has just enough room to make a perfect stage for freshly revamped furniture!  I know I will get a lot more use out of this space now.  You are sure to see a lot of it on q is for quandie!

photo cottage linen white

when is a window not a window?

When is a window not a window?

window

When it’s a wall!

wall

Abracadabra.  It’s a window again.

window

The solution to my rear window conundrum?  To have Ken build a faux wall that I can put in and take out on a whim.

How cool is that?  I can have my cake, and eat it too!

wall

That Ken is so clever.  He built an insert to match the existing wall that fits just inside the window opening.  Then he added little handles on the back so I can slide it into place easily from behind the shed.  He also added a hook to the window so I can hook it up and out of the way when the “wall” is in place.  The window, by the way, was already on hinges at the top.

wall insert

I’m so happy with this solution.  When I want to take photos of furniture I have the option of a solid wall backdrop, or a window backdrop.  And one day, when I get tired of revamping furniture for a hobby, I will still have the fab window in my shed.

Coming soon, some ‘minty freshness’ followed by a wrap up post showing some final photo studio ‘after’ pics.  Stay tuned!

fab furniture photo studio, cabinet.

Remember the old cabinet that was in the summerhouse before I began transforming it into a photo studio?

summerhouse cupboard beforeWell, there is a bit of history behind this cupboard.  When we moved into our house, the bottom half of this was in the Carriage House and it was pretty filthy and beat up.  Not that I mind beat up, but I can do without filthy.

The top half of it was in the kitchen.  That’s why the top half is so freshly painted.  It fit perfectly on top of the radiator, and the radiator itself was enclosed by a faux cabinet bottom that made it look somewhat like a piece of furniture.  Except the bottom part was poorly constructed, and it had terrible doors with inserts that were meant to let the heat flow out.  And a horrible formica top.

So, when we revamped the kitchen, we decided to remove it all and just add a small shelf to the top of the radiator, see …

kitchen radiatorMuch better.

Anyway, when we removed the upper cabinet, it occurred to me that maybe it would fit on the shabby cabinet that was out in the Carriage House.  Not only did it fit, but it appeared to be original to the piece.  There are grooves in the lower cabinet that perfectly match the upper cabinet.  I was bringing them back together again!

I moved it into the summer house and it has been there ever since.

OLYMPUS DIGITAL CAMERA

As part of my photo studio revamp, I decided to clean it up a bit and use it to store photo props.

I knew that adding a little vintage wallpaper here and there would up the fab factor.

studio cabinet drawers

So I ordered some from Hannah’s Treasures on Etsy and then added it inside the drawers.

studio cabinet drawers 2

 And I ordered some more from Rosies Wallpaper on Etsy and added it to the lower shelves.

studio cabinet inside

If you’ve noticed that the glue along the front edge isn’t quite dry, please ignore that.  I’m too impatient and it is so humid here today that it just isn’t drying on my time schedule.

studio cabinet inside full

You’ll notice that I used different wallpaper on the shelves from that in the drawers.  Yeah, I know.  I could have matched them, but what would be the fun in that?  This way I get to enjoy two fabulous vintage patterns.  Also, before I move on, I have to say that both of these Etsy shopkeepers were fab.  I received both of my orders within days and they were packaged very nicely.  The colors on their Etsy page were spot on, and the paper was in excellent condition.  I was impressed (and I am in no way being compensated for this tidbit, just wanted to give them credit where credit is due).

As you can see below, I also repainted the interior of the top section with Annie Sloan’s Duck Egg.  I knew it would work beautifully with the vintage wallpaper.

studio cabinet empty

I also changed out the hardware on the upper cabinet.  It did have some very nice glass knobs, but I wanted something a bit more rustic looking, so I switched them out for these.

studio cabinet hardware

Next came the fun part, filling it up with photo props!  I’ve been accumulating a pile of photo props for a while.  I’d like to not have to remove everything from my house each time I stage a piece of furniture.

studio cabinet angle

At this point, you are probably thinking to yourself “hey, wait a minute, I thought those walls weren’t pink anymore?!”  They aren’t.  This is one of two things, either a reflection from the giant wall of my red Carriage House which is right behind me while I’m taking this photo, or a reflection off the red shirt I had on.  I’m going to have to work on this problem.  Do you think Mr. Q would be OK with a plan to paint just that one side of the Carriage House white?

But meanwhile, the cabinet is full of my photo props with room for more as I find them.

studio cabinet interior

studio cabinet inside lower

So there you have it.  A slightly revamped cupboard full of vintage fabulousness.

studio cabinet full

Next up; how Ken and I deal with that back wall!

fab furniture photo studio, phase one.

The potting shed is well on its way to becoming a fab photo studio!

First up, I scraped the existing pink walls and then used the hose to power wash the interior.

summer house beforeAt that point, I realized that there was yet more scraping to be done.  Sigh.  I hate prep work.

Next came two coats of white over everything.

white studio

This is some serious whiteness.

Time to add some interest to the floor.  I contemplated a damask stencil, but in the end I just had to go with my standby fave, a diamond pattern.

Out came the tools of the trade.

photo studio floor supplies

I’ve mentioned before that I don’t like to tape when I paint a floor.  The taping takes so much time, and you go through so much tape.  You also have to deal with bleed thru.  Of course, you could tape it all, then paint with the base color again to prevent paint bleeding under the tape.  But, then that is another step as well.  Personally, I’d rather just draw the pattern on the floor and paint it in freehand.  I have a pretty steady hand for this, but a good angled brush makes it fairly easy.  Also, it really doesn’t have to be absolutely perfect in here.

I started by finding the exact center of my floor, and then I started measuring out from there, using a square to keep the lines nice and straight.

photo studio floor process

If you look closely, you can see that I originally drew a smaller square, but then decided I wanted them a little larger.

After several hours of back breaking work (seriously, I am getting too old for crawling around on the floor for 4 hours), I have a fab floor that I totally love!

photo studio floor

I think this is going to make an awesome backdrop for furniture photo shoots.  As I have found with my grey and white striped walls in the house, pretty much any color furniture looks great with this combo.  And on the rare occasion when it just doesn’t work, I can always throw a rug down.

Just for kicks, I decided to do a trial run photo shoot.

photo studio chair

As I hoped, the studio does work like a big walk in light box.

photo studio bee balm

So far, so good.  Next up, Ken and I came up with a great solution for that back window.  We’re going to work on it next week.

I also am revamping the cabinet that will go back in here and contain my photo props.  Stay tuned!

bluebirds of happiness.

Clearing out the summerhouse to make way for a furniture photo studio means getting rid of most of the things I had out there.  The cane back sofa sold really quickly on craigslist.  The wicker chair was quick to go at my Carriage House sale.  But I also had a lot of vintage china out there.  I cleaned up most of it and attempted to sell it at my sale, but not much of it sold.  Sue is considering holding a shabby chic china sale at her house this summer, but if it still doesn’t sell, I may try to find one of those wedding rental companies that rents out china and see if they need platters.  But, in the meantime, I want to hang on to my favorite pieces which are all the ones with a bird theme.

bluebird creamer

Bluebird china was manufactured by over 50 different companies in the late 1800’s to the mid-1900’s.  It was generally used for everyday.  How lovely it would be to have an entire set of dinner plates to eat from!  But most of what I have is in pretty rough shape.  Not something that I’d actually want to use.  It’s pretty to look at though.

bluebird china 2

Not all of my bird china features blue birds though.  These pieces have pretty green lovebirds.

green lovebird china

This bluebird is tucked in amongst the flowers.

bluebird with rosesAnd this one has the most delicate ghost of a landscape behind him.

bluebird china closeup

 And here is another sweet pair of lovebirds.

bluebird china with book

Since I couldn’t bring myself to part with these, I decided to make room for them in the pantry.  This dovetails nicely with two new decorating rules that I devised for myself after visiting Sue’s house.  Now, I made up these rules for myself.  In no way am I suggesting that you should follow them too.  You have to make your own rules.

Rule no. 1 – Keep black and white areas separate from colorful areas.

I need this rule because I have a split personality when it comes to decorating.  I love cheery, colorful, cottage, vintage farmhouse.  But, I also love white/grey colorless French Nordic.  The problem is, I can’t seem to pick a side and stick with it, and I don’t think the two work together in the same space.

So, in keeping with this rule, the pantry is now firmly in the colorful vintage farmhouse camp and includes my bluebird china.

bluebird pantry

bluebird pantry closeup

Rule no. 2 – Keep collections together and display en masse.

Instead of splitting my chintzware between the summerhouse and the front porch, I now have all of it in the hutch on the porch.

chintz on porch closeup

I think both of these areas look more unified now.  And the color and patterns make me happy.

Which is not to say I don’t still love the black and white stuff.  Next on my list, choosing a spot to devote to these …

black and white

the summer house.

Another rite of spring at the Carriage House is the opening of the summer house.  I call it the summer house because it sounds fancy.  I base it on this definition:

summer house or summerhouse has traditionally referred to a building or shelter used for relaxation in warm weather.[1] This would often take the form of a small, roofed building on the grounds of a larger one, but could also be built in a garden or park, often designed to provide cool shady places of relaxation or retreat from the summer heat.

summer house collageWe’re pretty sure that this little shed was used as a play house by the previous owner’s daughter, although it was nothing more than bare wood inside when we bought our house.

We added the window at the back and a potting bench and originally used this as a potting shed.  But, it turned out to be impractical because it was hard to get the dirt out all the time.  I am a messy gardener.  It’s easier to just pot things up in place in the garden.

So, I decided to turn it into a cute little summer house.  It’s very pink and girly.  I keep my favorite bird china out there.

2014 spring blog12

But, it needs some freshening up this year.  I’m kind of done with pink.  And the thing is, I rarely actually take the time to just sit out there.  I’m far too busy for that.  So I’ve thought about going in a whole new direction.

I feel like the sky is the limit with what I decide to do out there.  It’s just a shed.  I can go a little crazy if I want to.  To be honest, that is almost a problem because I can’t decide what direction to take.

How about a writing shack?

photo via pinterest
photo via pinterest

This would look really cool, but I don’t have a laptop so I wouldn’t likely do much writing out there.  I’m pretty sure Mr. Q wouldn’t drag his stuff out there either.

Perhaps a comfy spot for napping?

photo via pinterest
photo via pinterest

I have taken a nap or two out there though, and in the end it kind of creeps me out.  Anyone could just sneak up and scare the crap out of me.

I’ve also thought of a little al fresco dining pavilion.

photo via pinterest
photo via pinterest

But it’s a little small.  We could probably only fit two diners comfortably.  I have a very nice patio dining set already, just steps away.  We dine al fresco all summer long.  It could make a nice alternative in case of rain, but if it’s raining do we want to dash from house to shed with food?

I could really use another bathroom!  Secretly I kind of love the idea of an outdoor bathroom.

photo via pinterest
photo via pinterest

In this climate, it would never work.  I could only use it 4 months out of the year.  The pipes would freeze every winter.  And I don’t even have electric out there, let alone water.  Obviously this is never going to happen.

After considering all of my options, I think I have come up with a plan.  I could paint the walls and floor white, and haul pieces of furniture in there for photo shoots.  It will become my tiny little photo studio.  One problem is the window in the back, I would need to cover that up to avoid back-lit photos. I could build a backdrop wall with vintage wallpaper like this fabulous example from pinterest.

photo via pinterest
photo via pinterest

 I’m sure I can come up with some sort of plan for that.  I’m not quite sure how difficult it might be to get the furniture in and out of there, but I’m pretty sure Mr. Q and I can handle that.

I wish I could say that I’d spend a lot of time leisurely dining out there, or taking naps, or writing a fabulous novel, but I know myself and it ain’t gonna happen.  So, why not turn it into a space that I could really use?  I think I’m going to go for it.

What do you think?


chillin’ on the porch.

One of the rituals that tells me spring is here is the opening of my front porch.  As soon as we start getting warmer days, I clean it out, open the windows for some fresh air and Mr Q and I start spending evenings out there.

front porch 1The Adirondack is his, the wicker chaise is mine.  I catch up on magazines, or both of us just read.  I may consume a fair amount of wine out here too.

2014 spring blog10

There used to be a matching wicker chair for Mr. Q, but you know I have given up matching furniture.  Plus, he wanted the Adirondack because it’s really quite comfortable.  I have a pair of them, the other one is outside.  Ken, a.k.a. handyman extraordinaire, made them.  Just to explain how skilled he is, he just took an old Adirondack chair and used it to make a template for building more chairs.  He then made quite a few of these, I did sell several at my occasional sales.

Nearly everything else on the front porch is a garage sale find.  One of my favorite finds is the glass globe on the ceiling light.

front porch light

When we moved into our house there weren’t very many original light fixtures left (my house was built in 1904).  The one on the front porch was fab though.  It had that vintage schoolhouse look.  But it got broken in an unfortunate mishap with an extension cord, don’t ask me how, I wasn’t there.  Anyway, a while back I found this globe at a garage sale.  I think I paid $12 for it.  I knew it was a gamble because it might have ended up not fitting the fixture, but it worked like a charm.

The light is just outside the door into the house.

front porch 3

The cabinet on the end came from a garage sale.  This was one of my earliest furniture rehab projects, from back in the day when I painted pretty much everything white.  I recently repainted the inside aqua.  It used to be pink.  This summer I plan to change it up with something different in the ovals panels on the sides.  I decoupaged them with map paper, but it has faded badly.  Not sure what I will do instead.

2014 spring blog11

I have some of my aqua pottery and chintzware inside, plus some lovely vintage aqua glasses.  To be honest, I ultimately wouldn’t mind switching this entire cabinet up for something else.  When I come across just the right thing, I think I’ll know it.

Just next to the door is this oak washstand which was a craigslist find.  I’d like to repaint this with Miss Mustard Seed sometime this summer.  We’ll see if I get around to it.

front porch 5

The New Orleans watercolor hanging above it has always been a favorite of mine.

This set of small TV trays was another garage sale find.  I can’t even remember what color they were originally, but I painted them black and numbered them.  I originally planned to put them in my Carriage House Sale, but they are so darn useful for holding glasses or wine, or cups of coffee.

front porch 6You may have noticed my black and white floor.  I painted this myself, and in fact this is my second version of a checkerboard floor on the porch.  The first time I painted it in shades of green.

front porch floor

My process was to just paint the entire floor white, then draw the lines for the squares using a yard stick, a square and a pencil.  You can see I ran a chalk line down the center to help keep them straight.  Then I  just painted in the black squares by hand.  I have a pretty steady hand.  It would have driven me nuts to tape all of those squares.  I know I broke some rules by not centering the squares from one side wall to the other, but oh well, sometimes I’m a rule breaker.

I am really fond of this floor, although sometimes I wish I had gone for a more subtle combination of grey and white.  I might try that on another floor somewhere … who knows.

And I almost missed sharing one of my favorite things on the porch!  The quote above the front windows.

front porch quote

A good reminder for those lazy summer evenings spent drinking wine and reading a good book.

treat the cheese nicely.

Last night I picked up an amazing dresser that I purchased via Craigslist.  The sellers had a gorgeous 100 year old home in the Linden Hills neighborhood of Minneapolis, one of my fav garage sale haunts.  Their house was stunning, and their decor was equally fabulous.  However, I always feel a little sad when I see one of these houses that has been entirely re-done inside.  Some of the original features were retained such as doors and crown molding, but the kitchen was obviously a complete gut job.  They now have marble counter tops, stainless steel appliances and modern looking dark wood cabinets.  Again, stunning, but yet it still makes me a little sad.  I wonder what the original kitchen was like.

 This brings me to my kitchen.  I have tried to retain the quaint 1900’s farmhouse quality over the years.  I’m not saying that my way is better, it’s just my preference.

 When we moved in to our house in 1987 the kitchen was mustard yellow and country blue and fully wallpapered.  Here is the only photographic evidence of that time.

IMG_7491

Sorry Annie, Chris, Kurt & Mike.  I have totally published this picture without permission, but you look great in it, so no biggie, right?  Annie, you have always been amazingly photogenic.  Even in the 80’s.

We have made a lot of changes to the kitchen since then.  It first went through a period when it was peach and navy blue, with a fruit themed wallpaper border.  Ah yes, remember the hey day of the wallpaper border?  Strangely enough, I don’t have any pictures of that version of the kitchen.

Then in 2006 we decided a more thorough remodel was in order.  It was another case of the domino effect.  It started with mainly wanting to put in new sink and counter top and do some painting.  In the end we tore out the plaster and removed particle board ceiling tiles and then added new sheet rocked walls and ceiling, re-wired the electrical and added lights over the counters and more outlets, ripped out a vinyl floor and refinished the original wood underneath and widened the opening to the next room.  Yikes!

In the end, it was all worth it because now we have a lovely kitchen.  It probably wouldn’t suit someone who loves to cook and spends a lot of time in the kitchen, but it’s perfect for us.  I’ll be honest, my kitchen doesn’t get used all that much for actual cooking.  I like to joke around that I have to dust my stove, but really, I do

full kitchen

As you can see, we have very limited counter space.  We’ve thought about adding an island, but it would be smack in the middle of a major traffic area since we have to walk through the kitchen to get to the bathroom, and to get in and out of the house.  If you are wondering about the floor, yes you read that right earlier, this floor had been covered up by vinyl.  Mr. Q spent hours and hours removing the approximately one million little staples holding it in place.  We then had it sanded, and the checkerboard stain added (the dark squares are stained, the light squares are natural).

kitchen counters

This is my wall of cupboards.  It’s plenty of cupboard space for us.  Originally the top row of cupboards had solid doors just like the rest, but they actually were mostly empty.  We have to stand on a ladder to reach them, and just didn’t need to store things up there.  So, I decided to cut out the doors and add chicken wire, then display my collection of ironstone up there.  In hindsight, I really wish I had thought to add lights when we re-did the wiring, but dang it, I didn’t.  Still kicking myself over that one.  We did add a subway tile back splash and the under-cabinet lighting.

ironstoneOur kitchen is very basic.  We don’t have a dishwasher, or any fancy appliances.  No ice maker in the fridge, no gourmet gadgets.

kitchen collage 2Most everything I decorate with comes from garage sales.  The child sized folding chair came from a sale, I painted the seat with chalkboard paint, added a metal number tag and hung it on the wall (Although, to be honest, first I put it in my occasional sale and no one bought it.  I believe the price was $22.  How is this even possible?  Look how cute it is!).  The fabulous carved wooden Krishna statue came from a garage sale too, and the blue metal bike seat/message board came from The Cottage Sale put on by Josie Jones (as you can see, I love it Natalie and it fit perfectly in this spot in my kitchen).

cheese plate collageThe Norwegian cheese plates that are hanging on the wall above the chair are garage sale finds as well.  Aren’t they fantastic?  I paid a mere $1 for the pair.  I did some research after I purchased them and learned that the phrase on them,  skjær pent av osten, translates to something like “treat the cheese nicely” and was meant as a reminder to slice the cheese evenly so that everyone got their fair share … or something like that.  They are a nod to my Norwegian maternal grandparents.

kitchen collage 1

Thank you for taking a tour of my kitchen today.  If you ever stop by, I may not cook you a meal,  but I would certainly open a bottle of wine and serve you some cheese that has been treated nicely.