it’s kinda weird.

This blogging thing, it’s kinda weird sometimes.  I have a ‘stats’ page and it shows me how many people are looking at my blog, but it feels like a fairly random number to me.  It doesn’t tell me who those people are or if they like what they see.  Is it someone who clicks in, takes a look, and then thinks “oh, how boring” and moves on?  I’m always surprised when someone says “I love your blog!  I read it all the time!” and I had no idea they were even reading.

hyrangea

Now, don’t feel like I’m casting any stones here, because I am also one of you.  I read lots of blogs that I almost never comment on.  Technically that makes me a “lurker” too.

But now that I am on the other side of that equation, I see how important those comments are.  The only time I really feel like people are enjoying what they see is when they leave comments.  I love getting your input!  I don’t care if your comment is short.  Even if you don’t feel like you have anything insightful to add, it’s still nice to hear from you.

photo cottage slate and tools

So, here’s some tips about commenting on my blog.

First, if you are a total newbie to blogland, the first step in commenting (or reading other comments) is to click on the little speech bubble to the right of the title of the post.  Hopefully there is a number inside the bubble, because that’s how many comments are already posted. Basic info, I know, but some people don’t know this.  Also, this is how it works on my computer, I think if you’re reading on your smart phone or iPad, it might look different.  But I can’t help you there.

Next, the very first time you leave a comment you will have to await moderation before your comment posts.  This is to help keep spammers out.  I hope it’s not too annoying for people.  And the key thing to keep in mind is that after you’ve done this once you will then be pre-approved for future comments.

When you leave a comment you will be asked for your email address.  This isn’t shared with anyone except me and it’s not posted anywhere on the blog.  I don’t sell email addresses or use them for any purpose other than to contact you directly if you win a give away or something like that.  You’ll also leave your name (which will be posted with your comment).  Feel free to leave just a first name, or perhaps you’d rather go by a nom de plume or an alias.  Go ahead and get creative!  You can also leave the name of your website, if you have one.

Here’s another tip about that.  Many of my commenters have great blogs of their own.  You can see them by clicking on their name above their comment.  If the text is blue, you can click on it and go visit their blog!

rose

Next, you have some options.  You can check a box to receive an email every time a new comment is posted to that particular blog post.  Keep in mind, you won’t just get my response to you, you’ll also get every other comment made on that post.  I don’t get 100’s of comments, so you are probably safe doing this.  However, if it’s a give-away post, you might want to avoid checking the box so you don’t get tons of annoying emails because those tend to get a lot of comments.

You can also check a box to get an email notification of new blog posts.  I highly encourage you to do that, wink, wink!

plant a garden manual

That’s it.  Simple right?!

So hey, if you have a minute, leave me a comment just to say hi!  Tell me a little bit about you!  Where do you live?  Do you paint furniture?  What’s your favorite color?  What is your decorating style?  I’ll be thrilled to hear from you, I promise!

the new Q.

Wait!  Don’t change that channel!  No, you are not in the wrong place.  I’ve got a new look.  What do you think?

Some girls treat themselves to a pedicure, a new pair of shoes or maybe a fabulous new haircut.  I’m all for those things, but I chose to splurge on a new logo instead!

I decided to work with Ashley of Dinosaur Stew after seeing the beautiful blog she designed for Ann of Farmhouse Blues.  I just loved the sweet, simple style of her page.  I originally contacted Ashley to discuss a total makeover for the blog, but once I found out that I would have to move from a free WordPress blog to a self-hosted WordPress blog, I chickened out.  I just wasn’t ready to take that step.  I also found out at that time that Ashley was a fellow Minnesotan!  She’s up in Duluth.  We Minnesotans have to stick together, dontcha know.

That was a while back.  More recently, when I decided to move forward on a logo, I knew I wanted to work with Ashley.  I had her design two versions for me.  I wanted one that was more linear and could be also converted to a watermark for my photos, and I also wanted one that would fit in a square.

As it turns out, I am totally in love with the more linear, simple version.

q is for quandie logo

Ashley got it perfect on the first try.  I’ll use this one as my main logo for most things.

The square logo was based on more of my input.  I have to confess that I sent Ashley back to the drawing board on this one many times.  She was very patient and incorporated all of my requests for tweaking this or that.

Print

I’ve incorporated this one into my Gravatar profile so far, but I think it would be fun to use on some signage as well.

Ashley also provided me with some watermarks that I can use on my photos.  A black one …

example of black watermark

and a white one …

example of white watermark

 As part of my update, I also changed out the background paper on the blog.  The former background was just a photo that I took of my own grey and white striped living room wall.  I’m afraid it was rather pathetic.  I can’t believe I left it that way as long as I did!  It was in serious need of an update.  I tried a few different looks and found that most of them were just too busy and they distracted from the blog itself.  For now this new one will do, but I may keep shopping around for something perfect.

So there you have it!  A fresh new look for q is for quandie.  I was also busy this past weekend with several furniture makeovers and I’ll share them with you soon, so stay tuned!

random makeovers.

I’ve been busy in my workshop lately with a lot of small projects that don’t really seem to merit their own blog post.  So I decided to throw them all together in one post.  So, here we go with some random makeovers!

Remember the bed I purchased in the Nokomis neighborhood?

bed before close up

I painted it in homemade chalk paint in one of my favorite colors, Aloe by Sherwin Williams.

Nokomis bed full

The detail on this bed was just lovely.

Nokomis bed close up

It sold very quickly at Reclaiming Beautiful in Stillwater.

Nokomis bed 1

I have to say that working with the homemade chalk paint (made by mixing Plaster of Paris with water, then adding to regular latex paint) reminded me how much nicer real chalk paint is!  The homemade stuff works and it’s certainly cheaper, but it’s tricky to get the proportions right.  The paint thickens up if left too long.  Plus, I’ve read that breathing in the dust while sanding the Plaster of Paris isn’t really good for you.  I don’t have any authenticated info on that, but just to be on the safe side, I think my homemade chalk paint days are officially over.

Next up, remember the basket from lunch time garage sales?

lunchtime finds

That’s it down in front, kind of an ugly brick red color.  I used a favorite cheat of mine to paint it.  I started with grey spray paint to cover all of the nooks and crannies easily.  Then, I added a lightly brushed on coat of grey chalk paint.

painted basket

It is so much easier to get good coverage first using the spray paint, and then the matte look of chalk paint by one quick brushed coat.

Next, I painted another toolbox.  Unfortunately, I don’t have a before picture.

rooster toolbox 2

It was sort of that ugly beige color that you often see these in.  Sue tried to sell it at our Carriage House sale, but there were no takers.  So I offered to take it off her hands and give it a makeover.

rooster toolbox 1

I painted it with Urban Rooster chalky paint in a color called Jaded Rooster.  Darrielle of D.D.’s Cottage and I recently swapped some paint.  I sent her some Fusion paint (and you can see what she did with it here, here and here), and she sent me some Urban Rooster paint.  I haven’t had much chance to use the Urban Rooster on a full piece of furniture yet, but I loved using it on metal.  It went on very smoothly.  I liked that it wasn’t as thick and texture-y as some chalk paints I have used.  I used two coats on this piece, then I sanded it and finished with wax.

Then I added a fabulous rub-on that has been in my stash for years.  Sometimes rub-on’s dry up over time and no longer work, so I was really happy that this one was still good.

rooster toolbox close up

This is a Rhonna Farrer Phrases Rub On, but sadly I don’t think these are available to purchase anymore which is too bad because they are fab.

rooster toolbox 3

My friend Terri and I were recently lamenting the fact that rub-on’s seem to have gone out of favor.  If any of you have a good source for them, I’d love to know about it!

And last but not least, I shared the ‘before’ of this little dresser way back in October.

mini dresser before
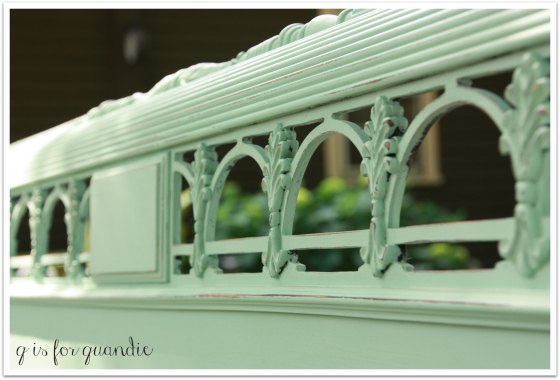
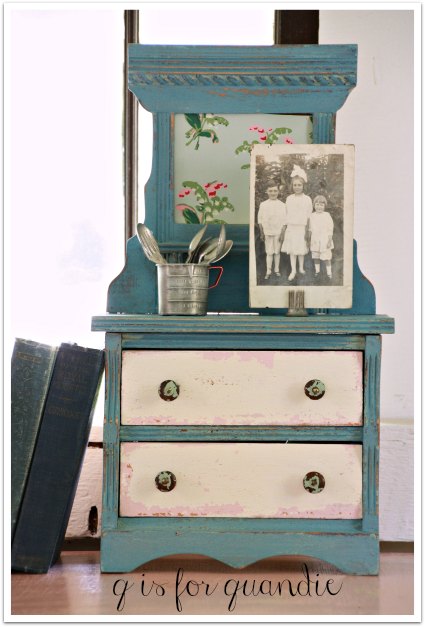
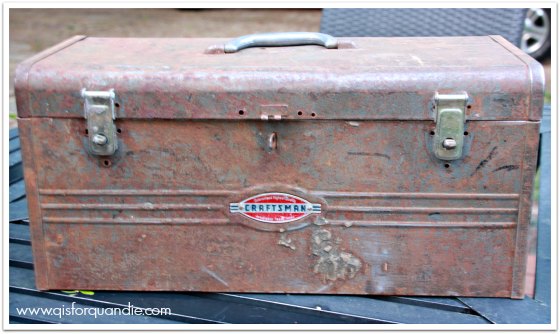
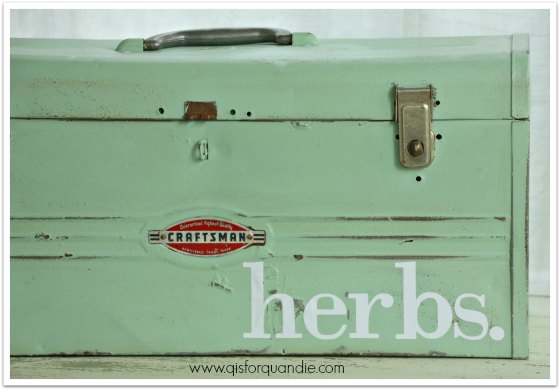
I have painted this three times since then!  Well, parts of it anyway.  I started out painting the whole thing in Sweet Pickin’s Sweetie Jane.  And nearly every single bit of paint chipped right back off.  I wanted it to be really chippy, but not that chippy.

mini dresser version 1

Next I just sanded down and painted the drawer fronts.  First in pink, then a layer of white.  The paint adhered better after the sanding, and I was very happy with how the drawer fronts looked.  You can see that change in this photo, bottom right.

mini dresser in Q branch

But after living with it a while, I realized that I didn’t like how white and un-chippy the drawers were compared to the rest of the piece.

So recently when I had some extra Miss Mustard Seed French Enamel left over, I decided to add another coat of paint to the body.

mini dresser after

Although I didn’t really plan it this way, having these different layers of color gives the piece the look of having been painted many times through the years.

Sometimes it takes me more than one do-over before I get it right, but as they say, if at first you don’t succeed …

So, which of these random projects is your favorite?  I’d love to know!


sometimes you just get lucky.

Sometimes with craigslist you just get lucky.  There is no other way to describe it.  It’s not skill, it’s just plain old kismet.  Such was the case yesterday.  I was thinking about some changes I want to make in my master bedroom, and I realized that I’d rather buy an old cupboard to replace my existing armoire instead of trying to paint it.  The reasoning behind that can wait for another post, but suffice to say, on a whim I went on craigslist and searched “farmhouse cupboard”.  I didn’t think much would come up, and I was right.  However, what did come up was a pair … yes, a pair! … of primitive cupboards.  And they were only about 15 minutes away.  And they had just been posted 20 minutes earlier.  What are the chances?

You can bet that I jumped at the chance to buy them.  Within a couple of hours, the first one was mine.

lucky cabinet title

They would have both been mine right away, except the owner had one at home and one in a storage locker.  Mr. Q is going to meet the seller’s husband at the storage locker today to pick up the second one.

This thing is genuinely chippy.  From real age, not a faux finish.  And just check out that under layer of blue.

genuine chippy

Love it!

And if that wasn’t enough, Sue and I checked out a barn sale at lunchtime, and I came home with a fabulous pair of vintage suitcases and a beautiful Homer Laughlin pitcher.

lucky luggage

Could my day have gotten any better?

lucky vintage luggage

pitcher

I knew the pitcher would make the perfect vase for the roses that Mr. Q gave me for our anniversary on Wednesday.

roses in pitcher

Yep, way better than the generic florist vase they came in.  Aren’t these the loveliest shade of coral?

flowers close up

I added the stock that I still had from garage saling last weekend.

This makes 26 years for us (I’m only counting the married ones).  Jeesh.  Time flies.  Then again, seriously, were we ever really this young?

1978 Mike and Linda

(Thanks again for sharing this pic with me Annie!  It’s a classic.)

Yep, we’ve been together a long time.  Sometimes you just get lucky!

on a break.

Phew!  I really needed a break from ‘creating’ after my sale.  I took a week off and am back refreshed!

It would be a little misleading to imply that I sat around and drank cocktails on the deck the whole time.  Over the last week I put my workshop back together, revamped my front garden, and followed up on some exciting new prospects for the Q.

I did find time for some other fun stuff too though.  My sister and I took a trip down to Afton to check out a couple of darling local vintage shops, Eye Candy REfind and 3:17 Vintage.  If you are local and haven’t been down there, get on it!  And in addition to the vintage shops, you can also check out Squire House Gardens.  I absolutely love that place!

squire house 2

We visited on a rainy day, but I find a particular beauty in a rainy garden, don’t you?  Especially when it means you have it mainly to yourself.

They have some unique plants for sale, and some really great garden ornaments.  I came away with Frankie the Frog.  I’m not normally a ‘frog’ girl, but this guy is a charmer, am I right?  I’ve nestled him among the sedum.

frankie

And while in Afton, be sure to get some ice cream at Selma’s.  Debbie and I shared a root bear float.  We both have fond memories of the root beer floats that our grandfather used to make for us when we were kids.

We also had tickets to the Minnesota Orchestra last weekend.  I had bid on them at a silent auction for my favorite charity, Wingspan Life Resources.

minnesota_orchestra_orchestra_hall_logo

I won the tickets, and so Debbie, Mr. Q and I went to one of their “Inside the Classics” concerts.  If you haven’t been to see an orchestra lately (OK, well, or never) things have changed!  Their concerts are much more informal.  We found it very entertaining.  I also found out that Pink Martini will be performing at Orchestra Hall next year, so I’m definitely getting tickets for that.

pink martini

Any other Pink Martini fans out there?

Well, enough of all of that!  The break is over.  Here’s what’s coming up on q is for quandie.

I’m entering a couple of new partnerships!  I’ll be selling some pieces at Reclaiming Beautiful in Stillwater.  If you haven’t stopped in there yet, be sure to check them out.  I headed down there last night with a few pieces of furniture and a pile of “grow.” plates.

grow plate

I’m also going to be working with Lacy Vreeland of Eye Candy REfind on some upcoming events.  She’s asked me to be a ‘featured artist’ at the grand opening of her Hastings store!  How cool is that?  That will be coming up later this summer and I’ll be sure to share all of the details with you as it gets closer.

I’m also working with Ashley of Dinosaur Stew on developing a new logo for q is for quandie!  I decided to splurge on this as a treat to myself.  We are in the early stages, but I’m really excited to see what she comes up with.

Even with all of that going on, I’ve been finding some fun pieces to work on.  We drove into the wilds of Wisconsin (well, Somerset anyway) to pick up this piece …empire before

And Mr. Q picked this one up a few weeks back, and it turned out that the seller was a fan of the blog!  Now the pressure is really on to do something fantastic with it.

car handles before

I’m developing a love/hate relationship with those drawer pulls.  Don’t they remind you of an old car door handle?  Do I love them?  Do I hate them?  I’m not sure, but I have to say they are kind of growing on me.  I have a plan percolating for this dresser that will play up those funky handles.  Maybe.

And I hope to get to work on the settee soon.

settee before

Plus Debbie and I will be heading to the Minneapolis neighborhood that our parents grew up in, Nokomis, for some sales tomorrow.  Wish me luck hunting for more fabulous finds!

eat your words.

If you have been following me for a while, you may remember that prior to my fall sale last year I was trying to convince people that there were lots of fun things to do with pretty plates, besides eating on them.  Despite my efforts, my big stack of pretty floral platters and plates still sat untouched after the sale.

plates

Even with woefully low prices on them of $3 and $4.

So I am giving them one last chance at a new life.

I saw this idea at the 2011 Bachman’s Idea House.  I borrowed this photo from pinterest, but it originated on Itsy Bits and Pieces, and you can read more about the Bachman’s Idea House there.  But anyway, this idea totally struck me at the time and I’ve been wanting to try it myself ever since.

Bachmans idea house

So I dug out my plates and platters, my Cricut machine and some vinyl.  I picked a quote and started cutting.

plates with words

I learned a trick to keeping your letters straight a while back.  You cut them on the ‘kiss cut’ setting, then you place a piece of painters tape over the letters before you remove them from the backing.

cricut trick step 1

Then you use the tape to pull the letters away from the backing, but keeping them all in a straight line and evenly spaced.  Carefully place them onto your surface, in this case a platter.

cricut trick step 2

Pull the tape away without taking the letters with it.  This can be a little tricky, so go slowly.  Also, a tip, make sure your tape is smaller than your letters.  If your tape overlaps your letters entirely, it’s difficult to get it off without also removing the letters.

cricut trick step 3

And voila!  Straight letters.

cricut trick step 4

So I used a couple of different fonts to write one of my favorite gardening quotes on my pretty floral plates.  I added some plate hangers and hung them on the Carriage House.

plate quote on wall

I love how they turned out!

plate quote close up

plate quote

If you have a stack of mismatched vintage china and a Cricut machine sitting around, you should make one of your own!

Since I had the Cricut machine warmed up, I kind of went a little Cricut crazy.  I added a simple word to a small enamelware saucer that can be tucked into a planter.

cricut enamelware grow

And then I filled an old flour sifter with succulents and added a word of encouragement to that as well.

cricut flour sifter

And finally, I used white vinyl to add some words to this old globe.

cricut globe

I hope to get a few more things ‘Cricut-ed’ before my sale next week so if you can’t make your own, come to my sale and buy one of mine!

Linking up with the Thrifty & Vintage Finds Party at Dagmar’s Home.

all good things come to an end.

I hate to be the bearer of bad news, but for those of you who are local and haven’t already heard, Round Barn Potting Co. in Andover will be closing its doors at the end of June.  As they say, all good things come to an end.  As you may know, I have sold furniture (as well as other small things) there on consignment for several years.  I also taught a couple of Miss Mustard Seed milk paint workshops up there.  Lori (Round Barn’s owner) and I also partnered a booth at Junk Bonanza last year, and we attended Miss Mustard Seed retailer training together in Madison.

Round Barn Potting Co. has always been one of my favorite places to shop.  She has such a unique selection of both vintage and new merchandise.  And of course, I’ve been buying my milk paint there since she started to carry it.  It will be a sad day when Lori closes her doors for good.

Lori will be having 4 sales in June to sell off the entire contents of the shop.  On June 4th she’ll begin with 50% off everything in the place!

green books and wallpaper

Since everything in the store will be drastically reduced in the coming month, I needed to bring the last two pieces of furniture that I had up there home again.  The first piece is this striped dresser that I painted before I even started this blog.

cottage stripes title

This piece has such cottage style.  I can also easily see it in a cozy farmhouse bedroom under the eaves.

cottage stripes close up

I painted this with homemade chalk paint back in the days before I had tried the real thing, and long before I tried milk paint.  I replaced the hardware with some pretty green glass knobs.

cottage stripes close up

The second piece I brought home is this mirrored dresser with wallpapered drawer fronts.

vintage wallpaper dresser full

I did this one last fall.  It’s painted with MMS milk paint in Eulalie’s Sky.  I have to say that the wallpaper has held up remarkably well.

vintage wallpaper title

These pieces are still for sale, and if they don’t sell sooner, they will find a place at my Carriage House sale.

But meanwhile, I hope that if you are local you can find the time to head up to Andover to get in one last visit to the Round Barn before it closes.  They will be open every Thursday thru Saturday in June from 10 am to 5 pm.  Stop up and say farewell.  And maybe stock up on Miss Mustard Seed products while they last!

a portable herb garden and a Fusion giveaway.

Happy Monday!  I hope you have your coffee in hand, this is going to be a long one!  So kick back and enjoy.

fbh portable herb garden

You all know that the people from Fusion offered me some free paint a while back to try out.  They also invited me to join their blogger group.  I am beyond flattered to be included in this group of really talented and creative people.  Today I’m participating in a blog hop with the rest of the group, and as a bonus for you, there is a giveaway component!  So, first I’ll share my Fusion project, but stay tuned at the end for all of the details on the giveaway and links to visit the other bloggers who are participating with Fusion projects of their own today.

At the same garage sale where I found my hard vulcanized fibre case, I also picked up a rusty old Craftsman tool box.

fbh before

Personally, I’m not opposed to rust.  I would have considered leaving this guy all rusty except for two things.  First, it’s going to be a gift for my mother-in-law, and I don’t think she has the same appreciation for rust that I do.  Second, someone wrote the price on top with a Sharpie at the garage sale.

fbh price

Yep, it was $2.

This is a good sized toolbox, and I decided it would make a fabulous portable herb garden for my m-i-l for mother’s day.

To prep the toolbox for paint, I sanded it quite a bit.  I wanted to remove a fair amount of the rust because I didn’t want a lot of it to bleed through the paint.  I’m sure that a proper paint job would involve somehow removing the rust entirely with some nasty chemicals or something, but that’s not the way I roll.  I just sanded until it felt pretty smooth, and then I wiped it down with a damp rag.  I taped off the handle, the latches and the Craftsman logo.  Then I added two coats of Fusion’s Laurentien.  Since you could still see the “$2” through the paint at that point, I added another two coats just over that writing, blending at the edges.  That did the trick.  I distressed the toolbox thoroughly.  Even though I didn’t leave it rusty, I still wanted it to look old.

Next I dug out my trusty Cricut machine and some white vinyl and added a title to my toolbox.

fbh herbs

A couple of years ago I used my Cricut and some vinyl to add my house numbers to my mailbox and they have held up beautifully outside in the elements.  So I’m hoping that this ‘herbs.’ holds up as well.  If not, it’s not the end of the world, the letters can just be peeled off again.

fbh closeup 2

With Fusion paint, you do not need a top coat, even if your piece will be going outside.  However, if you distress it down to bare wood or metal, like I have here, you should add some protection with wax or a top coat of some kind though.  In addition, you can add wax to help you achieve a more aged look, and that is what I decided to do with my toolbox.  I added a coat of Fusion’s beeswax first, and then strategically added some Cece Caldwell aging cream (a dark wax) to add a little more dimension.  Having that base coat of beeswax helps the dark wax be a little more ‘workable’.  You can blend it and move it around a little.

Never let it be said that I do things in the proper order.  I know it drives my handyman Ken a little nuts when I paint something, and then say “now, could you just fix this little piece?”.  He would prefer to do repairs before I paint, although I keep telling him that it’s OK if he dings up the paint, I want it to look distressed!  Anyway, I next flipped the box over and used my very manly large drill bit to make drainage holes in the bottom.

fbh holes

Plants do not do well without drainage.  Ooops, you can also see that I only painted the bottom with one coat.  Shhhh.  Don’t tell, no one will ever know.

As I mentioned this is a fairly good sized toolbox, and it’s already kind of heavy on its own.  For that reason, I didn’t want to fill it up entirely with dirt, so I used a little trick.  I filled the bottom with some empty cans and plastic bottles to take up some space.  This is a great trick to use if you have a large planter.

fbh filler

Once it gets filled in with dirt, no one ever knows!

fbh dirt scoop

One the dirt was in, the next step was to fill this baby up with herbs.  I found a great selection at my local Bachman’s.  I just love the Minnesota shaped tags on these.

fbh herb tag

I ended up with the golden oregano, chives, thyme, rosemary, tri-color sage and a purple basil.  My m-i-l loves to cook with fresh herbs, so I know she’ll get use out of all of these.

I planted them and then labeled them all with the same chalkboard picks I used for my administrative professional’s day flowers.

fbh closeup2

I tucked some vintage plates in the dirt too, just to add some interest until the plants fill in.

fbh plates

I know my m-i-l will love this little herb garden.  She often uses fresh herbs in her cooking and in salads.  If the plants fill in and get too crowded, she can always move some of them into her garden.

OK, now for the fun stuff.  You guys are eligible for some free stuff from Fusion now too!

fusion giveaway

There are two ways to enter!
1. Visit Fusion Mineral Paint here, and then leave me a comment telling me which one of their products you want to try the most and you’re in!
2. For a 2nd entry, follow Fusion Mineral Paint on Instagram here, and then comment again with your Instagram name letting me know that you have done so (or just leave the comment if you already follow Fusion on Instagram).
I will be randomly drawing a name from all of the comments I receive and that name will be provided to Fusion for a chance to win the grand prize.  Fusion will determine the final winner.  Each of the participating bloggers will be providing a name as well.  I’ll be keeping my fingers crossed that my winner will be the ultimate winner!
Visit-more-Fusion-Mineral-Paint-Projects.11-PM
Hint, hint:  You can also enter the contest at each of these other blogs giving you a whole bunch of chances to win!
This giveaway is good worldwide. You must be over the age of 18 to win. Void where prohibited. Winner will be deemed by random draw. Winner must enter with valid email and reply within 3 days of winning email sent to you. This giveaway ends Monday, May 18th, at midnight EST. Winner will be announced in this blog post by May 20th.
If you don’t want to wait to win and just want to get started on your own Fusion project today, the closest place to buy Fusion for my local readers is Farmhouse Inspired in Hudson.  Jody at Farmhouse has offered a discount of 10% on Fusion paint for my followers!  So, stop in and mention q is for quandie to get the discount!  Thanks Jody!
The rest of you can find your nearest Fusion retailer here.
Best of luck to you!  I hope you win!
5/19/15 update:  I used a random number generator to pick Miranda V. to submit to the final drawing for the Fusion prize.  I’ll be keeping my fingers crossed that she wins!
Final update!  The winner is Lucy Auburn, whose name was actually drawn by two of the bloggers participating.  Congrats Lucy!

thrifty lunch.

I spent my lunch hour checking out the local thrift shops again a while back,  and I hit the vintage camera jackpot.

thrift store cameras

Crazy, right?  I found four of them!  Which is funny, because I just said that I needed some more to fill in my black cabinet on the porch.

front porch hutch display

I knew that if I kept my eyes peeled I would find some!  I didn’t expect it to be this quickly, or to find 4 at once.

thrift store camera 1

I tucked all of them into my cabinet.

thrift store camera cabinet

I just need a few more to fill in.

thrift store camera 2

And in addition to the cameras, I also picked up this awesome pair of vintage glasses.

thrift store glasses

I’ve often thought it would be fun to have some vintage eyeglasses for staging furniture photos.  Especially desks or nightstands.  So I splurged and purchased these for $10.

I just love a thrifty lunch, don’t you?

hard vulcanized fibre.

One of the handy things about having a day job office that is located in a mostly residential area is that I can pop into garage sales on my lunch hour (one of the not so handy things is a limited choice for lunches).  I stopped at one the other day and didn’t find much, except I did get this interesting case.

brown case before

I was at a loss as to what it was for, and what it was made out of.  It didn’t quite feel like metal, but it definitely wasn’t leather.  I had a sort of cardboard-ish vibe, but felt much stronger.

Despite not knowing what it was made out of, I decided to paint it.  I wasn’t digging the brown.  And even though I wasn’t sure how it would work out, I went ahead and got out the milk paint.  Guess what?  It stuck just fine.  Two coats of MMS milk paint in Typewriter, a finish coat of hemp oil and a stencil left me with this.

black case

The case came with a really cool key that still works.

key

It wasn’t until I was editing the photos that I took for this post that I realized the label on the top said it all.

black case label

Hard vulcanized fibre.  Ever heard of it?  Here is what wikipedia has to say about it.

Vulcanized fibre is a laminated plastic composed of only cellulose. The material is a tough, resilient, hornlike material that is lighter than aluminum, tougher than leather, and stiffer than most thermoplastics.

So there you go!  If you were wondering whether or not milk paint would stick to hard vulcanized fibre, well, wonder no more!  It does.

black case after