a do-over.

Every winter a magical thing seems to happen.  Just when it gets too cold to be taking photos either outside or in the photo cottage, the leaves all fall off the trees and suddenly I have this fantastic light in my piano room.  This also happens to be the only room in my house with a wall that works as a suitable back drop for furniture photos.  It’s like kismet.

I was never really happy with the outdoor photos I took of this petite dresser that I painted in MMSMP in Kitchen Scale.  The fall leaves are gorgeous, but I didn’t like the way the color looked on the dresser.

Small dresser painted in MMSMP Kitchen Scale

So, once all of those yellow leaves fell, I decided to stage a ‘do-over’ inside the house.

do over close up

I think this gives you a better idea of the true color.  As we all know, Kitchen Scale is my fave, so I want to do it justice.

do over

Maybe it’s my imagination, and it doesn’t really look all that different.  Maybe I just prefer the color when paired with white and grey rather than yellow.

do over with chair

Either way, I’m glad I allowed myself a do-over for this one.

I had planned to add these photos to my craigslist ad for this piece, but there was no need because it sold without them!  I had a lot of interest in this one, so I am on the lookout for similar pieces to make over.  It seems that lots of people out there would love to have a Kitchen Scale nightstand/dresser!

whatever happened to …

I thought perhaps some of my regulars would like an update on various subjects that sort of got left hanging on my blog.

Danube cruise header

My cruise on the Danube is still ahead.  We are going during Christmas Market season, which means we will get to enjoy this …

Vienna Christmas market

And maybe even this …

Budapest winter

I don’t usually choose winter travel, but I’m getting prepared (more on that later) and am really looking forward to it.

Remember the Curtis Jere wall sculpture?  Or as Mr. Q fondly calls it, the deathstar?

Curtis Jere

Yep.  I still have it.  Here’s an update.  I sent inquiries to two auction houses that specialize in mid-century modern.  Palm Beach Modern Auctions would love to take it.  They estimate it would sell for $800 to $1,000.  But, I would have to ship it to them, and then they take a 20% commission.  I also contacted Wright in Chicago.  They estimated its value at $2,000, but they felt it wouldn’t be worth it to ship it to them and pay their auction fees (they did not elaborate on what those are) so they suggested I try to find a local buyer.  I have also contacted two MCM dealers in the Twin Cities, and so far neither of them have followed up with me.  I plan to continue trying to find a local dealer that specializes in mid-century, but meanwhile I am storing the death star!

Remember my grandiose plans for my front hallway?

hallway collage

Well, we got as far as ripping off the carpet and then the whole project was derailed by my decision to have  a booth at Junk Bonanza, and then spring came and I was so busy, and then summer came and I was still busy.  Now fall is here, and guess what?  I’m still busy.  Hopefully I’ll revisit this project over the coming winter!

Now, who actually remembers this one?

Cambridge before

This goes way back to last March.  Mr. Q and I picked it up north of the cities on a frigid winter’s night.  I still have this piece, but I haven’t worked on it.  The plan was to deal with it over the summer when I would have some space to spread out in the Carriage House.  Instead, it keeps getting shoved to the back of the list in favor of pieces that need less work.  Plus, the more I look at it, the more I think it’s a dresser that was “married” to two halves of a dressing table.  Right?  And once you have that visual in your head, you just can’t get it out and the whole piece just looks weird.  I think I need to consider taking these pieces apart again.  What do you think?

Finally, there is this bed.  This came as part of a set.

workshop bed

I already refurbished and sold the dresser and the vanity that went with this bed.  But the bed needs more work.  I have it pulled out front and center in the workshop.  I hope to get to work on it soon.

I think I’ve touched on everything that is left hanging.  Did I miss anything?

I’m not making any promises on any of this stuff … well, except the cruise on the Danube, I’m definitely doing that one!

easy upholstery.

A while back my friend Cathy offered me a vanity bench.  I initially thought it would work with my stenciled vanity/dressing table.  However, when I put them together, they just didn’t suit each other.  The bench is too wide for the vanity.  Nonetheless, it is a fabulous little bench, and I’m sure it will find a good home with another vanity, or maybe just on its own at the foot of a bed.

I painted it with Miss Mustard Seed milk paint in Trophy, and then reupholstered it in a simple linen with a stencil added.

This is so simple to do, and the linen stencils beautifully.  Here are my tools.

bench supplies

A stencil, some craft paint, a stencil brush, paper plate, paper towel, some new batting and some plain inexpensive linen (not pictured).

The original seat to the bench is underneath my supplies.  As you can see, all that was left was a remnant of the original fabric.  I ripped that off, and then cut my linen about 2″ bigger than the seat all the way around.

Now, this next tip is important, so I hope you are paying attention.  You should stencil the fabric on a hard flat surface before you upholster the bench.  You won’t get crisp lines on your stencil if you try to stencil over the batting.  I’ve learned this the hard way.

stenciled fabric

I just laid my linen flat on a table.  I squirted some paint onto the paper plate, swirled my brush in it, and then blotted it on the paper towel.  You don’t want your paint to go on thick and goopy or runny.  You could tape the stencil in place, but I like to live dangerously, so I just hold it in place.  Then, just stipple the paint on.

The Martha Stewart paint I used dries pretty quickly.  I probably only waited about 10 minutes before continuing on to staple the fabric over a couple layers of new batting onto the seat.

stenciled bench close up

The trickiest part of this process was being sure the design was straight before I stapled the fabric in place.

bench no 3

I just came to the realization that I did a pathetic job staging this one.  I meant to go back and add in some accessories, but I got distracted by laundry and then some gardening.  With the end of daylight savings time, it was getting dark out before I remembered and then it was just too late.

Let’s just imagine there is a lovely rug under this bench instead of my dirty photo cottage floor.  Or maybe a cute pair of shoes stashed under there.

stenciled bench again

Try to focus on the pretty upholstery and paint job, OK?

complications in the carriage house.

Carriage House Door poster

Sometimes I wonder if I make it all look too easy.  I want to be sure to share the disasters with you too.  And today I have a good one.

Recently I sent Mr. Q off to pick up an Eastlake dresser.  I love painting these.  I know there are probably some ‘antique’ people out there that cringe when I say that, but I only paint the ones that are in questionable shape.  So this one seemed right up my alley.  Note:  the photo below is not the actual dresser, I borrowed this photo online, but this is the basic style of the dresser and in similar condition.

photo from The Weathered Door

It was a little rickety, but Mr. Q had Ken over to consult, and he thought we could re-glue some key joints and it would be good as new.  So, we threw it up on some horses and started gluing and clamping.

We left everything to cure properly, and Ken said he would check on it the next day while I was at work.

That day, my phone rang at the office and it was Ken.  He was laughing so hard, he could barely get the story out.  Apparently he was going to move some clamps and add some more glue when he bumped the dresser.  He said he watched it, as if in slow motion, fall to the ground where it came apart into a million pieces.  There was nothing to do but laugh.  And laugh.  And then call me and laugh some more.  Note:  the photo below IS the actual dresser!

humpty dumpty pieces

Yep.  We’re going to call this one Humpty Dumpty from now on.

I don’t have all of the king’s horses and all of the king’s men, but fortunately I do have Ken.  And he likes puzzles.

He is actually looking forward to the process of putting it all back together again!  He likes a challenge.  It will make a great winter project for him.  So, it may be a while before you see this one again.  And there is always the possibility that instead of a sturdy dresser, we will just end up with some very expensive fire wood.  I’ll keep you posted!

road trip.

This past Saturday some of my gal pals, Sue & Cathy, and I took a road trip just south of the Twin Cities.  There are some great shops down in that neck of the woods that I have always wanted to check out.

We stopped in Carver first for a visit to Carver Junk Co.  I had met the owners of Carver Junk at the Miss Mustard Seed retailer training that I did last winter.  I’ve always wanted to check out their shop.  Carver is a tiny little town with lots of charm.

Look at this fab gas station.

carver gas station

And this gorgeous house.

Carver house

I got some great stuff at Carver Junk Co.  A scarf, some earrings, and this fab vintage book.

book

I’m not sure what I’ll do with this book, but I just loved the different fonts on the pages.  I hope I can come up with a cool idea for using these pages.

Unfortunately I didn’t get any pics inside the store, but they had some really gorgeous furniture pieces, many of them painted in Miss Mustard Seed milk paint of course.

Our next stop was Shop 501 in Chaska.

welcome

I could have spent hours digging around in this shop.  I’m sure there were lots of treasures that I overlooked.  I did pick up a dyed grain sack from this pile though.

dyed grain sacks

I’m not sure yet what I’ll do with it, but it looks pretty good just draped on an old ladder.

dyed grain sack

They had tons of great vintage pieces in Shop 501 …

vintage dresser

clocksincluding some great vintage toy trucks.  I’m always on the look out for one in my fave aqua color.  I’d love to have one for display at Christmas time.  My friends spotted one for me, unfortunately at $92 it was way out of my price range!

This one was sweet too.

books in truck

We had a beautiful sunny day for our road trip, and it was interesting to see what other people are doing with their furniture makeovers.  I came away with some fun finds, and some ideas for future projects.

boo!

When hinges creak in doorless chambers, and strange and frightening sounds echo through the halls; Whenever candlelights flicker where the air is deathly still – that is the time when ghosts are present, practicing their terror with ghoulish delight!

Happy Halloween!  I thought this would be the perfect day to share my latest creation with all of you because it’s perfectly bewitching!
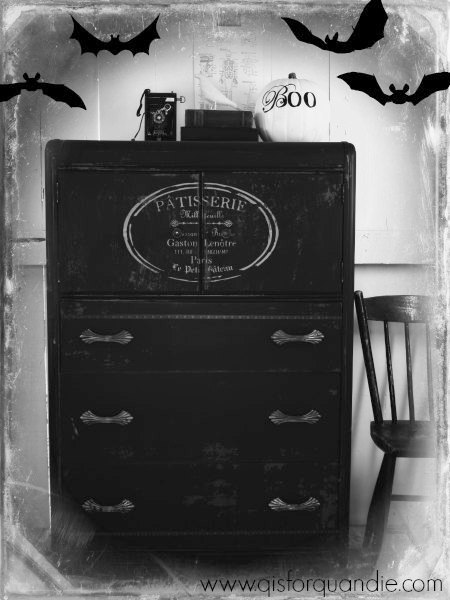
boo dresser with bats

Are you scared yet?

halloween closeup

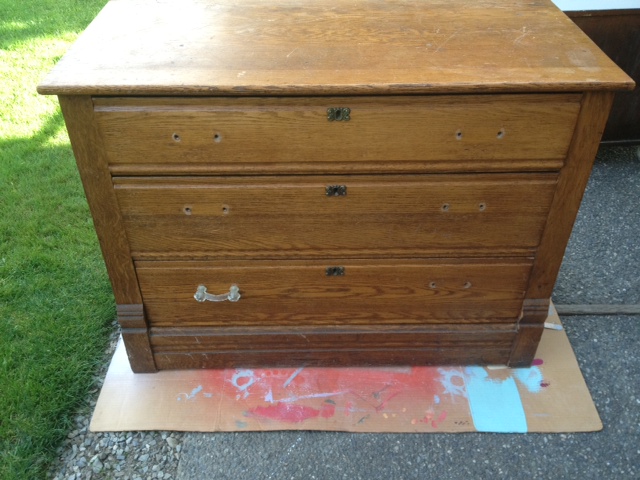
Mr. Q and I picked up this waterfall dresser in the dark of night a couple of weekends ago.  The ‘before’ picture is deceptive.  All looks well on the outside, but dig a little deeper and beware of creepy crawly things on the inside.

waterfall spooky before

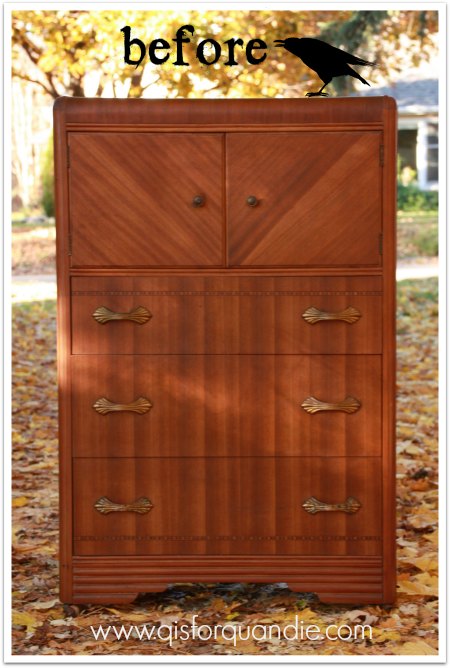
Seriously, all Halloween references aside, this dresser looked gorgeous in the light from the headlights on our truck, which was all we had to go by.  Even if we’d had more light, I still don’t think we would have looked past what appeared to be a dresser in pristine condition.  Once we got it home and really started to dig in, I realized that this one needed more work than I thought.  The top drawer was very hard to open and close, and there was some veneer damage along the bottom of the sides.  But it was nothing that I couldn’t deal with.

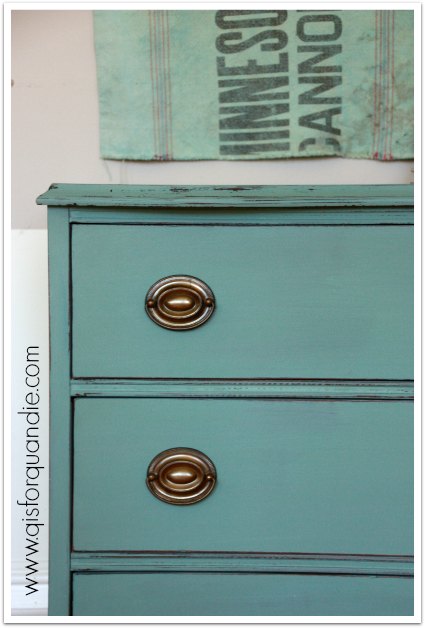
However, the biggest problem was that the seller must have coated this dresser with something to make it look this pretty.  I could feel an oily residue on it.  I suspected that this would be a problem when using milk paint.  So, I sanded it thoroughly, and then just to be double safe, I washed it with a TSP substitute.  Then I totally ignored the little voice in my head that said “maybe you should switch to chalk paint!”, and I painted it with MMS milk paint in Typewriter.

And as the paint dried, that was when I started to get scared.  It was chipping.  A lot.

waterfall super chippy

I wasn’t planning on super chippy, but super chippy is what I got.  Once I got over the intial ‘oh crap, what have I done’ moment, I realized that it actually looked pretty fab.  If you are an afficinado of the chippy look (and I am), this is really a cool dresser.

Let’s just discuss a couple of details before I unveil the dresser in all of its glory.  You may have noticed the little strips of inlaid veneer on the top and bottom drawers.  I thought they were pretty, so I masked them with tape while I painted.  I love how that worked out.

waterfall hardware

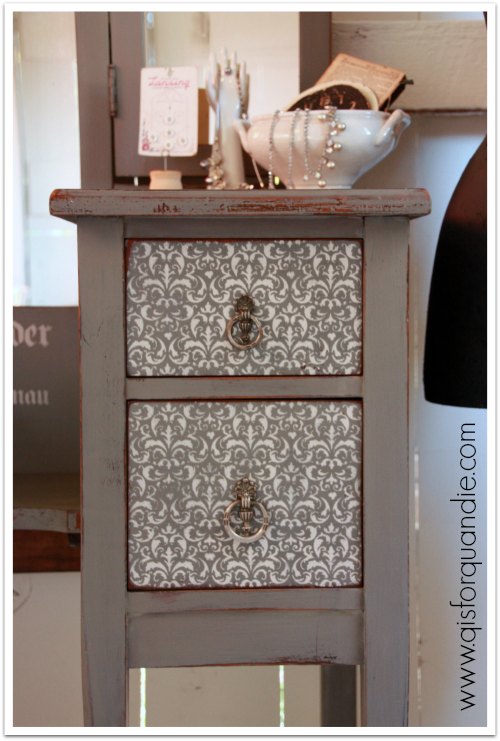
You can also see that I kept the original hardware.  It was just perfect for the dresser.

I also painted the interior behind the top doors black.

waterfall inlay

That interior space could be a nice way to hide a small TV in the bedroom, if one was so inclined.  It would have to be a small one though.  Aside from a TV, it makes a great space for spare folded blankets, or all of your sweaters.  This would be fun piece for a kitchen though too.  Plenty of storage with a more unique look than cupboards.

As usual, I really struggled with getting any sort of pictures that do justice to this dresser.  It’s just so hard to get good photos of black pieces.  And the contrast between the chippy areas and black paint is much more pronounced in photos than it is in person.  I spent the better part of an afternoon trying to improve my results.  I used a tripod.  I changed my aperture, I played around with my shutter speed.  In the end, this is as good as it got.

waterfall full pic

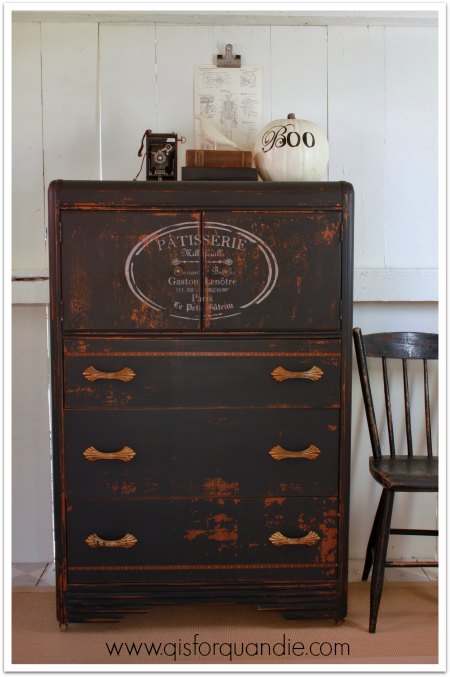
So, what do you think of my perfectly spooky make-over?  Who needs a bewitching black dresser?  Anyone?  Sorry, this one is sold.
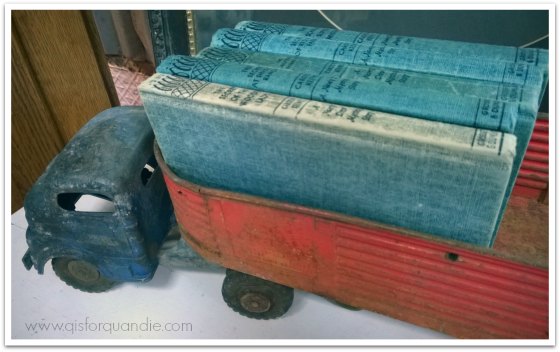
mirror, mirror

Who’s the fairest one of all?

Certainly not these two!  At least not yet.

mirrors before

A friend gave me these mirrors.  She was going to chuck them, but asked if I wanted them first.  They actually look nicer in this picture than they really looked in person.  They were kind of chunky/heavy looking, plus they have that 80’s finish on them.  I figured if nothing else, they would be great fun to practice painting techniques on.

Then I saw this pin, and was inspired.

Painted mirror from Reloved Rubbish

And as luck would have it, this pinspiration piece was painted in Annie Sloan’s Louis Blue and Old White, with a wash of Coco, all three of which I happened to have on hand.  Plus, I’ve been wanting to try using a wash, so here was my chance.

I started with two coats of Louis Blue over everything.  As you can see, I never tape off mirrors when I paint the frames.  I just have at it, then go back later with a razor blade to remove the paint from the mirror.  The sharper the blade, the easier this is to do.  I go through a lot of blades, but Mr. Q purchased a package of 200 for me, so I have plenty!

mirror in louis blue

Next I painted Old White around the frame and on the carved details.  At this point the colors are far too crisp for my liking.  You can also see here that I am not super particular about the lines between the blue and white.  I know that later I will be sanding those lines, and adding dark wax in the creases, both of which hide a multitude of sins.  So no need to be overly particular at this stage.

mirror with white added

Next I mixed equal parts water and Coco to make a wash.  The general directions I read about using a wash basically said to paint it on, then wipe some of the wash off with a clean cloth.  This was a super messy process. for me anyway.  Luckily I was able to do it in the yard, so it didn’t matter that watered down paint was splattering everywhere!  Turns out, I’m not so good at this.  I think with more practice, I would improve, but honestly I don’t think there will be many washes in my future.  It gives a finish that just leans a little too much towards that ‘faux’ look for me.

After the wash dried, I hand sanded the edges and the carved details, then used a coat of clear wax followed by some dark wax in the areas I wanted to define further.

mirror close up

So … to recap, this was two coats of Louis Blue, two coats of Old White, wash with Coco, sand, coat of clear wax, coat of dark wax.  Phew!  That is a lot more steps than I am used to doing.  I haven’t even finished the second mirror yet, but I wanted to get some pics for a blog post before I lost the light.

Mirror painted in Annie Sloan Louis Blue and Old White

I think they turned out gorgeous.  However, I don’t think the wash was worth the effort.  I could have gotten just as fabulous an effect with just the dark wax, and I feel like the wax looks a little more natural than a wash.

mirrror final

How about you?  Have you ever tried a wash?  Are you pro-wash, or anti-wash?

watching the leaves fall.

Every once in a while, I allow myself a pretty extravagant luxury.  It’s one that most of us rarely have the opportunity to indulge in.  It is a full day with no plans, no to-do list, no commitments elsewhere.  24 hours of whatever I feel like doing.  I find this super hard to do, how about you?  I’d like to say that I’d spend it just sitting in my adirondack chair, wrapped in a blanket with a steaming cup of coffee, watching the leaves fall.

watching the leaves fall

But seriously, who am I kidding, I could handle that for about 5 minutes max.  Then I would have to jump up and do something.

So, it’s not really about sitting back and doing nothing for me.  It’s more about doing what I want to, with no pressure to finish something or be somewhere at a particular time.  I just go where the day takes me.

This past weekend it took me on a tour of my fall garden.

fall asters

Remember all of those beautiful yellow leaves that were on my trees last week?  Now most of them are on the ground.

fall wheelbarrow

But even though it is nearing the end of October, we’ve had a very mild fall with only a couple of near freezing temps at night.  So, there are quite a few things in the garden that are still going strong.  Like my painted fern.

fall painted fern

And the lamium and heucherella.

fall heucherella

Even the ferns in the front window box still look good, and the white mums finally opened up.

fall window box

The hydrangeas always look good into the fall.

fall hydrangea

I know many gardeners take the time now to clear out the gardens for winter, but I rarely do that.  I think the yellowing plants provide their own sort of beauty.

fall statue

Now that I have taken you on a stroll around the garden, I think I might spend a little time painting.  I have two fun projects in the works.

upcoming projects

Stay tuned to see what I do with these!

vanity, thy name is …

vanity title

I sent Mr. Q out to rural Wisconsin to pick up this dressing table a few weeks ago.  There was some confusion about the location and he ended up at an abandoned farm.  He said there were overgrown weeds and rusted out farm equipment everywhere, and since we’ve been watching a lot of Criminal Minds lately, he was kind of creeped out.  It looked like prime serial killer territory.  Fortunately, he figured out he was at the wrong end of the road and was able to find the right house and no harm came to him.

And then he came home with this.

1902 vanity before

This piece seems older than the hills.  I decided to go with it and try to add even more age to it.  I painted it in MMS milk paint in Trophy.  Then, I added a stenciled pattern to the drawer fronts.  The gorgeous silver drawer pulls that came with the vanity worked perfectly with the grey of the Trophy.

vanity drawer close up

I added another stencil under the mirror, distressed heavily and finished with a coat of hemp oil.

1902 vanity stencils

And this would be about the moment where I realized that even though you can’t see that board at the back under the mirror while standing in front of this vanity, or while sitting in a chair in front of it … once you sit on the floor and start taking pictures shooting up it seems like a glaring omission!

So I went back and painted it, and then took some more pictures.  And voila!

1902 vanity title

A sweet little dressing table.  Or vanity.  What do you call them?  I must tell you, while surfing craigslist today I found one person calling theirs a ‘powdering desk’ and another called it a ‘sitting dresser’.  I generally call these vanities, but if you search ‘vanity’ on pinterest you’ll also get a bunch of bathroom vanities.  So, perhaps vanity, thy name is ‘dressing table’!  I don’t think I’ll go with ‘powdering desk’, although I do find it kind of quaint.

I staged the dressing table with a few of my favorites things.  Some vintage jewelry and buttons, and some crackly ironstone.

1902 vanity staging

Some old family photos.

1902 vanity photos

And of course, Lula, my dress form.  You can read all about Lula here.

1902 vanity with dress form

I got some great reflections of the photo cottage in some of my shots.

1902 vanity reflections

So, how about you?  Could you use a powdering desk of your own?

1902 vanity final

This one is available, leave me a comment if you are interested.  Sorry, this one is sold.

all the world’s a stage.

I had several small farmhouse style tables for sale at my fall Carriage House sale, and none of them sold!  So sad.  I was whining to my friend Sue about this, and she suggested I stage photos of them in all of their potential incarnations and then put them on craigslist.  After all, sometimes people just need a visual.

vintage typewriter

So, when last Sunday dawned semi-bright and sunny, I decided to put Sue’s idea into action.

I started with the Boxwood table being used as a desk.  You can imagine that vintage typewriter switched out for a lap top, can’t you?

boxwood as desk

But hey, how fab would it be as a potting bench as my reader Victoria suggested?

boxwood potting bench close up

boxwood as potting bench

Another great use for a table this size?  Use it to add much needed additional counter space as a kitchen island.

boxwood kitchen collage

boxwood as kitchen island

Hey, we’re not done yet.  This table would also make a great bedside table.  If you have the space beside your bed, this is a great alternative to a traditional night stand.

boxwood as nightstand

And then of course, there is always the obvious use … as a dining table that is just the right size for two.

boxwood for dining

boxwood for dining collage

Once I had all of this done with my Boxwood table, I turned around and did it all over again with the white one.

white table collage

And then, I took a nap.

Not really.  So … how about you?  Can you think of any possibilities I missed?  What would you do with one of these tables?