a pair of chairs.

The other day I saw an ad on craigslist for this pair of chairs (this is the seller’s picture that was with the ad).

chairs

Here is how my thought process went.  “Hey, those could be kind of fabulous!  Then again, maybe they are permanently ugly.  I know paint can do wonders, but is the shape all wrong?  And what are those weird pointy things sticking out of the back?  Will they come off?  And what is under those cushions?  Even though the upholstery is white, it still manages to be all wrong with that 80’s texture and sheen.  What will it take to re-fab these?  Should I?  or shouldn’t I?”

Then I did some research on pinterest and the closest I came to a similar chair that looked good was this chair from The Cross Decor & Design (although it appears to no longer be available).

wing back cane chair

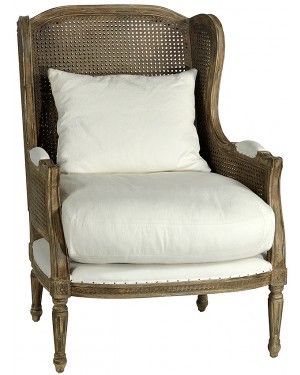
And it’s not painted.  Mine will be painted.  But it still gave me a hint of what these chairs could look like.

After exchanging a couple of texts with the seller and finding out that yes, those back cushions are removable and there is cane beneath them, I decided to take a chance on these chairs.  Mr. Q and I drove out to pick them up on a frigid evening.  Upon seeing the chairs in person, I was still not sure about them.  They weren’t as nice as the cane back chair I painted last year that now resides in the Q Branch, but I had to remind myself that I wasn’t sure about that chair at first either.  The price was right, and I was there already, so I handed over the cash and threw them in the truck.

Here is my ‘before’ picture of one chair.

chair before

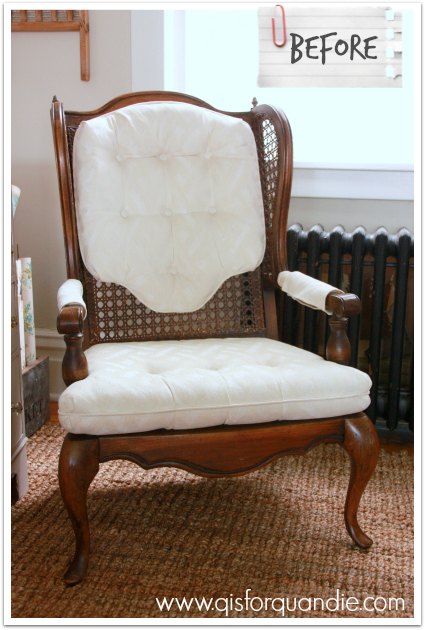
From the angle of my shot you can see that it has some pretty cabriole legs in front, and some nice curves on the arm supports that weren’t as apparent in the craigslist photo.  That back cushion is still just freaking me out though!  Not to mention the weird pointy details, which as it turns out are made of metal.

chair metal acorn
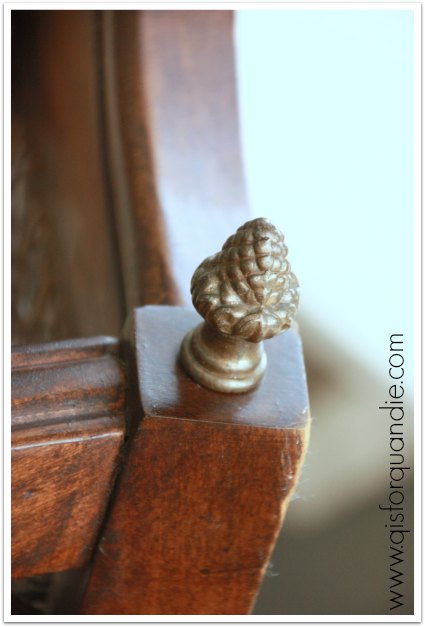
Those are definitely coming off!

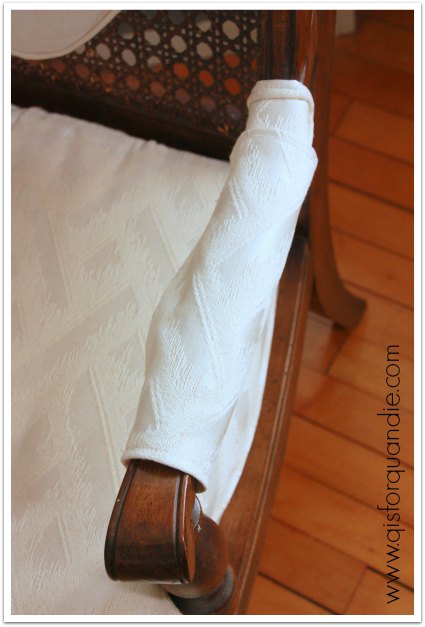
Then there are the tacky arm sleeves that are velcroed in place.

chair arm covers

Gotta go!

Here is the chair with those items removed.

chair better already
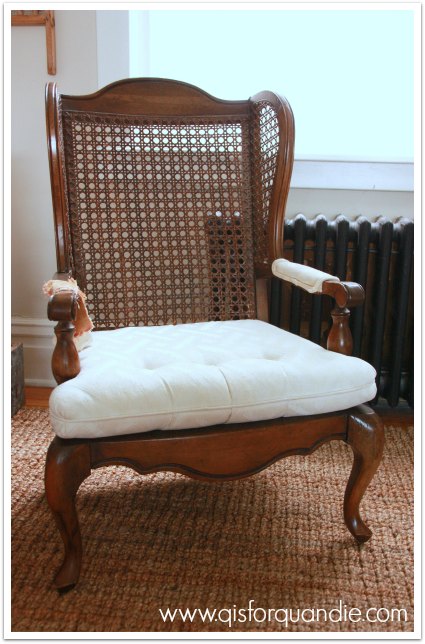
Ahhhhh, getting better already.  I also found upholstered arms under those funky sleeves, and started ripping one off.  There are about a million staples holding it in place though, so that little process is going to take some patience.

I threw one of my H & M pillows on the chair just to get a feel for how it would look without back cushions.

chair with pillow

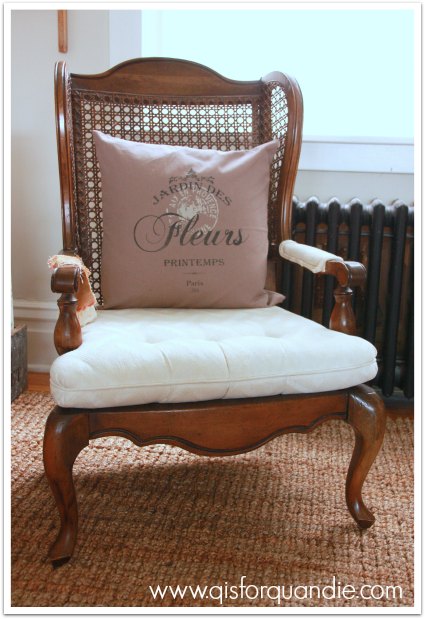
Not bad, right?  Some paint and some new fabric on the seat cushions are going to do wonders for these chairs.

By the way, after I showed these chairs to Meggan, she sent me this.

fixer upper chairs

Turns out that Joanna Gaines used them in the a recent episode of Fixer Upper, the Tire Swing House.  I hadn’t even noticed!  Well, if cane wing back chairs are good enough for Joanna, they are good enough for me!

Now I just have to decide, should I go for chippy with Miss Mustard Seed milk paint, or solid with chalk paint?

vintage goodness.

Way back on my birthday last November, my friend Terri gave me a galvanized cake stand that she purchased from Decor Steals.  She knew it was so ‘me’, and that I love pretty much all things galvanized.  Yet, still, it sat around for all of this time because I was struggling with how to use it.  Obviously, I’m not going to be using it for cakes.  I’m one of those people who has to dust my stove, remember?

I finally decided that I would use it as a centerpiece on my dining room table.

vintage goodness

And I pulled out some of my vintage pieces in my favorite shade of aqua to put on top of it, the flour sifter that I picked up recently while thrifting and a little clock that I purchased at Oronoco Gold Rush.

clock and sifter

I also added my favorite aqua clock and some aqua flower frogs, along with another of my ’22’ tickets.

clock and ticket

I love how it looks on my table.  I may change out the cyclamen plant with something in bloom, but for now I like the patterns on the leaves.

I like changing up little things like this in my house.  It gives me an opportunity to see things with a fresh eye, and it doesn’t cost anything.  You should give it a try.  Move some of your things around and display them in a different room, or in a different way, just for fun!

sail the seven seas.

Remember the lovely tall dresser I picked up a while back and took its photo in the snow?

riverside dresser before

I pulled it out of storage for its makeover last weekend.  The shape of this dresser says ‘gentlemen’s chest’ to me.  Usually the taller dresser in a set was meant for the gent (sorry, couldn’t resist that bad rhyme).  I could easily have gone more feminine on this piece though, with those pretty curvy legs at the bottom.  But I was feeling the masculinity of this piece and went with MMS milk paint in Artissimo, which is a rich navy blue (finished with Cece Caldwell’s clear wax, which has rapidly become my favorite wax to work with).  I stripped the top and then just waxed it with the Cece Caldwell’s dark wax.

Dresser painted in MMS Artissimo milk paint

After adding a vintage suitcase and my dad’s old Tarzan books, I was getting the feeling that this dresser had a sense of adventure.

seven seas leg and suitcase

artissimo staging

Then I added some old sheet music inside the upper drawer.

seven seas sheetmusic

And now this dresser is ready to sail the seven seas!

artissimo dresser side view

How about you, are you ready for some adventure?

Linking up with:

Embracing Change

lock in your love.

Have you heard of love locks?  According to wikipedia the idea of love locks goes back 100 years, but they started appearing in Europe in the early 2000’s.  What am I talking about?  For those of you who don’t know, it’s simply the idea of affixing a padlock to a bridge or a gate as a way to symbolize your love.

I saw my first love locks back when Mr. Q and I were in the Cinque Terre in Italy in 2008.

cinque terre love lock

We walked along the Via dell’Amore and wondered why all the padlocks?  Someone explained them to us, and we were so bummed that we hadn’t know about it in advance and didn’t have a padlock with us.

We vowed to pay attention the next time we traveled, and sure enough, when we went to Prague in 2011 we brought a lock.  And we researched in advance so that we could find the right spot.

love locks Prague

It was a charming little bridge that was kind of hidden away in the Mala Strana, but not far from the main areas.  We attached our own padlock and figured our love was now unassailable.

love lock Prague 2

Comically though, we missed the part where you are supposed to lock it, and then throw the key over the side.  Key?  Wait, what?  We brought a combination lock!  Ha!  Oh well, close enough, right?

Unfortunately, it seems that what started out as a sweet and romantic custom, has now become a menace.  Love locks are popping up all over the place.  According to BBC News, they are creating havoc.  Adding so much weight to often historical bridges that their structures are compromised.  Some just think they are an eyesore.

love locks Prague

Personally, I think graffiti can be an art form.

marry a clown

But, I get it.  Not everyone loves it.  And the number of locks really adds up over time.  It costs money to remove the locks when there gets to be too many.  It’s not like coins in a fountain, where at least the value of the coins offset the cost of cleaning them out of the fountain.

Now that I have done the research, Mr. Q and I won’t plan to lock up our love again.  There were a couple of locations on our last trip where we could have done so, in Elisabeth Square in Budapest, or on the pedestrian bridge across the Danube in Regensburg, but we neglected to bring a lock with us this time.  At first I felt bad about that, but now I wonder if maybe it was a good thing.  We don’t want to contribute to the destruction of historic bridges.  We’ll just have to rely on our combination padlock in Prague and hope that it continues to do the job.

I hope you have your love all locked up this Valentine’s Day too!

fixer upper.

Are any of you watching Fixer Upper on HGTV?  I had 4 different friends tell me that I just had to see this show.  If 4 people who know me well think this show is right up my alley, it must be!  Luckily, I found Season 1 in its entirety on Comcast on Demand.  So last weekend I had a Fixer Upper marathon.  My friend Meggan suggested a drinking game to go along with the show.  Every time Chip says “bucks” you have to take a drink.  Had I been playing the game, I would have been sloshed after just one episode!  And I watched about 10 of them.  Once you start listening for “bucks”, it’s hard to watch the show without giggling every time he says it.  Go ahead, just try it!

Aside from that, I have to say that I love Joanna Gaines’ style.

Fixer Upper - Tire Swing House
Fixer Upper – Tire Swing House
Chip and Joanna Gaines' farmhouse
Chip and Joanna Gaines’ farmhouse

 Check out more pictures of the Magnolia farmhouse here.  If you aren’t watching the show, you should be!  And go ahead and add Meggan’s drinking game and let me know how that works out for you!

But meanwhile, I have a little fixer upper of my own to share with you today.  I purchased this industrial stool from my friend Sue at my own Carriage House sale.  No one else bought it (which is just plain crazy, it was $12), so I did!

mint stool before

Some people might have just left this stool as is.  But since I pretty much paint anything that isn’t nailed down (and even a lot of stuff that is), I decided to give it a little makeover.

I painted the entire stool with some custom mixed milk paint, the same paint I used on the Wintergreen dresser.  So, now it looks like this.

mint stool after

It has a metal base and a wooden seat.  From everything official that you read about milk paint, you wouldn’t think it would stick to metal without using the bonding agent.  However, I have found that isn’t always the case.  I’ve painted a couple of other metal pieces and not used bonding agent, so I decided to give it a try on this one too.  Worst case scenario, my paint would all flake off and I’d start over.  Instead I got some very nice chipping, but not too much chipping.  Here is a close up of the metal legs so you can see the end result.

mint stool close up

In addition, the mixed milk paint I used was close to 4 weeks old.  Mixed milk paint isn’t supposed to last more than 5 to 7 days.  I’ll admit, it was a little stronger smelling than usual.  But other than that, I didn’t see any problem with using it.  Once I gave it a good stir, it wasn’t lumpy at all.  It had thickened up a little, but that worked in my favor on this piece.

mint stool top

I’m not advocating painting with milk paint that is past it’s due date, or counting on it sticking to metal.  However, sometimes breaking the rules works out just fine.

mint stool staging

the paris bed.

The client who purchased the gorgeous dresser that I painted in Duck Egg blue recently, also purchased the matching bed.  She’s not putting them in the same room though.  The dresser was for her own bedroom, and the bed is intended for her daughter’s bedroom and she wanted it painted white.  I am still a big fan of white painted furniture, although I don’t do as much of it as I used to.  I knew this bed would be gorgeous no matter what color it was painted though.

Bed painted white.

Am I right?

But let’s go back to the beginning of the story.  This bed had some damage on the footboard, which you can see here.

paris bed damage

I sent it home with Ken for repairs.  He chiseled the break so that it was even, and then glued in a piece of wood to patch it.  Here is how it looked with the patch in place.

paris bed repair collage

If you haven’t heard me say it before, I’ll say again, I am very lucky to have Ken for a neighbor.  He can do these sort of repairs in no time, and he does a beautiful job of it.

Here it is painted.  You can hardly even tell that there was a problem.

paris bed repair painted

This foot board was really the piece that sold me on this entire bedroom set.  I have seen many beds with a foot board that curves around the bed, but I had never seen one that had side pieces quite like this.

paris foot board corner

Aren’t they just gorgeous?  The headboard on this bed is lovely too.

paris bed headboard detail

But the foot board is like a work of art.

paris foot board closeup

I staged the bed with a stack of vintage suitcases, and you’ll recognize my faux french hat box from Monday’s post.

paris bed with suitcases

My client told me that her daughter loves everything french, so I couldn’t help adding a little surprise to the bed.

paris foot board full

Do you see it?  There at the bottom?  A little Paris stencil that fit perfectly on that raised section of trim.

paris bed stencil close up

I think it added the perfect finishing touch to this lovely bed.

White bed with Paris stencil

paris bed before and after

Linking up with:

French Country Cottage

pop up painting class.

I’m hosting another BYOP (bring your own piece) pop up painting class!

class title

Here are the details:

When:  Saturday, February 21 at 10 a.m. (class will last approx. 4 hours, but may go longer if we are waiting for pieces to dry)

Where:  Casa Q (that’s my house, which is in Oakdale near the intersection of hway 36 and 120)

What:  The goal of this class is to send you home with a fully finished painted piece (that you brought with you) of some kind.  Your piece needs to be small enough to fit on top of a table.  For example, a stool, a small chair, a mirror frame, a small side table, a plant stand, a magazine rack, a doll sized dresser, a metal tool box, a vintage suitcase …

painting class collage 1

painting class collage 2

you get the idea.

You will learn about both milk paint and chalk paint, plus the many different top coats that are available for them.  You’ll learn which pieces do well with milk paint, and which ones are better off with chalk paint. as well as how those products with react with different pre-existing finishes.  If someone wants to stencil her piece, I have a multitude of stencils available for your use.

Included:  all supplies necessary to finish your piece, snacks and beverages.

Cost:  $95 per person

I only have room for a maximum of 4 students, and I need a minimum of 3 to hold the class.

If you are interested, please send me an email at oakdalecarriagehouse@gmail.com to hold your spot!

Update:  I have 3 signed up, only one spot remains!  Let me know if you want it.

a french hat box.

Last year when I shared a booth at Junk Bonanza with my friend Lori, she purchased some absolutely gorgeous vintage hat boxes from Belgium from another vendor.  I absolutely loved them, but they were priced way out of my price range.  Since my typical price range for such things is probably around $12, I guess that isn’t saying much, but let’s just say they were quite a bit more than $12.

I don’t have pictures of the exact boxes that she purchased, but they were similar to this.

via pinterest
via pinterest

I’ve always had an idea in the back of my head to create my own similar hat box, but recently when some of my co-workers introduced me to transferring graphics using gel medium I realized that I really should give it a try.

So I pulled out a hatbox that I happened to have on hand.  Before I started, it looked like this.

hat box before

First I added a base coat of chalk paint in French Linen (a greige color), then I added two coats of white.  While that dried, I found a graphic that I liked from the Graphics Fairy and printed a reverse image of it on my regular old laserjet printer.

nov-french-rev-transfer-gra

Once the paint was dry, I painted a coat of the gel medium onto the hatbox where I wanted the label to go, and then placed my printed image face down on top of that.  I smoothed out any bubbles and made sure it was nice and flat.  Then I left it to dry for a couple of hours.

Once it was good and dry, I used a wet cloth to wet the paper.  Then I gently rubbed the paper off, leaving the image behind.  I had to use a lot of caution because I was working on top of chalk paint.  As you may know, chalk paint can be distressed (or wiped off) using a damp cloth, so I had to work cautiously to make sure I wasn’t rubbing off any paint.  I did find that the gel medium protected the paint fairly well, but if I rubbed outside the area with the gel medium I did remove some paint.

Once all of the paper was removed, I added a coat of wax to the entire box.

And voila!

faux french hat box

You can see that I had a little trouble with the upper right corner.  I think I didn’t have as thick a layer of gel medium in that spot.  I’m OK with that though, because I think it helps the box look aged.

hat box close up

I could have added a little dark wax to give it a little more weathered look as well, but for now I like the whiteness of it.

hat box vignette

The alabaster lamp is one that I picked up at a garage sale last year.  I just re-wired it, which is super simple.  If you’ve never tried it, don’t be afraid to do so, it really is easy.  Do you recognize the skeleton lamp shade?  It’s the small white shade that I picked up on my thrifty field trip with its cover ripped off.  I just clipped on a vintage wedding photo instead.

hat box on suitcase

So what do you think of my faux french hat box?  Do you think it comes close to passing for the real McCoy?  I can tell you that it cost way less than $12 to make, so it was right in my price range.

Update:  bad blogger alert!  I’ve been a bad blogger and not given you the ‘official directions’ for this project, which say to let the gel medium dry for at least 8 hours.  Also, if you’re wondering, the product I used was Liquitex acrylic gel medium.  If you want to try this at home, here is a much better step by step tutorial on how to do it yourself.

Linking up with:

My Salvaged Treasures and French Country Cottage

lucky is a state of mind.

Remember my pile of goodies from my thrift store field trip?

field trip 1

You can’t see it very well, but the lampshade is sitting on top of a white metal shelf.  I think these vintage shelves were typically intended for the bathroom.  This one didn’t have much going for it, but I wanted to give it a colorful makeover.

So, I painted it with Cece Caldwell’s Santa Fe Turquoise, added some vintage wallpaper to the shelves, touched up the gold trim with some Rub ‘n Buff and added another Tim Holtz rub-on to the front.  So now, it looks like this …

lucky shelf 1

I love using pretty containers for utilitarian supplies; a little crystal bowl for your cotton wipes, and a vintage pink elephant shot glass for your q-tips.

lucky shelf 4

A while back I purchased a set of state trivia cards at a garage sale.  They are the perfect color for me, and I thought they would be fun for scrapbooking.  You might have noticed it clipped to the ladder in the q branch, but I borrowed it for this photo shoot to hide a nail hole in the wall.  Plus it plays into my “state of mind” theme perfectly, get it?

lucky shelf 3

So, I happen to have a whole bunch of these cards for different states that I don’t really need.  If any of you are from a different state and would like your state card, leave me a comment and let me know what state you would like and I will pop it in the mail for you  (not available:  Nevada, Florida & New Jersey … and obviously Minnesota).  I don’t think I have every state, but I have quite a few.  First come, first served.

lucky shelf 2

I’m not the only one who believes that lucky is a state of mind, right?

Update:  as of Sunday morning, I still have Alabama, Arkansas, Connecticut, Delaware, Georgia, Idaho, Kentucky, Maryland, Massachusetts, Mississippi, New Hampshire, North and South Carolina, Oregon, Rhode Island, Tennessee and Vermont.  Anyone?

c’est magnifique!

Remember the really gorgeous bedroom set I picked up a while back?  I have been working on a custom paint job with a client on the dresser (and she is also purchasing the bed).  I have to say that coming up with a plan for the dresser was very much a collaborative effort.  We started out in a completely different direction, but once my client shared her vision for the entire room (this dresser is going to be part of a full makeover of her master bedroom) we were able to pull together a look that will work in the room.  One of the major considerations was another piece that she has, a gold antique french curio cabinet.  Something similar to this (although this is not her exact piece) …

french gold curio

I knew that she wanted a french look for the dresser, but once I saw this piece I realized she wanted what I consider a ‘Louis the XIV’ sort of french look.  We had originally talked about using black on the dresser, or possibly even a grey.  But I really couldn’t picture either of those colors working well with the gold piece.  The gold curio is clearly a statement piece and should be the standout in the room, but the dresser will also have a big presence.  I didn’t want them to compete, but instead work together.  At some point, my customer mentioned that she liked the idea of adding some gold to the dresser.  I’ll admit, I was not on board at first.  But then I started doing a little research on pinterest.  I even put together a new board called ‘go for the gold.’

This chair in particular sold me on the gold idea.  I realized that when done right, a touch of gold could be gorgeous.

french chair

Also, this made me feel like I finally had a clear idea of what my client was looking for.  Except instead of grey, we decided on Duck Egg blue, which will bring out some of the color in the mural on her curio (which is similar to the example above, with a gentlemen in a blue coat).  It’s also the color that she originally talked about wanting to bring into the room.

Which brings us to the resulting dresser.

Dresser painted in Annie Sloan Duck Egg

I used a light hand to apply the gold Rub ‘n Buff to bring out the details on the dresser.

french dresser detail

It’s enough gold to help tie this piece in with the curio cabinet.  I think the gold works really beautifully with the Duck Egg blue.

dresser painted in Annie Sloan Duck Egg

I staged this piece very simply with an old book that has the same look as the dresser, a duck egg blue with gold details, and a vintage clock.

french dresser detail 2

The original hardware on this dresser is very pretty, and was already gold toned.  I just cleaned it up a little and put it back on.

Annie Sloan Duck Egg with Gold Rub 'n Buff

Those little doors at the top of the dresser open to reveal two shelves inside.  I painted the interior to match.  Don’t you just love the curvy-ness of that opening?

french dresser inside

I also love the little detail of these pretty brackets that sit at the back of the wider portion of the dresser.

french dresser bracket collage

I’m more than happy with how this dresser turned out in the end.  It was such a gorgeous piece to start with, so I wanted to do justice by it, and I think I did.  What do you say?

french dresser before and after

P.S.  That little french cane back chair with the gold accents from my pinterest board is going to be the inspiration for how I paint the vanity that matches this set.  But first I have to paint the bed.  Stay tuned.