in one short year.

Just one short year ago my sister was visiting on her summer vacation.  She lived in New Jersey then.  We had talked about the idea of her moving to Minnesota, but I didn’t really think that would ever happen.  We enjoyed a fabulous breakfast on the deck

berries

And we spent some time planning our then upcoming river cruise on the Danube.

budapest guide books

If you had told me then that in less than a year both my sister and my niece would be living in Minnesota, I don’t think I would have believed it.  I still have to pinch myself whenever we make casual plans to get together.  You see, it’s the casual plans that are the most surreal.  We’d always been good about getting together for big plans (like a cruise down the Danube), but what you don’t have when your sister lives halfway across the country are the casual get together’s.

bad Danube selfie

The other day I was in the Q Branch writing a blog post and a car pulled up in the drive.  Mr. Q said “oh look, it’s the relatives!”  And I honestly was puzzled about who it could possibly be.  It couldn’t be my sister-in-law, I had just seen her about an hour earlier on the other side of the cities.  She certainly wouldn’t have turned around and driven out our way.  Could it be one of Mr. Q’s cousins?  They’ve never been known to just drop by, so that would have been odd.  It wasn’t until I popped my head out the door and saw my sister and niece that it hit me.  Now I have relatives who can just drop by!

In one short year my Limelight hydrangeas have gone from this size …

hydrangea 2014

to this size …

hydrangea 2015 2

(this thing is giant this year!)

hydrangea in 2015

And my life has gone from seeing my sister two or three times a year to going to a Zumba class together every Wednesday evening.  I pick her up because the gym is right around the corner from her apartment.  And then after class, I drop her off.  It seems so wrong.  I shouldn’t be just dropping her off.  I should be staying a while and visiting, making the most of every minute I can spend with her because I may not see her again for a while … but wait … I don’t have to think that way anymore.  I can see her every day now if I want to.

cast - debbie

Then again, maybe I should still think about it that way.  I’m going to continue to make the most of it, because you never know how much things can change in just one short year.

dining room progress.

I am making steady progress on my dining room makeover.  The chairs are all finished up, and my former chairs have gone to a good home (thanks Patty!)

chair seats

I’ve removed the bad IKEA lights that were hanging over the table.

dining room ceiling

For now I have replaced them with a funky junky lamp of my own devising.  I purchased a fab old lamp shade skeleton at the Round Barn’s going out of business sale.  Then I used some simple wiring supplies from my local Ace Hardware to make my own hanging fixture.

dining light parts

I simply threaded the cord through the opening at the top of the shade where normally the shade would attach to a harp.  I wired it to the pull chain socket, screwed in the bulb and voila!

dining light

I hung the light from an old pulley that I had in my “stash of stuff I want to use someday” (you all have one of those, right?).

I’d love to now brag about how cheap this project was and how I came up with this cool lamp for less than $20, but that ain’t the case.  I spent around $25 on the electrical parts, plus another $30 or so for the shade.  You can’t really tell in the photos, but that lamp shade is 2′ across.

dining light closeup

Next up, an amazing hutch that I picked up last Friday.  I think it’s going to be perfect for the room.  I got it painted on Saturday, but yesterday we went to the zoo with my sister and niece, so I didn’t get it waxed yet.

zoo title

And yes, we were wearing jackets in August.  It was only in the 60’s here yesterday.  It was a perfect day for the zoo.  No crowds.

zoo 1

Lots of great animals to see.

zoo 2

It was a great break from painting furniture!  But I’m back at it today and hope to share my finished hutch with you soon!

let’s talk about chipping.

So, I know a lot of people have asked the question “does a chippy milk painted piece continue to chip after it is finished?”  Well, I thought I would give an answer to that question based on my own experience.  Disclaimer:  these are only my own opinions based on my own experience with milk painted pieces, this is not a sponsored post.

green chippy close up

It’s not a simple yes or no answer though (it never is, is it?)  The answer is yes, and no, and it depends.

Let’s start with the “yes” answer.  If your piece is (1) fairly chippy, and (2) you haven’t thoroughly removed all chipping paint, and (3) it gets a fair amount of use, and (4) you haven’t sealed your piece with something like poly or Miss Mustard’s Tough Coat Sealer, then yes, your piece will probably continue to chip.

An example of this is my French cane back chair.  I painted this piece back in February 2014 (here is the original post) and this is how it looked then.

IMG_7749

As you can see in the above photo, it’s nicely chippy.  Not extremely chippy, but there is definitely some chipping.

For about a year the chair was not used much, but then I moved it into the Q Branch in January 2015 and have been using it quite regularly since then.

study desk w french chair

And here is how it looks now.

chair back now

I’d say it has lost a fair amount of paint, especially on the cane back, but also on any raised areas or areas where the chair is handled a lot.

chair back 2

Personally I love this look!  The more worn the better, this is what I’m aiming for on pieces that I’m keeping for myself.  This chair was finished with wax, by the way.  It has not been sealed.  I haven’t ever felt like there are paint chips on the floor every day or anything like that, but over time I clearly have lost some paint.

Here, I’ll make it easier for you to see with a side by side comparison …

side by side

The cane was also painted with milk paint.  I painted this chair in the winter, so I couldn’t use my cheater spray paint method on it (I don’t like to spray paint in the house).  I’ll have to keep an eye on my new cane back dining chairs and see if the spray paint holds up better on the cane.  I suspect it will.  Maybe I will regret that down the road, because I’d be happier if my dining chairs did look this chippy and shabby.

My next example of chipping is the French Market sign in my kitchen.  This was uber chippy when I finished it.

sign 2

I have it leaning on the back splash of my kitchen counter.  It also just happens to be where we lean freshly washed dishes (we don’t have a dishwasher, or as I like to say my dishwasher is named Mr. Q), and as it turns out, damp conditions will definitely contribute to continued chipping.  Here is how it started to look after being there for a few months.

chippy close up

I knew that if I tried to sand and/or scrape off these chips I would have barely any paint left.

So instead, I added a coat of Miss Mustard’s Tough Coat Sealer.  And it no longer chips at all.  We still lean freshly washed dishes on it with no problem.  The Tough Coat Sealer does add a little shine to the finish, but just a little (you can’t even see it in the photo).  Here is how it looks today.

sign after

It sort of ‘glues’ the chips into place.  So if you have a really chippy piece, and you want to keep those chips, then this is a great option for you.

Then there is my “Kitchen Scale” buffet.

Kitchen Scale hutch

You can see that it has a decent amount of chipping around the edges.  This piece was thoroughly sanded, vacuumed and finished with hemp oil.  I believe I got all of the loose paint off when I finished it almost two years ago.  It also gets a fair amount of use.  In the winter I store my paint inside this (some people store dishes in a buffet, I store paint!) and I constantly push it out of this spot so that I can use the spot for photo shoots of finished furniture.  So it gets manhandled fairly often.  Yet I have not had any continued chipping on this one.

So, to recap.  If your milk painted piece turns out really chippy and you don’t remove absolutely all of the flaking paint, it will continue to chip (unless you seal it with Tough Coat Sealer or something similar).  Also, if your milk painted piece is exposed to damp conditions, it will likely continue to chip (again, unless you seal it).  In addition, if your piece is going to get heavy use (like a chair that one sits in for many hours while posting on their blog) you may get both additional chipping and general wearing off of paint.  However, if you’ve done a good job getting all of the flakes off to begin with, and your piece stays in a fairly dry area, and it’s only manhandled once in a while it shouldn’t chip more down the road.

vintage vanity detail 2

And finally, just for the record, I love the chippy look, so I generally don’t use a sealer on my pieces (I stick with wax and hemp oil).  I also don’t usually sand every last scrap of chippy paint off, because I want to see those flaky bits left behind.  To me that is the beauty of milk paint!

you can

If you don’t love the chippy look, I’d recommend using chalk paint or Fusion paint.  Why bother with milk paint unless you are going for a chippy look?


ironstone and almond.

Sorry to say, I neglected to get a before picture of the dresser I painted last weekend.  But there wasn’t much to see.  It wasn’t hideous and it also wasn’t a piece where it was hard to see the potential.  This one went in with lots of potential and it lived up to it beautifully.

ironstone and almond

After patching a couple of spots of chipped veneer on the drawer fronts, I stripped the top.  I wasn’t sure if the wood was going to be very pretty with just the CeCe Caldwell Aging Cream, but decided to give it a go.  I’m so glad I did.  My sister was sharing my workshop while working on her china cupboard (soon to be revealed), and she was amazed by the transformation with just a little wax.  A while back one of my readers, Teri, asked me to show pictures of just such a transformation in progress, so here they are!

Here is the top after stripping (using a citrus based stripper), sanding with 220 grit sandpaper and wiping clean with a little TSP substitute (phosphate free, I use the spray and get it at Mendards).

stripped top

It looks very dry and not terribly pretty.

Then here I am applying the Aging Cream with a piece of old flannel sheet (action shot taken by my sister, note my paint splattered fingers!) …

waxing action shot

So, just to be clear.  I am simply rubbing the Aging Cream (a.k.a. dark wax) into the wood, and it brings out that much gorgeousness!  Please note, the use of ‘lint free cloth’ is recommended for waxing, but I am a rule breaker!  Since I had sanded this wood smooth, I thought the flannel was a safe bet and it worked for me.

waxing

After rubbing the wax on, I usually wait about 10 minutes or so and then wipe away the excess with a fresh, clean cloth.  Here it is after that step.

waxed top after

If you want more shine, you can go back after 24 hours and buff to a shine.  I usually skip that step, I’m just not a ‘shine’ girl.

I can remember back to before I tried this myself.  I had no idea that you could simply use wax to achieve these results.  No stain, no poly.  Of course, the results depend a bit on the natural beauty of the wood you are working with, so keep that in mind.  Also, a waxed top will not be as durable as a poly’ed top.  I think that is perfectly acceptable for a dresser, but maybe not as good for a desk or table top depending on how much wear they will get.

So … here’s what I did with the rest of the dresser.

ironstone and almond title

I painted the body of the dresser in Miss Mustard Seed’s Marzipan (which is an almond color).  I really love this color, which is kind of strange since it’s a glorified beige and I’m not really a beige girl.  But, this is a warm, rich, almond-y color, not a pinky, peachy, beige-y color.  So much better.  It took three coats to get this coverage.

Next I added some Miss Mustard Seed Ironstone on the two medallions on the top drawer.

ironstone details 2

I finished with Miss Mustard Seed clear furniture wax.  I wasn’t sure I would put the original hardware back on at first, but in the end it was perfect with the new color of the dresser, so I kept it.

almond hardware

Although I didn’t get any chipping on this one, it did distress beautifully along the edges.

almond distressing

My Perfect English Farmhouse book and some crazed and stained ironstone were perfect for staging this dresser.

almond staging

And the chair that makes its way into so many of my photos looks great next to this dresser too.

almond chair

And here is one last look at that waxed top.

almond dresser top

This beautiful dresser is for sale, if you are local and interested in the details, leave me a comment and I’ll get back to you!

ironstone and almond 2

Linking up with Finding Silver Pennies.

the chairs.

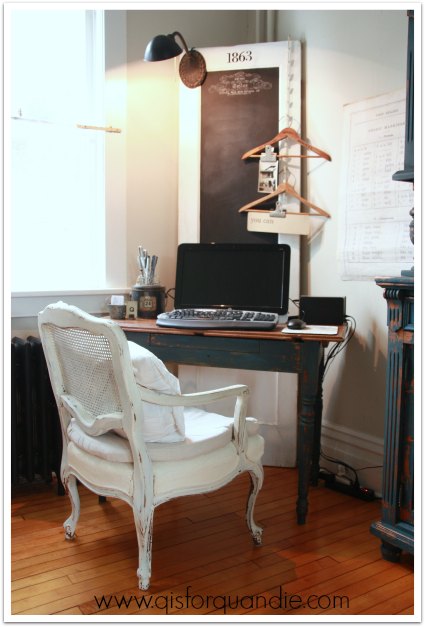
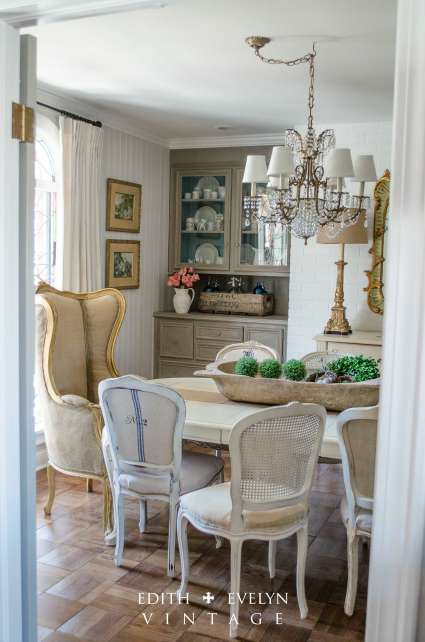
Sometimes I think it may seem as though I decide to makeover a room and then I just whip it up in no time.  That’s not really how it goes.  I usually think about it for a long time, and then I try to work up the gumption to get ‘er done.  That can take awhile.  I’ve been wanting to perk up my dining room since last winter.  I knew I wanted new chairs, and as I mentioned last week, I specifically wanted french cane back chairs.  I’ve been watching craigslist for them since last spring.  I finally saw a set that I liked, but not only were they expensive ($75 each), they were also all the way out in Mound, MN.  Still, I decided they were too good to pass up.

chairs before

I recruited my sister to drive out there with me.  It should have been about a 50 minute drive, but since we missed our turn off, it ended up taking more like an hour and 15 minutes to get there.  But, it was worth the drive.  These chairs are perfect.

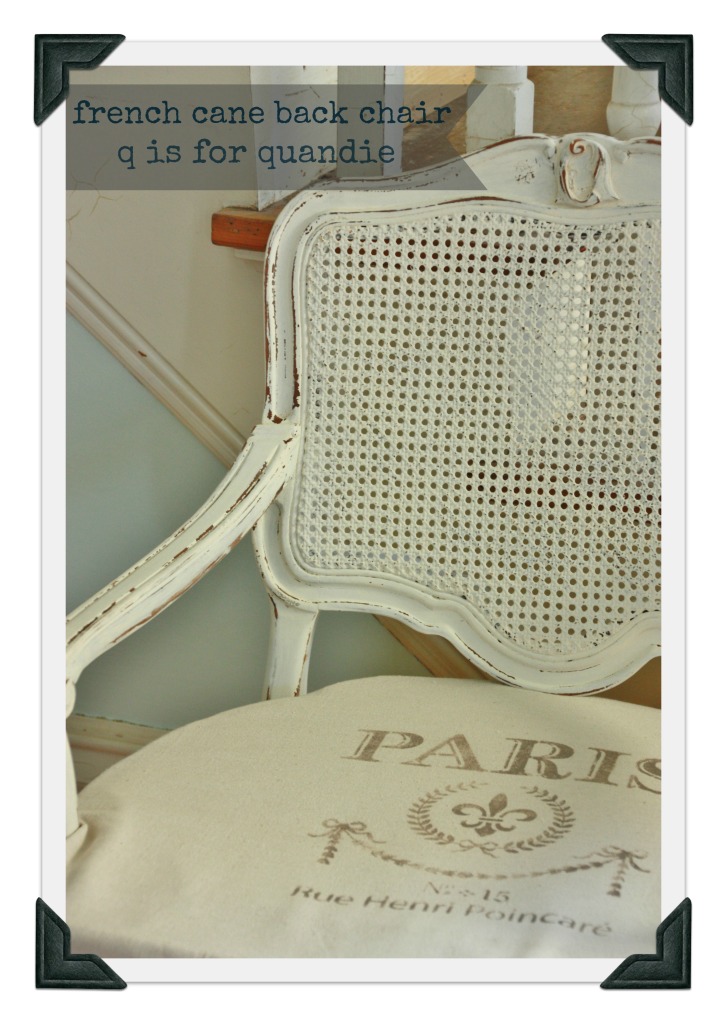
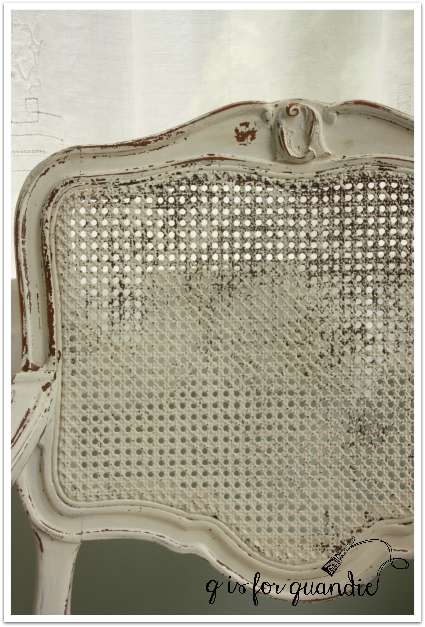
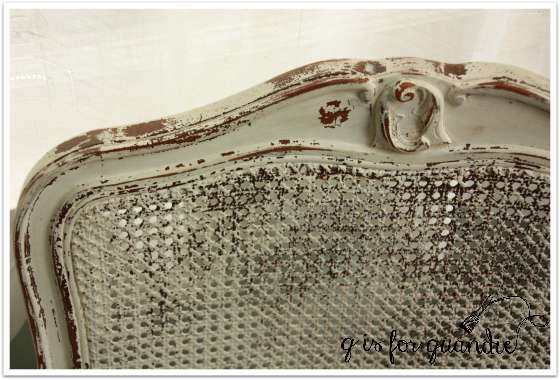
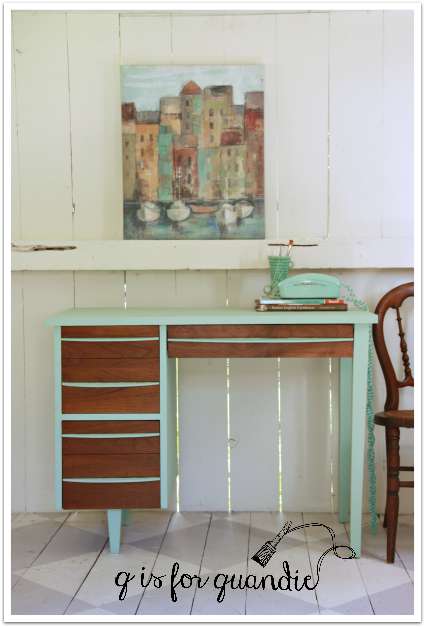
First of all, they are really well made and very sturdy.  The cane is in perfect condition.

chair before

They have really nice proportions and they are very comfortable.

And best of all, they have seats that can be recovered with just some stapling skills.  No fancy reupholstery required.

chair seat before

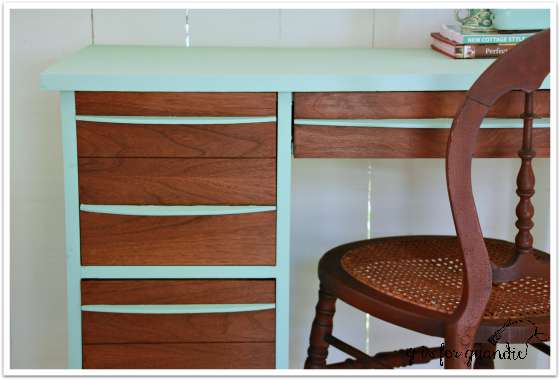
The piping around the edge tricked me at first.  I thought maybe these were non-removable seats.  So I was thrilled when I turned them over and saw the screws for removing them.

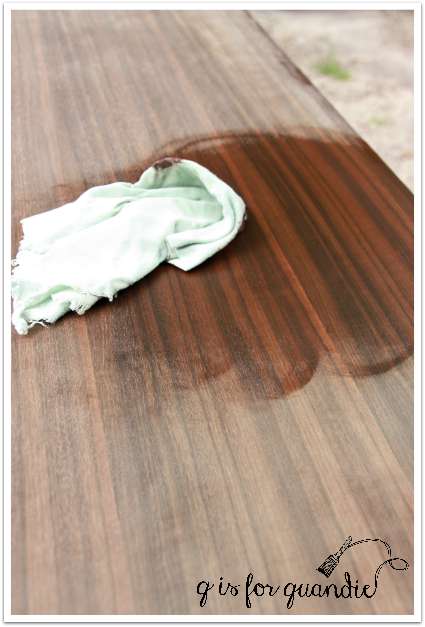
The only thing wrong with these chairs was their shiny orange finish and unappealing fabric and those are easy to fix!

After removing the seats, I used my favorite cheating method to paint the cane.  Spray paint!

chair with cane back

Painting cane with a brush can take forever.  So instead, I spray paint it first.  In this case I used Rust-Oleum in Heirloom White with a satin finish.  Once I had the cane fully covered in the spray paint, I let it dry.  Then I went back over it with the paint I was using on the rest of the chair.  In this case, Annie Sloan’s Old White.  Now the white matches, and I only needed one lightly brushed coat on the cane.

The rest of the chair took two coats.  Once the paint was dry, I sanded by hand to distress.  Since these chairs were for me, I could distress to my heart’s content.  I like my pieces to look a little beat up.  Once sanded, I vacuumed off the dust and waxed with Miss Mustard Seed’s furniture wax.  Let me take a minute here to talk about using a brush to wax.

wax brush

I think I’ve already established that I am kind of a cheap skate.  I don’t like to spend much on tools and supplies (well, on almost anything really except trips to Europe and good hair products) and this Miss Mustard Seed large wax brush was priced over $30.  I will tell you that I probably never would have ended up with it except for the Round Barn’s going out of business sale.  It was half price, so I decided to splurge on it.  Yes, I purchased this brush myself, this is not a sponsored post in any way.

And I’ll tell you what, this brush was worth every penny (and would have been worth paying full price for actually) when it came time to wax these chairs.  It got in all the nooks and crannies easily, it maneuvered around all of the curves and bends, it even worked beautifully on the caning.  If you do a lot of waxing and you don’t already have one of these, get one, stat!  So much easier than trying to use a rag to wax these chairs.

I debated a couple of different options for seat upholstery.  I thought about using drop cloth fabric and stenciling it with a grain sack like I did on these folding chairs.

chair seat

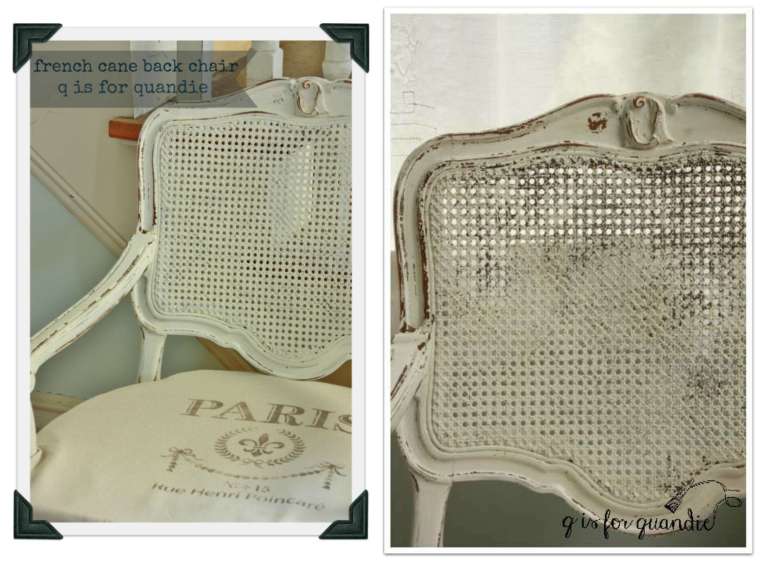
I also thought about using one of my many European stencils instead of the grain sack stripe.  But since I already have a European style stencil on some other pieces that are in going in the room, I felt like that would be overkill.  In the end, I just went with authentic grain sacks.  And I LOVE them!

chair seat

I purchased 4 of these grain sacks from 3:17 Vintage in Afton.  Each one is a little different and they are exactly what I wanted on the chairs.  Well … wait a minute … to be honest, exactly what I wanted was a fabulous European grain sack with an awesome blue grain sack stripe down the middle.  But have you priced those?  For the price of just one of those, I was able to get 4 plain old mid-western grain sacks and still have some change left over.  And if I had splurged on the European version, I probably would have never let anyone sit in the chairs.  This way I’m perfectly fine with using them, and if they get spilled on, no problem!  They are pre-stained!

I have to admit, Ken the handyman totally rolled his eyes when he saw these.  He simply can not fathom why I would want stained old grain sacks on my dining room chairs!

chair after

But in case you missed it the first time I said it, I LOVE how these turned out, stained grain sacks and all!

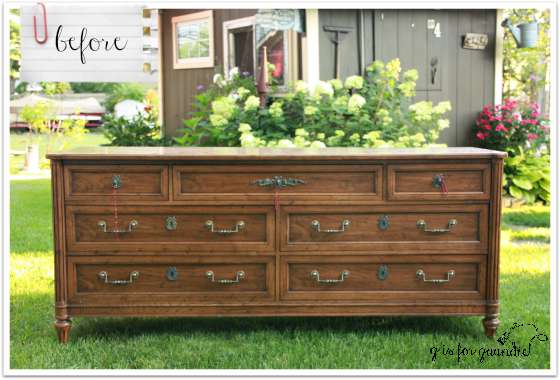
I had set myself some lofty goals for this past weekend.  I wanted to finish the chairs, plus paint two dressers.  I didn’t quite get there.  The chairs are all painted, sanded and waxed, but I still need to upholster the seats on the other three.  It won’t take long, but they weren’t quite ready for this post.  As for the rest, one dresser is completely finished and needs a photo shoot, the 2nd dresser is painted, but needs to be sanded and waxed.  So, I have my work cut out for me this coming week.

I’m also going to keep moving on the dining room makeover.  Things are starting to come together, more ideas are percolating, and I hope to share more on that with you soon.

chair collage

Oh, and in case you are wondering, my sister and I blew off our visit to Oronoco Gold Rush.  There was a heat advisory here on Saturday.  Gold Rush can be overwhelmingly hot even on a cooler day.  The combination of no shade, lots of pavement and lots of people results in heat overload.  And let’s not even think about the condition of those porta-potties in that heat!

it’s a mod, mod world.

Last Sunday one of my fellow vendors at Reclaiming Beautiful posted a quick heads up about a garage sale in Stillwater on Facebook.  Mr. Q just happened to be free, so as an experiment I sent him by himself with strict instructions to text me photos and prices before buying anything.  One of the pieces he sent a picture of was this mid-century modern desk.

mod desk before

Lately the mid-mod stuff has just really appealed to me, and when he told me it was $10 I said “yes!”

Unfortunately, what I couldn’t see in Mr. Q’s quick phone photo was the water damage.  See it on the legs?  Yep, that’s water damage.  There is also some fairly significant veneer damage around the edges of the top.  Basically both of these factors rule out refinishing this piece with some Dark Walnut stain, which was originally what I wanted to do.  The drawer fronts were in pretty good shape though, so I stripped and stained those, and painted the rest.

mod, mod desk

I also painted the handles on the drawers.

I’m still not sure about that choice.  Maybe I should have left them wood.  And maybe I should have painted the desk in a more subdued palette.  Dark grey?  Black?  Oh, but what’s the fun in that?  This is painted in Fusion’s Laurentien, one of my favorite aquas.

MCM desk close up

Obviously the chair I’ve used for staging my photos is all wrong.  This desk needs a mod chair, like an Eames style chair …

Eames style chair

Or this pretty aqua chair …

modern aqua chair

Use this picture of the desk without the chair to imagine it paired with one of these more modern chairs.

mod desk without chair

Yep, better, right?

This desk is priced to sell at $125.  Anyone need a sweet little mid-century modern desk?

never look a gift horse in the mouth.

A while back my sister-in-law Tracy texted and asked if I wanted a dresser that was ‘free to a good home.’  She included a picture.  I’ll admit, I didn’t immediately love it.  It seemed uninspiring and maybe a bit too traditional for me, and it was hard to see the details on my phone.  But hey, it was free!  So I said yes.

gift horse before

And before you think I am insulting my sister-in-law, I have to point out that she works in a senior care facility and this was a piece from her work, not from her own home.

When we got there to pick it up, she told me that I could also have the matching nightstand if I wanted it.  Sure, why not?  In for a penny, in for a pound.

gift horse nightstand before

I decided to start with the nightstand since it was small.  I pulled out my Fusion paint in a color called Inglenook that I hadn’t tried yet.  I lightly sanded the whole piece, and then I painted two coats of Inglenook on the outside.  I painted the interior in Fusion’s Limestone for some contrast.  That took three coats to get good solid coverage.

Nightstand painted in Fusion's Inglenook

Once I got a closer look at the hardware on these pieces, I decided I had to keep it.  It has great detail.  I added some gold Rub ‘n Buff to spruce it up.

I put the hardware back on, and I was bedazzled.  Truly.  This was one of those amazing transformations.  I’ll admit, I did not see it coming.  The piece went from really traditional (like something that my mother would have in her house) to really pretty and very French.  I hadn’t even noticed the French-ness, but it definitely came out with the paint job.

french nightstand

Before I continue on to the dresser, I have to tell you about that suitcase.  I came home from work one night and there it was on my porch.  I don’t know how it got there.  I must have had a visit from the vintage suitcase fairy!  So I threw it into the photo shoot.  In hindsight, maybe it was a weird addition to the photo.  If you are my vintage suitcase fairy let me know so I can thank you properly!

I had originally been planning to paint the dresser in a pale grey, but having seen how gorgeous the Inglenook was, I had to go with that again.

french dresser

Have I mentioned, by the way, that this thing is ginormous?  It is nearly 6′ wide!

There are four different types of hardware on this guy.  The drawer pull on the top middle drawer matches the nightstand and is the most detailed.

gold hardware 1

My reader Victoria calls these “mock key knobs”, which makes sense since it’s supposed to look like a key that has been inserted into a lock.  These are some pretty gorgeous mock key knobs, right?

The two smaller side drawers have a very simplified version of the mock key knob.

gold hardware 2

The lower drawers have regular drawer pulls rather than mock key knobs.

gold drawer pulls

But they also have a faux keyhole in the middle of each drawer.  When I pulled these off I found that the original manufacturers (I assume) had put a little piece of black electrical tape behind the opening on these escutcheons to make it look like there was really a keyhole behind them.  I decided black electrical tape just did not cut it for me, so I added old book pages behind them instead.

french keyhole

I love adding these kinds of details to my pieces.  I don’t know if anyone even notices them, but I hope they do.

If you’ve ever used Rub ‘n Buff, you probably know that you just put a little on your finger, rub it on, and once dry, buff to shine (hence the name).  After doing all of these pieces of hardware, I had one seriously gold finger … which was ironic because there was a Bond film festival on TV while I was working on these and I watched Goldfinger not just once, but twice in one day (well, OK, I did nap through some of it the 2nd time around).  Ahhh, Connery at his finest.  But seriously, how did they get a character named Pussy Galore past the censors in 1965?

Anyway, I staged both of these piece simply with some Vanilla Strawberry hydrangeas, some Rachel Ashwell books and one of my favorite vintage clocks.

vanilla strawberry

Both of these pieces are available if anyone out there wants to add a little je ne se quoi to their home.  Local sales (Twin Cities area) only I’m afraid.  It could never be cost effective to ship these!  The larger dresser is $295 and the nightstand is $95.  Sorry, these pieces are already sold!  As I suspected, they went really quick at these prices.

the dining room.

My dining room needs a makeover.

dining room with barn wood walls

I’ve already established that I can’t bring myself to paint the walls.  If I were to paint over that original barn wood patina there would be no going back.  But I’m going to try to lighten up the room with furnishings.

Starting with the chairs.  These chairs are really dark, and they aren’t very comfortable.  I know exactly what I want to replace them with, french cane back chairs like these at Edith & Evelyn Vintage …

dining chairs

and I found a set on craigslist (unpainted).  They were a splurge at $75 each, but I’ve been looking all summer and not coming up with any more budget friendly options that I liked as well.  So I went for it.  I’ve already begun painting them and hope to have them done soon.

Next, the IKEA lights hanging over the table, they have to go.  I have a plan in mind for replacements.

dining room ceiling

As you can see, I also have a legit (by legit I mean actually hardwired and works off a wall switch) ceiling fan fixture in the room.  It’s off center, and the light on it is tacky as can be.  But this fan is super functional for us (no air conditioning, remember?), and the fan itself is pretty innocuous stylewise.  I need to do some research on just trading out the light kit.

As for the table, well, Mr. Q made that table.  He is rather emotionally attached to it.  So it stays.  But I plan to dress it a little bit differently.

dining room table

Next, the buffet.  This black one is already long gone.

waterfall buffet painted black

I replaced it with a smaller china hutch that I painted.  I think it might be a little small for the space, but I’m working on some ideas for dealing with that.

I also need to re-work this wall.

dining mirror wall

I initially added all of these mirrors to try and bring more light into the room.  It never really worked.  I love the gold frames on these, but they aren’t working on the red wall.  I have an idea about working some of these into the room still, but I’m not sure if it will work.  I also know exactly what I want for this wall.  A large graphic sign.  Finding such a thing at an affordable price might be another story altogether though.  But next Saturday is the Oronoco Gold Rush, so maybe I can find the perfect piece there!

Meanwhile, in addition to my new chairs, I had a couple of other painting projects going on this weekend.  I hope to get the final details finished on those and share them with you later this week, so stay tuned.


smokey ash sewing machine table.

You’ve all seen them.  Old sewing machine tables.  They once had a sewing machine tucked inside and you could flip open the top and pop up the machine.  I bet these things were considered the height of innovation and so very convenient when they first came out.  No more having to drag the heavy sewing machine out of the closet and set it up on the kitchen table.

 And now of course they are obsolete, and the carcasses are a dime a dozen.  Somehow I managed to accumulate two of them and both were free.  And missing their machines.

Unfortunately I neglected to take ‘before’ photos of this piece, and I also didn’t get ‘fail’ photos of this one.  What do I mean?  Well, the first time I painted this I did an undercoat of  MMS Flow Blue with a top coat of Linen.  Problem was, it was a bleeder.  And you couldn’t see it with the Flow Blue.  It wasn’t until I added the Linen (which is a warm white) that I saw the pink stain coming through.  Since I didn’t really love this piece in the Linen anyway, I decided to just go back to the drawing board and paint it a darker color.

First I slapped on a quick coat of MMS Tough Coat Sealer, just to be sure that bleeding stain wouldn’t continue to plague me.  Then I painted it with Urban Rooster’s Smokey Ash.  Of course, the distressing brought out the Linen color underneath.

grey table close up

I’m not usually a fan of seeing a white base coat under something, but I was kind of stuck with it on this table so I made the best of it by adding a white stencil to the top.

grey table 2

I painted the little flip down compartment (where you kept your bobbins and needles) in Urban Rooster’s Cotton Candy.

grey table inside

I tried six ways from Sunday to get good photos of this table, but it just wasn’t cooperating.  First I staged it in the photo cottage …

grey table in photo cottage

I didn’t love these photos though.  I couldn’t get the angle quite right.

I tried adding the suggestion of some French flair with this book on the chair.

french flair

But it wasn’t helping.  This is a great book, by the way. Lots of fantastic pictures of French interiors.

I then moved the table to the front porch and placed my French cane back chair next to it.  I’m really not any happier with these photos, but I had to call it good because I took this table over to Eye Candy REfind for the grand opening last weekend.

grey table title 2

I don’t think a chair has enough bulk to balance the table, but next to a bed or sofa it would be perfect.  Since the inside is basically hollow with just that little hinged bobbin drawer, it doesn’t provide much storage.  But you can add your own with some vintage suitcases stacked underneath.

grey table 1

I had Ken permanently attach the hinged top on this table, but I am thinking about creating a drinks station with the second one.  You’ve probably seen them on pinterest, where you flip open the top and there is space for an ice bucket where the sewing machine once was.  But that project is for another day!


where am I, and why am I in this hand basket?

I’m sorry to say it, but my garden has gone to hell in a hand basket this year.

handbasket title 2

I usually get tired of gardening around mid-August.  I figure a frost is coming soon (that is a ridiculous exaggeration, FYI) so why bother to continue weeding, etc.  But this year I have been motivated to give up weeding much earlier than usual because I have an unwelcome visitor!  A snake!

He appeared in my neighbor Arlene’s yard first, but he moved over to mine just hours later.  I think it’s a bull snake.  I’m no snake expert, but I did a little google research and that looks like the likeliest culprit.  When I saw him he was sunning himself under my clothes line.  I came around the corner and he freaked and ran (well, slithered) under the photo cottage!

garden photo cottage

Good gracious!  Why did he have to pick there?  He’s probably under that hosta right now!

He looked to be at least 4′ long.  OK, that’s another exaggeration, but he was pretty big.  Even nnK didn’t want to get near him, and she doesn’t mind snakes.

So the garden is getting a little scruffy.  It still has some bright spots though.  The hydrangeas are going gang busters this year.

garden

garden 2

And the lemon slice million bells are taking over the boiler pot window boxes.

window box

The fairy garden is looking lush, but then again, I don’t really have to worry about finding a snake in there so it gets more attention!

fairy garden

Cossetta is looking a little worse for the wear with a spider webbed face and her wonky crown.  She’s trying to cloak herself in ferns out of embarrassment.

cossetta

Can you blame her?

I have a Tiger Eye Sumac that has totally engulfed my arbor.  The clematis is tangled up with it, but still blooming away happily.

tiger eye and clematis

You’ll notice that I have skillfully avoided showing you the weeds.  I’m also not taking pictures of the plants that have been totally decimated by the dreaded Asian Beetle, but trust me, they are there!  But nobody wants to see photos of that stuff, right?

If you stand back and squint your eyes a bit, the garden still looks pretty good.

arbor

Just don’t get too close, and beware of snakes!