the turquoise tacklebox.

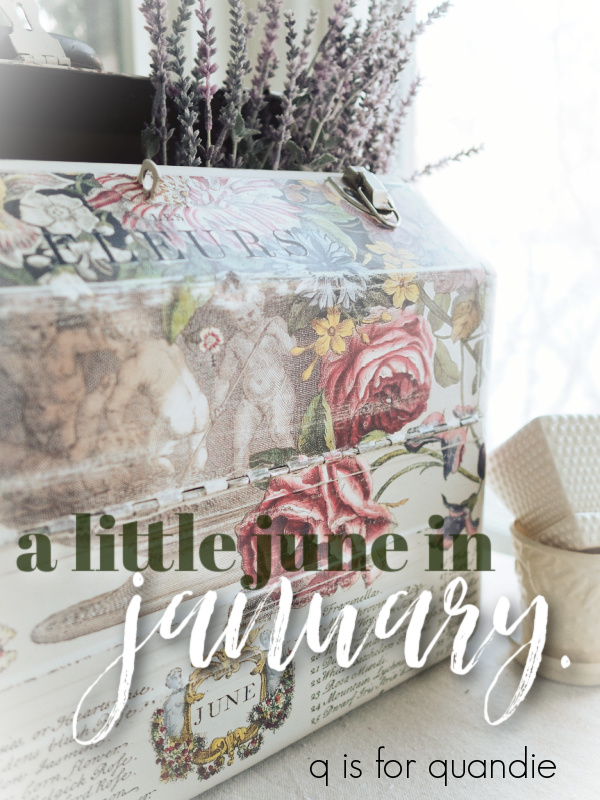
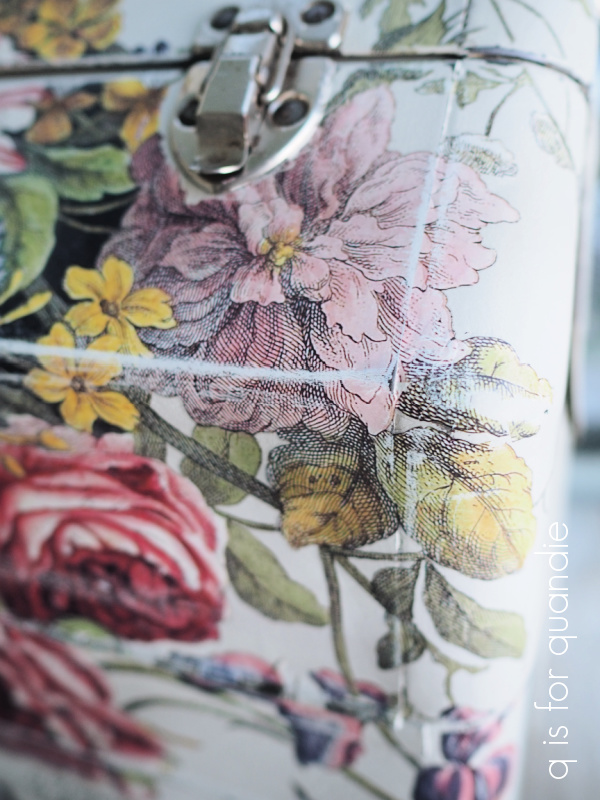
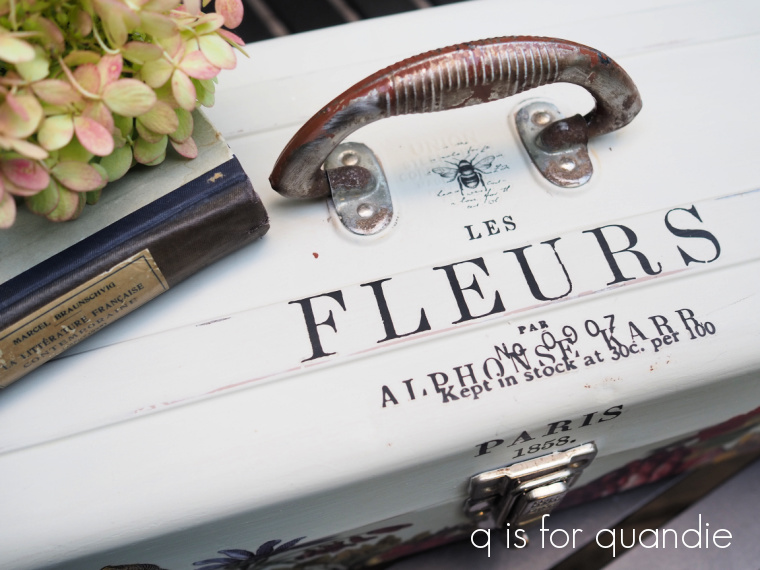
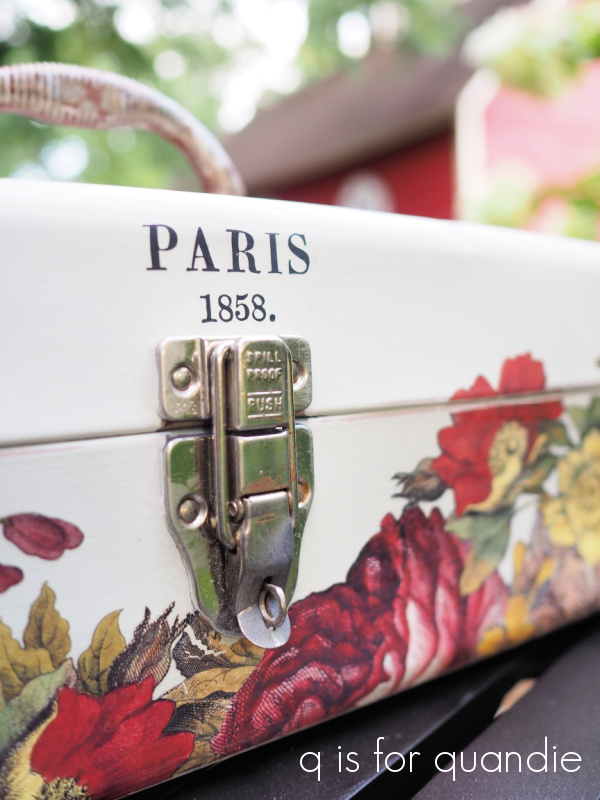
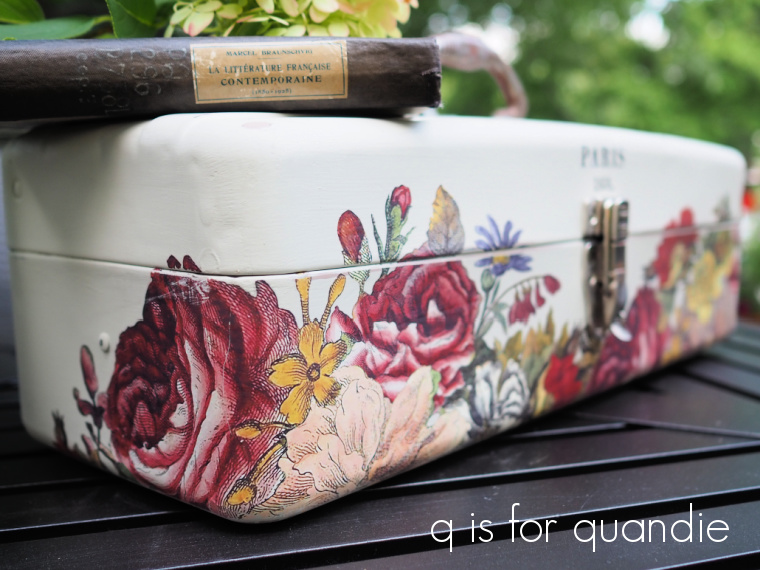
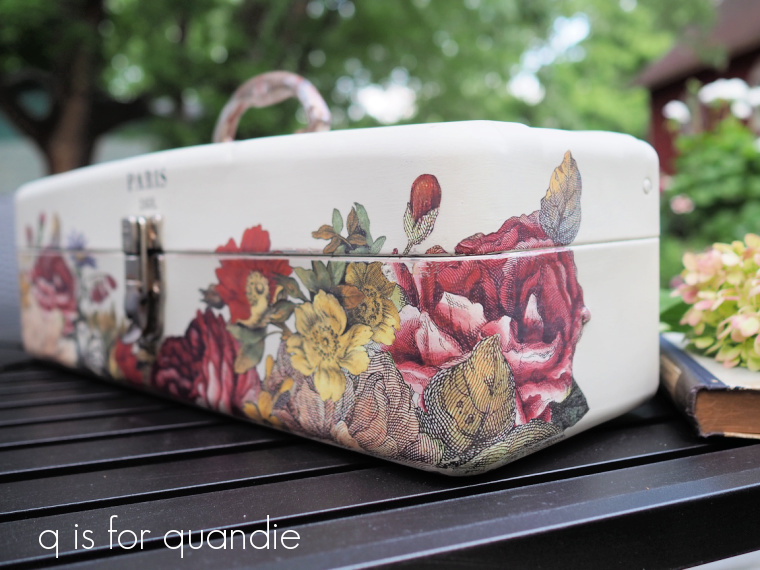
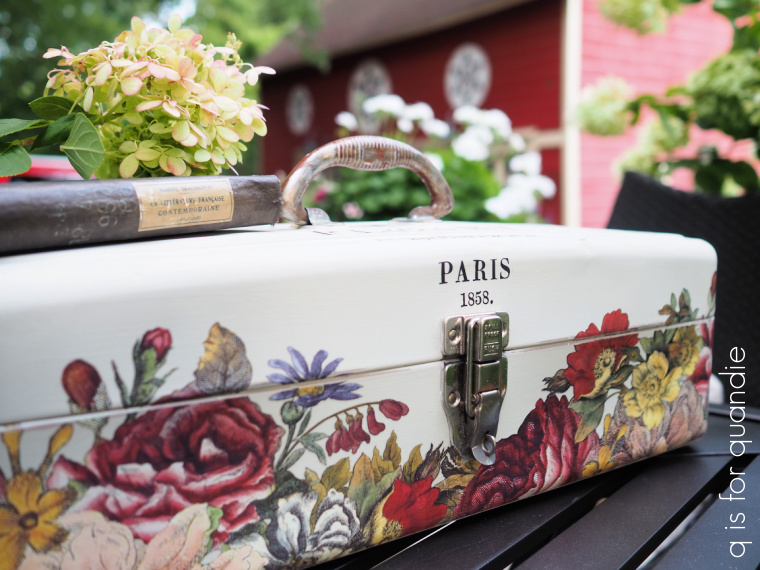
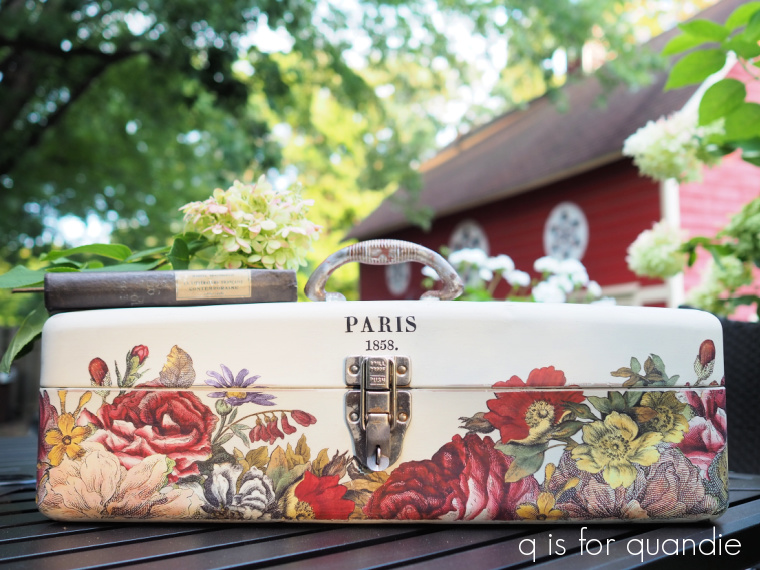
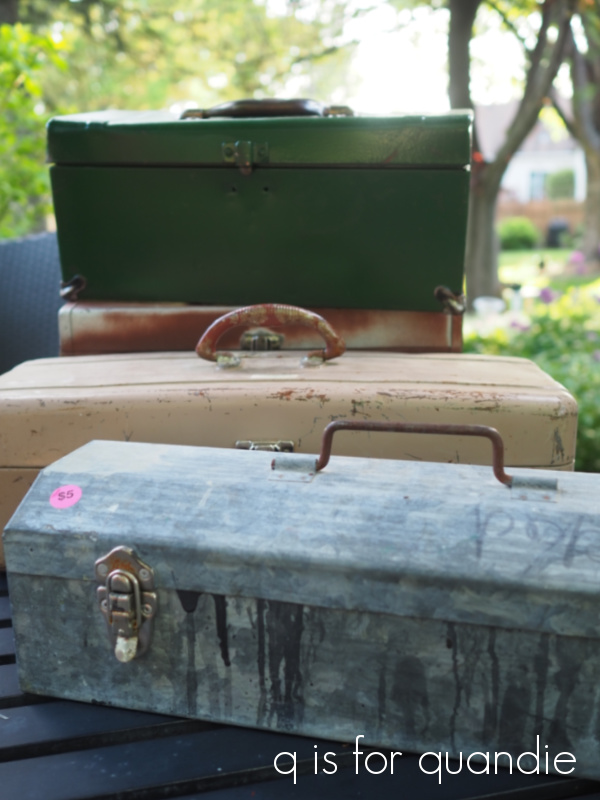
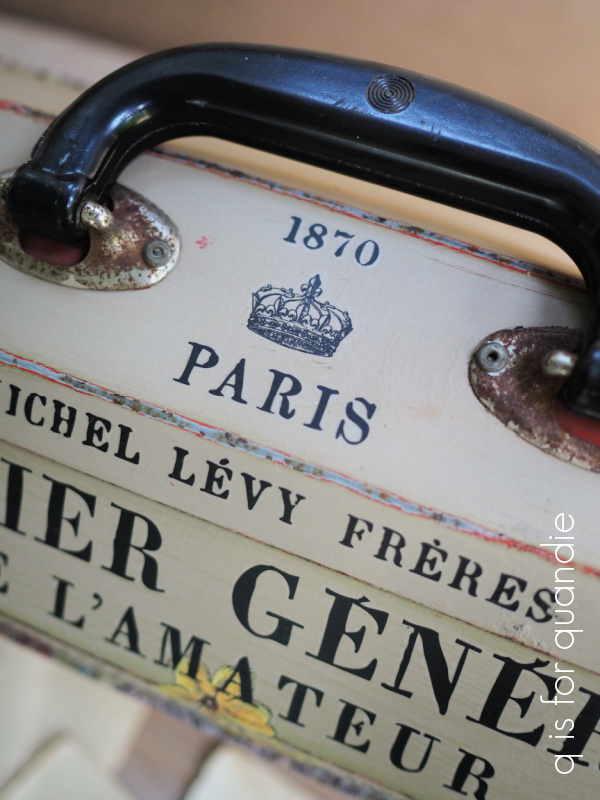
Some of you may remember way back in 2018 (gosh!  4 years ago!) when I dressed up some toolboxes with some prima marketing transfers.

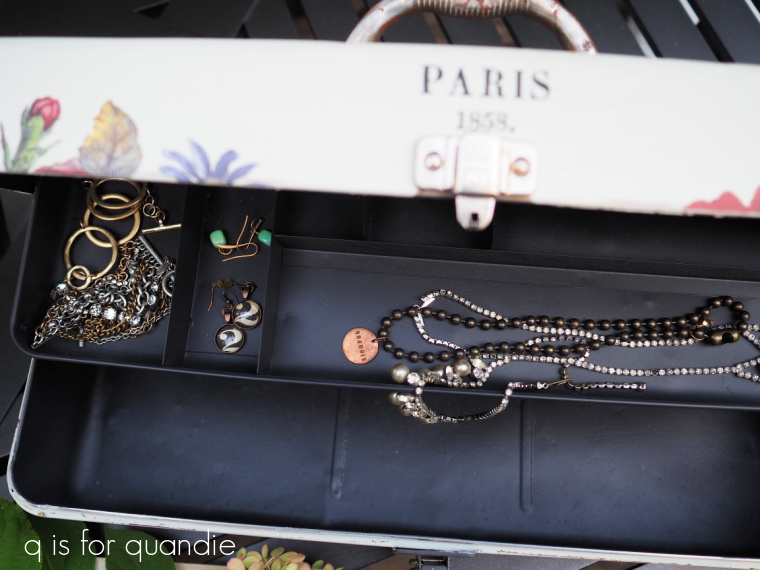
I sold the black one and the green one, but the turquoise one … which actually is a tacklebox, rather than a toolbox … was one that had been gifted to me by my co-worker Jodie.  I wanted to keep it, it’s perfect for holding my hot glue gun and extra glue sticks.

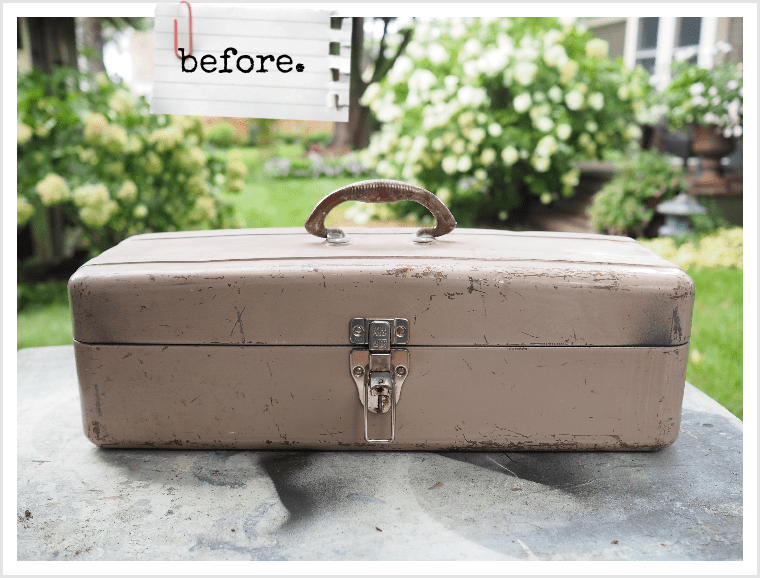
I have to confess, those pink roses were never really ‘me’ though.  But somehow re-doing something that I keep inside a cupboard was never at the top of my to-do list while I was still working a full time job and blogging.  Now that I’m retired from the day job, I’m determined to get around to doing a few makeovers for myself, starting with this tacklebox.

The first step was to sand down the transfers a bit, just to smooth them out so that their outline didn’t show under a new coat of paint.

Next I cleaned the box with some soapy water.

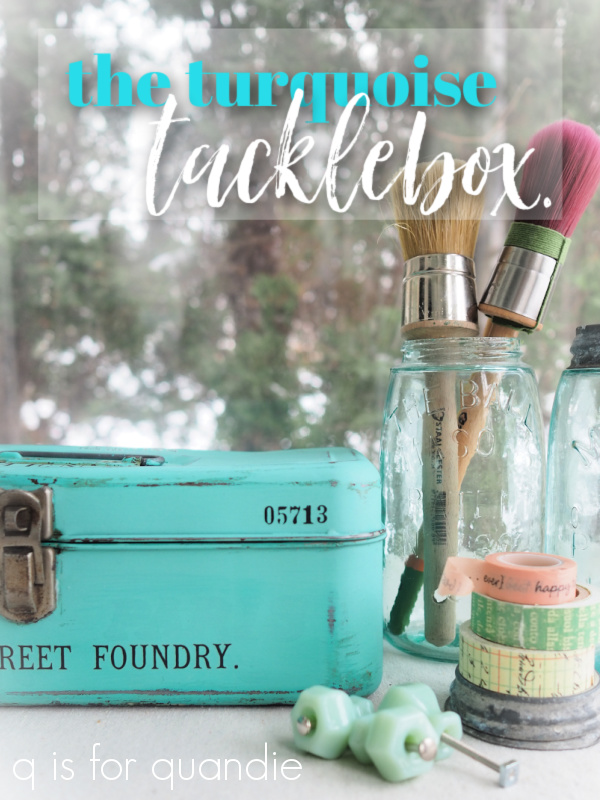
I definitely wanted to keep that turquoise color, so I pulled out some Dixie Belle paint in The Gulf.

It was quick work to paint a single coat of paint over the box, and that was all it took to get the coverage I wanted.

Pretty good coverage for one coat, don’t you think?

After sanding to distress and vacuuming away the dust, I added a few words from IOD’s Label Ephemera transfer.

The number “05713” on the right is from a Tim Holtz transfer.

I added a topcoat of clear wax to bring out a little depth to the paint color, and to protect the paint job.

By the way, I did not paint that little plate that holds the handle in place, that’s the original color.  The Gulf was a pretty good match!

If I was planning to sell this one, I would have taken the time to paint the inside of the box as well.  But since I’m keeping it for myself, and since the color still works, I just left it alone.

This was such a quick and easy makeover.  I bet it only took me about an hour including dry time.  I guess I probably could have squeezed it in while I was still a working woman 😉

So, what do you think?  Do you prefer the ‘before’ or the ‘after’?  Are you a fan of the original rusty patina, or do you like the fresh paint job better?  And how about that color?  Should I do more toolboxes in vibrant colors, or do you prefer the more neutral look I usually do?  I’m curious about all of these things, so leave me a comment and let me know.

a little june in january.

Well, the hubbub of the holidays is over.  I don’t know about you, but I’m one of those people who take down and put away my holiday decorations starting December 26.  Except this year I didn’t start until December 27, because I had family over on December 26 to celebrate my nephew’s 40th birthday.  He was visiting from Philly, so it was fun to have him here for his big birthday.

But now I have all of my indoor decorations down and stored away for next year.

As for the outside stuff, well, that’s a different story here in Minnesota.  We had some sub-zero temps over this past weekend and there’s no way I’m braving that to take down decorations.

Plus, the bulk of them are frozen in place under a layer of snow now anyway.  They won’t be coming out for a while.

So I focused on a few indoor painting projects this past weekend instead, including this rather giant toolbox.

I don’t think that photo above does a good job of showing the size of this one, but here is the toolbox along with a few of the other things I purchased last summer.  Seeing it in relation to the chairs puts it in a little more perspective.

It’s really quite the beast.  And in its original state, it was also quite heavy even while empty.  I honestly don’t think I could have even lugged it around when filled with tools (or anything at all for that matter).  When you opened it, two layers of trays opened up accordion style on either side.

As much as that was pretty cool, I asked Ken to remove them for me.  For one thing, they added considerable weight and for another they would have been nearly impossible to paint without resorting to spray paint.  They also would have limited the possibilities for future use.  Sure, you could have used it for your fishing lures, or your socket set, but as you’ll see in a minute, I don’t think the new look screams tackle box or toolbox.

After it was gutted, I cleaned the toolbox with Dawn dish soap.  Once dry I painted the outside in Dixie Belle’s Sawmill Gravy, and the inside in their Silk paint in a color called Hampton Olive.

I chose this color for a few reasons.  First of all, it’s very similar to the original color of the interior, so I was paying homage to that.  Second, I thought it worked well with both the transfer I planned to use as well as the Sawmill Gravy.  I wanted to use a Silk paint because the sealer and topcoat are built in.  I thought I’d save myself a couple of steps this time around.  And this was the best option out of the colors of Silk paint that I had on hand.  Finally, I liked the idea of toning down the girly-ness with a more masculine color on the inside because as you’re about to see, this one is plenty girly on the outside.

Yep, I went full on floral for this one, with a few cherubs to boot.  That is the bottom half of the June, Ode to Henry Fletcher transfer from IOD.

I’ve had this transfer for a while and I really wasn’t sure I’d ever find the perfect piece for it, but it worked beautifully on this toolbox.  I love the way it has a bunch of flower names listed at the bottom.

I’m guessing that these are all flowers that bloom in June.  Does Jasmine bloom in June?

I added the wording on the top of the toolbox from a couple of other IOD transfers.

The “Les Roses” section is from their Petit Rosier transfer, and the “Les Fleurs” wording is from their Label Ephemera transfer (and in case you were wondering, yes, you can layer transfers in this way).

Once the transfers were applied, I sanded lightly along any edges and corners to give it a more distressed appearance.

Finally, I added a coat of clear wax.

I don’t know about you, but June feels far away to me just now.  So I thought I’d bring a little bit of June to January.

You could store all kinds of fun things inside this baby.  Art supplies, gardening tools, hats and mittens … lots of possibilities.  I am listing this one for sale (see my ‘available for local sale‘ page for more details), but I have to price it a bit higher than usual.  Those IOD transfers are not cheap (but they sure are gorgeous).  In the end, if it doesn’t sell, I bet I’ll get over it and find a spot for it at my house.  If any of you locals need to bring a little bit of June into your January, be sure to email me at qisforquandie@gmail.com.

As always, thanks to Dixie Belle Paint Co for supplying the paint used in this project.

a simple lockbox.

I love doing simple little projects like this one that prove how much personality you can add with a little paint, some transfers and some decoupage paper.

My friend/picker, Sue, found this little lockbox for me last summer.

It’s just your basic metal box meant for storing important documents.  It’s obviously not particularly old, maybe from the 70’s or 80’s.  It’s not really anything special, but Sue knew I could give it a fun new look.

I started by scuff sanding the surface to give the paint a better chance to stick.  Then I cleaned the box with soap and water.  Once dry, I started painting.  I painted a strip down the center in Dixie Belle’s French Linen, and once that was fully dry, I taped a line on either side of the handle and painted the outer edges of the box in Dixie Belle’s Sawmill Gravy.

I love this combination of colors, these two play really well together.

Once all of the paint was dry, I sanded the edges to distress the box, wiped away any dust and then added some IOD transfers.

These were just bits and pieces that I had in my transfer scrap pile, all of them coming originally from the IOD Label Ephemera transfer.

I cut out each line separately and arranged them to fit the top of the box.

I’d also painted the interior of the box in the French Linen.  Once that was dry, I lined it with some re.design with prima decoupage tissue paper called Washed Damask.

I used Dixie Belle clear coat in flat as a decoupage medium for the tissue, and I also gave the rest of the interior a couple of coats of the flat clear coat to provide extra protection to the paint.

I used clear wax as a topcoat on the outside of the box because I prefer the look it gives over the flat clear coat.

It leaves just a bit more sheen.  But it doesn’t provide quite as much protection, so that’s why I opt for the clear coat on the inside.  I also buffed up the lock using clear wax so that it’s nice and shiny now.

I wish I had the key to go with the box, but unfortunately I don’t.  I even went through my jar of random keys to see if I could find one that fit, but no luck.

So whatever is stored inside won’t be under lock and key.

But it will be stored in style.

This particular box is already spoken for.  One of my regular customers gave me a really fabulous, and really huge, cabinet in exchange for it.  I won’t be able to work on the cabinet until spring/summer when I can be outside in my carriage house workshop because there is no way I have room to do it in the house.  So you’ll have to stay tuned for that one!

In the meantime, let me know what you think of the lock box makeover.

As always, thank you to Dixie Belle for providing the paint and clear coat used on this project.

my big announcement.

I have big news to share with you today.  I’m retiring from the day job!

Honestly, I can hardly believe it myself.  It hasn’t really sunk in yet.  But November 30 will be my last day as a 9 to 5’er.

Most people plan months, or even years, in advance for retirement.  They have a target date in mind and they count down the remaining months, and then days, until the big day.  They have plenty of time to wrap their heads around the idea of being retired.

It didn’t quite happen that way for me.

Up until recently, I always said that I would work until 65 to avoid paying the high cost of health insurance.  After all, I loved my job.  It was my home away from home.  I had a beautiful office, tasks that I enjoyed doing, great benefits and pay, an easy commute, and co-workers that were like family to me.  Why wouldn’t I keep working?

But then the uppermost management position turned over.  Things started to go downhill, and then people started leaving.  One by one, people that I had worked with for decades were handing in their notices.

The atmosphere has grown increasingly stressful and I have never seen such low morale throughout the entire workforce in all of my 34 years with my employer.  It got to the point where the stress was causing me to toss and turn at night, and to dread Monday mornings.  When I found myself crying in my car in the Target parking lot over my lunch hour, I realized that it was time to move on.  Life is too short to spend it this way.

Fortunately, I am eligible for a pension and Mr. Q and I have been putting money away for years in anticipation of retirement.  Both of which will make it possible for me to retire so much earlier than I ever planned on.

And that brings me to the fun part of this post.  As of December 1, I am FREE!  No more full time job.  No more struggling to cram blog projects into the weekend.  No more alarm clock.  No more commuting in a snow storm.  No more feeling inadequate because I can’t meet unreasonable demands.

I am super excited to discover whatever the future might hold, the possibilities are endless.  And I’m also really looking forward to having more time to devote to painting furniture, repurposing vintage finds and posting here on q is for quandie!


the french linens box.

My picker, Sue, found this funky homemade wooden storage box for me a while back.

Here’s what it looked like on the inside.

I suspect it was meant for holding some particular item, possible a power tool of some kind?

Although I thought those built in features inside the lid were cool, I felt like the box would be more functional without them, so I removed them.

After giving the box a good clean, I painted the outside in Dixie Belle’s Drop Cloth, and the inside in their Gravel Road.  Once the paint was dry, I took a step back and ultimately decided that I would prefer Sawmill Gravy on this piece rather than the Drop Cloth.  Especially since I planned to do another subtle tone on tone stencil design on the box.  So I painted over the Drop Cloth with Sawmill Gravy.  Then I pulled out the same stencils I used on the spooky nightstand and stenciled the outside of the box using Dixie Belle’s Fluff.

Next up I pulled out one of my French stencils and added some wording to the top of the box, and then a crown to the front of the box.

Once that was done, I sanded to distress and gave the outside a coat of clear wax.

Next up I decided to line the inside of the lid with some pretty decoupage paper that I’d purchased a while ago from Roycycled.  Someone here had left a comment once asking if I’d tried this paper, and I had not.  They have some really pretty designs, so I thought I’d give it a go.

Unfortunately, it was a complete failure.

I’m so used to using the re.design with prima decoupage paper, which is pretty much completely fool proof, that I never even considered that this paper would be so delicate.  I used my normal process for decoupaging, I cut the paper to size first, then painted on a layer of Dixie Belle’s flat clear coat, then placed my paper down.  So far, so good.  Then I added a layer of the clear coat over the top of the paper, and it started to wrinkle.  As I tried to smooth out the wrinkles, I ended up tearing the paper instead.  Ugh.  So frustrating!  Then I tried to smooth the tear a bit, and tore the paper even more.

At that point I decided to cut my losses and pull the paper out of there before the clear coat had a chance to dry.

Well, live and learn.  Perhaps it was user error on my part, and I didn’t have quite the right technique for working with the Roycycled paper.  Regardless, I’m going back to using the re.design with prima decoupage tissue paper, and, FYI, they just came out with a bunch of pretty new designs (check them out here).  But for this box, I pulled out an old black & white design that I had on hand from back when I was a content creator for them.

Not a wrinkle in sight.

If you gave up on decoupaging because it was so finicky, or you didn’t like the wrinkles, you really need to give it another go using this stuff.

In addition to using the Dixie Belle flat clear coat over the decoupage paper, I also gave the entire interior of the box a couple of coats for durability.

And now this box could be used to store your favorite vintage linens.

Or maybe a few of your winter sweaters, or possibly some of your Christmas decor.

Really, who doesn’t just need a cool box to store their treasures in?

If any of you locals are interested, this box is for sale and the details can be found on my ‘available for local sale‘ page.

Thank you to Dixie Belle Paint Co for supplying their products used in this makeover.


colors for fall.

Recently Dixie Belle was kind enough to send me all of the colors in their new Suzanne’s Fall Colors line.

They are all perfectly cozy colors for this time of year!

So I decided to use as many of them as possible on one project.  Well, lol, not really.  I didn’t make a concrete decision to do that, it just sort of turned out that I was able to use three out of the five colors on today’s project.

A while back one of my readers gave me a bunch of drop down table leaves that had been removed from tables.  A pair of them were the perfect size for my Farmers Market stencil from Wallcutz.

I decided to give them a little texture first using the Dixie Belle Sea Spray texture additive.  I mixed it with some of their Colonel Mustard paint and stippled it onto the surface of my table leaf.  Once that was fully dry, I sanded it back just a bit to take down the high peaks.  I’ve found that I prefer a slightly more subtle textured look, and this is a great way to achieve it.

Next up I painted the first leaf in one of Suzanne’s Fall Colors called Juniper.  Then I added a shadow of my stencil first using the Latte color.

I only ‘shadowed’ the word FARMERS and the little doo-dads on either side of MARKET.  Then I followed that up by painting the full stencil in Cashmere.

Full disclosure, I staged and photographed this sign before I left on my trip out to my mom’s.  So I didn’t really have any great fall color in my garden yet, although my Sweet Autumn clematis was blooming like mad.

So I had to fake the autumn vibes a bit with some pumpkins.

One of my regulars has already snagged this sign, so it’s not available for sale.

For the 2nd of the leaves, I painted it in Dixie Belle’s Midnight Sky (over the mustard sea spray texture).  And to be completely honest, I can’t exactly remember which colors I used for the stenciling on this second one!

I may have used the same ones, but then again, I may not have.  I think I used Dixie Belle’s Putty on this one instead though.  I really should write these things down when I’m not going to get to blogging about them right away!

And this one is still available, so if any of you locals have a spot for it, be sure to check out my ‘available for local sale‘ page for all of the details.

Anyway, what do you think of my table leaf signs?  And how about those new fall colors from Dixie Belle?  Which one is your favorite?

the floral anthology tackle box.

Today I have another toolbox to share with you guys.  Only, wait, it’s not technically a toolbox.  It’s a tackle box.

Here’s the before …

A fairly beat up, and rather dreary putty color.

Sometimes I choose to gut these tackle boxes so that they have more open space for storing something inside, but this time I decided to leave the tray in place and just spray paint the interior.  I used Rustoleum’s Chalked spray paint in Charcoal, and I gave it a couple of coats of their Matte Clear Coat spray for protection.

Now you could use this tackle box for jewelry, or for your makeup.  Or really anything you want.

Once I had the inside painted, I painted the outside in Dixie Belle’s Sawmill Gravy.  Once dry, naturally I followed that up with some fabulous transfers.

The little bee under the handle is one of re.design with prima’s knob transfers.  The rest of the wording is from IOD’s Label Ephemera transfer, including the Paris 1858 on the front …

The floral transfer is more of the IOD Floral Anthology transfer that I’ve been using lately.

This time I used two halves, one to the right of the clasp and one to the left.

  I wrapped them around the sides …

And in front they meet in the middle.

Once the transfer was in place, I sanded lightly around all of the edges and then sealed this piece with Dixie Belle’s flat clear coat.

If you’re keeping track, this is the 3rd project that I have used sections of this one transfer on, starting with the belles fleurs suitcase

Followed by the the herbier toolbox

And now the floral anthology tackle box.  Plus I have enough left to do one more small project.

So if you’ve been looking at these transfers and thinking they are a bit pricey at around $30, keep in mind that you can get a number of small projects out of them.  Or of course, you could just do one large piece of furniture with them as well.

Isn’t she pretty?  The colors in the transfer look much more vibrant with the Sawmill Gravy behind them as opposed to the Putty and the original color of that suitcase.  Personally I love all three looks though, how about you?

FYI, this item has already gone to a good home and isn’t available for sale.

the naturalist’s toolbox.

I’ve got another toolbox to share with you guys today.

This time I gave the green one on the top of the pile a makeover.

I initially gave it a paint job using Dixie Belle’s Gravel Road on the inside, and Drop Cloth on the outside.  But it felt a bit too plain to me after that, so I painted the ends in Dixie Belle’s French Linen.

After distressing the paint job a bit, I dressed it up with transfers from a variety of sources.  The wording is from IOD’s Label Ephemera transfer, the butterfly on the top is from re.design with prima’s Parisian Butterflies.

  The sprigs of flowers on the front are from another of re.design with prima’s older retired transfers, and I didn’t even retain the name of it so I apologize for that.  However, if you’re looking for something similar, this one from Dixie Belle might work for you.

After painting the inside in the Gravel Road, I added a bit of re.design with prima’s Dark Damask decoupage décor tissue paper to the bottom.

I’ve yet to find another product that works as well for decoupaging.  I did give another brand of tissue paper a try and it was a dismal failure (I’ll be sharing that in a future post).  This décor tissue paper doesn’t tear and it doesn’t wrinkle, and it’s super easy to apply with some Dixie Belle clear flat coat.  I just ordered a couple of their newest designs to have on hand for my next toolboxes!

In the meantime, I hate to tell you, but this one is already sold.  One of my regulars purchased it along with the Farmers Market headboard sign that I shared a couple of weeks ago.

But I thought I’d still share it here with all of you.

What do you think?

the bloom where you are planted toolbox.

I have another painted toolbox to share with you today.

Unfortunately I totally neglected to get a good ‘before’ photo of this one.

It’s actually the one at the back beneath the dark green one.  You can just see a bit of it there, and you can sort of see that someone half spray painted it brown.

Well, I painted over the outside in Dixie Belle’s Drop Cloth and I painted the inside in their Mint Julep.  Then I pulled out some scraps from the Cosmic Roses transfer from re.design with prima.  I’ve been using bits and pieces of this transfer on various things.  You last saw it on the Laundry Co sign …

I only had a few scraps left, but I was still able to trim them up and place them on both the outside of this toolbox …

plus on the inner tray …

This toolbox has a sort of bump out that holds the tray in place about half way down, and I was easily able to wrap the transfer around that.

I stenciled the top, and inside the tray using Dixie Belle’s Golden Gem Mousse.

I think the colors on this one are so pretty.

Normally this is the part where I mention that this toolbox is for sale locally, but this one has already gone home with its new owner.

I have a few more toolboxes coming up in the line up, plus a few other small projects I’ve been working on.  So be sure to check back next week!

As always, thanks to Dixie Belle Paint Co for providing the paint used for this project and to re.design with prima for supplying the Cosmic Roses transfer.

the herbier toolbox.

First up, I just want to thank everyone who left a comment on Monday’s post.  I didn’t have time to respond to all of them this week, but I did read every one.  Also, for anyone who didn’t leave a comment, you can still get one in by midnight tonight for a chance to win a bag of Dixie Belle’s Sea Spray so be sure to check that out.

I did find time to do a little toolbox painting over the last week or two, so I thought I’d share one of those with you guys today.

Since my workshop out in the carriage house is not climate controlled, I have to strike while the iron is hot … or, well … not too hot, but not too cold either, and also not too humid.  In other words, when the conditions outside are perfect for painting, it’s a good chance for me to get a lot of stuff painted assembly line style.

With the toolboxes I start by piling them up on the lawn and giving them all a good wash with the hose and some spray Dawn dish soap.  Once dry, I sand them lightly (more if they are rusty, less if they aren’t) and then wipe them down again.  Then I add a coat of Dixie Belle’s clear BOSS to the rusty ones to slow down the rust coming through the paint.  I say ‘slow down’ because I don’t know that BOSS inhibits further rusting.  I suspect that over time they will continue to rust, just not as quickly.

I leave the BOSS to dry for a day, then start with painting the insides of all the toolboxes.  I painted one inside with DB’s Drop Cloth, one in their Mint Julep, one in Gravel Road, and one in Blueberry.  It’s lucky that I have a lot of paint brushes so that I can have lots of colors going at one time.

Once the insides are done, I move on to the outsides.  I used DB’s Putty, Drop Cloth, and French Linen on the outsides.  I generally paint all of the sides and tops one day, then the bottoms another day.  Sometimes that process takes twice as long because I decide to do a two-tone look on the outside (you’ll see that one later).  Once all of that is dry they are finally ready for the fun part, dressing them up.

Here is how this first toolbox started out …

Super red, and super crusty.  I love the shape of it though, and the way it opens up with two sides that are on hinges.

After its coat of BOSS, this one got two coats of Drop Cloth on the inside followed by a couple of coats of DB’s flat clear coat to protect it.  Then I added some of re.design with prima’s decoupage paper to line the bottom.

For the outside of this one I decided to step outside of my Dropcloth box and paint it in Dixie Belle’s Putty.  I thought that the Putty would create the perfect backdrop for the IOD Floral Anthology transfer that I wanted to put on the front.

I think this color provided a little more depth to the overall look of the toolbox.

Once I had the floral section in place, I added some wording from the IOD Label Ephemera transfer.

The little crown on the top is from a re.design with prima Classic Vintage Labels transfer.

I added a couple of coats of Dixie Belle’s flat clear coat over everything to protect it.

I absolutely love how this one turned out.  It may be my favorite toolbox so far.

It would be perfect for storing craft supplies.  But I think I’d consider keeping my makeup in there too.  You could also store your scarves in there.  So many possibilities!

I am selling this one, and I’m pretty sure there wasn’t anyone left on my painted toolbox waiting list, so this one will be up for grabs.  Be sure to check out my ‘available for local sale‘ page if you are local and in need of a fabulous painted toolbox.

As always, thank you to Dixie Belle Paint Co for supplying the BOSS, the paint and the clear coat used on this project.