the repurposed guest bed.

As I’ve mentioned, since furniture sales have slowed way down for me, I’m taking this time to focus on projects for myself that I’ve been putting off for a while (OK, maybe years in some cases).  Today I have a really fun one to share with you guys.  There is a bit of a long story behind this one, so you may want to refill your coffee before diving in.

Several years ago, Mr. Q and I swapped our guest room for his home office.  Prior to that, the guest room was the larger room, and his office was the smaller one.  We finally came to the realization that he uses his office every day, and we rarely have house guests.  It didn’t make sense to have the larger room going mostly unused, especially in a smaller home like ours where space is at a premium.

But switching to the smaller guest room meant getting rid of the full sized bed we were using and replacing it with a twin.  We actually traded the full sized mattress and box spring with my neighbor, nnK.  She took the full size, and gave us her twin sized versions.

That left us with a spare full size headboard and foot board (and side rails).  We stuck them up in our carriage house and there they’ve sat since 2017.

Now, you might be wondering why I didn’t sell the bed, so let’s go back a bit.  Here is the bed when it was part of the guest room.

Sorry, that’s the best photo I could find of the bed in its ‘before’ condition and it doesn’t even show the foot board, which is one of those ones that curve around the mattress.

There’s a little history behind this bed.  Mr. Q and I purchased our home around the same time that his great uncle’s estate was being divvied up.  We ended up with this bed, a matching dresser and a dining room set from Uncle Roy’s house.  This was back in 1988.  When we got the bedroom set, it was already painted.  I wanted to return it to the natural wood (that was the trend in the late 80’s), so I sent them off to be ‘dipped’.  Does anyone else remember that?  Maybe it’s even still a thing, I don’t know.  But basically your furniture is dipped in a large vat of stripper to remove the paint.

When we picked the pieces back up from the dipper, he explained that the manufacturer intended for these pieces to be painted.  This was obvious after they were stripped because they were each made out of more than one kind of wood, plus the ‘carved’ details were molded plaster, not carved wood.  So after all of that dipping, I had to repaint the pieces rather than staining and varnishing them.

Keep in mind, this was the late 80’s, I was still in my 20’s (ha, ie. a long time ago), I knew nothing about painting furniture!  So I went to the paint store and asked for help.  They explained that I should absolutely use oil based paint for durability (eeekkk! I can’t stand using oil based paint!), so that’s what I did.  I painted them in an oil based warm white.

Flash forward another decade or two.  I decided to redecorate and paint the pieces black.  I painted over the oil based paint with latex paint.  As you may be guessing, that did not hold up well over time.  That’s the reason I’m telling this rather long winded story.  It’s a cautionary tale of what not to do when painting furniture.  Do not paint over oil based paint with latex paint.  Over time it starts to peel right off, and that’s why I couldn’t sell this bed frame.  The black paint was peeling.  The only way to make this bed suitable for sale would have been to completely strip all of the paint layers and start over, and there is no way that would have been worth the effort.

So I stored it for a few years.  Last winter I thought I’d make the headboard into one of my Christmas signs (like this one).  I had Mr. Q bring it down from upstairs in the carriage house, and that’s when I drove over it.

LOL, didn’t see that coming did you?  But yep, it was leaning up against the wall in the carriage house and it fell over.  That’s where I park my car in the winter, and because the headboard is black and it was dark in there, I didn’t notice it on the floor and I drove over it.

That did a bit of damage.  So I put off working on this project once more.

And that brings me to today.  I finally had the time to work on this one, and I had a really cool plan for it.

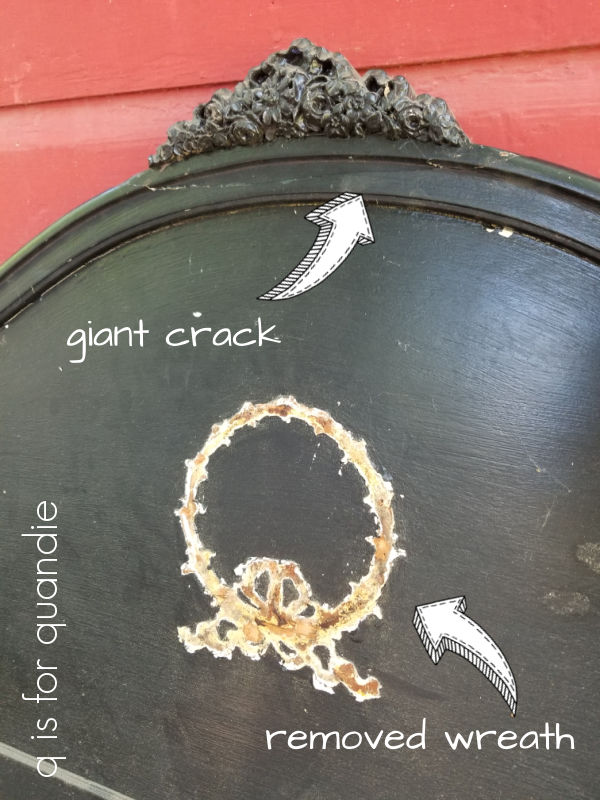
I started with removing the plaster wreath from the headboard, and filling the giant crack I made driving over it with some of Dixie Belle’s Mud.

Next up I tried to remove as much of the peeling latex paint as I could, and then sanded the entire piece to prep it for new paint.

In an effort to improve adhesion, disguise an uneven surface, and create additional age with more layers of color, I next pulled out some Dixie Belle Sea Spray and The Gulf paint.

I mixed the two to create a brownie batter-like consistency and painted a coat of that on the headboard.

This was just an underlayer of color though, I painted over it with two coats of Dixie Belle’s Drop Cloth.  I purposely allowed both the black and the aqua to peak through in some spots.

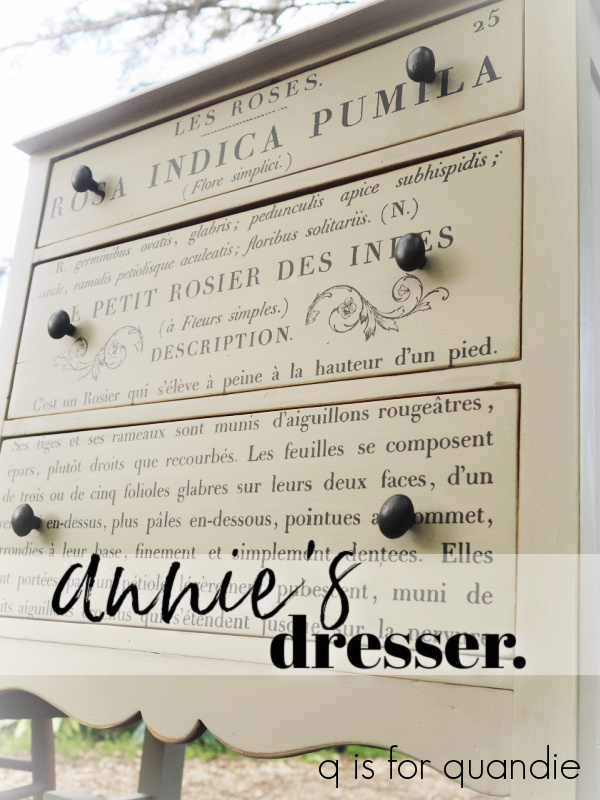
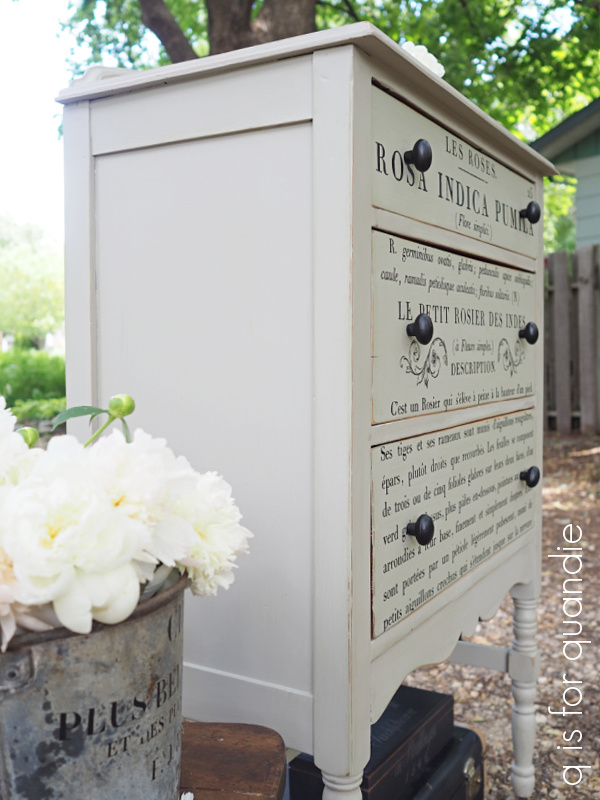
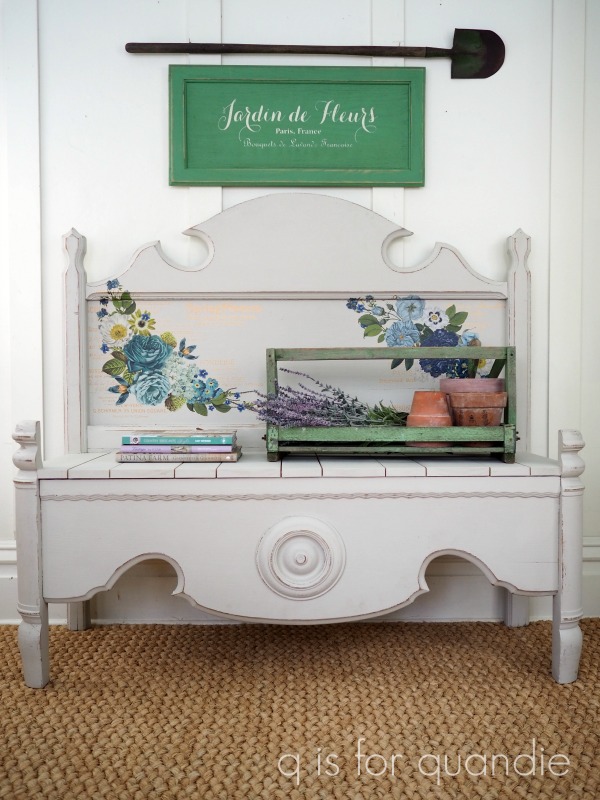
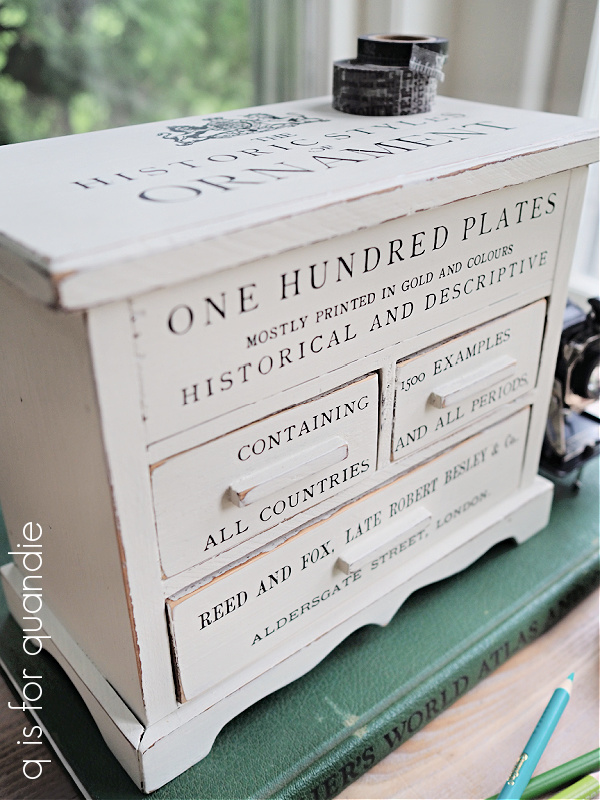
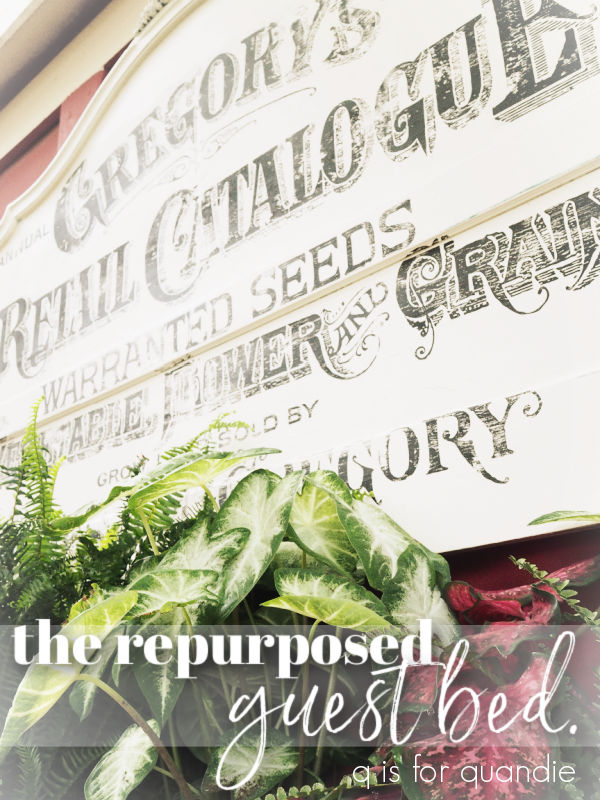
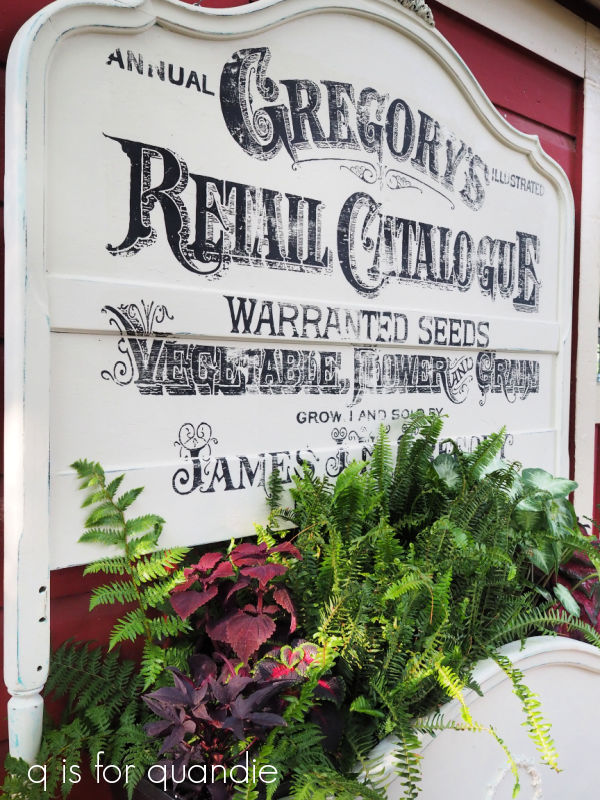
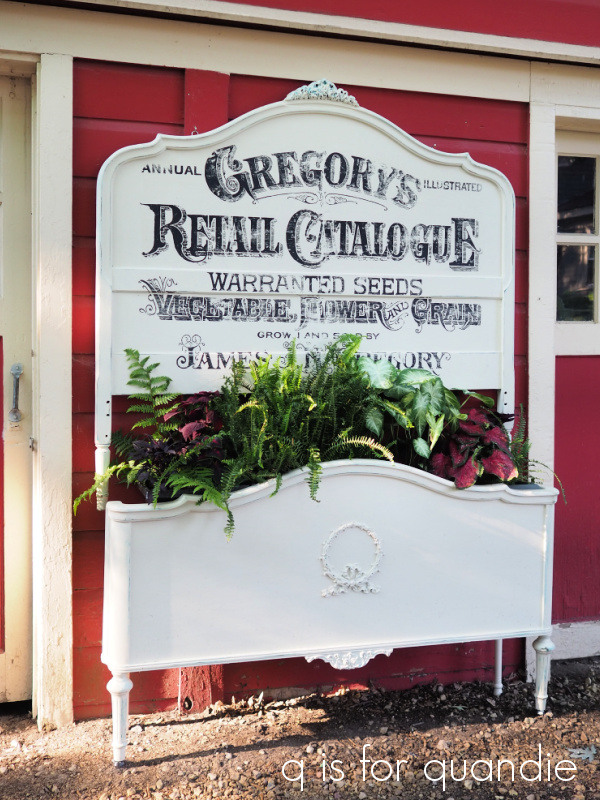
Then I added the Gregory’s Catalogue paint inlay from I.O.D. (for a full tutorial on using the paint inlays, check out this post).

When using a large design that comes on multiple sheets like this one, I start in the middle and work my way out adding wet paint to each section as I’m ready to place that piece.

Be sure to follow all directions with these paint inlays, especially keeping in mind that it’s best to seal them with a spray sealer first rather than a brushed on finish (the paint of the inlay is easily reactivated with a water based finish and will smear).  So once I had the paper backing off and everything was dry, I sprayed my headboard with Rustoleum flat clear sealer.  Once that was dry I also added a couple of coats of Dixie Belle’s flat clear sealer over it.  Since I’ll be hanging this outside, I wanted to protect it fairly well.

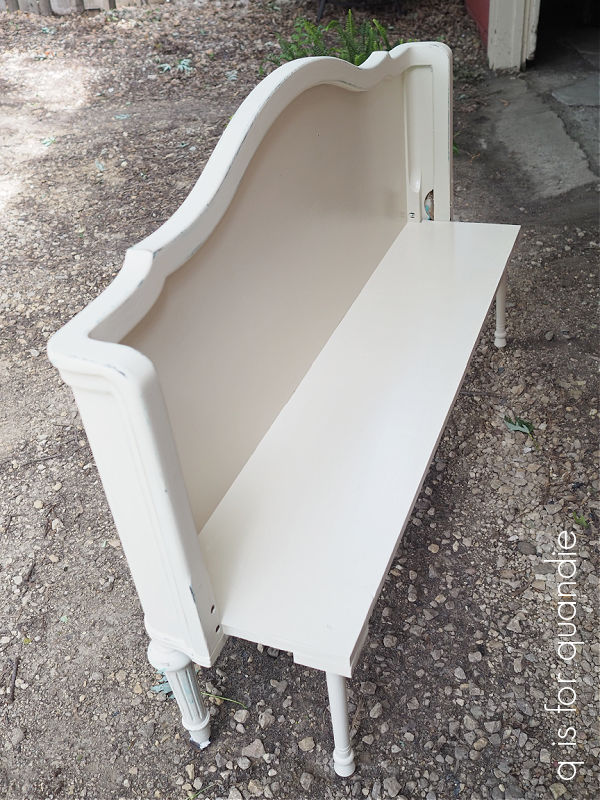
Now, let’s look at what we did with the footboard.

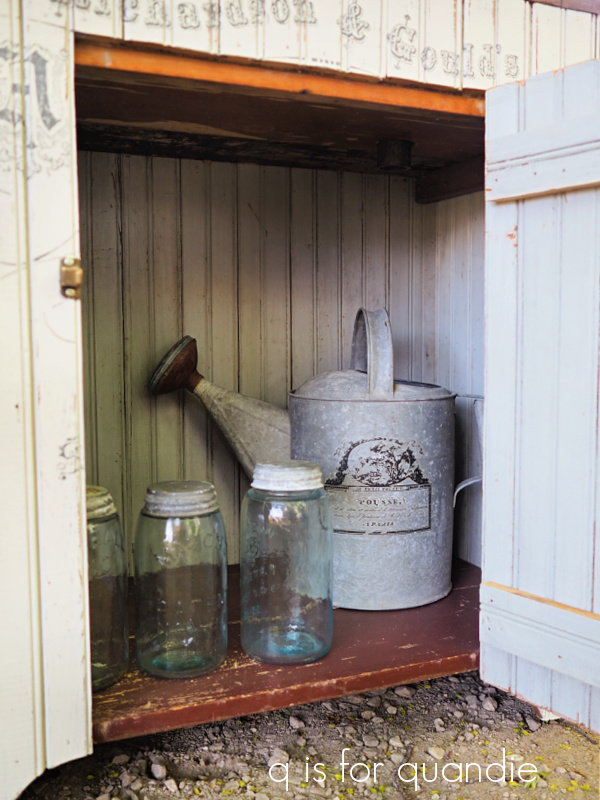
Once again, I need to add a disclaimer here.  Since this project was a keeper for me, I didn’t go as all out as I would have if I intended to sell it.  Were I selling it, I would have asked Ken to build a proper box on the back of the foot board.  Instead I just had him add a shelf with a couple of legs at the back to support it.  My plan was to use this as a ‘planter’ by placing it up against the carriage house and putting plastic planter boxes on that shelf.

I painted the whole thing using the same process as the headboard, The Gulf with Sea Spray followed by two coats of Drop Cloth.

I then sealed the inside of the ‘planter’ with Dixie Belle’s Gator Hide.  Gator Hide is their most durable, water repellant finish.  Since I will be placing potted plants on that shelf, I know it will be getting wet so I’m giving it the best chance of holding up.

If you’ve never used Gator Hide, I will tell you that it has a bit more sheen than my usual flat finish.  Personally I’m not a fan of shine, so for that reason I only used it on the inside of this piece where it won’t show.  I used the flat Dixie Belle clear coat on the front.

If you’ve stuck with me so far, here’s where we are with this project.

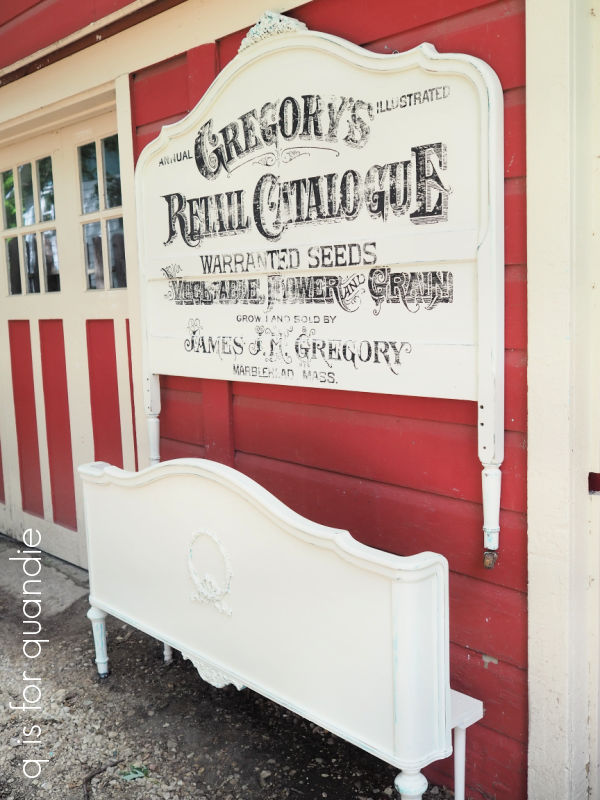
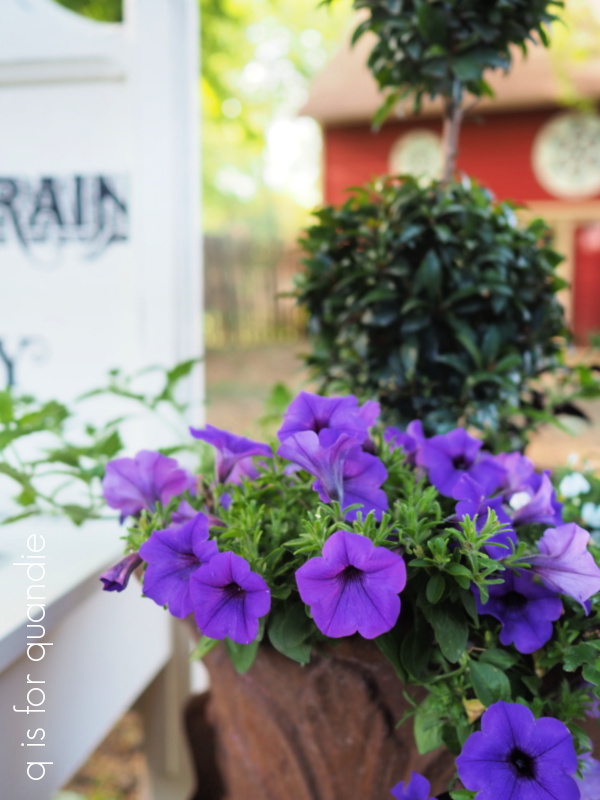
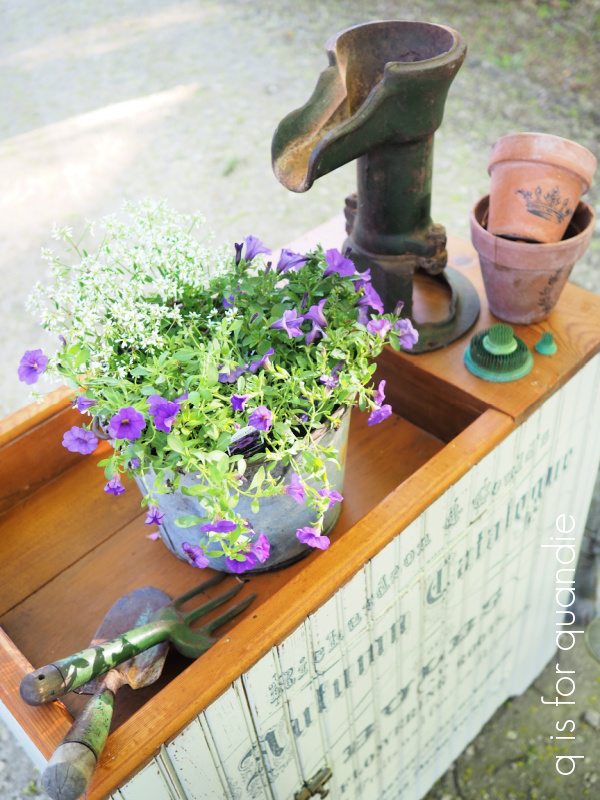
I’ve hung the headboard sign on the carriage house between the doors, and placed the foot board planter beneath it.  All that’s left is to fill it up with plants.

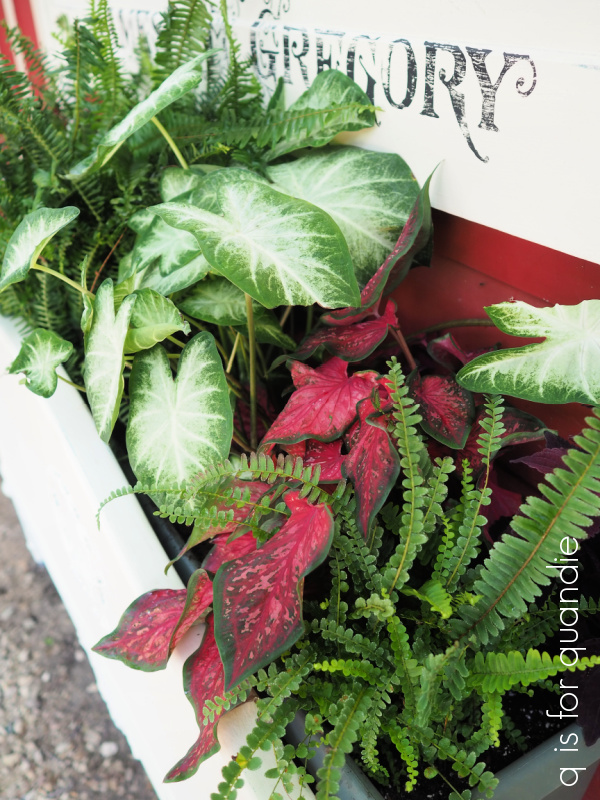
I learned another valuable lesson here, or at least one that is worth sharing with my local readers.  Don’t go to Gertens first for your plants.  I purchased two small ferns for $14.99 ea, two white caladium for $18.99 ea, and two dark red coleus for $4.99 ea from Gertens.  Then several days later I went to Home Depot and found caladiums that were twice the size for $9.98 and a fern that was 4 times the size for $14.98.  I really wish I had checked Home Depot first!

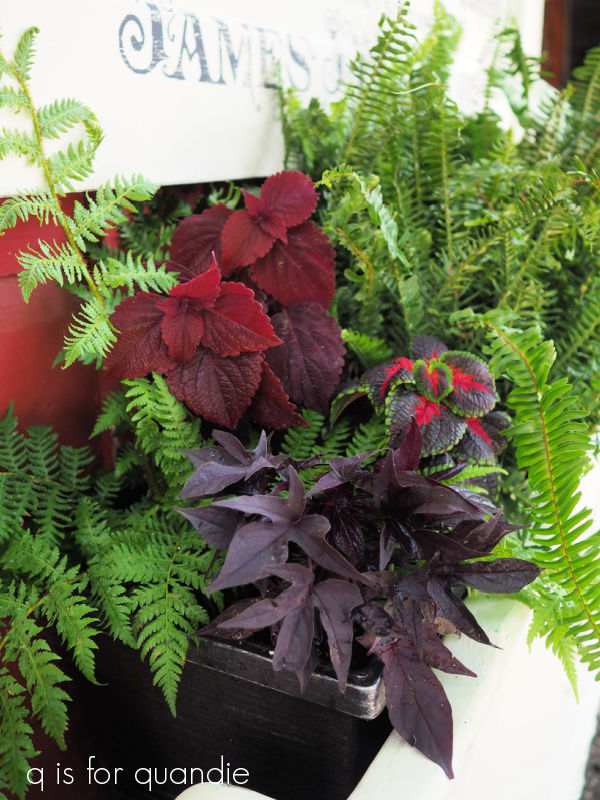
Well, live and learn, and either way, I am loving this combination of shade plants for my foot board planter.

I’m relying on foliage for the interest and color in this north facing spot.

So, several weeks and … uh … quite a few dollars later, I have created a focal point with lots of impact at the end of my driveway.

I learned a few lessons along the way with this one; (1) don’t assume all painted furniture can be stripped and stained, (2) don’t drive over your headboard, (3) don’t paint over oil based paint with latex paint, and finally (4) check Home Depot for inexpensive plants before resorting to Gertens.

I won’t say this was an inexpensive project.  By the time you add in the cost of the board Ken added to create a shelf, the paint inlay and especially the plants, pots & potting soil, this one added up.  If I’d also had to buy the bed itself, plus all of the Dixie Belle products I used (two colors of paint, Sea Spray, flat clear coat, Gator Hide) … well, yikes!

But I sure am happy with the results.  It’s definitely a keeper.

What do you think?

Thank you to Dixie Belle Paint Co for providing all of their products used on today’s project.

deconstructed.

Let’s start the weekend early and play a drinking game.  Get yourself some tequila (or your booze of choice), or OK, if you’re reading this first thing in the morning maybe it had better be coffee.  Now, every time I say ‘deconstructed’, take a drink.  We’re up to three already if you count the title and title photo.

As I’ve mentioned, since my furniture pieces aren’t exactly selling like hot cakes these days (and yes, I even still have that pair of mid mod end tables, go figure), I’m working on both smaller projects as well as projects for myself.  Which brings me to today’s project.

I brought this chair home from the Mac-Grove garage sales back in 2018.

So, yeah, that was four years ago.

Good gracious, it’s about time I got around to it.

Anyway, I purchased it because I thought it would be a great candidate for creating the ‘deconstructed’ look.  If you aren’t familiar with that look, go to pinterest and search for it.  You’ll find lots of examples, like this one from lizmarieblog.com …

I know the deconstructed look isn’t for everyone, but I kind of love it.

Some deconstructed pieces are more functional than others.  I don’t think anyone would want to sit on the example above from Liz Marie, but there are versions out there that are more suitable for actual use too.

First up, I removed the upholstery, which involved pulling about two million upholstery tacks.  Then I removed the really thick foam that was on the seat and clearly was not original to the chair.  That left me with this …

Of course I then removed that batting from the chair back, that may have been original but it was pretty gross.

Then I stood back and evaluated.  I could replace the strapping on the chair back with new strapping.  But … at that point, what would be left of the original chair?  And would it have that deconstructed look that I love?  I decided to leave the old strapping in place.

I also debated keeping the plywood support that was in place on the chair bottom, but I’m fairly sure that wasn’t original either.  And I didn’t like the way that section at the front was half an inch higher than the rest of the seat.  So I asked Ken to cut a new seat bottom for me from a piece of thick particle board.

We didn’t get fancy, and rather than notch out the seat to fit exactly, I asked Ken to just cut it to fit front to back.  That means some raw edges are exposed, but again … it’s deconstructed.

Then I covered the new seat with batting followed by a piece of drop cloth that I had stenciled with the Albert Rouff 1842 stencil from ellen j goods.

I used Dixie Belle’s Gravel Road paint to do the stenciling, I wanted it to look a bit more faded than it would have using black paint.

For those of you who struggle to get a clean line when stenciling, try stenciling on drop cloth.  It’s super easy and nearly fool-proof.

All of the exposed raw edges where the original upholstery was tacked into place just add to the deconstructed look.

Well, I think so anyway.

I also think the little wooden casters on the front two legs are a fabulous detail.

But I do wonder, why casters only on the front two legs?  There are no holes in the back legs, so they definitely never had casters.  What was the purpose behind having just two, or maybe it was simply for aesthetic reasons.

Four years ago I definitely planned to paint this chair with a creamy white milk paint and hopefully get some chipping.  But now I have to confess, even I am starting to veer away from painting everything.  So instead I applied Dixie Belle’s Big Mama’s Butta to the frame of the chair to clean up the wood a bit, but otherwise left it alone.

I have to say, I’m not sure if this dark wood works in the spot (shown above) where I plan to keep the chair though.  There is a lot of black (the baby grand, just off to the right), dark grey on the upper walls, and white.  It feels a little odd to throw in some dark wood.

So now I’m debating.  Do I go ahead and paint it?  Since I plan on keeping it, and I love me some chippy milk paint, maybe I should paint it.  What do you think?  Let’s take a vote.  Leave a comment below, paint or no paint?

Now, for those of you that played the drinking game with actual liquor, please don’t drive or operate heavy machinery.

Thank you to ellen j goods for providing the stencil used on my deconstructed (that’s 10, if you’re drinking) chair.

scandi end tables.

Moving forward on my plan to unstick myself, creatively speaking, I decided to work on this fabulous pair of end tables that came from my neighbor nnK’s parents.

She’d grown tired of them and replaced them with chrome and glass of some kind.

They look great from that angle, but nnk’s mom had kept houseplants on these tables resulting in water damage to both tops.

There was also a spot where the veneer was worn through, I’m not quite sure how that happened.  In addition, the pieces were discolored from years in bright and sunny living room overlooking the lake.

All of which meant that these tables were great candidates for some paint.

I decided to keep it super simple, just painting the damaged shells of the tables and leaving the drawer fronts and legs in their original finish.

Since the previous owners had often spruced up these tables with a coat of furniture oil of some kind, I gave them an extra thorough cleaning with Dixie Belle’s White Lightning which contains trisodium phosphate.  I usually use a TSP substitute, but in this case I thought I should go for the big guns.

Today’s q tip; always wear gloves when using TSP.  Also, be sure to rinse your piece with clean, plain water after cleaning it with White Lightning to remove any residue.

Once the tables were dry again, I sanded them with 220 grit paper to rough up the surface a bit and thus improve the adherence of the paint.

Finally, I painted the shell in Dixie Belle’s Silk paint in Anchor.  Just a reminder, Anchor is the black in the Silk line, Black Sands is a charcoal grey.  I was confused by that once and ordered the wrong color and I don’t want you guys to make the same mistake.

Once again, I chose the Silk line from Dixie Belle because of its built in primer and top coat.  It was super simple to add two coats of Anchor to each table.

The Silk paint has just a tad more shine to it than the very flat chalk paint, but I’d say it’s comparable to the sheen you get with a waxed chalk paint finish.

I then spruced up the existing finish on the areas that I didn’t paint using some of Dixie Belle’s Big Mama’s Butta.

By the way, the backs of the tables look like this …

And here is the completed pair.

I like the clean, modern lines of this Scandi looking pair.

Although this isn’t my usual style, it was still fun to breath new life into these tables with just a little paint and some butta’.  The next step will be to find out whether or not they will sell!  I’ll keep you posted.  Of course, if any of you locals are interested in purchasing this pair, be sure to check my ‘available for local sale‘ page for the details.

As always, thanks to Dixie Belle Paint Co for providing the White Lightning, Silk paint and Big Mama’s Butta used for this makeover.

getting unstuck.

As I’ve mentioned recently, my furniture is not selling very quickly (or at all) for me these days.

I had a really strong start to 2022.  I sold a number of pieces in January and February including the nightstands made by separating the two sides of a vanity …

this gorgeous armoire …

the barrister bookcase …

a primitive chippy dresser …

and the botanical cupboard …

But since then the only piece of furniture I’ve sold is the dry sink.

Well, and also the rusty garden furniture, which I suppose does count as the sale of furniture.

I’ve been selling refurbished furniture for a long time, and if there is one thing I can say for sure, it’s that it is very difficult to predict what will sell and what won’t.  Mainly because it changes all the time.

For a while there, dressers were a sure fire seller for me while more unique pieces like dry sinks, armoires, book shelves or restyled radio cabinets were likely to be more difficult to sell.  Now the opposite seems to be true.

One of the problems I have when unsold pieces start backing up is that I have nowhere to store them safely.  Sure, I could put them out in the carriage house, but it is damp and dirty out there (not to mention the bugs and critters).  Definitely not a great environment for storing my finished pieces.  They really need to be inside the house, so I line them up in the dining room.  And currently I’m out of space out there.

But really, the bigger problem I have when pieces aren’t selling is that I get stuck creatively.  I totally lose my motivation for working on more furniture.  I just can’t continue to add to the pile.  It starts to weigh me down.

So I took some time this past holiday weekend to try and brainstorm some potential solutions to this problem and I came up with a few ideas.

First up, I have this washstand that hasn’t sold.

I decided that I really liked this piece myself, and it could possibly work in my front hallway.  So I put it out there just to see how it would look.

It turned out to be a good fit.  So at least it’s out of my dining room and freeing up some space in there for now.  I’ll continue to list it for sale, but in the meantime I’ll enjoy it in my hallway.

Next up is the bench.

As you may remember, this is look number 3 for this bench.

If it still doesn’t sell in the next month or so, I may possibly take it into the shop where I sell on consignment.  I don’t usually take big pieces of furniture to them, and I have to wait until they have space for it, but maybe I can reach a wider audience … or at least a new audience … there.

I’ve also decided to try something a little more trendy on this piece …

I’m going to strip the drawer fronts and then either leave them as raw wood or add a white wax.  Then I’ll repaint the rest of the shell in a closely matching chalk paint, maybe Dixie Belle’s Putty or maybe the Burlap that I used on those nightstands.  Or maybe I’ll just strip the whole thing.  I’m not sure yet.  But it will be getting a new, raw wood sort of look.

If that ends up helping it sell, I may have to rework the other two dressers that aren’t selling.  This one …

and this one …

Another idea I had is to try going in a little different direction with the style of pieces I work on, starting with this set of modern end tables.

I’ll be sharing their makeover with you tomorrow.  And then we’ll see if these sell quickly or not.  If so, maybe I need to change up my inventory and focus more on mid mod pieces?

And finally, I’m also going to spend some time working on a couple of projects for myself.  I have a cabinet that I’ve been meaning to get to that will be part of a makeover of my shed/photo cottage, and I also have a headboard that I’m making into a sign to hang on the carriage house.

So hopefully in the end some/or all of these options will help me get unstuck.

I’d love to hear from any of you that are furniture refurbishers.  What is selling for you these days?  And when you get stuck, how do you get unstuck?  Leave a comment and let me know.

annie’s dresser.

Back when my friend Annie gave me the toolbox that I shared back in May, she also had two dressers that she wanted to part with.  I really thought I would get to these sooner, but here it is the end of June!

I have to say, I thought time would slow down a bit once I was retired from the full time job.  But if anything, it just goes even faster!  I also thought I’d have plenty of time to get EVERYTHING done.  Ha!  Jokes on me.

But I finally have the first dresser finished.  Here’s how it looked when I brought it home way back in April, before there were leaves on the trees or plants coming up in the garden.

If you predicted that I would remove those carved details from the drawer fronts, you were right.  It’s funny, there was a time when I was adding details like that to plain pieces.  Now I’m taking them off.  Just goes to show how trends change.

They were easy to remove using a chisel to pry them away from the drawer.  They had been both nailed and glued, so once I had them off I sanded any remaining glue off the drawers.

I wanted to break out of my Drop Cloth/Midnight Sky (ie. warm white/black) comfort zone and try a new color, so I pulled out Dixie Belle’s Dried Sage.  They describe this color as a soft gray with green undertones, which is pretty darn accurate.

So, OK, maybe I didn’t take a really huge leap out of my comfort zone.  More like a baby step.

After my usual prep process of lightly sanding and cleaning this piece, I gave it two coats of Dried Sage.  Once it was fully dry, I added I.O.D.’s Petit Rosier transfer to the drawer fronts.

Once I had the transfer applied, I top coated the piece with Dixie Belle’s flat clear coat.

After the clear coat was on, I got busy with other things and the dresser sat for a few days.  That was when disaster struck.

Well, OK, ‘disaster’ might be a bit of an overstatement, but basically the water based topcoat drew the stain through the paint.

I’ve had this happen before, and quite honestly I should have known better with this piece.  Looking back at the reddish orange stain on the piece in the ‘before’ photo, I don’t know why I didn’t just head this problem off at the pass with a coat of Dixie Belle’s B.O.S.S. to block stain bleed through.  Often times you’ll see bleed through right away with the first coat of paint, but every once in a while the stain won’t bleed through the paint until you add that topcoat.  And even then, it can take a couple of days to show up.

Normally at this point I would just start over with a coat of B.O.S.S. followed by another coat of paint.  But in this case I’d already applied a slightly pricey transfer to those drawer fronts.

Fortunately, the drawer fronts didn’t look that bad.  So I added a coat of B.O.S.S. to the top and sides of the dresser and then headed off on my trip to my mom’s house.  When I returned a week later, I added another coat of Dried Sage to the shell of the dresser.

As I expected, the areas with the B.O.S.S. were a slightly lighter color than the drawer fronts.  So I decided to see what I could do with different top coats to darken them up.  I dug out a practice board, painted it in the Dried Sage and then tried four different top coats.

As you can see, the flat clear coat just barely darkened up the color of the paint.  Clear wax darkened it just a teeny bit more.  The DIY Dark & Decrepit was too much.  But I decided that I could work with the Dixie Belle brown wax over an initial coat of clear wax.

Today’s q tip:  if you start with an initial coat of clear wax, the dark wax you add over it will be easier to manipulate and blend.  It will also make it easy to remove any excess dark wax if you put too much on your piece.  You can go back with clear wax on a rag and use it like an eraser to remove some of the dark wax.

So, I clear waxed the shell of the dresser first, then added some dark wax here and there, especially around the drawers to blend the color of the drawer fronts with the color of the shell.

I think it worked out fairly well.  Obviously this is a case of do as I say, not as I do.  I’m reminded to hedge my bets by starting with a coat of B.O.S.S. whenever I encounter a stain that even remotely looks like it might bleed.

The sides of the dresser are much improved.

You may have already noticed that I did not put the original hardware back on this piece.  I planned to initially, but after seeing how nicely the black transfer contrasted with the Dried Sage, I decided to go with a simple black knob from Hobby Lobby instead.

Finally, I lined the drawers with some pretty paper.

And with that, Annie’s dresser has been made over.

What do you think?

This dresser is for sale, be sure to check my ‘available for local sale’ page for details.

Thank you to Dixie Belle Paint Co for supplying their products used in this makeover.

if it’s broken.

If it ain’t broken, don’t fix it.  But if it is broken, well … sometimes you still can’t quite fix it.

A few weeks back my handyman/neighbor Ken and his wife asked me whether or not I would like to have their cast iron garden furniture.  It’s your typical set that includes a bench (not pictured below), two chairs and a little round table, all in the classic grapevine pattern.

By the way, the giant pot is not from the neighbors, I only put it in the ‘before’ photo because I was working on it at the same time.  Kinda wish I hadn’t done that, but that’s water under the bridge now.

Ken and Arlene have had this set for decades.  I’m sure at least 40 years or more.  Every year they would haul it into their shed for the winter to save it from the elements.  But over the years, Ken has found that task more and more difficult because these pieces are pretty heavy.  For the last few years my other neighbor (the athletic trainer at a nearby high school) has gotten some football players to help with that task.  Still, Ken wanted to be rid of the furniture.  He’s tired of storing it in the shed every year (and I also suspect he’s tired of re-painting it bright white every few years), but his wife won’t have it any other way.

When they offered the set to me, I had to point out that I would leave it out in the winter.  Not only would I leave it out in the winter, but I would purposely make it rusty.  So if they couldn’t handle seeing that, they shouldn’t give it to me.

But they were still willing, so I took it!

There were a couple of issues though.  Both the bench and one of the chairs have broken legs that Ken wasn’t able to repair.  If you’ve followed me for long, you know that Ken is my fixer.  So if Ken can’t fix it, well, I’m not even going to try.  Apparently he even went so far as to have a welder attempt to weld the legs in place, and that didn’t work.

So basically, neither of those two pieces are suitable for actual sitting.

Well, that’s OK with me.  I planned to use the Dixie Belle Patina Paint to make them rusty, and unless you seal them, that makes them unsuitable for sitting on anyway.  Plus, let’s face it, it’s not like this furniture is comfortable, right?  Does anyone ever actually sit on it?  This is definitely one of those form over function sort of situations.

So I made them rusty.  The bright white just wasn’t ‘me’.  As per usual, I started off in the wrong direction.  I decided to give them a dark base color so there wouldn’t be any patches of white poking through the rust.  I also decided to use spray paint for this, simply because it would be way easier than painting them with a brush.  I had a couple of cans of gloss black on hand, so I thought it would be OK to use that.  So I sprayed them up … and boy was that gloss spray paint SHINY.  Like so. very. shiny.

I didn’t want to see super shiny black spots behind my rust, so I switched directions and gave the pieces a base coat of flat red spray primer.  Much better.

One caveat re: the primer, if I was concerned about these pieces rusting for real I could have used the Dixie Belle Prime Start.  It contains an acid blocker that prevents the activator (green spray) that you apply later from eating through the paint and degrading your metal item.  But I’m OK with these pieces rusting away for the next decade or two.

Next I followed the normal process with the Dixie Belle Patina Paint in Iron, followed by the green spray (you can get detailed info on that process by clicking on the image below).

For reference, it took most of the 8 oz. container of the Iron paint to do the two chairs and the round table (I haven’t gotten to the bench yet).  So if you’re planning a rusty project, maybe this gives you an idea of how far the paint goes.

I really loved the rusty look I achieved on these pieces.

Yep, rusty is much more to my taste than the bright white … or the glossy black for that matter.

As I’ve mentioned in the past, the rusty patina can take a while to fully develop.  I’ve also noticed that a little rain falling on the items will speed up that process.

Dixie Belle does make a sealer specifically for use over their patina paint called Patina Guard.

You may want to consider using this sealer to protect a rusty finish, or more importantly to protect yourself from sitting on a rusty finish.  But personally I don’t like the sheen it imparts, so I prefer to leave my rusty pieces unsealed.  You can read more about that in this post.

I’ll be splitting up all of these pieces rather than keeping them together as a set.

One of the chairs has found a home in my front garden next to the fountain.

I also have a spot picked out for the bench (once it’s done).

I did have a plan for the other chair and table, but ended up not liking them in the spot I picked out.  So now I’m going to attempt to sell those two unbroken pieces.  So if any of you locals are in need of a rusty table and chair for your garden, be sure to check out my ‘available for local sale‘ page for more details.

As for that pot, I made that rusty too, and here is how it turned out …

The pot also has a grape vine motif that looks great rusty.

It’s also available for local sale.

While I’m at it, I also have this pair of tall rusty planters and obelisks available.

These are quite tall and would look amazing flanking a door, or maybe a path in your garden.

Be sure to check out my ‘available for local sale‘ page for the details on all of these rusty items.

Have I gone overboard with the rusty look?  I don’t think so.  In fact I have another pair of planters that are going to go rusty next, and I still have to get to that bench!

As always, thank you to Dixie Belle for providing me with their Patina Paint products.

go big or go home.

First up, congrats to Mary from Glass Horse Studio.  I drew her name to win my patina paint giveaway!

I don’t know how many of you check out my ‘available for local sale’ page on a regular basis, but if you do, you may have noticed that my furniture is not exactly flying off the shelf these days.

I’m not sure what the hang up is.  Earlier this year I thought maybe it was just the cold weather, but I can’t blame it on that anymore.

Then I thought, maybe white just isn’t ‘in’ anymore.  Several of my pieces are white including this stenciled dresser …

Or maybe the problem is that ‘farmhouse style’ is on the way out.

I’ve sold so many of these washstands, they are perfect as nightstands or side tables.  I can’t imagine why this one isn’t going.

Desks are always a bit of a tough sell, most people simply don’t use desks in their homes anymore, so not being able to sell the desk isn’t a complete surprise.

Black has always been a quick seller for me, so I went with simple black on this next one.  No transfers, no stencils …

And I still have it.  What’s up with that?

This pretty shade of blue green has always been one of my personal favorites, but maybe it’s no longer so popular?

Or maybe it’s the french writing that’s holding this one back?

I have all of these pieces advertised on Craigslist and on Facebook Marketplace and I’m not getting even a nibble.  On any of them!

And that brings me to the bench.

This bench goes all the way back to December 2020 when Ken created it out of an old 3/4 bed frame.  I had painted it in DB’s Sawmill Gravy and added re.design with prima’s Cosmic Roses transfer.

I had it listed for about 9 months, and then in October 2021 Ken and I decided to revamp it a bit to see if we could get it to sell.

Ken cut down the posts at the front of the bench because he’d thought they looked weird from the start.  Then I repainted it in Dixie Belle’s Drop Cloth and added that french transfer to the back.  If you’ve been following me that long, you may remember that I wasn’t happy about the repetitiveness of the transfer (cakes and pastries, cakes and pastries, cakes and pastries).  I didn’t even notice it until I already had it half applied.

Anyway, another 7 months have gone by and I still have the bench.

So I decided to give it one more try.

I consulted with Ken and we decided to remove the circular do-dad from the bottom of the bench.  It kind of draws the eye and looks a little … well … kind of nipple-y really.  It popped off fairly easily, then I sanded that area a bit and touched up the paint.

Next up I sanded off the transfer and re-coated that area with more Drop Cloth.  Then I applied I.O.D.’s Gregory’s Catalogue paint inlay.

Go big or go home, right?

This paint inlay isn’t playing around.  It’s big and it’s in your face.  And I love it.

I actually purchased this particular paint inlay to create a sign for myself, something that would hang on my carriage house … or maybe on my front window box.  I still plan to pursue that project, but for now, the inlay was kind of perfect for this bench.

Several of you have commented that the paint inlay process seems putzy or complicated, but I have to say that applying this one to the bench was easier than applying a transfer of the same size would have been.  Or at least it took far less arm strength (all of that rubbing with transfers!) and less time (not including dry time, but less actual working time).

As long as you pay attention and follow the directions (see my tutorial here), these are quite easy to apply.

Before I let you go, we just have to talk about that gorgeous purple petunia for a minute.

That is the Proven Winners Supertunia Mini Vista® Indigo.  The color on this thing is so gorgeous.  It’s probably going to entirely take over that pot and consume the topiary behind it, but I don’t care.  It makes me smile every time I see it.  I just had to share that with you guys.  I’ve seen lots of photos of this plant online and they seldom do justice to the actual color of it.

So the question remains, will this bench finally sell?

That remains to be seen, but I’m cautiously optimistic.  I think it turned out pretty fabulous and I really wish I had a spot for it myself.

If any of you locals are interested, be sure to check my ‘available for local sale‘ page for the details on this bench as well as the other pieces that are still in my inventory.

As always, thank you to Dixie Belle Paint Co for the paint and clear coat used on this piece.

the historic styles mini.

You may remember that I picked up this little mini dresser while garage saling recently.

I knew it would be a fun one to restyle.

I started by sanding it lightly, cleaning it and then painting the outside in Dixie Belle’s Drop Cloth.  Then I added some bits and pieces from I.O.D.’s Label Ephemera transfer to the top and front.

I really wish someone would come out with another typography transfer.  I just love this one, but I am getting a little tired of re-using the same wording over and over.  And of course, it also is retired so eventually retailers are going to run out of their inventory.  It would be fun to have something new, wouldn’t it?

I gave it a pop of color on the inside by painting it with Fusion’s Laurentien.  I wanted to use an all in one style paint, like Fusion or Dixie Belle’s Silk for durability.  After choosing some October Afternoon scrapbook paper to line the drawers, I decided that the Laurentien was the perfect color to go with the paper.

Rather than flipping up on hinges, or having a top drawer, this little dresser has a lid that comes off.

This piece would be fantastic as a jewelry box, but I chose to style it with crafting supplies.

I mean seriously, how cute would this be for keeping some of your crafting supplies organized?

But using it as a jewelry box would be a valid option as well.

I definitely prefer the ‘after’ version, how about you?

This one is for sale, so if you’re local (I don’t ship) be sure to check out my ‘available for local sale‘ page for more details.

an old favorite.

Remember I mentioned that I purchased a vintage dry sink at a garage sale a few weeks back?  Well, here it is in its ‘before’ state.

How could I resist that?  It even had the old green pump still attached.  Well, part of it anyway.  The handle is missing.

This one was definitely the perfect candidate for some milk paint.  I just happened to have some Homestead House milk paint on hand in a color called Stone Fence.  I’d used this color quite a few years ago and I really liked it, so I’d ordered more of it recently.  It was just waiting for the right project.

I went very minimal on prep because I knew I’d be OK with some chipping.  So I simply cleaned the beadboard on all four sides with some TSP substitute, and then rinsed with clear water.  Next I painted the beadboard with two coats of the Stone Fence leaving the top of the dry sink unpainted.  Once dry, I sanded with 220 grit paper.

I then vacuumed away any dust, gave it a wipe down with a clean, dry microfiber cloth, and then applied my old favorite transfer called Seeds.

That transfer could not have been any more perfect for this piece (although I didn’t use the entire transfer, there were a couple more lines at the bottom that I cut off and will save for another project)!

This is an old Prima Marketing transfer from before they parted ways with the I.O.D. sisters.  I was just looking back at one of my blog posts about a pair of twin beds that I put this transfer on back in 2018, and I mentioned in that post that the transfer cost $17.99!  Dang, what happened to those prices?!  Now you can’t find transfers this size for less than $29.99.  That’s a 65% increase in 4 years.  What’s up with that?

(Sidebar:  that urn planter on the left is another that I used Dixie Belle’s patina paint on to give it a rusty iron look, it’s really just plastic!)

The Seeds transfer came in a larger size (which is what I used on this dry sink), and a smaller version.  I used part of the smaller one on this chair …

I used this design on A LOT of pieces, and I was hoarding this last one for something special (the transfer is retired, so no longer available).

Just a quick q tip to say that I don’t necessarily recommend storing (a.k.a. hoarding) transfers for more than a couple of years.  They can dry out and then become difficult to apply.  I’ve also had them come unstuck from their backing and stuck to the protective sheet instead, and then they are worthless.

But I was ignoring my own advice and hanging onto this one until just the right piece came along.  Luckily, the transfer was still in good shape and went on fairly easily.

That being said, it can be a little more challenging to apply a transfer over an uneven surface like beadboard …

You just have to go slowly and continually press the transfer down into those grooves.

As for the top of the dry sink, I decided to just clean it up a bit.

I sanded it with 220 grit paper to remove some smudges of paint left on it by a previous owner, and then revived the finish with a coat of Dixie Belle’s Big Mama’s Butta.

It’s not perfect, but that was my point.  I didn’t want to totally remove the patina that showed its age.

The remainder of the piece received a top coat of Dixie Belle’s flat clear coat.

As for the inside, I cleaned it and that’s it.  I like that it looks authentic inside with original chippy paint.

I think this piece would be adorable as a plant stand.  You could fill the ‘sink’ area with potted plants and store all of your plant supplies underneath.

In the end, this was the perfect piece for my last precious Seeds transfer, don’t you think?

This piece is for sale, so be sure to check my ‘available for local sale‘ page for more details.

a pair of benches.

I picked up this rather non-descript pair of benches at the Bryn Mawr sales earlier this month.

They were literally the first thing I saw as I stepped out of the car.  I think I was a little over-excited at the prospect of returning neighborhood sales when I snatched these up.  They really weren’t anything special.  They certainly aren’t vintage.

They are pretty sturdy though.  So after I gave them a good cleaning, I hoped I could give them each a new personality with a little paint and some transfers.

I painted the first one in Dixie Belle’s Kudzu.

I added the I.O.D. Rose Chintz paint inlay to the shelf underneath.

And then I added the Fresh Cut Flowers stencil from The Stencil Market to the top.

It was a perfect fit.

I followed all of that up with some sanding to distress the edges, and then a couple of coats of Dixie Belle’s flat clear coat.

I painted the 2nd bench in my favorite warm white, Dixie Belle’s Drop Cloth.

I covered the shelf underneath in a black and white gingham transfer from re.design with prima.

Then I added a portion of their French Specialties transfer to the top of the bench.

Once again, I finished it off with a couple coats of DB’s flat clear coat.

As a sidebar, I took all of the photos for this post yesterday morning, and then yesterday afternoon this happened …

That white stuff?  It’s hail.

We had a massive hail storm.  It sounded like rocks were being dropped from the sky.  And really, they may as well be rocks … except they melt eventually.  Many of my hostas were totally shredded.

Just when they were starting to look really fabulous.

I have to steel my nerves to head out there this morning, survey the damage, and start the clean up.  But, on the bright side, I have lots of time to spend in the garden this summer.  Looks like I’m gonna need it.

So anyway, two somewhat different looks for a pair of formerly matching benches.

Which one do you prefer?

If any of you locals are in need of a small but sturdy bench, both of these are for sale.  Check out my ‘available for local sale‘ page for more details.

Thank you to Dixie Belle Paint Co for supplying the paint and clear coat used on the benches.