
Back when my friend Annie gave me the toolbox that I shared back in May, she also had two dressers that she wanted to part with. I really thought I would get to these sooner, but here it is the end of June!
I have to say, I thought time would slow down a bit once I was retired from the full time job. But if anything, it just goes even faster! I also thought I’d have plenty of time to get EVERYTHING done. Ha! Jokes on me.
But I finally have the first dresser finished. Here’s how it looked when I brought it home way back in April, before there were leaves on the trees or plants coming up in the garden.

If you predicted that I would remove those carved details from the drawer fronts, you were right. It’s funny, there was a time when I was adding details like that to plain pieces. Now I’m taking them off. Just goes to show how trends change.
They were easy to remove using a chisel to pry them away from the drawer. They had been both nailed and glued, so once I had them off I sanded any remaining glue off the drawers.
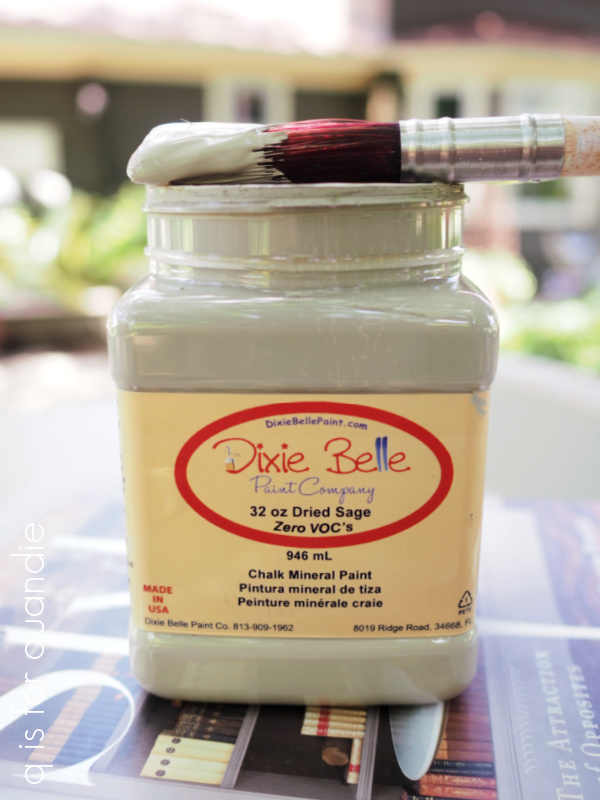
I wanted to break out of my Drop Cloth/Midnight Sky (ie. warm white/black) comfort zone and try a new color, so I pulled out Dixie Belle’s Dried Sage. They describe this color as a soft gray with green undertones, which is pretty darn accurate.
So, OK, maybe I didn’t take a really huge leap out of my comfort zone. More like a baby step.
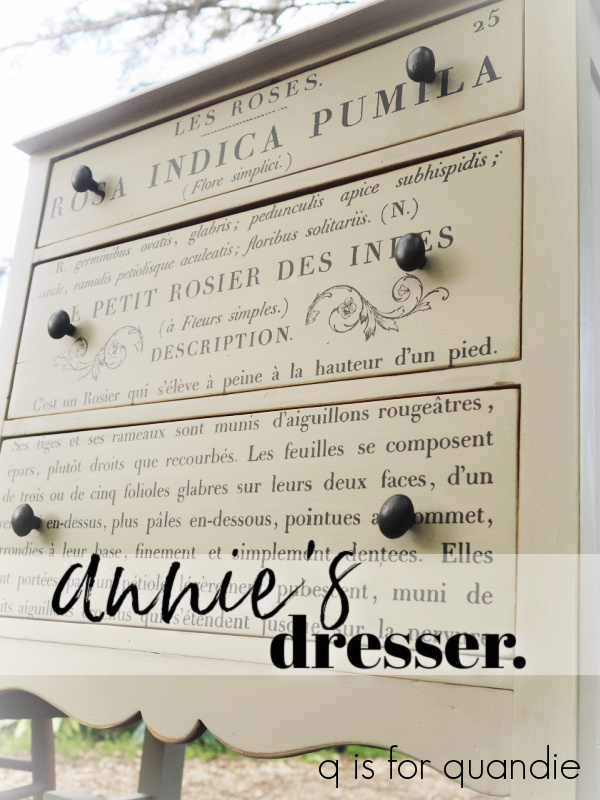
After my usual prep process of lightly sanding and cleaning this piece, I gave it two coats of Dried Sage. Once it was fully dry, I added I.O.D.’s Petit Rosier transfer to the drawer fronts.
![]()
Once I had the transfer applied, I top coated the piece with Dixie Belle’s flat clear coat.
After the clear coat was on, I got busy with other things and the dresser sat for a few days. That was when disaster struck.
Well, OK, ‘disaster’ might be a bit of an overstatement, but basically the water based topcoat drew the stain through the paint.

I’ve had this happen before, and quite honestly I should have known better with this piece. Looking back at the reddish orange stain on the piece in the ‘before’ photo, I don’t know why I didn’t just head this problem off at the pass with a coat of Dixie Belle’s B.O.S.S. to block stain bleed through. Often times you’ll see bleed through right away with the first coat of paint, but every once in a while the stain won’t bleed through the paint until you add that topcoat. And even then, it can take a couple of days to show up.
Normally at this point I would just start over with a coat of B.O.S.S. followed by another coat of paint. But in this case I’d already applied a slightly pricey transfer to those drawer fronts.

Fortunately, the drawer fronts didn’t look that bad. So I added a coat of B.O.S.S. to the top and sides of the dresser and then headed off on my trip to my mom’s house. When I returned a week later, I added another coat of Dried Sage to the shell of the dresser.
As I expected, the areas with the B.O.S.S. were a slightly lighter color than the drawer fronts. So I decided to see what I could do with different top coats to darken them up. I dug out a practice board, painted it in the Dried Sage and then tried four different top coats.

As you can see, the flat clear coat just barely darkened up the color of the paint. Clear wax darkened it just a teeny bit more. The DIY Dark & Decrepit was too much. But I decided that I could work with the Dixie Belle brown wax over an initial coat of clear wax.

Today’s q tip: if you start with an initial coat of clear wax, the dark wax you add over it will be easier to manipulate and blend. It will also make it easy to remove any excess dark wax if you put too much on your piece. You can go back with clear wax on a rag and use it like an eraser to remove some of the dark wax.
So, I clear waxed the shell of the dresser first, then added some dark wax here and there, especially around the drawers to blend the color of the drawer fronts with the color of the shell.

I think it worked out fairly well. Obviously this is a case of do as I say, not as I do. I’m reminded to hedge my bets by starting with a coat of B.O.S.S. whenever I encounter a stain that even remotely looks like it might bleed.
The sides of the dresser are much improved.
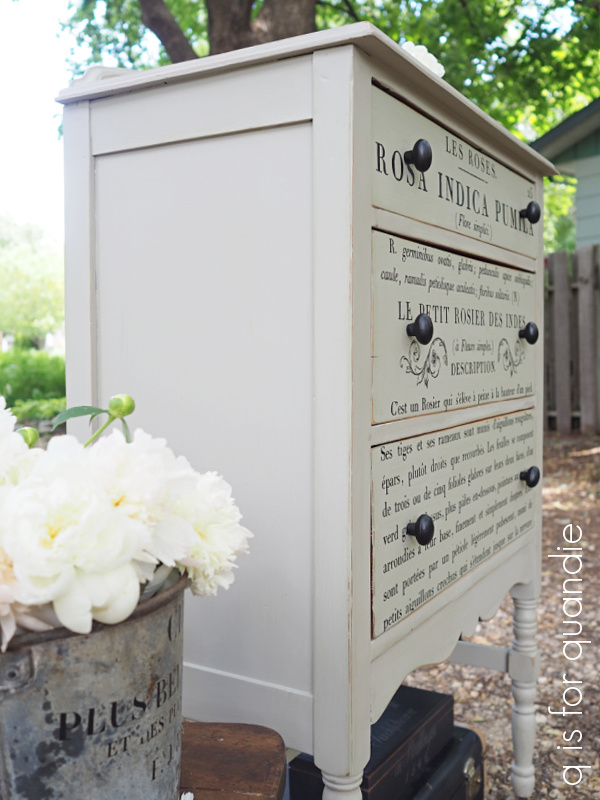
You may have already noticed that I did not put the original hardware back on this piece. I planned to initially, but after seeing how nicely the black transfer contrasted with the Dried Sage, I decided to go with a simple black knob from Hobby Lobby instead.

Finally, I lined the drawers with some pretty paper.

And with that, Annie’s dresser has been made over.

What do you think?

This dresser is for sale, be sure to check my ‘available for local sale’ page for details.
Thank you to Dixie Belle Paint Co for supplying their products used in this makeover.

Well I will be honest and say I’m a little surprised you didn’t BOSS it first. I make it a habit to always prime my pieces. You did save it and it looks great!! I love that transfer.
LikeLike
Right?! I know, what was I thinking?? Rookie mistake 😉
LikeLike
Wow what a save! I have had such headaches in the past when dealing with this bleed through. Got some of the boss for the last one (thanks the Q branch) and wow what a game changer that stuff is! This color is beautiful and the transfer looks awesome. The knob change and detail removal were just just the ticket. I’m glad you kept the little casters on the bottom. I predict a quick sale!
LikeLike
Thanks Sheri! And you’re so right, that BOSS is a game changer 🙂
LikeLike
The Dried Sage is beautiful. Thank you for explaining how you addressed the bleed through. Tucking that bit of information into my toolbox.
Love the final look!
LikeLike
Thanks so much!
LikeLike
Good save! It looks great and I love the overall look. Isn’t retirement funny-yup you think you will have all this extra time but the time does seem to go faster!
LikeLike
Definitely! I keep wondering why I’m not getting more things crossed off my to-do list 😉
LikeLike
I love how it turned out! Have a question though. Does Dixie Belle paint always require a top coat or did you apply the top coat because of the transfer? Have you ever used fusion mineral paint? Wondering if you would seal that one too? Thanks for what you share, I always enjoy your blog! 🙂
LikeLike
Technically Dixie Belle’s chalk paint does not require a top coat. However, it will be difficult to clean your piece later if it doesn’t have one. So I always topcoat it. And in this case, yes, the I.O.D. transfers recommend using a topcoat over them also. I was once a content creator for Fusion, so I’ve used lots of their paint. Check out these links for a couple of my favorites, here and here. It is a great product, and super durable without any additional topcoat (also super washable). The only time I used a topcoat over Fusion paint was for aesthetic reasons, like adding a dark wax or glaze. Dixie Belle’s Silk line of paints is very similar to the Fusion paint. It also doesn’t require a topcoat and is very durable and washable once cured. I don’t add a topcoat to the Silk paint either.
LikeLike
What do I think Miss Quandie? I think I love it! The long legs on this chest are wonderful…….would be so excited if I found one like it here!
LikeLike
The legs were my favorite feature on this piece too. I did debate stripping them and staining them in a natural color, which is so trendy right now, so that they could be the star of the show. But in the end, I decided to paint them 😉
LikeLike
Again, very nice!
LikeLike
Looks amazing!! Great job!
LikeLike
Thanks Michele!
LikeLike