furniture, furniture, everywhere.

You may have noticed that I haven’t posted any finished pieces from last weekend.  Well, I didn’t get much painting done.  I was booked solid picking up furniture.  Sometimes it just works this way.  I’ll go weeks without seeing much of interest on Craigslist, and then suddenly I’ll see numerous items that I want to get my hands on.  Last weekend we picked up six pieces!

Want to see them?  Of course you do!

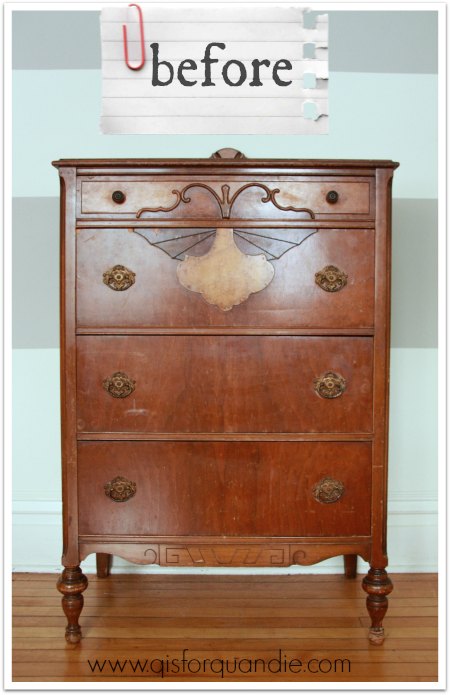
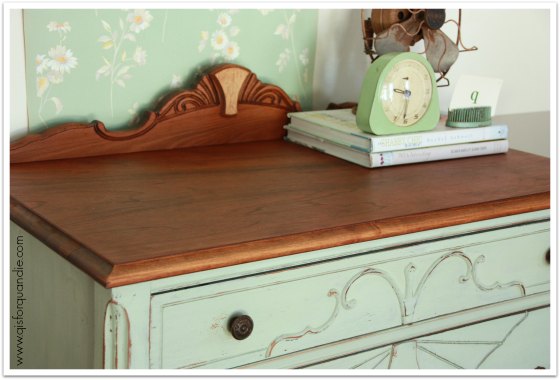
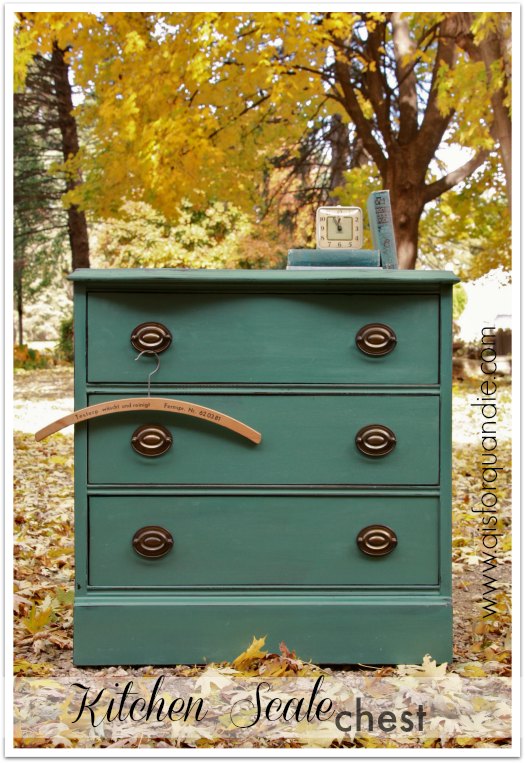
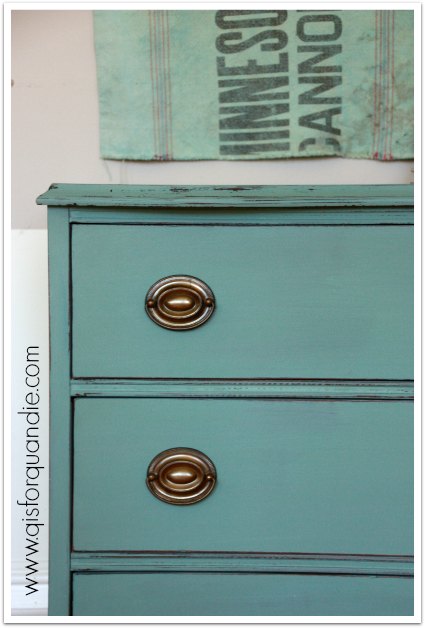
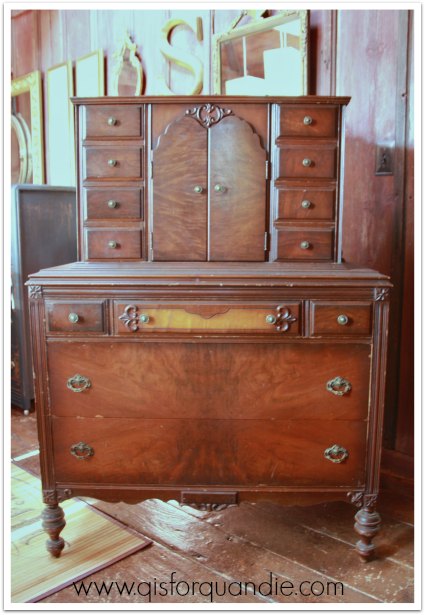
First, this fab tall dresser.  It’s right up my alley.  I’ve done quite a few similar pieces, like the Grain Sack dresser and the Kitchen Scale dresser .  I was able to send Mr. Q to pick this one up Friday morning while I was off at the day job.  I’m not sure yet what color I will choose for this one, any suggestions?

riverside dresser before

Can I just say?  Are you digging this ‘before’ picture as much as I am?  Since I am storing this one in the Carriage House until I can get to it, I decided to take a few quick before shots in the driveway rather than hauling it into the house just for a quick picture.  And yes, it was lightly snowing at the time.  I truly had no idea how lovely that would make the picture.  Now I want to take all of my furniture outside for winter photo shoots!

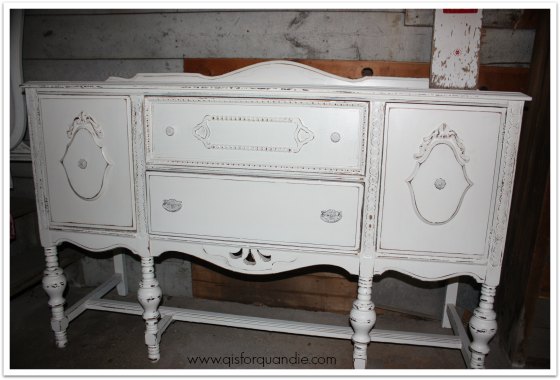
And since I was in the driveway with my camera, I went ahead and got a ‘before’ photo of this buffet that Mr. Q and his friend Gene picked up for me early Sunday afternoon.

Prescott buffet before

In case you are wondering, I do plan to paint this in Kitchen Scale just like my own very similar buffet.

Kitchen Scale hutch

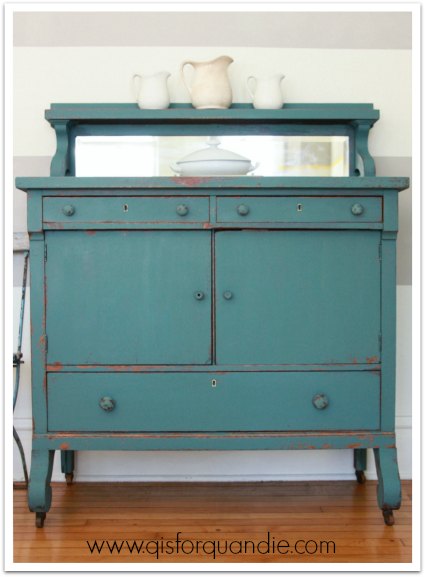
So if you have always coveted it, and you are local … well, soon you’ll have your chance!

This one even came with the original keys for the locks which is extremely rare.  And the inside was lined with newspaper pages from 1959 which is kind of cool.

1959 newspaper

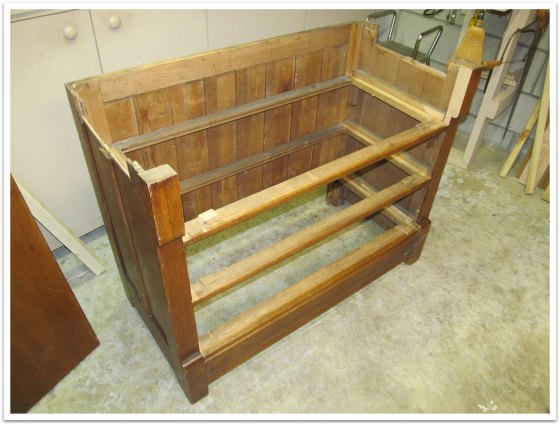
The real reason that I had Mr. Q call in Gene for assistance was the next 3 pieces that came as a set.  The seller told me they were heavy and I needed to bring my own manpower, so I did.  I spent a little more than I normally would on this set, and you’ll see why in the end.  But let’s start with the bed.  And in case you are wondering, I just took these pics yesterday when the sun came out again.  Not quite as magical as the snowy pics, right?  So much for the winter outdoor photo shoots.

forest lake bed before

But, isn’t the bed beautiful?  From the above photo you can’t even see what sold me on it.

It’s the wrap around foot board …

forest lake bed details

Isn’t that unique?  I’d never seen one like this before.

The set also came with a vanity.

forest lake vanity before

(Sorry Terri, Mr Q’s legs are still fully clothed!  It was -9 degrees when we took these pics.)

But the real reason for the splurge on this set was the dresser.  I have a customer who has been looking for a spectacular piece for a bedroom makeover, and I knew this piece would be just that.  I sent her some pictures of the dresser before I purchased it to be sure she was interested, and she definitely was, so I took the leap.  And here it is.

forest lake dresser before

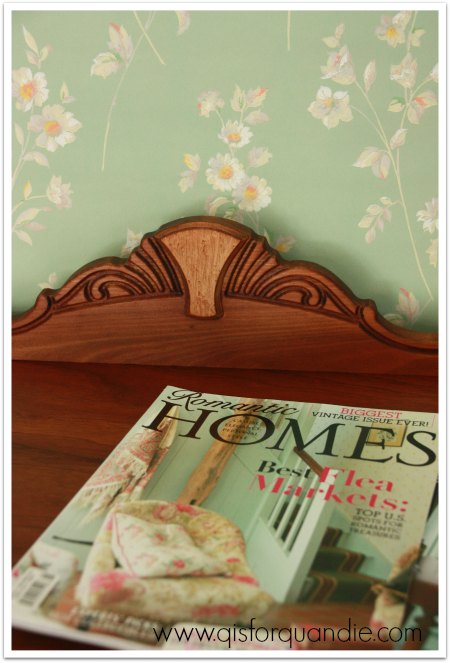
This picture does not do justice to this piece, not to mention it’s just a bad picture overall.  There is some trim at the back of the top that doesn’t even show here, but is similar to the top of the mirror on the vanity and the top of the headboard.  This dresser is just so heavy, there was no way Mr. Q and I were going to haul it outside, or even into the next room for its photo shoot, so we’ll have to make do with this photo for now.

I don’t normally do custom work.  Why?  Because I already have a day job where I have to answer to others, so when I work on furniture, I want to have the freedom to do whatever I want to.  But every once in a while I make an exception, like I did with the ‘travel the world’ desk for my fabulous customer, Nikkii.  And now with this piece, I’m making another exception just because I really want to turn it into something spectacular for this client.  The next step is to meet with her and decide on a plan for its makeover.  I’m really excited to see just how lovely this dresser can be.

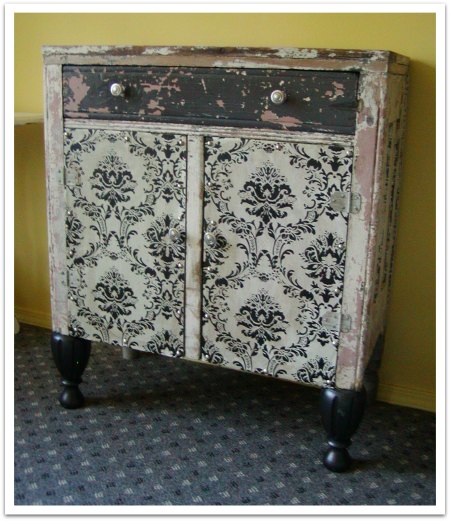
My final find from last weekend is something that I am keeping for myself.  Mr Q and I picked it up on one of our Friday date nights.  When I first saw the ad for this piece, I got an 80’s country pine vibe from it and initially I just wasn’t sure.  After thinking about it, and getting my friend Terri’s opinion, I decided to at least go take a look.  I knew I could do a lot for it with some paint.

studio hutch before

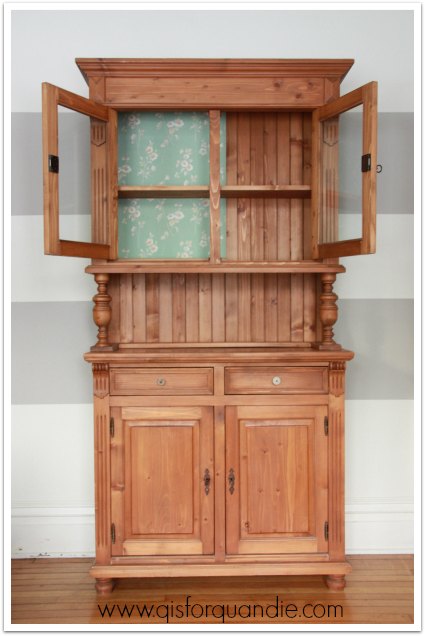
In person, the piece was not nearly as “chunky” as I was worried it might be.  In fact, at first I thought perhaps it really was old.  The cupboard doors open with some antique looking keys, it has that beadboard back.  The sellers we purchased it from had an amazing 1925 house in Edina that appeared to be filled with gorgeous antiques.  But no, upon closer inspection it is obvious that this is a newer piece of furniture that was likely designed to look like an antique.  In a way, this is a good thing.  I don’t feel one iota of guilt about painting it.

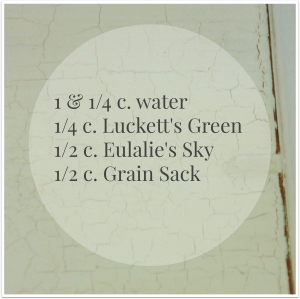
I hung the wallpaper inside the top of the cabinet while I was considering what ‘look’ I wanted to go with, but in the end I went in a different direction.  Here is a sneak peek of coat no. 1.  This is MMS milk paint in Artissimo, in case you are wondering.  It looks quite different before a top coat, doesn’t it?

studio cabinet sneak peek

So, I did get some painting done last weekend.

I’m sure you can guess what my future plan is for the cabinet since you know what room I’m working on.  I’m not sure how soon you will be seeing it again, but you’ll definitely see it down the road.  In the meantime, I think I may have crossed the line and become a furniture hoarder, so I am swearing off craigslist for now until I can get these pieces done.  I’m not even going to look.  Well … unless something really fabulous is out there 😉

vintage by quandie.

Have you heard of Vintage by Nina?  Nina is Nina Hartmann and she has some gorgeous books out there.  She also has a shop, but since she is in Sweden, I don’t know if she ships to the U.S. or not.  I’ve never tried to order from her.  I get her books at the Round Barn.  I will also warn you, they are pricey.  I don’t usually spend nearly that much for a book, but her books are worth it to me.  By the way, in case you are wondering, this post is not sponsored in any way.  I don’t have any sponsors, no one ever pays me or gives me free products to blog about them (drat!).  I just like to share my finds with you guys, and give you links to the sources when possible.

This brings me to the reason for this post, my latest piece, whose paint job was inspired by this picture from Nina’s book, among vintage & friends.

vintage by nina

I had actually pinned this photo on pinterest and at the time it was not credited to Nina Hartmann.  I had no idea it was from her book until I purchased the book and found it inside.  Anyway, gorgeous, right?  It provided the jumping off point for the vanity/dressing table I painted last weekend.

dressing table painted in MMS Grain Sack milk paint

I used MMS milk paint in Grain Sack and Typewriter to copy the look.

You’ll notice that on this piece the Typewriter doesn’t look as black as it usually does when I use it.  That’s because I used a topcoat of MMS clear wax instead of the hemp oil.  I find that leaves the black a tad chalkier looking, which was exactly what I wanted in this case.

vintage vanity painted in milk paint

vintage vanity detail 2

The chipping really worked on this piece, and it gave me the look I wanted.  I think if I had done this same color scheme with chalk paint it would have looked a little gaudy.

vintage vanity painted with MMS milk paint in Grain Sack

I shared the knobs for this piece with you as a sneak peek last weekend.  I found them at Hobby Lobby and knew they were going to be perfect on this dressing table.  The original knobs were OK, but just OK, nothing special.

vintage vanity knob

I’m making you wait for the full reveal, have you noticed?  Just be patient, we’ll get there.  Meanwhile, I opted to paint the bench in Typewriter to contrast with the vanity.

vintage vanity bench

I recovered the seat with some stenciled drop cloth fabric.

vintage vanity seat

Remember my trick of putting scrapbook paper in the drawers?  Did that again here (again with paper from October Afternoon).

vintage vanity drawer interior

I staged this piece with one of my vintage cameras and a little touch of Q.

vintage vanity staging

As you can see, my manikin Lula is wearing her winter fur.

vintage vanity and Lula

OK, enough delays, here is the full piece.

vanity painted in MMS milk paint

I have to tell you, I really struggled with my photos on this one.  It was difficult to get the white balance right and to try and show the true grey tones of the Grain Sack.  I think this last picture comes closest to the most accurate colors.  I re-did it five times!  So by this point, my eyes are playing tricks on me anyway.  I wish I could just invite you all over to my house to see it in person so you could really see it.

vintage vanity painted with MMS milk paint in Grain Sack

And oh my goodness, I nearly forgot to share the ‘before’ with you.  How much do you love the golden fleece of a seat?  And Mr. Q’s legs and hands as he holds the mirror in place for me?

golden vanity before

 Anyone need a fab dressing table to add a little vintage glamour to their home?

one, two, buckle my shoe.

Every once in a blue moon someone I know offers me free furniture.  They know that I refresh old furniture, and they just want to get rid of something.  I’m sure those of you who regularly re-do furniture have experienced this phenomenon.  It’s awesome.

Last Saturday a friend dropped off this piece.

freebie before

Not terribly exciting, but kind of sweet and cottage-y.  I knew it would be much better without those drawer pulls.  I know that some people like this style pull, but not me.  I had just stocked up on clear glass knobs, and I knew they would bump up the ‘cute factor’ on this piece.

I took my color inspiration from this sweet white and yellow dresser painted by Janice at Fred and Bessie’s.  Seriously, how darling is this little number?

yellow and white inspiration

So, I pulled out my chalk paint.  I had to do a little custom mixing to get just the pale yellow I wanted, and to be honest the first time around the yellow was too pale for the white stenciled numbers.  So I darkened it up a bit and tried again.  And voila!

pale yellow and white dresser

Dang, but it is cute!  Thank you Janice for the inspiration!

Since my piece had very little detail going for it (unlike the darling dresser that Janice painted), I knew I needed to jazz it up somehow.  I’m a long time fan of the numbered drawer look, so I went with that.  The stenciled numbers help distract from the grooves and dings from the old drawer pulls too (they are there, trust me).

one, two close up angle

I got these stencils from Maison de Stencils, you can order them here.  I used the 6″ by 6″, but they come in a smaller size as well.

I have to tell you that my skills with a drill have come a long way.  I’ve been studying Ken’s technique, and I feel like I did a pretty good job getting these new knobs in place.  However I did not make a template, and I know Ken would have.  I also definitely need a new drill, mine is crap.  I just can’t get the bit tight enough anymore.

I cheated a bit inside the drawers.  You see, I am not a fan of lining drawers.  Not only do I find it putzy to do, but I also feel that a couple of years down the road most types of lining look terrible.  I prefer to leave my drawers unlined, unless they are really awfully stained.  So, sometimes I just put pretty scrapbook paper in drawers and leave it loose.  The future owner of the piece can decide if they want a more permanent solution.  And that is what I did here.

one two inside

That is October Afternoon paper, a company that I adore, which also happens to be local.  Check them out if you haven’t seen their stuff before!

When it came time to stage this baby, I was at a loss at first.  I don’t decorate with much yellow myself, so I didn’t have a lot of yellow props to choose from.  Plus, I felt like this piece is obviously perfect for a nursery, yet I don’t have anything particularly ‘baby like’ on hand either.  I was so wishing that I had snagged one of the fab vintage baby dresses that my friend Sue had at one of our last Carriage House sales, then I could have copied Janice’s idea and hung a baby dress from a knob.

baby dresses

Sue, do you have any left?  Let me know.  Maybe I need one to keep in my prop stash.

But anyway, the more I thought about it, the more things occurred to me … like I had some darling vintage baby shoes that I stashed away for the Carriage House sale.  And some of my vintage tablecloths had the right yellow in them.

one two staging

Adding the green scale and a blue chair in the same pale tones worked well too.

vintage scale with baby shoes

So, there you go.  A good example of what a little paint and some new hardware can do for an old dresser.

yellow and white dresser

Anyone need a darling little dresser for a nursery, or maybe a child’s room?  Or … really, this would be cute in a sun room or anywhere else that you just need a pop of cheery pale yellow.

these are a few of my favorite things.

I think the end of the year is always a good time to reflect on what we did over the past year, and think about what we want to accomplish over the next.  One of my biggest accomplishments for 2014 was salvaging over 65 pieces of furniture!  First of all, let me say, even I think that is just plain crazy!  Seriously.  How in the world did I manage that?  Well, we’ve already established that I get a lot of help from Quandie’s cast of characters.  But, aside from that, I also have it down to a science.  I think it saves a lot of time when you know the products you are working with, the steps it takes to renovate a piece of furniture and you have all of your tools and supplies handy and ready to go.  I can also crank them out much faster in the summer when not only can I have 3 or 4 pieces going at once in the Carriage House, but I can work until 9 or 10 pm after coming home from the day job and still have plenty of light.  Things slow down in winter when I only have the space to work on one piece at a time, and photo shoots are relegated to weekends which is the only time I’m home during daylight hours.

To be fair, there are those who might also suggest that I don’t have much of a social life, which just might be true.  I also have a husband who does most of the cooking and cleaning.  And let me also point out, I have 4 mile commute.  Never underestimate the value of living close to your place of work.  I have a solid extra one to two hours per day compared to some of my co-workers who commute longer distances.  Of course, there is also the big one … no children.  That’ll free up some time.

But really, when it comes down to it, my real secret is that I just simply love rehabbing furniture.  I get excited about each new piece.  On weekends I will wake up at 7 a.m. and jump out of bed with anticipation.  I will exhaust myself with a 12 hour marathon of painting, and still have to force myself to put down the brush at the end of the day.  In the end the answer is, do what you love and you’ll never work a day in your life.

So, here it is the end of the year, and we’ve established that I have lots of projects under my belt for 2014, so how about we all pick a favorite?

I’m not sure that I can narrow my choice down to just one though.

I love the way this stenciled dresser turned out, and the crystal knobs worked perfectly without distracting from the stencil.

stenciled dresser

But the black magic dresser was also one of my faves.  I love the little mirror on the back, and the contrast between the black paint and the wood details.

black magic title

This yellow dresser was also one of my faves.  Love the yellow and white together.

summer sunshine after

The minty fresh vanity was also a favorite of mine.  I loved how the custom mixed MMS milk paint turned out, and the little unexpected pop of vintage wallpaper inside the knee hole.

minty fresh vanity

Then there was the first piece that I used vintage wallpaper on, the linen press.  This one, by the way, was my top viewed post of the year at 1,503 views.

wallpaper 1

Yep, I can’t pick just one.  That would be like picking a favorite child.  Let’s call these my top 5.  And now it is your turn, and I expect more from you.  I expect you to just pick one.  Check out my ‘fab furniture’ tab and pick out your favorite for the year.  You can choose from any of them, not necessarily just my five faves.  Please leave me a comment saying which one is your favorite, and maybe something about why you picked it.  I’m going to draw a random comment and send some sort of stash of goodies (yet to be determined) to the winner (deadline to get your name in is Friday, January 2)!

And one last thing as we draw a close to 2014.  Thank you so much to each of you who followed my blog in 2014, and even those who aren’t following, but just randomly reading along.  And an even bigger thank you to each of you who took the time to leave a total of 2,282 comments, and especially my top five commenters (hmmm, not a real word apparently) Victoria, Ginene, Darrielle, Terri and my sis, Debbie!  You guys rock!

Happy New Year everyone!  See you next year!

wintergreen.

Mr. Q and I picked up this dresser the eve before Christmas Eve, and it couldn’t have gone more smoothly.  I was taking a bit of a leap because the craigslist ad for this one had one tiny, dark picture that just showed about half of the dresser, and one line of text that said “Old dresser for sale.”  And that was it.  But the price was right, and it was only about 20 minutes away, so we went for it.

I love these kinds of CL transactions.  I show up on time (I always try to show up on time), the seller is waiting for me, the dresser is empty and ready to go (in this case, already sitting out in the breezeway), I look it over, the drawers work, the hardware is all there.  I hand over the cash, we load it up, and are heading back home, all literally within about five minutes.  Slick.  And I came home with this.

wintergreen before

It was in fairly decent shape, but the finish on the top was looking pretty rough.  There are a couple of spots with veneer problems too.  Definitely nothing that a little paint and wax can’t fix though.

I knew right away that this was the perfect candidate for milk paint.  It needed a chippy, distressed, authentic farmhouse finish.  For some reason I really felt like going with a lighter color on this one.  I’ve done a lot of black lately, and maybe because it has been so gloomy here, I just needed to lighten up.  So I decided to mix up another batch of the mint green milk paint that I used on the minty fresh vanity last summer.

vanity recipe

I think it helped create the perfect vintage look for this one.

wintergreen title

I considered highlighting some of the detail with white paint, but once I had it painted I realized that I prefer the way the design looks all in one color.  It reminds me of a butterfly.

wintergreen detail

  The top had to be stripped, even if I was going to paint it.  There were numerous water rings whose outlines would have shown through the paint.  Once I had the finish stripped, the wood was so pretty I decided to just wax it with the CeCe Caldwell dark wax.

wintergreen stripped top

This was my first effort at stripping something other than just a flat surface (because of that detailed back piece), and I was very happy with the result.  You probably don’t remember this, but one of my New Year’s resolutions for 2014 was to work on my stripping skills (ha!) and I feel like they have come a long way this year.

wintergreen top w magazines

Are you digging my vintage wallpaper background?  I have to chuckle a little, but just last week my friend Sue and I both admitted that we have a problem in common.  We both tend to hang onto our favorite ‘supplies’ rather than using them.  Do you do that?  Sort of hoard those things that really speak to you, even though you just keep them stored away somewhere?  This wallpaper is one of those things.  I really love it, so I hesitate to actually use it on something.  The color was perfect for behind this dresser though, and I’m still considering using it to line the drawers … except I’m not sure I can part with it.

wintergreen wallpaper

In fact, I would prefer not to part with this dresser either.  In case you haven’t noticed, this is exactly my style.  Vintage, with a little bit of curvy feminine detail.  Just enough chipping to look aged without being over the top.  Yep, I love it.  But, there is no room in the inn, so this one will have to be sold.

dresser painted with custom mix MMS milk paint by qisforquandie.com

Oh, one last thing, did you notice the original drawer pulls?  Their shape mirrors the shape of the raised detail on the upper two drawers.  I had to keep them for that reason, even though I considered replacing them with clear glass knobs.

wintergreen close up

So, what do you think of a little fresh wintergreen for brightening up some otherwise rather dull winter days?

Before and after, dresser in MMS milk paint

mixing it up.

While moving all of my painting supplies indoors for winter, I noticed that I had several small jars of the same (or very similar) color.  None of them would paint an entire piece of furniture though.  So it occurred to me to just mix them all together.

mixing it up

Two of these were sample size pots of different brands of chalk paint; the Americana Decor paint is from Home Depot (yep, did you know they are carrying a chalk paint now?) and the Cottage Paint (bottom, back) is from our local Hirschfields.  The Annie Sloan can just had a tiny bit left in the bottom.  I mixed all of these together in a Talenti gelato container.  Not only is their gelato delicious, but the containers have a fab screw on lid and work great for mixing and storing paint in smaller quantities.  I can’t really think of a better excuse for eating banana chocolate swirl gelato, can you?

Once I had these all mixed together, I had more than enough for a dresser.

painted Eastlake dresser

I bet you don’t even recognize this one.  It’s Humpty Dumpty!  Remember him?  He started out like this…

hd1

And then Ken fixed him up to look like this…

hd5

Finished, he looks like this …

hd title

Now for the choices I made, which were inspired by several comments left on my first post about this piece (thanks CJ, Victoria and Darrielle).  First, I stripped the top using a non-toxic (less toxic?) citrus stripper.  When I decided to do this, I wasn’t sure if I would follow it up with some dark Java gel stain, or just wax.  After removing the old finish, I knew that I didn’t want to go as dark as the Java, so I pulled out a sample size pot of CeCe Caldwell’s Dark Aging Wax.  It is a rich brown color, compared to the MMS antiquing wax, which leans more towards black.

wax comparison

I sanded the top lightly by hand with 220 grit sandpaper, and then rubbed on the wax.  The wax added a beautiful richness to the top of the dresser without going too dark.  See…

hd top

Gorgeous, right?

I really debated the color and brand of paint for this one.  I seriously considered the MMS Artissimo.  I’ve done a couple of Eastlake style dressers in it, and they both turned out lovely.  Then, I thought maybe MMS Boxwood, mainly because I thought the dark green would be festive for the Christmas season, and fun to stage with some red and green holiday stuff.  In the end though, I decided to go with a color that I know sells really well.  And why wouldn’t it?  It is a beautiful color.

After painting the body of the dresser in my mixed up paint, I decided to go ahead and paint the hardware.  Darrielle was right, since I had all of the hardware I should make it work rather than replacing it.  And Victoria reminded me that painting the hardware was a good option.  Once I covered the brassy gold color with paint, the hardware was actually quite pretty.

hd hardware fixed

I also decided I had to come up with some keyhole escutcheons as CJ suggested.  The holes for the original escutcheons were just too large to ignore.  Unfortunately I only had two matching escutcheons, not three.  So I improvised by adding a number plate to the top drawer.

HD number

Yes, I know that escutcheon is crooked, it’s not permanently adhered yet.  I had to get some pictures done while I could, so I just slapped them on temporarily.  We literally had a 20 minute window of sunshine on Christmas Eve, and otherwise have had nothing but gloomy overcast days for what feels like weeks.

This dresser has the pin and cove dovetail joints that I’ve talked about before, so this piece likely dates to the late Victorian period (late 1800’s).

hd pin and cove

Ken pulled out all the stops when he put this dresser together.  He even reattached the top using dowels and glue.  The next time he does this for me, I should really get pictures of that process to share with you.  But, my point here is that this dresser is now as solid as can be.  It does not wiggle or jiggle in the slightest.  The drawers slide as smooth as silk. This dresser can easily last someone another 100 years now.  So if any of you local readers need a beautiful Duck Egg blue dresser, let me know!  This one is available.  Sorry, this one is sold.

hd before and after

I’m returning to milk paint on my next dresser, which I hope to get painted this weekend.  Check back next week to see it!

silver linings.

I confess I have a bit of a back up of unpainted furniture lingering in my Carriage House.  Luckily, we had to purchase a new truck for Mr. Q last summer and we decided to go with something bigger than our old Ford Ranger (to be able to haul more furniture, naturally) and the F150 we bought doesn’t actually fit in the Carriage House.  We didn’t think ahead about that part, and now Mr. Q is stuck parking outside and cleaning snow off his vehicle all winter long.  But on the bright side, I now have one side of the building to store furniture in.  Silver linings, right?

This may be a slippery slope though; I have found myself filling it up with future projects!

I was planning to take a much needed break from painting after my vacation, but my plans for this past Saturday fell through at the last minute and I ended up with some time on my hands.  The moment was right to break out the supplies and get some painting done!

So, Mr. Q and I hauled this dresser into the house.

German dresser before

First off, I had the mirror for it.  I just removed it before I took the ‘before’ photo to do some repairs to the frame.

If you look closely, can you see how badly damaged the veneer is on the two big drawers?  Wait, here is a close up photo …

german dresser before close up

It didn’t take me long to realize that the veneer on those two drawers couldn’t be saved at all.  It obviously really dried out at some point and splintered all over the place.  Someone had tried to repair it with a lot of glue, but it just wasn’t going to cut it.  So I removed the drawer pulls and that bit of trim on the upper drawer, and then sent them off for a date with Ken and his belt sander.  Ken sanded the veneer completely off down to the wood underneath.  He was worried I wouldn’t be able to make the drawers look good afterwards, but he underestimates the power of paint and a good stencil!

dresser painted with MMS milk paint in Typewriter

Right?

OK, let’s talk details.  when I took the mirror apart I realized that there were some spots near the bottom that had lost their silvering.  Remember the ‘old black magic‘ dresser I painted late last summer?  That had a mirror in similar condition, and I lined it with old book pages.  I knew that technique would also be perfect on this dresser, which then led to my choice to paint it black.  So, it is painted with MMS milk paint in Typewriter.  I did not get any chipping on this piece, and I did not use a bonding agent.  I think the existing finish was just so dry that the paint nearly behaved as it would on bare wood.  I used hemp oil for my topcoat.

silver linings close up

I used pages from the old German book I recently purchased at Carver Junk Co to line the mirror, and that led to my decision to use a German stencil as well.  I’ve been dying to use a new stencil I purchased recently, but it’s in French for one thing, and for another it translates to “friends and family gather here”, which just seems wrong for a dresser that will likely go in a bedroom.  Kind of … wrong, right?  So I had to go with my old German standby.

silver linings stencil close up

It is one that I have been using for a couple of years, and funny enough “Donau” is German for Danube.  And Worth an der Donau is a town on the banks of the Danube, 22 km east of Regensburg, which means I sailed right past it on my trip.  Unfortunately, it was probably dark out when we passed by.  Isn’t it a small world?

You’d think from the photos that I stenciled this using a white paint, but actually it is Martha Stewart craft paint in Gray Wolf and it’s fairly dark.

martha-stewart-satin-acrylic-craft-gray-wolf

I swear.  It really is this color.  The contrast with the black just makes it appear much lighter.  Check the first full on picture of the dresser for a better representation of how it looks.  Keep this in mind if you plan to stencil on black.  White has far too much contrast.

One last detail, I replaced all of the knobs on this piece with some vintage black glass knobs that I had on hand.  I had planned to keep the original hardware, but when I removed the knobs on the upper drawers, I found that two of them were missing their back plates.  Thus, you couldn’t tighten them up without them sinking into the holes they were in.  While digging around in my stash for replacements, I came across these black knobs and had enough for the whole piece.

silver linings knobs

At 34″ tall and about 40″ wide, this dresser is actually rather more petite in person than it looks in the photos, although the mirror adds another 37″ to the overall height.

silver linings b and a

If you need a black dresser with a little German flair, this one is for sale.  Leave me a comment if you are interested and I’ll get back to you.  Sorry, this one is sold.

humpty dumpty.

Remember the dresser that fell apart?  I’m fondly calling it Humpty Dumpty.  Well, it didn’t take all the king’s horses or all of the king’s men … although I think some horses of a different kind were involved … it just took handyman Ken and his clever know-how to put Humpty together again.

Yep, he’s already got it done!

As a reminder, here is how it started out.  In a pile on the floor.

hd1

Somehow Ken managed to sort all the pieces and start putting them back together again.

hd2

This time it didn’t fall off the horses.

hd3

These photos of the repair process were all taken by Ken in his workshop, which is far tidier than mine.

hd4

And now, Humpty Dumpty looks like this!

hd5

This is now one solid, well functioning dresser, thanks to Ken!

Next up, a new paint job.  I’m trying to decide what to do about the handles.  These are obviously new replacement handles designed to look old.  Should I keep them?  Or replace them?

All three of the keyhole escutcheons are missing.  Should I find replacements?  Or leave them as is?

Should I strip and wax the top, and just paint the rest?  Or paint it all?

What do you think?

blast from the past.

I was going through some old photo files the other day.  A couple of things struck me.  The first was just how long I’ve been doing furniture make-overs.  I started in the 90’s when shabby chic was at its height.  How is it even possible that this was more than 20 years ago?  Have I really been doing this that long?  Crazy!

Next, I was reminded of some really fun pieces I had done.  So I decided to share some of them with you.  I don’t have extensive before and after photo shoots of any of these.  Most of them were just photographed for a Carriage House sale ad.  So, no judgments about the quality of my photos, ok?

Let’s start back in 2008.  Look!  The photo cottage exterior was barn red back then.  And I painted this fab potting bench and used a rusty old child’s shovel as the drawer pull.  I was using a lot of vintage tablecloths to reupholster chairs back then.  I was also doing a fair amount of decoupage (on the bucket under the chair, the galvanized pot under the bench).  If memory serves, I believe my fab customer Jenny bought this potting bench.  Am I right Jenny?  Do you still have it?

blast 2008

In addition to containers, I also decoupaged on furniture.  Many of my favorite pieces back then were decoupaged.  Like this desk.

Black desk with decoupaged book pages

Here is a close up of the drawer.  Those black swirly bits are rub-ons.

Decoupaged book pages on drawer

In 2009, I painted this gorgeous white buffet.

white buffet

Fast forward to 2012.  The always classic Union Jack dresser.  This was the first one I ever did, and honestly, I think the best.  I’ve struggled with getting them right every since.  Maybe it was just beginners luck.

blast 2012

I’ve always been a fan of both white and aqua.  So fresh and lovely.  That little aqua and white table originally belonged to my grandparents.  I kept in my own home for a long time, but it was time to say goodbye to it.  So I gave it a darling makeover and sent it on its way.  That sleigh bed was one of my favorite pieces too.  How fantastic would that be in a young girl’s room.  Actually, that is where it ended up.  I remember the woman who bought it was going to put it in her daughter’s room.  I wonder if she still has it.

blast white and aqua

This darling little aqua and white nightstand was one of my faves.  I’m quite sure that it was originally half of a vanity/dressing table that someone took apart.

1914 nightstand

When it comes to the Carriage House sale, I am not the only one coming up with fabulous furniture.  Sue occasionally knocks one or two out of the park herself.  This was one of my favorite pieces that she did.  Isn’t it deliciously chippy and fabulous?  It sold in about 2 seconds flat!

blast Sue's cupboard

So, there you have it, a little walk down memory lane.  Hope you enjoyed it as much as I did.

a do-over.

Every winter a magical thing seems to happen.  Just when it gets too cold to be taking photos either outside or in the photo cottage, the leaves all fall off the trees and suddenly I have this fantastic light in my piano room.  This also happens to be the only room in my house with a wall that works as a suitable back drop for furniture photos.  It’s like kismet.

I was never really happy with the outdoor photos I took of this petite dresser that I painted in MMSMP in Kitchen Scale.  The fall leaves are gorgeous, but I didn’t like the way the color looked on the dresser.

Small dresser painted in MMSMP Kitchen Scale

So, once all of those yellow leaves fell, I decided to stage a ‘do-over’ inside the house.

do over close up

I think this gives you a better idea of the true color.  As we all know, Kitchen Scale is my fave, so I want to do it justice.

do over

Maybe it’s my imagination, and it doesn’t really look all that different.  Maybe I just prefer the color when paired with white and grey rather than yellow.

do over with chair

Either way, I’m glad I allowed myself a do-over for this one.

I had planned to add these photos to my craigslist ad for this piece, but there was no need because it sold without them!  I had a lot of interest in this one, so I am on the lookout for similar pieces to make over.  It seems that lots of people out there would love to have a Kitchen Scale nightstand/dresser!