fresh as a daisy.

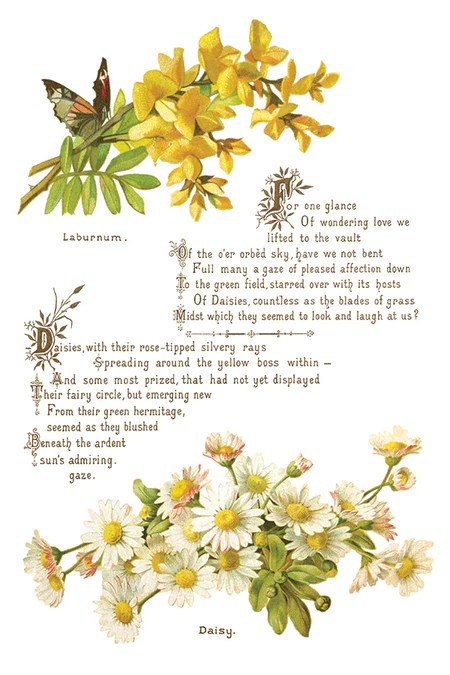
When I first saw the new I.O.D. Lover of Flowers transfers I just knew I had to have it (along with a couple of other new ones).

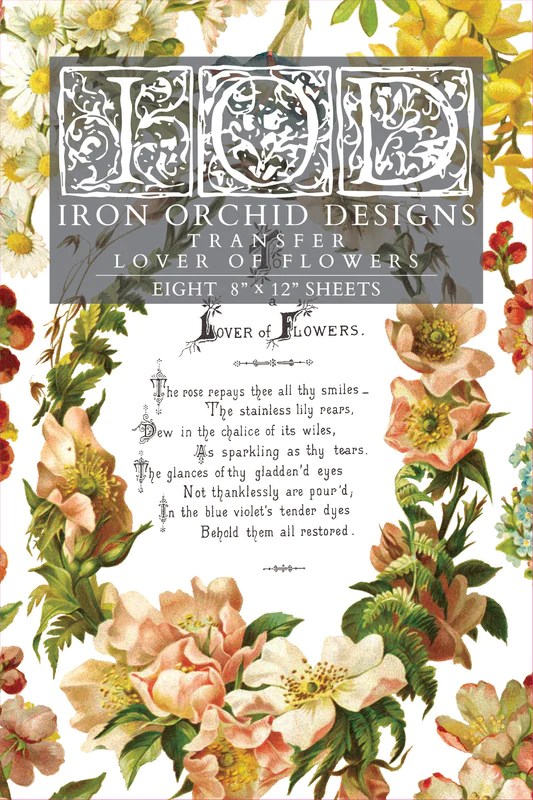
I love that it has a combination of both florals and typography to go with them.

There are 8 pages of designs, and I will get at least 10 or more small projects out of one pack.  So at $22 for the set, I think that’s a bargain.

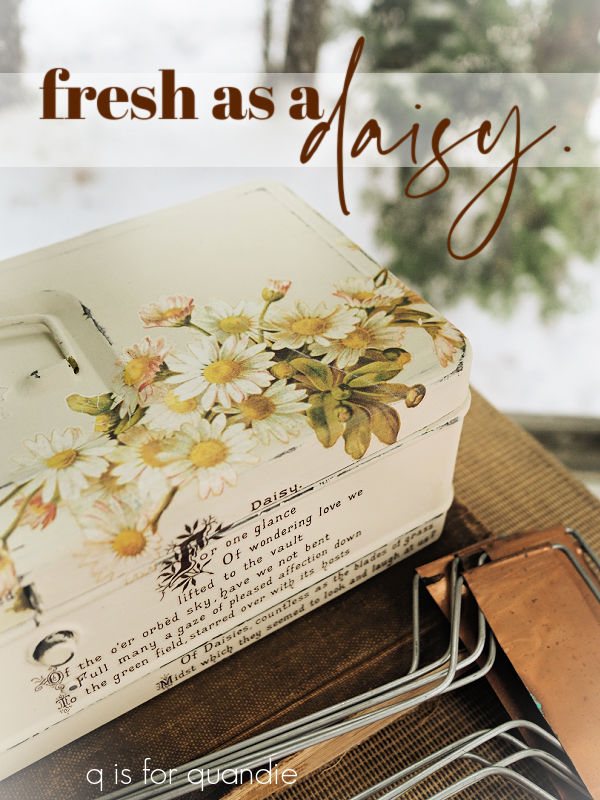
When I was ordering this I was really drawn to the roses, and the pretty blue forget-me-nots.  But after meeting the mailman at my door for my package and ripping it open, I just knew I had to find a use for the daisies.

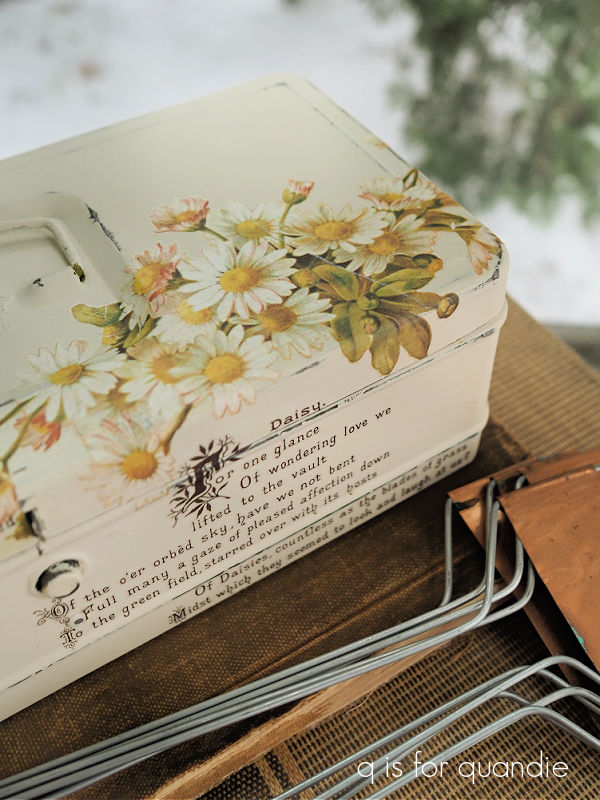
So I went to my stash and pulled out this simple lockbox.

It was the perfect candidate for a ‘fresh as a daisy’ makeover.

After giving it a light scuff sanding, and then a good wash with some Dawn dish soap and hot water, I gave it a coat of Dixie Belle’s clear B.O.S.S.  Once that was dry, I painted the inside in DB’s Guacamole and the outside in my favorite Drop Cloth.

Then came the fun part of adding the transfers.  I cut up the different elements on this page of the transfer …

and then started laying them out on my box.

I wasn’t initially planning to use the Laburnum floral, but in the end I felt like I needed a little bit more than just the daisies.

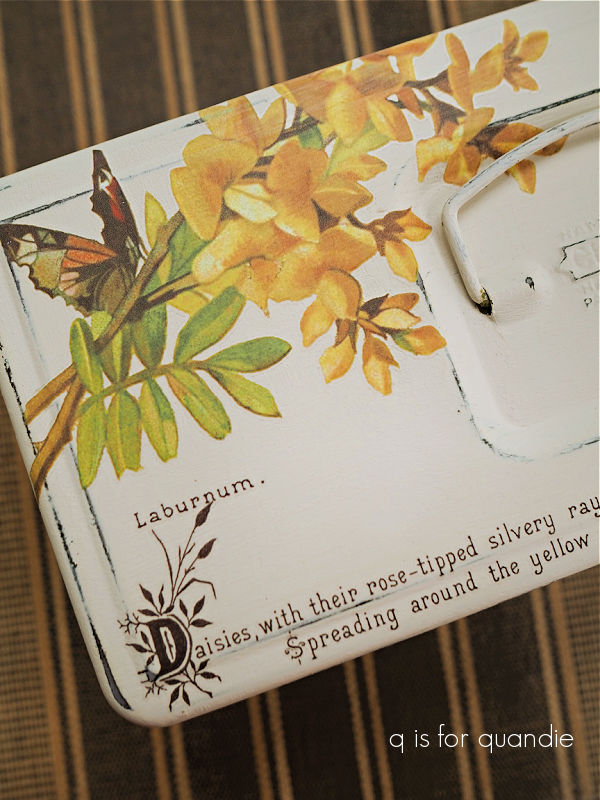
I messed up the poem slightly by putting the lower half of it on the top of the box, and then the upper half on the front, but I don’t think anyone is going to notice that.

I absolutely love the muted colors of these florals in combination with the Drop Cloth.  So sweet.

I didn’t forget about the inside.  There was another page of the transfer with just a single Marguerite Daisy image, so I added that to the inside lid.

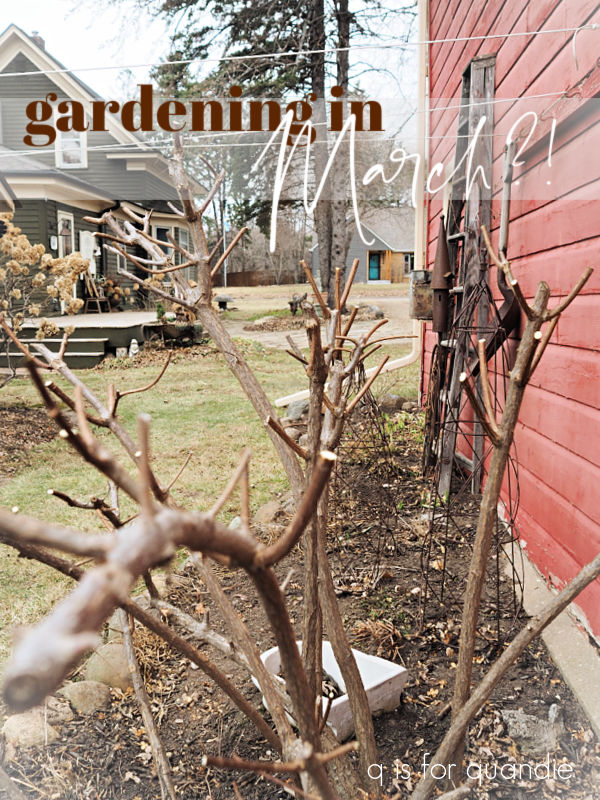
By the way, if you’re wondering what all of that white stuff is outside the window in the background of that photo … yes, that is snow.  I took these photos during our recent snowstorm.  Mother Nature seems to be playing a cruel trick on us.  After a brown Christmas, and a mostly brown winter, and even gardening weather in early March, she decided to bombard us with nearly a foot of snow at the end of March.  Just when I thought spring was here!

Anyway, back to the box.  I finished it off with a couple of coats of Dixie Belle’s flat clear coat both inside and out to seal it up nicely.

What do you think of it?

Of course this box is for sale locally, so if any of my local readers are interested be sure to check out my ‘available for local sale‘ page.  Otherwise, I’ll likely eventually bring it into the shop.

Thank you to Dixie Belle Paint Co for providing the B.O.S.S., paint and sealer used on this project.

the barn makeover.

You’ll remember the mini barn that I purchased at my local Goodwill.

It was missing a bit of trim, and a section of wall between the two doors, so I sent it over to Ken’s workshop for some repairs.

He replaced that section of wall, the trim on six of the windows, and one of the little door latches …

and he also added a little trim to the loft opening.

Next up I gave the entire barn a scuff sanding, and after wiping it down I gave it two coats of Dixie Belle’s B.O.S.S. in grey.  I didn’t really need to block any stains, but I thought it would be easier to cover that red and green if I had a grey primer down first.

In hindsight, I wish I had painted the entire barn in a dark color such as DB’s Coffee Bean first so that I could have distressed my final paint back to the darker color.  In the end, I could see both the grey B.O.S.S. and the green when I later attempted to distress the roof.  Rookie mistake.

Next up I painted the roof and the interior of the barn in Dixie Belle’s Dried Sage, and the exterior walls in their Drop Cloth.  It still took two coats of paint to cover the grey primer, so again, I would have been just as well off with a darker paint.  Once my paint was dry, I experimented with some different colors on the window trim.  I tried a bright white (DB’s Fluff) first, which was distinguishable from the Drop Cloth, but I didn’t like it.  I tried Coffee Bean, but I didn’t like that either.  I even considered just painting them with the Drop Cloth, but ultimately I decided to go with the Dried Sage.

After a bit of sanding to distress them, I think they look good.

Next up I pulled out Dixie Belle’s Farmhouse silkscreen stencils

I especially thought the Fresh Eggs one would be perfect on the side of the barn.

I cut up the one with the chicken and just used the typography on both the other side …

and the front of the barn.

Once all of my paint was dry, I gave everything a coat of Dixie Belle’s clear wax.

And that brings me to the lights.

As I was working on this project I kept thinking how fun it would be to have some barn lights over the doors.  So I went on Etsy just to see what was available out there.  I ended up finding the perfect lights at Miniature Crush (although I ordered them through Etsy, you can also order items directly from Miniature Crush, and as a bonus for me, they are also located in Minnesota).

They came in a matte black color that was rather one dimensional though.

I wanted them to look galvanized so I pulled out some of Dixie Belle’s Gilding Wax.  I started with the Zinc, but it was too dark and barely showed up over the black.  So then I tried the Silver, which looked pretty good but was maybe just a bit too bright.  I went back and added a bit of the Zinc over the Silver, and I still didn’t love it.

It doesn’t quite look authentic to me.

So then I pulled out the Dixie Belle Patina Paint in Copper, along with the Green activating spray.  I first removed as much of the Gilding Wax as I could with a q tip dipped in mineral spirits.  Then I painted over the lights with the Copper paint, and followed that up by dabbing the activating spray over the wet paint using a small brush.

Eureka!  So much better.  The totally look legit now.

One quick note about these lights.  They are battery operated, and they have a little switch on the side to turn them on and off.

To get to the battery (which is replaceable) you have to screw off the back part of the base.  So you can’t really glue these lights in place permanently.  Instead they come with a tiny adhesive magnet on the back.  You apply the adhesive side of the magnet to your item, then the light fixture hangs onto the magnet.  Here’s the thing, that means they come away pretty easily.  And that makes this item unsafe for small children who could pull them off and choke on them.  So they would have to be removed if you wanted this to be a child’s toy.

In addition, the lights were $19.99 each!  So now I have an additional $40 invested in this makeover.  I’m not sure that was a wise decision, especially since I plan to try and sell this one.

But all of that being said, I sure do love how they look!  And maybe someone else will as well.

I initially thought I would stop here, but then I was at Hobby Lobby and I came across a miniature weathervane.

And at only $2.99, it was so much cheaper than the lights!  So how could I resist?

I gave it the same treatment as the lights using the Copper patina paint.

The verdigris patina develops pretty quickly with the Copper paint.  And doesn’t the weathervane also look so much more authentic now?

I had to drill a hole in the roof of the barn to attach it, but that was fairly simple.

And with that, my barn makeover is complete.

How cute is that?  I much prefer my toned down neutrals to the red and green.

What do you think?

If any of you locals just can’t resist adding this adorable barn to your decor, check out my ‘available for local sale‘ page for more details.

preventing rusty bleed thru.

When I paint rusty toolboxes, I always try to mention that I start with a coat of Dixie Belle’s B.O.S.S. to prevent existing rust from bleeding through my paint.

Today I thought I’d elaborate on that a bit.

First up, let me start by saying that I used the word ‘prevent,’ but that might not be entirely precise.  I don’t want to say that the B.O.S.S. will completely eliminate any possibility of future rust bleed-thru.  However, it will definitely mitigate most of the problem.

Also, I should clarify that Dixie Belle has replaced the original B.O.S.S. (shown above) with their new Bonding Boss.  In addition to blocking stains and odors, the Bonding Boss also improves the adhesion of your paint.

But either of these products will work to reduce bleed thru, so if you have the older version you can continue to use it for this purpose.

This rusty, crusty metal tool caddy is a great example of what happens when you don’t use a blocking primer over rust.

It had been out in my stash for ages.  I’m not even sure how long, or where I picked it up.  As you can see, it started out with some pretty significant rust.

I’d pulled it out of the stash sometime last year thinking that I could paint it black and add the I.O.D. Rose Chintz paint inlay.  At the time I figured I didn’t need to worry about blocking the rust because it was going to be black, so it wouldn’t show too much (which I’m sure would not have worked out).  But for some reason, after I had it painted black, I really didn’t love it.  So I shoved it back in the ‘future project pile’.

Then I pulled it out again a few months later and decided to give it a coat of Dixie Belle’s Dried Sage.  Why?  I honestly don’t even remember.  But really, I didn’t love that color on it either, so back in the pile it went again.

I also had forgotten that I didn’t give this one a coat of B.O.S.S. to block the rust before adding the black paint.  So here we are another six months or so later, and now the rust had definitely bled thru both the coat of Midnight Sky, and two coats of Dried Sage.

Whoops!  Anyone who has experienced any kind of bleed thru knows that paint alone won’t block it, no matter how many coats you apply.

Just look at all of that rust coming through!

Fast forward to last week when I once again pulled it out of the pile.  This time I gave it not just one, but two coats of Dixie Belle’s B.O.S.S.  I’ll admit, unless a toolbox is especially rusty, I usually only give them one coat of B.O.S.S., but the instructions for this product do say to use two coats for the best results.  This is true if you’re trying to block other sorts of stains as well like tannin bleed thru, or the ink from a Sharpie.

So I gave it two coats, allowing both to dry fully before moving on to the next.  I then gave the final coat of B.O.S.S. 24 hours to dry fully

I followed that up with one of Dixie Belle’s new National Park Collection colors from their Silk line called Everglades.

It only took what I like to call one and a half coats of Everglades to get good coverage.  In other words, I painted one full coat of paint, and then just had to go back and touch up a couple of spots that needed a little bit more.

I know not everyone is going to love this sort of pea green color, but I am really drawn to it.  If you prefer a chalk style paint over an acrylic (the Silk is acrylic), then Dixie Belle’s Guacamole is a good option.

It’s not quite as bright as the Everglades, but it’s a fabulous avocado shade.

Once the Everglades was dry, I pulled out the Floral Anthology transfer from I.O.D. and added a few florals.

If you haven’t heard, I.O.D. has come out with some new designs for spring and I couldn’t stop myself from ordering a few of them.  So while I wait for those to arrive, I was trying to use up some of my older transfers.

I also added some wording from the Classic Vintage Labels transfer from re.design with prima.

The Dixie Belle Silk line of paint has a built in topcoat, so I didn’t need to add a topcoat to the paint.  However, the transfers do need a topcoat to protect them over time, so I added a coat of Dixie Belle’s clear wax over the entire caddy (yes, you can wax over the Silk paint).

So far, so good.  But I’ve only had this painted for about a week.

I definitely need to hang onto this tool caddy for a few months more to be sure that the rust really isn’t going to bleed thru.  So this one is now going into my newly created ‘stuff I’m accumulating for a potential occasional sale at my house’ pile.  I’ll keep you posted on the results, so be sure to stay tuned!

a 70’s flashback.

Last week my friend opK and I headed to Minneapolis for the Gathering of Friends Antique Market.  They hold this market twice a year in one of the greenhouses at the original Bachman’s location.

I have to admit that I rarely actually buy anything, I mainly go to get inspiration.  I like to get a feel for what kinds of things seem to be popular, such as old, crusty paintbrushes, lol!

And of course, at this time of year garden items are always popular.

There were lots of galvanized watering cans.

And quite a lot of garden statuary that was either way out of my price range, or already marked sold.

I saw a twin to my Cossetta …

priced at $425.  Yowza!

But the trend that really jumped out at me was the 70’s stuff.

Who else remembers Harvest Gold and Avocado Green?

Earth tones were big in the 70’s, and now they are coming back.  But apparently, so are the bright colors of the 60’s.

I’m not sure I’m ready for that, how about you?

There were some classic items on display as well, like this clothesline strung with antique baby gowns.

And plenty of quilts.

There were also a few unusual items.  I was initially startled by this one …

until I opened it up to find sewing machine parts inside 😉

I didn’t find anything tempting enough to actually purchase, but I did come home with lots of ideas.  I was also inspired to consider going back to hosting my own occasional sale out of the carriage house this year, so if you’re local be sure to stay tuned for more on that later this spring!

st. patty’s toolbox.

With St. Patty’s Day coming up, I just had to do something green!

And this toolbox was green both ‘before’ and, as you’re about to see, ‘after’.

To be honest, I don’t really remember where this came from.  I think I may have grabbed it at a late fall garage sale, but I’m not sure.

No matter.  It was definitely rusty and filthy dirty, and I remember debating whether or not it was worth the effort.  After giving it a good clean with some Dawn dishwashing soap and hot water, I then went over the rusty areas with some 120 grit sandpaper.  I mainly like to smooth down the surface so it doesn’t look quite so chunky, but I don’t attempt to remove every bit of rust.

But that means that I need to do something to keep the rust from bleeding through my paint.  So I thought this was an ideal opportunity to try the new Bonding Boss from Dixie Belle.

By now you are used to seeing me use Dixie Belle’s B.O.S.S. to block odors and stop stains.  This is their newest version of that product.  It combines all of the blocking qualities of B.O.S.S. with the bonding qualities of their Slick Stick.  It comes in clear, gray or white.  I like the clear version because I don’t want to see a layer of white or gray when I distress the edges of an item I’ve painted.

It’s nice to have one product that does a job that formerly required two different products, but that being said I’ve never had any adhesion problems using chalk style paint over the old B.O.S.S..  So I’ll continue to use it until the stuff I have on hand is used up, then make the permanent switch to Bonding Boss after that.

Once the Bonding Boss was dry, I painted the interior of the toolbox in Dixie Belle’s Cottage Door.  I love this warm shade of peachy-pink.

I added a Classic Vintage Label transfer from re.design with prima inside the lid.

This toolbox came with a tray, so I painted that up too.

Then I added a little section of I.O.D.’s Rose Chintz paint inlay to one of the sections.

I knew that I wanted to paint the outside of the box in a shade of green, but which one?

English Ivy or Kudzu?  I love them both.

Since I was planning to use the paint inlay on the outside too, I decided I’d better do a sample board to see which green worked best with it.

I painted half the board in English Ivy and half in Kudzu, and then added some scraps of the paint inlay.  I also pulled out a scrap of black transfer wording to make sure that would look good over my color of choice as well.

In the end, I rather thought either color would work but I decided I liked the English Ivy just a bit better.  The darker color made the florals pop a bit more.

So I painted the outside of the box in English Ivy and then applied the paint inlay to the bottom front and around the sides.

Before moving on, I sprayed the paint inlay with Rust-Oleum’s matte spray sealer to keep it from smearing while I worked on the rest of the box.  While I was at it, I spray sealed the tray and interior of the box as well.

Once that was dry, I sanded the edges of the box to distress them and then worked on adding some typography to the lid.

I kept it pretty simple, with just some segments of wording from the I.O.D. Label Ephemera transfer.  I added a line of text to the front of the lid as well.

I decided to go ahead and spray seal the exterior since I already had the spray handy, and it’s so much quicker than brushing on a top coat.

After the spray was dry, I also added a quick coat of clear wax over it.  There’s just something about the sheen of a wax topcoat that really appeals to me, although it wasn’t necessary for any practical reason.

With that, this toolbox makeover is complete.

I brought this one into the shop where I sell on consignment (Reclaiming Beautiful in Stillwater, MN), so if any of you locals are in need of a fabulously green toolbox, head into Stillwater this weekend.

Thank you to Dixie Belle Paint Co for providing the Bonding Boss and paint used for this makeover.

another mini makeover.

Remember the dollhouse that I purchased for $5 at a garage sale last year?

I’m not sure I mentioned it at the time, but it came partially furnished.  LOL, well, it was mostly just tacky plastic stuff that I discarded, but I did hang on to these three pieces …

They were made out of wood, so I thought they might be fun to paint up.

But much like with full-size furniture, I had to send the larger cupboard over to Ken’s workshop for some repairs first.

It was missing what I presume was meant to be a pull-out cutting board, the opening for it has already been covered up by Ken in the photo below.

A couple of the drawers needed some glue, and like so many cast off pieces of furniture, it was missing just one knob.

After scuff sanding and cleaning it, I gave it a couple of coats of Dixie Belle’s Drop Cloth.  Then after sanding the edges to create a worn look, I added a couple of transfers.

You’ll note that I painted over the knobs.  That was partially to make them blend a bit more, and partially to disguise the fact that the original 4 knobs are metal while Ken carved a wooden replacement for the fifth one.

The transfers I used are knob transfers from re.design with prima.

They tend to be the perfect size for miniatures.

I lined the drawers with some pretty scrapbook paper.

Can we just take a moment to admire my miniature fly swatter?

I saved a handful of things from the dollhouse that my dad made, including that and the other props I used in these photos.

The remaining two pieces were pretty simple makeovers with more paint and transfers.

The transfer on top of the bookcase is from the Classic Vintage Labels from re.design with prima.

As is the ‘cafe’ transfer on the trunk.

These mini’s were so fun to work on, and so much easier than working on full-sized furniture, LOL.

I think they are much improved with a little quandification.

What do you think?

As far as what I’m going to do with them, I do have a bit of an idea percolating in the back of my mind.  We’ll just have to wait and see if it comes to fruition or not!

gardening in March?!

Good morning from the garden!

I don’t think I’m back to regular weekly ‘Sunday mornings in the garden’ posts quite yet, but due to our crazy mild winter I was actually out gardening this week.  I can hardly believe it myself.

Gardening in early March, in Minnesota!  Who woulda thunk it?

I am a full month ahead of schedule with pruning the hydrangeas!  Last year I pruned them mid-April, and there were still patches of snow and ice on the ground.

Since I’m so far ahead of schedule this year I’ve decided to take my time and focus on cleaning up one garden bed at a time.  So far I’ve finished the front garden under the window box, the shade garden alongside the house, and now the garden next to the carriage house.

That is the ‘after clean up’ photo, in case you weren’t sure.

The right corner of that flower bed contains a Vanilla Strawberry hydrangea, a Tiger Eye Sumac and that amazing Roguchi clematis.

I started my clean up with the hydrangea and followed the general panicle hydrangea pruning rules:

  • reduce the overall height of the shrub by about 1/3.
  • remove any dead, broken or weak branches.
  • remove any branches that are rubbing on other branches.
  • prune just above a leaf node.

This photo doesn’t do these trimmings justice …

But they were all at least 3′ long, if not more.

The Roguchi clematis went next.

In case you’re new here and haven’t heard me go on and on about this variety, let me just say that right now it’s my favorite clematis.  It blooms from May through October and is absolutely covered in flowers that whole time.  The flowers aren’t particularly showy, but they are pretty sweet.

Clematis plants belong to one of three pruning groups, and these groups have different rules.  This one belongs to group 3, which means that you want to prune it right down to about a foot or two from the ground.  In my opinion, this is the easiest sort of pruning job for clematis.  Just prune all of the stems right above a leaf node, about a foot or so from the ground and then discard everything from above that point.

So all of this …

came off and got discarded.

As for that Tiger Eye Sumac, you may remember that I pretty much thought it was dead last year.  It normally doesn’t die back to the ground, but last year it did.  We cut all of the dead limbs off assuming it was a goner, but then it sent up new shoots from the ground.

Unfortunately those ground level shoots seem to have been a rabbit magnet this winter.  The easy way to tell rabbit damage from deer damage is when the damage only goes up to maximum rabbit height.

I’ll just have to wait and see how the Tiger Eye does this year.  I may dig it out and plant a new one in another spot.  It’s competing with the hydrangea in this location anyway.

But speaking of rabbit damage, you may remember my ongoing struggles with creating a lilac hedge.  I started this hedge in 2011, and after much trial and error, I think only one of the original lilacs I planted remains.  All of the others died off and have been replaced.  Currently I have a tall section of hedge in the middle, with two newly planted sections on either end.

This past fall I decided to go above and beyond with protecting the newer plants from the rabbits by enclosing them with chicken wire filled in with chopped leaves.

And it worked like a charm!  The rabbits weren’t able to get to them, and now they are chock full of buds.  I’m so hoping that their growth really leaps over the next couple of years and they catch up with the rest of the hedge.  Maybe I will finally have a lilac hedge after all!

Who doesn’t love a good lilac?

As for the rest of that garden bed cleanup, I just needed to cut back some perennials and clean out fallen leaves.  I tried to be mindful of where I was stepping because I have bulbs coming up!

Wait, what??  Bulbs up in early March?  And actually, most of these were already poking their heads up in late February before I left to visit my mom.  How fun is that?

I have quite a few more garden beds to work on over the coming week, plus I should really get some chicken wire around my emerging tulips.  I don’t want a repeat of last year when deer completely munched on one whole section of new tulip bulbs.

I purchased some more green chicken wire specifically for this purpose, so I should get it in place now since the tulips are starting to come up already!

I’m really looking forward to seeing whether or not my Darwin Hybrid Pink Impression tulips have multiplied.

Darwin hybrid tulips will supposedly naturalize well.  We’ll just have to wait and see.

In the meantime, have you been back out in your garden yet this year?  Leave a comment and let me know!

another library book review.

It’s time for another library book review!

If you’ve been following me for a while, you know that my mom goes to the library on a regular basis.  So when I’m visiting her I tag along and check out what her library has to offer.

Unfortunately, I seem to have exhausted their supply of ‘decorating with vintage stuff’ type books.  They didn’t have anything on the shelf in this category that I hadn’t already checked out.

So I decided to check out their gardening section next, but it seems as though books on gardening aren’t much of a draw in the desert!  For obvious reasons (they currently have a watering ban that only allows them to water plants once a week).

I did find one book on landscape design, and a handful of ‘garden adjacent’ books to check out though.

I’ll start with the prettiest of the books, which was Vintage Roses.

This book is absolutely chalk full of gorgeous photos of roses.

It begins with a brief section on the history of roses, then goes on to highlight specific varieties which are broken down into four categories; classic blooms, dramatic flowers, romantic beauties and fragrant delights.

Each rose looks positively drool-worthy to me.

I wish that I could get better results with roses here in my garden.  Unfortunately, I don’t have the patience to deal with the many challenges of growing roses, including those nasty Japanese beetles that turn their leaves into Swiss cheese every year.  I still have one old fashioned shrub rose (the easiest type to grow) that I try to train up a metal garden obelisk each year with very limited success.

My neighbor Arlene had a lovely rose garden for decades until she finally gave up the roses back in 2018.  I found quite a few local readers here on the blog that were willing to take them for their own gardens.

If you have any interest at all in roses, you would really enjoy this book.  I also think it would make an awesome gift for a rose lover.

Next up in the library book pile is Decorating with Plants.

This books gives a lot of detail on the growing needs of specific varieties of house plants.

If you are getting into house plants, this book would be a great resource.  They had a page on Streptocarpus, or Cape Primrose, and after reading it I realized I was making some mistakes with the Streptocarpus that I brought into the house this winter.

It looked great when I first brought it in (above), but I haven’t seen many flowers on it all winter.  The foliage is lush and green though.  Apparently I shouldn’t be feeding it over the winter, too much fertilizing can cause lush foliage and no flowers.

But back to the book.  This one also contains room by room ideas on displaying your houseplants like this vertical garden for a foyer.

Or this idea of filling your bathroom with ferns.

The third book in my pile also features houseplants and is called Plant Craft.

This books features 30 specific craft projects that feature plants.  Mostly indoor, but there were a handful of outside projects too.

I have to admit that I really only found two projects that appealed to me, the first being a simple terrarium.

But most of us could probably figure out how to plant a terrarium without a book.

There was also a section on how to make a Kokedama.

If you aren’t familiar, Kokedama is the Japanese art of growing plants in a moss-covered ball of soil wrapped with string.  I’ve debated trying to make one of these, but in the end decided that caring for it would probably be a bit too fussy for me.

Last up is the Encyclopedia of Landscape Design.

This is one of those DK books (published by Dorling Kindersley).  They specialize in illustrated reference books.  I absolutely love their travel guide books.

This book is packed with tons of info on everything from creating a site plan …

to ways to create screens or boundaries.

They also have lots of info on plants including tree, shrubs and perennials.

Unfortunately quite a lot of the plants they featured were not hardy in my zone 5a (formerly 4b) garden.

Still, this book would be a great resource if you are starting from scratch with some landscaping.

I hope you found this library book review of interest.  If you’d like to check out some of my other library book reviews, just click on the photos below to head to those posts.

kitchen wax and other things.

And once again, I’m back from my travels.  In case you weren’t paying attention to my last post, I went off to visit my mom in Henderson, NV for a week.

My mom will be turning 84 later this year, so I like to take every opportunity to spend some time with her these days.  In fact, I’m going back again in April with my sister.

For this trip I was flying solo though.  It is incredibly easy for me to get to my mom’s, despite it being 1,680 miles away.  There are plenty of flights to choose from between Minneapolis and Las Vegas, and the flight takes about 3 hours.  I live fairly close to the airport on my end, and my mom lives even closer to the airport on her end.  In addition, I find that both the Minneapolis airport and the Las Vegas airport tend to operate quite smoothly.  The same can not be said for Puerto Vallarta …

That place was a zoo!

And of course, now that I am retired I can go visit my mom anytime.

Aside from dining out a couple of times, and doing a little shopping and errand running, we mostly just spent some quality time hanging out.

I thought I’d share a few updates on projects out at mom’s that I’ve shared with you guys in the past, starting with her front door.  If you’ve been following me for long, you may remember that I painted her front door back in February 2022.

I used Dixie Belle’s Midnight Green Silk paint from their Desert Collection, which seemed appropriate since she lives in the Mojave Desert.

Two years later, the door still looks as good as the day I painted it.

It was a little dirty, but wiping it down with a damp rag quickly took care of that.  Considering that this door is subjected to the blinding Nevada sunshine on a daily basis, I am pretty impressed with how well this paint has held up.

Speaking of holding up, check out that pot of cyclamen.  I planted that back in October of last year, and my mom basically does nothing more than water it now and then.

It has been outside all winter, and despite the occasional night below freezing it still looks fantastic and is blooming away.  Here in Minnesota we basically treat cyclamen as a blooming houseplant.  I rarely get a 2nd flush of blooms out of them.  My mom says this one has been blooming steadily all winter.

I can’t say the same for the gardenia that I planted for Mom back in April of last year.  Here’s how it looked when I planted it.

It has grown quite a bit, but unfortunately it has never bloomed again.

I suspect that it might just be too hot on my mom’s patio for this plant to thrive.  If any of you have any tips on getting a gardenia to bloom, be sure to leave a comment.

In March of 2021, my sister and I gave my mom’s patio a makeover.

We purchased that cute little bistro set at Lowe’s for $248, and it too has held up beautifully for three years.  Unfortunately this set is no longer available at Lowe’s or I would certainly recommend it.

This little enclosed courtyard is perfect for enjoying a cool late February morning with some library books and a cup of coffee.

One of the things I did out at mom’s was to clean out some closets, as well as her laundry area in the garage.  I had to laugh when I came across her Jubilee kitchen wax.

I’m fairly sure that my mom has not waxed a floor since I was in grade school.  But for some reason the Jubilee wax has made every move from Illinois to Minnesota to Florida to North Carolina to Kentucky to Nevada (yes, my parents moved a bit).  And she even packed it when she moved out of her big four bedroom, three bath house to her current townhouse.

There’s no way my mom’s going to be down on her hands and knees waxing a floor these days, but for some reason she just keeps hanging onto that wax.  And now, somehow I just can’t bring myself to toss the Jubilee either.  How silly is that?

I did take some time to stop into the Goodwill that is just around the corner from my mom’s place.

Unfortunately there wasn’t a single item that could be considered ‘fabulous’.  It was quite disappointing (garage sale season can not arrive soon enough!).

How about you?  Are you ready for garage sale season?  Leave a comment and let me know!