I gave at the office.

Did you guys miss me on Wednesday?  I skipped right over having a post because … well … I gave at the office this week.  In other words, I spent all of my energy at the day job.  I’ve been putting in a little overtime of late because this is crunch time for me at my ‘real job’.  I’m not going to lie, it’s been a bit stressful.  I just haven’t had any energy left at the end of a long day to work on blog projects.

In addition, I can’t share the dresser that I finished last weekend yet because it’s part of a collaboration that I’m working on.  The reveal date isn’t until February 10.

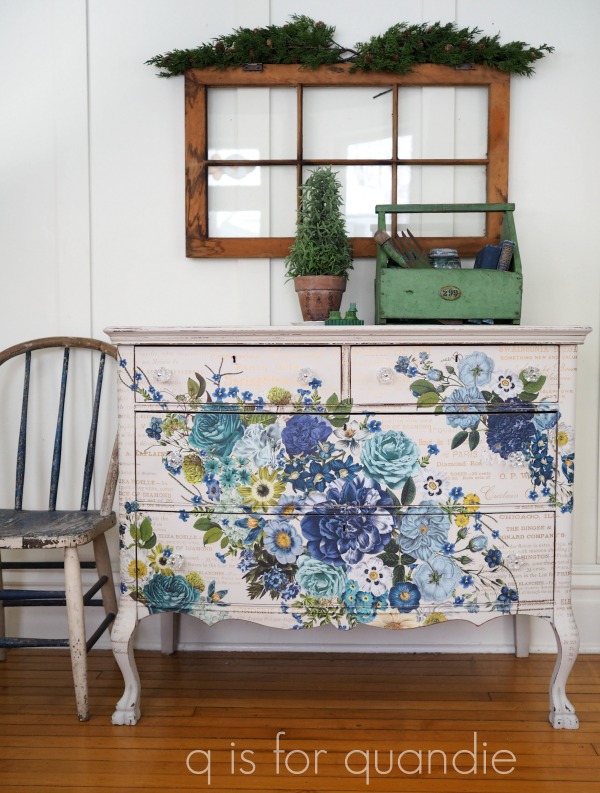
But … you know what … how about if I give you a sneak peek at my piece …

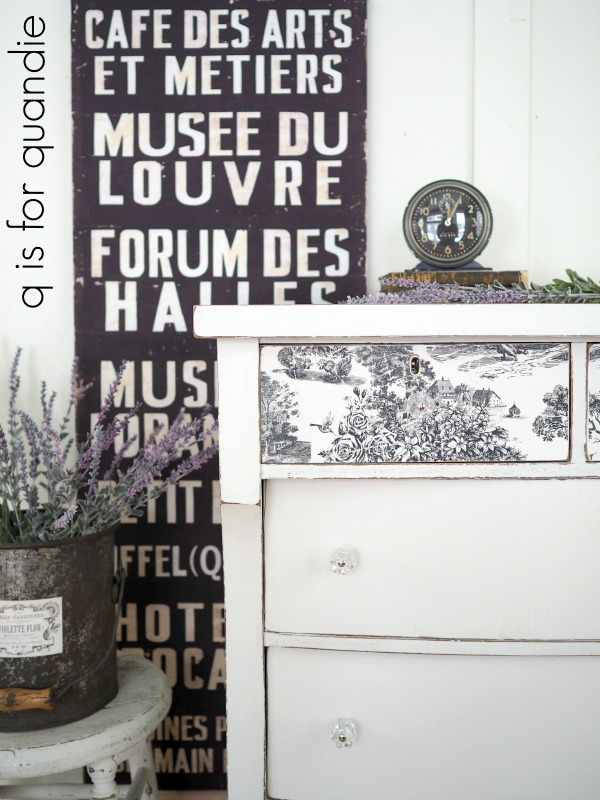
Shhhh, don’t tell anyone that I showed you that 😉

Anyway, my point is, I have very little to share this week (and possibly next as well).  I’m going to spend some time this weekend working on my next piece(s) of furniture, but don’t know that I’ll get any of them done in time for a photo shoot before the sun goes down on Sunday.

In the meantime, I have one little project that I can share today.  This is one that I wasn’t even sure I would blog about because it’s not terribly exciting.  However, since I’m desperate for content, I’m just going to go with it.

Remember the Cosmic Roses dresser?

When I purchased that piece the seller asked me if I wanted the mirror frame that went with it, even though it didn’t have the mirror glass or the harp for attaching it anymore and the trim was broken off.

Of course I said yes.

Although I’m fairly sure this frame never went with that dresser.  It’s not the right size, and had a totally different wood finish.  I knew I could do something with it though.

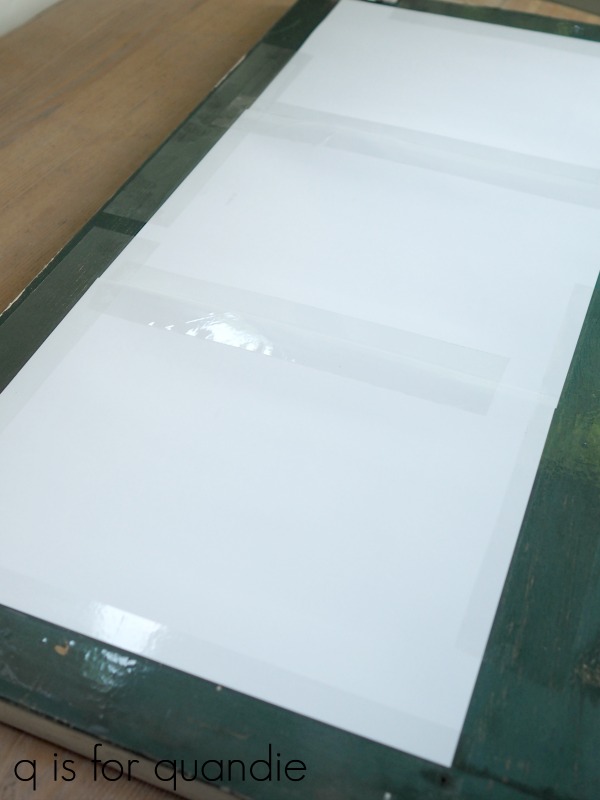
My handyman Ken made quick work of gluing the trim piece back on the top and cutting a piece of hardboard to fit.  I just had to paint the hardboard with some chalkboard paint (I used the Rustoleum black chalkboard paint on this one), and then paint the frame.

For the frame I went with Miss Mustard Seed’s Milk Paint in Farmhouse White.

I haven’t been using as much milk paint these days, but this piece reminded me how much I love it when it gets perfectly chippy.

I really love taking something that was destined for the dumpster and giving it a new life.

Not only have I been too busy to create things for the blog, I’ve also been too busy to get my stuff in to Reclaiming Beautiful.  Hopefully I’ll make it in there next week, and this chalkboard will go with me.  I want to get it there before Valentine’s Day has come and gone!

Thank you to Miss Mustard Seed’s Milk Paint for providing the milk paint I used on the chalkboard frame.

classic vintage labels.

One of the new transfer collections available from re.design with prima is called Classic Vintage Labels, and I absolutely love it.  I mentioned it last week when I shared how I used one of the sections on a secret Santa gift …

Here’s what comes with this transfer.

There are 27 different labels included in this one set, so I decided to get to work and see if I could add some labels to a few more things around here.

First I gathered up some raw materials including some enamelware and some clay pots.

Then it was as simple as just adding the rub-on labels.

This set of 4 enamelware refrigerator boxes got jazzed up with some labels.

The Bees & Queens label is definitely one of my favorites.

The transfers adhere beautifully to enamelware.  I added one to this old pot as well.

I think it makes a great impromptu ice bucket.

It feels like this cafe label was meant to go on this bucket.

This container was perfect for a hot chocolate gift basket that I put together.

Next I added a few labels to some clay pots.

I’d purchased a variety of cyclamens to give as hostess gifts over the holidays and it was fun to present them in pretty pots.

Even just the simple bee transfers add a lot to a plain clay pot.

Of course I couldn’t resist buying a cyclamen to keep for myself.

I love the pop of bright color they add to cold January days.  The flowers on these last quite a long time too, so you can enjoy them for a while.

Is it too early to start transitioning from holiday decor to spring decor?  Because I feel like I’m ready.  How about you?

Thank you to re.design with prima marketing for providing the Classic Vintage Labels transfers used in all of these projects.

a jewel tone jewelry box.

My picker, Sue, texted me a few weeks ago and told me she was at an awesome estate sale and I should check it out.  My sister was on her way over so we could do some holiday shopping anyway, so we just had to take a little detour when she got here and head to Stillwater.

One of the items I purchased at the estate sale was this wooden box.

I think it might be homemade, although I’m not entirely sure of that.  I’m also not sure of it’s original purpose, but I’m going to call it a jewelry box.  It could also have held small hand tools, or nuts and bolts I suppose.

Clearly it was in need of some paint.  I painted it in Dixie Belle’s Sawmill Gravy.

Once the paint was dry I pulled out the Royal Burgundy transfer from re.design with prima.  This transfer comes in six sheets, but I only used two of them for my project.

I did the front and the top of the box.

You might be thinking that it was a total waste to use just two of the six sheets for this box (and trust me, I was thinking that too at first), but I can always use the other sheets for at least one if not two more small projects.  In fact, I already used the scraps from just the two sheets I used on this project on the ice skates I shared last week.

So really, this is a great way to get more bang for your buck with the transfers.

Aren’t the colors in this transfer gorgeous?  I love the combination of the chartreuse with the bright pinks.  Jewel tone colors are perfect for a jewelry box.

I lined the drawers with some patterned scrapbook paper.

And I swapped out the original knobs for these petite glass knobs from D Lawless Hardware.

This box ended up being so darn photogenic I had a hard time deciding which photos to use for my post.

You probably didn’t really need to see quite this many.  But I just couldn’t help myself.

By the way, I did draw the winners for the last two days of my 12 days of giveaways.  Congrats to Lynn and Alice for winning those!

Thank you to Dixie Belle Paint Co and re.design with prima marketing for providing the products used in today’s project.


oh deer.

Congrats to Laura Hopwood, the winner of the day no. 2 prize.  I’ll be drawing a name for the winner of the day no. 3 prize tomorrow (is this getting confusing for you guys too?  I’m doing my best to keep track of it all), if you haven’t commented on that post you have until midnight tonight!

In the meantime, today is day 4 of my 12 days of giveaways, and I’m first sharing the transformation of this adorable (if I do say so myself) metal toolbox.

This toolbox started out looking like this …

My picker, Sue, found this for me.  She always grabs metal toolboxes when she sees them.  She knows I love to give these a new life with some paint.

To begin with I washed the toolbox using Dawn dish washing soap to cut any grease that might have been left behind by the former owner.  Next I added a coat of Miss Mustard Seed’s Tough Coat Sealer to prevent the rust from coming through my paint.

Today’s q tip:  Keep in mind that the Tough Coat Sealer does not block stain from bleeding thru (try the Dixie Belle BOSS for that), but I have found that it works well as a protective coat over rust.  It also works well as a top coat for a rusty piece when you want to retain the rusty look.

Next I pulled out a couple of new Dixie Belle paint colors, Sawmill Gravy and French Linen.  I can tell you now, both of these colors will be making their way onto my list of favorite neutrals.

I first painted the entire toolbox in two coats of the Sawmill Gravy.  Once dry, I taped off a wide stripe down the middle and painted it in the French Linen.  After that dried, I sanded the box lightly and then added a few sections from re.design with Prima’s Deer transfer.

I have to say, I totally underestimated the cuteness factor of this transfer!  When I first saw it I thought it was only going to be good for some sort of man-cave or hunting shack item.  But then I looked a little closer and realized it had a reindeer on it.

Seriously!  How cute is that?

If you have a few men in your life and you are looking for something that’s not feminine and flowery, be sure to check out the Deer transfer.  And if you really do need to dress something up for the hunting shack, this transfer would still be perfect for that too 😉

Now, for today’s giveaway.  I wish I had a spare Deer transfer, but unfortunately I don’t.  I do, however, have some Sawmill Gravy and French Linen to give away.  I also thought, why not give them away along with the toolbox itself?  They fit perfectly inside.

Thank you to Dixie Belle Paint Co for sponsoring this giveaway by providing the paint, and to Prima Marketing for providing the Deer transfer that I used on the tool box.

The rules:  to be eligible to win today’s prize leave a comment on this blog post.  If you can’t think of anything to say, just tell me what you would keep in this toolbox.  Your comment must be left on the blog, not on Facebook or Instagram.  You are not required to follow my blog, although it would be awesome if you did!

I will randomly draw the name of a winner for today’s prize from all of the comments left on this post by Friday, December 6, 2019 at the stroke of midnight (U.S. Central time).

The fine print: no purchase necessary, you must be 18 years of age or older to win, void where prohibited by law, the number of eligible entries received determines the odds of winning, approximate retail value of prize is $65, if the prize is not claimed by Sunday, December 8, another name will be drawn at random to win, blah, blah, blah.

Good luck!

painted hydrangeas.

This past Saturday morning my sister and I headed up to the Holly Jolly Market in Otsego, MN.  The market is held in a greenhouse so not only are there really fab vintage holiday goodies (and trust me, if you are local you shouldn’t be missing this one each year), but they also sell spruce tips and other evergreens at great prices.  I bought a dozen spruce tips for $21.99 plus a few random greens for $5.99 per bunch.

If you’ll remember back, last year I didn’t manage to get my front window box decorated for winter.  We were on our Adriatic cruise for two weeks in November and when we got back on the day after Thanksgiving the dirt was frozen rock hard so I just decided to skip it.

This year I was determined to get on it early, before the dirt was too frozen to work with.  I really thought November 9 would be early enough.  Nope.  The dirt was already partially frozen.  So I followed a tip one of my readers shared with me and I poured hot water on it to thaw it out a bit.  It worked like a charm and I was able to get those spruce tips sunk into the dirt.

While at the Holly Jolly Market I was admiring some deep red dried hydrangeas in one of the booths, so I asked the vendor how she managed to retain that rich color.  Her trick?  Spray paint.  As soon as she said it, I remembered that a couple of years ago one of my readers also recommended spray painting my dried hydrangeas.

Funny enough, in addition to red, the vendor also had some sprayed some with the Rust-Oleum color called Eden which just happens to be the same color I used on my Adirondack chairs, remember?

So when I got home from the market I dug into my spray paint stash and came up with a red, and the left over Eden from the chairs.

While we were at the market it was a beautiful, sunny morning and the temperature was above freezing.  The forecast wasn’t great though.  It was supposed to start raining by 3 pm, then turn over into a wintry mix.  The temps were predicted to start going down and keep going down with a high only in the teens Fahrenheit expected by Monday.

I knew I needed to get the window box done that afternoon or my dirt would be even more frozen.  By the time I got to the spray painting step it was drizzling and getting colder by the minute.  So if you’ve ever wondered if you can spray paint dried flowers that are wet with rain, in temps just above freezing … well, turns out you sure can.

In fact, it created a kind of cool effect, don’t you think?  Although I don’t suggest trying this on furniture 😉  I also don’t suggest doing this while wearing your favorite new parka, especially if you accidentally shake a wet and freshly painted blossom 😦

I’m quite sure that my neighbors thought I was nuts standing out in the rain cutting flowers off my hydrangea bush, holding them up and hitting them with the spray paint.

But it was definitely worth it in the end.  I got most of the spots off my parka, and the hydrangeas look fantastic.

Once I had the spruce tips, the hydrangeas and some twig lights in place, I added this giant jingle bell that my sister gave me a couple of years ago.

Things still looked a little bare, so I threw in three galvanized snowflakes that I’ve had for years.

They have battery operated lights in them and I always used to hang them on either the house or the carriage house, but honestly they always looked a little odd at night.  If all you can see are the lights, well … they just look like a random collection of oddly placed lights.

By the time I got to this point I was soaked through, starting to get cold, and it was starting to get dark so I called it quits for now.

I think I still need to add some twigs with red berries or something to add another layer of color up high.  I may have to take a walk in the woods and see what I can find for that.

But in the meantime, I’m feeling pretty good about filling up my giant front window box for less than $40.

How about you, are you rushing to get some outdoor decorating done before the temps plummet even further?  Or are you lucky enough to live in a warmer climate where you can decorate outdoors at your leisure?

a thing for boxes.

I seem to have a thing for old wooden boxes.

Remember the one I found at the estate sale back in August?

I ended up simply adding a portion of the Prima Marketing Somewhere in France transfer to the front and then sprucing it up with a little furniture wax.

I was hoping it would work on the shelves in either our living room or piano room, but it’s just a tad too big.  So for now I have it in our bedroom.

We had a couple of my South Dakota cousins over for dinner a while back and my cousin David insisted that this box looks like a tiny casket.  It’s far too small to really be a casket for a person of any size though, so then he claimed it was a cat-sket.

Hmmmm.  Well, I guess it could work for that.  Luckily our cat Lucy is still going strong.  We did have a bit of a scare with her last week, but after a bunch of expensive tests her vet has decided she simply had a virus.  She’s doing much better now, knock on wood.  Plus all of those tests did show that she’s doing pretty good for a cat of 13, so hopefully we won’t be needing a cat-sket any time soon.

My love of old wooden boxes continued with my ‘find of the day’ from the St. Anthony Park sales.

I decided to give this one a paint job in Dixie Belle’s Drop Cloth, then I added an old Prima Marketing transfer called Memoir (the small size).  This transfer is no longer being manufactured but you may be able to find one online if you search.

Just about half of the transfer fit on the front of the box, and I put another section on the top.

I decided to leave the inside of the box alone.  I didn’t want to cover up the King Radio decal.

Those dividers pretty much eliminate any chance that this one is a cats-ket 😉

I used Dixie Belle’s Big Mama’s Butta in Orange Grove on both the inside and the outside of the box.

That freshened it up a little and gave it a fabulous scent.

I was having a bit of a split personality moment while staging the photos for this one.  I was initially thinking that it would be perfect for storing old family photos or other ephemera.

But then I switched gears and realized it would also work well for storing some art supplies.

Either way, it’s a fun little storage box.

Once again, it’s too big for my living room/piano room shelves, so I’ll likely take it in to Reclaiming Beautiful to be sold.

If you have a thing for old wooden boxes too, check out some of the others that I’ve done here, here, here and here.

not reinventing the wheel.

OK, so I’m not reinventing the wheel or anything with today’s post.  I’m sure you’ve all seen old windows turned into photo frames many times before.  Initially I wasn’t even going to blog about this project, but it was a fun one to work on and I love how it turned out so I decided, why not?

What’s the worst that can happen?  You’ll all get bored, move on to the next thing in your day and not leave any comments.  I can live with that.  So here it is.

My neighbor, nnK, has a stash of old windows from a barn that was torn down.  I was over at her house one day because one my fellow vendors from Reclaiming Beautiful, Amy, was looking for old windows to build a green house (I can’t wait to see how that project turns out for her!)  Amy left with a truck load of windows, and afterwards I noticed that there was just one 3 pane window left in the stash and it had perfectly chippy white paint so nnK let me have it, sort of like a commission for finding her a buyer for the windows.

I brought it home and gave it a good cleaning.  Then I sanded it down to knock off any really loose paint.  Finally I used The Real Milk Paint Co’s Dead Flat Finishing Cream to seal it.

Today’s q tip:  Always remember that old paint may contain lead.  You can buy inexpensive testing kits at any DIY store if you want to know for sure.  Lead paint is more dangerous for children than adults, but still you should take proper safety precautions when working with it.  I like to seal chippy old paint like this to keep it from continuing to flake off.

Once the Finishing Cream was dry I added some random leftover bits from the Prima Marketing Seeds transfer.

I also added the old window hardware.  This was some old hardware that I picked up at a garage sale once upon a time.

Next I went through my photos and picked out some of my favorite travel pics.  I used PicMonkey to make them black and white and then printed them off as 5″ x 7″ photos on 8.5″ by 11″ matte photo paper.

I chose this picture from our trip to Budapest.

This one from our trip to Venice.

And this one that I took at the Beamish in England.

I totally loved that place, so if you’re ever in Newcastle upon Tyne you should absolutely check it out.

Initially I was thinking that the tricky part of this project would be trimming the photos just right to fit the window panes, and then figuring out how to adhere them.

But then I realized that I liked the look of the photos with a little space between them and the glass.  So taping them to the back of the window frame without trimming them at all worked out perfectly well.

And the 5″ x 7″ dimensions also worked perfectly leaving some visible white space around each photo, sort of like a mat.

I added these hangers to the back of the window …

I prefer this style hanger to the saw tooth version because they screw in and will hold heavier items like this with no problem.

So, to recap, the window was free, the photos were free (unless you count the ink and paper, which presumably one already has on hand), the transfer was left over from another project and the window hardware was something from my stash of old hardware.  The only things I had to purchase were the hanger thingies.

Although I originally intended it for the living room …

I’ve now moved it to the piano room.

Down the road I can always swap out the photos for different ones, or move this to yet another room.

Not bad for an investment of just a couple of dollars and about an hour or so, huh?  Do you have any old windows lying around that you can turn into photo holders?

thankful autumn.

I know it’s a bit early to be thinking about Thanksgiving itself, but this year I’m going to take some inspiration from one of Prima Marketing’s newest transfer collections and practice gratitude for the entire fall season.

On Wednesday I posted about the tree that came down in our yard and how thankful we were that nothing else was damaged, no one got hurt, and the entire mess was cleaned up before 9 a.m. by some tree guys that were already in the neighborhood.

Just the other day I mentioned to Mr. Q how blessed I am to have my sister and niece living nearby now.  For those of you who might be new here, my sister got married and moved away to New Jersey when I was 18 years old.  We didn’t live in the same state for over 30 years until she and my niece moved here to Minnesota 4 years ago.

Now I can’t even imagine them not living here.  We have so much fun together.  How did I ever get by without them for so many years?

I regularly give thanks for my neighbor/handyman Ken too.  Never more so than this past week as we’ve been working on a little home improvement project together.  I’m going to share it next Wednesday, so be sure to check back for that.

I also feel incredibly lucky that Prima Marketing chose me to be a member of their design team.

It’s so fun to get a sneak peek at the designs each time they come out with a new release, which brings me to today’s quick and easy project.

I started with a pile of vintage plates and platters.

Then I pulled out one of Prima’s newest transfer collections called Thankful Autumn.  This collection will be available to purchase on September 15.  You can find a retailer near you, or an online source for Prima’s transfers here.

Then I just cut out the various designs and added them to the plates.

A quick q tip for you:  when working with the transfers over glass (or china in this case) be forewarned that they stick like mad to these surfaces.  As soon as that transfer touches the surface, it is stuck there.  So be sure you get your placement right before allowing contact.

I was a little off on this next one.

But the sentiment is still there.  Even if it’s a little wonky, there’s no place like home sweet home.

the cart before the horses.

First off, thank you all so much for your comments on Monday’s post.
There was a good mix of city slickers and country bumpkins with a few suburbanites plus one ‘lake lassie’ thrown in for good measure.  It was fun to read all of your various reasons for your choice of country v. city!

Don’t forget, if you didn’t already comment on Monday’s post, you have until Friday to leave a comment on that post to be in the running for the prize.

You’ll remember back in May I purchased some handmade vintage wooden toys at a garage sale for $1.  They weren’t marked and there was a sign at the sale that said everything that wasn’t marked was a quarter.  But I really thought the seller would say “Oh, but not those …” when I asked about them, but instead she said “you can have them all for $1.”

My first makeover was the adorable pull-toy elephant whose head bobs up and down when you pull him along.

My handyman Ken had to do a few repairs on him before I gave him a milk paint makeover.

Next up was the truck.

Ken fixed the gate on the truck bed, and then I used Dixie Belle paint and some Prima Marketing knob transfers to dress it up.

I’ve saved the best for last though.  I called this one the Find of the Day when I bought it.

I just love those horses.

But I didn’t love the faded shades of red and green on the wheels and the wagon bed.  So I painted the wheels using Dixie Belle’s Midnight Sky and the wagon bed using Dixie Belle’s Drop Cloth.  Initially I had also planned on repainting the horses, but in the end I was afraid that I wouldn’t be able to recreate those faces adequately.  So instead I just gave them a good scrubbing to clean them up.

I mean really, how sweet are those faces?

And the Drop Cloth on the wagon was a pretty good match for the existing color on the horses.

Once the cart was painted I added some portions of the smaller Prima Marketing Seeds transfer to each side.

They were perfectly suited for it.

I filled the wagon with a set of Wonder Books of the World’s Progress.

I purchased them at a garage sale too.  There were quite a few sets of vintage books for sale and another shopper was scrutinizing them all, I’m sure looking for publishing dates and trying to figure out if they might be valuable.  But I just grabbed these because I thought they were pretty.

They are such a lovely shade of blue.  And they just happened to fit perfectly in the cart being pulled by these horses.

Small projects like these aren’t great money makers for me, especially considering the amount of time that goes into them.  I’d be much better off spending that time working on a piece of furniture.  But I love taking cast off things like these toys and bringing them back to life.  I know my handyman Ken really enjoyed working on these toys as well.

How about you guys?  Do you enjoy the blog posts about small projects like this, or would you prefer it was all furniture, all the time?

breakfast and lunch.

I purchased one of those IKEA Bekvam step stools at a garage sale a few weeks back.  Normally I’m not a fan of IKEA furniture, but in this case the price was right (at $3).  I knew it would be cute painted up.

I have to admit though, I wasn’t expecting to blog about this one.  I just thought I’d paint it quick and take it to Reclaiming Beautiful to sell.  Nothing fancy, it would be an easy project.  So I didn’t really take a ‘before’ picture of it, but then it turned out so fantastic that I had to share it with you guys.

So now I’m borrowing a ‘before’ photo from the web.  Try imagining this stool, but dirtier and marred with some spots of paint (it must have been used in a workshop) …

I wanted to paint the entire thing using Fusion’s Buttermilk Cream.  This is my favorite shade of pale yellow.

But when I pulled out my jar of this color it had only the smallest amount of paint left at the bottom.  So sad.

Therefore I just used the Buttermilk Cream on the tops of the stool, and I used Fusion’s Limestone on the legs.  These two colors make a lovely combo, I’ve used them before on a couple of pieces.

Once the paint was dried I pulled out Prima Marketing’s new Re.Design transfer called Delicious Menu.

I used parts of this transfer last week to dress up an old metal picnic basket and a couple of other things like this old enamelware coffee pot.

I simply pieced together different words that would fit on the stool and make some kind of sense.

Once I got started I couldn’t seem to stop.

What can I say, I just love adding words to things.

Super cute, am I right?

One last bit of info.  I often see people asking what is used to ‘seal’ the transfers.  I use different things depending on what paint I’ve used.  In this case, since Fusion is so durable and has its own built in top coat, I just add a little bit of Fusion clear wax over the transfer itself and over the raw edges where I sanded the paint away to distress the piece.

So how about you, are you a fan of things with words on them?  What do you think of this Bekvam stool update?