the bomb box.

Earlier this year I picked up this wooden crate at my friend Jackie’s garage sale.

Apparently it once held bombs.  I’m not sure what she was doing with a box of bombs … uh oh, maybe I shouldn’t be saying ‘bomb’ so much, my blog is going to end up on some kind of a watch list.

The rope handles on the sides were intact, and I think they add a nice touch.

I didn’t want to alter the original stenciling on the crate, just in case someone … you know … likes it?

But the opposite side was completely blank, so I knew I could do something there.

I also thought this box would be the perfect size to hold a small tabletop sized Christmas tree.  It is 10″ tall x 13.5″ wide x 12″ deep.

I went through my numerous Christmas stencils and decided that the smaller version of the Rudolph & Co stencil I had would fit quite nicely on the blank side of the box.

I stenciled it using Dixie Belle’s Caviar.

Next I pulled out this faux tabletop tree that I purchased at Target a few years back and it fit perfectly in the box.

Obviously this was a super quick and simple project.  But how perfect is that box for a little Christmas tree?

I’ve brought this box into the shop this week, so if you’re local be sure to head to Reclaiming Beautiful in Stillwater if you want to check it out!

neutral or traditional?

A friend recently nabbed this cute little pair of mini chairs for me.

Although they had an awesome chippy paint on them, they were quite dirty.  I tried scrubbing them down, but they still looked fairly grungy so they definitely needed a paint job.

I decided to give them two different holiday looks; one is more traditional with red and green, and the other is more neutral.

Let’s start with the traditional look.

I painted this chair in my favorite Dixie Belle Drop Cloth.

Then I pulled out those same 6×6″ stencils that I used inside the Christmas clock shadow box that I shared a while back.  As I mentioned then, I ordered these from Amazon, but the exact stencils are no longer available.

I masked off the area for each of the colors that I used and stenciled them separately.

The truck is DB’s Honky Tonk Red, the tree is their English Ivy and the rest is done in Caviar.

It’s a little more time consuming to do a multi-color design like this, but I think it’s worth it in the end.

I painted the 2nd chair in Dixie Belle’s French Linen.

I used another of the 6×6″ stencils on this one too.

I used DB’s Drop Cloth, and this one was a bit simpler since I just used one color for the stenciling.  I did add a little dimension by adding a quick swipe of French Linen on each of the letters.  I just used an artist’s brush and added those free hand.

One benefit to the more neutral chair is that it isn’t strictly a Christmas decoration.  You could leave this one out all winter.

Either way, both chairs turned out pretty cute.

I’ll be bringing these into the shop along with the rest of my holiday merch this week.  They are priced at $22 each if any of my local readers are interested.

Leave a comment and let me know which look is your favorite!

my holiday merch.

Before I get into today’s post, congrats to Amanda whose name I drew to win my Christmas Inspiration giveaway!

Earlier this week I brought just a small sampling of my Christmas items into the shop where I sell some of my things on consignment, Reclaiming Beautiful in Stillwater, MN.

By a small sampling, I mean I was limited to just five items this week.  It was a bit of a struggle for me to determine which five things to drop off, but ultimately I went with these five …

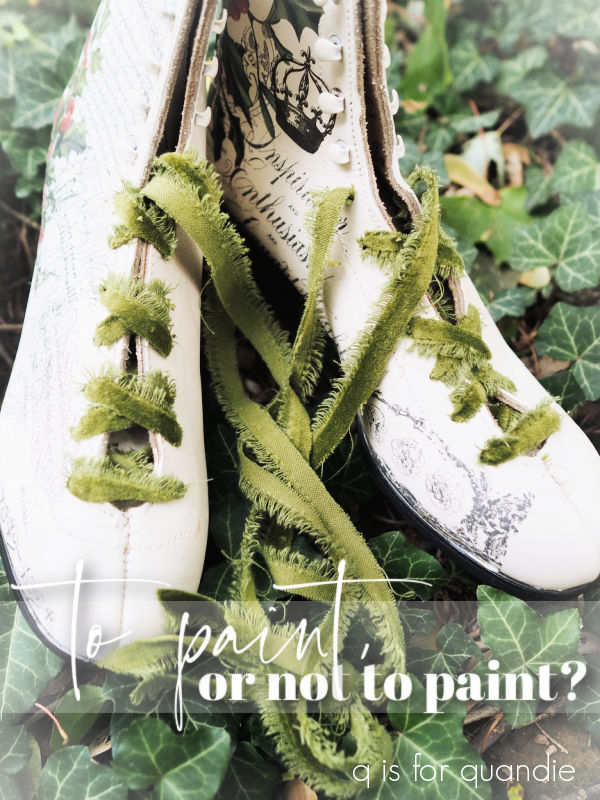
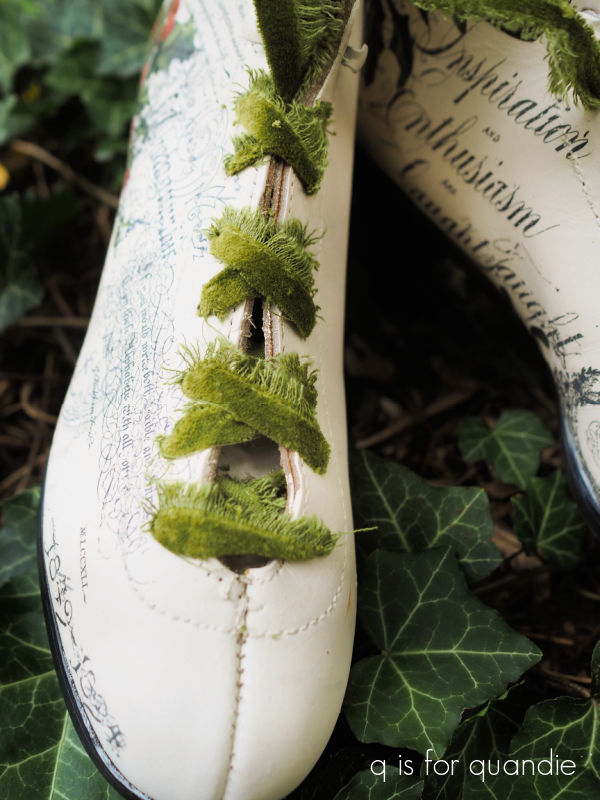
First, the skates that I shared with you guys last week.

These are priced at $55.

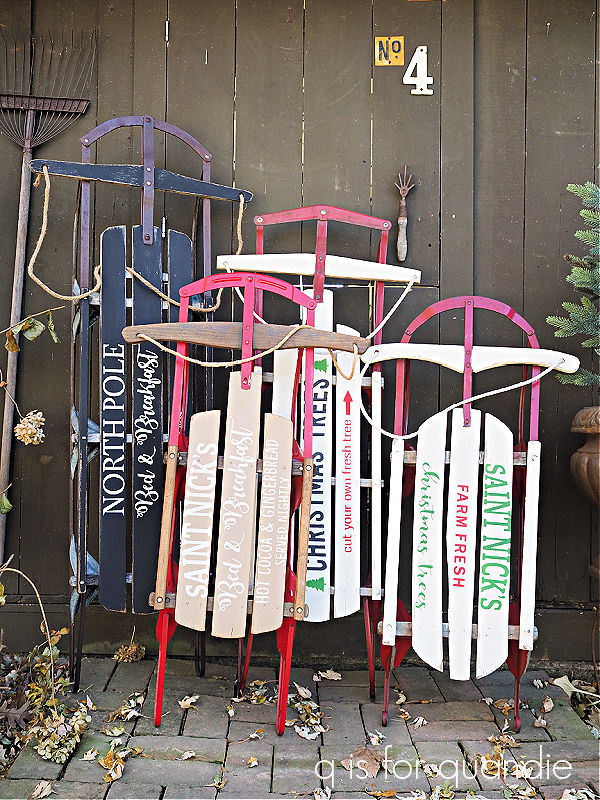
Next up, this stenciled sled.

It is 37.5″ tall x  22″ wide and is priced at $58.

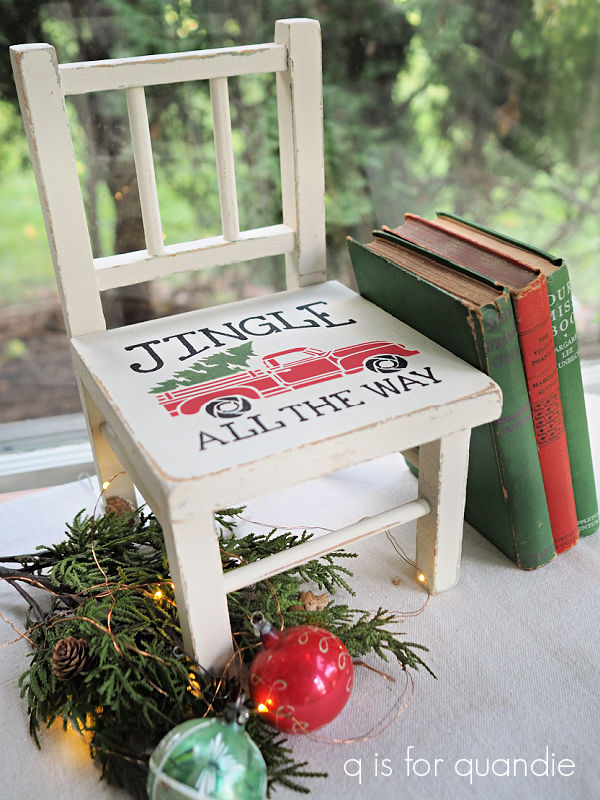
I also brought in this adorable green kid sized chair …

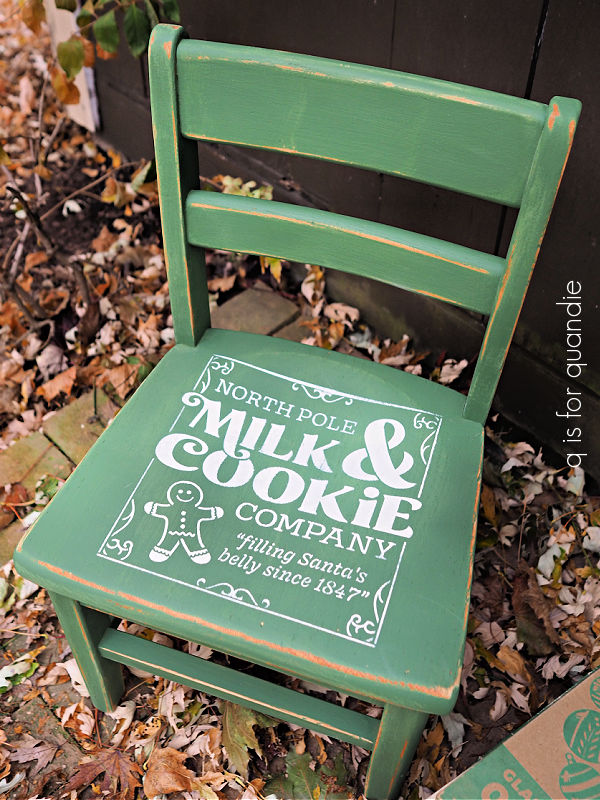
It is 22.5″ tall x 13.5″ wide x 12″ deep and is priced at $48.

Item no. 4 that went in to the shop already is this wooden stenciled sign.  I thought perhaps I should round out my selection with something that wasn’t in the traditional red and/or green.

This sign is 28.5″ wide x 21.5″ tall and priced at $45.

Lastly, I brought in the birdcage centerpiece that I created last year.

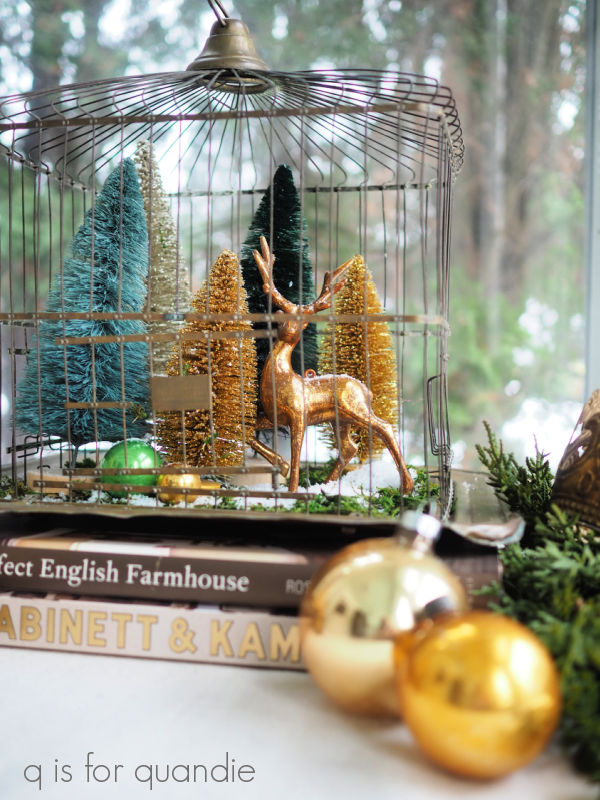
The birdcage is 12″ tall x 10″ deep x 13.5″ wide and is priced at $48.

So that’s the five items that have already gone to the shop.  It’s certainly possible that they have not been purchased yet (although last night was the shop’s holiday open house), but you locals would have to visit the shop to find out!  Check out their Facebook page for hours and location.

Now, how about taking a look at a bunch of the other pieces that I have ready to take to the shop next week?  Let’s call this a bit of a pre-sale for any of my local readers who might be interested.  If you are interested, you can jump on them now by leaving me a comment or by sending me an email at qisforquandie@gmail.com.

I’ve been working hard pulling together a bunch of items for Christmas and I wanted to show them all here, but I’ll be taking the time to write proper blog posts about a few of these items over the next several weeks as well, so stay tuned for more detail.

I have one more vintage sled with metal runners (personally, this one is my favorite with its neutral shades).

This sled is 38.5″ tall x 23″ wide and is also priced at $58.

I also have this next sled, which doesn’t have metal runners, but it still turned out pretty darn cute.

This sled is 37″ tall x 12″ wide and is priced at $48.

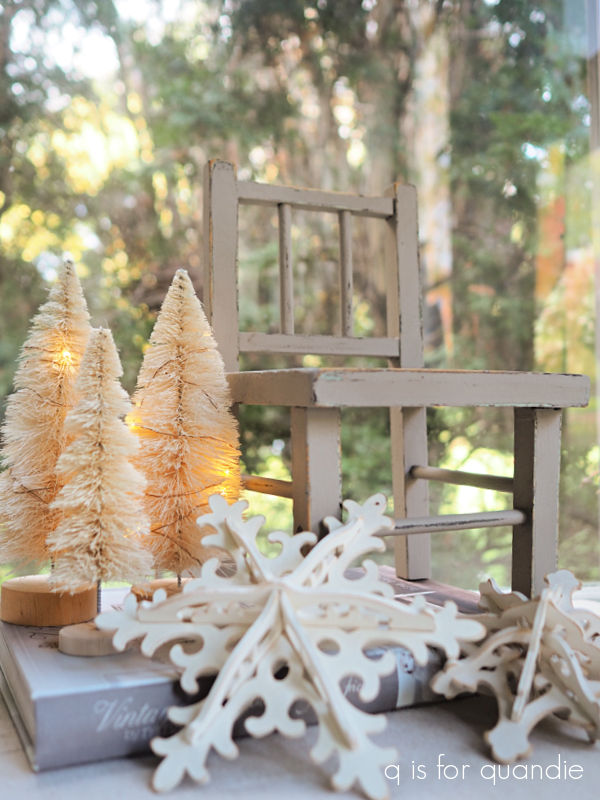
I have another kid sized chair, this one is painted in my favorite warm white, Dixie Belle’s Drop Cloth, and I think it has a bit of a Scandi vibe with the red and white.

This chair is also 22.5″ tall x 13.5″ wide x 12″ deep and priced at $48.

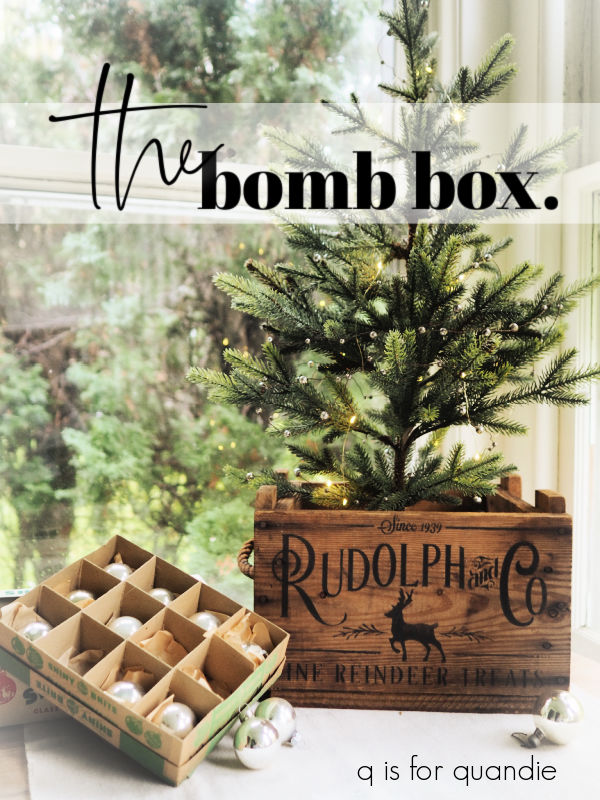
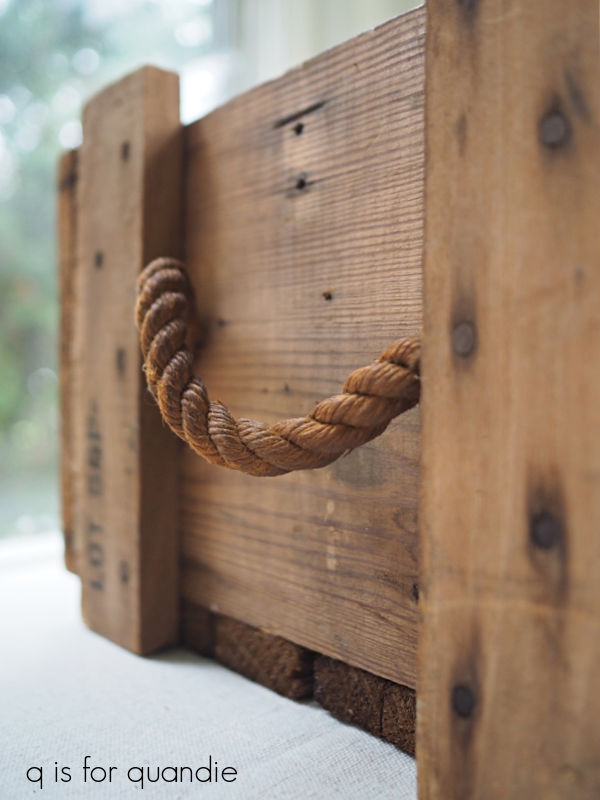
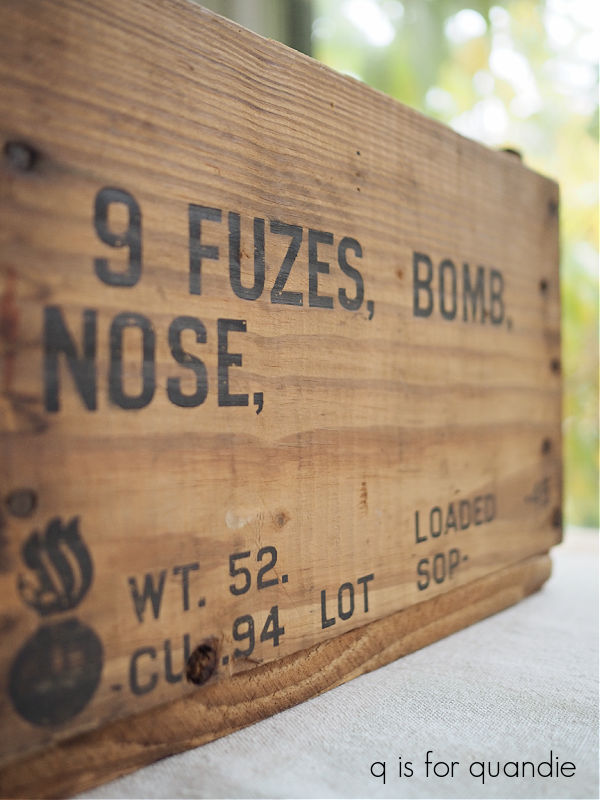
This wooden ‘bomb box’ is going into the shop priced at $45.

At 10″ tall x 13.5″ wide x 12″ deep it’s the perfect container for a small tabletop tree.

I turned this old beadboard cupboard door into Christmas decor, and it’s for sale as well.

It is 25″ wide x 22″ tall and for sale at $55.

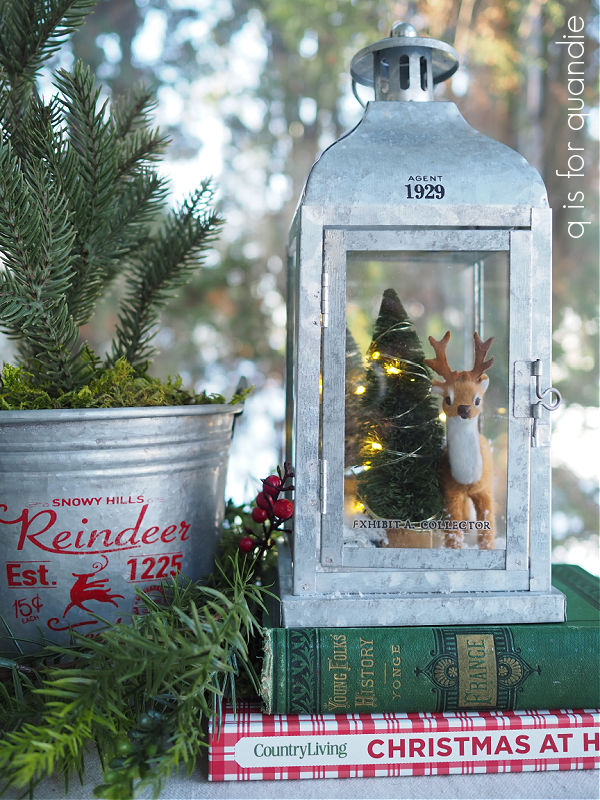
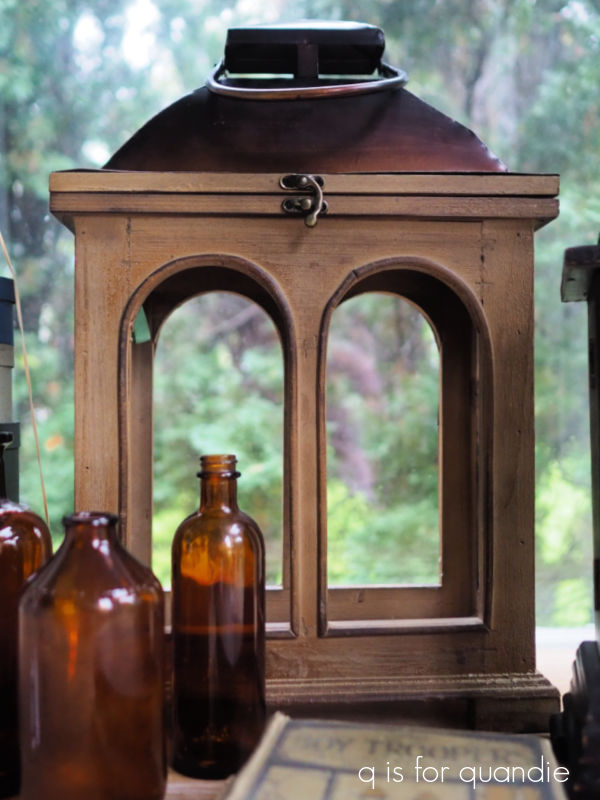
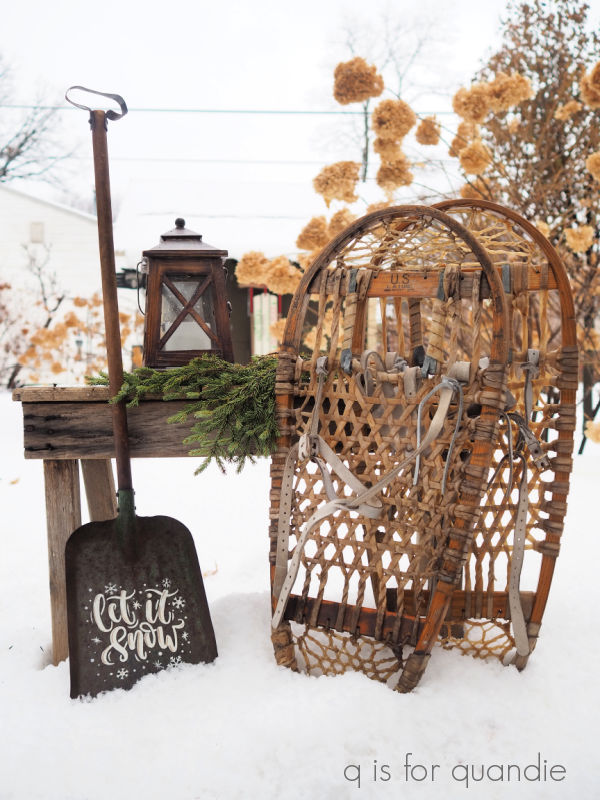
I’ll be bringing this lantern in priced at $32.

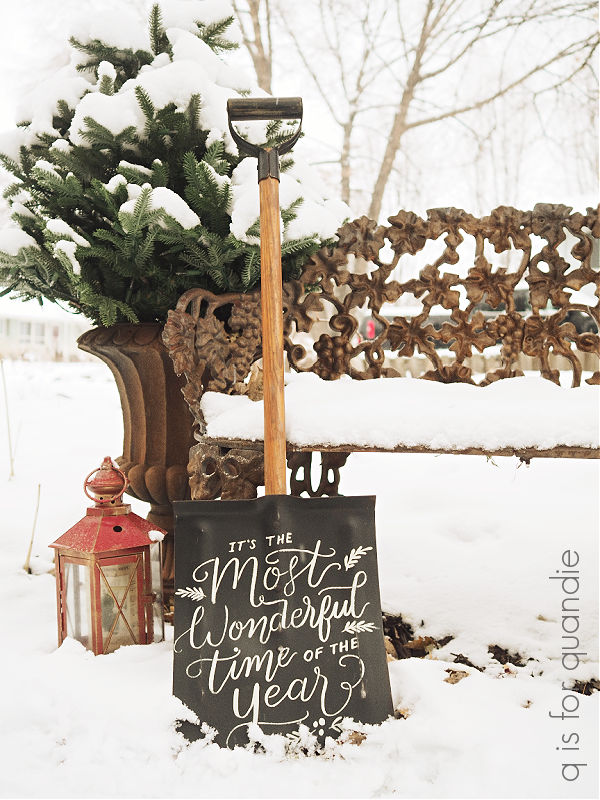
I have this ‘let it snow’ kid sized vintage shovel, which I actually painted up last year and kept for myself.  But I’ve decided to let it go this year for $45.  It is 34″ tall.

Speaking of things I kept last year, but am going to bring in to the shop this year, this sign falls into that category too.

This one is 13″ tall by 28.5″ wide and also $45.

I’m willing to part with these petite vintage ice skates for $25 …

and this adorable lantern (on right) for $26.

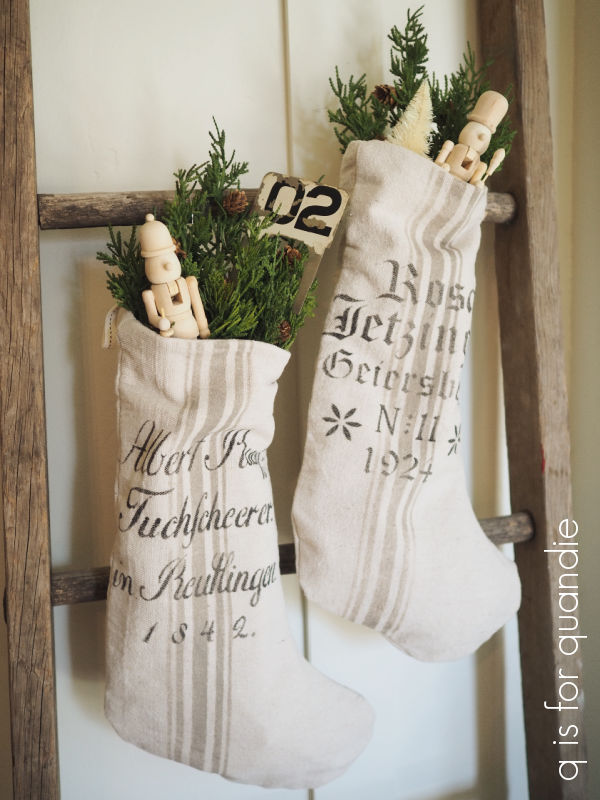
I also have a few faux grain sack stockings leftover from last year.

I’m marking them down to $11 each, so I’m hoping they sell this time around.

Next up is a random cutting board that I had in my stash.  I painted it in Dixie Belle’s Drop Cloth, and then I trimmed up an image from the I.O.D. Candy Cane Cottage transfer set to fit.

Super simple, and pretty cute, right?  It’s for sale at $18.

Did I also mention that I didn’t just buy one of the Candy Cane Cottage sets?  I bought two just in case I really loved it, and they sold out quickly.  Turns out it was lucky I did that, they are already sold out and pretty much impossible to find.

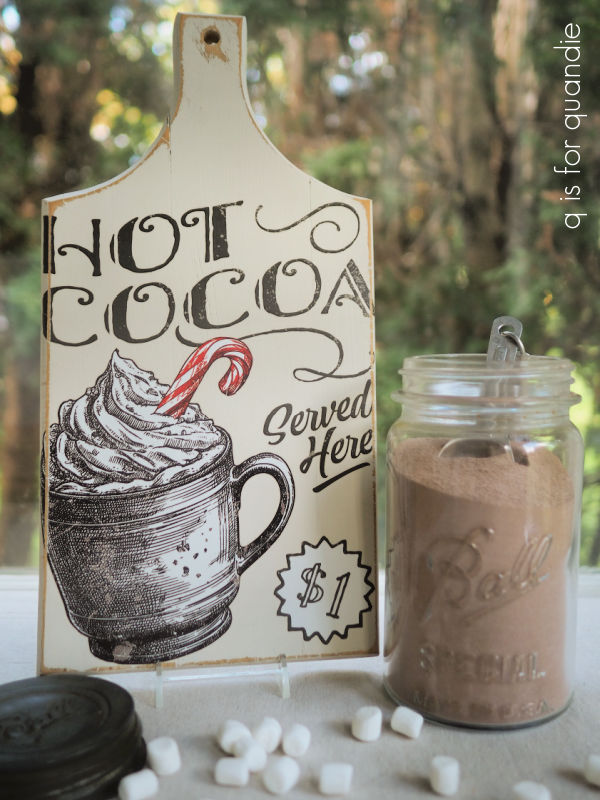
I put that same Hot Cocoa design from my 2nd set on a vintage gingham tray that I had on hand.

That gingham pattern kind of messes with my camera’s ability to focus, but I promise, in person it looks good and it’s priced at a mere $12.

I also used the Grandma Kringle’s Candy Canes design on a vintage enamelware coffee pot.

Once again I had to trim off a little bit of the design in order to get it to fit my piece, but that was easy enough to do.

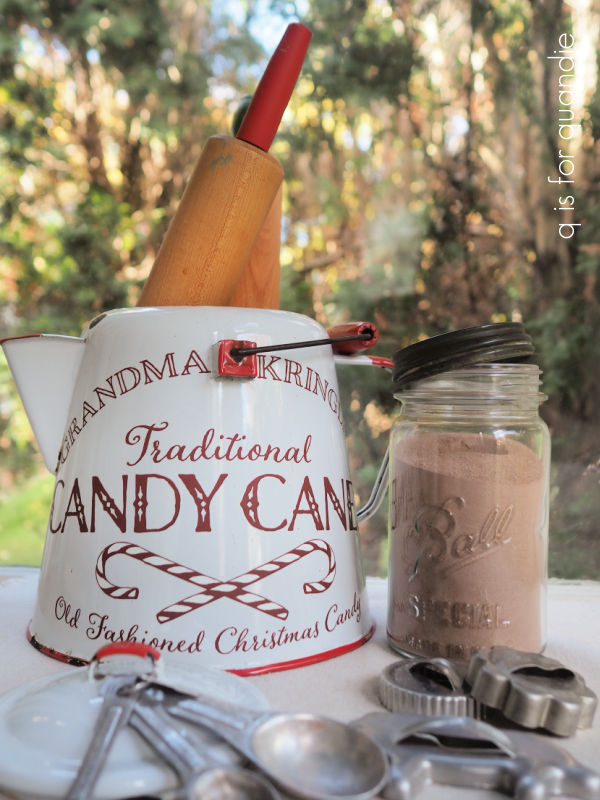
The candy cane coffee pot is priced at $25 (and FYI, both of the rolling pins in it are for sale at $10 each).

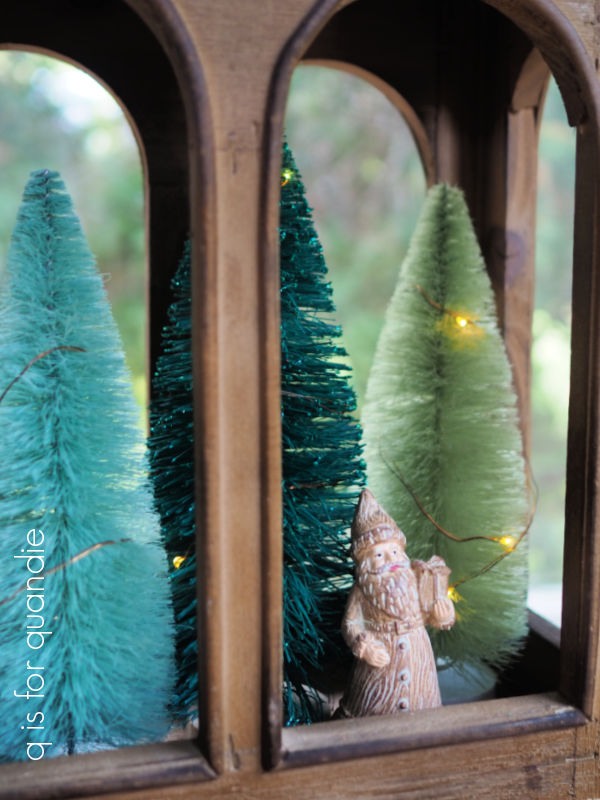
Next up are some bottle brush trees that I dressed up by adding them to vintage silver pieces.

I tucked some battery operated fairy lights into some of them, the battery pack just slipped right inside the silver piece.  Those with lights range from $18 to $22, those without lights are $16.

I also did some bottle brush trees in vintage door knobs, priced at $12 each.

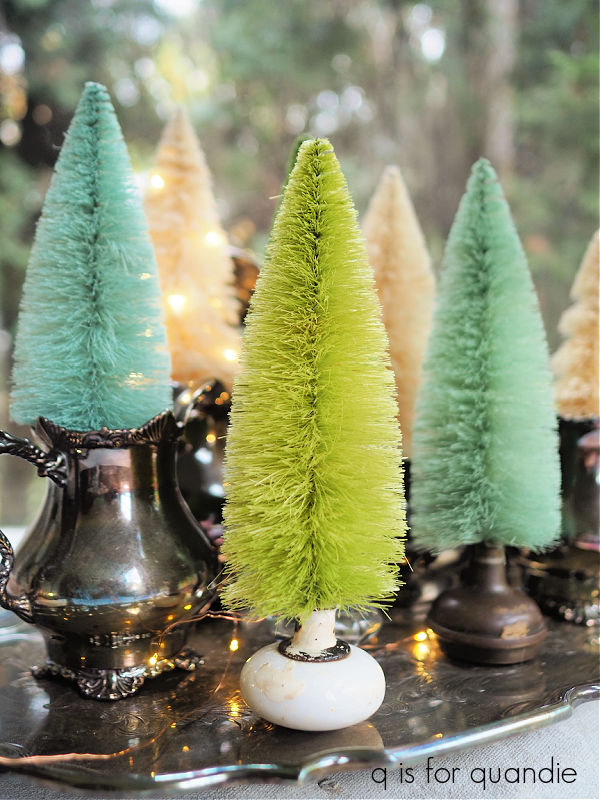
They all look festive grouped en masse on a large silver tray (priced at $24).

And there you have it.  Most (but not all) of my holiday merch.  I’ll still be working on some fun holiday projects and sharing them here along with some more detailed posts about a few of the items shown above.

If you locals (Twin Cities, MN) are interested in purchasing any of the items (other than the first five that are already at the shop), be sure to leave a message here or send me an email at qisforquandie@gmail.com.  I’ll try to modify this post to mark items as sold if they get spoken for.  First come, first served, and you may want to act fast because I’ll be delivering these to the shop next Wednesday.  I should also note that I don’t always see the emails right away, so your best bet is to leave a comment here.

the candy cane toolbox.

Remember back when I said I prefer to work with vintage toolboxes rather than newer ones?

Well, there are always exceptions to every rule, right?

Today’s toolbox was not especially old.

Nor was it in the usual rusty and/or crusty condition.  Which is kind of a bonus really.  It didn’t take a whole lot of prep to get this one ready for paint.  I washed it and then gave it a coat of Dixie Belle’s clear B.O.S.S.  No sanding required.

And really, I probably didn’t even need the B.O.S.S. on this one.  But at the time I was prepping a whole bunch of toolboxes, sort of assembly line style, so I B.O.S.S.’ed them all.

I decided to stick with the red on the inside of this one, just giving it a fresh coat of Dixie Belle’s Honky Tonk Red.

Once that was dry, I added a candy cane transfer from I.O.D.’s Candy Cane Cottage inside the lid.

Next up I painted the exterior of the box in Dixie Belle’s Drop Cloth.  Then I started cutting up different elements from Candy Cane Cottage to see what I could come up with for the outside.

Rather than immediately rubbing transfers on as I chose them, I decided to place everything first to see what would fit.  That way if I needed to overlap some elements I could be sure to apply them in the right order.

This time around that only ended up impacting one spot, where the word “Old” overlaps the floral under it a bit.

If I had put down the wording first, I could have rearranged the floral so that it didn’t cover it, but in the end it’s easier just to do a little pre-planning.

Those florals were the sole reason I ordered this particular transfer.

They are such a pretty combination of floral and holiday with those red berries.

As I mentioned in a previous post, I only wish these images were larger.  I used the two larger florals included with the transfer on either side of the toolbox, and then supplemented those with two of the smaller florals on each side.

By the way, I should probably mention at this point that this limited time only transfer is sold out everywhere.  If you didn’t order it immediately upon release, you likely missed out.

I also added some wording from Candy Cane Cottage to the top of the toolbox.

I think it turned out pretty dang cute.

Now, you might be wondering, what in the world would you do with a Christmas themed toolbox?

Well, how about keeping your gift wrapping supplies in it?  Scissors, ribbon, tape, bows, etc.

Or, you could just use it as decor, placing it on a shelf or table top, or even just under the tree.

But I also really like the idea of filling it up and using it as a gift box.  Remember the toolbox I created a few years back as a Secret Santa gift?

This one would be perfect to fill up with the same sort of stuff.  Some peppermint schnapps, peppermint sticks, hot chocolate mixes and some fabulous retro shot glasses; everything you need to make a peppermint patty (the drink, not the candy).

Whatever you’d use it for, it is available for local sale so be sure to check my ‘available for local sale‘ page for more details if you’re interested.  Be sure to act fast if you want to pick it up, I’ll be bringing this one into the shop on Wednesday.

Also, be sure to leave me a comment and let me know if you’ve used the I.O.D. Candy Cane Cottage transfers, and if so, how did you like them?

to paint, or not to paint?

To paint, or not to paint?  That is the question.

And it’s one that I often struggle with.

I don’t like to destroy an authentic patina that took decades to develop by painting over it.  In fact, I often cringe a little inside when I see other crafters doing exactly that.

But then again, things almost always sell better for me if I paint them.

And that brings me to ice skates.

Wait, what?  Ice skates?  Surely I’m not losing sleep over whether or not to paint vintage ice skates, am I?

Well, let’s look at some ice skates I’ve shared in the past.

The first skates I ever painted were these pretty pink ice skates back in 2017.

So sweet, right?  Well, here is the before photo of them …

Painting those felt like a bit of a no-brainer.

Flash forward to 2019 when I added a floral re.design with prima transfer to some skates after freshening them up with some of Dixie Belle’s Drop Cloth.

I LOVED how those turned out!

So then I repeated that idea back in 2020 with this pair of skates.

I considered both of those pairs of skates to be your basic outdated 80’s or 90’s ice skates with no vintage value whatsoever, and probably no real practical value as functional ice skates either.

They both looked pretty much like this before I painted them …

But then there are the skates that I really don’t think should be painted, like this pair that my friend Sue sold at one of our Carriage House sales …

I also have this pair of skates in my stash that I used to stage a photo last year.

I changed out the laces for some alphabet twill ribbon, but otherwise left them ‘as is’.

That brings me to my current stash of skates.  I have one pair that I’m not sure I should paint …

They aren’t quite as fabulous as the pair that Sue had, but they do have a certain aged patina that I like.  What do you think?  Should I paint them, or should I leave them alone?

Before you answer that question, let me share another pair from my stash that I recently painted up.

After giving them a good wash with a damp rag and some Dawn dish soap, I gave them a coat of Dixie Belle’s Drop Cloth.  It just took one coat to freshen them up enough to add some transfers.

Then I pulled out the remaining remnants from my Dixie Belle Evergreen and Holly transfer.  I’ve mentioned this transfer quite a few times lately, mainly because it was a limited release for last year and now it can be pretty hard to find (although there are a few still out there).

I had a few bits of holly left from mine, so I decided to use them on the skates.

But I needed to fill in more space, so I also pulled out DB’s Vintage Post transfer.  I used a combination of Vintage Post and Evergreen and Holly together last year on a lock box and I really liked how they worked together.  Once again, they combined beautifully.

In case you’re wondering, I left the opposite side of each skate plain.

I figure most people are going to display these hanging from a sled, or maybe hanging in front of a wreath on the door.  In other words, only one side of each skate will really be visible so I didn’t want to waste my resources (ie. transfers).

Once I had all of the transfers applied, I added a coat of Dixie Belle’s Big Mama’s Butta over the skates to add some protection.  That being said, they would not be terribly weather proof.  I would not display them outside in an unprotected area.  You could put them on a covered porch though.  The cold won’t hurt them, but too much moisture might.

While I was working on painting and applying transfers, I had the original laces for these skates soaking in some OxyClean.  But when I pulled them out I realized that they weren’t really salvageable.  They were quite frayed, and they also had some rust stains that wouldn’t come out.

So I decided to add some velvet ribbon as laces.

I found some wonderfully frayed green velvet ribbon at Hobby Lobby that was perfect for the job.

After a bit of hesitation, I have decided to sell this pair of skates (I was really tempted to keep them!), but I can always make another pair for myself if I just can’t live without them.

So be sure to check my ‘available for local sale‘ page for more details if you’re interested (sorry, I don’t ship my items so you have to be local).  I’ll be bringing these into the shop when I get back from visiting my mom, so speak up soon if you want them!

Thank you to Dixie Belle Paint Co for providing the paint, Big Mama’s Butta and transfers used on these skates.

need some holiday inspiration?

As I think I may have mentioned, my sister and I are off visiting our mom this week (she lives just outside Las Vegas).  Mom’s birthday is on Halloween!  So we thought it would be nice to fly out and spend her birthday with her.

Initially we were just going to hang out at her house, but then we decided to take a road trip to Zion National Park.

It’s only a little over two hours away by car and we’ve never been.  So why not?

While I’m off enjoying some hiking in Zion, and soaking up some sunshine in Vegas, it is rapidly moving from fall into winter back home.  My biggest complaint about fall is that it’s always too short.  The forecast this week at home calls for highs in the 30’s, and the possibility of snow on Tuesday.  Ahhhh, trick or treating in the snow, how fun.

Since fall is over and winter is here, I thought you all might appreciate a little inspiration to kick off your holiday crafting season.

So, let me direct you to the right hand side of the page (if you’re reading this on a computer screen) just below the search box, but above the thumbnail photos, you’ll find the word ‘sorted.’ with a box below it where you can select a category.  Scroll through to ‘happy holidays.’ and click on it.

This will bring up all of my holiday related posts.

You may have to skip one or two posts about painted pumpkins, or a Valentine’s Day toolbox, but for the most part this category is filled with Christmas decor ideas.

Just start scrolling to find inspiration for stenciling Christmas stockings.

Or making your own Christmas gift wrap, either with paint and stencils …

or with stamps …

You can get inspired to dress up a pair of ice skates …

and you’ll find lots of ideas for stenciling a sled.

Or stenciling a wooden box for your Christmas tree.

You could always choose to add an I.O.D. paint inlay to your crate instead.

I’ve got a few ideas for adding a winter vignette to a lantern.

And loads of ideas for turning cast off cupboard doors (find some at your local Habitat for Humanity ReStore) into pegboard signs.

And of course, you could always turn a headboard or foot board into Christmas decor as well.

And don’t forget those kid sized chairs!

They are perfect for the addition of a stencil, transfer or paint inlay!

As are little stools.

It’s always fun to dress up an old kid sized snow shovel too.

Now, just to help you out a bit and encourage you to get in the mood for Christmas, I thought I’d give away some of my favorite paint.  Almost every painted project I’ve shown here was painted in Dixie Belle’s Drop Cloth, Caviar, Honky Tonk Red and/or Evergreen.

So here’s a chance for one lucky winner to try out all four colors!  I’m also including the Country Living Christmas Spectacular which has 136 ideas for a festive season.  OK, the truth is I purchased this magazine for myself only to find out that all of the articles inside were also included in their Christmas at Home book, which I also have.  So I’m passing the magazine on as part of this giveaway.  It really does have some great ideas inside though!

The rules for today’s giveaway:  Simply leave a comment on this blog post (and please forgive me if I don’t respond while I’m out of town, but know that I read and appreciate all of them).

Your comment must be left on this blog post, not on Facebook or Instagram.  You are not required to follow my blog, or follow my Facebook or Instagram accounts, although it would be awesome if you did!

I will randomly draw the name of a winner for today’s prize from all of the comments left on this post by Sunday, November 5, 2023 at the stroke of midnight (U.S. Central time).

The fine print: no purchase necessary, you must be 18 years of age or older to win, void where prohibited by law, the number of eligible entries received determines the odds of winning, approximate retail value of prize is $160, if the prize is not claimed by Friday, November 10, 2023 another name will be drawn at random to win, blah, blah, blah.

the other half.

I’ve been working on refining my non-collection of ironstone lately.

I have a fair number of pieces, and my Welsh cupboard was getting rather full.

I went through my stash and pulled out some pieces that could go.  While I was pricing them up for the shop, I thought maybe it would be nice to have a way for them to easily display them and potentially move them around if needed without too much effort.

So I went out to the carriage house to see what I had that might work and I came across this wooden caddy.

As you can see, it was nothing special ‘as is’.  Just something a handyman whipped up out of plywood, probably to hold tools of some kind.

After giving it a good cleaning, I decided to paint it in Dixie Belle’s Coffee Bean.

I’d recently been watching a YouTube video where the creator was using this color and called it a ‘warm black’.  Hmmmm.  I’d never thought of it that way.  To me it’s always been a dark chocolate brown.

As you can see, my jar of Coffee Bean is well used.  But not being a huge fan of brown, I’ve only ever used it as a base coat underneath another color or as the dark shadow color for a stencil.  But after hearing it called a warm black, I’m seeing this color with new eyes.  Maybe it does deserve its moment in the sun.  So I pulled it out and added just one quick coat to the caddy.

I can certainly see where someone might call this color a warm black.

You might just start seeing me use a bit more Coffee Bean now.

Once the paint was dry, I pulled out that 2nd sheet from the Harvest Hues transfer that I used on the tackle box I shared on Monday.  Remember?  It’s the one that I damaged by allowing it to roll up on itself.  But luckily, the undamaged portion was just long enough to fit the side of this caddy.

Plus the transfer was tall enough that I could cut it in half lengthwise and put it on both sides.

I also had a few random pieces that could wrap around the corners.

After adding the transfer, I sanded the edges of the caddy to distress them and then used Dixie Belle’s Easy Peasy spray wax to seal everything in.

All that was left was to fill it up with ironstone.

I thought this pretty covered casserole with its wheat design was especially appropriate for fall.

The caddy itself is for sale, as is all of the ironstone.  I brought it all in to Reclaiming Beautiful on Wednesday.  So if you’re in need of a few more ironstone pieces or a warm black wood caddy, and you’re a local, stop in to the shop this weekend!

random garage sale finds.

First up, I realized that I hadn’t mentioned that I drew Marguerite’s name as the winner of my Peachy Keen giveaway, so congrats to her!

Next, I also realized that it’s been a while since I posted about any of my garage sale or thrift store finds.

In fact, I checked back and I think the last post about a garage sale item makeover was back in August.  Seriously, how in the world does time go by so quickly?

Well, despite the fact that almost two months have gone by since I last posted some finds, I have been getting out to garage sales nearly every week (not counting two weeks of traveling, and then a week of covid) with my friend opK.  I don’t seem to be bringing home any major hauls, but I have found a couple of things here and there.  It just never seems like quite enough stuff for a complete blog post.

For example, here’s my ‘haul’ from last week.

See?  Not too exciting.

But let me share a bit of what I’ve done with some of these pieces.

Let’s just start with the stack of shaker boxes.

You know me, I have a problem resisting boxes of any kind.

The colors on these were a bit dated though, and I’m not sure anyone needs a complete stack of 7!  So I decided to break them up into two sets, and give them an ombre paint job in shades from white to gray.

I started with the 4 smallest boxes.

They are all painted in Dixie Belle paints, starting from the top of the stack and working down I used Drop Cloth, Sawmill Gravy, French Linen and Hurricane Gray.

I added random bits of various transfers to the front of each.  I had to search a bit to find sections that were small enough for these little boxes, but I used some of re.design with prima’s Classic Vintage Labels, and some of I.O.D.’s Traditional French Pots.

I also added a sweet little bee from re.design with prima’s French Labels to the top box lid.

I painted the larger 3 boxes in a similar fashion using the three lighter colors, and then found transfers to fit on them as well.

These scraps came from the same sets, along with the bits on the bottom two boxes that are from the small version of the Seeds transfer from prima.

I know it’s often difficult to really tell the size of items in photos, especially when there isn’t anything shown to provide scale.  The biggest box is 7″ across, and the smallest is a mere 3″ across.

As I was looking around for items to stage them with, I realized that the smaller boxes would be pretty adorable on top of one of my mini dressers.

How cute is that?  I may just have to keep those now.

Next up, you may have noticed the trio of amber bottles I found.

I knew I could give these a quick update with some faux apothecary labels.

Um, but wait a moment, didn’t I have three of them?  Yeah, I broke one of them while washing them up.  Drat.

After washing them, I used Mod Podge to add some faux labels.  I shared this quick process and a source for a .pdf of the labels in a post back in February (here).

Next up, how about that clock?

It doesn’t have a lot going for it as a clock, but when I opened it up I realized that the clock face and mechanism would come right out leaving a cool little shadow box.

So I pulled that out, then painted the outside in Dixie Belle’s Drop Cloth.  Then I freshened up the inside with a coat of their Caviar.  Once dry, I added a small stencil to the inside back.

This stencil is from a pack of 6 x 6″ stencils that I ordered on Amazon last year for a few projects.  Unfortunately, when I went to share the link for them I found that they are currently unavailable.  I’m sure you could search out other small Christmas themed stencils though.

Anyway, after adding the stencil, I placed some bottle brush trees and a cute little carved reindeer inside the shadow box, and lit them all up with some fairy lights.

So cute!  Having that stencil in the background really adds some dimension to the piece.

I did feel like the front needed just a little bit of quandification though, so I added some Tim Holtz transfers.

Last up is the lantern.

I liked the raw wood look on the sides, but the metal ‘roof’ looked a bit cheap up close.

So I decided to use some of Dixie Belle’s Patina Paint to give it more depth.

I started by painting the top with a base coat of DB’s Caviar (black chalk paint), then I painted on two coats of their Iron paint followed by the Green Spray to create a rusty finish (for a full tutorial on this product, check out this post).

Ahhh, so much better!  To get that texture I stippled the paint on rather than brushing it.  I advise doing that if you don’t want to see brush strokes in your finished look.

Next up I added some bottle brush trees with fairy lights inside the lantern.

Along with a little carved Santa.

The lights I had on hand ended up being a bit wonky, so I’m going to have to get some more fairy lights for this one.  But you get the idea.

I’m in the midst of getting a lot of my Christmas merch ready for the shop, and most of what I’ve shared in this post will be heading over there soon!  I’m trying not to rush the holiday season, but I have several really cool holiday projects completed already that I’m dying to share with you guys.  So be sure to stay tuned!

the merry fairy box.

OK, I know it’s too early for Christmas.  But for those of us who make things to sell, we have to get going on that now.  I find that November is the best month for selling holiday decor, and guess what?  That’s next month already.  Yikes!

Anyway, remember my holiday themed toolboxes from last year?

My favorite was this one.

I actually ended up keeping it.  I love the subtle nod to Christmas with the poinsettias and the red typography.  It doesn’t scream Christmas with candy canes and Santa Claus, and that’s what I like about it.

This is another one from last year …

I used some of that same Christmas floral transfer, Evergreen and Holly, from Dixie Belle.

Unfortunately, that transfer was a limited time only sort of deal.  They don’t have it anymore, and as far as I can tell they aren’t coming out with a new one for this year.

So I have been searching high and low for something similar to use on some toolboxes that I have waiting in the wings for this year.  But everything I’m finding is coming up short.

I did order the Holly Jolly Xmas transfer from redesign with prima, but those designs are a bit too big to fit on a typical toolbox.

When the new I.O.D. holiday release came out, I was super excited about a couple of their new holiday transfers; Candy Cane Cottage and Fairy Merry Christmas.  So I ordered those too.

I noticed that the sheets they came on were a bit smaller than usual, but I figured they’d still be perfect for toolboxes.  But I was wrong.  Or at least sort of wrong.  A few of the elements are a good size for toolboxes, but many of them are just way too small.  Plus, I’m mainly interested in the florals, which are absolutely gorgeous, but again, quite small.

All in all, I’m pretty disappointed.

But that being said, I am going to try to find ways to use them … maybe just not on toolboxes.

That brings me to today’s project.  I have a stash of various recipe or card catalogue type of wooden boxes.  So I decided to paint one up that was just the right size for one of the images from the Fairy Merry Christmas set.

I painted the box in Dixie Belle’s Cactus, and once dry I added a merry fairy to the top.

Sweet, right?  But maybe not 100% my cup of tea.  I love the delicate look of the holly, and boy oh boy do I wish they had some transfers that were just sprigs of that holly!

The closest thing to that in this transfer set are the three wreaths that are included.

Two of which are a mere 6″ wide and tall.

I really wanted to use more of those pretty holly elements on this box though, so I ended up cutting up one of the wreaths and re-arranging it around the front of the box.

I think I did a pretty good job of disguising the fact that it was originally wreath shaped.

I chose to add another of the merry fairies inside the lid of the box.

Now, don’t get me wrong.  I do think these transfers are very pretty.  I love the subdued color palette, and the artwork is beautiful.  I just wish they were more suited to my needs.  Selfish of me, I know.

I think this transfer would be perfect for making gift tags, or maybe small wooden Christmas tree ornaments or something.  And who knows, maybe I will end up doing something like that with some of them.

Certainly, this little box turned out nicely.

But I sure do wish I could find another Christmas floral that I like as much as I liked that Dixie Belle Evergreen and Holly!

How about you?  Do you have a favorite Christmas transfer?  Any suggestions for one that might work on my toolboxes?  Leave me a comment and let me know!

a pile of painted pumpkins.

Is it too soon for pumpkins?

I think so.  However, sometimes I feel like I have to jump on the bandwagon simply because I plan to take some painted pumpkins to the shop, and many shops (ie. Hobby Lobby, Target, Marshall’s, Home Goods, etc) were already decked out for fall several weeks ago.  I actually feel like I’m behind on fall décor!

In addition, we have a big trip coming up!  Have I mentioned that yet?  Remember way, way back in 2019 before Covid?  We had booked a European Capitals cruise.  When the Covid thing started in early 2020, I remember thinking ‘oh, this will be over long before our fall trip‘.  Little did I know that it would be four years before we managed to get back to Europe!

But we’re finally going!  This time my sister, niece and nnK’s brother are all joining us.  We’re spending six days in Amsterdam, followed by a 7 day cruise around Norway.

Anyway, that means I need to get a jump on seasonal fall stuff because by the time we get back from that trip I’ll need to get started on Christmas décor!  LOL.  Good gracious … that’s actually true though, I definitely have to get a jump on that.

So let’s take a look at some painted pumpkins.

Last year I picked up a variety of faux pumpkins at after-holiday bargain prices.

Most of them are white, but three of them are paper mache.

My original plan was to paint the paper mache pumpkins, and the medium-sized bright white pumpkins (those bright white ones were particular plastic looking).  I left that large creamy white pumpkin alone, that one is going to go outside in the garden later in the fall.  I was also planning to leave the smallest creamy white pumpkins ‘as is’ and use them to fill a bowl or other container at my own house.

But then I was thinking about some re.design with prima Middy label transfers that I ordered a while back, and they were the perfect size for the smallest of the pumpkins, and before I knew it, I’d added them to almost all of the little pumpkins.

I know, they aren’t exactly fall colors.  Nor are they really fall-ish looking designs.

But if you’re not into the traditional orange, these might be a good alternative.  The blue transfers are from the Vintage Labels I set, and those in the next photos are from Vintage Labels II.

The prima website calls the color a soft, warm grey.  Hmmmm.  They definitely read as a lavender to me.

I painted the three larger paper mache pumpkins, and the three creamy white mid-sized pumpkins in three different Dixie Belle colors, Dried Sage, Sawmill Gravy and Sea Glass.  I didn’t do any sort of prep before painting, and you don’t really have to when using the Dixie Belle chalk style paint over a non-smooth, non-glossy surface, and the pumpkins qualified.

I love the two that I painted in Sea Glass.

Totally not a traditional fall color, I know.  I turned the stems on them gold using some of Dixie Belle’s Gold Gilding Wax.  The combination of Sea Glass and gold always feels very ‘Louis XIV’ French’ to me.

I also added DB Gilding Wax to the stems on the other two medium sized pumpkins, only in the Bronze color.  I felt like the original stems looked really plastic in their original speckled green color.

The bronze worked beautifully with the Dried Sage

Applying the transfers to an uneven, rounded surface can be a little bit tricky.  But, I don’t think they have to be perfect either.  If you look closely, some of them may be a bit on the wonky side.  But I think that just adds to their charm.

I added another of the blue transfers to the medium pumpkin that was painted in Sawmill Gravy.

The paper mache pumpkins both ended up with French labels.

The transfer on the left is an old I.O.D. French Pots transfer (back when they were still grey rather than black), and the one one the right is from the Classic Vintage Labels from re.design with prima.  By the way, that photo does a better job of showing the paint colors with Sawmill Gravy on the left, and Dried Sage on the right.

I tied some velvet ribbon around the stems on these two rather than gilding them.

I finished off all of the painted pumpkins with some clear wax to add a little bit of protection, but still, these are only suitable for indoor use.

This was a fun little project for a rainy afternoon, and you can find these sorts of faux pumpkins at any craft store.  But if any of you locals don’t have time to create your own, I took these in to Reclaiming Beautiful in Stillwater this week.  You can always swing by and pick one up!

Thank you to Dixie Belle Paint Co for providing the paint used on these pumpkins!