an onion by any other name.

Since quite a few of you liked the idea of Sunday mornings in the garden, I’m going to give regular Sunday garden posts a go.  So grab a cup of coffee and let’s talk onions.  I bet you didn’t think I’d start out with onions!

True, the Allium genus includes onions, leeks, garlic and chives …

I’m sure most of you are familiar with your basic chives.  I love cutting them fresh to sprinkle on baked potatoes, and recently Mr. Q added them to an omelet he made for our dinner.  But they aren’t a particularly pretty plant, are they?

Instead, I want to share ornamental Alliums with you today, and they are a pretty plant … and more importantly a really cool flower.

I had been gardening for quite some time before I discovered ornamental Alliums.  But now that I have, I absolutely love them.

I grow two types of ornamental Alliums, those that are planted as bulbs in the fall and those that are herbaceous and have a large root ball (and you can plant them any time in the growing season).

The bulb Alliums have foliage that comes up in early spring, produces the flowers, and then dies back to the ground after flowering.  Sort of like a tulip or daffodil.  In my zone 4b garden, these Alliums bloom in late May to early June and by now there is no trace of the plant left in the garden … unless I have left the flower stalks in place to dry.

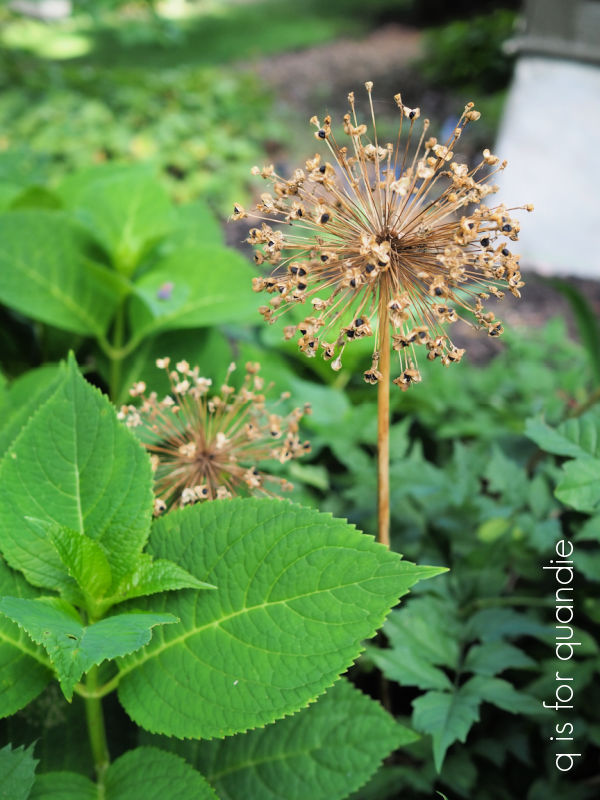
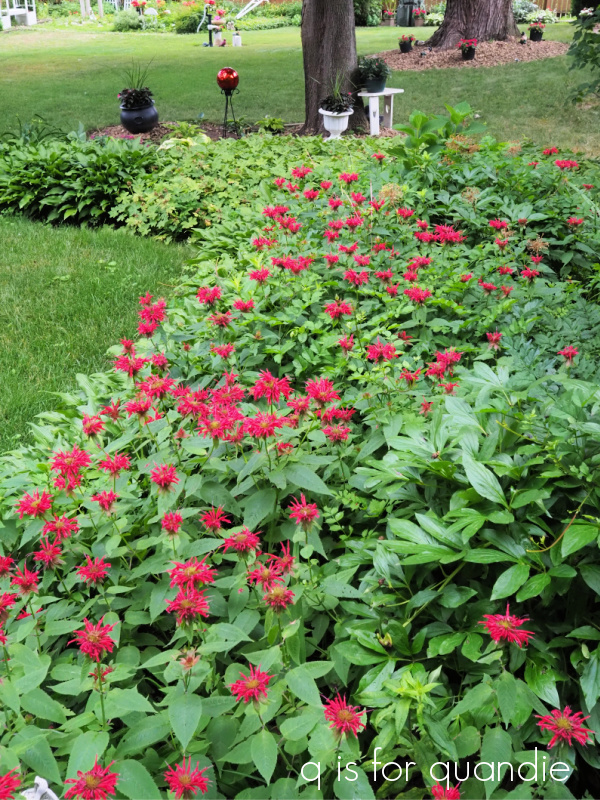
Just in case that photo is confusing to some, none of the green plants around those dried flower stalks are the Allium, those are other plants.

Once dried, which usually just takes a few weeks, I pull the Allium flowers out and store them until late fall when I use them in my winter floral arrangements (much like the Astilbe that I mentioned last week).

The bulb Alliums are fantastic for intermixing with other perennials that will bush out after the Alliums are done and fill in the space around them.  I have mine planted with peonies, hostas and iris.

I have had great success with my bulb Alliums, the only maintenance they really require is removing the foliage once it dies back which is pretty effortless.  Most of mine are planted in partial sun, which seems to be working fine, but they can handle full sun.  And actually, I have some success with the bulb form in spots under deciduous trees where they get more sun until the trees leaf out.  Mine have been multiplying over the years, but I wouldn’t consider them invasive in any way.  In addition, much like my sister, deer don’t particularly care for onions, so that’s a plus for me as well.

I didn’t keep track of what variety of Allium bulbs I planted years ago, but I suspect they are Purple Sensation, which is fairly common.

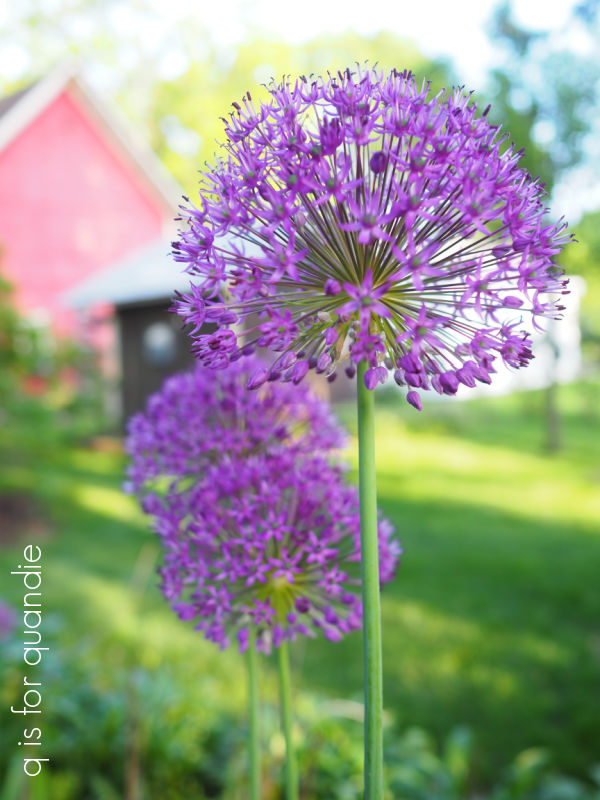
In addition to that fabulous purple, bulb Alliums can also be found in white, yellow, pink, burgundy, and blue.  They also come in a variety of heights from 8″ tall all the way up to a whopping 50″ tall, and with bloom times from late spring to early summer.

So if you plan right, you can have bulb Alliums blooming for a month or more.

You can find Allium bulbs for sale in late summer to early autumn along with the tulips and daffodils, but in my experience there isn’t a great variety to choose from at most DIY stores (like Home Depot or Menards).  There are usually a few more options at nurseries, but even they don’t seem to have a great selection.

For that reason, I went online and ordered some more unique varieties to plant this fall.  I’ll try to keep you posted on that process, whether or not I like the place I ordered from (Longfield Gardens, and FYI I borrowed that graphic above from them as well), how well they grow over the next year, etc.

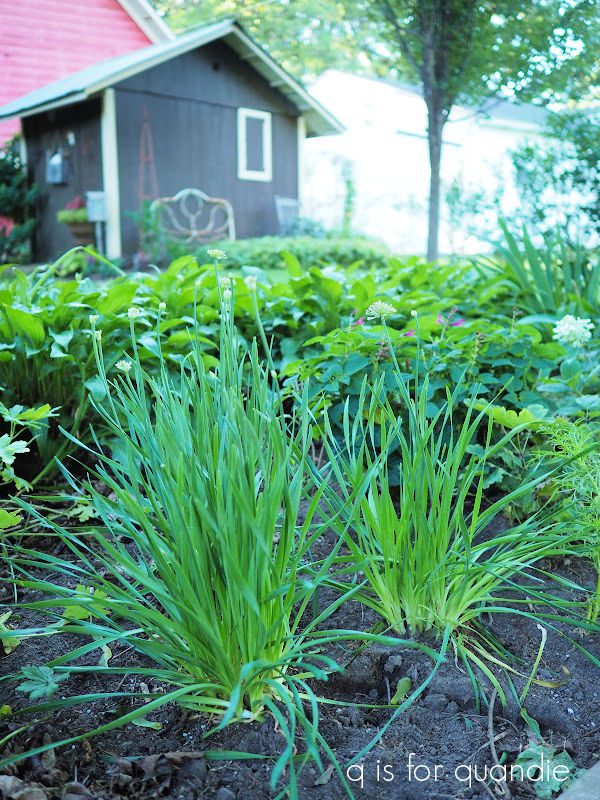
That brings me to the herbaceous Alliums, and these are blooming this week in my garden.

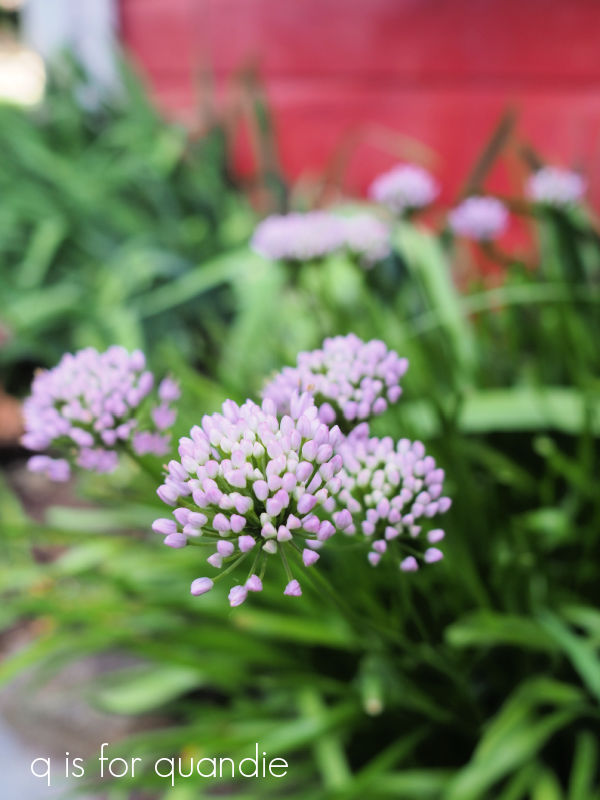
I have three varieties of the herbaceous form.  The one above is one that I purchased at a garage sale, and therefore I have no idea what it is.  I suspect it may be Millennium.  It has a lovely pale purple flower, and a nice compact form.

I recently planted two more varieties, Windy City

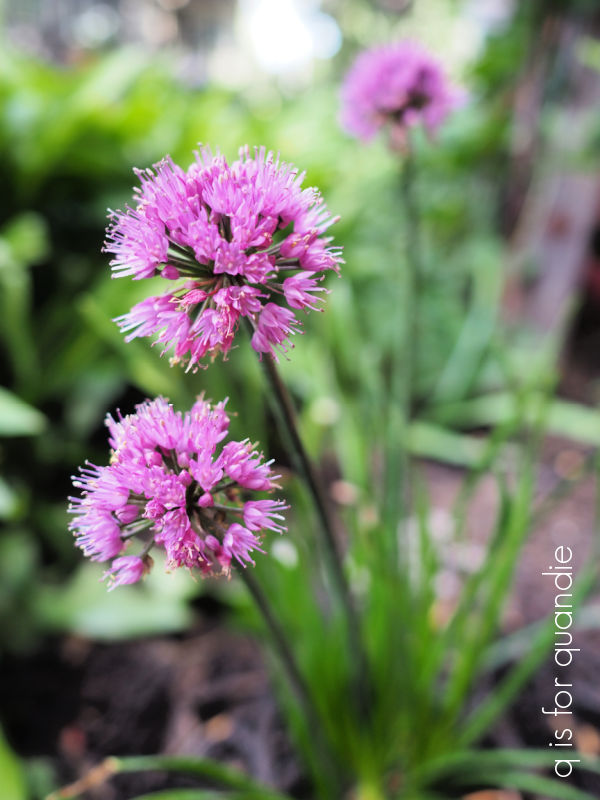
and Serendipity from Proven Winners …

This type of Allium plant grows more like chives, in a clump with foliage that stays green all season.  They tend to be shorter and with much smaller flowers than the more showy bulb Alliums.  Serendipity will get 15 – 20″ tall, Windy City will get 15 – 17″ tall.

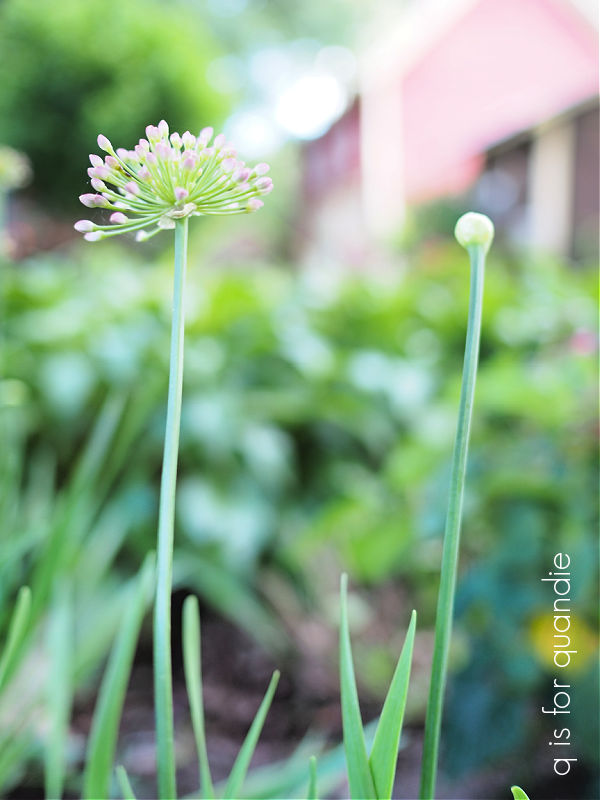
I just planted the Serendipity Allium this week (I found it at Home Depot), and it doesn’t look too spectacular just yet.

Eventually it should look like this …

Of course, time will tell if these two newer Alliums will do well in my garden, but I’m optimistic about them.

How about you?  Do you grow Alliums?  And if so, do you have any specific recommendations for the rest of us?  Or maybe a favorite variety?  And if you don’t grow Alliums, have I convinced you to throw a few bulbs in the ground this fall and give them a try?  Leave a comment and let us know.

the repurposed guest bed.

As I’ve mentioned, since furniture sales have slowed way down for me, I’m taking this time to focus on projects for myself that I’ve been putting off for a while (OK, maybe years in some cases).  Today I have a really fun one to share with you guys.  There is a bit of a long story behind this one, so you may want to refill your coffee before diving in.

Several years ago, Mr. Q and I swapped our guest room for his home office.  Prior to that, the guest room was the larger room, and his office was the smaller one.  We finally came to the realization that he uses his office every day, and we rarely have house guests.  It didn’t make sense to have the larger room going mostly unused, especially in a smaller home like ours where space is at a premium.

But switching to the smaller guest room meant getting rid of the full sized bed we were using and replacing it with a twin.  We actually traded the full sized mattress and box spring with my neighbor, nnK.  She took the full size, and gave us her twin sized versions.

That left us with a spare full size headboard and foot board (and side rails).  We stuck them up in our carriage house and there they’ve sat since 2017.

Now, you might be wondering why I didn’t sell the bed, so let’s go back a bit.  Here is the bed when it was part of the guest room.

Sorry, that’s the best photo I could find of the bed in its ‘before’ condition and it doesn’t even show the foot board, which is one of those ones that curve around the mattress.

There’s a little history behind this bed.  Mr. Q and I purchased our home around the same time that his great uncle’s estate was being divvied up.  We ended up with this bed, a matching dresser and a dining room set from Uncle Roy’s house.  This was back in 1988.  When we got the bedroom set, it was already painted.  I wanted to return it to the natural wood (that was the trend in the late 80’s), so I sent them off to be ‘dipped’.  Does anyone else remember that?  Maybe it’s even still a thing, I don’t know.  But basically your furniture is dipped in a large vat of stripper to remove the paint.

When we picked the pieces back up from the dipper, he explained that the manufacturer intended for these pieces to be painted.  This was obvious after they were stripped because they were each made out of more than one kind of wood, plus the ‘carved’ details were molded plaster, not carved wood.  So after all of that dipping, I had to repaint the pieces rather than staining and varnishing them.

Keep in mind, this was the late 80’s, I was still in my 20’s (ha, ie. a long time ago), I knew nothing about painting furniture!  So I went to the paint store and asked for help.  They explained that I should absolutely use oil based paint for durability (eeekkk! I can’t stand using oil based paint!), so that’s what I did.  I painted them in an oil based warm white.

Flash forward another decade or two.  I decided to redecorate and paint the pieces black.  I painted over the oil based paint with latex paint.  As you may be guessing, that did not hold up well over time.  That’s the reason I’m telling this rather long winded story.  It’s a cautionary tale of what not to do when painting furniture.  Do not paint over oil based paint with latex paint.  Over time it starts to peel right off, and that’s why I couldn’t sell this bed frame.  The black paint was peeling.  The only way to make this bed suitable for sale would have been to completely strip all of the paint layers and start over, and there is no way that would have been worth the effort.

So I stored it for a few years.  Last winter I thought I’d make the headboard into one of my Christmas signs (like this one).  I had Mr. Q bring it down from upstairs in the carriage house, and that’s when I drove over it.

LOL, didn’t see that coming did you?  But yep, it was leaning up against the wall in the carriage house and it fell over.  That’s where I park my car in the winter, and because the headboard is black and it was dark in there, I didn’t notice it on the floor and I drove over it.

That did a bit of damage.  So I put off working on this project once more.

And that brings me to today.  I finally had the time to work on this one, and I had a really cool plan for it.

I started with removing the plaster wreath from the headboard, and filling the giant crack I made driving over it with some of Dixie Belle’s Mud.

Next up I tried to remove as much of the peeling latex paint as I could, and then sanded the entire piece to prep it for new paint.

In an effort to improve adhesion, disguise an uneven surface, and create additional age with more layers of color, I next pulled out some Dixie Belle Sea Spray and The Gulf paint.

I mixed the two to create a brownie batter-like consistency and painted a coat of that on the headboard.

This was just an underlayer of color though, I painted over it with two coats of Dixie Belle’s Drop Cloth.  I purposely allowed both the black and the aqua to peak through in some spots.

Then I added the Gregory’s Catalogue paint inlay from I.O.D. (for a full tutorial on using the paint inlays, check out this post).

When using a large design that comes on multiple sheets like this one, I start in the middle and work my way out adding wet paint to each section as I’m ready to place that piece.

Be sure to follow all directions with these paint inlays, especially keeping in mind that it’s best to seal them with a spray sealer first rather than a brushed on finish (the paint of the inlay is easily reactivated with a water based finish and will smear).  So once I had the paper backing off and everything was dry, I sprayed my headboard with Rustoleum flat clear sealer.  Once that was dry I also added a couple of coats of Dixie Belle’s flat clear sealer over it.  Since I’ll be hanging this outside, I wanted to protect it fairly well.

Now, let’s look at what we did with the footboard.

Once again, I need to add a disclaimer here.  Since this project was a keeper for me, I didn’t go as all out as I would have if I intended to sell it.  Were I selling it, I would have asked Ken to build a proper box on the back of the foot board.  Instead I just had him add a shelf with a couple of legs at the back to support it.  My plan was to use this as a ‘planter’ by placing it up against the carriage house and putting plastic planter boxes on that shelf.

I painted the whole thing using the same process as the headboard, The Gulf with Sea Spray followed by two coats of Drop Cloth.

I then sealed the inside of the ‘planter’ with Dixie Belle’s Gator Hide.  Gator Hide is their most durable, water repellant finish.  Since I will be placing potted plants on that shelf, I know it will be getting wet so I’m giving it the best chance of holding up.

If you’ve never used Gator Hide, I will tell you that it has a bit more sheen than my usual flat finish.  Personally I’m not a fan of shine, so for that reason I only used it on the inside of this piece where it won’t show.  I used the flat Dixie Belle clear coat on the front.

If you’ve stuck with me so far, here’s where we are with this project.

I’ve hung the headboard sign on the carriage house between the doors, and placed the foot board planter beneath it.  All that’s left is to fill it up with plants.

I learned another valuable lesson here, or at least one that is worth sharing with my local readers.  Don’t go to Gertens first for your plants.  I purchased two small ferns for $14.99 ea, two white caladium for $18.99 ea, and two dark red coleus for $4.99 ea from Gertens.  Then several days later I went to Home Depot and found caladiums that were twice the size for $9.98 and a fern that was 4 times the size for $14.98.  I really wish I had checked Home Depot first!

Well, live and learn, and either way, I am loving this combination of shade plants for my foot board planter.

I’m relying on foliage for the interest and color in this north facing spot.

So, several weeks and … uh … quite a few dollars later, I have created a focal point with lots of impact at the end of my driveway.

I learned a few lessons along the way with this one; (1) don’t assume all painted furniture can be stripped and stained, (2) don’t drive over your headboard, (3) don’t paint over oil based paint with latex paint, and finally (4) check Home Depot for inexpensive plants before resorting to Gertens.

I won’t say this was an inexpensive project.  By the time you add in the cost of the board Ken added to create a shelf, the paint inlay and especially the plants, pots & potting soil, this one added up.  If I’d also had to buy the bed itself, plus all of the Dixie Belle products I used (two colors of paint, Sea Spray, flat clear coat, Gator Hide) … well, yikes!

But I sure am happy with the results.  It’s definitely a keeper.

What do you think?

Thank you to Dixie Belle Paint Co for providing all of their products used on today’s project.

same day service.

First up I want to thank everyone for the kind comments left on Monday’s post, thank you so much, those comments mean a lot to me!

Some of you may remember the black dresser that I worked on earlier this year.  When I brought the dresser home, it had a mirror on it.

I usually find that dressers sell better without a mirror, they are so much more versatile that way and can be used in more settings than just a bedroom, so I removed it.  Initially my handyman Ken and I tried to salvage the frame that held the mirror and keep it on the back of the dresser.

But in the end I felt like the scale of it was all wrong, so I replaced it with a plain, straight board.

I never like to just discard pieces like this, so I held onto it for a rainy day.  Recently I pulled it out of a pile of random furniture parts and decided to turn it into a pegboard sign.

Basically all I did was add a stencil …

some wooden knobs, and a picture wire on the back so it could hang on the wall.

And voila, a cute decoration for someone’s laundry room was born.

It’s perfect for hanging your vintage clothes pin bag, or some old advertising wooden hangers.

There’s just something about adding wooden knobs to function as pegs that elevates a stenciled sign.  When I saw a couple of Ziploc bags full of them at a garage sale for $2, I snatched them up pronto.

Now I’ll have plenty of them for some Christmas cupboard door signs.  Four of them were perfect on this piece too.

This was an easy way to give this discarded bit of trim a new life.

I’d keep this pegboard for myself, but I don’t actually offer same day service on laundry … how about you?

The laundry co pegboard sign is available for sale locally, be sure to check my ‘available for local sale‘ page for more details.

my 15 minutes of fame.

If, like me, you continue to be a big fan of farmhouse style, there is a new magazine out that you will love.  It’s called Farmhouse Home & Living and the premier issue is available in stores now (I found my copies at Barnes & Noble).

But the really exciting bit, for me anyway, is that I’m in it!

A while back, while I was on vacation in Charleston in fact, the editor reached out to me and asked if I would like to be included in their upcoming “Farmhouse Flips” story.  She had already chosen the piece she wanted to feature, my farm fresh honey washstand.

I was super flattered, and of course I said yes!

I didn’t have to do much, just send her some high res versions of my photos and give her permission to use them.

The magazine staff did the rest, and they did a fabulous job.  I have to laugh though, they got some of their info from my ‘about me‘ page, and reading it in the article made me realize that I hadn’t updated that page since I retired from the day job.  Whoops!

I’ve since rectified that on my blog, so we’re all good now.

By the way, if one of the things you love about my blog is that I don’t have any ads, you’ll love that about this magazine too.  No ads, just 97 pages of great farmhouse style content.

I thought it would be fun to celebrate my 15 minutes of fame with a giveaway!

I’ve included a copy of the magazine, one of my oil can photo holders, and a few of my favorite Dixie Belle Paint Co products; chalk mineral paint in Drop Cloth, Iron Patina Paint, Green Patina Spray and Easy Peasy spray wax.

The rules:  Simply leave a comment on this blog post to be eligible to win.

Your comment must be left on this blog post, not on Facebook or Instagram.  You are not required to follow my blog, although it would be awesome if you did!

I will randomly draw the name of a winner for today’s prize from all of the comments left on this post by Friday, July 29, 2022 at the stroke of midnight (U.S. Central time).

The fine print: no purchase necessary, you must be 18 years of age or older to win, void where prohibited by law, the number of eligible entries received determines the odds of winning, approximate retail value of prize is $125, if the prize is not claimed by Friday, August 5, 2022 another name will be drawn at random to win, blah, blah, blah.

Thank you to Dixie Belle Paint Co for providing their products that I’m including in my giveaway today.

sunday mornings in the garden.

Welcome to my new series to be posted here on Sunday mornings; a short (or maybe not so short) post about what’s happening in my garden each week.  This likely won’t continue year round, for obvious reasons.  I live in Minnesota and although snow can be pretty too, there isn’t a lot going on in the garden in January.  So we’ll just see how that goes.  Many of you seemed to enjoy my garden tour post last week, so why not make it a regular thing?

And on the plus side, for those of you with absolutely no interest in gardening, you’ll know to just skip the Sunday posts 😉

I do wish I’d thought of this in the spring instead of halfway through the growing season … but, here we are.  Better late than never.

The bee balm was blooming profusely in my garden last week.

This plant goes by a lot of names, the most popular being bee balm or bergamot, but its official name is Monarda.

I always think the flower looks like exploding fireworks.

Bee balm is in the mint family (the flowers and leaves are edible), and if you’ve ever grown it, you’d know that by the scent of its leaves.  And also by the way it spreads in the garden, much like mint, it can take over.

I have pretty much let mine run rampant in my back garden.  I have to confess that this is the garden in my yard that gets the least amount of love.  I think because it’s also the one that gets the most sun.  In my garden tour post last week I mentioned that I really don’t like gardening in the sun and it shows in this particular bed.  But at this point in summer, the bee balm is practically the only thing blooming in this spot so I’m OK with having lots of it.

I also have a rogue trumpet vine in this garden that so far I have been unable to eradicate.  It came with the house, so I’ve been battling it for over 30 years.  Oh, and P.S., this garden is on the border of our property, the white and black pots and the red gazing ball you see in the background are in my neighbor’s garden.  Obviously if those were my pots, I’d have turned them all rusty by now using Dixie Belle’s patina paint.

Bee balm comes in a variety of shades of red, pink, and purple-ish.  It also comes in a variety of heights.  My neighbor has one that is only about a foot tall, but the variety I have is 3′ tall.

Monarda is definitely a pollinator.  It attracts bees (hence the common name of bee balm), butterflies and other beneficial insects, and it also attracts hummingbirds.  I can attest to that because we often get hummingbirds visiting ours.  I’d love to be able to add a fabulous photo of a hummingbird in my garden here, but I’m never quick enough to get one.

Another pollinator plant that looked fantastic this week was my Astilbe.

I have three different colors of Astilbe in my garden; white, purple and one that started out as a peach color when I purchased it but has since reverted to a sort of sickly lavender.  The white has already gone over, and the lavender is just getting started, but the purple was at the peak of perfection this week.

I originally planted this Astilbe in a much shadier spot in my garden and it performed very poorly there.  The plant tag said it was a good choice for shade gardens, but I can tell you from experience that it does need some sun if you want it to get full and bloom profusely.

I moved it to our front northwest facing garden quite a few years ago and it does so much better now that it gets a lot of evening sunshine.  I’ve since divided it a couple of times, and I think I need to divide it again.  I was watching Gardener’s World recently and they said that Astilbe needs to be divided regularly to keep blooming.

Hmmmm.  Mine seems to still be blooming pretty good.

I have some ideas brewing in my head for expanding my gardens next year, so I may hold off and start dividing things next year to supply a new garden.

I mentioned that Astilbe is a good pollinator plant, and although I do see butterflies and bees on mine, the blooms are always loaded with tons of these little flies.

See them there?  I can see five of them in that photo.  I’m not super fond of those flies, whenever I water that spot they all fly up and swarm around which is kind of gross.  But they aren’t hurting anything so I try to leave them alone.

The Astilbe is planted right under my front window box, and I’ve discovered that the blooms combine beautifully with the purple and pink fuchsia and the dark purple sweet potato vine in the box.

One last note about the Astilbe, I often leave the flower heads on the plants to dry out.  Then I use them in my planters for winter.

So this plant does double duty for me.

Do you grow bee balm or Astilbe in your garden?  Or do you have another favorite flower that blooms in mid-July?  Leave a comment and let me know.  Also, be sure to let me know how you like the idea of my new gardening series!

the autumn catalogue cabinet.

I picked up this little cabinet at a garage sale that Mr. Q and I spotted on the way home from a walk.

It’s obviously not vintage.  In fact, the seller told me that her brother-in-law (or some such relative) made it.  Kind of sad that she’s selling it at her garage sale for $10, but well … no one is really into that yellow looking pine these days, are they?

I gave it a new look though.  First I painted the inside in Dixie Belle’s Silk paint in Cactus.

 Then I once again attempted some blending on the outside using DB’s Sawmill Gravy and French Linen.

Next up I added the small version of the Seeds transfer to the front.

That isn’t quite the entire transfer, a bit at the bottom didn’t fit in the inset space so I will save that piece for another project.

I must add a thank you here to Constance Colvin who sent me the transfer.  Thank you so much for that Connie, I hope you like what I’ve done with it!

Finally, you may have already noticed the unique handle that I added to the cupboard.  The cupboard came with a carved wooden knob that wasn’t really my style, instead I thought it would be fun to swap that out for this old rusty garden trowel that my friend Sue found for me.

Ken drilled a hole in the trowel, and then I attached it using the same sort of bolt and nut that you would use with a glass knob.  However, as you can see below, that bolt was pretty shiny compared to the old rusty trowel.

So, easy enough, I rusty-ed it up with a little of Dixie Belle’s patina paint, and now you don’t even see it.

You may have noticed in the photo showing the interior color that the door opens down on this piece.  I’m not sure what the reasoning is behind that, but it is easy to open and close.  It might make this piece better suited to hanging on a wall rather than sitting on a table top though.

This was just a quick and easy update for a slightly outdated little cupboard.

What do you think?

This little cupboard is for sale locally, so be sure to check my ‘available for local sale‘ page for more details.

As always, thank you to Dixie Belle Paint Co for supplying the paint for this project, and once again, thank you Connie for sending me the transfer!

deconstructed.

Let’s start the weekend early and play a drinking game.  Get yourself some tequila (or your booze of choice), or OK, if you’re reading this first thing in the morning maybe it had better be coffee.  Now, every time I say ‘deconstructed’, take a drink.  We’re up to three already if you count the title and title photo.

As I’ve mentioned, since my furniture pieces aren’t exactly selling like hot cakes these days (and yes, I even still have that pair of mid mod end tables, go figure), I’m working on both smaller projects as well as projects for myself.  Which brings me to today’s project.

I brought this chair home from the Mac-Grove garage sales back in 2018.

So, yeah, that was four years ago.

Good gracious, it’s about time I got around to it.

Anyway, I purchased it because I thought it would be a great candidate for creating the ‘deconstructed’ look.  If you aren’t familiar with that look, go to pinterest and search for it.  You’ll find lots of examples, like this one from lizmarieblog.com …

I know the deconstructed look isn’t for everyone, but I kind of love it.

Some deconstructed pieces are more functional than others.  I don’t think anyone would want to sit on the example above from Liz Marie, but there are versions out there that are more suitable for actual use too.

First up, I removed the upholstery, which involved pulling about two million upholstery tacks.  Then I removed the really thick foam that was on the seat and clearly was not original to the chair.  That left me with this …

Of course I then removed that batting from the chair back, that may have been original but it was pretty gross.

Then I stood back and evaluated.  I could replace the strapping on the chair back with new strapping.  But … at that point, what would be left of the original chair?  And would it have that deconstructed look that I love?  I decided to leave the old strapping in place.

I also debated keeping the plywood support that was in place on the chair bottom, but I’m fairly sure that wasn’t original either.  And I didn’t like the way that section at the front was half an inch higher than the rest of the seat.  So I asked Ken to cut a new seat bottom for me from a piece of thick particle board.

We didn’t get fancy, and rather than notch out the seat to fit exactly, I asked Ken to just cut it to fit front to back.  That means some raw edges are exposed, but again … it’s deconstructed.

Then I covered the new seat with batting followed by a piece of drop cloth that I had stenciled with the Albert Rouff 1842 stencil from ellen j goods.

I used Dixie Belle’s Gravel Road paint to do the stenciling, I wanted it to look a bit more faded than it would have using black paint.

For those of you who struggle to get a clean line when stenciling, try stenciling on drop cloth.  It’s super easy and nearly fool-proof.

All of the exposed raw edges where the original upholstery was tacked into place just add to the deconstructed look.

Well, I think so anyway.

I also think the little wooden casters on the front two legs are a fabulous detail.

But I do wonder, why casters only on the front two legs?  There are no holes in the back legs, so they definitely never had casters.  What was the purpose behind having just two, or maybe it was simply for aesthetic reasons.

Four years ago I definitely planned to paint this chair with a creamy white milk paint and hopefully get some chipping.  But now I have to confess, even I am starting to veer away from painting everything.  So instead I applied Dixie Belle’s Big Mama’s Butta to the frame of the chair to clean up the wood a bit, but otherwise left it alone.

I have to say, I’m not sure if this dark wood works in the spot (shown above) where I plan to keep the chair though.  There is a lot of black (the baby grand, just off to the right), dark grey on the upper walls, and white.  It feels a little odd to throw in some dark wood.

So now I’m debating.  Do I go ahead and paint it?  Since I plan on keeping it, and I love me some chippy milk paint, maybe I should paint it.  What do you think?  Let’s take a vote.  Leave a comment below, paint or no paint?

Now, for those of you that played the drinking game with actual liquor, please don’t drive or operate heavy machinery.

Thank you to ellen j goods for providing the stencil used on my deconstructed (that’s 10, if you’re drinking) chair.

the hardware cabinet.

You may remember when my picker Sue found this little cabinet for me back in May.

At the time I mentioned that I wasn’t sure that I liked the cup pulls combined with the scrolly embellishments.  It seemed a bit busy to me.  I definitely didn’t like the brick red color, but maybe that’s just a personal preference thing.

I got some mixed opinions from you guys in the comments on how to update this one, but I opted to start with painting it white to see how that changed it up.

So I mixed up some white milk paint (a mix of two shades) and gave it a couple of coats.

It turned out fabulously chippy!  And I think the white did tone down the visual clutter on those drawer fronts a bit.

Once it was painted, I kept looking at it and thinking somehow the balance was off.  I decided what it really needed was some feet, or some sort of base anyway.  I looked at both Michael’s and Hobby Lobby for some small wooden feet to add to it, but didn’t find anything I liked.  Certainly I could have then looked further afield for something appropriate, but while I was cleaning out my workshop I came across an old yardstick that I’d already cut up and used part of for another project.  There was enough left to go around three sides of the cabinet as trim for a base.

I thought it would add a funky touch.  Plus I liked that the wording on the yardstick was red, which tied in with the red paint still visible behind the chippy white paint (and I left the interior in its original red as well).

The cabinet is not just sitting on flimsy yardsticks, Ken cut some wood to use as a solid base and then tacked the yardstick pieces around three sides.  So it’s nice and sturdy.

Since the yardstick has a hardware-ish sort of theme, I thought adding this section from the I.O.D. Label Ephemera transfer to the top would tie in with that.

Side bar; am I the only one who automatically sings “02134” whenever I read “Boston, Mass”?  The old Zoom address song?  Anyone else raised on early 70’s PBS kid shows?

OK, anyway, as I mentioned, I left the cabinet red inside and then lined it with some scrapbook paper.

I also came across some vintage oil cans that Sue found for me while cleaning out the workshop, so I decided they would be perfect for continuing the hardware-ish theme.

It took a bit of cleaning to get these un-oily … or mostly un-oily.  I washed them with Dawn dish soap first, then I followed that up with two rounds Mean Green Superstrength Cleaner and Degreaser, and finally a rinse with clean, hot water.

I’ve done a few of these oil cans in the past and they’ve all sold.  Most recently, after adding a white transfer, I sold the tiny little can that I shared in the same post as this original cabinet.

I’ve also painted them in the past …

and I also found one in an original cobalt blue paint once.

So I’m still debating these oil cans.  Should I paint them, should I add transfers, or should I leave them in their current state?  Will I continue to find a market for selling them?  Any suggestions?

Meanwhile, this little cabinet would be perfect for storing one’s stash of knobs.

Or any other hardware or crafting items really.

Since I already have a good storage system for my hardware, this cabinet is for sale locally so be sure to check out the details on my ‘available for local sale‘ page.

the fresh cut flowers cart.

I spent some time last week working on smaller projects, so I have five of them to share this week!  In other words, I’ll be posting one per day through Friday.

I also spent time last week cleaning out my workshop in the carriage house.  There is a lean-to on the back side of the building and it tends to be one of those areas where we shove things to get them out of the way and before you know it, we are three or four layers deep in stuff and can’t even remember what is back there.

Just for reference, here’s a photo of the lean-to …

And I’m really just sharing that as a opportunity to show Annie where her Royal Standard hostas ended up because I missed it in my garden tour post from last week.  They are happy as clams in their new home.

OK, so this is one of those items that ended up buried in the lean-to for years.

It’s some sort of old cart that my bff’s sister gave to me years ago.  I don’t even remember the story behind it now.

It’s not your typical antique factory cart like the one we once had as a coffee table in our living room …

It’s a bit lower (and smaller overall) than that at only 10.5″ tall when laid flat, so it’s not suitable as a coffee table.

It has those handles, for wheeling it upright and that short curved end piece so Mr. Q thinks it must be some sort of hand truck or dolly.

It definitely has some heavy duty, and now quite rusty, iron wheels (they do still work though).

Regardless of its original purpose, I decided that it should have a new life as garden décor.

So I cleaned it up, sanded the flat wood area a bit and then painted it with one coat of Dixie Belle’s Midnight Sky.  Then I stenciled over that with my Fresh Cut Flowers stencil from The Stencil Market.

Once it was dry, I gave it a couple of coats of Dixie Belle’s flat clear coat to protect it a bit from the elements.

Now it’s perfect for placing somewhere in the garden.  You can keep it upright, like I’ve shown it above, or lay it down flat …

and then put a pot of flowers, or maybe an old galvanized watering can on top.

This piece is for sale locally, but if it doesn’t sell I’m sure I could find a spot in my own garden for it.

Be sure to check out my ‘available for local sale‘ page for more details.

seriously, what are the chances?

My friend/picker Sue picked up this cute little toy dresser for me recently.

It’s not an antique, or a salesman sample, or anything like that.  But it is pretty darn cute.  If only it wasn’t missing the mirror.

Sue thought I could get a new one cut for it, and maybe so.  I do wonder how difficult it would be to cut that oval though.  So I decided to just paint it in and see what I could find in my transfer stash to fill that spot.

But first up, I removed the knobs.  They are OK, but I knew I could do better.  Especially since I already had some fabulous small glass knobs on hand (from D Lawless Hardware).

Next I gave the piece a good sanding, and then a good cleaning.  Then I followed that up with two coats of Dixie Belle’s Drop Cloth.  The existing finish was pretty dinged up, and I much prefer the warmer shade of the Drop Cloth over the original white on the dresser.

Then I added the top half or so of the small Petit Rosier transfer from I.O.D. to the front of the dresser.

The small (11″ x 14″) version of the transfer fit almost exactly across the width of the drawers, what luck.

FYI, this transfer has been retired.  You can still find it online, but supplies are limited.

Next I pulled out my Classic Vintage Labels transfers from re.design with prima.  I knew there was an oval shaped label in that set and I was hoping it would be the right size and shape to fill that spot where the mirror once was.  I will admit that I was thinking to myself, ‘what are the chances?  probably pretty slim, right?’

And look at that!  Pretty much the perfect fit.  Seriously, what are the chances?  Things like this rarely work out this well.

Once I’d also added the “les roses.” wording from the I.O.D. transfer to the top, I sanded the edges of everything and then added a coat of clear wax.

Then I popped on the glass knobs.

I think those knobs elevate this piece just a tad, don’t you?

Finally, I lined the drawers with some pretty floral scrapbook paper.

How sweet is that?

I staged it simply with a lovely little round floral dish that Sue also found for me, and some vintage jewelry.

This would make a fun jewelry box, you’d just have to come up with some little boxes or something to put inside the drawers to prevent everything from becoming a jumbled mess.

But really, this piece could be used anywhere to hold small items … like perhaps your large collection of reading glasses … or is that just me?

I already happen to have a mini with the Petit Rosier transfer on it of my own …

So today’s project is for sale (locals only, no shipping available).  Be sure to check out my ‘available for local sale‘ page for more details.

One last thought on this project; this is not the sort of thing that anyone is going to make their fortune on … or really even be able to pay the bills with.  I paid $12 for the dresser, $18 for the transfer and $9 for the knobs.  It didn’t take much paint or wax, so I’m not counting those things.  Plus I have a lifetime supply of scrapbook paper, so I’m just happy to be able to use that stuff up.  But, that means I have $39 into this piece, which would be perfectly fine if I was keeping it for myself.  However, I usually sell pieces like this for $48.  So, if it sells at that price, I’ve made about $4.50/hour for my two hours of labor.

Choosing to change out the hardware and add that expensive smaller I.O.D. transfer would not be wise choices if I was in this for the money. Instead I would recommend using pieces from the I.O.D. Label Ephemera transfer (also retired unfortunately), or the newer I.O.D. Brocante or Traditional Pots transfers.  Although those are more expensive at around $30 each, I can get 10 or more projects out of each one.

Luckily I’m not in this for the money, although I try not to lose money on any of my projects!  I really enjoy the process of creating, and in the end I’m happy that I can sell most of my pieces and I don’t have to become a hoarder.  Or, worse yet, take them to the Goodwill.  But I wanted to at least mention this for those of you who may be trying to make a buck.

If you sell your items, would you bother with a project like this?  Or do you stick to items with a higher profit margin?  Or maybe you think my price is too low and you could sell it for more?  Leave a comment and let me know.