
I spent a little time on Rachel Ashwell’s blog the other day. She doesn’t really blog a whole lot, but every once in a while I check out what’s new. Her latest post was about vintage furniture and here is what she had to say:
“When hunting for wooden pieces, I am usually looking for authentic paint in the Shabby palette (white, ivory, pale pink & blue, grey teal or bleached raw wood) or pieces that can create a rustic vintage decor and on a rare occasion I will repaint. I get great joy when I see pieces come through our “restoration for reloving” process. Each piece is cleaned, shored up if wonky, drawers and shelves lined with vintage wallpaper, new glass, marble or hardware applied…and when ready we proudly tack on our branded brass plaque.”
Well, I am rarely lucky enough to find a piece that has an authentic vintage paint job in a color that I like so when I find one, much like Rachel, I like to preserve it. Such was the case with the Nokomis dresser.
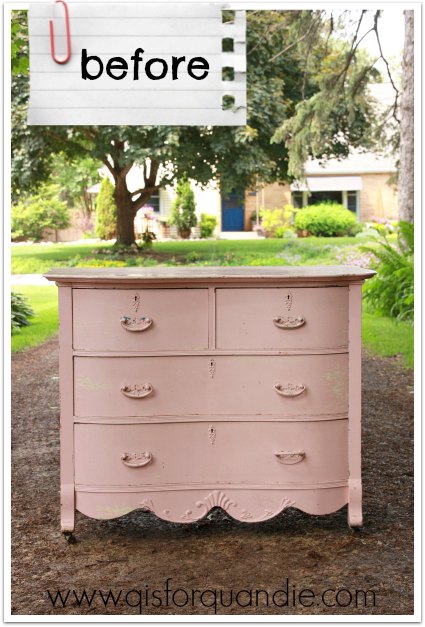
It was really pink, but not a terrible pink. It also had some great layering under the pink. Some blue and some cream. I like to believe that Rachel would have snatched this one up had she come across it somewhere too.
Even though I wanted to save the original paint, I felt like I needed to tone down the pink-ness just a tad. Adding some vintage wallpaper to the drawer fronts was just the ticket. I chose a paper that had pink roses, but also has the blue and cream (ordered from Hannah’s Treasures via Etsy).
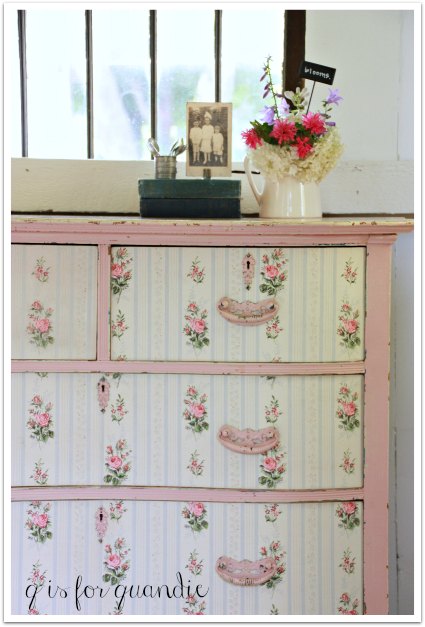
To me this is the quintessential farmhouse floral wallpaper.

Now, I’m going to give some details on wallpapering furniture here. If you are never in a million years going to wallpaper anything, feel free to just skip right over this next part.
But, if you have been thinking about using vintage wallpaper on something yourself, here are a few tips. First of all, I use Zinsser Sure Grip all purpose adhesive (I got mine at Home Depot). I use the powder, because I can just mix up as much as I need, which isn’t much. I usually cut my pieces just a bit bigger than they need to be. For example, these drawer fronts were about 7.5″ high, so I cut 8.5″ strips. I apply the adhesive to the back of the paper using an inexpensive chip brush. Then I “book” the paper. This is basically just gently folding half of the paper over to the other half, glued sides together. Gently! Don’t make a crease in the middle. I was taught to do this back when I was wallpapering entire walls. I don’t really know why. Google says two things. One, if your paper is going to stretch, this allows it to do so before you apply it. Two, this allows the adhesive to “activate”. I don’t know if either of these things are really true or not, I just do it anyway. Next, since this pattern had a stripe, I tried to pick an obvious position on the paper to start at the left hand side of each drawer. I could go into a bunch of detail here about ‘repeats’ and stuff like that, but that would really get boring. For the most part, I didn’t pay too much attention to the repeat on this paper. If you know what I’m talking about, go back and take a look a the pictures. Yep, didn’t get the repeat perfectly, did I? Did you care the first time you looked? Probably not. However, I did have to get the stripes lined up. That would have been easier had I started with the bottom two drawers, and then lined up the upper right hand drawer last. But, never let it be said I do things the easy way. I had to rip the paper off that upper right drawer and re-do it when the stripes didn’t line up with the bottom. I didn’t take that piece separating the upper drawers into account. Ooops. Luckily I had enough paper.
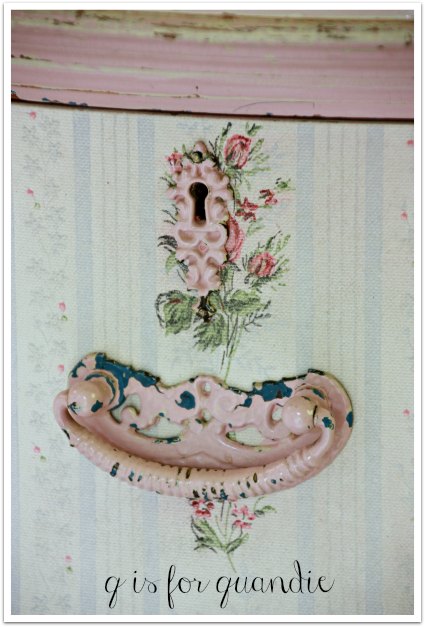
I actually had more than one person ask me if it was going to be difficult to trim the wallpaper around the keyhole escutcheons. Sometimes it catches me off guard when I realize that not everyone knows how some of these things work. Although they were fairly painted over, the escutcheons were just held in place by two small nails. I used a razor blade to loosen the paint around them, then just carefully pried them off. After I wallpapered the drawers, I put the escutcheons back on using the nails. Easy peasy, no trimming around them required.
So far I have had very good luck with the Zinsser adhesive. I find that the wallpaper goes on and stays on. I wait 24 hours or so after applying it, and then I go back and sand the edges. Yep, you read that right, I sand them. It gives them a nice smooth edge, and leaves nothing loose to catch on stuff.
My little Artissimo blue chair makes a great companion to this dresser. It cuts a little of the pink sweetness, and it brings out the blue in the wallpaper.

I like to think that Rachel would approve of this one, what do you think?


Beeeeautiful! I love the addition of the wallpaper to the drawer fronts. This pattern is definitely similar to one of the eight layers we unearthed on the walls in our old house! Thank you for the wallpapering tips, too. I have never tried it, but have always loved the look of yours, so maybe I should give it a whirl!
LikeLike
Oh my gosh, eight layers! I feel for you. I only had three layers in my bedroom and that was bad enough! Give the wallpapering a try. I’d suggest starting with an small overall pattern first (no stripes or large repeats) like I did on my first wallpapered piece, the linen press. Once you try it, you might get addicted!
LikeLike
What a pretty in pink dresser-thanks for the tip on what wallpapering! I want to try this sometime
LikeLike
Thanks Darrielle! You should give it a try!
LikeLike
So sweet. I’m glad you kept the original paint. I’ll be sure to tell my sisters and Mother about the grand opening on August 2! Lots of luck to you!
LikeLike
Absolutely! Tell them to pencil it in. I’ve heard rumors that there will be mimosas involved 😉
LikeLike
Beautiful job. I’m usually not a pink lover but this turned out gorgeous. This would be so pretty in a bathroom with an ironstone pitcher and some pretty white towels.
LikeLike
I used to be more of a pink lover. My photo cottage used to be pink, my front porch was originally pink, my guest room started out pink … yep, there used to be a lot of pink, but it has all gone by the wayside. But this piece was meant to stay pink so I went with it. I agree, it would be perfect in a bathroom with some white accessories!
LikeLike
Really pretty after its re-do. That would be darling in a baby girl’s nursery. The scallops make it for me. No way I would ever pay those RA prices! Wow! I love shabby chic but not that much. 😎
LikeLike
I know, right? Crazy prices! Obviously people are just paying for THE Rachel Ashwell name. Plus, I have to admit, the expense of shipping them from wherever she finds them to her stores has to add a lot to the cost. Not to mention the cost of paying employees to fix them up. Lots more overhead than I have!
LikeLike
P.S. Those scallops at the bottom are fabulous, aren’t they?
LikeLike
Just was finally able to drop in today and wowza what treat. I am pretty tailored in my personal choices for my home. This little sweetheart slays me. Would have never looked at the repeat if you had not mentioned it you crazy girl. Honestly I do not even see anything off. This piece is perfect for a little girl’s room. I, too, would not hesitate to put it a nursery. I have had all of Rachel’s books and love her linens at Target. I often wonder if there some people out there with money trees and I just don’t have one. Seriously who would/could pay those prices?
LikeLike