gradually decorating.

Back when I was a working stiff, I tended to put up my Christmas decorations in one long marathon session on the day after Thanksgiving.  But now that I’m retired, I’m finding that I prefer a more gradual sort of decorating.  Just putting things up here and there and not feeling pressured to have it all up in one day.

I’m also realizing that I’m rather bored with a lot of my Christmas décor.  I still really like the things, but I don’t want to just put them up in the same place and the same way that I’ve done for years.

So I’m taking my time and trying to come up with new ways to use my existing decorations, but also adding a few new items to the mix.

As I mentioned last week, I asked Sue to sew up some more drop cloth stockings for me.  I ended up stenciling four of them to keep myself.

I’m more of a neutral décor sort of gal, so I used Dixie Belle’s French Linen for the stripes and Midnight Sky for the grain sack stencil (these are JRV stencils, fyi).

Unfortunately, we don’t have a fireplace or any sort of faux mantle to hang them on.  Every year around this time I look around our house wondering where I could fit one in, but we really just don’t have the perfect spot for one.

So I decided to make myself a cupboard door sign to hang the stockings from.

Once again, I stuck with neutrals.  I began with a new cupboard door (from the ReStore).  I gave it a base coat of Dixie Belle’s Putty paint mixed with some of their Sea Spray for texture.  Once dry, I painted over it with DB’s Drop Cloth.  Then I sanded heavily to reveal some of the Putty.  I added some stencils using more Putty and Coffee Bean.  Finally I added some wood knobs to the bottom that had also been painted in Putty.

The next step was to find somewhere to hang it.  After carrying it around the house a bit, I ended up deciding to layer it over an old arched window that hangs in our dining room.

It was the perfect fit.

I filled the stockings with some faux greenery …

and I draped a faux evergreen garland around the window.

Finally, to give the whole thing a little more presence, I hung some old chippy shutters on either side.  I purchased four of these shutters at the Bryn Mawr neighborhood garage sale back in 2016.  I’ve used them in a few different locations over the years.

I may still add some battery operated fairy lights to the garland, but I need to stock up on batteries first.

But so far I’m loving this bit of holiday décor in my dining room.  How about you, do you put up your decorations all in one go?  Or do you take your time?  Do you switch it up from year to year, or do you like to keep it the same?  Leave a comment and let me know!

the ornemanistes toolbox.

I hope you guys aren’t getting tired of the toolbox transformations because I’ve got another one for you today.  And I have to say, I think ‘transformation’ is definitely the right word for this one.

Let’s start with some ‘before’ photos.

Yep, I have to admit, I wasn’t sure this one was going to be worth the effort.  This toolbox certainly didn’t seem like anything special in its ‘before’ state.  However, as you’re about to see, it totally was worth it!

Earlier this fall I spent a sunny afternoon cleaning up a pile of toolboxes and lock boxes out in the backyard using the hose.  I then took a quick photo of the pile before I gave them a good scrub …

As you can see, the interior was just as rusty and flakey as the outside.  Also, this toolbox included the red tray that is shown above on the upper left.

I started by sanding this one a bit more thoroughly than usual to remove any of the flaking paint.  Then, as I mentioned, I washed it up with Dawn dish soap and the garden hose.  Once dry, I coated it inside and out with Dixie Belle’s B.O.S.S.

Then I studied that tray for a moment.  I kind of liked the patina on the handle, but wanted to clean it up a bit.  So I opted for painting just the inside of the tray in Dixie Belle’s Honky Tonk Red which ended up being a perfect match for the original color.

Then I added a little Christmas bird from Dixie Belle’s Evergreen and Holly transfer.

Isn’t he sweet?  I followed that up with a coat of DB’s flat clear coat to protect it all.

I also went ahead and gave the interior of the toolbox a couple of coats of Honky Tonk Red followed by some flat clear coat as well.

Next up I painted the outside in my favorite Dixie Belle Drop Cloth.

Then I thought about the I.O.D. Cosette transfer that I had on hand.

I’ve had this transfer for a while, just waiting for the right piece of furniture to put it on.  But I have to confess, I’d been hesitating to use it because I didn’t like the red wording.  I felt like adding even that little bit of red to something would make it more difficult for someone to work into their décor, thus making a piece more difficult to sell.  I don’t know, I certainly could be wrong about that, but I really was wishing all of the wording on this transfer was black.

So decided to do something a tad reckless (LOL, for me anyway).  I cut out that center section of wording to use on this toolbox.

I’m calling it reckless simply because this transfer costs around $40, and here I was just hacking a section out of it for a toolbox.  But then again, I wasn’t using the full transfer because of that red.  Now the red is gone, and I could fill that center section with something else when I find the right piece of furniture for the size of the rest of the transfer.

And the red was perfect on this toolbox!

I added some poinsettias from the Dixie Belle Evergreen and Holly transfer to tip the look over into the Christmas category.

I also added a little Tim Holtz number transfer.

I also used part of that center section of the Cosette transfer up under the handle, and the tiny red “PARIS” on the latch.

This might be the last Christmas themed toolbox I do this year.  I’ve mostly run out of Christmas transfers and don’t think I’ll be finding more this season.

I sure do feel like I’m going out with a bang on this one.  I have to admit, if it doesn’t sell I won’t be sad about that.  I may just have to keep it.

But that being said, if any of you locals are interested be sure to check out my ‘available for local sale‘ page for details.

Thanks to Dixie Belle Paint Co for providing their products used on this toolbox!

a holiday open house.

Happy Thursday everyone!  I don’t normally post on a Thursday, but I wanted to make sure all of my local readers know about Reclaiming Beautiful’s open house later today.

If you’re in the Stillwater area, be sure to stop by.

Unfortunately, I won’t actually be there myself.  I have my neighbor’s birthday dinner to attend.  But I did bring in a bunch of fun merchandise last night including some more drop cloth Christmas stockings.

As I mentioned last week, I asked my friend Sue to sew up a few more of these for me.  I stenciled some of the new batch very simply with the JRV Grain Sack Mini stencils.

I also did four of them with the red grain sack stripe that I experimented with last time.

I also brought in this fabulous vintage kid sized snow shovel.

I added the wallcutz Most Wonderful Time of the Year stencil to it after first painting the blade in Dixie Belle’s Midnight Sky.

Is that frickin’ adorable or what?  I was really tempted to keep this one for myself, but I also have another vintage, kid-sized snow shovel that’s green and I’m going to do something with that one.  I’ll be sure to share it when it’s done.

I also painted up a couple of cupboard door signs to bring to the shop.  These were brand new cupboard doors that I purchased at the ReStore.  They usually have a big bin filled with them.  To first give them a little bit of age, I painted on a base coat of Dixie Belle’s Putty mixed with their Sea Spray to add some texture.

Once that was dry, I painted over it with Drop Cloth on the first one.  Then I sanded it with 120 grit sandpaper to smooth out some of the texture and reveal little bits of the Putty beneath.  Finally, I added some Christmas stencils and some painted wooden knobs.

For the second one, I painted over the Putty with Dixie Belle’s Midnight Sky.  Then I added another of my favorite wallcutz stencils called North Pole.

I have one more stenciled item that I brought in.

My friend Sue found this decorative sled for me.  Unfortunately, once again I missed getting a ‘before’ shot.  It had a very ‘country’ sort of look with stylized blue flowers painted on it.  I sanded those down and painted the slats in Dixie Belle’s Honky Tonk Red, and the runners in Drop Cloth.

Then I added the Comfort & Joy stencil, also from wallcutz.

Finally, rather than replacing the rope handle with plain rope, I added this beaded garland from Hobby Lobby.

Last up, remember those adorable toy kitchen items I shared a while back?

Well, I picked up a little wooden tote at the thrift store to put them in.  I painted it in Drop Cloth, and then I gave stamping another shot.

That’s the I.O.D. Crockery stamp.

I’ve mentioned in the past that I struggle to get the results I want with rubber stamps (with the exception of stamping on paper).  I followed some suggestions from a few of you and used VersaFine Clair ink over unsealed chalk paint (the Dixie Belle Drop Cloth).  But once again the stamp got a little squiggly on me.  So far that is the best combination I’ve found, but stamping still doesn’t agree with the perfectionist in me.  I’m not giving up on it though, I’ll keep working at improving my skills.

But in the meantime, wouldn’t this little set be the perfect gift under the tree for some tiny baker?

I hope you enjoyed seeing some of my latest Christmas projects, even if you aren’t local and can’t make it to the shop.  And for those of you who are local, if you aren’t busy tonight be sure to stop by and check out all of the wonderful things Reclaiming Beautiful has to offer.

one tool tote, two ways.

I mentioned a while back that I had one of these wooden totes that I was reserving for a Christmas look.

It’s your basic tool caddy, freshly made out of unfinished wood.  Sometimes I will layer these unpainted items in several colors to add the illusion of age, or maybe use some of Dixie Belle’s Sea Spray to add some texture.  But this time I opted for a simple black paint job using DB’s Midnight Sky.  Once I had it painted inside and out, I pulled out my smaller Rudolph and Co Reindeer Treats stencil from wallcutz.  I have this stencil in two sizes, the smallest and the largest, and it’s one of my favorites.

I wanted to give my stencil a little more dimension, so I first stenciled just the “Rudolph and Co” in Dixie Belle’s French Linen.  Then I moved the stencil slightly up and over and stenciled the larger wording, plus the top section in DB’s Drop Cloth.  I left the ‘and’ just in French Linen.

I stenciled the back side without a shadow, mainly because I find it’s trickier to get it to look good with smaller, fine letters like these.

I do like to have something on both sides of a tote like this in case the future owner wants to display it in the center of a dining table.

Once the paint was dry, I sanded to distress the edges.  I was distressing back to fresh, new wood though.  So in order to give this a more aged look I waxed it with brown wax to darken up those areas where the sanding revealed fresh wood.

I thought it would be fun to style the tote in two different looks.

I started with some natural looking greens, my unfinished nutcrackers, an old cloth tape measure and some metal cash register numbers.

This neutral sort of look is right up my alley.  You can find those unfinished nutcrackers at most craft stores it seems.  They are meant to be painted, but I like them left ‘as is’.

The sort of papery looking greens with the little white berries are from Hobby Lobby.  I  purchased them recently and they were super cheap at only $1.49 each (Christmas stuff was already 60% off the day I shopped).

If you’d rather have a little bit of bling in your holiday décor, this next look might appeal to you more.

I swapped out the greens for some that are a little less rustic and added fairy lights, then I decked it out with vintage gold balls, some golden crowns, a tiny birdcage …

and a little star shaped ornament that I’ve had forever.

I can’t really decide which look I like better, what do you think?

I’ll be bringing this tool tote into the shop this evening, unless one of you locals wants to snatch it up first for $38.  If so, be sure to let me know in a comment or by email at qisforquandie@gmail.com.

baked fresh every day.

I think ‘never say never’ should really be my motto.  I often think certain products just aren’t going to work for me, or I dislike certain styles, and then given a little time, they grow on me.

I have to say, I still wouldn’t be likely to purchase the I.O.D. Noel paint inlay again, but I did find another project to use it on.

I purchased this bread box at a garage sale last year …

I’d kind of forgotten about it.  But I came across it recently while digging for some leaf bags out in the carriage house.  I thought it might just be the perfect size for the gingerbread bakery portion of the paint inlay.

So I painted it up in Dixie Belle’s Sawmill Gravy.  Then I cut up the paint inlay to arrange it on the front of the breadbox.

I applied it using my normal process, you can find the step by step instructions in this post.

I ended up eliminating the image of the gingerbread house itself, it was a bit too cartoonish for my taste.  So I just used the wording on the door of the breadbox.  Then I added the section of greenery and orange slices to the top and bottom.

The image of the greenery on the bottom of the box is the 2nd use of that image.  It’s hard to see in my photos, but it is slightly more faded than the first use.

But certainly I easily got a 2nd use out of it.

One the inlay was dry, I sprayed those areas with a matte spray sealer before attempting to sand the edges to distress.  I recommend doing that as the paint from the inlay easily wipes away otherwise.

One thing to keep in mind with the paint inlays is that they do add a bit of texture to your piece.  If you look closely at this next picture you can see what I mean.  I’m referring to those creases in the paint.

Since you’re pressing the paper into fresh paint, it’s going to leave an impression.  I used a brayer to get this one as flat as possible.  If you don’t like that look, you may not like using the paint inlays.

In case you’re wondering, this door on this breadbox is hinged at the bottom and opens up like this …

In the end, I think this one turned out pretty fab.

But now I’m hungry and I haven’t had breakfast yet so I’m going to go eat my props!

The breadbox is for sale locally, so be sure to check my ‘available for local sale‘ page for more details.

As always, thank you to Dixie Belle Paint Co for supplying the paint used for this project.

grain sack stockings.

I recently did some searching on Etsy for Christmas stockings made out of authentic grain sacks.  There are some fabulous examples out there, that’s for sure.  The authentic ones seem to range in price from $50 to $100 or more each.  I don’t doubt that they are worth every penny.

But if you want a similar look at a more affordable price point, I suggest making your own with drop cloth fabric and paint.

It helps if you can sew, or you have a friend who is willing to sew for you.  By now you all know that I can’t sew.  However, my friend/picker Sue was happy to sew up some stockings for me.  I washed up the drop cloth first so it would be more pliable, and then she took it from there.

They are just basic stocking shapes, but Sue also lined them with some simple cotton fabric.

She made a prototype first out of a linen fabric she had on hand, and then went on to make four of the drop cloth versions.

I decided to use the prototype to help me decide what color of paint to use.  I was thinking it might be more Christmas-y to have a red grain sack stripe, so I pulled out a grain sack stripe stencil and used some of Dixie Belle’s Honky Tonk Red to add it to the prototype.

Here’s a quick bit of advice, if you think you’ll stencil lots of grain sack stripes in your lifetime then a stencil like this is totally worth the money.  It’s so much faster than taping off all of those lines, and you don’t have to fill up the landfill with tape.  Don’t worry if your stencil isn’t as long as your item, it’s easy to just line it up and continuing stenciling the length of your piece.  I can’t remember where I got mine anymore, but you can find them out there.  JRV Stencils has a nice set of three for $22.95.

Next I pulled out my set of 4 German grain sack stencils from Ellen J Goods.

I chose one and added it over the red grain sack stripes using Dixie Belle’s Caviar.

Then I hemmed and hawed and dithered and tried to make up my mind whether or not to use the red on the four drop cloth stockings.

I mean, I like it.  It certainly adds a bit of traditional Christmas color.  But when it came down to it, I just knew that I would prefer a more neutral look.

So instead of red grain sack stripes, I opted for Dixie Belle’s French Linen for the stripes which gave me a much more neutral look.

I used one of each of the four German grain sack stencils on each stocking.

Now I realize that I should have asked Sue to make a bunch more of these for me, so that I could sell some and also keep some for myself.

So I checked with her and she’s willing to make more for me, so I took this set of four into the shop to sell earlier this week.  If any of you locals are interested, you can pop into Reclaiming Beautiful in Stillwater this weekend to see if they are still there.  Or, leave a comment and let me know.  I will be making more of them.

These stockings might not be made out of authentic antique grain sack, but I think they look pretty fabulous.

What do you think?

Before I let you go today, I just had to share this with you.  Remember the vintage ‘Cooky Book’ that I shared along with the rest of the baking supplies on Monday?

Well, in another Baader-Meinhof moment while out shopping the next day I came across this in a local gift shop (Patina, if any of you locals want to go look for it).

Apparently they re-issued it!  There was a sticker on one of them that said “the original 1963 classic version”.  I didn’t look at the price, but I’m betting it was not the $1.95 on the sticker on my book.

Thank you to Ellen J Goods for providing the German grain sack stencils and to Dixie Belle Paint Co for supplying the paint used on these stockings.  And a huge thank you to Sue for sewing them up for me!

the christmas curiosities box.

It’s time for another Christmas themed lockbox, and this time I managed to get a ‘before’ shot!

This one wasn’t in terrible shape, with just a few rusty spots here and there.  Nonetheless, I followed my usual prep process of sanding lightly, cleaning, and then priming inside and out with Dixie Belle’s B.O.S.S.

Then I painted the inside with Dixie Belle’s Collard Greens.

Next I painted the outside in DB’s Sawmill Gravy.  Both of these colors have a greyish undertone and they make perfect companions.

Once again I applied bits and pieces from various transfers to the outside.

The holly and poinsettias are from Dixie Belle’s Evergreen and Holly.  The cursive wording on the top of the box is from a re.design with prima transfer.

The cherubs are taken from Dixie Belle’s Vintage Post transfer.

This is a great example of how something not meant to be Christmas-y at all can be mingled with the holly and given an instant holiday vibe.

There was a little spot on the handle that must have been originally meant for a label of some kind, so I painted it in and then added a Tim Holtz ‘curiosities’ transfer.

I finished everything off with a coat of Dixie Belle’s flat clear coat.

Now this lockbox is perfect for storing your Christmas curiosities.  Or maybe just your Christmas cards as one of my readers suggested for the last Christmas themed lockbox.

What would you keep in it?

The lockbox is for sale locally while it lasts.  Be sure to check my ‘available for local sale‘ page for all of the details.

Thank you to Dixie Belle for providing all of their products used on this lockbox.

christmas baking.

I’ve never been a Christmas baker, how about you?  My sister has always done tons of baking at Christmas, although she has started to cut back a little in recent years.

Certainly baking for the holiday season is a tradition that goes way back.  So I’ve managed to accumulate quite a bunch of vintage baking items that I’ll take into the shop this week.  As I was sorting through them and adding price tags, I thought I would take photos and share them with you guys.

I’ve got a couple of rolling pins and two glass jars full of vintage cookie cutters.  I’ll sell each jar with its contents.

My favorite cookie cutters are the ones with painted wooden handles.

So sweet!

I also have a few flour sifters.

I don’t know that anyone actually uses these to sift flour these days, but I thought they’d be fun with little Christmas trees in them.

The vintage Betty Crocker cookie (or should I say ‘cooky’) cookbook is perfect for adding a little Christmas décor to the kitchen too.

I love that it still has its original $1.95 price tag on the front.

I even have some toy sized vintage kitchen gear.

This set came with a little note that said “Lorraine’s toys 1925”.  How adorable is that?

Also in the ‘Christmas baking’ category, I’ve painted up this little stool and added the Milk & Cookies stencil from wallcutz.

Here’s how the stool started out …

It was so filthy dirty!  And it had paint splatters all over it, and one wonky leg.  I cleaned it up, then gave it a fresh coat of Dixie Belle’s Drop Cloth.  Then I taped off some sections of the Milk & Cookies stencil and added it to the top using Dixie Belle’s Caviar.

It’s a petite little thing, only 1′ tall.  It would be perfect for placing under the tree with a plate of cookies for Santa on Christmas Eve.

I’ll be taking all of these goodies and more into the shop this week.  The stool is priced at $30, so if any of you locals want to snatch it up before Wednesday be sure to let me know.

Now, how about you?  Do you bake a lot for the holiday season, or are you more of a non-baker like me?  Leave a comment and let me know!

gardens around the world.

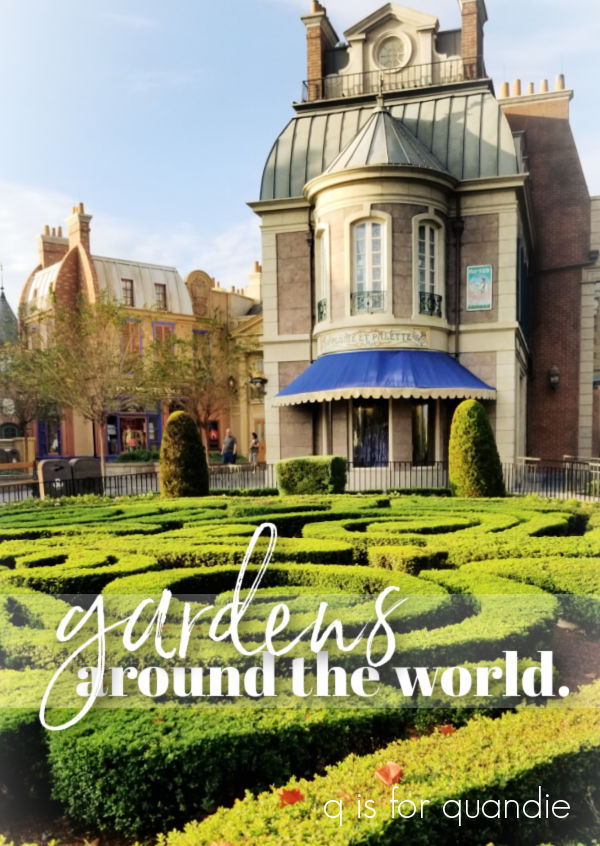
Good morning from the garden.  Unfortunately, I came home from Florida last weekend to a garden that was pretty much completely done.  All but the most hardy of perennials have died down to the ground, and most of the leaves are off the trees.  So I’m not sharing my own gardens today, instead I thought those of you who are gardeners would enjoy seeing the gardens of Epcot’s World Showcase.

For anyone not familiar with Disney World, Epcot is one of the four theme parks there.  The back half of Epcot is devoted to the World Showcase which features 11 areas themed to specific countries situated around a large lagoon.

Back in the day, Disney offered a guided tour of the gardens in the World Showcase and Mr. Q and I did that tour.  I loved it.  You got to go into the World Showcase in the morning before it was open to the public.  This was back when the World Showcase didn’t open until 11 a.m.  (this was also before the Norway ride became the Frozen ride, ahhh, the good ol’ days).

Anyway, unfortunately they no longer offer this tour.  But I did get a lot of insight back then into how they use landscaping to enhance the feeling of each country’s pavilion.  The attention to detail at a Disney park is always impressive, and no more so than in the World Showcase.

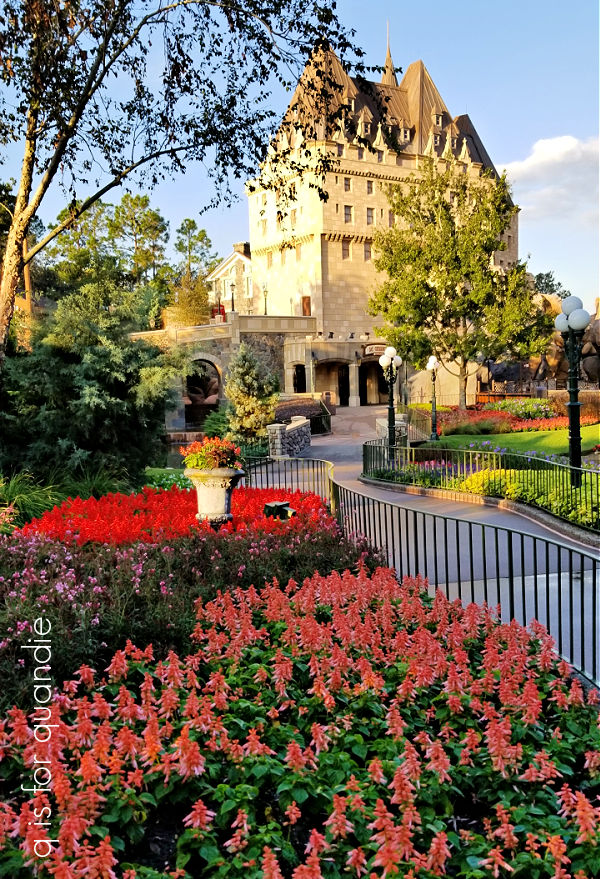
The garden in Canada is modeled after the famous Butchart Gardens in British Columbia.

It’s filled with big swaths of flowering annuals, as well as colorful coleus.  If you want constant color in your garden, annuals are the way to go.  But you’d better have a Disney sized budget for that since you have to replace them every year.

It inspired me to consider putting a few patches of coleus into the ground in my gardens next year though.  The only problem with that approach here in Minnesota is that it takes most of our short growing season for the coleus to fill in, and by the time it starts looking spectacular our first frost is only weeks away.  So maybe not.

But Florida can definitely pull it off.

By the way, here’s a quick q tip for you.  If you want to explore the World Showcase without hoards of people, these days you’ll want to head there immediately when the park opens.  Everyone else will be getting in line for rides.  You’ll have about an hour to make your way around the lagoon (roughly 1.2 miles) before the crowds catch up with you.

The shops and dining locations may not quite be open yet, but you can explore the details of each ‘country’ while having it practically to yourself.

Next up is the U.K. pavilion, and it’s definitely one of my favorites.

It’s so dang charming.

A formal sort of hedged garden is right up my alley, and they have them in spades in the U.K. pavilion.

Hedges and topiary, I need to add both in my own garden.  I’m putting them on the wish list.

There was a liberal use of annuals for color again, and also big masses of caladium.

The light green on the left and the pink on the right are both caladium.

We cross over the Channel into France next.  The landscaping here feels even more formal than the U.K. with more hedging and topiary.

But aside from the hedge garden above, the France pavilion doesn’t have much else in the way of gardens (it does have a lovely water feature, but I neglected to take a photo of that).

The next country you’ll encounter on the way around the showcase is Morocco.

Once again, there aren’t any large garden beds in this pavilion.  But really, the tilework is so impressive that you wouldn’t want to detract from it with gardens.  Plus, Morocco has a dry Mediterranean climate which isn’t really conducive to lush, green gardens.

Here’s a quick bit of trivia about the Morocco pavilion.  It was sponsored by King Hassan II and is the only Epcot pavilion sponsored directly by a country’s government rather than a corporate sponsor.  The King sent Moroccan artisans over to design and create the tile mosaics.

Next we head into Japan.

You just know that this pavilion is going to have some gorgeous gardens.

And specifically a lovely koi pond.

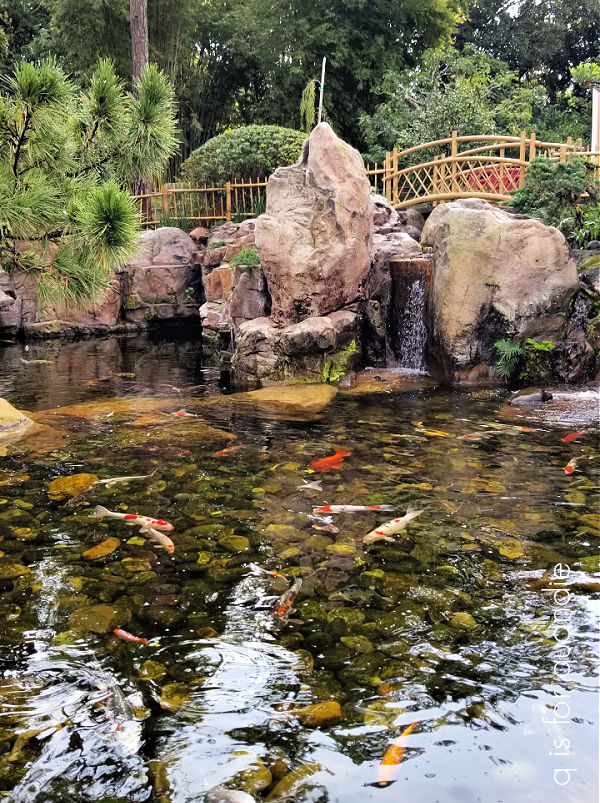
I love the simplicity and serenity of a Japanese garden.

Just a sidebar, if you’re interested in Japanese gardens be sure to watch Monty Don’s Japanese Gardens series (available on Prime).

The next country on your way around the world is Italy.  Once again, it’s a gorgeous pavilion with architecture borrowed from Venice, Rome and Tuscany.

They don’t have any formal garden beds in this pavilion, instead they seem to rely heavily on terracotta pots.

There certainly are some gorgeous pots though.  That one in the back of that trio above has an annual in it that I used myself this past summer.

I believe it’s Evolvulus Blue Daze and it performed really well for me.  I need to make a note to plant it again next year.

I was a little surprised to find that they had hostas growing in containers as well.

To me they look a bit sad though, don’t you think?

Germany has a very unique garden, it’s a model railroad garden.

There are several trains running around the tracks at all times.  The plants seem to mainly consist of small, pruned evergreens.  But I did notice that they have quite a few of the Berberis thunbergii ‘Concorde’ that I have in my fairy garden.

That’s it in the lower right corner of the photo above.

Next up we have China.

The garden in China is mainly dominated by a beautiful pond filled with water lilies.

Again, very peaceful and lovely like Japan.

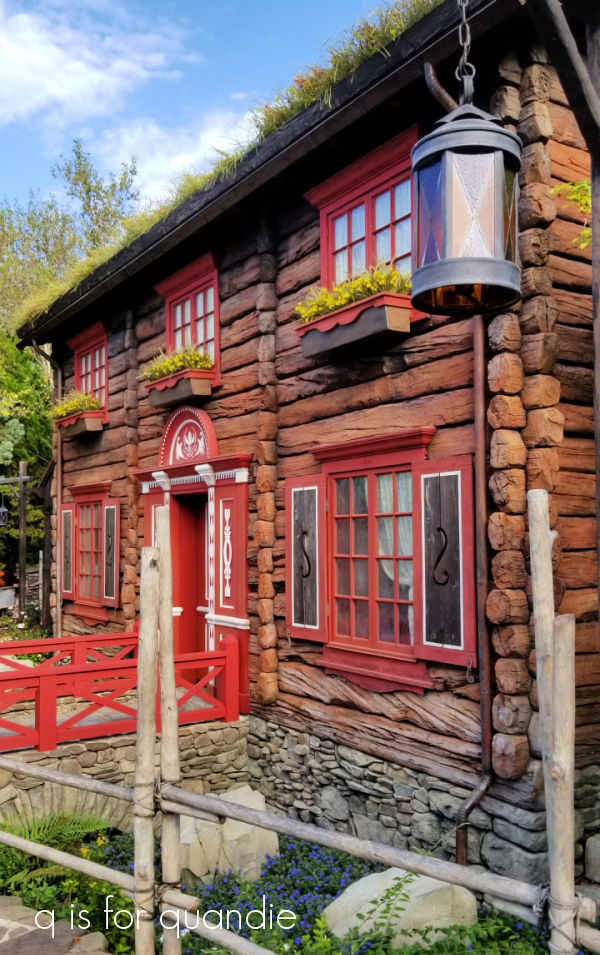
Norway doesn’t have a very structured garden area, but they do have a building with a sod roof which is quintessentially Norwegian I think.

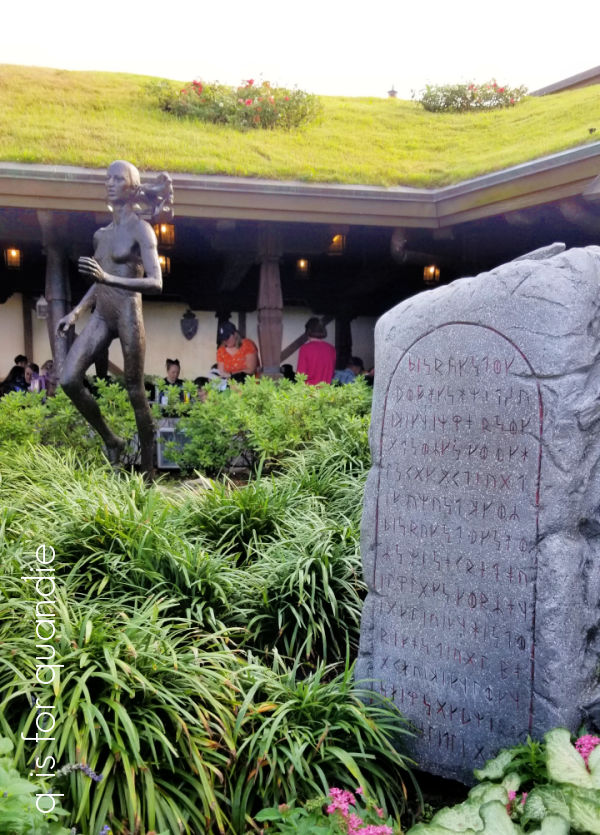
As is the lefse that my sister purchased at the Kringla Bakeri Og Kafe in the Norway pavilion.  I’m not much of a lefse fan myself, so I went with the Verden’s Beste Kake, which was delicious.  We enjoyed our treats in the seating area under that sod roof.

The royal sommerhus also has a sod roof.

The last country on our journey around the world is Mexico.  I was hoping to find an orchid garden in this pavilion, but apparently they only do that during the Flower & Garden event.  So really the pavilion just features lots of tropical foliage.

It’s certainly pretty, but definitely not my favorite.  I have to say I’m not really all that into tropical foliage.  I have no desire to plant things like hibiscus, or orchids.

Any of you familiar with Epcot have probably noticed something missing in my post.  I completely skipped over the American Adventure pavilion.  Ooops!  Well, aside from flowers in red, white and blue, there wasn’t much to write home about in that one.

Looking back at all of these pavilions, the U.K. gardens are definitely my favorite with Canada as a close second place.  How about you?  Which would be your favorite?  Have you ever toured the gardens of the World Showcase?  Leave a comment and let me know.

noel is a no for me.

Do you guys ever regret a purchase?  I suppose we all do sometimes, right?

Well, I have to admit that I feel a bit like I wasted my money on the I.O.D. Christmas themed paint inlay, Noel, that came out earlier this year.

It was a bit pricey at somewhere around $46 (depending who you purchase it from), but that would be OK if I was going to use it on lots of projects.

There are plenty of designs included in the set …

So I very much thought I could get many different projects completed with it.

But it seems like every time I pull it out to use it on something, the design isn’t quite right for some reason.  It’s too small, or it’s too large, or I just simply don’t like it.  Maybe it’s the grey color of the wording, it feels really bland.  I would prefer black.  It’s unlikely I’ll ever use the “NOEL” portion of the inlay, or those grey snowflakes.

It’s also not quite as easy to layer the paint inlay images as it is with transfers since you have to place them into wet paint.

I was hoping to be able to use some of the inlays on my sleds, but that didn’t really work out.

There weren’t many options for designs that would fit the narrow slats, but Mr. Q helped me come up with the above design.  The tree farm wording ‘on top’ of a set of three trees.  Not a bad layout, but I didn’t think it had enough impact.  Maybe it’s that grey color, or maybe the writing is just too delicate for the sled.  What do you think?

I ended up sanding the paint inlay off and repainting the sled using some stencils.

I then decided to use another section of the paint inlay on a simple wooden crate.

I’d painted and stenciled a couple of crates in a pretty aqua blue a few years ago, the one on the bottom sold but the one stenciled in white did not.

So that crate was slated for a makeover this year.

I repainted it in Dixie Belle’s Drop Cloth on the outside, and their Juniper on the inside.  Then I cut out and arranged various segments of the Noel paint inlay to fit the side and applied them (you can find full instructions for using a paint inlay here).

Now, don’t get me wrong.  I think the crate turned out pretty adorable.

And I love the paint inlay product from I.O.D. in general.  I’ve gotten lots of use out of the Rose Chintz

and Gregory’s Catalogue.

I just don’t think that I.O.D. hit it out of the park with the designs for Noel.  One adorable project for $46 isn’t good enough.  And frankly, I set the bar pretty high for I.O.D.  I usually absolutely LOVE their style.

In the end, you can get a lot more bang for your buck with a couple of reusable stencils like the one I used on this chair.

I’ve used this stencil over and over and over on so many things and it’s still going strong.

All of this being said, I haven’t completely given up on the Noel inlay.  I may find some more ways to use it between now and Christmas.

I’m curious, have any of you purchased the Noel paint inlay?  And if so, have you found lots of things to use it on?  Feel free to shout it out in a comment if you disagree with my assessment.

In the meantime, the crate is for sale at $38 (SOLD!).  If any of my local readers are interested in it, send me an email at qisforquandie@gmail.com.  Otherwise it will head into the shop next week!