

First, an update on Wednesday’s post about the green table. Shortly after publishing that post I realized that I didn’t want to part with the table. If I could solve its weight problem, and put some casters on it to make it more mobile, it really would provide the perfect neutral surface for staging photos of small items outdoors.

After flipping the table over, I realized that a lot of the weight was coming from some heavy wood pieces that were attached underneath to allow you to slide the table apart and add a leaf in the middle. Since I no longer even have the leaf, I could just remove those. I also realized that the table had once had casters and thus already had the sockets in place to hold them. I found 4 matching casters in my stash and just had to add them.
And just like that, my problems with the table were solved and now I’ll be hanging onto it.
Do you guys remember back in May 2021 when I contemplated putting a primitive sort of cupboard in front of the carriage house?

At the time I thought it would be a convenient spot for a potting bench, but those who commented on that post almost universally voted against it.
And P.S., after taking that photo above I realized I had the cupboard upside down. Ooops.
Anyway, I didn’t put the cupboard in that spot, obviously, since I now have my fabulous repurposed guest bed planter there.
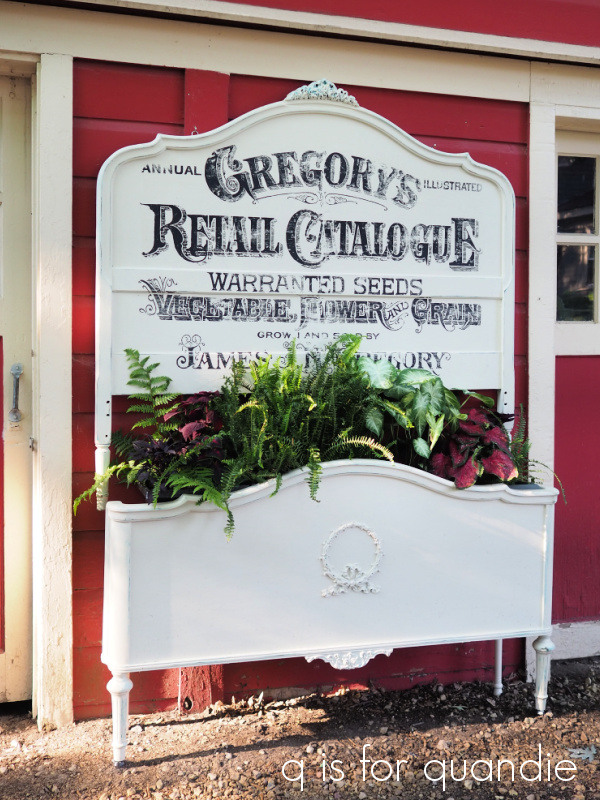
And FYI, the Fresh Flower Market sign that was there has moved up to the deck.

But I tucked that cupboard away for a rainy day, and although we haven’t had very many rainy days this summer, I’ve now given it a whole new look so that it can serve as the potting bench inside the potting shed.

Let’s start at the beginning. First up I had Ken add those large casters to the bottom. It makes it easier to move it around when necessary, plus I felt like the piece needed to be elevated somehow. Casters worked perfectly for that.
Next up, after my usual prep of cleaning and scuff sanding, I painted the outside in a mix of 3 different shades of white milk paint. I was trying to use up colors that I already had on hand. I had Homestead House Sturbridge White (which was too stark white), Fusion’s London Fog (which was too creamy), and Homestead House Stone Fence (which would have been perfect on its own, but I didn’t have enough of it). Between the three of them, I came up with a shade of white that was just right.
I got quite a bit of chipping with the milk paint on the top of the cabinet.

But none on the front. Mostly likely something was spilled on the top in its former life, and that substance resisted the paint. But I’m OK with that. I like chippy paint. After sanding well and vacuuming away any loose paint, I sealed the milk paint with two coats of Dixie Belle’s flat clear coat. That will help seal any chipping paint, and I can easily wipe the top down when it gets dirty.

Today’s q tip: Always seal chippy milk paint with a clear coat before trying to add transfers over it. Otherwise the transfer will pull off your paint, rather than the transfer sticking to your surface.
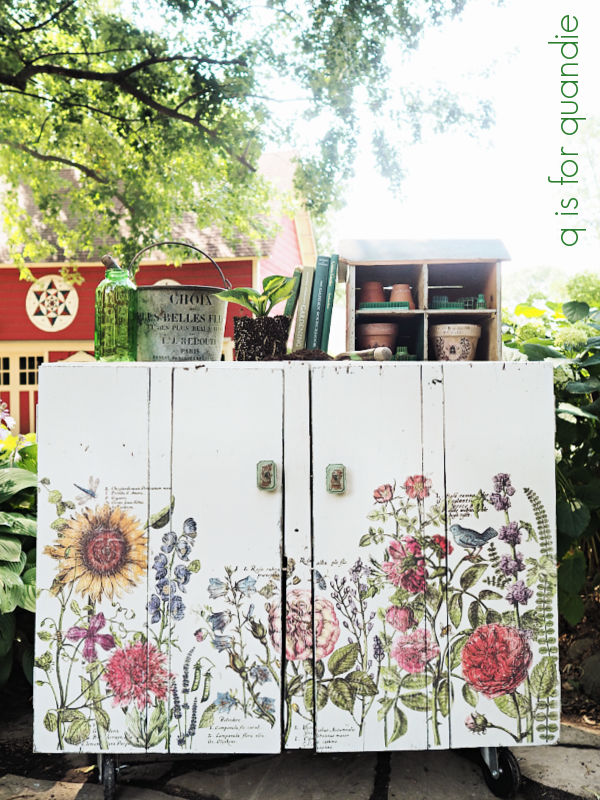
Next up I added some I.O.D. transfers to the front doors.
![]()
I used all of their Botanist’s Journal transfer (a section on either end) and then filled in the middle with some of their Ladies in Waiting transfer.
![]()
I felt like these graphics were perfect for a potting bench!
![]()
I have to mention here that once again I ordered the I.O.D. transfers from The Painted Heirloom. I ordered them on Saturday, and received them on Monday! I was super impressed by the speedy turn around. I’ve ordered from Vonda a few times and have always had great results.
Once the transfers were applied, I sanded lightly over them with 220 grit paper to distress them and give them a more faded appearance. Then I sealed them with another coat of flat clear coat.
You may also have noticed by now that I removed the original round wooden door closure thingie from the cabinet. I didn’t like the look of it. Instead I added magnetic closures to each door to keep them shut, and I put some knobs in holes that were already there.

These knobs came from Hobby Lobby, but I purchased them a long time ago so I’m not sure if they still have them.
I debated whether or not to paint the inside of the cupboard. Since I was keeping it for myself, I considered taking the easy way out and leaving it alone. But I knew it would look great painted in Dixie Belle’s Gravel Road. I love using this warm, dark grey inside cupboards.

There’s lots of space inside this cupboard for storing extra clay pots and other gardening supplies.

To be honest, it’s not likely that I’ll do much actual potting in the shed. It will really be utilized more for storage of gardening supplies and possibly the occasional flower arranging.

I tend to plant up most of my larger pots where they sit. Most of them get rather heavy once they are full of dirt and plants.

With the completion of the potting bench, I pretty much have all of the pieces completed for my potting shed makeover.
But now I’m stuck. I really should re-paint the interior of the shed, but … well … I’m not looking forward to that task. I’m struggling with lack of motivation to get that done. We’ll see if I get to it before the end of summer.
In the meantime, I’m cutting myself some slack (the benefit of being your own boss) and working on a few toolboxes (such as the one I shared at the beginning of this post) instead. So stay tuned for that.

So tell me, which version do you prefer? ‘Before’ (and upside down) or ‘after’?

After 100%
LikeLike
Me too 😉
LikeLike
Absolutely after! Gorgeous!!
LikeLike
Thanks Donna!
LikeLike
Oh my gosh! It turned out beautiful! it definitely needed those casters. Good call!
LikeLike
Yep, definitely need to be lifted up off the ground a bit. I love using casters for that.
LikeLike
Looks great!
LikeLike
Thanks Cyndi!
LikeLike
Another great save!!! Fresh and floral. Perfection.
LikeLike
I thought I really liked the before but then the after grabbed me! 😳 I like your placement of the flowers. I’m struggling with some door fronts and flower placement. Could you please fly down and assist 😉.
As always I enjoy looking forward to your blog!
Smiles, alice
LikeLike
Sure. Where do you live again? I’m guessing it’s too hot for me wherever it is 😉
LikeLike
Boy howdy you are so correct! Hotter then h@LL Texas! Plus I now have rebound Covid! A double whammy! 😫😳☹️
LikeLike
Yikes! I think I’ll stick with Minnesota for now.
LikeLike
I love the after!!! Those florals just made it!
LikeLike
Thanks Freida!
LikeLike
I liked the before, but the after is perfect!
LikeLike
I liked the ‘before’ also, but now that I’ve given it a new look I can’t imagine having left it ‘as is’ 🙂
LikeLike
Definitely after! I’ve used botanist’s journal before on a tall slender dresser. It was beautiful and hated to let it go. That’s one of my favorite transfers. I have never really used milk paint except for on a huge farm bed, and then it didn’t chip very much. I was a newbie though and gave it a good sanding before hand. And that was probably my mistake. Anyway I’ve always love seeing the pieces that you’ve use milk paint on. Great job as always. 🙂
LikeLike
Yep, that thorough sanding would have helped your piece to not get chippy. But even when you think you know exactly when or why milk paint will chip, it still can surprise you!
LikeLike
I like the before as I perfer just painted worn look rather than stencils.
LikeLike
I definitely like a mix of plain, worn painted pieces and those with stencils or transfers on them.
LikeLike
Oh my goodness!!! This is amazing. Casters are awesome on this piece and the transfer just makes it! An all around beauty of a makeover. So glad you held o to that table. I think you would have had regret down the road if you had sold it.
LikeLike
I think you’re right about that Sheri!
LikeLike
After, After, After!! Gorgeous!
LikeLike
Thank you Barb!!
LikeLike
After definitely! It’s so light, bright and fun now. It looks like it will afford you a good bit of storage and I can’t wait to see how you set it up in the potting shed. Are you going to keep the checkered floors when you do get around to painting the shed? I hope so because I just love those in there! 🥰
LikeLike
Yes, I absolutely plan to keep the floor. I’m not sure if I’ll attempt to touch it up, or just leave it alone though. We’ll see.
LikeLike
Definitely, AFTER!
LikeLike
Thanks Kimberley!
LikeLike
After! The genius strikes again!!
LikeLike
Thanks Gay!
LikeLike
The after piece is beautiful. Just looking at it makes me want to do some gardening!
LikeLike
That’s perfect! A potting bench should absolutely inspire people to do some gardening, right?
LikeLike
Wow, another great garden ready art piece!
LikeLike
Thanks so much!
LikeLike
WOW- After is my favorite for sure! I just love the way it turned out and it will be so cute for your potting shed as well as providing functional storage. Another make over that is just fabulous!
LikeLike
Thanks Cheryl! Yep, this one will be perfectly functional 🙂
LikeLike
Definitely after! It’s SO cheery! Great job. I love that transfer and the dark grey on the inside.
Melissa
LikeLike
Thanks Melissa!
LikeLike
Super duper Miss Quandie! Who says you can’t make a silk purse out of a sow’s ear!!! Wow what a difference! I love the caster wheels and everything you did with this kind of sad cabinet!
LikeLike
I have to admit, I thought you might not like this one because of the over abundance of florals (I know they aren’t your favorite), so coming from you I am taking this as high praise indeed!
LikeLike
Of course the after is much better. Looks like a potting bench now. The stencil is perfect.
LikeLike
Thanks sis!
LikeLike
Definitely the after!!!! Looks so happy. I think painting the inside of the potting shed is a great idea.After all could you put this BEAUTY in an shed that wasnt as gorgeous as it is? Take care. Possibly you could recruit your sister to help? Have a painting party.
LikeLike
You are so right Charleen, and exactly what I was feeling … that I couldn’t put this piece into my rather shabby looking shed, it would just be wrong. Luckily my friend Annie has volunteered to help me paint the shed. We’ve got a painting date on the calendar, so there will be a painting party coming up 🙂
LikeLike