
On Friday I shared the makeover of my friend Viv’s nightstand.

I mentioned in that post that I was also working on the larger dresser that went with it. Unfortunately, I didn’t get a ‘before’ picture of the dresser. To be honest, it was just so big and heavy that I didn’t want to spend the energy to get it set up for a ‘before’. So you’ll just have to use your imagination knowing that this large dresser was the same wood tone as the nightstand, and initially had the same round wooden knobs.
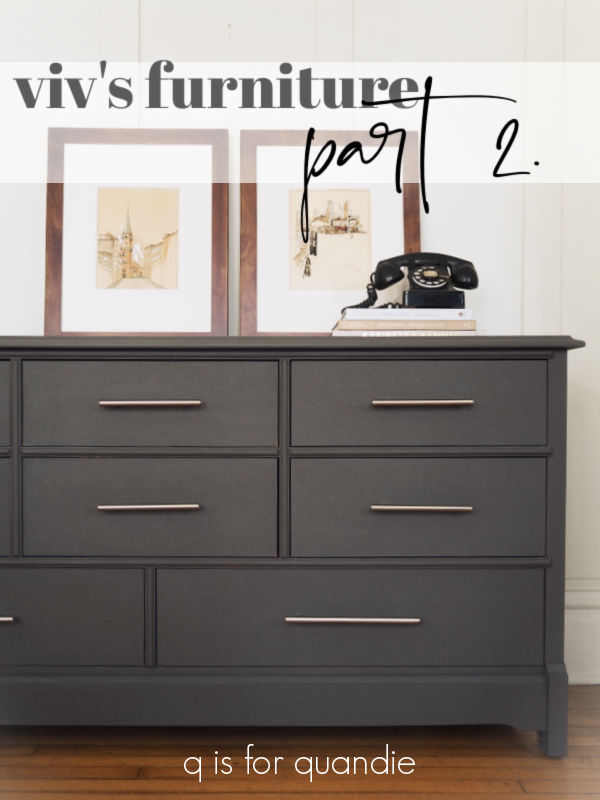
And now it looks like this …

I followed the same process that I used on the nightstand on this dresser. I filled the holes for the original knobs with Dixie Belle’s Mud. Then I scuff sanded and cleaned it. I added a base coat of Dixie Belle’s B.O.S.S. just on the top, because much like with the nightstand, it had some water rings and other damage to the original finish that might have popped through otherwise.
Finally I painted it with two coats of Dixie Belle’s Gravel Road.

Once dry, I sanded lightly with 220 grit paper and then finished it all with some of Dixie Belle’s Easy Peasy spray wax.
You might think that all of that took a fair amount of work and was rather time consuming, but that was actually the easy part. For me, anyway.
The hard part for me was adding all of those drawer pulls … and keeping them straight.

I fell back on a trick I’ve learned from my handyman, Ken. I made a template.

First, I measured all of the drawers. I initially thought that the top two rows of drawers were all the same size, but lucky I measured, because they weren’t. The top row drawers are 1″ shorter than the middle and bottom row. So I have two horizontal lines on my cardboard template. The top line is for the taller drawers, and the next line is for the shorter drawers. I simply used the template on all of the taller drawers first, then cut that extra 1/2″ off and used it on the shorter drawers.
Unfortunately, I totally messed up when I got to the two bottom drawers. Although I had adjusted everything for the different width of those two drawers, I completely forgot that Viv had purchased wider pulls for them. So I drilled my holes at the same distance apart as the shorter pulls. Ugh!
So I had to go back to the drawing board and fill those holes back in with the Mud, wait for them to dry, sand, re-paint, then re-measure everything and drill again. Luckily I’d only done one of the bottom drawers when I realized my mistake.
And fortunately, it wasn’t too difficult to fix.
I added just a few props before photographing this one, my grandpa’s artwork, some books and an old phone.

Once again, it was fun to give this piece an updated, more modern look.

I think it turned out rather fabulous, don’t you?
Thank you to Dixie Belle Paint Co for providing all of their products used in this makeover.

sure did!
LikeLike
Thanks Kim!
LikeLike
Interesting that you mud the misdrilled holes. As I misdrill often, I use dowels so that I need not wait. This piece updated beautifully and the other is now the perfect partner.
LikeLike
My handyman Ken prefers the dowel approach as well. But don’t you still have to wait for the glue to dry, then still add a little fill to make it all smooth around the edges? Or is there some dowel technique that avoids all of that?
LikeLike
some of A , some of B. CA glue and spray is all but instand. glueing a ribbed owel tightly is fairly fast also, and has the sme integrity as the surrounding wood. often for me, it’s the wrong sized hole, not misplaced. the dowel method basicly allows me to start over from scratch.
LikeLike
I’ll have to check out that glue, I currently just use basic wood glue for almost everything. I definitely need to up my glue game! Also, good point about the wrong sized hole v. a hole in the wrong spot. You definitely need the dowel if you are re-drilling near or over the original spot. Thanks for those tips Neal!
LikeLike
The dresser looks Amazing ♡ I love the new look on both pieces!!
LikeLike
Thanks Diane!
LikeLike
The dresser looks fantastic! The dresser looks updated and refreshed. I like the clean lines😊
LikeLike
Thanks Monica 🙂
LikeLike
I love this look!! I am a more modern furniture kind of gal, really nice work!
LikeLike
Thanks Karen!
LikeLike
Fabulous indeed!
LikeLike
Thanks Netti 🙂
LikeLike
Looks great!
LikeLike
Thanks Freida!
LikeLike
Looks fabulous! Again another swell fix! Wish we were neighbors 😉!
Smiles, alice
LikeLike
Well, you’d have to be OK with long winters 😉
LikeLike
Now that could be a real challenge for me! 😂
LikeLiked by 1 person
Rather fabulous is an understatement! Vic has to be happy with this update! Bye bye orange😁
LikeLike
I think she is going to love it!
LikeLike
Elegant.
LikeLike
Thanks so much 🙂
LikeLike
Absolutely fabulous!!!
LikeLike
Thanks Suzi 🙂
LikeLike
I love how these turned out! Makes me want to paint our son’s dresser exactly like it! Great work!
LikeLike
Give it a go, it was fairly easy to do.
LikeLike
They turned out really nice.
LikeLike
Thanks sis!
LikeLike
I love this! Both pieces turned out beautifully. So fresh, and updated. This is one of my favorites you’ve done. You are so talented
LikeLike
Thanks Tamara, and it’s great to hear from you! Hope you are enjoying retirement 🙂
LikeLike
Just WOW!!
LikeLike
Thanks Rhonda!
LikeLike
Linda, I have loved all of your mid century modern refinishing! But this one is absolutely fabulous! What a cool color too!
LikeLike
Thanks Wendy, I love this color too!
LikeLike