

I recently pulled this schoolhouse chair out of my workshop to give it a fun holiday makeover.

In case it’s not obvious, this chair is child sized. It has a bit of a mid-mod vibe, don’t you think? I actually would have liked to strip and re-finish this one in that raw wood look, however it had some fairly significant damage to the veneer …

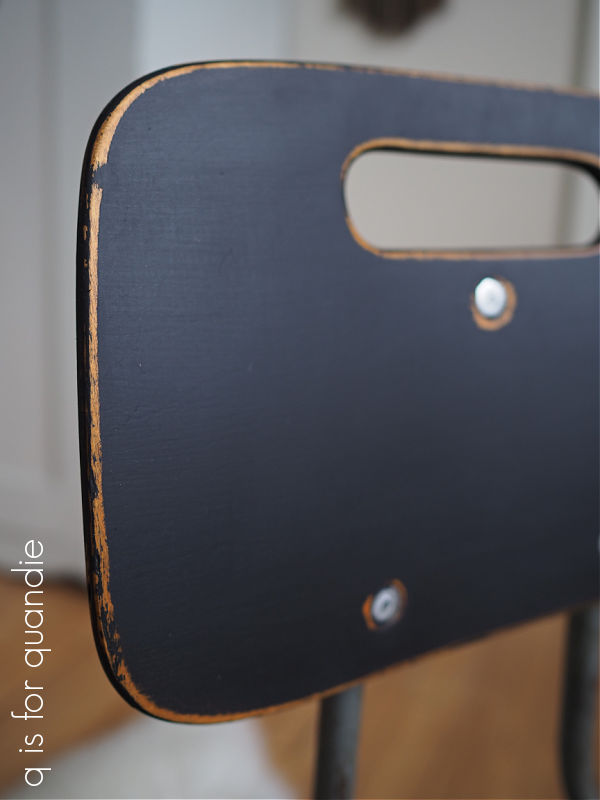
I feel like paint is the best way to disguise this sort of damage, so I decided to go ahead and paint the wood using Dixie Belle’s Caviar. But I also decided to leave the legs in their rusty, worn state. I think I’m taking a bit of a gamble with that, but I’m hoping that there will be a fellow rust lover out there who appreciates this choice.
My first step was to sand the chair all over, including those legs. That’s just to remove any flaking bits. Then I cleaned the chair well using TSP substitute. Next I sprayed the legs and the metal parts of the chair back with a Rust-Oleum clear matte sealer. I like to seal in the chipping paint and/or rust so it doesn’t continue to flake off. So the legs are beat up and rusty, but they are clean and sealed.

Next I painted the seat and back with two coats of Caviar. Once that was dry, I sanded to distress.
I specifically chose to sand the Caviar, and vacuum/wipe away any dust, before moving on to my next step, which is adding a stencil in Dixie Belle’s Drop Cloth. That’s because I wanted to avoid getting any of that black dust smeared into my white lettering. I’ve learned from experience to do this when using contrasting colors. It’s just a good way to make sure the white stays crisp.
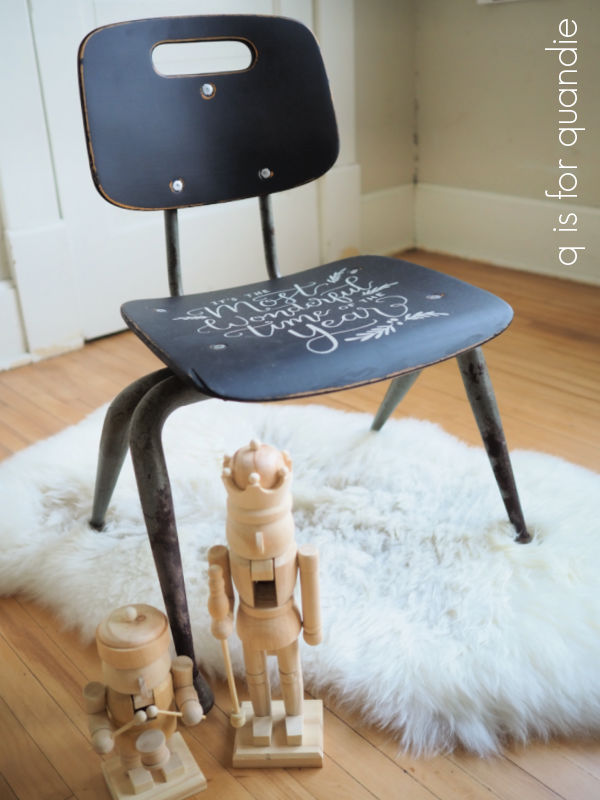
Next up I pulled out the Most Wonderful Time of the Year stencil that wallcutz sent to me when they offered to sponsor this post.

I added that to the seat of the chair using the Dixie Belle Drop Cloth.

It was a perfect fit. That’s because I ordered it that way. This stencil is available anywhere from 10″ x 10″ up to 21″ x 21″, so you can order the size best suited to your project. In my case, that was the smallest 10″ x 10″ size.
I used a small artist’s brush to fill in the bridges in a few spots to give this a more hand-painted look rather than a stenciled look.

If, like me, you don’t particularly like to do a free-hand design on your chalkboards, this particular stencil would be perfect for that too. It would mimic the look of a message that was handwritten in chalk.
On one of my recent posts about stenciling a reader asked me two things; what brush do I like to use for stenciling and how do I clean my stencils. I figure if one person is taking the time to ask that in a comment, there are probably more of you wondering the same thing.
First up, my current favorite brush for stenciling is the Best Dang Brush from Dixie Belle. I’ll admit, it’s not cheap at $25.95. So if you don’t do a lot of stenciling, you may not want to invest in this brush. However, if you do, it is one that won’t fall apart on you after six months of regular use like so many others.
It is a large brush, so it covers a lot of area quickly. I like that. The one downside to its size is that you may have to mask areas that you don’t want to accidentally hit with the paint, like over the edge, or a portion of the stencil that’s going to be a different color. I just use painters tape for that.

Now, as for cleaning my stencils, the honest truth is that I don’t always clean them. The only time I clean a stencil is if I’m just using it for one project at the moment and I’m about to clean my brush anyway. That’s because I clean both at the same time under running water. I use the Best Dang Brush to rub away the paint on the stencil, and then I finish with cleaning the brush. This works great as long as you do it immediately upon completing your stenciling. If you give the paint too much time to dry on the stencil it will be harder to get off.
This is certainly an instance where it’s better to do as I say, not as I do. With a stencil that has some fairly fine details, like this one in particular, your results will remain crisp if you keep the stencil clean. If you allow paint to build up on it, over time your edges won’t be as crisp. So yeah, I really should clean my stencils every time I use them. But hey, nobody’s perfect, right?

This chair just might be perfect though. OK, well, perfection is in the eye of the beholder. But if you love a mid-mod vibe and pieces that show a bit of history, then yes, you might call this perfect.

I think it would be adorable sitting next to the tree at Christmas, or maybe sitting next to your door to welcome guests as they arrive for the holidays. It would also be perfect for adding to a child’s bedroom during the holiday season. It is for sale, and if it doesn’t go to one of you local readers then I’ll be adding it to my growing stash of holiday items that I’ll take in to Reclaiming Beautiful (the shop in Stillwater, MN where I sell on consignment).
If you’re local and interested in more details, check out my ‘available for local sale‘ page.
Thank you to wallcutz for providing the stencil, and to Dixie Belle Paint Co for providing the paint and the brush used for today’s project.

You’ve done such a marvelous job on this chair! It’s perfect. 🙂
LikeLike
Thanks so much Kymber!
LikeLiked by 1 person
I have this same chair! My grandson sits in it next to me and we do projects and it could sure use a makeover too. Thanks for the inspiration!
LikeLiked by 1 person
Shari, I had awesome grandparents, and many fine memories of doing things with them. Keep up the good work!
LikeLike
It’s a quick and easy project Sheri, give it a go!
LikeLike
Love this chair! Rust and all!
LikeLike
Thanks Sandy, I knew there were fellow rust lovers out there 🙂
LikeLike