

First up, congrats to Sue Pagels. I drew her name at random to win my giveaway from last week. Not to worry if you didn’t win, I have another fab giveaway today! Be sure to read all the way to the end of today’s post for the details.
You may have seen my buddha statue in previous posts about my garden.
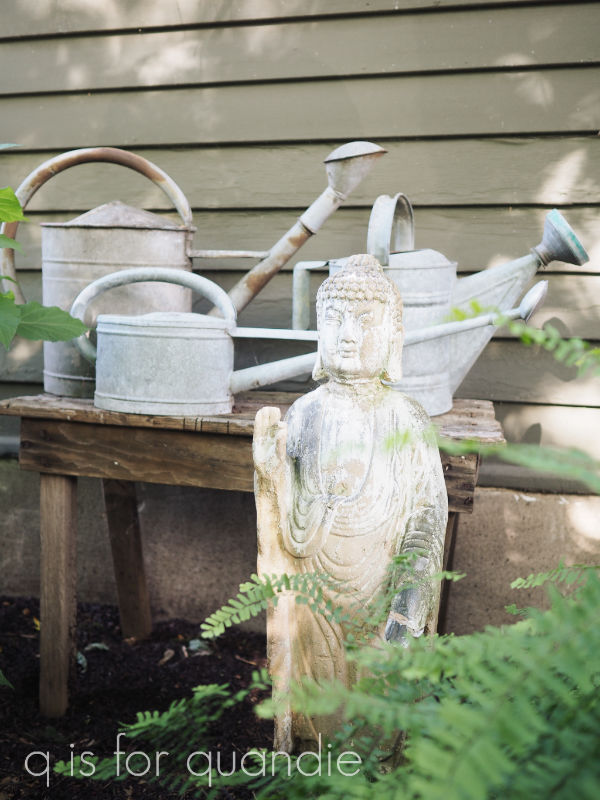
I’ve had him for years … possibly even decades. I have absolutely no memory of when or where I purchased him. He’s just been hanging around in the garden for a long time.
I’ve always left him outside year round, and over the last couple of years he’s been looking pretty rough. The last two, or maybe even three, springs I’ve said to myself “I really should do something about that.” But, I never got around to it.
Well, now that I’m retired from the day job, this is going to be the summer of getting around to it! Starting with buddha.
So here’s how he looked this spring, prior to his makeover.

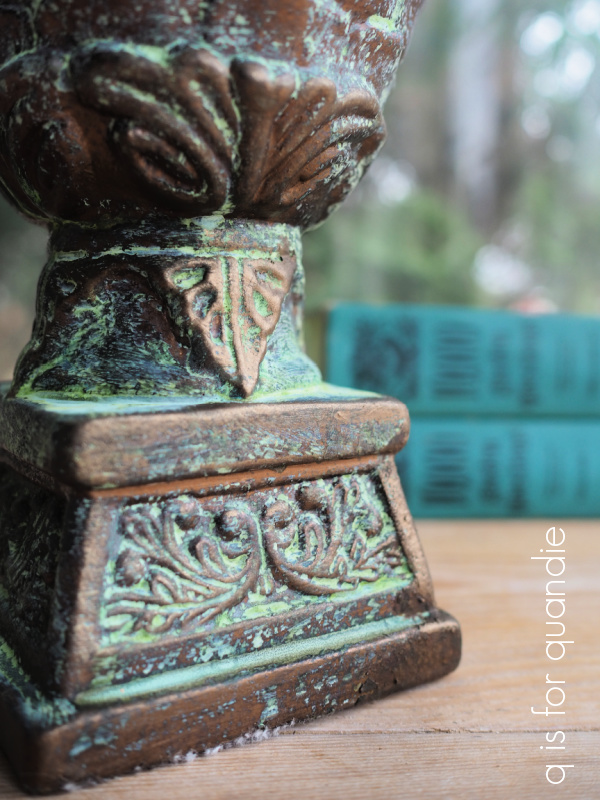
I believe he is made out of some sort of pinkish/orange concrete. I had once thought he was terracotta, painted to look like concrete, but he’s far too heavy to be clay. He must be concrete of some kind. He’s heavy and solid.
Anyway, I lugged him out of the garden and brushed the dirt off a bit before I brought him inside.
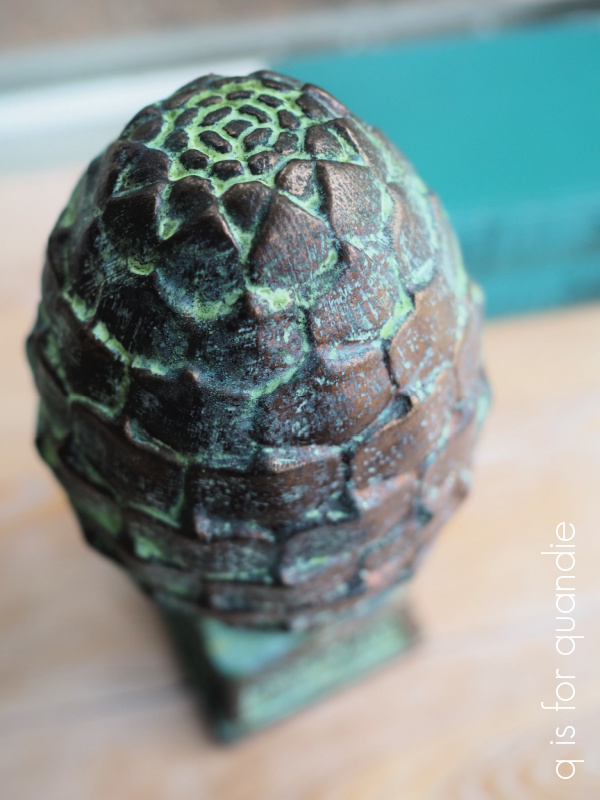
But before I got started on him, I decided it would be wise to practice my technique on a smaller item first. So I pulled out this acorn finial.
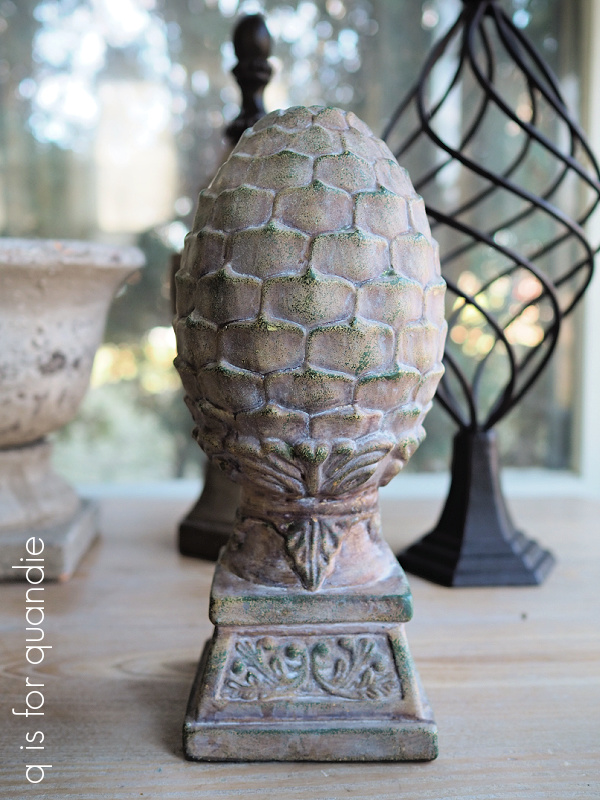
You may remember that I found this while thrifting a while back and I was going to leave it ‘as is’. But I decided this piece would be a good guinea pig.
So I pulled out my Dixie Belle patina paints in Bronze and Iron, the Green spray and some of their gilding wax in Bronze.

I started out by painting the acorn in a coat of Bronze paint. Once dry, I added a 2nd coat and while that coat was still wet I sprayed it with the Green patina spray.
To add a little more authenticity to the look, I then dabbed some of the Iron paint just on the corner and sprayed it (while still wet) with the Green spray to add a little rust.
Lastly, I used my finger to rub some of the Bronze gilding wax on some of the high points on the piece to bring some of that bronze back out again.
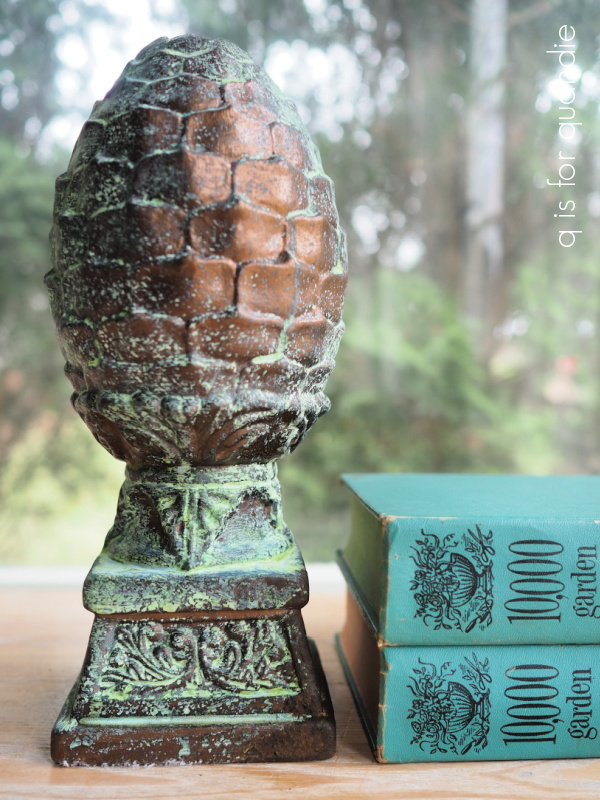
Yep, perfect. This is the look I wanted for my buddha. So I followed the same process; base coat of Bronze, allow to dry, 2nd stippled coat of Bronze, spray with Green spray while paint is still wet, allow to dry, stipple some Iron paint to add patches of rust, spray again with Green spray while wet, allow to dry. Step back and evaluate the results. Add some more rust spots. Allow to dry and then bring out some highlights with the Bronze gilding wax.
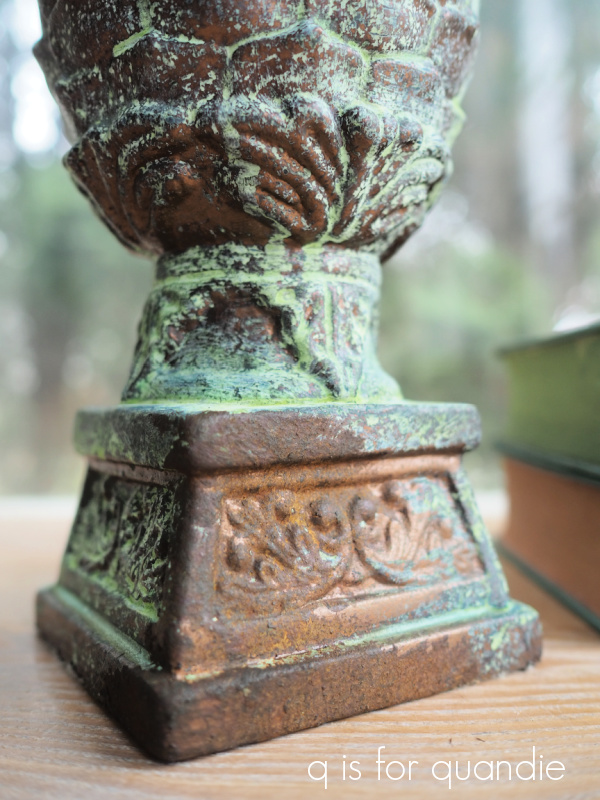
I applied the gilding wax using my finger, just rubbing it on to add some highlights on his nose and brow for example.
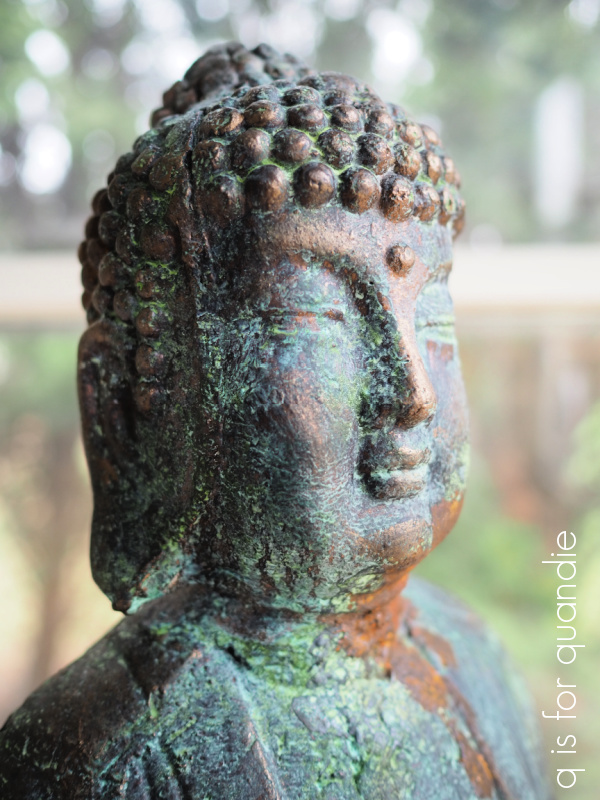
He turned out fabulous.

I put him back out in the garden a couple of weeks ago, and here’s how he’s looking now.
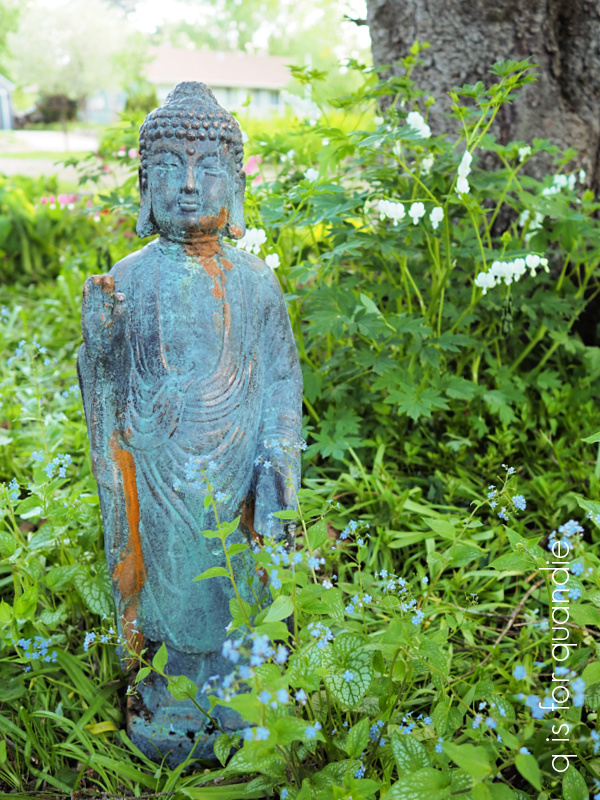
He’s looking pretty genuine, right?
Here are some q tips for you on using the Dixie Belle patina paints.

no. 1 – the verdigris patina develops a lot more quickly than the rust patina. The rust patina can take days to fully develop in fact, so if you don’t see as much rust as you want right away just be patient. If a couple of days go by and you still want more rust, you can always stipple on more Iron paint and spray again.
no. 2 – whether shaken or stirred, be sure to mix your paint thoroughly, and often, as you’re working with it. There are actual metal flakes in the paint that create the patina and they tend to settle to the bottom of your jar of paint rather quickly.
no. 3 – if you have distinct brush strokes in your paint, the spray may settle in those lines making them more apparent. For that reason, I recommend stippling the 2nd coat (or any subsequent coats) of paint. Stippling is just pouncing the paint on with an up and down motion.
no. 4 – you don’t have to seal your patina projects. However, if you’re adding patina to something that will come into contact with people’s clothing you may want to seal it (the patina will likely rub off on clothing). In addition, the patina will continue to develop over time, so if you want to halt that process, you can seal it. Dixie Belle does make a sealer for the patina paint called Patina Guard, but I find that it adds a bit of shine and I personally don’t like that look. That’s just my personal preference though, you may be just fine with it.

no. 5 – if you’re working on a flat surface, you may find that the verdigris looks like droplets on your piece (because you sprayed it on in droplets). I think this product gives a more authentic look on items with some texture and detail. The spray settles in the crevices and looks amazing.
I definitely think my buddha benefitted from a little patina.

And now you can benefit too!
I’m going to draw the name of one lucky winner to receive all of the products I used to create my bronze buddha. You’ll receive Patina Paint in Bronze and Iron, the Green Spray and some Bronze gilding wax.

The rules: To be eligible to win, simply leave a comment on this blog post. Maybe let me know what item you would turn into bronze!
Your comment must be left on this blog post, not on Facebook or Instagram. You are not required to follow my blog, although it would be awesome if you did!
I will randomly draw the name of a winner for today’s prize from all of the comments left on this post by Sunday, May 29, 2022 at the stroke of midnight (U.S. Central time).
The fine print: no purchase necessary, you must be 18 years of age or older to win, void where prohibited by law, the number of eligible entries received determines the odds of winning, approximate retail value of prize is $69, if the prize is not claimed by Friday, June 3, 2022 another name will be drawn at random to win, blah, blah, blah.
Thank you to Dixie Belle Paint Co for providing the Patina Paint I’m giving away today.

I would love to Patina a concrete outdoor wall thermometer I have. It also need some updating. Love all of your projects!
LikeLiked by 1 person
I spend hours painting a bronze verdigris on pots and statues trying to get that authentic look! I love the innovative products that we now have available! Love your new garden statue.
LikeLiked by 1 person
Buddha looks much older and wiser, now. We’ll done! I could use the patina products on some of my garden art!
LikeLiked by 1 person
I have been wanting to try this technique on my planter urns for so long! Would love to win!
LikeLiked by 1 person
Omg! Love this look and have a few garden items I would love to replicate this look!! Hope I win! Always love your posts and style@
LikeLiked by 1 person
The Buddha looks so much better after his patina treatment. I’ve been on the hunt for something like him for my garden. Love all your projects and look forward to getting your latest email.
LikeLiked by 1 person
Oh this is perfect and Sir Buddha looks much happier. Exuding even more peace and consciousness in his newly patinad (is that a word 🤣) state. I would love to do a frog statue I have in my garden with this.
LikeLiked by 1 person
I love how your Buddha turned out! I have a head I bought years ago that I’m thinking needs an upgrade. It looks like concrete but it is some kind of lightweight material. Love your posts. I get excited to read them when I see a new one!
LikeLiked by 1 person
Great job on your garden Buddha! I have a tall planter urn that would be a good candidate for this treatment as it is just too plain right now. Thanks for sharing.
LikeLiked by 1 person
Convinced! I went from…”oh, I like the worn concrete look” to “gotta try this..wow!”. The transformation of his face was amazing. Thank you for sharing the technique. Your q tips take away a lot of “yikes, I haven’t done this” nerves!
LikeLiked by 1 person
Wow! What a transformation! This is wonderful – I could use this my old pony statue in my garden. Thank you for showing this style.
LikeLiked by 1 person
Your Buddha definitely benefitted from this makeover! It really brought out his details!! I have a lantern I’d love to try this on! This is a really cool technique!
LikeLiked by 1 person
Amazing, it works like magic!
LikeLiked by 1 person
I thought he looked good before but the after is amazing! Looks authentic! I have a couple of garden pieces I need to try this on! Thank you (as always) for your inspiration.
LikeLiked by 1 person
The rust from his neck is perfection! I painted a plaster lamp to mimic just this effect and it is my favorite transformation I have ever done.I used a paint kit back in the day and have eyed these products with lust for a long, long time. What would I paint? The answer is what wouldn’t I paint? I adore this effect, but to answer your question, I have a piece on my desk that has thistles on it that is just pleading for a redo. If I don’t win (I type very well with fingers crossed.), I think I may have to take the plunge and get this marvelous assortment of paints. WOW!
LikeLiked by 1 person
The possibilities are endless!
LikeLiked by 1 person
Love your Buddha-he looks very handsome! I would love the patina method.
LikeLiked by 1 person
Oh my….which thing???. Maybe my vintage bird bath….yep….it could use use some awesomeness and become cool vintage!!!! Thanks for all your posts….my absolute favorite to follow!!!!
LikeLiked by 1 person
Buddha turned out great! If I were to win, the first thing I’d use the paints on is a finial similar to yours (I always thought “artichoke”) that’s been bumping around my shop for a while!
LikeLiked by 1 person
I love the results of the patina paints! So cool!!
LikeLiked by 1 person
Wow! What a fantastic transformation! Your Buddha looks amazing! I would have loved to have watched you work on this piece, I’ve been brave enough to play with patinas and rusts and .things. Thanks so much for sharing this project with us. May your Buddha continue to beautify your garden for decades more!
LikeLiked by 1 person
Laura, really like how your 2 projects turned out. Is the finial an acorn or a pine cone or artichoke? Very interesting but it is hard to tell. Love it.
LikeLike
Sorry, not Laura. I meant Linda! Teri
LikeLike
LOL, I was wondering who Laura was 🙂
LikeLike
Wow! He looks Fabulous!! I love that look and I have several items in my garden that I could use those products on. Thank you for the chance for this giveaway 😊
LikeLiked by 1 person
What a great technique. It gives me hope for all my 2nd hand pots and planters. But I’m in the rainy Pacific Northwest and rust is our 2nd name. Do you think it will hold up on outdoor items even with the top coat???
LikeLike
Buddha stays outside year round here in Minnesota, so we’ll see how the bronze patina holds up. But I also have several items I used the iron/rusty patina on that have been outside for several years now and they’ve just gotten a little rustier over time. I do think it depends a bit on what you are painting (is it wood, concrete, metal, plastic) and how well the paint itself will adhere to that particular surface.
LikeLike
That looks beautiful and very expensive! I have two resins artichokes I would patina first! Then, once I had the hang of it, I would do the chandelier over our kitchen table!
LikeLiked by 1 person
I’m in love with your Buddha ❤️
LikeLiked by 1 person
Oooooooooh! So cool. I have a concrete cherub (just the head and wings) that would benefit from a new look.
LikeLiked by 1 person
Oh my goodness! The patina paint really made your Buddha pop! He will definitely be seen amongst all the beautiful foliage.
LikeLiked by 1 person
That Buddha is way cool! Amazing technique! Thanks for sharing!
LikeLiked by 1 person
Buddha is looking pretty happy in his new garb! I find it quite interesting that when you apply the green patina spray to the bronze, it goes green but when you apply it to the iron, it rusts. Guess I should have paid more attention in science class way back in the day. 😜
LikeLike
You and me both! I’m sure there is some chemistry behind it, but chemistry was the one and only class I ever struggled in. All that memorization of the periodic table. Yuck!
LikeLike
Good job Miss Quandie as per usual! I’m intimidated by your endless creative ENERGY 😀 Do you sometimes, ever, not feel like working on something? Do you ever need to motivate yourself to start or are you ALWAYS rubbing your hands together, raring to go? Is PART of the motivation that you’ll sell it for moolah? Another blog that I follow is ‘Confessions of a Serial Do it Yourselfer” and that girl, Christy, is a dang dynamo! I’ve never seen someone turn out so many projects! But she has a booth that she sells all her stuff at and I totally get her motivation/satisfaction…….she needs to keep it stocked (-:
LikeLike
I certainly have my days where I’m not motivated to work on anything creative. So on those days I take a break, watch bad TV, do the laundry, whatever. But so far the creative energy always returns 🙂
LikeLike
First of all, thank you so much for drawing my name as your winner in your last paint giveaway! I am beyond excited! I have two pieces waiting in the wings for their makeovers! Love the Buddha, he turned out fab! I do have a regal looking concrete cat that would look great too ~
LikeLike
You’re very welcome Sue!
LikeLike
I love the patina technique! I have a couple of garden urns that need to be updated and this technique is the perfect answer! Thanks for the timely post! I would love to be the lucky recipient of all the ingredients to try this look on my urns. Thanks for your sharing your talents and generosity!
LikeLiked by 1 person
Gorgeous! I have some items I would like to try this on; going in the memorial garden I am creating in remembrance of my mom.
LikeLiked by 1 person
OMGosh! Buddha looks so much better with the patina! Than cemet colored! I love Verdigris! Very pretty! Love to see what you come up with
LikeLiked by 1 person
Those products are so great! I have a cement planter that I would love to try it out with! Love your blog!
LikeLiked by 1 person
OMG that finish is amazing! I have a small Buddha in my garden too but it’s just concrete. I’ll definitely be trying out this technique this summer
LikeLiked by 1 person
The patina finish is amazing! Thank you so much for the helpful tips for using these products.
LikeLiked by 1 person
Love the new patina finish! Great reincarnation on this piece!
LikeLiked by 1 person
He does look really cool now. Can’t wait to see him in the garden.
LikeLiked by 1 person
Love your Q tips! I have a couple of planters that I’d love to try this technique on. Keep these great projects coming!
LikeLiked by 1 person
Both projects look wonderfully authentic to me. You did a great job! I would love to apply this technique to a concrete statue of a little toddler sitting and gazing out. He was from my Grandfather’s garden. I’ve had him for over 50 years. I have him sitting on a tree stump, greeting everyone who drives up the hill to my home. His head got knocked off and was re-cemented a long time ago and I’m hoping your painting technique might hide the evidence. Love your blog!
LikeLike
Oh, he lost his head! I do think this technique would help disguise his repair 🙂
LikeLike
I love the final results of this technique! Looks aged but refreshed! I look forward to your posts!
LikeLiked by 1 person
Wow, these turned out great! I can think of several items that could benefit from these products. Great giveaway!
LikeLiked by 1 person
Amazing! Love how it turned out. i have just the piece to try this on. a terra cotta chimney that I’m going to put in my new garden up north. Congrats on retirement.
LikeLike
Do you actually put fires in your chimney? If so, I’m not sure how this product will hold up to that heat. You might want to research that a bit before you paint it 🙂
LikeLike
No, no, its just a garden ornament 🙂
LikeLike
I’m not sure what I would use that patina on- but if I won, I’d find something in a hurry.
LikeLiked by 1 person
I love it! I haven’t tried this before.
LikeLiked by 1 person
Have always been afraid to try this, but you explained it very well!! Starts me to thinking of a bunch of projects I could do this with!! I have a small wheel barrel that would look cool on!! An outdoor pedestal too!! Hmmm thanks for the inspiration and I love the guinea pig!!
LikeLiked by 1 person
Your Budda turned out absolutely FABULOUS!!!! I would love to do this treatment on a couple planter urns I have, an outdoor tray, a pot, etc….the list goes on! That patina technique is the best!!!!! It could not have aged naturally any better or more beautifully than what you did to it!
LikeLike
I have always wanted to experiment with Dixie Belle’s Patina paints. I love how your Buddha turned out!
LikeLike