

I was surfing Facebook Marketplace lately and came across this lovely armoire.

Coincidentally, it was being sold by someone I know (in fact, I shared a tour of her lovely home over on the Reclaiming Beautiful blog a few years back). So I reached out and set up a time to take a look.
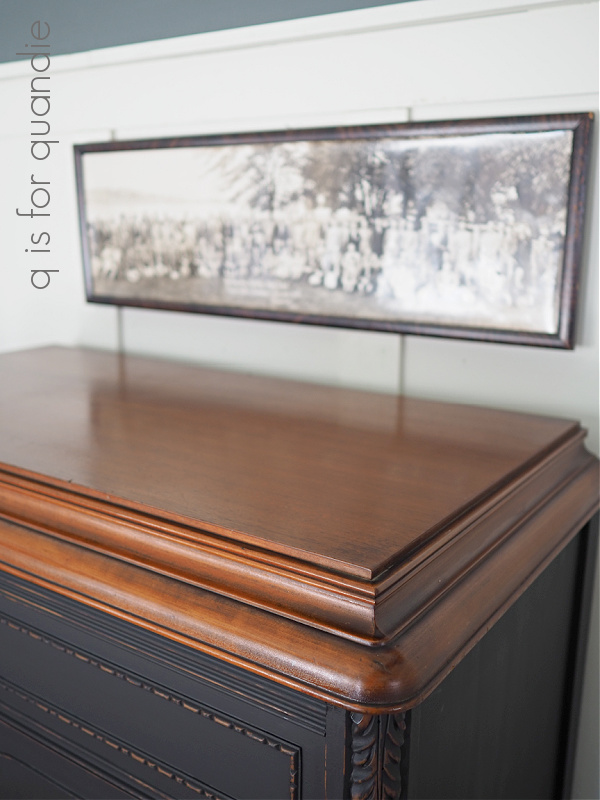
I have to confess up front, this piece has some very pretty veneer. I know there will be those out there who are appalled that I painted it. So I’ll say two things about that before I move on. First up, the finish was very dry and even completely worn off on the legs. It needed to be refinished at a minimum. Second, it’s only paint. Down the road it could always be stripped off again when this style of veneer is back in fashion. And it would be a fairly simple strip job.
In the meantime, I painted it. Or some of it anyway. The top was in good condition as is, and it had a lovely warm patina to it.
So I decided to leave it alone, get the paint on the rest and see if I liked it that way. Or perhaps more importantly, see if it sells that way.
I can always paint it later if it doesn’t sell like this.
So, I did my usual prep on the areas I planned to paint and then painted them in Dixie Belle’s Caviar.
Once I had the paint on, I really felt like it needed just a little bit more to make it stand out in a crowd so I added a stencil to each door using Dixie Belle’s Putty.

I’m often asked if I know what these foreign language stencils say, and while I don’t speak German, I’m fairly sure those are just names on this one. The name of a person, Fritz Kohnen, and the name of a place, Roßhaupten, which is a municipality in Bavaria. This stencil is from Maison de Stencils, and I really love it. I’ve gotten tons of use out of it. I may even have to buy another one because I’ve let the paint get really gunked up on this one and am starting to have trouble getting crisp lines.

Here’s my q tip for today; do as I say and not as I do and clean the paint off your stencils. Especially if they have fine lines and you want to be able to reuse them over and over again. Although that being said, I’ve definitely gotten my money’s worth out of this one and it would be well worth the price to simply purchase another fresh one at this point.
Next up I used the ‘wet distressing’ method to distress this one.

Wet distressing works really well with the Dixie Belle Chalk Mineral paint. If you’re unfamiliar with this technique, it’s basically using a wet cloth to rub away paint from the areas you want to distress rather than using sandpaper.

I like to use this method when I just want to carefully remove the layer of paint without removing any of the finish beneath it. With sandpaper you will often go right down to the bare wood. It has the added bonus of not creating any dust, which is great when you work in your piano room during the winter.
Just in case you’re curious to know whether I have a fabulous painting studio or not, no, I do not. Here is where I paint in the winter …
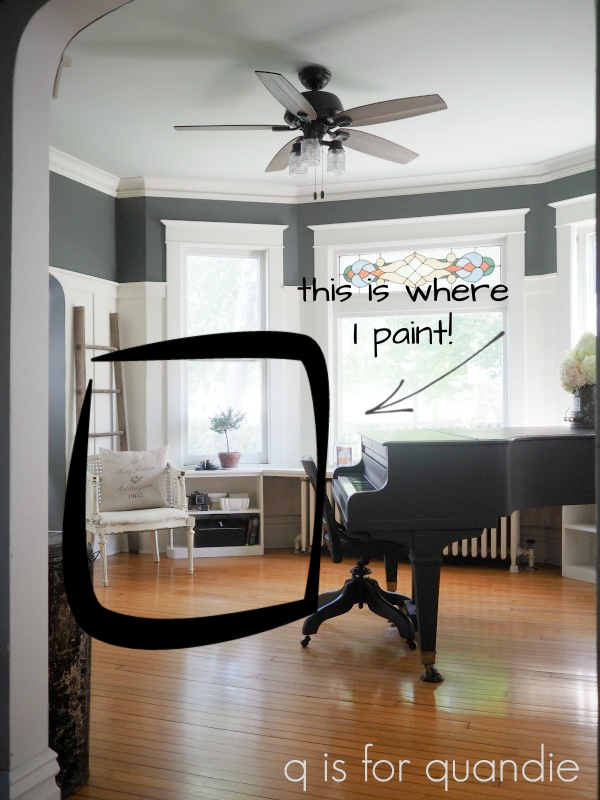
I move that chair out of the way, which creates enough open floor space for most pieces of furniture (although painting a dining room table would probably be out of the question for me in winter). Then I throw a drop cloth over the piano so that I can use it as a work bench. On the plus side, this room is really pleasant to work in. It’s flooded with light in the winter, which is nice. But it is smack in the middle of my house, so it tends to look fairly messy most of the time.
Anyway, back to the armoire.

After two coats of Caviar, adding the stencil, wet distressing, and a light sanding all over with 220 grit paper, I added two coats of Dixie Belle’s flat clear coat. To avoid the topcoat looking streaky over black, I added about a teaspoon of the Caviar paint to the clear coat before applying it.

I decided not to paint the inside of the armoire. Instead I gave it a good clean, followed by a light scuff sanding and then I buffed it up with some of Dixie Belle’s Big Mama’s Butta in the Orange Grove scent.
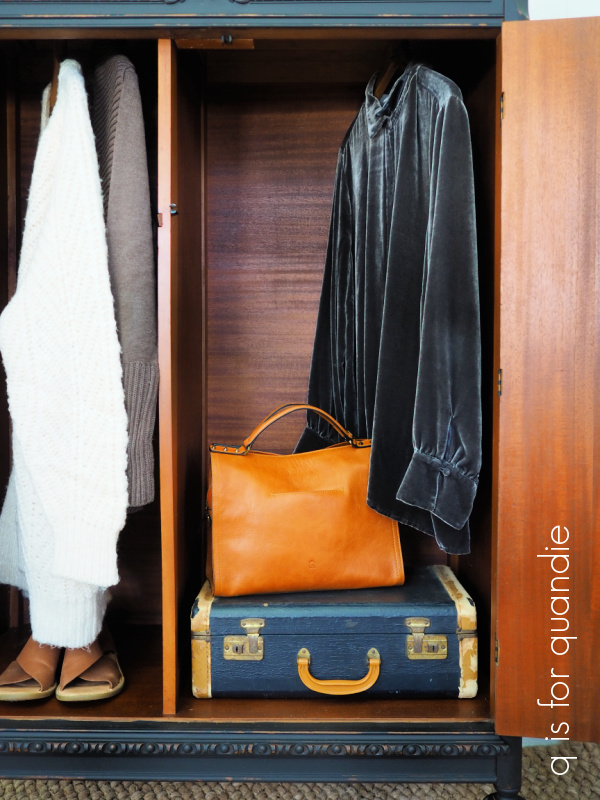
Now the wood looks gorgeous, and it smells good too.
There is a bar inside for hanging clothes. I debated having Ken add shelves, but ultimately decided to just leave this as an armoire for hanging items. Hopefully there is a buyer out there who needs more space to hang things. One could use it in the foyer for extra coats and jackets. Trust me, here in Minnesota we need an entire wardrobe of various jackets. The spring warm raincoat, the summer lightweight raincoat, the early fall lightweight jacket, the late fall medium weight jacket, the ‘January thaw’ winter jacket, and the ‘omg, it’s 20 below zero out there’ parka. We need extra space for all of that outerwear, am I right fellow northerners?

This was such a beautiful piece to work on and I totally enjoyed every minute of it.
I’ve already begun work on the next piece I plan to share with you guys …

I bet most of you can guess what I’m going to do with this one, right?
But in the meantime, this armoire is for sale locally so be sure to check out my ‘available for local sale‘ page for more details.

Thank you to Dixie Belle Paint Co for providing the products used in this makeover.

Beautiful
LikeLike
Thanks Skip!
LikeLike
This is gorgeous! I think the paint and distressing really makes the details stand out! And I think the hanging aspect is spot on. Never enough closet space for most of us. Especially in an older home and a place with real winter weather.
LikeLike
I hear that! I have very small closets.
LikeLike
Beautiful and the staging is fabulous as always!
LikeLike
Thanks Cyndi!
LikeLike
What a beautiful piece!
LikeLike
Thank you!
LikeLike
The black paint with the wood top of this armoire go so nicely together. It give it a warm, rich feeling. Great job!
LikeLike
Thanks Jill. I like that warm tone of the top too.
LikeLike
Lovely!! I’m enjoying your more frequent posts, always inspiring. 🙂
LikeLike
Thanks Amanda, glad you are enjoying my posts!
LikeLike
Very classic and elegant! Great choice on colour and stencil and remaining wood.
LikeLike
Thanks Laura!
LikeLike
Sure is pretty. I love painted pieces with stained or natural wood tops.
LikeLike
I’ve always loved that look on smaller piece, but wasn’t sure I’d like it on this one. But I did end up loving the way this one turned out 🙂
LikeLike
Oh I love the shape of this piece so much! I love the legs and the trim, and the profile of the top! The black is beautiful and the stencil is perfect! Another home run Miss Quandie!
LikeLike
Thanks Connie! That top is unique isn’t it?
LikeLike
Love how this turned out – just beautiful! Love how you kept the wood top and how the distressing highlights the details.
LikeLike
Thanks Cheryl!
LikeLike
My first thought was, “Oh, no! Don’t touch it.” With the snowy background it was so perfectly Swedish. And then I saw the finished product and shut my mouth. Gorgeous.
LikeLike
Sometimes those ‘before’ photos make a piece look better than it really is. In this case my before photo is a bit washed out, giving the piece a paler look than it really had. I did think this one would be gorgeous stripped and then lime waxed, but I don’t have the space to accomplish something like that in winter. Had I gotten this piece in the summer I might have been tempted to try something like that.
LikeLike
It turned our perfect, as far as I’m concerned. I have a chest that I might get brave and try something similar, but I would like a green so dark it looks black. Probably have to mix my own.
LikeLike
You might have to mix your own to get exactly the color you have in mind. Or you could use one of the chalk paints that you can have tinted to any color, like the Behr chalk paint. I’ve never used it myself, but it might be worth a shot if you want a very specific color.
LikeLike
It turned out great! I agree with it’s only paint! Some people, to me, are so silly about painting “antique “ furniture because of ruining the value. Very very few people have that valuable of a piece. Off my soap box 😉. It turned out great and Added value !
Smiles, Alice
LikeLike
I think we’re on the same wavelength about painting ‘antiques’ Alice! Thanks for your comment 🙂
LikeLike
This is right up there with my top bestest things you have done. Such a great job and it is a very handsome piece of furniture.
LikeLike
I love that description, it is handsome!
LikeLike
I love this armoire! I love the way that your black pieces turn out. They always have such a beautiful warm patina to them. This piece is just beautiful. 😊
LikeLike
Ooooo…..gorgeous!!! One of my favorites!
LikeLike
This is gorgeous. Everything you do is so beautiful! You have a great eye.
LikeLike
Bravo! I have a 5 piece gentleman’s wardrobe that would look great painted this way. It has two mirrors on the front and a top and bottom piece that hold 3 cabinets together. Do you have any videos showing the wet technique? I’m not sure how you were able to rub the paint off the raised areas without rubbing the flat areas.
LikeLike
Sorry, no, I don’t do videos. As for the wet distressing technique, you just have to be careful where you rub to remove paint from raised areas without rubbing the flat areas. It really is quite easy though. I hope you give it a try. Also, to be clear, this method works with paint that can be reactivated with water like a chalk style paint or a clay based paint. It won’t work with an acrylic or latex paint.
LikeLike