inspired by.

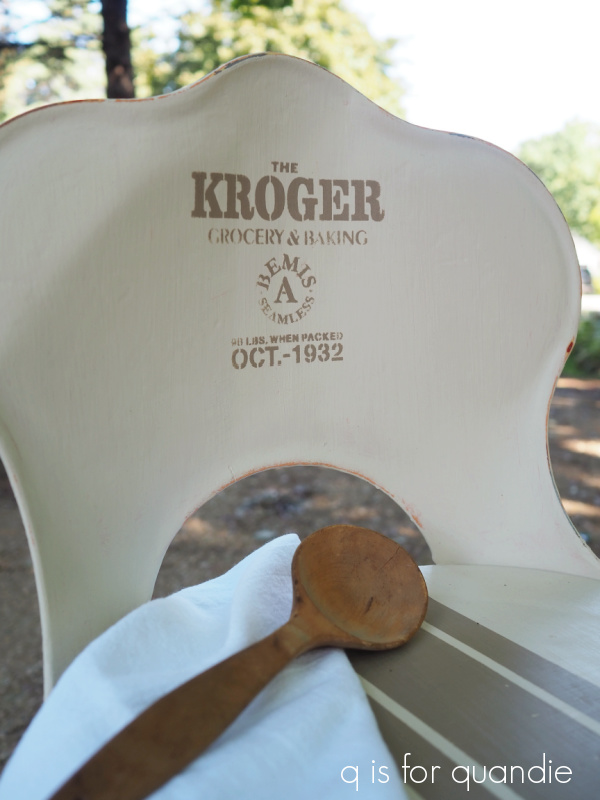
One of my readers offered me this little cabinet a while back.  She’d planned to give it a makeover herself, but never got around to it and finally decided to give it up.  Hey, it happens to all of us, right?

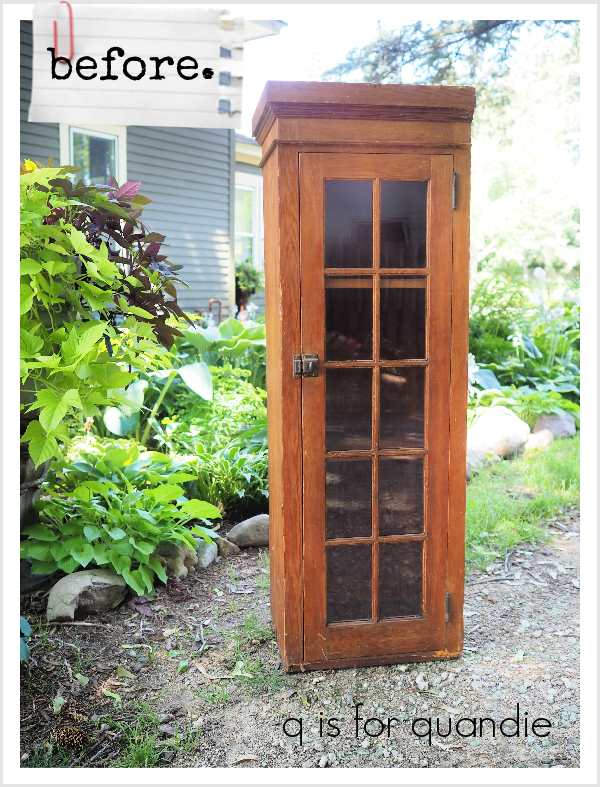
If you look at the top, right side of the cabinet, you can see that this piece was formerly a built-in.  There isn’t any trim on that side because it was up against a wall.  So the first step with this piece was to have my handyman Ken work some of his magic on it.

He wasn’t aiming for perfection, I just wanted him to add a little bit of balance to that side of the cabinet.

So he added a 1″ x 2″ board to the side to ‘match’ the other side, and then he moved that tiny bit of trim (with the arrow pointing to it in the photo above) from the back of the cupboard to the side instead.  He also added a little piece of filler wood behind it so that there wasn’t a gap.

Then he added that little triangular piece of wood under the 1 by 2 to sort of fake your eye into not noticing the lack of trim there.

I used some of Dixie Belle’s Mud to hide some gaps too.  Then I painted all of the new wood in Dixie Belle’s Coffee Bean.  I did that because I knew I wanted to paint this piece in milk paint, and milk paint over raw wood looks a bit different than milk paint over finished (or painted wood) and I didn’t want that area to stand out.

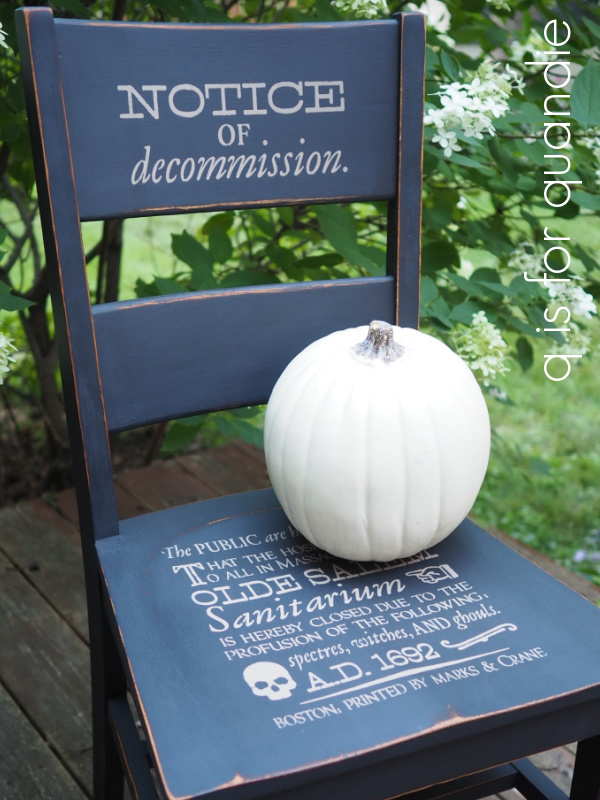
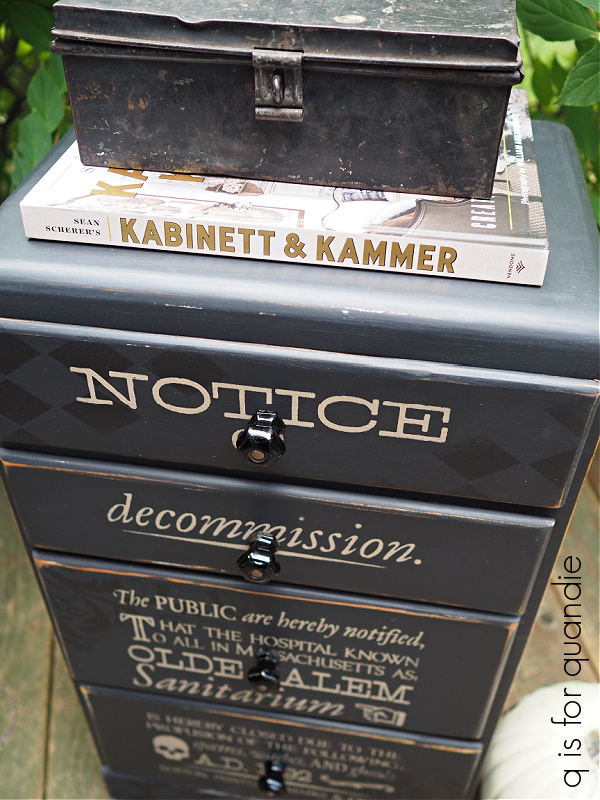
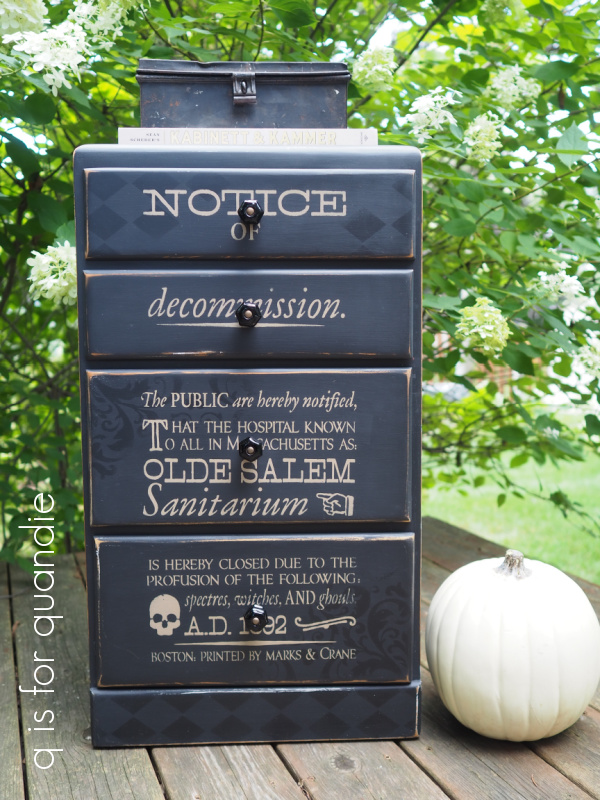
I mentioned that last week’s spooky furniture was inspired by the Kabinet & Kammer book.  I’m often inspired by things I see in decorating books, and today’s piece is another example of that.  This time my inspiration comes from Patina Farm by Gianetti & Gianetti.

Specifically, this cupboard in Patina Farm …

I love that smoky blue grey color, along with the really worn and distressed look of that cabinet.

I thought that I could probably recreate that look using Miss Mustard Seed milk paint in Aviary.  So I mixed up the rest of the Aviary paint I had on hand and started painting.

I really cut it close with the paint.  I’d already used some of the package of paint on both my sister’s trunk and a small chair, so I had less than half left.  Luckily I was aiming for a massively worn look because that helped disguise the fact that I didn’t really get perfect coverage with just two coats on paint on this piece, but that was all the paint I had left.

It was enough to give me the look I wanted though.

After painting the outside, I distressed heavily (by sanding with 220 grit paper) and then added a top coat of clear wax.  I ultimately decided not to paint the inside.  I think the smoky blue color works well with the tone of the warm wood interior, and with the door shut you really don’t see much of it.

I did clean it up a bit inside using Dixie Belle’s Big Mama’s Butta though.  This time I used their new scent for fall called Flannel.  It smells pretty much just like men’s cologne, so if you’re looking for a more masculine scent, this is it.  It would be perfect for freshening up the drawers of a gentlemen’s chest of drawers.

This cupboard would be a fun piece to tuck into a narrow spot in your home, and as you can see it looks great with some ironstone inside.

Although this is usually where I tell locals that they can check out my ‘available for local sale’ page for more details, but this sweet little cupboard is already spoken for!

Just a heads up to those of you who look for my blog posts on the regular, my sister and I are flying out later today to visit our mom.  We’ll be gone all of next week, so I’ll be taking a little bit of a blog break.  But I’ll be back with another post on October 4, so be sure to stay tuned!

the floral anthology tackle box.

Today I have another toolbox to share with you guys.  Only, wait, it’s not technically a toolbox.  It’s a tackle box.

Here’s the before …

A fairly beat up, and rather dreary putty color.

Sometimes I choose to gut these tackle boxes so that they have more open space for storing something inside, but this time I decided to leave the tray in place and just spray paint the interior.  I used Rustoleum’s Chalked spray paint in Charcoal, and I gave it a couple of coats of their Matte Clear Coat spray for protection.

Now you could use this tackle box for jewelry, or for your makeup.  Or really anything you want.

Once I had the inside painted, I painted the outside in Dixie Belle’s Sawmill Gravy.  Once dry, naturally I followed that up with some fabulous transfers.

The little bee under the handle is one of re.design with prima’s knob transfers.  The rest of the wording is from IOD’s Label Ephemera transfer, including the Paris 1858 on the front …

The floral transfer is more of the IOD Floral Anthology transfer that I’ve been using lately.

This time I used two halves, one to the right of the clasp and one to the left.

  I wrapped them around the sides …

And in front they meet in the middle.

Once the transfer was in place, I sanded lightly around all of the edges and then sealed this piece with Dixie Belle’s flat clear coat.

If you’re keeping track, this is the 3rd project that I have used sections of this one transfer on, starting with the belles fleurs suitcase

Followed by the the herbier toolbox

And now the floral anthology tackle box.  Plus I have enough left to do one more small project.

So if you’ve been looking at these transfers and thinking they are a bit pricey at around $30, keep in mind that you can get a number of small projects out of them.  Or of course, you could just do one large piece of furniture with them as well.

Isn’t she pretty?  The colors in the transfer look much more vibrant with the Sawmill Gravy behind them as opposed to the Putty and the original color of that suitcase.  Personally I love all three looks though, how about you?

FYI, this item has already gone to a good home and isn’t available for sale.

a little bit spooky.

Last year I shared a cute little chair that I gave a little bit of a spooky makeover to using a stencil.

I thought it was super cute, and it sold right away.  So I thought I’d give it another shot on a larger chair.

I purchased this pair of chairs thinking I’d save them for a similar treatment for Christmas (paint and a stencil) …

But recently I decided to try the Notice of Decommission stencil on one of them first.  If it doesn’t sell, I can always sand it down and paint it again for Christmas.

I started by cleaning the chair, scuff sanding it lightly and then painting it in Dixie Belle’s Midnight Sky.  I added the stencil using their Putty.

Next I sanded to distress and added a coat of clear wax.

And that was it.

Wouldn’t this chair be cute in your foyer, or on your covered front porch, for Halloween?

Since I loved the results on the chair, I decided to go out on a limb and use the same stencil on this little chest of drawers that I picked up at the White Bear Lake Trash to Treasure day.

I say I’m going ‘out on a limb’ because I really don’t know if a piece of furniture like this will sell with a slightly spooky theme.  But again, if it doesn’t sell I can always start over with fresh paint.  After all, that’s the beauty of paint.

It appeared as though this piece had been painted with spray paint, and it was starting to peel in some spots.  So I sanded more heavily than I normally would, I had to remove that spray paint almost entirely.  Your paint job is only as good as the surface under it, so painting over peeling paint doesn’t do anything to stop the peeling.

I then gave this piece a fresh coat of the Midnight Sky as well.  Then I decided to add a little depth to the piece by stenciling some designs using a slightly darker black with a tiny bit more sheen.  For that I used Dixie Belle’s Silk paint in Anchor.

I wasn’t entirely sure how this would work out, but I love the result I got.  It’s kind of subtle, and maybe even a little bit ghostly.  I used the Dixie Belle Harlequin stencil for the diamonds and the damask pattern is a stencil from re.design with prima.

Next I added my Notice of Decommission stencil, again in the Putty.

I sanded to distress, and topcoated with clear wax.

I had removed the original drawer pulls when I prepped this piece, and I decided not to put them back on because they would have covered up too much of the stencil.  So I went through my stash and found 4 black glass knobs.

The silver bolts that hold the knobs in place were a bit too jarring in the middle of the black knobs, so I painted them with the Midnight Sky first and then added a quick coat of Prima Marketing’s Bronze Age Metallique wax.  That warmed them up perfectly.

I staged my photos of this piece with Sean Scherer’s Kabinett & Kammer.

If any of you are familiar with that book, you’ll understand why.  The overall aesthetic leans slightly towards the dark and mysterious.

Even my use of the black metal strong box was inspired by this book.

I’m hoping that someone out there appreciates this style and will want to add a unique little chest of drawers to their home.

What do you think?

Both the chair and the chest of drawers are for sale.  Be sure to check out my ‘available for local sale‘ page for more details if interested.

Thank you to Dixie Belle Paint Co for supplying the paint used for these makeovers.

who needs tuscany when you have farmington?

A while back my … gosh … I don’t really know what to call her … my virtual work colleague?  I was initially thinking my ‘online friend’ but that seems to have the wrong connotation 😉 Basically, Deb is the contractual ambulance biller assigned to our account at my day job.  We have one of those work relationships that are conducted almost entirely over the phone and via email.  I’m pretty sure I’d literally only met her in person twice (or was it even only once?), but I speak with her on the phone several times a week and email her almost daily.  Recently she purchased the Farm Fresh Shelf from me and when she and her husband came to pick it up we got to chatting, and they invited us to help with their grape picking this year.

Deb and her husband own Crazy Legs Vineyard in Farmington, MN (check out their Facebook page).  They sell their grapes wholesale to local wineries.  As soon as she mentioned it, I knew that such an event would be great fun for me and my sister.

So bright and early this past Saturday, Debbie (my sister, the other Debbie in this story) and I loaded up the Bug with some lawn chairs and garden gloves, put the top down, and headed to Farmington.

As soon as we got there I knew we were in for a treat.  Just check out that barn!

And the gardens …

I wanted to just take a tour of the place rather than getting straight to the grape picking!

I absolutely loved this little side building …

Wouldn’t that be a charming spot for a little vintage shop?

I don’t actually know what’s inside.  It’s probably used for something far more practical.  But it sure is cute, and I love the arrangements in the window boxes.

Without a doubt, they just made the grapevine wreaths (I’m guessing they have plenty of vines to hand), and it looks like they might be painted in a faded barn red (I may have to borrow that idea for my own fall décor this year).

And isn’t this little courtyard area next to the pole barn charming?

They had a really fun and unique combination of flowers in the window boxes here.

I tried Angelonia (tall purple one in the center) in my front window boxes once and they were a complete failure, but they look amazing here.  I’ve never had great luck with Torenia (low purple ones on the side) either.  And I love how they combined these with the variegated New Guinea Impatiens.  Really unique and pretty fabulous.

Ultimately, I had to tear myself away from my own self-guided tour to do some actual grape picking though.

After some quick instructions on what to do, we set to work.

These vines were just loaded with grapes.

Apparently hot, sunny and dry is great grape growing weather.

We picked  a lot of grapes!

OK, we didn’t pick all of those ourselves, but we did pick a lot!

I was surprised when I loaded that photo onto my computer and realized that you can barely even see the bees.  There were A LOT of bees buzzing around that container.

  They were making quite a racket!

Here’s a quick q tip for you, if you are afraid of bees, or allergic to their sting, then grape picking might not be for you.

But neither of us were bothered by the bees, for whatever reason they didn’t seem to mind that we were cutting away their grapes.  They just moved on to the next bunch.  There really were plenty of grapes for all.

By noon, we were pretty much grape picked out.  Our gloves were totally saturated with grape juice and it was starting to get pretty hot out there under the noon-day sun.  Luckily it was time for lunch, wine, and some live music.

I totally enjoyed the band, The Dang Ol’ Tri’ole.  It was the perfect afternoon for sitting in the shade, enjoying a glass of wine and listening to some music.

To cap off the event, Deb’s son shot a cannon out of his … I don’t what you would call this thing … a giant pumpkin shooting cannon thingie …

Oh, and just to be clear, that little guy in the photo is not Deb’s son.  He was a spectator.

I’m fairly sure that someone in the next county over is wondering where that smashed pumpkin in their corn field came from.  Deb was just hoping it didn’t hit someone’s cow.  I don’t even know how far away that pumpkin landed, I never did see it come down!

And speaking of pumpkins …

They also grow pumpkins and squash at Crazy Legs Vineyard, and they sell them at the end of their driveway.

In addition to your typical orange pumpkins, they had lots of white ones …

plus a bunch of really unique varieties that I managed to not get a photo of.  I did manage to purchase a couple of them though, along with a few unusual gourds, and here they are …

I’m not exactly sure yet how I’m going to use these, but I’m sure something will come to me!

As we were heading down the driveway when we first arrived, we were chatting with another couple that was there for grape picking.  They joked that they couldn’t go to Tuscany this year, but this was the next best thing.  I have to say, I think this was even better!  Beautiful scenery, grape picking with friends, delicious pasta and wine for lunch, followed by live music.  We’d have paid a fortune to do that in Tuscany, and this was totally free (except for the pumpkins I purchased at the end) and no need for the 10 hour flight.

Who needs Tuscany when you have Farmington?

the naturalist’s toolbox.

I’ve got another toolbox to share with you guys today.

This time I gave the green one on the top of the pile a makeover.

I initially gave it a paint job using Dixie Belle’s Gravel Road on the inside, and Drop Cloth on the outside.  But it felt a bit too plain to me after that, so I painted the ends in Dixie Belle’s French Linen.

After distressing the paint job a bit, I dressed it up with transfers from a variety of sources.  The wording is from IOD’s Label Ephemera transfer, the butterfly on the top is from re.design with prima’s Parisian Butterflies.

  The sprigs of flowers on the front are from another of re.design with prima’s older retired transfers, and I didn’t even retain the name of it so I apologize for that.  However, if you’re looking for something similar, this one from Dixie Belle might work for you.

After painting the inside in the Gravel Road, I added a bit of re.design with prima’s Dark Damask decoupage décor tissue paper to the bottom.

I’ve yet to find another product that works as well for decoupaging.  I did give another brand of tissue paper a try and it was a dismal failure (I’ll be sharing that in a future post).  This décor tissue paper doesn’t tear and it doesn’t wrinkle, and it’s super easy to apply with some Dixie Belle clear flat coat.  I just ordered a couple of their newest designs to have on hand for my next toolboxes!

In the meantime, I hate to tell you, but this one is already sold.  One of my regulars purchased it along with the Farmers Market headboard sign that I shared a couple of weeks ago.

But I thought I’d still share it here with all of you.

What do you think?

the kroger stool.

A couple of weeks back one of my blog readers offered me a free cupboard and when she was dropping it off she also offered me this little metal stool.

So, I thought, why not?  I knew it would be a fun little project to give it a new look.

I started by sanding it well.  It had peeling paint in some areas, especially underneath, so I wanted to get rid of that.  As I was sanding I could see that this stool had been various colors in the past including red, and yellow.

I debated going with red myself, but I find that red is a bit of a tough sell for me.  So instead I decided to go with my favorite Dixie Belle Drop Cloth.

Continuing to keep it fairly neutral I used Dixie Belle’s Putty to add a grain sack style stripe to the seat …

And to add a Jami Ray Vintage Grain Sack Mini stencil to the back …

I sanded the edges to distress, and then I gave it all a top coat of clear wax.

For the finishing touch, I purchased new rubber feet.

I found these at my local Menards for $1.49 for all 4, and the color matched the Drop Cloth perfectly.

Hopefully this more neutral version of the stool will fit perfectly in someone’s kitchen.  Maybe even yours?  If you’re local and can pick it up, that is.

Overall, it was quick and easy to go from outdated peach to farmhouse neutral with just a little paint.

What do you think?

Thank you to Dixie Belle for providing the paint used on this project.

the bloom where you are planted toolbox.

I have another painted toolbox to share with you today.

Unfortunately I totally neglected to get a good ‘before’ photo of this one.

It’s actually the one at the back beneath the dark green one.  You can just see a bit of it there, and you can sort of see that someone half spray painted it brown.

Well, I painted over the outside in Dixie Belle’s Drop Cloth and I painted the inside in their Mint Julep.  Then I pulled out some scraps from the Cosmic Roses transfer from re.design with prima.  I’ve been using bits and pieces of this transfer on various things.  You last saw it on the Laundry Co sign …

I only had a few scraps left, but I was still able to trim them up and place them on both the outside of this toolbox …

plus on the inner tray …

This toolbox has a sort of bump out that holds the tray in place about half way down, and I was easily able to wrap the transfer around that.

I stenciled the top, and inside the tray using Dixie Belle’s Golden Gem Mousse.

I think the colors on this one are so pretty.

Normally this is the part where I mention that this toolbox is for sale locally, but this one has already gone home with its new owner.

I have a few more toolboxes coming up in the line up, plus a few other small projects I’ve been working on.  So be sure to check back next week!

As always, thanks to Dixie Belle Paint Co for providing the paint used for this project and to re.design with prima for supplying the Cosmic Roses transfer.