Earlier this week I was on my way home from work when I noticed a car pulled over just in front of me. The passenger had popped his hand out of the window with his phone as if to take a photo. At first I thought he was taking a photo of me, but I figured that couldn’t be right so I took a look in the rear view mirror. Just behind me was a guy driving a motorcycle with a side car, and perched in the side car was his dog. And the dog had googles on!
Now, I didn’t actually pull over to take a photo, but I found a good one of a different dog in a side car to borrow from the web (and I also found out that this is kind of a thing and they make Doggles just for this purpose!)

I had the biggest grin on my face all the way home after seeing that dog. He looked so blissfully happy riding down the road in that side car with the wind in his fur.
It just made me realize that we all need to take a moment and just enjoy the simple things. I don’t know about you, but I could use a few more ‘dogs in side cars’ moments these days to remind me of that.
OK, I just had to share that story with you guys. But now we can move on the official post for today.
In addition to new transfers, re.design with prima also released some new decoupage decor tissue paper designs this week.
‘Huh? What is decoupage decor tissue paper?’ you ask?

Well, this product itself is not new. They’ve had these decor tissue papers for a while now, but I haven’t done much with them aside from cutting one up and leaving it loose as a drawer liner. Basically these are a fibrous textured paper that is thicker and more durable than normal tissue paper, or even just decorative paper. The feel of it reminds me a bit of dryer sheets, or possibly interfacing material (if you have done any sewing and are familiar with that stuff). Not only is it harder to tear, but it also is breathable which makes it perfect for decoupaging. No more dealing with air bubbles!
I decided to finally do a little experimenting with it to see how I liked it. OK, I’ll be straight with you guys, I didn’t especially love some of the original designs that came out so I hadn’t really felt inspired to work with them. But I pretty much love all of the new ones that came out this week and that prompted me to get to work with them.

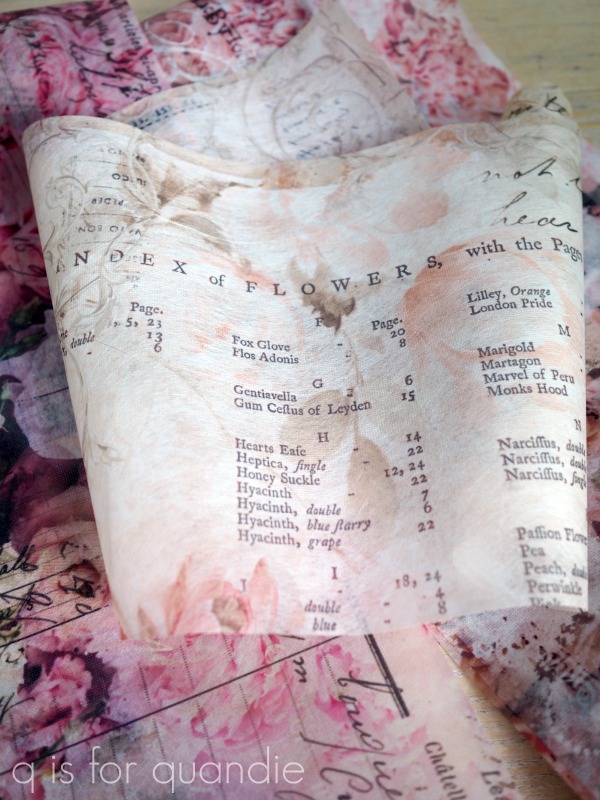
For my first project, I chose a design to use inside the hinged box on the mirrored box I shared with you last Friday. I went with a design called Floral Parchment and I used Dixie Belle’s Gator Hide as a decoupaging medium.

The first thing you need to know is that this paper is not fully opaque. In other words, it’s a little bit transparent. Enough so that the color you put under it will make a difference in the final look. Here’s how this paper looks over Dixie Belle’s Apricot paint color …
 See what I mean?
I’ll share a few more examples in a minute, but first, here is the technique I used to apply the paper which was definitely easy peasy.
When lining something like this, I think it’s easiest to cut the tissue paper to size first. Then do a test fit by placing it in the drawer dry. Then pull it back out and brush a layer of the Gator Hide inside your drawer. Next, place the tissue paper back in over the Gator Hide. As long as the Gator Hide remains wet, you can maneuver the tissue paper around to get it straight and into place. The paper is very easy to work with even when wet, I never felt like I was in danger of tearing it or leaving an unwanted crease somewhere. You can even lift it back up and re-situate it if you need to.
Once you have the paper in place, go back over the top with another layer of Gator Hide. Then use your fingers or your brush to go over the surface of the paper making sure that it is laying flat everywhere. This is super quick and simple, nothing at all like trying to get those dreaded air bubbles out when decoupaging with other papers.
Don’t panic if it seems like the paper has gotten rather dark and obscured looking with the Gator Hide. Once it’s dry it will lighten back up and be clear.
I was so happy with how my first example turned out that I decided to do a few more. I pulled out some old wooden boxes that my picker found for me recently.

I rather liked the patina on all of them, so I opted not to paint them (for the most part).
Let’s just look at them one at a time to see what I did with them.
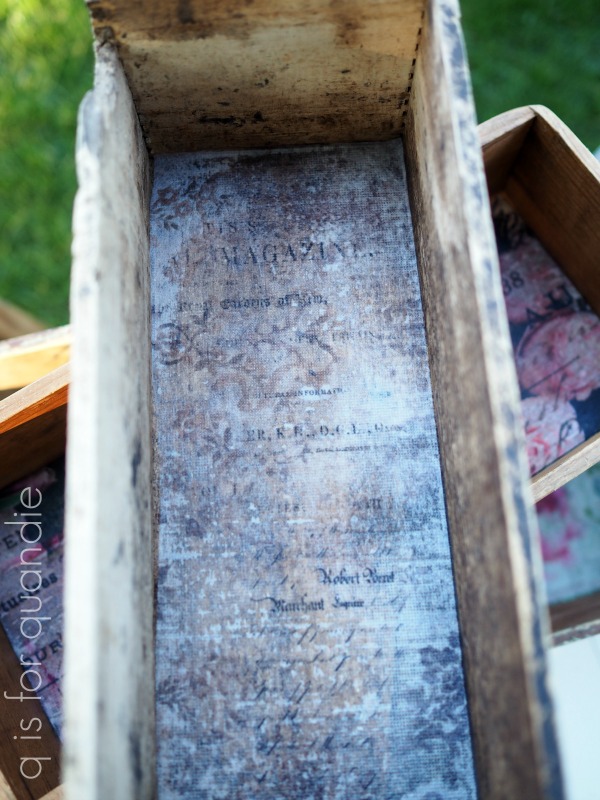
First up is the old cheese box. Here’s how it looked after I cleaned it thoroughly.

I wanted to keep that worn look on the outside, but also make sure the inside was suitably cleaned up and sealed. So I lined the bottom with the Washed Damask decoupage tissue and carried the final coat of Gator Hide up the sides inside the box.

Now you can store stuff in this box without feeling like it might get contaminated.
Next up was the rather plain box. Initially I’d thought about painting it, but instead I cleaned it up and then added some scraps from IOD’s Label Ephemera transfer to the outside.

And then I lined it with the Flower Market tissue paper (by the way, this is one of re.design with prima’s older decoupage tissue papers, not one of the new ones).

Last up is my favorite of the boxes. This box seems like it has been cobbled together from left over bits of wood. The top slats on the sides had a couple of coats of paint on them (there is a lovely minty green under the brown), while the lower slats must have been from an old packing crate of some kind.

I added the “Specimen Blend” wording, but the “Montreal” was already there.
I did a little more work on this one by adding some old drawer pulls to the ends.

Next I painted just the bottom inside with Dixie Belle’s Mint Julep and once dry, decoupaged some Floral Wallpaper tissue inside it as well.

What I really like about using the Gator Hide as a decoupage medium is that you know it will create a durable surface. So you could place some potted plants inside without worrying about doing too much damage to the bottom of the box (although I would remove them from the box for watering just to be on the safe side).

I love how all of these projects turned out. I’ve also seen others doing some really fun things with the decoupage decor tissue, like covering old books or putting it on the sides of drawers. And of course, you can also put it on drawer fronts too.

Here’s a q-tip for you on that though, keep in mind that these papers come with just two sheets to a package and each sheet is about 9.5″ tall x 30″ wide. So there’s a good chance you’ll need several packages if you want to cover (or line) multiple drawers. They are fairly inexpensive at around $8 to $11 per set, but if you need three or four sets that can add up quickly.
But I only needed about half of one sheet for the insides of my boxes. I could have lined all four using just one set if I’d kept them all the same. But these re.design with prima papers are all so pretty I couldn’t possibly have used just one!
Now, before you go hog wild and start decoupaging everything in sight, I have to note here that I have no idea how hard it might be to remove this stuff once it is applied. I suspect it might be quite a mess. So be sure that you want whatever you are decoupaging to stay decoupaged! I’m not sure there is any going back.
As always, thanks to both re.design with prima and Dixie Belle for providing the products used in today’s post.
If you’re looking for Dixie Belle products you can find them here.
If you’re looking for re.design with prima products you can find local retailers here, or online sources here.
And finally, I highly recommend looking for dogs in side cars. They are the perfect way to bring a smile to your face when you least expect it.


This is my very favorite work post of yours. I’m not confident enough to stencil, but this looks like I can do it. Plus I love the look. Thanks for the info! An Autumn project…Oh, and those doogles!
LikeLike
Aren’t they fantastic? (the doggles I mean, not my boxes)
LikeLike
They all turned out great. What a great way to finish the inside of a project. I would bet most people wouldn’t think of doing anything to the inside of drawers but when it is done it really makes the whole thing (dresser/drawers/box etc.) standout that much more. And… the dog in the side car made me smile too.
LikeLike
You just gotta love a dog in a side car!
LikeLike
The side car would be fun to see. The boxes are fun. Nice way to line them.
LikeLike
Thanks sis!
LikeLike
Many projects have stalled in my head because they don’t seem finished before I even start them…does that make sense? This seems like an ahaa moment! I’m not big on the floral, but I love the look of print (in any language) to complete my cigar and jewelry boxes I’ve saved up!
Is it possible to show the finished product of the Peach drawer? So you’re saying the paper will take on the hue of the underlying color…like a camelion ? I likey! Thank you for the inspiration!
LikeLike
Yes, exactly. The paper shown in the 3rd & 4th photos is the one I used over Apricot in the 5th photo. You can see how the hue of the paper has become much more peachy over the Apricot paint. If you click on the underline words ‘mirrored box’ in the post, that is a link that will take you right to the post where you can see that piece finished.
LikeLike
Thank you for the dog in a side car story-what a great start to the day. The decoupage paper sounds interesting and fun in small spaces.
LikeLike
You’re welcome Laura!
LikeLike
Loved the doggie in the side car anecdote….an incredible day brightener, as are the decoupaged drawers!
LikeLike
Thanks Michaela! Seeing that dog really did make my day 🙂
LikeLike
You’ve got some cool boxes there! I love how you “shined” them up and the tissue paper is nice in these SMALL doses…..And the doggie sighting, yes! We’ve got four dogs so boom! I love it Miss Quandie!
LikeLike
I think you need a side car Connie! Take those dogs for a ride 😉
LikeLike
“It just made me realize that we all need to take a moment and just enjoy the simple things.“
Indeed. And your blog, full of pretty, interesting, gussied-up old things like old boxes lined with pretty floral papers, and sharing about everyday life happenings – like gardens, not-collections, house tours, barn sales, & the like – is one place I know I can go to spend a few moments enjoying some simple (and special) things. Thanks.
LikeLike
What a lovely compliment, thank you so much Marguerite!
LikeLike