
Remember the pile of furniture that I purchased at the Linden Hills neighborhood garage sale?

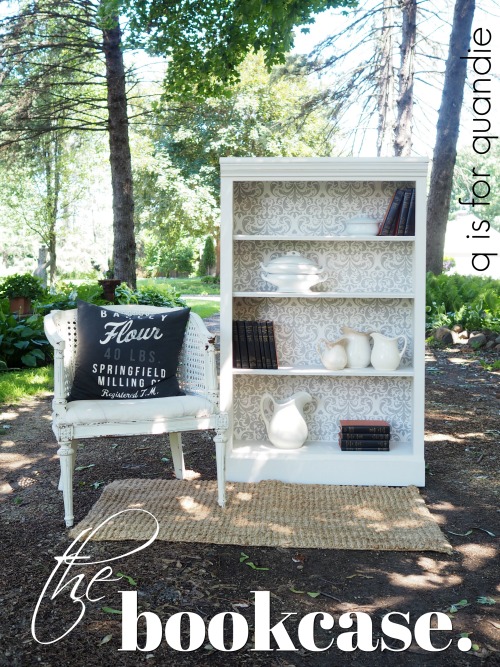
Well, today’s post is about that white bookcase in the back behind the other pieces. As it turns out, I neglected to get a good ‘before’ photo of just the bookcase. Argh.
My handyman/neighbor Ken would be so disappointed if he knew that I didn’t have a good ‘before’ photo of this one (he never reads my blog because he is 80 years old and he doesn’t even know what a blog is, so let’s not tell him about this, OK?). He made some clever changes to it and I know he was proud of his work. Although I can try to describe what he did, as they say, a picture is worth a thousand words.
Well, I’ll try and do my best.
The thing about this bookcase is that it was formerly a built-in. One side of it wasn’t finished on the outside because it had been up against a wall and tied in to the baseboard trim along the wall. The other side was trimmed out top and bottom. And of course the side that was trimmed out is the side you can’t see in that photo because it’s behind the cabinet with the glass door. Dang.
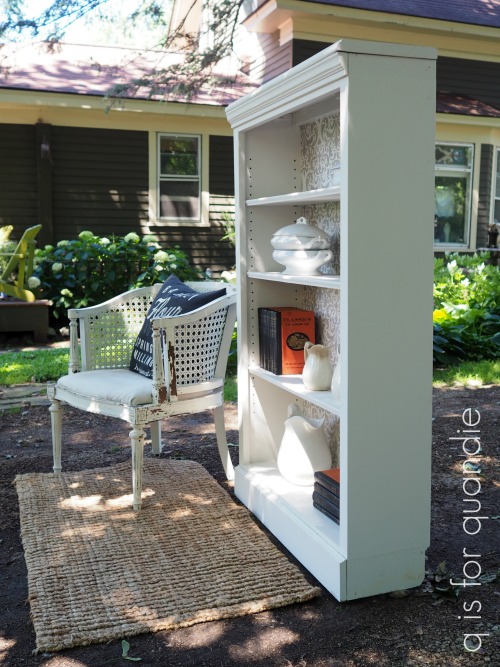
Suffice to say that Ken removed some trim, cut down some trim, added an outside to the one side, and basically gave the entire piece a more symmetrical look. He did a brilliant job.
While he was doing all of that, I removed the back so that I could stencil it.
I’d recently received some beautiful stencils from Prima Marketing’s new re.design line including one called Imperial Damask. This is a large stencil at 22″ x 28″.

I knew it would be perfect for adding something special to this bookcase.
If you’re ever thinking about stenciling (or wallpapering) the inside back of a bookcase, it is much, much easier if you can remove the back to work on it. In this case the back was held on with a bunch of nails and it came off rather easily.
So I started by sanding it down and adding a coat of Dixie Belle’s Fluff, which is a lovely shade of white and almost perfectly matched the existing paint job (which badly needed to be refreshed).
Before I started stenciling, I needed to pick the right color for the stencil. I narrowed it down to three Dixie Belle colors; Sand Bar, Savannah Mist and Driftwood. I painted a scrap of wood in the Fluff and then pulled out a small stencil I happened to have that is very similar to the Imperial Damask, just on a much smaller scale. I stenciled a section with each of the three colors (please excuse the sloppy stenciling, this was only a color test).

Once I saw all three, it was easy for me to pick the Driftwood (far right).
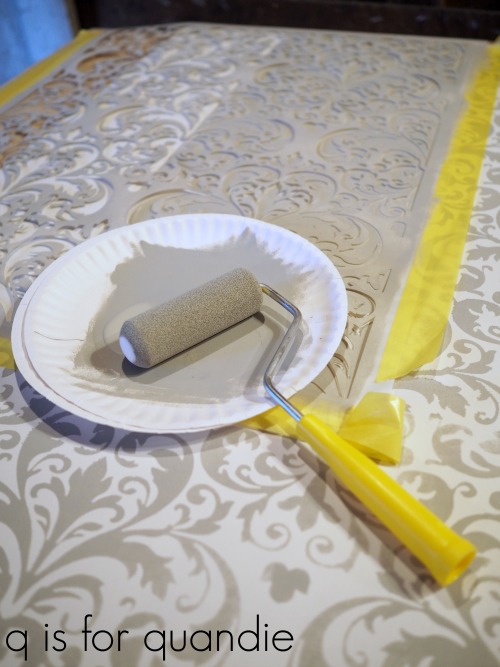
Next I used a small inexpensive foam roller to apply the paint using the Prima Marketing stencil.

I just poured a little of the paint onto a paper plate and then rolled the foam roller in it. I didn’t water the paint down at all. The original thickness of the Dixie Belle paint makes it perfect for stenciling. Much like when stenciling with a brush, you want to use a somewhat dry roller to avoid a messy result. Runny paint is not your friend when stenciling.
I wanted the design to be centered once the back was back in place, so I measured and placed the center of the stencil at the top center of the back and then worked out and down from there waiting for the paint to dry each time before re-positioning the stencil.

Today’s q tip: always start in the center and work your way out when using an all-over stencil like this one. Otherwise your end result may look very unbalanced.
Before putting the back of the bookcase back on, I gave it a coat of Dixie Belle’s Flat Clear Coat.
Next I sanded and added a fresh coat of Dixie Belle’s Fluff to the rest of the piece, followed by the Flat Clear Coat. I added a second coat of Clear Coat on the shelves because they will likely take more of a beating than the rest of the piece.
Once everything was dry, Ken helped me put the back piece back on. While we were working I was telling him that I really couldn’t have done this piece without his help, while he was claiming that he really couldn’t have made it pretty enough to sell without me. We concluded that we are a great team. He makes ’em functional, and I make ’em pretty.

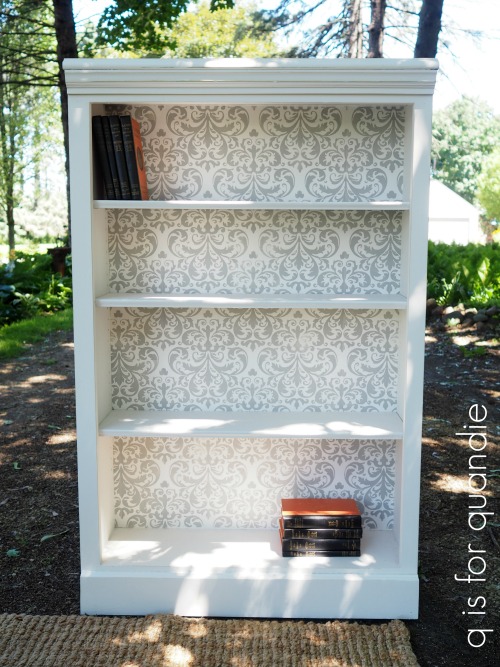
And this one sure is pretty!
The stenciled back adds so much life to this bookcase!
What do you think?
The bookcase is for sale locally. If interested, be sure to check out my ‘available for local sale‘ page.

I love this bookcase and the stencil is stunning. The color that you picked for the piece is perfect. Thanks for sharing
LikeLike
Thank you Monica!
LikeLike
Oh so pretty!
LikeLike
Thanks Janice!
LikeLike
Love it!
LikeLike
I love the way this one turned out too 🙂
LikeLike
Just stunning! You took an ordinary bookcase and made it a showpiece. The stencil and subtle color choice is perfect. This.will.sell.fast.
LikeLike
Fingers crossed Laura!
LikeLike
Gorgeous! The stencil totally changes the look of that simple bookcase!
LikeLike
For sure!
LikeLike
Wow, I love, love, love this! This bookcase is gorgeous. I sure wish I lived local!
LikeLike
Me too Kim 😉
LikeLike
Beautiful stencil and you picked a great color. It is lovely. I am all about teamwork. I need a Ken next door.
LikeLike
Everyone should have a Ken next door!
LikeLike
Lovely! I just finished a bookcase and decoupaged old sheet music to the inside of the back. What a treasure Ken is!
LikeLike
Yep, I’m very lucky to have Ken around!
LikeLike
Love it! I think filling it with iron stone or milk glass would be gorgeous! Go ahead and ship it to me here in Indiana! Lol
LikeLike
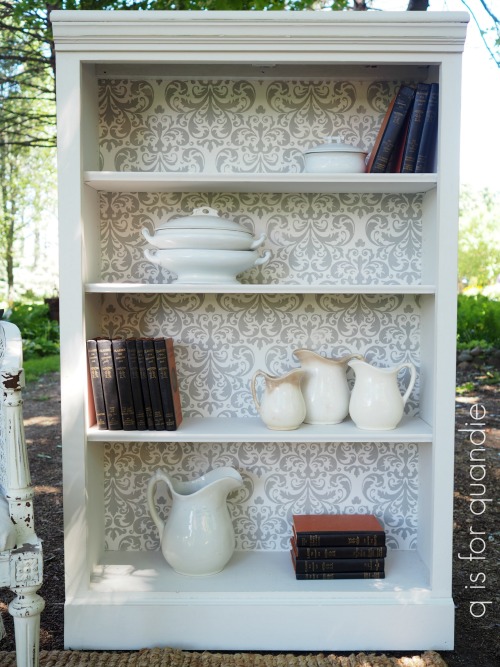
This bookcase would be perfect for showcasing a milk glass collection!
LikeLike
Wow! What a great idea to stencil the back. I love the way it looks. Another great “refresh”. That seems to be the new buzz word.
LikeLike
That is the latest buzz word, and in this case it really does apply since I simply refreshed the existing white paint job and added a little pop with the stencil!
LikeLike
I’m reading this as I’m slowly walking up…and when you said you were going to stencil the “back” of the bookcase, my first thought was that no one would see it. Lol. I was thinking the “back” that faces the wall. Duh to me. But I’m still sitting here smiling to myself about it. Easily amused I guess. Love how it turned out – and I picked the same color before I read which one you picked!
LikeLike
LOL, that would pretty much be a waste of time and paint, wouldn’t it?
LikeLike
The stencil is a great addition to the bookcase. Looks even better in person.
LikeLike
Thanks sis! I often think that some of the ‘before’ photos of pieces look much better than the pieces themselves in person, but in this case I think you’re right. The ‘after’ pics don’t do this one justice!
LikeLike
It sure is pretty. The stencil is subtle so the bookcase will look good in any decor. Lovely transformation.
LikeLike
Thanks Maureen!
LikeLike
I love, love, love this bookcase. Now, if I only could convince my husband that we needed another bookcase (or if he’d only go out of town so I could sneak one in)!
LikeLike
Doesn’t your hubby have a fishing trip to go on or something like that 😉
LikeLike
It looks stunning!
LikeLike
Thanks Laura!
LikeLike
Just so pretty! I can see it filled to brim with ironstone. Terri’s comment cracked me up. Thanks for the chuckle.
LikeLike
LOL, I’m still chuckling over that one too. I can just see the look on Terri’s face as she tried to figure out why in the world I would paint the back!
LikeLike
Love the final look! Now I’m looking at my bookcases and thinking “should I????” I’be been thinking that one of the bookcases in my office needs to be spruced up. My first thought was to rearrange the books and decor items but now I’m wondering if I should paint and stencil for a whole new look!
LikeLike
Go for it Nancy! If the back comes off it’s super easy to add the stencil.
LikeLike
Love how this turned out! I’d forgotten the Prima has stencils, will check into that. Anyway, good color choices as well and I’m sure it will sell quickly!
LikeLike
They have some really awesome new stencils in their re.design line!
LikeLike
I did a French Script Stencil that included part of my wedding vows to the very back of a large armoir. I agree it’s a lot of work – I did it with a stencil brush – and would’ve been a waste of time and paint except that the armoir ended up at the foot of our bed so it’s the 1st thing I see when I wake up in the morning. I definitely didn’t want to wake up to something ugly! Now, if it’s ever moved up against a wall I will be so sad! This was the perfect addition to your bookcase and you picked the same stencil color I would have! Your work is beautiful and inspiring as always
LikeLike
Yes, that sounds like an instance where painting and stenciling the very back was a good idea 😉 Next time try the roller on the larger stencils, it goes SO much faster. How cool that your stencil includes part of your wedding vows, that makes it extra special!
LikeLike
I’ve become very fast at stenciling with a stencil brush. I did the 5 1/2′ x 6 1/2′ armoire back in less than 30 minutes. I know most people use a daubing motion to stencil but I only do that if I’m layering colors. I use a swirling motion to stencil or blend colors and am speedy. I’m very obsessive with my stenciling and any smudges or bleed-under drives me nutso! This French Script stencil came out absolutely perfect & is gorgeous to me. My neighbor says it’s a “masterpiece”. I’m afraid to try a roller because it seems like it would be so much harder to get just the right amount of paint on it & prevent any mistakes. I’ve seen bloggers who’ve done an entire wall with a stencil brush and “dabbing”. That’s some crazy patience I don’t have, even though it was beautiful. If I were to do a wall I definitely would try the roller technique. I keep all your tutorials in a file to refer to, so it’ll be handy if I need it. I’ll be sad if I ever have to move the armoire up against a wall where the back can’t be seen. Waking up to it brings me joy. A friend suggested hanging a mirror at the head of my bed so that passers-by can see the stencil too because it really is pretty or to do something similar if it has to be moved so that the back will be reflected and still seen. She has great ideas!
You have no idea how much of an inspiration and teacher you are to me. Your Q-Tips and tutorials are a great source of info & inspiration. They get my brain working.Now, instead of copying a tutorial like I used to, I use the tutorial to learn a new technique then use it to create my own unique work. You’ve encouraged and taught me how to find my artistic voice – a voice I never knew I had. Almost weekly now I have people ask me to paint something for them. I’ve done no real advertising. I simply did some free work for various people (my husband thought I was crazy) with the idea that other people (family, friends, etc) would see my work in others’ homes and get the idea they want something of their own done. Well, my crazy idea worked. Now I just need to get over the panic when people say “Just do whatever you want” to a piece of their furniture! I don’t even know what colors they have in their homes or what they like! You need to do a tutorial for me on how to get over that panic! LOL! Thanks to you and this blog, I’ve found my voice, a source of joy and peace in my life and now a little mini-business. I thank you for this and so much more!
Yikes! My comments are always long but this one is out of control! I just felt the need to let you know the impact you have on others lives. A lot of people think “It’s just painting – ain’t nothing special” but what you do truly is special. Your voice and tutorials have taught me more than painting. I’ve found joy here and I thank you for that.
LikeLike
Thank you so, so much for this amazing compliment Christie! Sometimes I shake my head and wonder why exactly I spend so much time on this blogging thing and whether or not I should keep at it, but then I get comments like your’s and I realize that people are getting something out of it! So thank you very much for taking the time to leave such a thoughtful and meaningful comment 🙂 And I love your friend’s idea about the mirror. That would be a great way to show off that stenciled back!
LikeLike
WARNING! Here’s another novel of a comment but have the need to let you know all you do for your followers/strangers! ~~ I can only imagine the amount of time and effort you put into each blog post- and that’s on top of the hard work you put into each piece that all come out amazing-even when that piece of furniture fights you every step of the way! You also add in the mistakes you make for those of us who think a bloggers project always comes out perfect AND you show us that those screw-ups can make the piece even more original & beautiful than if it had gone as planned. There are no words to describe all you’ve added to my life. I became very ill with a lifelong, sort of treatable but not curable disease that destroyed my life and career. I’d been a dang good nurse for 24 years and lost the ability to do that anymore. It was a very large part of my life and an even bigger part of my identity. It was also the only thing I could do well-or so I thought. I’d been a nurse since I was 20! Reading blogs like yours gave me the urge to pick up a paint brush and try something very small- a simple flower on top of an old MCM side table that had a huge burn covering 1/2 of the top. My family loved it. I continued reading, found your blog quickly and the rest is history. I found something I love and was good at that I am able to do within the bounds of my greatly fluctuating disease symptoms. You not only brought a lot of peace and joy to my life , you also helped me find my identity again! It’s always amazed me how we touch other peoples lives in large ways by doing “small” things. Most of the time, we never know the impact we have on others as we go about our life just being ourselves. You need to know the large impact you made on one small life and the impact you’ve made upon my family. They now know who Q is and speak of how grateful they are that I found you and thus found myself again. Apparently they were very worried about me, emotionally and physically, but say that since I found your blog I am now myself again and they enjoy seeing me smile. My large extended family have all said they don’t worry about me emotionally anymore because I’m no longer “lost”. They don’t look at me like I’m talking about an imaginary person anymore when I talk about something Quandie taught me ‘cuz they know you now to. I also appreciate that you respond to everyone who comments on your posts. You’ve made me feel as if you’re a friend, not just a stranger on the other end of my computer! I thank you for all you’ve given to me and my family and hope you now understand a little bit of the impact you have on those random strangers on the ‘net. My health also has greatly improved now that I’ve found myself again- in a large part to you and a few other special bloggers out there. I pray you are able to continue doing what you do for a long time to come! Do be careful to not over-do it and burn yourself out. All of your fans will understand if you need to cut back on the number of posts you do in the future. We’d all prefer to have you here once a month than not at all! Selficially, I love seeing your posts in my email 2-3 times a week!
P.S. – I want to kidnap Ken! There are so few true woodworkers/wood lovers/wood artists left. It’s a dying art that makes me very sad.
P.P.S. ~ I will keep it short and sweet in the future (I think). I just have been having this overwhelming feeling that I needed to tell you all you’ve done for me, and I’m sure for many others. You’re more than a painter & blogger.
LikeLike
Well, I’m glad that I encouraged you to take that first step and paint that table, but I’m betting that the rest of the credit for your finding your identity again belongs to you! Good for you finding something new to feel passionate about 🙂 And please don’t kidnap Ken, I still need him!
LikeLike
Another beautiful “makeover”! Sure wish I had a “Ken”.
LikeLike
It is incredibly handy having a Ken right next door 😉
LikeLike
It’s so true that you and Ken make an awesome team, and that it one beautiful bookcase!
LikeLike
Thanks Cynthia!
LikeLike
It’s a wonderful piece and I can’t even tell it wasn’t originally like that. I’ve been thinking of stenciling an entryway wall so your post is really helpful to me right now. Thanks for the inspiration.
LikeLike
I’d definitely try using the foam roller if stenciling an entire wall. It goes so much faster than with a stencil brush!
LikeLike
Beautiful piece, The stenciling is lovely. This would be so pretty in someone’s dining room for dishes.
LikeLike
What a fab idea Becky! It would be gorgeous filled with white dishes. Or any color really!
LikeLike