

I have to be honest, I thought there was a pretty good possibility that I’d get started on my dollhouse renovation and realize that working in miniature was just too fiddly for me.
And then the dollhouse would become one of those projects that gets shoved aside and never finished.
I think that’s partly why I gave it away in the first place.
But I’m beginning to realize that I can do fiddly things, so I decided to tackle adding some shiplap to the dollhouse.
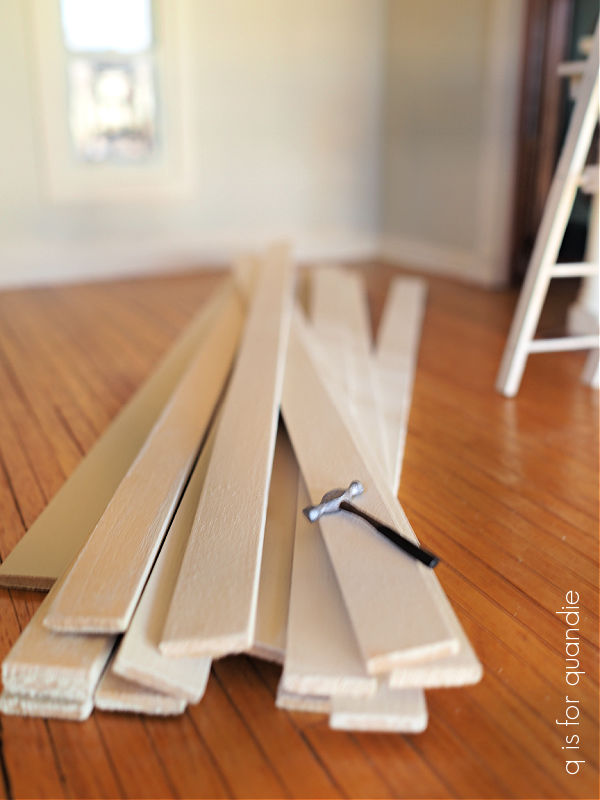
I started by ordering some wood strips from Miniature Crush. After they arrived, I gave them all a light sanding with 220 grit paper followed by two coats of Dixie Belle’s Drop Cloth.
When creating a faux shiplap wall you intentionally leave a tiny bit of space between each board, you don’t butt them up tightly together. So you need to be sure that the edges of the boards are painted because it looks obvious if they aren’t. Therefore, it’s easier to paint the boards before you install them.
Another important step before installing faux shiplap is to paint the wall first. Because again, it might show through those tiny gaps in the planks of wood. Especially if your wall has a color on it, or in this case, some floral wallpaper.
That brings me back to the ‘before’ photo of the dollhouse’s main bedroom, which is where I’m putting the shiplap.
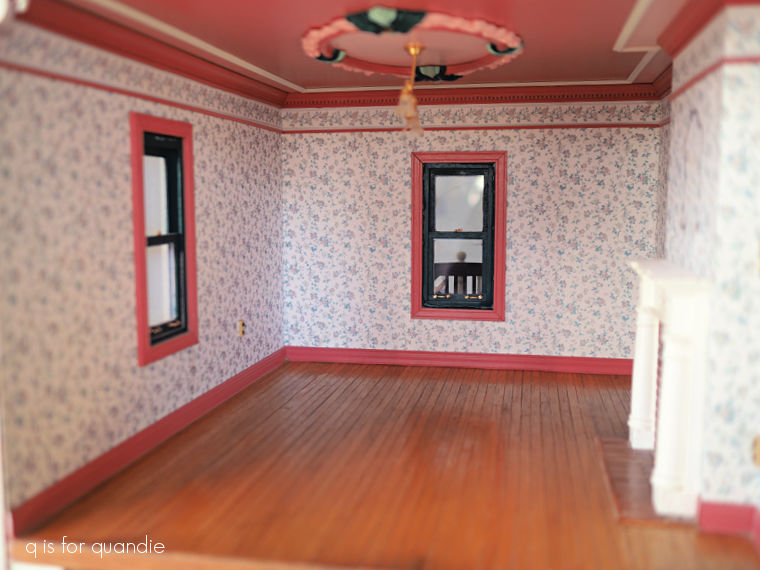
Phew! I really loved some horrible shades of mauve in the 90’s.
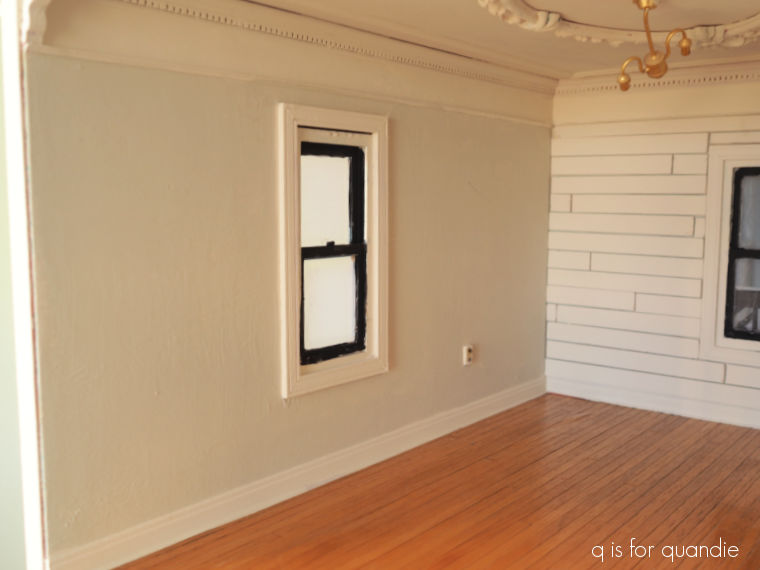
Yep, I definitely needed to cover that up first. So I gave the walls, trim and ceiling two coats of Dixie Belle’s Drop Cloth.
Since I was only going to shiplap one wall, I decided I needed a little bit of contrast between the color on the other walls, the shiplap and all of the trim, so I added just a bit of Dixie Belle’s Dried Sage to some Drop Cloth to darken it up a bit and then added that on just the walls that would remain bare.
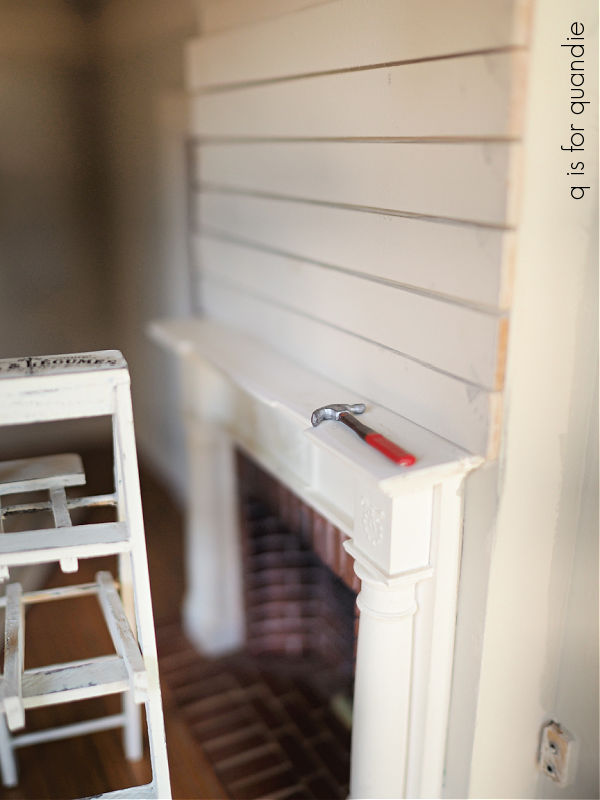
Then it was time to install the shiplap so I got out my tiny step ladder and my tiny hammers and got to work.

LOL, OK, the actual tool I used was one of these.

This is called a multi angle miter shear cutter, and it worked beautifully for cutting my shiplap. I didn’t have to cut any fancy angles, just straight cuts. But down the road I may need it for some angles. You can find one of these for less than $20 on Amazon, FYI.
I also didn’t really use a tiny hammer and nails, I just used some Titebond Quick and Thick glue to attach my boards to the wall.

I shiplapped (not a real verb, but it works here) the back wall as well as the fireplace surround.

OK, I have to admit that the corner near the bottom is a bit wonky. But that’s far more noticeable in this photo than it is in person. Plus, to do this ‘right’, I should have removed the base board, added the shiplap, and then replaced the baseboard over it. But ain’t nobody got time for that.
Plus, I’m a beginner. Everything doesn’t have to be perfect, right?
Also, I should note that you can buy 1:12 scale shiplap paneling in sheets, but I think it would be more difficult to cut a full sheet of ‘paneling’ to fit an existing wall. Whereas these strips were quite easy to cut using my new tool. In addition, I think shiplap looks more legit when you have staggered seams like I’ve created on the back wall (although in real life you’re supposed to caulk those seams).
What do you think of my fiddly shiplap job?
Not too bad?
I want to encourage any of you who are thinking about tackling your own dollhouse renovation to consider starting with a shiplap wall or two. It was fairly easy and a real confidence boost when you realize that you can do fiddly things after all!
Be sure to check back on Wednesday for the full reveal of the main bedroom.

Love the shiplap and I had to do a double take when I saw the ladder and hammer. 🤣. This whole miniature thing is just fascinating and I can’t get over how realistic it all is. The fireplace even has a faint look of ash on the back. Amazing! I can’t believe how you wallpapered that back in the day!
Sent from my iPhone
LikeLike
Actually, my dad did the wallpapering back in the day, and he was able to apply the wallpaper as he was building the house. So he added the wallpaper before putting the walls in place. Much easier!
LikeLike
That is just amazing! Did you paint right over the wallpaper? Does the top come off of the dollhouse so you can work from above in this room, or are you slinking your arm in there with each piece of ship lock? The trim on the windows! The whole process is fascinating! I’m really enjoying watching the house evolve. (Did you put a transfer on the top of that ladder?!?) LOVE the little hammer! Thanks for all the fun!
LikeLiked by 1 person
I did paint right over the wallpaper, which I would never recommend in real life, but there was no getting around it here. There’s no way I could have stripped that wallpaper! And I did have to reach in there to glue the ship lap in place … it was definitely a bit fiddly 😉
LikeLike
I LOVE your shiplap! And I laughed several times, as I read the post….trying to visualize using those tiny hammers to nail the shiplap up. I think it looks GREAT as does the color selection. Second coneyc…..Thanks for all the fun. I’m mesmerized!
LikeLike
Thanks for following along Paula!
LikeLike
just ordered the multi angle sheer tool AND followed all the miniaturists you highlighted on your other post! Super inspired!!!
LikeLike
Cool! I was surfing around on Etsy this morning and saw that you can buy a 1:12 scale version of that tool too, how funny is that? It would have been fun to have it for this post 🙂
LikeLike
I have been having trouble commenting directly on the blog for some reason. I was signed in to another person’s ID and I signed out – tried to use my ID but no luck, so am hoping you get my email…the work has been truly astounding for the level of detail and patience it must take to get the work done! I mentioned I will be tackling my own dollhouse one day and you have inspired me, and also reminded me that i am impatient lol. I really liked the article you sent last week with links to the on line miniature craftspeople – I am saving that one for when I am ready.
Thank you for sharing!
LikeLike
Whatever you did for this comment seems to have worked! Thanks so much 🙂
LikeLike
Yay! I am just replying to the email – glad it is working again!
LikeLike
Love the word “fiddly”. Your pictures and the staging really look like a real, full size room. Amazing!
LikeLike
‘Fiddly’ just fits doesn’t it?
LikeLike
It’s perfect.
LikeLike
this is awesome!
LikeLike