

Good morning from the garden!
OK, if you’ve been paying attention you know that I’m not in my own garden this morning. I’m in Mexico!

This will be my 3rd visit to this resort with my neighbor nnK and her parents (and this year my sister is joining us as well). I’m sure that I will be enjoying the gorgeous landscaping around the resort this week.
But before I left I whipped up a quick bulb lasagna to share here today.
Many of you are probably already familiar with a bulb lasagna, its seems like just about every garden YouTuber out there has shared the concept recently. But just in case you don’t know what it is, it’s basically spring bulbs planted in layers in a pot, sort of like the layers of lasagna.
If you plan it right, the layers come up and bloom in succession.
I wasn’t initially planning on creating my own bulb lasagna, but my sister and I were in Home Depot last week and their remaining stock of spring bulbs were 50% off so I couldn’t resist buying some.
I grabbed some Persian Blue allium because I’d never seen this color before, and it sure looks pretty.
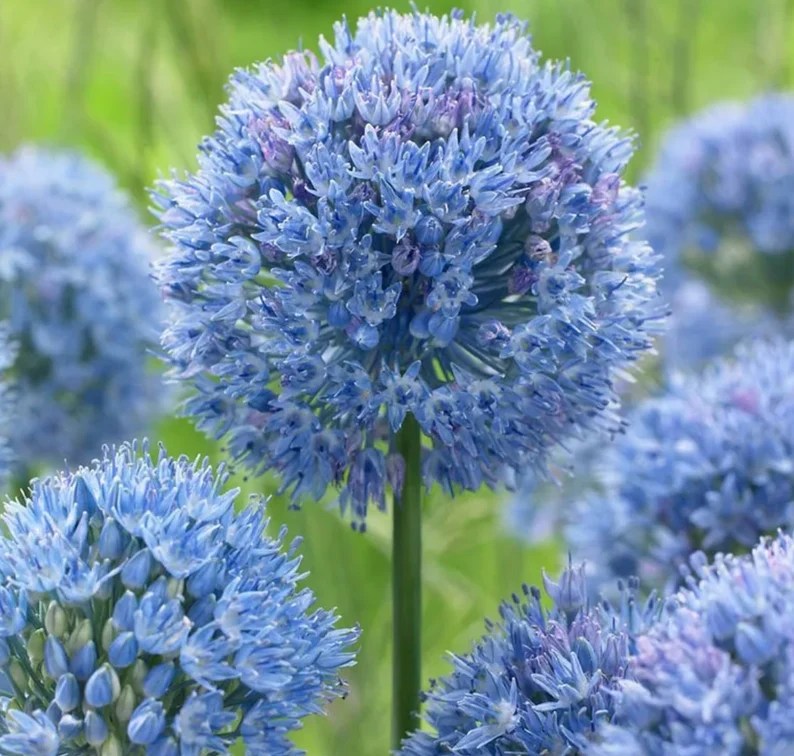
I hope it really does look like that!
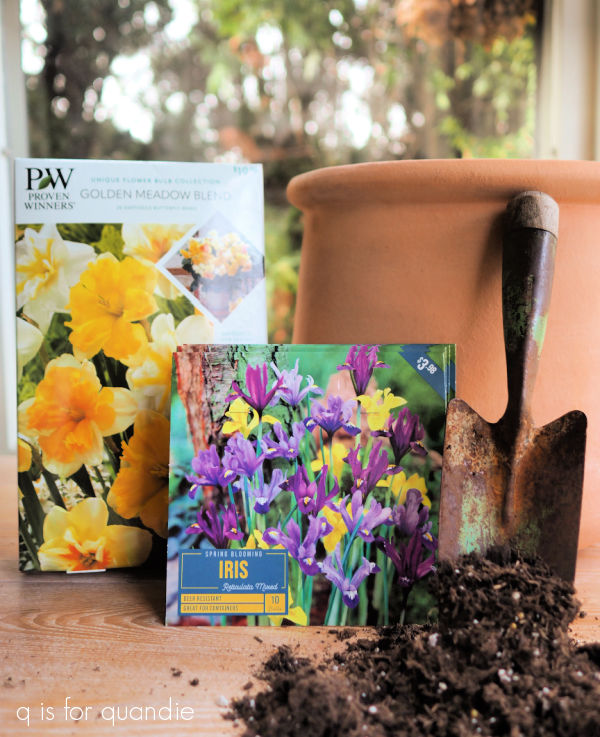
I also purchased the new Proven Winners Golden Meadow blend of daffodils.
I quickly got the allium in the ground last Monday before our weather turned really cold, but I didn’t get the daffodils in. Within a few days, with lows in the teens, our ground was getting pretty frozen so I decided it would be far easier to plant the daffodils in a pot.
And while I was at it, I could go back to Home Depot and get some of the spring blooming iris I saw there to add to it to create a bulb lasagna.
OK, so … simple concept … plant your bulbs in layers choosing bulbs that get planted at different depths and with different bloom times.
Since this is my first attempt at a bulb lasagna, I decided to keep it very basic. The daffodils get planted at 6″, and they bloom in mid-spring, so they went in first. I filled the pot with soil until it was about 8″ from the top, and then added my daffodil bulbs.

As you can see, I really packed ’em in there. Since I’m only doing two layers, that should be OK. However, if you do three or more layers you need to leave about 2 fingers of space between your bulbs so that they all have room to grow up through the layers.
My Iris reticulata are supposed to be planted at a depth of just 3″, so I added 3 more inches of soil over the daffs and then planted the iris.

I left a bit more space between the bulbs in that layer so the daffodils can come up through them. The irises should bloom first in early spring, and then the daffodils will come up and bloom in mid-spring. Theoretically.
I added a final 3″ of soil over the iris bulbs, and then watered my pot thoroughly.
I ended up with one spare packet of 10 iris bulbs and I was going to just pop them into a planter outside, but the soil was frozen solid. I swear it happens overnight!
So I pulled out another pot and just planted them up by themselves.

But now comes the tricky part, where to put them for the winter?
These bulbs have to go through a cold period of somewhere between 10 to 16 weeks, and my online research tells me that the cold period should be at temps between 35–40°F. Hmmmm. I was planning to put these pots outside, but our winters are definitely much colder than that. We’ve already had overnight temps in the teens, and this coming week they’ll be in the single digits.
Further online research tells me that the bulbs can freeze and rot in a unprotected pot left outdoors in our climate. So that option is out.
Some suggestions given online include putting them in an unheated garage or shed. I could do that, but in Minnesota even those spaces get much colder than 35–40°F. I’ve also seen the suggestion to put them in the basement, but my basement is quite a bit warmer than that.
So I’ve decided to opt for my front ‘three-season’ porch, or as I like to call it in winter, my walk-in fridge. It is unheated, but since it’s attached to the house it stays a little bit warmer than the shed or carriage house. It can also be quite sunny though, so I’m going to put the pots under a table and cover them with some old sheets to keep them in the dark.
You also have to keep the container from drying out, but also don’t let it get too wet. So I’ll be putting a reminder on my calendar to check it about once a month and add water if necessary.
It seems like there are a lot of things that could go wrong with this little project. Too little cold, too much cold. To little water, too much water. Too much light. I’m beginning to wonder if this was such a great idea after all. But everybody seems to be doing it, so hopefully it’s as easy as they say it is and next spring I’ll have a lovely pot of daffodils and iris.
Have you had luck with a bulb lasagna? Leave a comment and let me know, and be sure to share any tips you might have!

Linda, I was not familiar with the lasagna bulb installation. I’ll be really curious to see how well it came out. I know you’re having a fabulous time in Mexico. Enjoy
smiles Alice
LikeLike
Fingers crossed that my bulb lasagna turns out!
LikeLike
Your bulb lasagna looks & sounds interesting!! I might try doing it next year!? I am looking forward to your Mexico adventure pictures ♡
LikeLike
I’ll keep you posted on how the lasagna turns out!
LikeLike
I am eager to see how it works for you! I haven’t tried the lasagna method either but for a few years now, I have planted tulip and daffodil bulbs in 6-8″ plastic pots and sunk them in the ground on the north side of the house. Works like a charm! As you have already noted, the trick is to get the pots in the ground before it freezes. I was running late this year but got them in the ground just in time. Good luck!
LikeLike
Yep, I totally missed the boat on the whole ground freezing thing. We’ll just have to wait and see how it goes with the pots on the porch. I’ll keep you posted.
LikeLike