
I know, I know. These craft paper scroll signs have been around for years. As tends to be the norm for me, I’m the last one to catch on to a new (and by now, old) trend.
I really debated even sharing this project, fearing that you guys will all be thinking ‘been there, done that’.
But I’ve always wanted to try my hand at making one of these, and I never found the time when I was a 9 to 5’er. Now that I am retired, I’m going to have time to get to more of these little side projects.
Not only that, but for me this project was completely free, only requiring supplies that I already had on hand. Now that I’m on a fixed income, I’ll need to be watching my budget more closely. Ha … who am I kidding? I’ve always been a penny pincher, nothing has changed there.

First up, I gathered my supplies. I always have a giant roll of brown craft paper on hand. In addition, I pulled out my Dixie Belle paint in Caviar, my re.design with prima 1.5″ wax brush (which works great for stenciling larger designs), some stencils and some string (oh, and not pictured, some paper toweling and some Frog tape).
I rolled out a section of the kraft paper and weighted down the ends with heavy items that were close at hand to keep it from rolling back up as I worked. Then I used yellow Frog tape to secure my stencil (I ended up going with my North Pole Trading Co stencil from Wallcutz). I left about a foot of paper at the top and bottom to roll up later, and then cut this piece from the roll.

The yellow Frog tape is the one for delicate surfaces and I really recommend it for this project in particular because it won’t leave a mark on your craft paper when you pull it up.

Libby left me a comment last week suggesting I write a post about my stenciling technique, and I plan to do a more detailed one later, but for now, here is one of my most important q tips … always use a dry brush for stenciling.
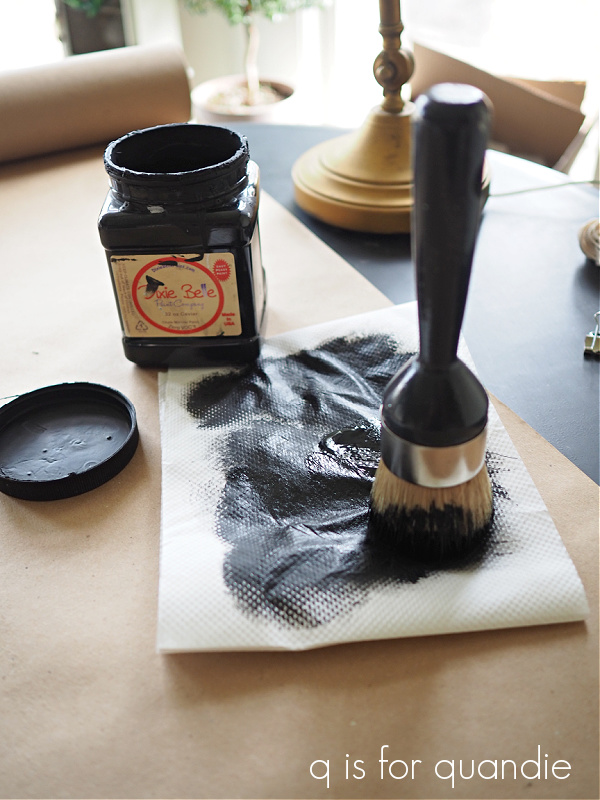
What does that mean? Well, basically you load your brush with paint and then dab most of it off onto a paper towel before using it. It feels rather wasteful, but it’s the best way to get a clean result.
Another of my stenciling recommendations is to use a thicker paint. In this case, I am at the very bottom of this particular jar of Caviar. I’ve gunked up the threads on the jar so badly with dried on paint that the lid no longer seals tightly. As a result, the paint has really thickened up, making it perfect for stenciling!

Patience is also key while stenciling. If you aren’t getting immediate coverage with your dry brush, that’s OK. Wait for the first coat to dry and then go back over it with a 2nd coat. Just make sure your stencil hasn’t shifted in the meantime.

Once the paint was dry, I used my Carpenter Square to make a pencil line where I wanted to trim down the width of my craft paper.

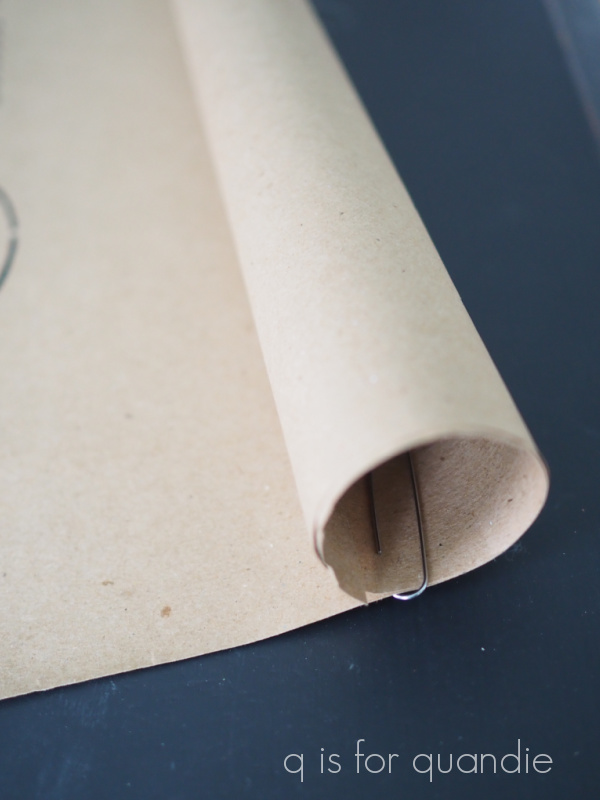
After trimming off the excess on the side, I simply rolled the top and bottom and secured the rolls using paper clips.
Then I threaded my string through the top roll, tied it in a bow, and hung my scroll on the wall.

Ultimately I felt like it needed just a little something more, so I added a garland of faux greenery to the top to dress it up.

This project couldn’t have been more simple, or more cheap.
Have you ever tried making a craft paper scroll? Am I hopelessly behind the times with this project? Been there, done that? Leave me a comment and let me know.

I always “think” I am in the know on frun projects but I’ve never seen this one. So, nope, not been there OR done that! Cute, quick project.
LikeLike
Well, go figure. I thought for sure everyone was already doing these!
LikeLike
Are you kidding me??!!? I LOVE this!! And I have never made this!! But now I want to!! 🙌🏻🙌🏻🙌🏻🙌🏻🙌🏻
LikeLike
Maybe we should have a craft night, or a craft afternoon …
LikeLike
*crafternoon 😉
LikeLike
Perfect! I need to start planning crafternoons!
LikeLike
I’ve never seen these, but I love it!! I think I have everything for this so I’m going to try it! I hope it turns out as lovely as yours did! 🙂
LikeLike
Give it a shot Abbie, I know you can do it!
LikeLike
Cute, cute, cute! It might be something I can handle.
LikeLike
Totally. And a great way to practice stenciling!
LikeLike
I have never seen these before either. I really like it and how simple it is.
LikeLike
Clearly you aren’t spending enough time on pinterest 😉
LikeLike
Cute and simple. Love the look of Kraft paper, always.
LikeLike
Thanks Jill!
LikeLike
Really cute!
LikeLike
Thanks Sue!
LikeLike
That looks terrific and I’m going to get one done. Thanks for sharing your tips. Super grateful for those! What a fun thing to do!
LikeLike
Have fun making your own Robin!
LikeLike
I have seen the scrolls with “ believe “ but nothing as cute and well done as yours! You could have a new career with classes! 😉. Thank you for another fabulous tut!
Smiles, alice
LikeLike
You’re welcome Alice! I do think some ‘crafternoons’ should be added to my retirement schedule 😉
LikeLike
I think this is a sweet and timeless project. Really a pretty wall hanging.
LikeLike
Thanks Suzy!
LikeLike
I too have never seen this one before! What a great craft to do with kids. Thanks for the inspiration (as always).
LikeLike
You’re very welcome Laura!
LikeLike
Never seen this done before either!!! So you have a whole new, appreciative audience! The greenery touch was just perfect – sets it off nicely. It’s the,”Quandie” touch!❤
LikeLiked by 1 person
Thanks Terri. I have to say, I am surprised that most of you haven’t seen this done before. Just goes to show you, right?
LikeLike
That is adorable! The garland is brilliant!!
I have never seen this project before; since this is on craft paper, can the scroll be reused from year to year? Please consider making a video on how to make this project so we can see how to make the curled ends & hanger.
LikeLike
Ugh. A video. You aren’t likely to see me making a video. I know better than to say never, but … yeah, unlikely. I am totally not a fan of seeing myself on film 😉
LikeLike
I’ve actually never seen this project befire…thanks so much for sharing! i hope you are enjoying your new found freedom.
LikeLike
So far, so good 😉
LikeLike
I have seen these before, Miss Quandie, but I haven’t seen yours! So……….awesome! (-: Holding “Crafternoon” workshops seems like a good idea, just don’t know how lucrative they would be since you tend to underprice yourself……..and also a small-minded thought on my part: don’t replicate yourself in your own market!
LikeLike
I’ve dabbled in presenting workshops before and they didn’t really work out for me while I was a working woman. Giving up an entire day on the weekend just wasn’t possible. But now that I’ve got a lot more time on my hands, maybe I’ll give it another shot. As for that last, having a blog where I explain all of my projects and techniques already means that anyone can copy me, with or without a workshop. I think when you choose to have a public forum, like a blog, that’s just part of the deal. I’m OK with that. This continues to just be my fun past time, and not my bread and butter (I thank my lucky stars to have a government pension every day!), so no worries. I’m happy to share my ideas and inspire others to try them out too.
LikeLike
Well…..you’re a saint Miss Quandie! Hahahahahahah!
LikeLike
Sweet project!
LikeLike
Thanks Linda Sue.
LikeLike
Never made it, but yours looks great Linda!
And that big North Pole stencil covered in red/green… Did i miss the post with the final master piece? Dont remember seeing that color combo… Its so juicy and bright 🙂
LikeLike
I made a sign in red and green with that stencil last year. It was pretty late in the season and I never actually shared it here!
LikeLike
Thanks, i didn’t miss it then 🙂 If you ever change your mind – i would love to see it.
LikeLike