
Welcome to day 4 of milk paint madness week!
Today I’m going to share some of my favorite advanced milk paint techniques including using bonding agent, layering milk paint with other types of paint, resists, how to control the chipping, how to create a crackle effect, and custom mixing.
bonding agent.
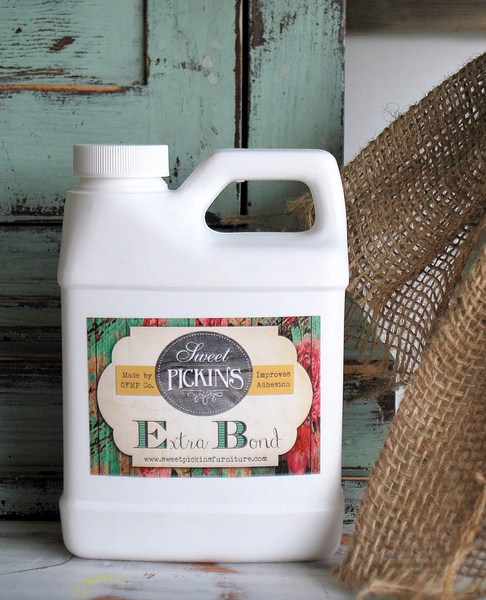
All of the milk paint brands sell a bonding agent. The purpose of bonding agent is to improve the adhesion of milk paint. I’ve never been a big fan of bonding agent, and here’s why. If you don’t want any chipping when using milk paint, then why use milk paint? I feel like bonding agent basically turns milk paint into an acrylic paint. That may not be scientifically accurate, but you get the idea. Your paint will become smoother and have a little bit more sheen. If you want a creamy smooth paint that adheres well and doesn’t chip, use Fusion acrylic paint. It will be cheaper to buy one jar of Fusion paint than it is to buy milk paint plus bonding agent plus a top coat.
However, bonding agent does have its place. For example, when there is a milk paint color that you absolutely love and you want that exact color but you don’t want it to chip. This came up recently for me (and you’ll read more about that tomorrow). Another time you may want to use it is when you have a surface that you know is going to really resist milk paint far more than you want it to, you can paint a first coat of your color with the bonding agent and then a second coat without. You’ll still get the look of milk paint with your second coat, but probably not a lot of chipping.
It’s easy enough to use bonding agent. It’s important to mix your milk paint powder with the water first. Once that’s well mixed, add the bonding agent directly into your paint and mix well. You should add one part bonding agent to two parts paint.
layering.
Back when I first started using milk paint I was very confused about what you could paint over with milk paint and what you couldn’t. Over time I’ve learned a little bit from other painters and a little bit from trial and error. Here’s what I’ve discovered.
Chalk paint and acrylic paint are perfect for layering with milk paint, especially if you’re worried about milk paint chipping right off the existing finish on your piece. Much like painting the first coat using bonding agent, you can also paint a first coat of chalk or acrylic paint. Then use a resist to encourage the milk paint you put over it to chip where you want it to. But more on resists and chipping in a minute.
When layering milk paint over chalk or acrylic paint you do not need to sand the chalk or acrylic paint. Just paint right over it with your milk paint. Please note, this is assuming you have a fresh coat of these paints, not an old paint job with a topcoat of some kind over it.

If you are painting over a piece that was painted previously and then sealed with wax or hemp oil, you need to be sure the topcoat is cured (30 days) before trying to paint over it with milk paint.
If you are painting over a piece that was sealed with The Real Milk Paint Co’s finishing creams or the Tough Coat Sealer you are fine painting over those with milk paint as soon as they are dry.
I treat old latex or oil based paint the same way I would an old varnished finish because all three of those will resist the milk paint to varying degrees. I’ll go into that a bit more in a minute.
I have also found that milk paint does not adhere well to spray paint. You’re probably wondering why in the world anyone would want to put milk paint over spray paint, but I have tried that when painting cane or wicker. I also once tried to paint over a chair that was initially spray painted. Not much of the milk paint stuck.
the chippy factor.
The most unique thing about milk paint is its tendency to chip when it meets resistance and thus can’t absorb into the surface that you are painting.
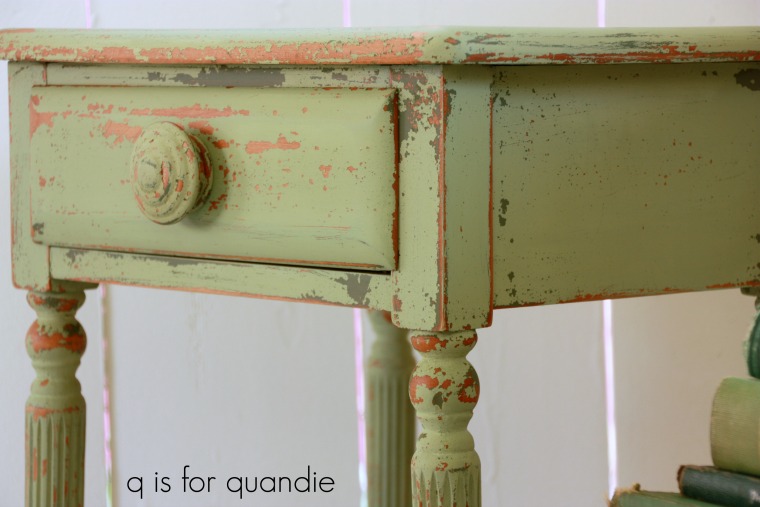
Resistance can take many forms. It can be a pre-existing impervious finish like varnish, it can be layers of furniture wax or polish that have been applied to a piece over the years, it can be oils from handling (or from cooking in the case of kitchen cabinets), or it can be old oil based or latex paint.
With lots of experience painting pieces in milk paint I’ve gotten better at predicting whether or not something is going to chip, but it still sneaks up on me sometimes.

The best way to control unwanted chipping is with good prep!
I can’t stress that enough. If you don’t want out of control chipping, prep your piece by sanding it well, vacuuming off the dust, then cleaning with a grease cutting cleanser like TSP Substitute.
But if you like to live on the edge and you can roll with the punches, just wipe your piece down with a damp cloth and then take your chances. Sometimes that’s a fun way to go too.
resists.
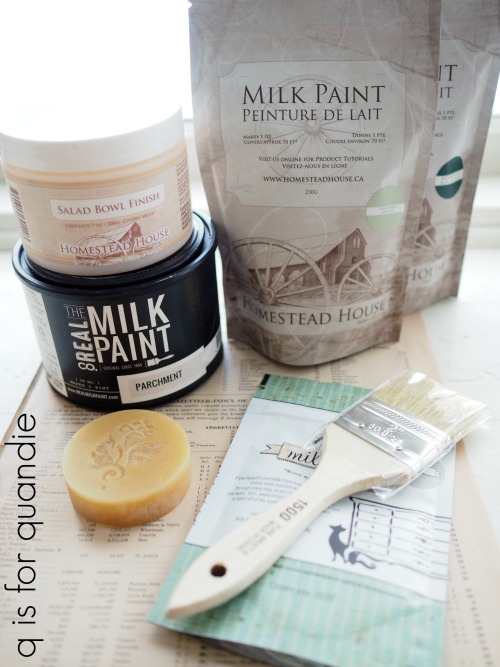
Once you’ve prepped your piece you can apply your own resist in a purposeful way to encourage chipping where you want it. There are lots of choices when it comes to a resist. You can use hemp oil, furniture wax, petroleum jelly, a wax puck, canning wax or candle wax. However, my favorite product to use is the Homestead House Salad Bowl Finish.
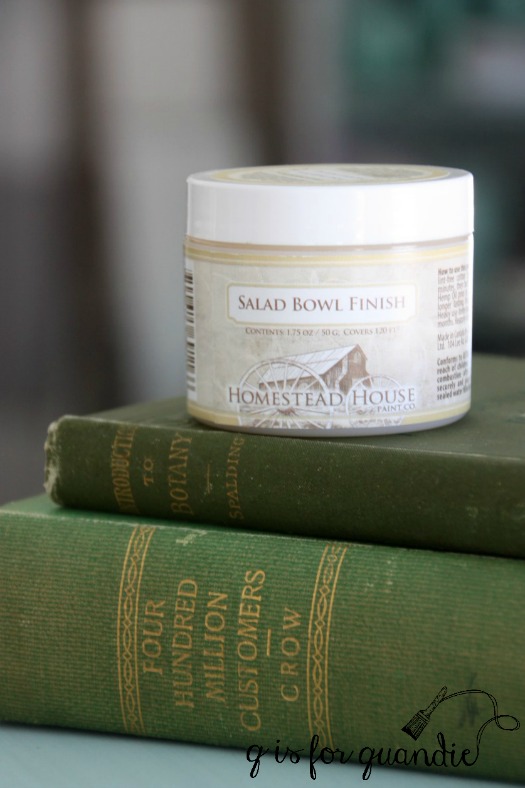
This is a beeswax finish that is formulated just a little bit differently from furniture wax. It’s harder and a little bit more oily, and it works perfectly as a resist. A little bit goes a long way. I have the small jar and haven’t even used half of it yet, and I’ve probably used it on at least a dozen or more pieces. As a side note, it works really well as a resist under Fusion paint too. I’m giving away the larger jar as part of today’s giveaway, so the person who wins will practically have a lifetime supply!
I apply the Salad Bowl Finish much like one would apply lip balm. Get a little on my finger, then use it to rub the wax onto the furniture in a very thin coat only where I want chipping. Add it very sparingly if you just want a little chipping, add more if you want a lot.
Miss Mustard Seed and Sweet Pickins also carry a beeswax finish.
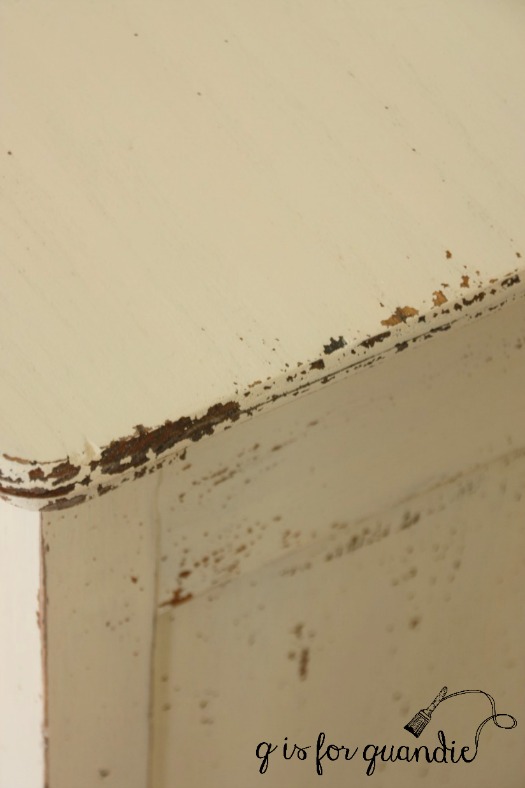
the tape method.
What if you painted your piece and totally forgot to add a resist to encourage chipping? Or maybe you expected the piece to chip naturally and it just didn’t (because sometimes that happens too).

Well, all is not lost. I’ve had great success with using tape to pull off some of the paint. Just press some tape onto the area you want to chip and then yank it off again. It’s sort of like the process of removing lint from your black slacks using tape. I always start with the yellow Frog tape (for delicate surfaces). However, if I find the paint still isn’t coming off I’ve been known to try a stronger tape like packing tape. Just use caution when doing this, you can also pull off a big solid strip of paint which isn’t quite what you want. Go slowly, start out with a very small area and go from there.
crackling.
Applying heat is a great way to encourage your milk paint to crackle. You can do this the accidental way (which I totally do not recommend), which is to paint your piece in the hot sun on a summer day. I’ve done that a few times and have gotten some great crackling, but that’s not very practical or predictable. A better way to encourage crackling is to use a blow dryer which gives you a little more control. I recommend mixing your milk paint a little bit thicker than you would normally, then as soon as you’ve painted it on add some heat by ‘drying’ it with the blow dryer on high heat.
If you want to emphasize the look of a crackled finish, try adding a colored top coat such as antiquing wax or white wax which will catch in those cracks and highlight them.
custom colors.

Mixing a custom color is one of my favorite ways to play around with milk paint. I know you can mix other kinds of paints to create your own colors too, but somehow with milk paint it feels a little more mad scientist-y. Maybe it’s because you mix various powders, then add water, then you have to wait 5 or 10 minutes to make sure the pigments are all fully dissolved before really getting a good look at the color you’ve created. Or maybe it’s because I sometimes practice my evil mad scientist laugh while I’m mixing my own paint colors.
Some of my favorite custom mixed colors are Blue Alligator …
![]()
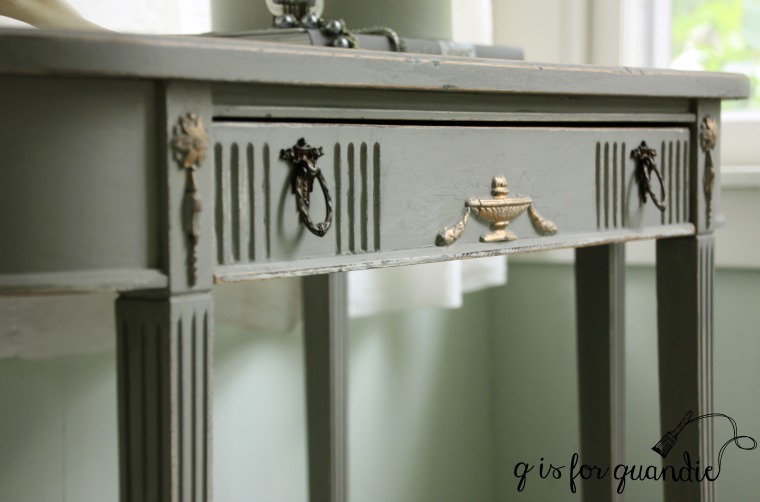
and French Desk Grey …
Mixing custom colors is a great way to use up those partial bags of milk paint that don’t have quite enough in them to paint a full piece of furniture.
I hope today’s post has given you some ideas for different techniques you can try with milk paint. Now for the fun part, today’s giveaway:
Includes: Four colors of milk paint, a jar of Homestead House Salad Bowl Finish and a Miss Mustard Seed wax puck. Thank you to Homestead House, Miss Mustard Seed and The Real Milk Paint Co for providing items for today’s giveaway.
The basic rules: to be eligible to win today’s prize leave a comment on this blog post telling me if you’ve tried any of these milk paint techniques, or if not, which one you want to try. Your comment must be left on the blog, not on Facebook. You are not required to follow my blog, although it would be awesome if you did!
Normally I make a point of answering every comment left on my blog. If someone takes the time to leave a comment, I like to acknowledge that. But I usually only get 10 to 20 comments so it’s easy to fulfill that promise. But I’m guessing that I’ll get many more comments on these posts so I’m going to warn you up front that I won’t be answering each one. That helps make it easier for me when it’s time to pick a winner too, so I hope you guys will cut me some slack on that this week.
I will randomly draw the name of a winner for today’s prize from all of the comments left on this post by Saturday, April 7, 2018 at the stroke of midnight. You are eligible to win each day, so if you leave a comment on each day’s post, your name is eligible to be drawn for each prize.
The fine print: no purchase necessary, you must be 18 years of age or older to win, void where prohibited by law, the number of eligible entries received determines the odds of winning, approximate retail value of prize is $106, if the prize is not claimed by Friday, April 13, another name will be drawn at random to win, blah, blah, blah.
Be sure to check back tomorrow for the final segment of milk paint madness, and in the meantime remember to pin today’s post for future reference.


I’ve got a dresser I’d like to paint and I just can’t decide what color or how. One day, it’ll just come to me, I hope!
LikeLiked by 1 person
I have not tried the tape method or the hair dryer. I have a small stool to paint so will try the heat to crackle it. As always great information!
LikeLiked by 1 person
And I definitely need the lifetime supply of this salad bowl stuff since we don´t get this here in Germany. But I have no idea if a win could go to Germany – if not, I wish luck to someone else! 🙂
LikeLike
Yep, if you win I’ll ship it to Germany!
LikeLike
I haven’t tried milk paint yet. I really like the ‘chippy’ look. If my piece didn’t look ‘chippy’ enough I would probably try the tape method.
Thanks for all the great info!
LikeLiked by 1 person
It is a good thing I can go back over these posts, they are too full of info for me to retain in 1 reading. Thank you again.
LikeLiked by 1 person
I’m a beginner. I’ve used Sweet Pickins on a few smaller pieces. Absolutely love it! I have a dresser and a hutch that I’m dying to do, still pretty nervous though. But I’m so excited to try some of these techniques to get the chippy look I’m hoping for. Thank you so much!
LikeLike
I have only sanded pieces to give them a worn look. I have not used much milk paint or the other products you write about. I would like to try. I have a wonderful old chair I would like to paint to give to my daughter. Thank you!
LikeLiked by 1 person
Love reading your posts about milk paint! My favorite paint! I’ve learned most of your techniques through trial and error. Have an antique gateleg table I’ve taken a break from prepping because I was so discouraged with all the bubbling “alligator” finish on the legs. Thinking milk paint will be the way to go, rather than Fusion. Would LOVE to try that salad bowl wax!
LikeLike
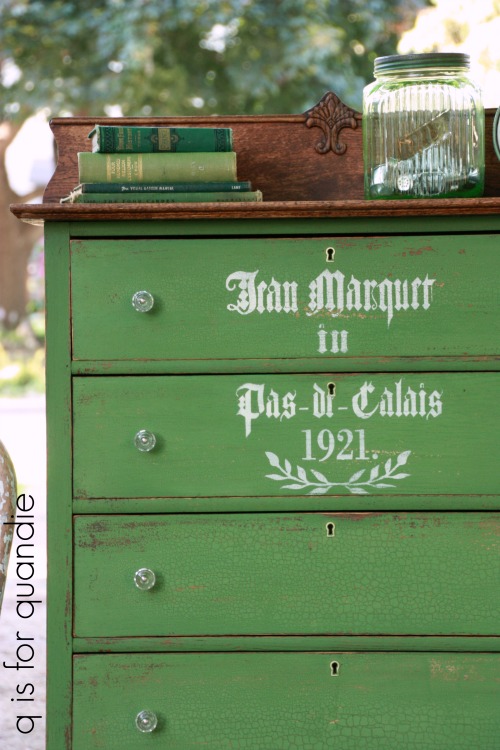
I love using milk paint over an ‘alligatored’ finish. That is what prompted the name ‘Blue Alligator’. There is a good closeup photo of the paint over the alligator finish in that post, check it out here.
LikeLike
I haven’t tried any of these but would like to try then out. I’m really appreciative of all this great information to learn from.☺️
LikeLiked by 1 person
Thanks again for the tips.
LikeLiked by 1 person
Oh my, another great post. I love the layered look. It just makes the piece look more vintage and aged over time. Once again, thank you for the opportunity at the giveaway. If spring ever comes, I have several projects I want to get started on.
LikeLike
Well, I thought spring was almost here. Then we got 9″ of snow and it’s currently 16 degrees outside, so now I’m really not sure 😉
LikeLike
I love all of these helpful tips. I can’t wait to try the crackle with heat! Thanks for the tips and for the opportunity to win free stuff! 🙂
LikeLiked by 1 person
Thank you! These are awesome tips and I can’t wait to try the crackle finish.
LikeLiked by 1 person
I’ve only mixed milk paint to get a custom color. These tips are fantastic—thank you!
LikeLiked by 1 person
Linda, you have so much great information packed in a this days blog. I hope when I need to refer back I can remember key words to make it magically re-appear! I have a container of bond, but haven’t used it yet, I just love the unexpected moments of chipping. Two things you shared that I haven’t done yet is the color layering and the heat crackle. They are definitely on my ‘next thing to do’ list. Great information, thank you.
LikeLiked by 1 person
Literally tried nothing with milk paint but Love the idea of a chalk paint base then resist and final milk paint layer! Also, your mixed colors are so gorgeous!
LikeLiked by 1 person
I’ve never actually used Milk Paint even though I have a few colors that I’ve purchased…just been too intimidated to try them. But your posts have given me inspiration! I definitely would like to try some layering and the resist method when I finally get my feet wet by actually using the product! Think I’ll start out with simply painting, until I get more comfortable. Maybe a chalkboard will be my first attempt! Thanks for the info and the opportunities to win some products to experiment with!
LikeLiked by 1 person
Great tips! If I win, I will be donating the prize to a painter friend in need!
LikeLiked by 1 person
That’s an awesome idea Terri, love it!
LikeLike
The tape method sounds like a winner to me. I’m trying it! Loved this series of posts from you, and I’d pay good money to see that mad scientist laugh! 😉
LikeLike
LOL, well, I have to say you’d be wasting your good money 😉
LikeLike
Good morning Linda. Thank you for all of the good information. I have used a wax puck and tape before. I have also used a blow dryer to cause more crackling. I have never tried the salad bowl finish. I would like to try it. Fingers crossed! 😊
LikeLiked by 1 person
I have this weird fear of chipping. And yet, when it happens, I love the look. I really need to loosen up and stop being such a control freak in my painting!
LikeLike
Well, to be honest I started out where you are now Mary. Chipping always freaked me out a little too. I like to think I’ve gotten better at rolling with the punches on that one, but I’m not sure that’s really true. I do feel a little more capable of controlling it now though.
LikeLike
Usually I charge myself with being a person who thinks out of the box, but reading your today post I realize I am a novice. I have used a heat gun to strip off paint to a clear finish for completely stripping and stain or paint anew. Never thinking to use a blow dryer to remove “just enough” paint.
Also, many times I’ve used duct tape to hold glued wood together in lieu of a wood clamp, but in the removing the tape the paint comes away too. Grimace, but I lost the lesson. That same trick I could transfer to controlled paint removal. Thank you again.
LikeLike
Yes, exactly La Verne! You were half way there on both of those techniques 🙂
LikeLike
Love milk paint madness week! Have tried several of the above techniques and plan to work on some layering next project.
LikeLiked by 1 person
Great tips, I will def try the hairdryer tip. I’m excited to try it on the next piece I’m painting for that awesomely chippy and crackly effect…. but for now, off to spring break to TX to catch some heat and sun.
LikeLike
I’m so envious! Enjoy that warm weather Gladys 🙂
LikeLike
I have been wondering about what finishes I should or shouldn’t paint over with MP, thank you! I have tried the tape method and had pretty good success with. But I accidentally discovered the heat method. We were in a time crunch to do a show and this bed bench we had built was just not looking like I had thought it would. But it was humid and the paint wasn’t drying and I got the heat gun out to try to speed things up and……WOW! That bench turned out to be the prettiest piece of furniture we’ve ever repurposed! One of the things that I still kick myself for letting go.
LikeLiked by 1 person
I have mixed milk paint to customize a color but otherwise I’ve just left the cracking and chipping to chance. Not always with a good result! I will be keeping this post for reference!
LikeLiked by 1 person
Oh linda you have mastered all of these milk paint techniques. I have not tryed any of these techniques. You are so inspiring for me to jump right in and go for it 🙂
LikeLiked by 1 person
It is so nice of you to share all of your wisdom with us commoners! I would like to try the “resist” as that is something I have always stayed away from a bit afraid that it would look amateur. But if I win today’s giveaway, I promise I will try it!
LikeLiked by 1 person
Your techniques are clear and concise. You’re the milk paint guru!
LikeLike
Namaste!
LikeLike
I’ve never used milk paint. I would probably enjoy using heat to make it crackle. That would be fun to watch AND create an interesting surface!
LikeLiked by 1 person
Great info on bonding agents and resist methods to “control” milk paint. Love all your Q-tips!
> WordPress.com
LikeLiked by 1 person
I’ve only done sanding, but would like to try the resist method with the salad bowl finish to see if it looks more authentic (when I do it, I know it looks authentic when you do it 🙂 ). I also like the effect of using the tape. Sometimes when I do the sanding, I have a hard time reproducing what would look like normal wear and tear. It’s definitely an art!
LikeLike
Very true Meggan! And in fact I don’t always get it right the first time myself. I’m posting a desk (hey, in fact it’s the one you sent me in search of at Goodwill recently) tomorrow where I wasn’t happy with the results the first time around so I went back to the drawing board and tried again.
LikeLike
I love the chippy look but not too chippy so with the controlling tips I think I’ll try it on a few new pieces. Thanks for your great…as always…demonstrations and options.
LikeLiked by 1 person
I have done the resist technique, and the tape method….especially liked the tape method….and now I want to try the crackling idea, and I will be mixing paint colors too…thank you!
LikeLiked by 1 person
I haven’t used the salad bowl finish before, but would love to try it! I have used vaseline in the past, and making tape to “help” chip.
LikeLiked by 1 person
I am wanting to try the “crackling” method with a hair dryer. I have an old hutch that would look wonderful with that technique!
LikeLiked by 1 person
Thanks once again for all of these great lessons. As I have not tried milk paint yet I haven’t tried any of these chipping methods. I have heard great things about the salad bowl finish and would love to try it.
LikeLiked by 1 person
As one who has never tried milk paint, this info helps me tremendously! I’ve done crackling but probably 20 years ago when there was exactly 1 crackling medium sold which was like a glue. I love the idea of trying all these techniques as I now understand all the steps and what you mean by resist. That always stumped me. Thanks so much Linda!
LikeLiked by 1 person
I want to get the chippy look on a small table. Thanks for the great tips!
LikeLiked by 1 person
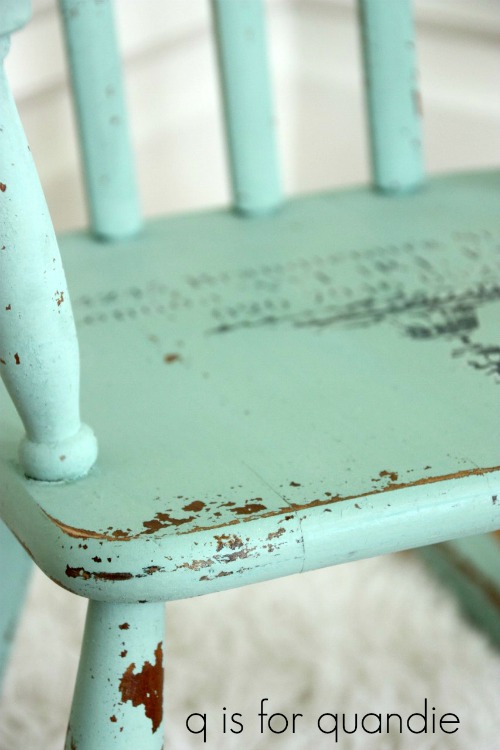
I have tried the wax puck method and also, a bit of Vaseline to get resist. But, sometimes, just see what happens naturally. I would like to know the colors that you used in the photo that is just below the section on taping. Looks like some green showing through a white or lighter aqua-ish color. I love that color and would like to try. Not to mention, would like to be part of the give away. Thank you for all of these posts on using milk paint!
LikeLike
That is a base layer of Homestead House Upper Canada Green milk paint with HH Limestone over it. I used the HH Salad Bowl Finish (or Miss Mustard Seed Beeswax Finish, same stuff) between the layers of paint to encourage that chipping. Similar colors in the Miss Mustard Seed line would be Luckett’s Green and Linen. The white balance in that photo is a little bit off which is making the white look aqua-ish, but it’s not. It’s a warm white. There is an other picture of that piece hanging on the wall in this post.
LikeLike
Thank you so much for the color information!
LikeLike
Thank you as always for the great information and tutorials! I used a candle once as a resist and crackled (by mistake) when trying to hurry up the drying time with a hair dryer. I love the look of milk paint and am anxious to try ‘controlled’ chippy’.
LikeLiked by 1 person
SO much goodness in this post! I’ve been wondering about everything you mentioned and it’s all in one spot. I especially want to try crackling and the tape method. 100 Thumbs up! 🙂
LikeLiked by 1 person
These are all great tips. Thank you! Off to check out your British rocker recipe. 😀
LikeLiked by 1 person
OH WOW!!! I LOVE all these GREAT tips!! I am moving to MY own little place soon…and cant wait to start painting some of my pieces!! Your tips will really help me!! Thank you for sharing!!!
LikeLiked by 1 person
So excited to have found your blog (thru fiona debell) I just started painting furniture a few months ago and I’m hooked! I been reading as much information as possible and your post has me even more excited! I’ve been scared to try the milk paint but you got me pumped girl!! I want to try the layering look. I’ve already painted a few pieces with Fusion Mineral Paint and it’s amazing so I’m dying to try it with the milk paint to get that chippy worn old look! I’m so hooked that I’m scouring garage sales in my area and going to give it a go at selling a few pieces here and there to see how it goes. I’m so fed up with the corporate world – would love to be my own boss! So grateful to have found this post and your blog!!!! Ok – I’ll be spending the next couple of hours devouring more of your posts!! THANK YOU!!!!
LikeLike
Well enjoy perusing my blog Lourdes! There is lots to see. And have some fun with layering colors. It’s a great way to use up partial containers of paint where you don’t have enough to completely finish a piece, but you do have enough to layer with other colors.
LikeLiked by 1 person
Well if Iwon I am sure I would be able to milk paint by just reading all your advice and instructions. What a great teacher you are and coming from someone with such a great knowledge is a great opportunity for all who read your blog. Thanks from me and luv to Mom and Sis. And you too.
LikeLiked by 1 person
I have used MMS milk paint. It did not get chippy that much but that was ok. I can go either way on projects. It is what it is. I would like to try Fusion and the Salad Bowl finish jar you talked about. Thank you.
LikeLiked by 1 person
Love the information today. I’m just getting started with milk paint and this post is really helpful! Thank you.
LikeLiked by 1 person
Thanks again, Miss Quandie (-: You DO have such a flair for writing……and so organized in your thinking and step-by-steps! Love it to pieces!
LikeLiked by 1 person
This blog!!! So Good! Thanks for all the information. I am new to milk paint and had so many questions regarding the chippiness factor — you’ve answered all of them and I think I can take on a project. Something small — corbels, a shelf or a side table. Thanks!
LikeLike
Love the idea of starting with some corbels. Those would be perfect for playing around with some layering of colors and chipping. Have fun!
LikeLike