

Last summer while out garage saling I saw a house with fabulous lights in big flower pots on either side of their driveway.
I have to laugh, because initially I was completely flummoxed as to how they accomplished that. I thought they’d had to run electrical wiring to the pots somehow. But duh, of course, they were solar lights.
Seriously, how did I not just realize that immediately?
Well … anyway … I thought they were fabulous, so I decided to copy the idea myself this year.
But I didn’t want to spend the $70 for the really pretty copper lights that I found online, so I decided to see what I could do to dress up a pair of plastic lights that I found at Fleet Farm for less than half that price.

I’m not sure that photo shows it, but these are made out of black plastic and that’s exactly what they look like up close. In other words, not terribly nice.
So I pulled out Dixie Belle’s patina paint and went to work on them.

Rather than doing my usual rusty finish using the Iron paint and Green spray, I brought out the Copper paint and Blue spray.
Full disclosure, I probably should have used the Bonding Boss primer in this situation since I was painting over slick plastic. But I was being impatient and I skipped it. I may pay for that later, especially since these lights will be out in the elements. I’m willing to risk it though.
So although I skipped that important step and went right to stippling on two coats of the Copper paint, you should do what I say and not what I do and use the Bonding Boss over slick surfaces.
While the 2nd coat of Copper was still wet, I sprayed on the Blue spray. It was looking really blue though, and I wanted more of that green verdigris sort of color, so then I quickly added some Green spray as well.
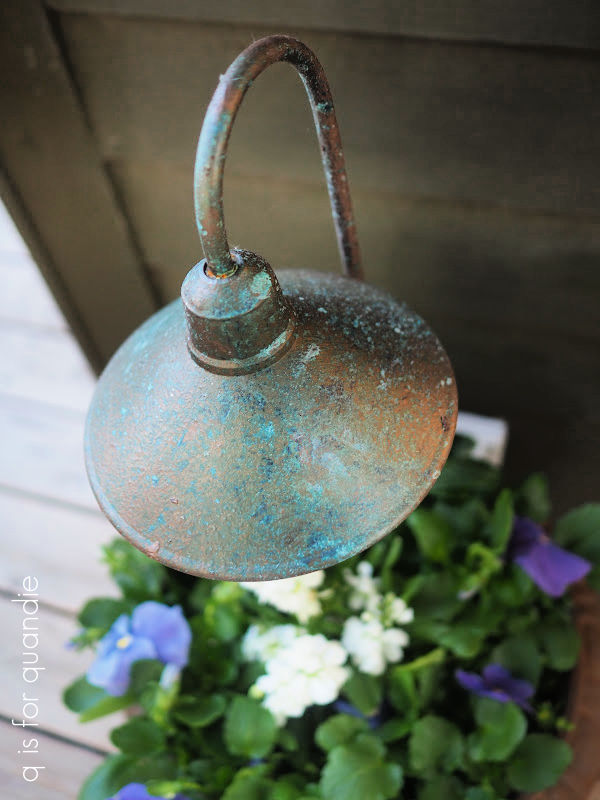
Perfect!

I think the lights look totally legit with this paint treatment.
If you want to see the full instructions on how to use the Dixie Belle patina paint, check out my how-to post by clicking here.

My only complaint about the lights is that big honkin’ solar power collector thingie. No one would mistake these for proper electric lights!

Although the panel is not very well disguised right now, as my plants get a little taller it will be a bit more hidden … but I can’t let it get too hidden or it won’t work properly.
But aside from that, I love how these turned out.
I’ve had them outside for a couple of weeks now, and so far the paint is holding up just fine as well. I’ll be sure to give you an update at the end of the season to let you know how they did.
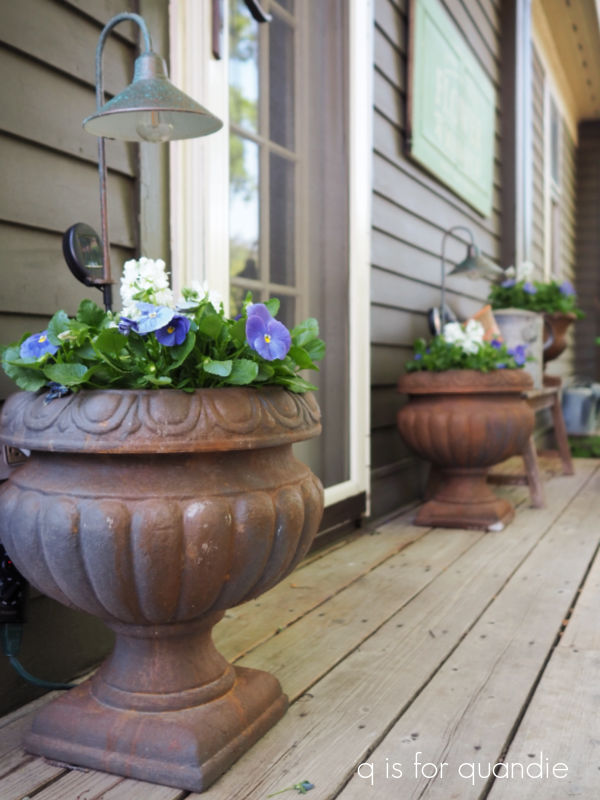
By the way, speaking of plastic to fantastic, those planters are also plastic.
I gave them the rusty treatment (Iron paint with green spray) last year … or wait … maybe two years ago? I’m not sure.

Either way, they definitely don’t look plastic anymore, right?!
Leave a comment and let me know if you’ve tried any of the patina paint, or if you have something that you think would benefit from the rusty treatment, or the verdigris copper treatment.
Thank you to Dixie Belle Paint Co for providing the patina paint used for these projects.

I’m wondering if you taped or hot glued the “power thingie” onto the back of the light shade facing the wall, it might end up hidden from view.
LikeLike
The power thingie isn’t detachable from it’s location on the stem. I was hoping I could move it up and down the stem to where I wanted it, but no such luck.
LikeLike
I have not tried the patina paints but am intrigued to do so. I absolutely love how these solar lights came out though I am with you on the position and size of the solar panel. I will be curious to know how well they function as the panels become partially hidden by the plants.
LikeLike
I’m sure they won’t function as well if they become partially hidden. Usually that just means the lights won’t stay on as long into the night. Since I an usually in bed by 10 p.m., it probably won’t matter much to me, LOL!
LikeLike
What a beautiful job! Great idea! While reading my mind went to my solar stash – do I have any substantial lights I could use?! lol
LikeLike
If not, you could always find some cheap lights at your local Home Depot and give them a new look!
LikeLike
I love how these turned out. I’ve never tried patina paint because I usually buy pre-rusted and patinaed items. You’ve inspired me to give it a try on some items I have.
LikeLike
These days it seems like the pre-rusted and patinaed items come with a stiff price tag, so using the patina paint is a easy way to get that look without paying for it. I hope you give it a try!
LikeLike
This post came at the perfect time for me. I was actually on your site researching patina paints! The home we purchased came with these amazing 3 feet pots with metal handles and scroll work. I thought they were legit concrete all last year, they looked so good. Unfortunately they didn’t winter well and need a makeover to look like the real thing. So … base the metal handles and scrolls with orange metal primer; paint first coat of iron everywhere; dab second coat on areas which would naturally rust and apply green spray while wet. Is that right? I’m not looking for an allover orange rusty color, so should I apply the topcoat to stop the activation process when I like how it’s looking? Any top coat recommendations? They will be in very sunny NC. I’d love to purchase from your site if you’re an affiliate. Thank you!
LikeLike
I’m not an affiliate, so maybe check for a local Dixie Belle retailer. You can also order directly from their website. You will possibly end up with rust anywhere you put the Iron paint, so if you don’t want rust all over, you don’t want to apply a first coat of Iron all over. If you need to cover the entire pot in some way, I’d suggest using a chalk paint all over in whatever color you want to see. Or you could experiment with a metal look paint that doesn’t actually contain iron flakes that will rust. Then just put the Iron paint where you want rust. I’m also not sure a topcoat will stop the activation process, I haven’t really experimented with that. I typically don’t use a topcoat because I don’t like the way it changes up the ‘look’ of rust (see more about that in this post). That being said, when I do want to topcoat the rust I find that the Rust-Oleum matte spray sealer works well to protect it without changing the texture too much. Also, keep in mind that the rust can take some time to develop (sometimes even a week or more), so if you don’t see rust right away, keep in mind that it takes time. Best of luck with your project!
LikeLike
Thank you so much. Your input is much appreciated!
LikeLiked by 1 person
Linda,
Those turned out great! I have used a patina paint ( another brand) and I love how it works!
smiles, alice
LikeLike
The patina paint definitely provides the most authentic faux finish I’ve seen 🙂
LikeLike
No way would anyone know these were plastic! They are fabulous!!
LikeLike
Thanks Paula! And I agree, no one would ever know. In fact, I had to go tap on those pots to make sure I wasn’t mis-remembering that they were plastic as I was writing this post, lol.
LikeLike
I love that stuff! So fun to see the cool results!!
LikeLike
The patina paint is one of my favorites too!
LikeLike