
My sister and I popped back into the ReStore last week and this time I picked up this bed.

Sorry for the poor quality of that photo. As you may be able to see, my driveway was pure ice that day and it was really cold out. I took a quick snap and called it good.
Anyway, I’m not especially trying to find beds these days. I was actually hoping to come home with a dresser or a buffet maybe. But, I didn’t find any of those sort of pieces that day, so another bed it was.
Compared to the gorgeous details on the bed I shared last week, this one seems a bit plain in comparison doesn’t it? I’m afraid that bed is going to be a hard act to follow. Still, I liked the fluted legs on the foot board of this one as well as the curve to the top of both pieces.
Lately I have been binge watching YouTube videos by Crys’Dawna at Bella Renovare. I became familiar with her work when I was a brand ambassador at re.design with prima. I also see a lot of her work on the Dixie Belle sites. Now, any of you who might also be familiar with her work are probably thinking to yourself that Crys’Dawna’s style and mine are drastically different, and that is absolutely true. I’ve seen her use as many as five or six colors on one piece, and we’re talking the brightest colors available. For example …

I’m pretty sure that you’ll never see me painting a piece quite like that (although I’ve learned to never say never). But that doesn’t mean that I don’t admire her work. Her blending of colors is flawless. Even though I probably won’t ever copy her exact style, I can still learn from Crys’Dawna’s videos and possibly modify her techniques to suit my own style a bit more. Or that’s what I was hoping anyway.
So I thought I’d give blending a try on this bed. The first step was to gather my supplies. I decided to go with shades of grey, so I pulled out Dixie Belle paint in Gravel Road, Hurricane Grey and French Linen. I also needed a brush for each color, plus a brush for blending them, and finally a spray bottle.

You can get a spray bottle like this from Dixie Belle Paint Co. It sprays in a continuous fine mist which works well for blending paint.
Now, let me stop here and say that this post is not going to turn into a tutorial on blending paint for two reasons. First, you’d be much better off just watching some of Crys’Dawna’s videos to learn how to blend paint. And second, as it turns out, I kind of suck at it.
Crys’Dawna makes it look so easy.
I spent half a day painting, spraying, and then blending, and then adding more paint, and spraying, and blending, and letting it dry, and then deciding it was awful and adding more paint, and spray, to try and blend it, and then letting it dry … you get the picture. No matter how much I sprayed and painted and blended, I just never liked the end result. It just looked like a splotchy paint job to me. And for the life of me, I could not get rid of the obvious brush strokes.

So why am I sharing this failure with you? I’m just keeping it real. Sometimes things just don’t work out for me. I definitely don’t have the patience to keep working at a finish like this.
After giving up on being able to achieve anything even closely resembling a smoothly blended look, I decided to go back to techniques that I’m good at. I re-painted the bed in a solid coat of Gravel Road (the darkest gray) and then I pulled out the French Damask stencil from re.design with prima.
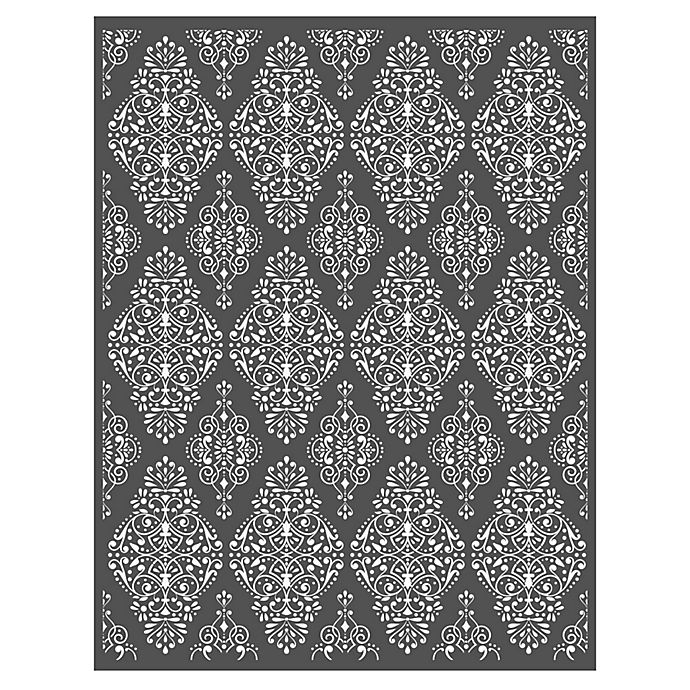
I placed the stencil horizontally, rather than vertically as shown above, and I used the Hurricane Gray to do the stenciling. I just wanted a hint of the pattern, not something that was totally in your face. Using a color that is just a bit lighter or a bit darker is perfect for creating that look.

I added a faint ‘1902’ to the bottom of the foot board as well.

I was going for a very faded, imperfect look with the stencil so I wasn’t too particular about thoroughly painting every little detail.
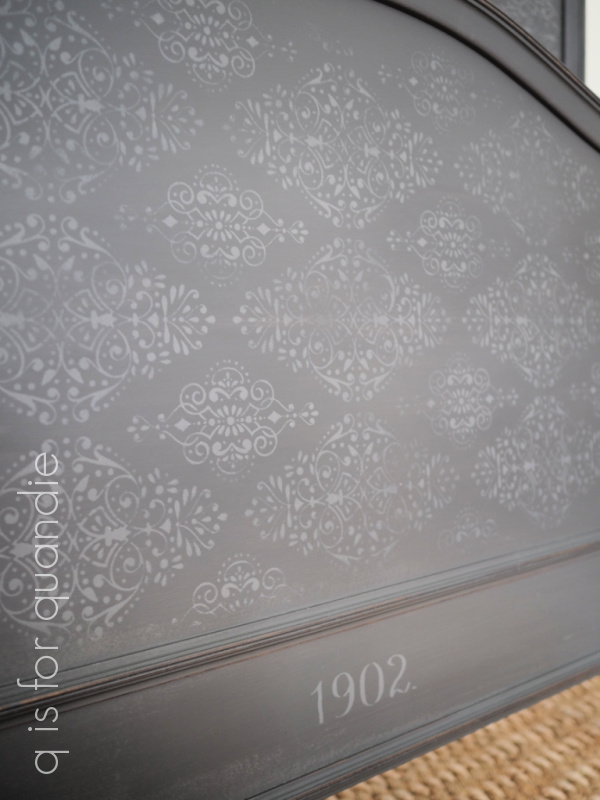
Once the paint was dry, I sanded over everything and then added a coat of clear wax.
So what is the moral of our story? I’m not really sure. Of course we should all try new things and push ourselves outside of our comfort zone periodically. But at the same time, every technique out there isn’t for everyone. In this case, Socrates was right, “To know thyself is the beginning of wisdom.”

Sometimes you try something new and realize it’s just not for you.
How about you? Have you tried this blending technique?
Well, if you’d like to give it a shot, I’ve decided to give away my gently used spray bottle because I’m pretty sure I’m never going to use it again. To give you something to blend, I’m also throwing in a couple of shades of green that I think would be lovely blended together, Kudzu and Palmetto.

Who wants to give it a try?
The rules: I’m going to make you work for it just a little today, so to be eligible to win today’s prize please leave a comment telling me about a failed experiment of your own and what you learned from the experience.
Your comment must be left on this blog post, not on Facebook or Instagram. You are not required to follow my blog, although it would be awesome if you did!
I will randomly draw the name of a winner for today’s prize from all of the comments left on this post by Sunday, January 31, 2021 at the stroke of midnight (U.S. Central time).
The fine print: no purchase necessary, you must be 18 years of age or older to win, void where prohibited by law, the number of eligible entries received determines the odds of winning, approximate retail value of prize is $54, if the prize is not claimed by Friday, February 5, 2021 another name will be drawn at random to win, blah, blah, blah.
As always, thanks to Dixie Belle for providing the paint I used on this bed as well as the items I am giving away.
In the meantime, this bed is for sale. If you are local and in need of a twin bed, be sure to check out the details on my ‘available for local sale‘ page.

Most of my forays into new techniques have been initial disasters but I love the process of experimenting so I persist. Recently, I’ve been experimenting with epoxy on furniture and created a galaxy on a student desk. The universe is very difficult to recreate- kudos to the actual Creator! Anyways, I appreciate your willingness to be transparent and hope that we can all be more kind to ourselves when we “fail”.
LikeLiked by 2 people
That sounds amazing Wendy, and also quite challenging!
LikeLike
I love doing blending but you are right, sometimes it doesn’t blend well for what ever reason.
Have not tried my hand at the, as I call it, faint stenciling. Would love to win your giveaway and give it a try.
Love your blog always good ideas and tips
LikeLiked by 1 person
I think I’ll start calling it ‘faint stenciling’ as well, it’s a great description!
LikeLiked by 1 person
I have tried blending resulting in just what happened to you. No matter how much I tried, it just looked blotchy and the brush marks were visible. I guess it’s not for me either.
LikeLiked by 1 person
Well, it’s nice to know that I’m not alone. Of course, we could keep working at it and trying to get it right … but then again, we could also just move on 😉
LikeLiked by 1 person
Well, I’ve probably failed at more than I’ve been successful with — kind of like my style of gardening.
Right now, I’m failing at transfers on shutters. They are outside wood ones that I want to bring inside and frame a window with instead of drapes.
I tried small ones that fit on the louvers but these are 7.5′ tall, so they were lost. I have tried larger ones, but putting them on horizontally looks dumb. Also, I tried using just white ones against a charcoal background and they add so little.
So I’ve sanded them back, re-painted, and am going for something a little more colorful and maybe something made to go vertically.
Wish me luck!
LikeLiked by 2 people
I commend you for continuing to try and find just the right look for your shutters Kathy!
LikeLike
First, since I’m a Dixie Bell retailer, don’t add me into the drawing! Second, I don’t love blending at all and I can’t say that I’ve seen a blended project where i thought “I want to try that”, guess I’m an old school furniture painter. I love the very artistic pieces that creators show us but it won’t sell in my small town. As far as things I’ve tried and failed? Taping off stripes is not a skill I’ve mastered. Sanding down curved edges smoothly (to raw wood) is still a challenge. So many things I want to do better! But I do love your faded genteel stenciling on this bed. It’s subtle and elegant
LikeLiked by 1 person
I think I’m pretty old school as well Laura 😉
LikeLike
I’ve been trying to stencil some signs this winter…you make it look so easy. Well, turns out I’m not getting the hang of it, at all. Although, so far my efforts are just above failure, I’m going to keep trying, since I invested in quite a few stencils before I found out it just might not be my thing.
As always thanks for the inspiration.
Jill
LikeLike
I’ve been wanting to try blending after seeing a fabulous dresser by Brushed by Brandy but am always too cautious when trying a new technique. I’ll try watching the videos you mentioned. I can’t stand having to re-do a piece. I have had one sitting in my kitchen for 4 months awaiting a redo-it’s become the island I never knew I needed.
LikeLike
Well, that’s one way to get a kitchen island 😉 I do admire Brandy’s work as well. Those ladies definitely have some mad skills!
LikeLike
The most important thing is to have very little paint on your brush or foam dauber. It seems wasteful to blot so much off but it’s better than sanding and repainting and re-stenciling
LikeLike
Stenciling can be challenging. I will say that I love chalk paint for stenciling, both for paint the surface you’re about to stencil and for the actual stenciling. It has a less slippery surface than acrylic or latex paints, so the paint can’t slide under the stencil and create blotchy-ness, and it’s also nice and thick which works well for the actual stenciling. And Melissa is absolutely right, use an almost dry brush. It does feel wasteful to wipe paint back off your brush, but it is crucial to getting a clean look with a stencil.
LikeLike
My failed experiment? Let me count the ways! For many years, I’ve had the cutest antique rolltop desk, a smaller size with only one bank of side drawers v. the usual two. We’ve used it daily since getting it in the 80s. At that time, I had refinished it with stain and varnish, but now it was looking tired and old-fashioned. So I set out to modernize it with spray paint and distressing — and guess what — I didn’t like it! I missed the wood look. Uffdah!! So I got out my sander and removed it all. Getting the paint out of the roll top grooves —well, you can imagine. With my hubby’s help, we got it down to the bare wood and it’s beautiful! ❤️ I made a promise to that poor old desk that not in my lifetime will it be experimented on again!
LikeLike
Oh, that does sound like a labor of love. Kudos to you for sticking with it and stripping that back down again Joni!
LikeLike
I have tried blending and I truly suck at it. Lol. I’ve watched the videos and yes, they make it look easy. I did a buffet for my daughter. The look she wanted involved white on the top third, then a bright turquoise blended vertically, with the bottom third being the original dark wood with some distressing. Not a beginner project for sure. It also had some gold leafing in random spots. I did it, but every time I look at it I cringe and I’ve told her multiple times, when she tires of it I’ll gladly paint it a solid color. LOL
LikeLike
Well, if your daughter loves it then I’d say it was a success 🙂
LikeLike
I had always made most of my own clothes. We had a friend’s party to attend so the day of I decided to whip up an easy one hour dress pattern. Nearly finished i tried it on…one front dart up here the other way down there…the zipper didn’t meet together at the top….straight to the waste basket pattern and all
LikeLike
LOL! I can’t even imagine attempting to sew a dress, let alone the same day I was going to wear it. You are a brave soul Sharon 😉
LikeLike
Yes, I’ve also tried blending on a small project. It certainly isn’t as easy as they make it look. I must have had 1/8 inch thick paint on that board by the time I was done and it still didn’t look right. I ended up sanding it down and painting it a solid color. Oh well, maybe someday I’ll try it again.
LikeLike
I try to never say never, so I suppose it’s possible I’ll try it again one day too … but definitely not anytime soon 🙂
LikeLike
I am so grateful to know that blending is not your thing. I aspire to achieve your different styles Linda. Thanks HEAVENS I don’t have to learn to blend. 🤪 I’ve tried it several times. Same story. Brushstrokes. As always, beautiful work stenciling! A technique I need to improve upon.
But I won’t pass up on a chance for some Dixie Belle paint and mister! 😉
LikeLiked by 1 person
LOL, no worries Wendy, we can both give blending paint a pass 🙂
LikeLike
Love the faint stenciling – very soft and subtle! A first failure was trying to create a “grain stripe” on a cabinet with blue tape – I’m not a “precise” person at all and it turned out ok, but not too too professional!! My other failure turned into one of my favorite pieces. I tried painting a dresser ASCP pink and cream and it turned out looking very weird for some reason. I painted over everything with one of her blues, sanded and distressed it, it showed the layers and I loved it!!
LikeLike
What a great example of making lemonade out of lemons … sounds like you ended up with a great result!
LikeLike
Good on you to try something new. I am not a fan of blending so have never tried. My biggest recent fail was putting “tough coat” over top of a dark colour on the top of a buffet. Yes I knew better but thought I would try….the buffet ended up with a tough coat sandwich as I had to apply another coat of dark paint on top. It all turned out well but I was annoyed with myself none the less.
LikeLike
Isn’t it the worst when you get a bad result with the topcoat? You’ve gotten all the way to the end of the process and then bam! Streaks! So frustrating. The tough coat sandwich was a good save though 🙂
LikeLike
Thank you for your honesty, I have only attempted shading on very small pieces, it is a difficult method to master.
In November I took a workshop to make a really cool vintage box and on two of the sides we were to freehand Buffalo checkered squares. Just the thought horrified me! The artist teaching the class made it look so easy and she encouraged us all to do this ourselves ( no cheating with stencils). Well, I already know that I have never had a straight hand, I can rarely even cut straight with scissors! But I told myself I would take my time and try. Well the first time it was a Big Fail! So, I painted over and started again…well the second time was hilarious! The somewhat crooked squares on one side were no where near the size of the the somewhat crooked squares on the other side! Yikes! Well, this time when I decided to paint & start over again, the painted squares were a bit raised and hard to cover neatly. Well, I figured if a painted over the one side that had already had squares done twice, with a slightly lighter color, it gave the look of “old & faded squares” that was actually kind of cool! So, I went with that and the finished box is beautiful and everyone raves about it. Lesson learned…stencils are my friends.😁
LikeLike
Stencils are definitely my friend as well. I’m never happy with anything I do free hand!
LikeLike
I have tried to use crackle and cannot get a consistent look. I would love to get a small crackle like an old finish but have not been successful. Gonna take some sample boards.
LikeLike
I think that’s definitely worth experimenting on some sample boards. I love a good crackle finish, although I’ve never used any kind of product to create one. Check out this dresser I painted way back in 2014 that crackles on its own! Dixie Belle makes a Crackle finish, I should order some and do some experimenting of my own.
LikeLike
I have as many failures as successes, so where to start? Currently I am working on a small side table that started out gray, then it needed something so I added some pink accents, and now I’m stalled because it just isn’t right. I need inspiration! (And I don’t seem to have any). Love watching your projects, keep it up!
LikeLike
Maybe try doing some pinterest surfing 😉
LikeLike
I think this is absolutely lovely. The understated shading of the stencil really works. And as much as I like the transfers this is a nice change. I actually miss your renditions of only paint, distressing and wax when necessary.
LikeLike
That’s good to hear Victoria. It’s funny that once you start really embellishing pieces with transfers and the like, you start to feel like a simple plain paint job isn’t exciting enough. But I should go back to basics with some simple paint jobs more often.
LikeLike
I’m so glad you shared your failed technique with us. It makes you human. Since all of your stuff turns out gorgeous (and the bed did end up gorgeous!), it’s easy for us to believe you succeed every time.
My big fail came with dry bri=ushing. Even though I’d offload almost all of the paint off my chip brush, that first stroke always started with a blob of paint, every. single. time! I was going to give up on dry brushing until I stumbled upon a blogger who said she used a “dry brush/wash” technique. When she’d do a stroke of dry brushing, she’d then wipe over it with a dry rag to smooth everything out. BAM! I found my technique! Now when dry brushing, I keep my handy rag to wipe over the strokes. The dry brushing remains, as do the individual strokes, but they are softened a bit and that first blotch becomes a beautiful part of the paint job. now, I can dry brush over raised parts easily, but these flat surfaces will always get the drybrush-wash technique. Before learning how to do that, I was repeatedly painting over my failed areas and trying again, and again, and again.
LikeLike
Failing at something can be a great learning tool. I’m glad you figured out your dry brushing technique Christie 🙂
LikeLike
I love the bed and appreciate the honesty. When someone whose work you respect keeps it real, it makes pushing through my own ”learning experiences” easier. I’ve only tried blending serving trays, and while I was ultimately pleased with them in the end, both took hours longer than they really should have and I struggled with not overworking the paint.
My personal nemesis is brown glaze or wash. I love using black glaze over a bright color. So when I saw people whose work I like using a brown glaze for antiquing, I dove right in. And I hated it. I brushed it on and wiped it back and it looked dirty. So I wiped it back some more. But no matter how much a wiped it back, it just looked dirty to me. I repainted that piece. But I have tried brown glaze on several projects – I brush it on, wipe it back, wipe it back some more, take it off, adjust the depth of the glaze, brush it on sparingly, wipe it back, wipe it back some more, over work it, take it off …. you get the picture. I’ve had to accept that while I like the grungy or antique look on other people’s work, it is only ever going to look dirty to me on mine. (This goes whether I’m working on furniture, home decor, or doing a mixed media piece). My family has been instructed that the next time I utter the words “Van Dyke brown” or “grungy” or “aging” they are to “Just say no.” It will save me some tears and save their ears from hearing words moms shouldn’t say. lol
I love Palmetto and would love to try Kudzu, so thanks for a chance to win.
LikeLike
I’ve really struggled to get the hang of glazes myself. And I also think we all tend to be much more critical of our own work then we are of others. We see someone else’s piece with brown glaze and think it looks great, but we don’t really scrutinize it closely like we do when we create it ourselves. Maybe we should cut ourselves some slack 😉
LikeLike
Love that faint stencil. So pretty.
LikeLike
Thanks Jeannie!
LikeLike
Yes, I have tried blending. Wanted to blend paint a storage piece I had married together from two different smaller pieces for my laundry room. I chose Col. Mustard, Daisy and fluff. You know my motto, don’t whisper, scream!! So now I have this screaming yellow storage piece in my laundry room! But it does brighten the room. It’s does look like a blob but the colors make me happy.
Think my problem is too much paint on the brush and too heavy-handed when applying it. Brandy says to use light, soft brush strokes and I cannot remember ever painting light or soft I love the bold Kudzu color.
Looks like you might be in for some snow in your area.
LikeLike
P.S. I do find using the spray bottle when just doing regular painting helps the paint go on smoother; it takes less paint and brush strokes do not show as much. Especially on darker paints. Now you might have to get another one!
LikeLike
Yes, I should have said more about that in the post. I can definitely see where the spray bottle would be crucial to getting a good blended finish!
LikeLike
You know Kaye, I have to say I did debate keeping the spray bottle for that very reason. I did love how smoothly the paint went on using the spray. Shoot! Now I will have to order another 🙂
LikeLike
Maybe that was my problem … too heavy-handed. I guess I need to start binge watching some Brushed by Brandy too! As for snow, I think it will be perfect weather this afternoon for staying home and painting some stuff 🙂
LikeLike
I have never been a creative painter like you. I love everything you have painted including the bed. So pretty! But…I was always a neat quick painter of walls furniture etc. Until I painted our new back door. I swear it looks like a 10 year old painted it! It is metal. The sun was pretty warm that day. I have no idea if that’s what happened or what but I can tell you it killed my confidence. After painting for years I’m afraid to try anything now.
LikeLike
I’d be willing to bet it was the heat of the sun on that metal. Definitely don’t let that stop you! Get back up on that horse and paint something else asap!
LikeLike
The bed ultimately turned out beautiful with the soft stenciling – and I love that you share your struggles with us! I will not be trying the blending technique(!) so no need to add me to the drawing.
But I had to share one of my worse painting decisions ever. When my husband and I were dating, we ‘inherited’ a vintage oak pump organ in need of a little TLC. That was the early 70s and ‘antiquing’ kits were all the rage. Yep, we painted it RED and antiqued over it with a dark brown stain! We lived with it for a year before taking on the tedious process of stripping it down to the bare wood and simply giving it a couple coats of varnish. It’s been a much admired feature in our living room for the past almost 5 decades.
LikeLike
Ah yes, the old 70’s antiquing. I’ve shared here before that my first furniture painting experience was antiquing my bedroom set with my mom back in the 70’s. It was lime green with a dark wash! LOL, can you imagine? Oh wait, you don’t have to imagine it, you can catch a glimpse of it in this post. Do you suppose that style of antiquing will ever return to fashion Netti?
LikeLike
My failed experiment (or my regret!) :\When I was in fifth grade, I refinished a darling bedside cabinet with a drop down door with a carved daisy on the front. My first project! I kept it all these years (without giving away my age – I was born in the 60’s). I got tired of the wood look, but couldn’t bring myself to paint it after remembering all the work to strip and refinish. I sold it at my garage sale a few years ago for $5!
I regret not keeping it and painting – I could be enjoying it and the memories today. I hope that whoever has it now is enjoying it. AND – I bet it is painted!
Morale of the story: don’t be afraid to paint and enjoy!
LikeLike
I so appreciate your comment Terri. I try to tell people this all the time, don’t be afraid to paint a piece if you don’t love it ‘as is’. I have learned this over the years myself. I have several pieces of furniture that were passed down to me from my grandparents and I was afraid to paint them. I ended up storing them in my carriage house (I’m glad that I didn’t sell them for $5!) because they weren’t ‘me’ until one day I realized that I’d love to have them in my house if they were painted. One was the washstand we use on Mr. Q’s side of the bed. I totally agree, don’t be afraid to paint and enjoy!
LikeLike
Your bed is absolutely gorgeous. The added “1902” is perfect. Wish I lived in your area. As for failed experiences , I usually get carried away with grandiose ideas way past my skill level such as mural painting on furniture. Usually I have to paint over and try something a little less difficult.
LikeLike
I love those mural pieces, I thought the first one I saw by Miss Mustard Seed was so gorgeous! I wish I had the time to tackle that sort of project. Maybe when I’m retired and have lots of time to keep trying again … or maybe time to take a class on landscape painting … or something like that. In the meantime, I’ll stick with the simplicity of the stenciled ‘1902’ 🙂
LikeLike
Well…. my experiment…. just this week… no bake cookies…. Don’t laugh. I am 41 years old and have never made no bake cookies. IF I HAD MY WAY… I would never try to make them again… Three batches… all dust…. How hard are no bake cookies?! But, the daughter really wants me to make no bake cookies… what’s the lesson? The daughter really wants no bake cookies so…. back in the kitchen I go…🤪🤪🤪
LikeLike
LOL, well, personally I can’t even really make the baked kind. Unless they come in a tube and you just slice and bake, that I can handle. Well, that’s not entirely true either, Mr. Q does all of the baking in our house. But best of luck to you with those cookies Carla!
LikeLike
Thank Goodness it’s just not me. I watched that many tutorials. Dont they make it look easy. I ended up doing the same and going back to what I’m at x
LikeLike
It is fascinating to watch though, isn’t it Catherine? There is just something really soothing about watching someone paint, it’s very zen.
LikeLike
Thank you for “keeping it real” and sharing your failed attempt. Although I don’t have one to share myself, it gives me courage to START a project that I’ve been hesitant to begin for FEAR of failure!
And I loved the end result!
LikeLike
Just jump in, what’s the worst that can happen? You have to start over, which is what I did here 🙂
LikeLike
The bed ended up looking so pretty! I love the way you keep plugging away at something, trying to make it awesome/sellable……I have to admit that I had a mental “shoulder slump” of shame reading your post but am only realizing it now in hindsight: my WALK AWAY policy! I very easily let myself get burned out on a project if it’s not working out and I have the graveyard in my garage to prove it…….the old “I need to do a crossword puzzle right now” fall back!
LikeLike
I’ve been known to walk away from a few things myself. I always eventually get back to them, but sometimes you have to turn your back on them for a few weeks … or months … 😉
LikeLike
Wow, another great job!. A different style bed and totally appropriate and beautiful look. I agree with the response above from M. C. Calvin, “Quandie” puts me to shame. She works a full-time job in addition to completing all these fabulous projects. I am retired and have a booth at a local antique mall and also paint furniture. I can’t seem to keep motivated right now and I surely appreciate all your hard work and sharing your ideas with us. I love your style. Keep on being “you”.
LikeLike
I have to admit, it is catching up with me a bit these days. This is a super busy time for me at the day job. But luckily we can’t really do much else in life at the moment (with the COVID situation as it is), so I what else would I do with my time?
LikeLike
I’ve been nervous to try thus technique but it might be time to try!
LikeLike
The blending you mean? If so, best of luck to you!
LikeLike
I like when you share ALL of your experience Linda! Motivates me to give a second chance to my own projects that didn’t turn out good0
The bed turned out lovely – i picture it with white linen sheets…
LikeLike
That would be gorgeous … especially vintage monogrammed white linen sheets …
LikeLike
Beautiful bed! I am a big fan of the subtle stencil. I love the look of a blended paint finish, often I find it to be a bit of a challenge to duplicate it on multiple drawer fronts. The great thing is it’s only paint and part of the fun is practising until you’re happy with the finish.
LikeLike
Oh, I can imagine it would be even more difficult to get a bunch of drawer fronts to all looks somewhat the same with blended paint. I definitely do not have the fortitude for that!
LikeLike
Yes..I have tried it…yellow white…no go… then added green..It was ok? and wanted to keep “trying”…It was a huge buffet, and suddenly had to move out of MN. So the project went to the curb…no room in truck…It was gone within 10 minutes!!! Went to TX…oh so much warmer!! Its 65 degrees now, but I am not looking forward to the 100 degree + temps…oh well, No snow!! You do a really great job on your blog …down to business…no this and that b/4 getting to ur project, and I really like that!! Not having to read 5, or more pages of nothing to do with project… Just get to the “project”. Thanks, a lot for that!!
Question…I think I read on one of ur blogs that there was a product that helped with distressing…Can you tell me the product name, and who or where I can purchase?? Thanks for all ur GREAT blogs and GREAT ideas!! Keep it up, great work!!
LikeLike
Hmmmm, I wonder if you are referring to the beeswax a.k.a. Salad Bowl Finish from Homestead House or Fusion (Miss Mustard Seed beeswax is also the same product)? Check out this post for more info on that.
LikeLike
The subtle stencil on this bed is gorgeous. I am always amazed at what a stencil can do for painted furniture. My goof ups have pushed me to get creative in salvaging almost any project. One real mess was a faux marble finish on an accent table. It had a beautiful curvy oval top and looked astonishing when I finished. A short time after it was completely finished it started to lift off the surface of the table right in the middle. There was no saving the finish. I ended up removing the entire painted top which pulled off very easily in big pieces.
LikeLike
Oh my gosh, that must have been heart breaking! I can just imagine!
LikeLike