
Way back in early summer I purchased some old cupboard doors to turn into signs.

They are long and narrow, so I wasn’t sure I’d use any of them for Christmas signs since none of my Christmas stencils were sized quite right for them.
But I had some time on my hands over the Thanksgiving weekend, so I decided to play around a bit and see what I could some up with.
I started by painting one cupboard door in Dixie Belle’s Drop Cloth and the other in their Midnight Sky. I thought it would be fun to do one in the more traditional red and green, and the other in black and white (which will work better with my own décor).
So, I pulled out all of my Christmas stencils and just added bits and pieces of several to create a design that worked on the long, narrow cupboard door.

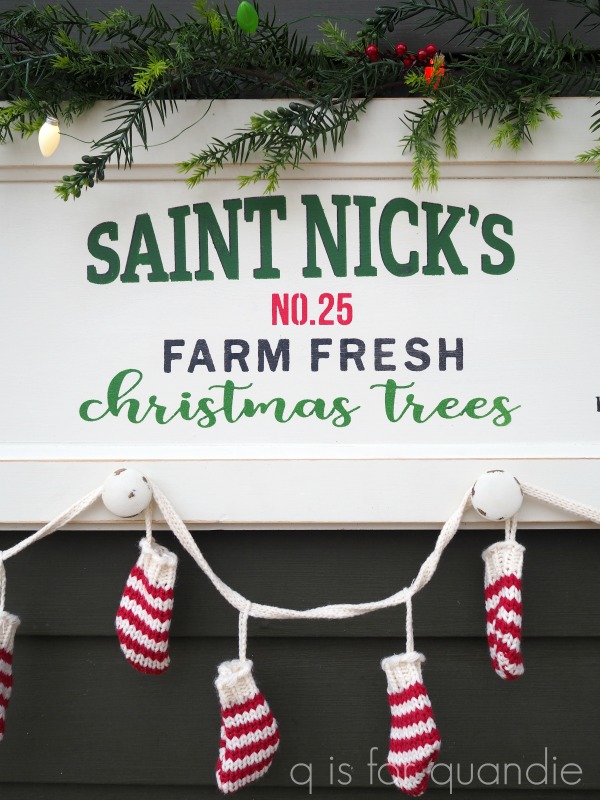
There are three different stencils creating the wording in the middle section.
And some of you might remember the truck stencil. I used it on quite a few things last year, but hadn’t yet used it this year. I’ll admit, it’s a bit putzy to tape off all of the different segments to use different colors of paint (because it’s just a single stencil rather than a separate stencil for each layer of color). But ultimately, it’s worth the effort.
Here’s the entire stencil on a pillow cover that I did last year …

By the way, all of the stencils I’ve used on both signs are from Maison de Stencils.
The cabinet doors came with some fabulous vintage black glass knobs. I took them off and put them in my stash of knobs, and then I painted up some wooden knobs to use instead. I added four of them along the bottom of the sign.

It would be adorable to hang a stocking from each of those knobs, but I didn’t have any that were the appropriate color and size so I just hung a cute little string of tiny knit stockings that I purchased a couple of years back.
But you could also put this up in the kitchen and then hang Christmas dish towels from it, or maybe a small basket full of evergreens, or some ironstone pitchers. Or hang it in the foyer and hang scarves and hats from it. Adding those knobs was easy to do and I feel like it adds so much potential functionality.

I kept the black sign a little bit more simple and monochromatic.

I did use a technique on the middle section that I haven’t done in a while, and that’s giving my stencil a ‘shadow’. Doing this adds a lot of depth to your stencil and it’s really fairly easy. You just stencil first in the color you want for your shadow, in my case I used Dixie Belle’s French Linen. Then, once that paint is dry, place your stencil slightly off to the side and down a bit, like this …

And then stencil with your final color, in this case Dixie Belle’s Drop Cloth.

I love the way this turned out and it looks amazing in person, but it seems to be totally throwing off my camera’s ability to focus. As a result, I had a really hard time getting a photo of the sign where it didn’t look blurry. But trust me, it does not look blurry in person.
This time I did have some stockings to hang that were the appropriate color and style …

You’ll remember that I stenciled these a couple of weeks ago.

Originally I made this sign for myself, but in the end I decided to take it into the shop to see if it will sell. I do have two more of these cupboard doors, so I can always make another for myself between now and Christmas if I decide I simply must have one.
I’ve pretty much run out of time on selling Christmas décor though. I usually find that if I don’t have my Christmas stuff out before Thanksgiving there is a good chance it won’t sell. So I took one last load of Christmas stuff to the shop this week and that will be it for this holiday season. I’ll still be posting a few more holiday things here though. For example, next week I’ll share some Christmas wrapping that I crafted for this year, so be sure to stay tuned!
In the meantime, if you haven’t yet left a comment on my blogiversary giveaway post, you still have until midnight tonight to be in the running to win the prize. So be sure to click over to that post and leave a comment!

That’s amazing! I will be looking for a cabinet door this week at Habitat for Humanity! What a great idea! Love, love, love the blue one and the stencil shadow idea – never thought of that either! Can’t wait to try it! Can’t tell you how much you inspire me! Thank you!
LikeLike
Habitat for Humanity ReStores are the perfect place for finding old cupboard doors! Have fun making some signs 🙂
LikeLike
I love both signs! It would be hard to choose between them.
LikeLike
Thanks Freida!
LikeLike
Both signs turned out great. How long are they? I could maybe fit one in the living room. An idea for next year’s gift to me. Up above the couch. I like the tree one and could hang some of those cloth gift bags on it. Then it would match the pillow you have me last year.
LikeLike
The shadow created on the black sign is wonderful – as is the use of a tape measure as garland! So creative!
LikeLike
I love that old tape measure 🙂 It has the perfect combo of aged patina with the graphic punch of the numbers.
LikeLike
Wow – love the shadowing on the stencil – I never would have thought of that! Both signs are great!
LikeLike
Thanks Sue!
LikeLike
All of the doors are “adoorable”!
LikeLiked by 1 person
LOL, good one Barb! 🙂
LikeLike
Great job as always. Your stenciling skills are excellent.
Cynthia
LikeLike
Thanks Cynthia!
LikeLike
Hi Linda, I love both of the signs. You do such a great job stenciling …and with the shadows…amazing. This is a great idea to use for stockings if you don’t have a fireplace. Thanks for the inspiration.
LikeLike
I was thinking the same … especially since I am not lucky enough to have a fireplace!
LikeLike
Love both of them.
LikeLike
Thanks Linda!
LikeLike
These signs are fantastic!! I love them!! I really like the shadow idea and I am definitely going to try that one. Thanks for sharing 😊
LikeLike
Yes, definitely give the shadow thing a try. It’s so easy and it adds so much. I don’t know why I don’t do it more often myself.
LikeLike
Love, love the black one! And the shadowing is perfection ❤ I have a few of these larger doors, and now you've given me inspiration for a weekend project.
LikeLike
Have fun with your project Angie!
LikeLike
This is my favorite inspiration post – especially the teachable moment for the dropped shadows! Even looking at your explanation it took a moment for the lightbulb (it’s dim) to go off that the shadow is painted first and the second stencil is for the regular letters!! LOL. I do go to the Restore a fair bit so I’ll look for long panels! And I love the knob idea, great for hanging things. Great post.
LikeLike
Thanks so much Laura! If you’re like me (and I suspect you might be) you have a stash of wooden knobs that came off things you’ve painted and swapped out the original knobs for something more exciting (or is it just me?). This is great way to use some of those knobs. But really, even if you don’t have a stash, plain wooden knobs are quite affordable.
LikeLike
Love love love the signs!! The wooden knobs are perfect! Thank you for the shadowing idea with the stencils as well. I will be trying that! I bought some architectural pieces of wood at a flea market a few weeks ago. I’m going to make a sign out of one of them! Wish me luck! Thank you for your inspiration!!
LikeLike
Sounds awesome. I’d wish you luck, but I’m sure you don’t need it 🙂
LikeLike
These are the cutest ever. Great job, I love you creativity!
LikeLike
Thanks so much Vickie!
LikeLike
Black one for me please 🙂 So elegant! Love the knobs idea!
It reminded me that i have 5 or 6 doors sitting in my garage… Hmm… I still have time to do something with them – thank you for inspiration Linda!
LikeLike
Perfect weekend project, paint up some signs!
LikeLike
Love your signs. I think the black one is my favorite. How you come up with your ideas…amazing!
LikeLike
I think it’s possible I spend too much time on pinterest 😉
LikeLike
I love both of these Miss Quandie……and I like the knobs on them A LOT…..the knobs take them to another level. But, you know what? I just KNOW that if I used the same stencils and if I laid then out exactly as you have done, my result would still not be as good as yours! I just ain’t got no Quandie pixie dust!
LikeLike
I might just have to send you some Quandie pixie dust Connie 🙂
LikeLike
Linda, that was such a great tip on shadowing words. My favorite is the dark one. Both are great though.
Thanks for the inspiration!
Smiles, Alice
LikeLike
You’re welcome Alice!
LikeLike
They turned out great! The black one is my favorite.
LikeLike
Thanks Kristin. Secretly I think I like the black one best too 😉
LikeLike
The stencil information is such a great trick! I now have another tool in my arsenal!
LikeLike
Love them both!
LikeLike