
I finally got around to painting my baby grand piano this past weekend and all I can say is, ‘what was I so worried about’?
Somehow I had built this up to be a HUGE project in my mind. Obviously I should have known better. I mean, come on, I’ve painted a few larger pieces of furniture in my day. The Welsh cupboard in my dining room for example.
By comparison, the piano was so. easy.
As a reminder, here is how the piano looked originally.

Not super awful, but definitely not great. And up close the finish on this thing was totally shot …

The arrows are pointing towards areas where the veneer has chipped away.
Before we move on, I have to explain something. I don’t actually play the piano. Well, I did take some lessons when I was a kid and I can now play ‘chopsticks’ fairly well. But many years ago a former co-worker of mine was moving and needed to find a new home for her baby grand piano. I had the brilliant idea that I would find the time to take lessons one day. Ha. Yeah, that never happened.
However, as it turns out, this is one incredibly handy piece of furniture. It’s got a nice large work surface at exactly the right height for me while standing. It’s perfect for folding laundry, wrapping presents, scrapbooking, painting small items and it also makes a great buffet/bar during parties.
I honestly can’t think of any other piece of furniture that I could put in this same spot that would be as functional for me while still looking appropriate in the room. But it was starting to look a bit rough, so as part of my magic wand decorating plan, it was scheduled for a makeover.
I started by sanding it down which took about 10 minutes. The finish was so dry on this thing that it didn’t take much work to rough it up. I mostly wanted to make sure to sand down the paint drips that were on it because those can come back to haunt you if you just paint over them. Next I vacuumed away the dust with my shop vac and then wiped it all down with a damp rag.
Next I pulled out some Dixie Belle paint in Midnight Sky. You guys know how much I love their other black, Caviar, well this one is just a tad lighter. That probably sounds odd to call a black color ‘lighter’, but it is just not quite as deep and rich as the Caviar. It’s also a bit warmer with less of a blue undertone.
I watered down the paint just a tad. I find that the Dixie Belle paint is pretty thick. You can use it straight out of the jar if you want a more textured look, but if you want a smoother finish you can water it down which has the added benefit of making it go further. I only used about 2/3 of the 16 oz jar to paint this piano. That’s also partially because for the most part I got away with just one coat of paint. There were only a couple of spots that needed a touch up with a second coat.
A couple of you suggested a strategy for moving forward on this project. Start with painting the outside of the piano first, then tackle the inside bits at another time. So I mostly did that, except that I opened the cover that goes over the keys and painted inside there. I figure that’s the most likely spot to get opened up on occasion.

So I taped off the keys and painted that area. I also took this opportunity to re-glue some of the ivories that had come unglued.

Just out of curiosity I did some google research on ivory piano keys. Prior to 1930 almost all pianos had ivory keys, and mine are indeed ivory (check out this article to learn more about that).
Anyway, I used my E6000 glue to re-attach all of the loose ivories. Then I added a stencil to the top of the piano.

I had so many ideas swirling around in my head about what to do with this piano. I thought about painting it white and adding a transfer, but then it would compete with the Specimens Cupboard which is in the same room.

I also thought about wrapping some sort of stencil all the way around the sides of the piano. But stenciling those curves would have been challenging, plus I felt like it wouldn’t be all that noticeable since you really can only see one side of the piano unless you happen to be squishing yourself between the piano and the wall or window. So not a lot of bang for my buck.
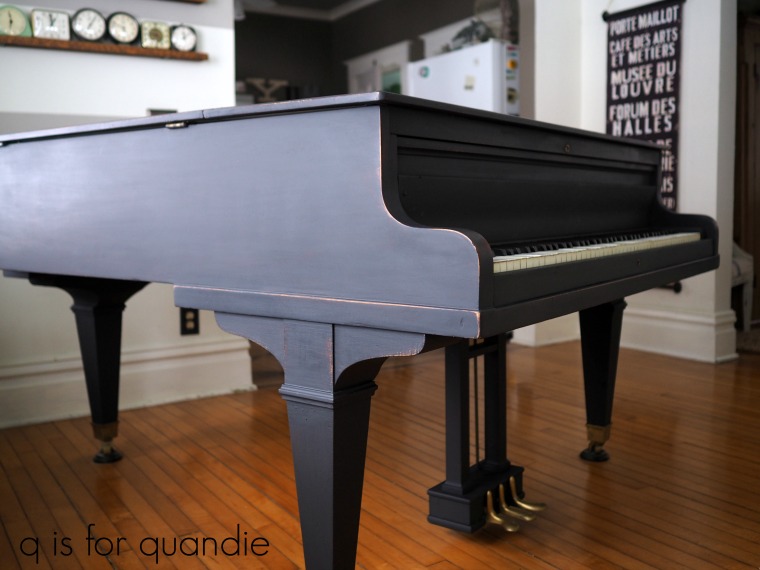
Ultimately I tend to prefer a ‘less is more’ kind of style so I went with this simple ‘European grain sack’ stencil from Maison de Stencils.

Once the stencil paint was dry, I sanded the entire piece lightly with 220 grit paper to smooth out the paint. I gave the edges a little extra pressure to add a distressed look.

After vacuuming away the dust, I then finished the piano with Fusion’s clear wax. You might be wondering why I chose to wax such a large piece, and especially one that is probably going to see a lot of abuse. There are definitely more durable top coats that I could have chosen. But in my experience wax and/or hemp oil are the easiest finishes to ‘fix’ down the road. If I get a ring from a sweaty glass, a scratch, or a drip of random paint here and there, all I have to do is sand it down lightly to smooth it out and then add a little wax to just that spot. So in the long run I think I’ll be better off with wax.
One last thing, I had originally planned on keeping the chair I have ‘as is’.

I don’t want to go all ‘matchy-matchy’ with it and paint it black, but I’m not totally loving it with the piano. I’ll probably keep an eye out for another option down the road.
By the way, I have to say I found it rather challenging to photograph a black piano in a room flooded with light reflecting off our latest snow fall.

Here’s the view out those windows.

Yep, lots of white to reflect the light.
OK, so if you are keeping track of the magic wand decorating project, here’s where I’m at …

-
- repaint the insides of the bookshelves in the living room – check!
- repaint the living room walls – check!
- replace the living room furniture – check!
- paint the baby grand piano – check!
- replace the ceiling fan over the piano – check!
- repaint the piano room walls
That last item on the list, repaint the piano room walls is the last item on my original to-do list. But I’m having so much success I’ve decided to go just a bit further with that last item plus add one more. I’m adding ‘repaint the piano room built shelves beneath the windows’ because they really need it. As for the walls, I have a plan and I have my handyman Ken’s commitment to help me with it, so you’ll just have to stay tuned to see what we do.
In the meantime, if you have been thinking about painting a piano or some other larger piece but haven’t had the nerve to make the leap, I say go for it! It’s definitely not as hard as it looks.

That is beautiful!
LikeLike
Thanks Cyndi!
LikeLike
Love your scrapbooking table! Your choice of colour was perfect it coordinates but not matchy. The piano completes the room !
LikeLike
I always say every room needs a pop of black. This is a just a big pop 😉
LikeLike
Super!
LikeLike
🙂
LikeLike
The piano looks great Linda!! Why not paint your chair white or one of those fun colors in your stain glass window? Growing up, my Mom painted her piano also.
LikeLike
Did I ever mention that I made that window? Back in the 90’s. And the colors really reflect that. Powder blue, peach, forest green. Are you having a 90’s flash-back yet? I don’t think I could go there. But I like the white idea!
LikeLike
Just gorgeous!
LikeLike
Thanks Victoria, I really am happy with how it turned out.
LikeLike
Wow that looks amazing! A definite improvement and it looks so fresh in the room! What a cozy warm place to hang out!
LikeLike
Yep, a definite improvement. And once I get the rest of the room done I think it will look even better 🙂
LikeLike
When we downsized from a large house to our cottage I created a she shed with heat and air for my old upright piano my parents bought for me when I was 7. Its not the prettiest piano I’ve ever seen but I’m not about to let it go. It was a sacrifice from my parents to me. I painted it black about 8 years ago and I love it!! Yours is gorgeous!!!! The reason you like yours is the only thing I miss about our big house. I had a large kitchen bar I did all of my projects on. It was handy for sure!! Btw…I do play but mine is in desperate need of tuning!!
LikeLike
How very cool to have a she shed for your piano! What a great idea, especially since you actually play yours 🙂
LikeLike
Love the black on the piano. It now looks like it should be in a concert hall. Do you ever have someone play it? Looking forward to seeing the room fully updated. I know you are anxiously awaiting a day when the snow melts and you can go outside and do projects out there!
LikeLike
Unfortunately the piano is horribly out of tune, so nobody ever plays it. Except young children who simply can’t resist banging on those keys when the see them 😉
LikeLike
Wow what a transformation! I love the piano, The stencil is perfect!! You are doing such a great job on your to do list! I have to say, I am so impressed. You are rocking it girl!!
LikeLike
I’m even surprising myself with how much progress I’ve made on my list. It just goes to show how much easier it is to accomplish stuff if you break it down into smaller tasks 🙂
LikeLike
I’ve been tempted to paint my piano too. Thank you for giving me the inspiration!
LikeLike
Go for it Joni!
LikeLike
Looks good.
LikeLike
Thanks sis!
LikeLike
I have struggled for years over the idea of painting my hubby’s grandmother’s grand piano. It was her concert pian but was in that shade of ebony that was popular back then-somewhere between a dark brown and a black. You did a fantastic job on that piece! LOVE it….. As for me? My decision was made for me- my son now has the piano. lol
Have a wonderful week!!!! Diana
LikeLike
Ha, well yes, that’s one way to get around having to paint it 😉
LikeLike
Beautiful! At the rate you are going you will run out of projects before the snow melts.
LikeLike
That’s the plan 😉 I am looking forward to getting back out into my carriage house workshop and painting some furniture when that happens!
LikeLike
I really like it Miss Quandie…….love the little stencil……..you make everything seem reasonable and easy!
LikeLike
LOL, well, this one was fairly reasonable 😉
LikeLike
Love this! A new life for the piano. One of the uses was as a memorial to your Dad when he passed away too. I still remember seeing his beautiful “Shriners” hat collection, along with family photos, looking quite elegant on top of that piano. Looks good in it’s new color. I bet it will inspire some other piano owners as well.
LikeLike
Oh my, I don’t even remember that. And isn’t it funny that you do! I still have those Shriner fez’es.
LikeLike
Stunning ⭐️
LikeLike
Thanks Donna!
LikeLike
Really great job!
LikeLike
Thanks Valerie!
LikeLiked by 1 person
I also suggest painting the chair white and adding a cool black and white cushion or pillow to the chair that would tie the whole look together. You did a great job on painting the piano. I also painted our piano black several years ago and it still looks good.
LikeLike
Great idea to add a cushion! I’ll have to see what I can come up with.
LikeLike
You did it justice! Love the stencil!
LikeLike
Thanks Wendy!
LikeLike
Turned out beautiful. Nice job.
LikeLike
Thanks Maureen!
LikeLike
Stunning. How much water do you use to water down the DB paint?
LikeLike
Thank you! I don’t really measure, I just add a little water until I get the consistency I want.
LikeLike
It’s a great update. I do think you ought to have it tuned and invite someone over to play it for you occasionally. I love to hear the piano. 🙂
LikeLike
Well, I think it’s rather pricey to hire a tuner so that’s probably not going to make it to the top of my ‘stuff I want to spend money on’ list any time soon. And then I’d also have to find someone to play it 😉
LikeLike
This looks amazing. So much better than the before imo. Love the color and the stencil detail and still practical for folding laundry. 😉
LikeLike
LOL, totally still practical for folding laundry!! 🙂
LikeLike
Your piano is now a classic beauty. The understated stencil is perfect. I absolutely love your style and all you’ve done in your home makeover. You have an impeccable sense of style. I look forward to every one of your posts!
LikeLike
It turned out really pretty Quandie. I think white would be too Lawrence Welk-ie.
LikeLike
And a one, and a two … LOL, my grandparents watched Lawrence Welk on a regular basis 😉
LikeLike
This look amazing! The black is timeless.
LikeLike
Thanks Leah!
LikeLike
Looks great! I’m thinking of getting a baby grand from a friend who doesn’t want it. But it’s brown and I’d rather have a black one. You have inspired me to just paint it instead of looking for a black one. I actually play it 🙂 so I’m looking forward to it. Thanks!
LikeLike
It really wasn’t terrible difficult to paint, and it totally changed up the look. I say go for it!
LikeLike
It looks absolutely lovely!
I would like to repaint a piano but wasn’t sure about a brush, roller or spray. Did you use a brush to paint it or did you spray paint it? And did you sand it with some paper or did you use a sander?
Thanks so much for any advice.
LikeLike
I sanded it lightly by hand using 220 grit paper, just enough to rough up the surface a little to hold the paint. Not enough to remove the existing finish or anything like that. Then I painted it with a brush because that is my preference. I don’t like using rollers for a few reasons; 1-they are hard to clean and it wouldn’t be cost effective to keep using rollers and throwing them away, 2-I don’t like the look of a rolled on paint and 3-they waste a lot of paint (it’s absorbed into the roller) and if you’re using an expensive paint, that’s a bummer. I also don’t use a sprayer for pretty much the same reasons, hard to clean, wasted paint, don’t like the look of a sprayed surface. But that’s just me. There are lots of painters out there who love using both rollers and sprayers and have great success with them.
LikeLike